006-589 - Freezer Menuett - Free user manual and instructions
Find the device manual for free 006-589 Menuett in PDF.


| Product Type | Freezer |
| Brand | Menuett |
| Model | 006-589 |
| Climate Class | N-ST |
| Energy Efficiency Class | A+ |
| Annual Energy Consumption | 200 kWh |
| Total Net Volume | 200 L |
| Freezing Capacity | 10 kg/24h |
| Temperature Range | -18 °C to -24 °C |
| Power Supply | 220-240 V, 50 Hz |
| Power Cord Length | 1.5 m |
| Dimensions (HxWxD) | 1430 x 544 x 610 mm |
| Net Weight | 45 kg |
| Refrigerant Type | R600a |
| Noise Level | 42 dB |
| Defrost Type | Manual |
| Door Hinge | Right, reversible |
| Shelves Material | Wire glass |
| Interior Light | Yes, LED |
| Lock with Key | Yes |
| Adjustable Thermostat | Yes |
| Cooling Type | Static |
| Warranty | 2 years |
Frequently Asked Questions - 006-589 Menuett
User questions about 006-589 Menuett
0 question about this device. Answer the ones you know or ask your own.
Ask a new question about this device
Download the instructions for your Freezer in PDF format for free! Find your manual 006-589 - Menuett and take your electronic device back in hand. On this page are published all the documents necessary for the use of your device. 006-589 by Menuett.
USER MANUAL 006-589 Menuett
natural_image
White rectangular refrigerator with a flat top and vertical side panel (no visible text or symbols)
SE FRYS
Bruksanvisning i original
Operating instructions
(Translation of the original instructions)
Important! Read the user instructions carefully before use.
Save them for future reference.
Värna om miljön!
Care for the environment!
Must not be discarded with household waste! This product contains electrical or electronic components that should be recycled. Leave the product for recycling at the designated station e.g. the local authority's recycling station.
Jula reserves the right to make changes. In the event of problems, please contact our service department.
www.jula.com

Tillverkare/ Produsent/ Produenci/ Manufacturer
Jula AB, Box 363, 532 24 SKARA
Distributör/ Distributør/ Dystrybutor/ Distributor
Jula Poland Sp. z o.o., ul.
natural_image
Exterior view of a white industrial vacuum cleaner unit with visible internal components and wiring (no text or symbols on main body)3
natural_image
Technical diagram of a mechanical assembly with a highlighted green component and mounting holes (no text or symbols)4

natural_image
3D technical illustration of a mechanical assembly with colored components and directional arrows (no text or symbols)5

natural_image
Simple line drawing of a rectangular frame with a curved arrow indicating rotation or motion (no text or symbols)6

natural_image
3D architectural rendering of a building facade with green structural elements and a curved white line indicating motion (no text or symbols)7

natural_image
3D diagram of a mechanical or structural component with layered structure and curved flow arrows (no text or symbols)8

natural_image
Pure architectural or engineering diagram showing a rectangular frame with grid lines and colored horizontal bars at the bottom (no text or symbols)SÄKERHETSANVISNINGAR
- Read these instructions carefully before use.
- Recycle the packaging in accordance with local regulations.
- Recycle the product at the end of its useful life in accordance with local regulations.
- Use the product only for its intended purpose.
- The product is intended for household use, or for use in staff rooms, hotel rooms or other similar places.
- Keep children under supervision to make sure they do not play with the product.
- If the power cord or plug are damaged they must be replaced by an authorised service center to ensure safe use.
-
Do not store explosive or flammable substances or objects in the product, such as spray cans with propellant gas.
-
Switch off the product, pull out the plug, and wait until the product has completely cooled before cleaning and/or maintenance.
- Do not use an extension cord or plug adapter, or the equivalent.
- Pull out the plug before fitting accessories.
- This product can be used by children from 8 years and upwards and by persons with physical, sensorial or mental disabilities, or persons who lack experience or knowledge, if they are supervised or receive instructions concerning the safe use of the product and understand the risks involved. Keep children under supervision to make sure they do not play with the product. Do not allow children to use, clean or maintain the product without supervision.
WARNING!
- Fire risk – flammable material.
- Always keep the ventilation openings clean.
- Never use other objects or methods than those recommended by the manufacturer to defrost the product.
• Make sure that the refrigerant circuit is not damaged. - Do not use electrical devices in the product, unless recommended by the manufacturer.
- Route the power cord so that it cannot be driven over, trod on or pinched, or tripped over.
- Do not connect the product to a power strip or portable power supply unit.
- DANGER: Risk of child getting trapped. Before discarding, lift off the doors. Leave the shelves in place, this makes it more difficult for children to climb in.
SYMBOLS
| [YYYY] | Read the instructions. |
 | Safety class II. |
 | Approved as per applicable directives/regulations. |
 | Recycle discarded product in accordance with local regulations. |
 | Warning! Risk of fire. |
TECHNICAL DATA
| Size W55.3 x H84.5 x D57.4 cm |
| Volume 86 L |
| Noise level 39 dB |
| Energy class A+ |
| Rated voltage 230 V |
| Weight 29 kg |
DESCRIPTION
- Thermostat
- Drawer
- Levelling foot
FIG. 1
INSTALLATION
UNPACKING
- Remove tape and any stickers from the freezer before use (except for type plate).
- Rub off any residual glue with your fingers, or with a little detergent. Wipe with warm water and then wipe dry.
- Do not use sharp objects or flammable or abrasive detergent, this can damage the surface of the freezer.
- Do not tilt the freezer more than 45^ when moving.
WARNING!
At least two persons are needed to lift the freezer, otherwise there is a risk of personal injury.
SPACE REQUIREMENT
- Leave at least 200 mm of free space on each side, 200 mm behind and 300 mm above the freezer, to ensure adequate ventilation.
- If the freezer is placed adjacent to a wall, leave enough space to open the door.
- Do not put the freezer near a source of heat, or in direct sunlight.
WARNING!
Keep flammable substances and fumes, such as petrol, away from the freezer – risk of explosion, fire, death and/or serious personal injury.
ELECTRICAL DATA
- Failure to follow all the instructions and safety instructions can lead to the risk of electric shock, fire, serious personal injury and/or material damage.
- Check that the mains voltage corresponds to the rated voltage on the type plate.
WARNING!
The plug must be plugged into a correctly installed earthed power point. Never modify the plug in any way. Do not use an extension cord or plug adapter, or the equivalent.
Electrical connection
- The freezer must only be connected to a correctly earthed power point, 220–240 VAC, 50 Hz, with a mains fuse of 10 A.
- The freezer should be connected to a separate circuit.
- Do not connect the freezer to a power point that can be switched off.
- Do not use an extension cord.
NOTE:
Pull out the plug before installation. When ready, plug in the plug and adjust the settings.
LEVELLING
- It is very important that the freezer is levelled on installation, otherwise the door might not close properly which can cause inadequate cooling or problems with frosting or moisture.
- Turn the levelling foot clockwise to raise the level or anticlockwise to lower it.
PUT ON THE DOOR
- Pull out the plug and empty the freezer.
- Adjust the two levelling feet to the highest position.
- Undo the screws that hold the top plate with a Phillips screwdriver and lift off the top plate.
FIG. 2
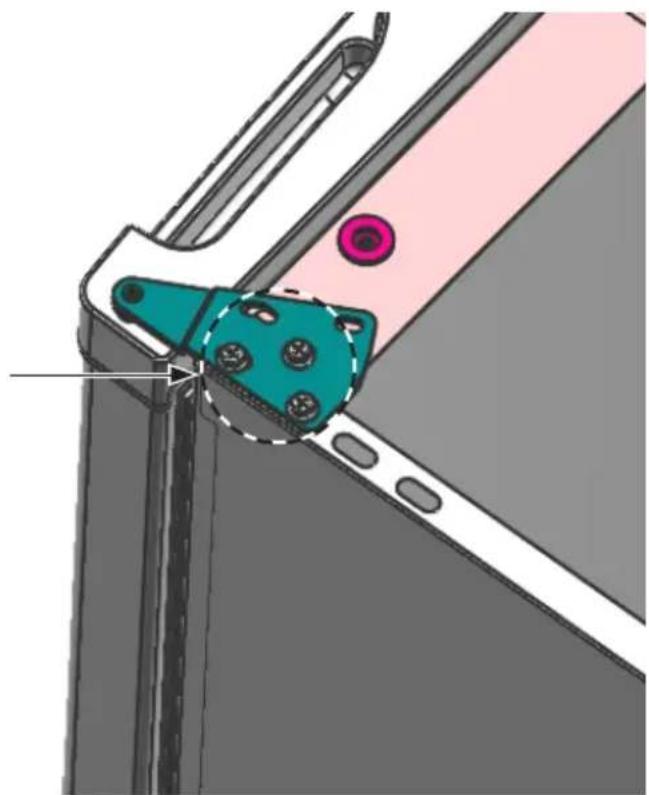
- Undo the screws that hold the top hinge with a Phillips screwdriver.
FIG. 3
- Move the top hinge, doorstop and bushing to the other side.
A. Fit the top hinge.
FIG. 4
B. Fit the bushing and doorstop.
FIG. 5
- Undo the screws that hold the bottom hinge with a Phillips screwdriver and fit the hinge on the other side with the screws.
FIG. 6
- Move the levelling foot to the other side and adjust so that the freezer is level.
FIG. 7
- Put the door in place, fit the top hinge, and replace the top plate.
FIG. 8
NOTE:
• This is most easily done by two persons.
- Do not tilt the freezer more than 45^ .
USE
TEMPERATURE SETTING
- Set the required temperature with the thermostat dial on the front of the freezer. The thermostat can be set between Cold and Colder.
- The exact temperature inside the deepfreeze depends on the ambient temperature. Check the temperature, and adjust if necessary.
FREEZING
Freezing food
-
The first time the freezer is used, or after defrosting, turn the thermostat to the coldest position and wait at least 2 hours before putting in any food.
-
Frozen food should be put in the freezer as soon as possible after purchasing to avoid thawing.
NOTE:
• Always follow the recommendations of the food manufacturer.
- Be careful to make sure the drawers do not damage the refrigerant tubes.
Freezing fresh food.
Pay attention to food hygiene – freezing does not sterilise food.
- Divide up and prepack the food in suitable portions before freezing.
- Never put warm food in the freezer.
- Pack the food in plastic bags, foil, or containers intended for deep-freezing, before freezing.
- For best results leave free space so that the air can circulate between the food in the freezer.
NOTE:
- Never put food or drinks in bottles in the freezer.
- If necessary the freezer can be used without the drawers.
DEFROSTING
- Pull out the plug, open the door, and take out all the food.
- Store the food in a cool place.
- Wait until all the ice in the freezer has melted. Some off the ice can be loosened with a plastic scraper.
- Wipe dry, close the door, and plug in the plug.
NOTE:
Never use sharp objects to remove ice or separate or loosen frozen food.
MAINTENANCE
CLEANING
- Pull out the plug before cleaning.
- Clean the freezer with a cloth moistened with water and a mild detergent. Do not use abrasive or strong detergents.
- Wipe dry.
- Do not use wax, strong detergent, bleach or detergents that contain petroleum on plastic or rubber parts.
- Do not use paper, window cleaner, abrasive or flammable detergent on plastic parts to avoid damaging the fridge.
LONG-TERM STORAGE
Follow the instructions below if the freezer is not going to be used for a long time.
- Pull out the plug.
- Empty and defrost the freezer and clean the inside according to the instructions.
- Leave the door ajar to prevent it smelling.
WASTE DISPOSAL
Recycle the product at the end of its useful life in accordance with local regulations.
TROUBLESHOOTING
The troubleshooting guide is used to identify the causes of common problems and how they can be rectified.
THE FREEZER DOES NOT WORK
Check that the plug is plugged in.
THE DOOR WILL NOT CLOSE PROPERLY
- Check that the drawers are correctly positioned.
- Check that the door seal is clean and undamaged.
- Check that the freezer is levelled.
THE FREEZER IS MAKING A LOT OF NOISE
Check that the freezer is levelled and is not touching any other product or furniture.
THE FREEZER DOES NOT GET COLD.
- If the door is opened frequently or held open it takes a while for the deepfreeze to reach the set temperature.
- Check that there is enough free space behind the freezer to ensure the circulation of air.
THE FOLLOWING ARE NOT A SIGN OF PROBLEMS.
- Purling sound, caused by the flow of refrigerant in the tubes.
- Compressor working at high temperature.
PRODUCT DATA SHEET(EU) 1060/2010
| a Brand Menuett | ||
| b Model 006589 | ||
| c Category for fridge or freezer for domestic use. 8 | ||
| d | Energy efficiency classA+++ (highest energy class) to D (lowest energy class). | A+ |
| f | Energy consumption in kWh per year, based on the results from standardised tests during 24 hours. The actual energy consumption depends on how the appliance is used and where it is placed. | 176 kWh/y |
| g^1Fridge storage volume (l) and star marking. / | ||
| g^2 Freezer storage volume (l) and star marking. 86 l | ||
| g^3 | Capacity in number of standard bottles of 75cl that fit in the appliance. | / |
| h^1Lowest storage temperature for wine storage part (°C). / | ||
| h^2 Design temperature for other areas (°C). / | ||
| i Frost-free. Static | ||
| j Safety during power-cut, temperature rise time in hours. 900 min/15 h | ||
| k Refrigeration capacity (kg/24 hours). | 6 | |
| l^1 | Climate class. | ST/N |
| l^2 | This appliance is intended to be used at an ambient temperature between (°C). | 16 - 38 °C |
| m Airborne acoustic noise (dB(A) re 1 pW). | 39 dB | |
| n Intended for recessing | N | |
| o | This appliance is only intended to be used to store wine. | N |
- SE FRYS
- SÄKERHETSANVISNINGAR
- WARNING!
- INSTALLATION
- UNPACKING
- SPACE REQUIREMENT
- ELECTRICAL DATA
- Electrical connection
- NOTE:
- LEVELLING
- PUT ON THE DOOR
- 2
- 3
- 4
- 5
- 6
- 7
- 8
- USE
- TEMPERATURE SETTING
- FREEZING
- Freezing food
- Freezing fresh food.
- DEFROSTING
- MAINTENANCE
- CLEANING
- LONG-TERM STORAGE
- WASTE DISPOSAL
- TROUBLESHOOTING
- THE FREEZER DOES NOT WORK
- THE DOOR WILL NOT CLOSE PROPERLY
- THE FREEZER IS MAKING A LOT OF NOISE
- THE FREEZER DOES NOT GET COLD.
- THE FOLLOWING ARE NOT A SIGN OF PROBLEMS.
Brand : Menuett
Model : 006-589
Category : Freezer