
6798DZ - Drill driver MAKITA - Free user manual and instructions
Find the device manual for free 6798DZ MAKITA in PDF.


| Brand | Makita |
| Model | 6798DZ |
| Product Type | Cordless Screwdriver / Drill Driver |
| Power Source | Battery (9.6 V DC, Makita type) |
| No-Load Speed | 320 min^-1 |
| Fastening Torque | 6 – 12 N·m |
| Overall Length | 174 mm |
| Net Weight | 1.4 kg (without battery) |
| Bit Holder Type | Quick-release sleeve (accepts driver bits and socket bits) |
| Torque Adjustment | 12 settings (1-12) via adjust grip |
| Reversing Switch | Yes, with neutral lock (clockwise/counterclockwise) |
| Clutch Mechanism | Automatic cut-off when preset torque is reached |
| Front Lamps | Not available (on 6798DZ model) |
| Battery Power Warning Lamp | Yes, lights red when battery is low |
| Charging Temperature | 10°C – 40°C (50°F – 104°F) |
| Carbon Brushes | Replaceable (when worn to limit mark) |
| Suitable Screw Size | Machine screws: M4-M8, Wood screws: up to 5.5 mm diameter (approx.) |
| Operation Mode | Pistol grip, trigger switch |
| Safety Features | Reversing switch neutral lock, clutch to prevent over-tightening |
| Maintenance | Replace carbon brushes, keep vents clean, store in dry place |
Frequently Asked Questions - 6798DZ MAKITA
User questions about 6798DZ MAKITA
0 question about this device. Answer the ones you know or ask your own.
Ask a new question about this device
Download the instructions for your Drill driver in PDF format for free! Find your manual 6798DZ - MAKITA and take your electronic device back in hand. On this page are published all the documents necessary for the use of your device. 6798DZ by MAKITA.
USER MANUAL 6798DZ MAKITA
GB Cordless Screwdriver Instruction Manual
natural_image
Line drawing of a mechanical device resembling a push-button electric shaver or power tool, with no visible text or symbols.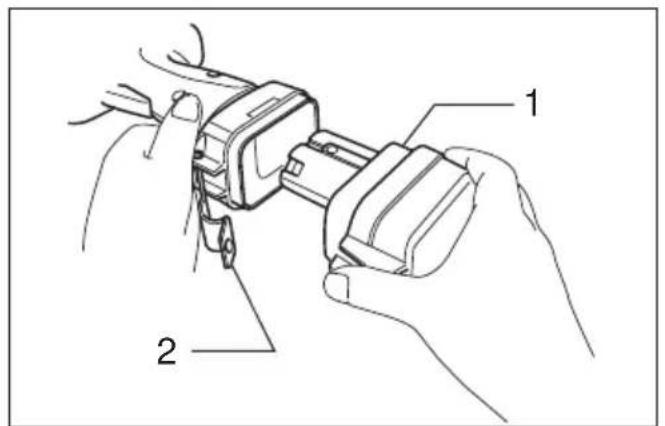
1
2
3
4
natural_image
Technical line drawing of a mechanical device with labeled parts (no text or symbols beyond basic lines)5
6
7
natural_image
Line drawing of a hand operating a drill bit with a tool (no text or symbols)8
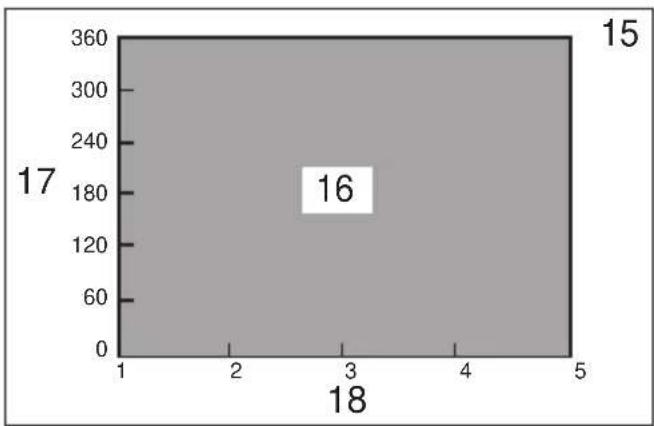
area
| X | Y | |---|---| | 3 | 16 |9
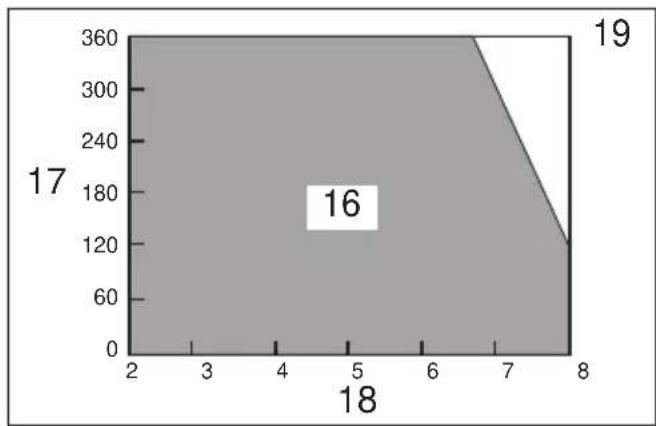
area
| x | y | |----|-----| | 2 | 17 | | 8 | 120 |10
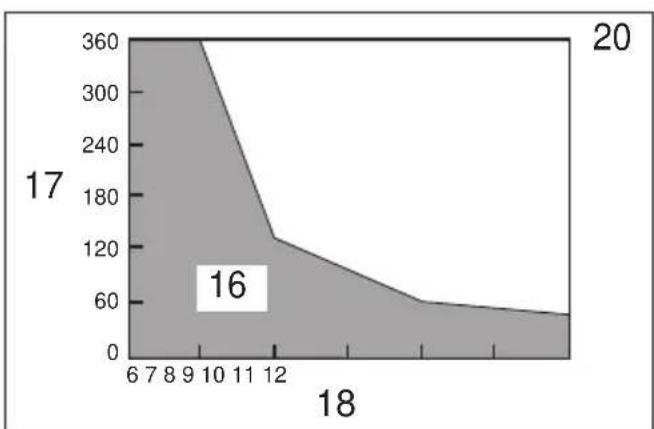
area
| x | y | |----|-----| | 6 | 360 | | 7 | 360 | | 8 | 360 | | 9 | 360 | | 10 | 360 | | 11 | 240 | | 12 | 120 | | 13 | 100 | | 14 | 80 | | 15 | 60 | | 16 | 50 | | 17 | 50 | | 18 | 50 |11 12
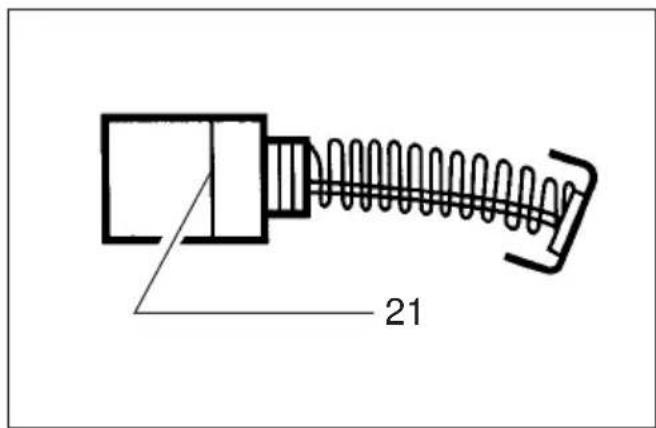
13
ENGLISH
Explanation of general view
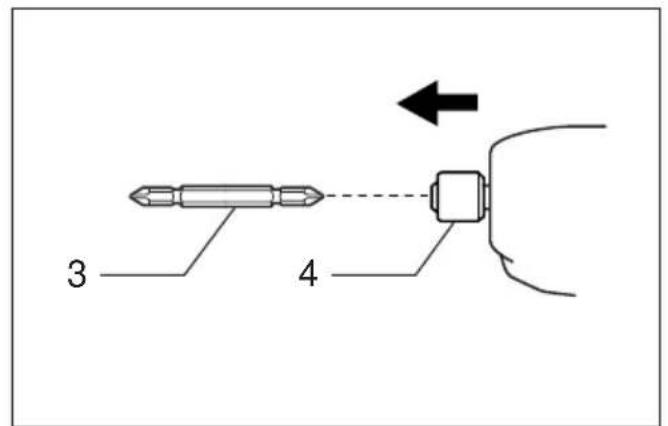
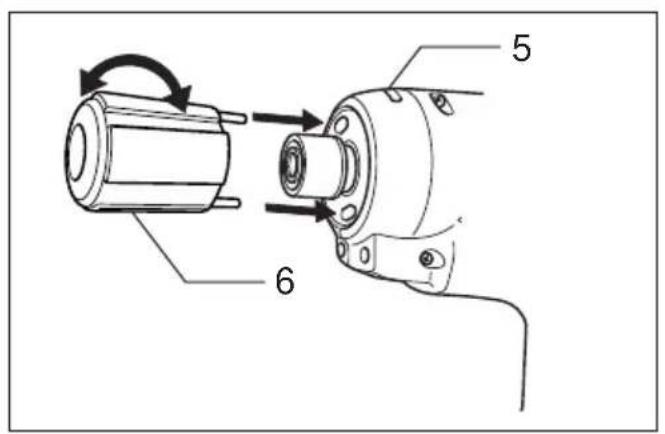
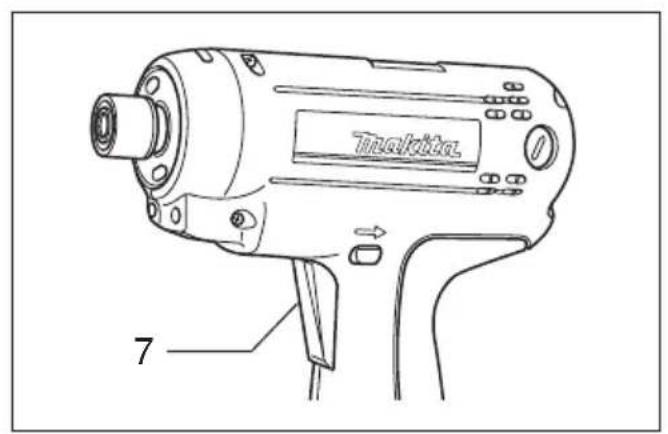
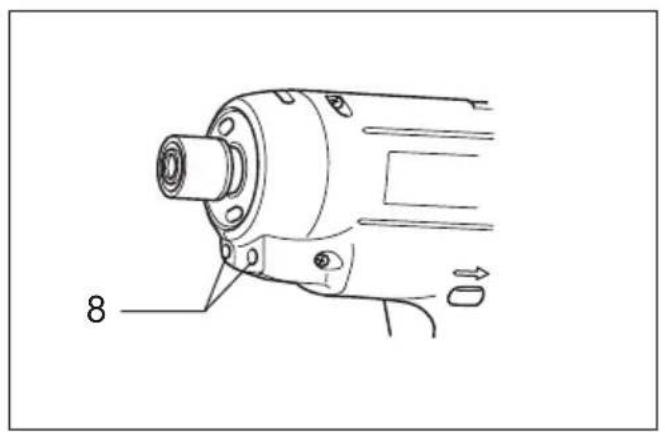
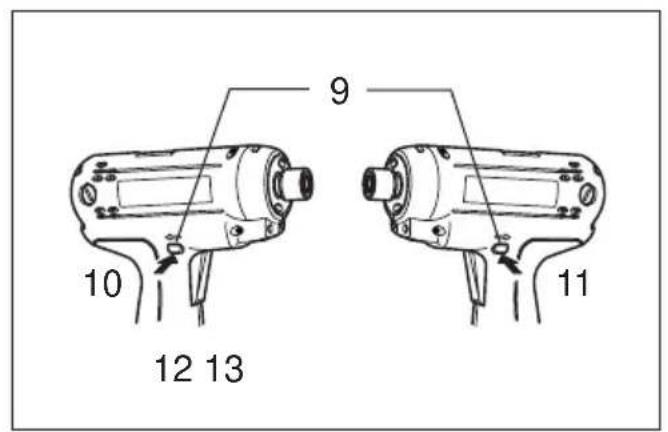
| 1 Battery cartridge | 9 Reversing switch lever | 17 Revolution angle (°) |
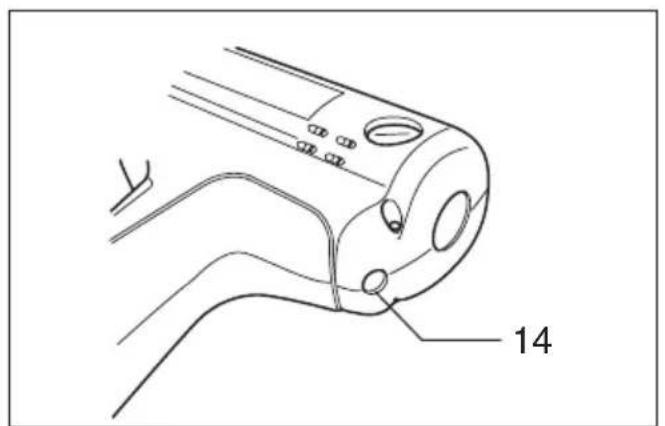
| 2 Set plate | 10 A side | 18 Torque (N·m) |
| 3 Bit | 11 B side | 19 Capacity limit of 6797D/FD |
| 4 Sleeve | 12 Clockwise | 20 Capacity limit of 6798D/FD |
| 5 Graduations | 13 Counterclockwise | 21 Limit mark |
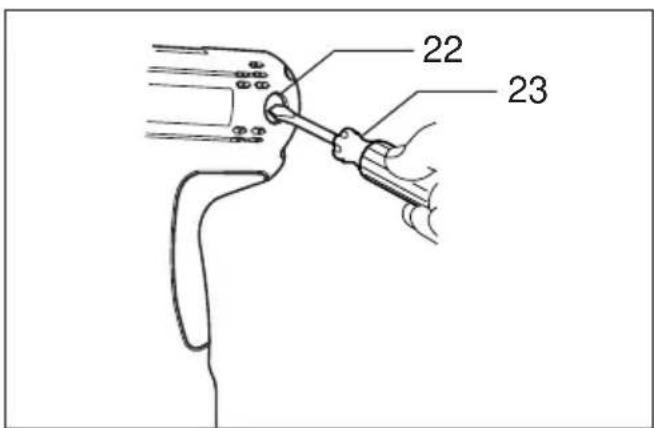
| 6 Adjusting grip | 14 Warning lamp | 22 Brush holder cap |
| 7 Switch trigger | 15 Capacity limit of 6796D/FD | 23 Screwdriver |
| 8 Light | 16 Range of fastening capacity |
SPECIFICATIONS
Model 6796D/FD 6797D/FD 6798D/FD
| No load speed (min) | 320 | 320 | 320 | ||
| Fastening torque | 1 – 5 Nm | 2 – 8 N | ·m | 6 – 1 2 N | |
| Overall length | 174 mm | 174 mm | 174 mm | ||
| Net weight | 1.4 kg | 1.4 kg | 1.4 kg | ||
| Rated voltage | D.C. 9.6 V | D.C. 9.6 V | D.C. 9.6 V | ||
- Due to our continuing program of research and development, the specifications herein are subject to change without notice.
- Note: Specifications may differ from country to country.
Safety hints
For your own safety, please refer to the enclosed safety instructions.
IMPORTANT SAFETY INSTRUCTIONS FOR CHARGER & BATTERY CARTRIDGE
ENC001-3
- SAVE THESE INSTRUCTIONS — This manual contains important safety and operating instructions for battery charger.
- Before using battery charger, read all instructions and cautionary markings on (1) battery charger, (2) battery, and (3) product using battery.
-
CAUTION — To reduce risk of injury, charge only MAKITA type rechargeable batteries. Other types of batteries may burst causing personal injury and damage.
-
Do not expose charger to rain or snow.
-
Use of an attachment not recommended or sold by the battery charger manufacturer may result in a risk of fire, electric shock, or injury to persons.
-
To reduce risk of damage to electric plug and cord, pull by plug rather than cord when dis2. connecting charger.
-
Make sure cord is located so that it will not be stepped on, tripped over, or otherwise subjected to damage or stress. 4.
-
Do not operate charger with damaged cord or plug — replace them immediately.
-
Do not operate charger if it has received a 5. sharp blow, been dropped, or otherwise damaged in any way; take it to a qualified serviceman.
-
Do not disassemble charger or battery cartridge; take it to a qualified serviceman when service or repair is required. Incorrect reassembly may result in a risk of electric shock or fire.
- To reduce risk of electric shock, unplug charger from outlet before attempting any maintenance or cleaning. Turning off controls will not reduce this risk.
- The battery charger is not intended for use by young children or infirm persons without supervision.
- Young children should be supervised to ensure that they do not play with the battery charger.
- If operating time has become excessively shorter, stop operating immediately. It may result in a risk of overheating, possible burns and even an explosion.
- If electrolyte gets into your eyes, rinse them out with clear water and seek medical attention right away. It may result in loss of your eyesight.
ADDITIONAL SAFETY RULES FOR CHARGER & BATTERY CARTRIDGE
Do not charge battery cartridge when temperature is BELOW 10°C (50°F) or ABOVE 40°C (104°F).
Do not attempt to use a step-up transformer, an engine generator or DC power receptacle. Do not allow anything to cover or clog the charger vents.
Always cover the battery terminals with the battery cover when the battery cartridge is not used.
Do not short the battery cartridge:
(1) Do not touch the terminals with any conductive material.
(2) Avoid storing battery cartridge in a container with other metal objects such as nails, coins, etc.
(3) Do not expose battery cartridge to water or rain.
A battery short can cause a large current flow, overheating, possible burns and even a breakdown.
-
Do not store the tool and battery cartridge in locations where the temperature may reach or exceed 50°C (122°F).
-
Do not incinerate the battery cartridge even if it is severely damaged or is completely worn out. The battery cartridge can explode in a fire
-
Be careful not to drop, shake or strike battery
-
Do not charge inside a box or container of kind. The battery must be placed in a well ventilated area during charging.
Charge the battery cartridge with room temperature at 10^ C – 40^ C ( 50^ F – 104^ F).
Let a hot battery cartridge cool down before charging it.
Installing or removing bit (Fig. 2)
fCAUTION:
Always be sure that the tool is switched off and the battery cartridge is removed before installing or
"Removing the bit.
Use only the driver bit or socket bit shown in the figu below.
Do not use any other driver bit or socket bit.
ADDITIONAL SAFETY RULES FOR TOOL
ENB026-1
-
Be aware that this tool is always in an operating condition, because it does not have to be plugged into an electrical outlet.
-
Hold tool by insulated gripping surfaces when performing an operation where the cutting tool may contact hidden wiring. Contact with a "live" wire will also make exposed metal parts of the tool "live" and shock the operator.
-
Always be sure you have a firm footing. Be sure no one is below when using the too high locations.
-
Hold the tool firmly.
-
Keep hands away from rotating parts.
SAVE THESE INSTRUCTIONS.
OPERATING INSTRUCTIONS
Installing or removing battery cartridge (Fig. 1)
- Always switch off the tool before insertion or removal of the battery cartridge.
- To remove the battery cartridge, pull out the set plate on the tool and grasp both sides of the cartridge while withdrawing it from the tool.
- To insert the battery cartridge, align the tongue of the battery cartridge with the groove in the house and slip it into place. Snap the set plate back in place. Be sure to close the set plate fully before using the tool.
- Do not use force when inserting the battery cartridge. If the cartridge does not slide in easily, it not being inserted correctly.
Charging
Before using battery charger, read all instructions a cautionary markings on the battery charger.
Tips for maintaining maximum battery life
-
Always stop tool operation and charge the batter cartridge when you notice that the warning lamp lightened up.
-
Never recharge a fully charged battery cartridge. Overcharging shortens the battery service life.
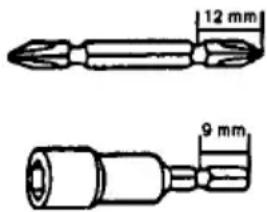
To install the bit, pull the sleeve in the direction of the arrow and insert the bit into the sleeve as far as it was go. Then release the sleeve to secure the bit.
To remove the bit, pull the sleeve in the direction of the arrow and pull the bit out firmly.
Adjusting the fastening torque (Fig. 3)
Use an optional adjust grip to adjust the fastening torque.
Insert the pins of the adjust grip into the holes in the front of the tool. And then, turn the adjust grip so that the torque gauge shows the desired torque by one of the numbers from 1 to 12.
The number provides fastening torque in newton-meter (Nm), and see below for the standard fastening torque;
6796D/FD: 1 - 5 (N·m)
6797D/FD: 2 - 8 (N·m)
6798D/FD: 6 - 12 (N·m)
After completion of the adjustment, always make trial fastening about twenty times in order to keep stability of torque. Then, check the fastening torque with a torque tester before starting operation.
Switch action (Fig. 4)
CAUTION:
Before inserting the battery cartridge into the tool, always check to see that the switch trigger actuates properly and returns to the "OFF" position when released.
To start the tool, simply pull the trigger. Release the trigger to stop.
Lighting up front lamps (Fig. 5)
(for 6796FD/6797FD/6798FD only)
Pull the trigger to light up the front lamps. And the lamps keep on lighting while the trigger is being pulled. The light automatically goes out 10 to 20 seconds after the trigger is released.
Reversing switch action (Fig. 6)
MAINTENANCE
CAUTION:
• Always check the direction of rotation before operation.
- Use the reversing switch only after the tool come a complete stop. Changing the direction of rotation before the tool stops may damage the tool.
- When not operating the tool, always set the revering switch lever to the neutral position.
This tool has a reversing switch to change the direction of rotation. Depress the reversing switch lever from the A side for clockwise rotation or from the side for counterclockwise rotation. When the switch lever is in the neutral position, the switch trigger cannot be pulled.
CAUTION:
Always be sure that the tool is switched off and the battery cartridge is removed before carrying out any work on the tool.
Replacement of carbon brushes (Fig. 12 & 13) Replace carbon brushes when they are worn down to the limit mark. Both identical carbon brushes should be replaced at the same time.
To maintain product safety and reliability, repairs, maintenance or adjustment should be carried out by a Makita Authorized Service Center.
Battery power warning lamp (Fig. 7)
The lamp lights up in red when the battery power becomes low.
If you disregard the warning and continue operation, the battery power will become not enough for the normal performance of the tool, and soon the tool will stop in order to avoid screwdriving with poor fastening torque. And so, replace the battery by fully charged one as soon as the red lamp lights up.
CAUTION:
The lamp may also light up in red before the battery power becomes low under these conditions.
- Heavy load under which clutch mechanism does not work. Do not use the tool in this condition. (See the list of the capacity limit.)
Screwdriving operation (Fig. 8)
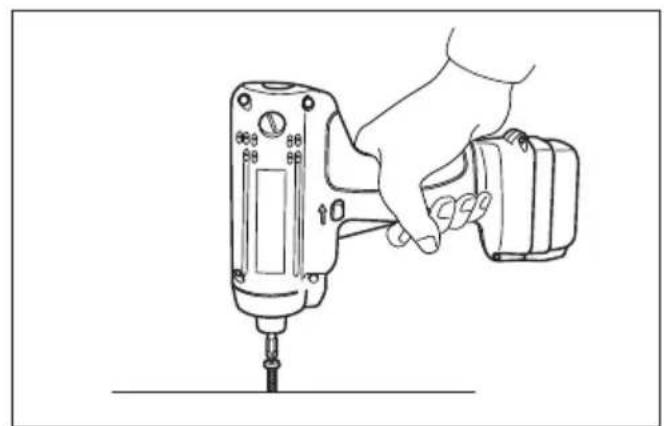
Place the point of the driver bit in the screw head and apply pressure to the tool. Then switch the tool on. When the clutch cuts in, the motor will stop automatically. Then release the switch trigger.
NOTE:
Make sure that the driver bit is inserted straight in the screw head, or the screw and/or bit may be damaged.
Limits of fastening capacity (Fig. 9, 10 & 11)
Use the tool within the limits of fastening capacity. If you use the tool beyond the limits, the clutch does not work. And the tool cannot deliver enough fastening torque.
NOTE:
The revolution angle means the angle which a screw/bolt revolves when the tool attains to 100% from 50% of desired torque.
- Safety hints
- IMPORTANT SAFETY INSTRUCTIONS FOR CHARGER & BATTERY CARTRIDGE
- ADDITIONAL SAFETY RULES FOR CHARGER & BATTERY CARTRIDGE
- Installing or removing bit (Fig. 2)
- ADDITIONAL SAFETY RULES FOR TOOL
- SAVE THESE INSTRUCTIONS.
- OPERATING INSTRUCTIONS
- Installing or removing battery cartridge (Fig. 1)
- Charging
- Tips for maintaining maximum battery life
- Adjusting the fastening torque (Fig. 3)
- Switch action (Fig. 4)
- Lighting up front lamps (Fig. 5)
- (for 6796FD/6797FD/6798FD only)
- Reversing switch action (Fig. 6)
- MAINTENANCE
- CAUTION:
- Battery power warning lamp (Fig. 7)
- Screwdriving operation (Fig. 8)
- NOTE:
- Limits of fastening capacity (Fig. 9, 10 & 11)
Brand : MAKITA
Model : 6798DZ
Category : Drill driver