
1051D - Planer MAKITA - Free user manual and instructions
Find the device manual for free 1051D MAKITA in PDF.


| Product Type | Hand-held Electric Planer |
| Brand | Makita |
| Model | 1051D |
| Power Supply | AC 230V, 50/60Hz |
| Motor Power | 1100 W |
| Planing Width | 110 mm |
| Planing Depth | 0 – 3.5 mm |
| No-Load Speed | 16000 rpm |
| Planing Blade Shape | Double-edged carbide |
| Dimensions (L x W x H) | 355 x 160 x 165 mm |
| Net Weight | 7.5 kg |
| Power Cord Length | 2.5 m |
| Main Functions | Planing, rebating, chamfering |
| Adjustable Depth Stop | Yes, with fine adjustment knob |
| Dust Port | Yes, Ø 35 mm |
| Safety Features | Double insulation, safety switch, blade guard |
| Certifications | CE, EAC |
| Maintenance | Blade replacement, carbon brush inspection, cleaning |
| Spare Parts Availability | Blades, carbon brushes, switch, power cord |
| General Information | User manual available in PDF format |
Frequently Asked Questions - 1051D MAKITA
User questions about 1051D MAKITA
0 question about this device. Answer the ones you know or ask your own.
Ask a new question about this device
Download the instructions for your Planer in PDF format for free! Find your manual 1051D - MAKITA and take your electronic device back in hand. On this page are published all the documents necessary for the use of your device. 1051D by MAKITA.
USER MANUAL 1051D MAKITA
1
2
3
4
5
6
natural_image
Technical line drawing of a mechanical clamp or bracket assembly with two plates and a clip (no text or symbols)7
natural_image
Pure geometric diagram with curved lines inside a rectangle and a dashed rectangle outside (no text or symbols)8
9
10
11 12
natural_image
Line drawing of hands using a mechanical tool to adjust or install a wooden block, labeled with number 19 (no text or symbols on the diagram itself)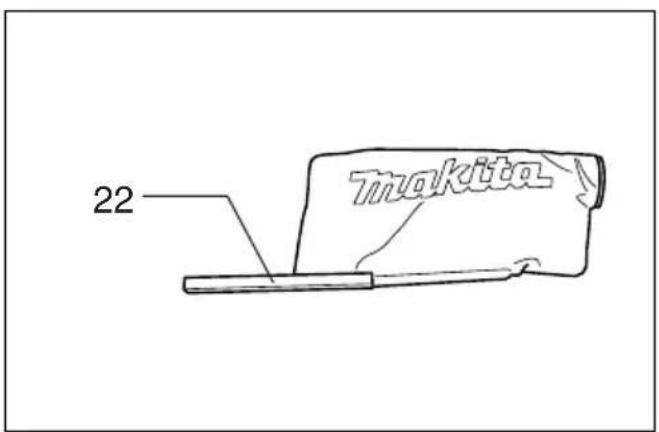
13 14
15 16
17 18
19
ENGLISH
Explanation of general view
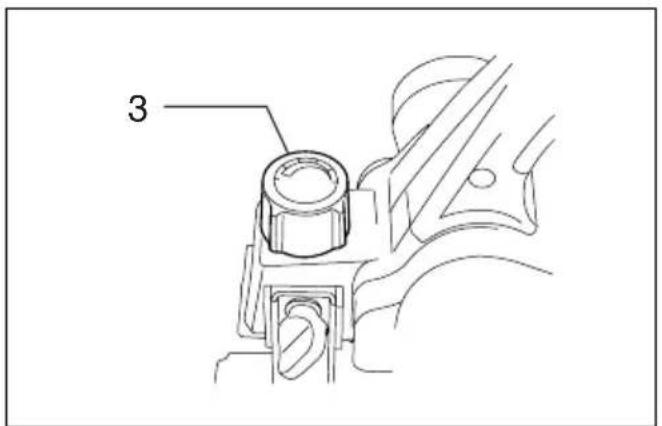
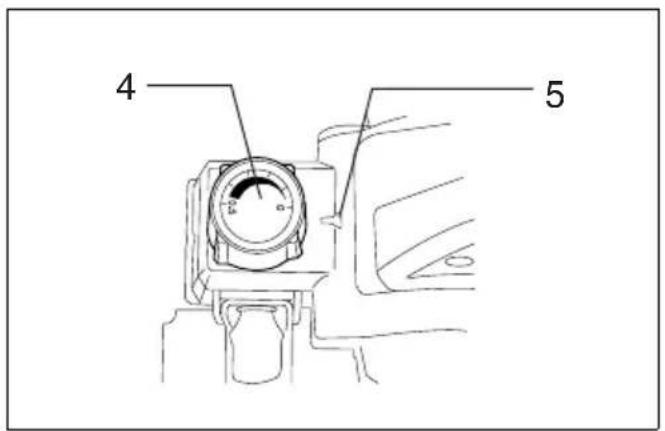
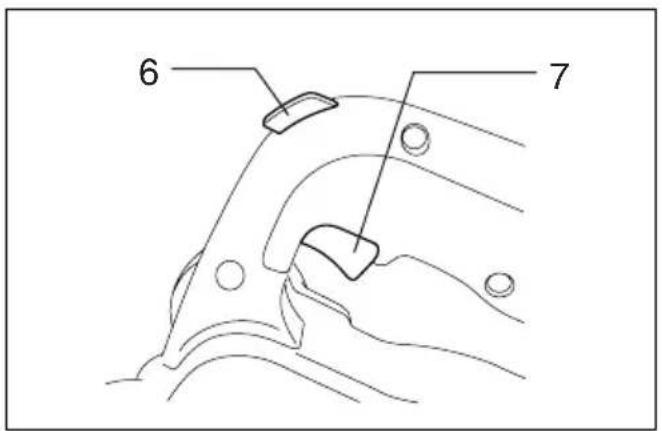
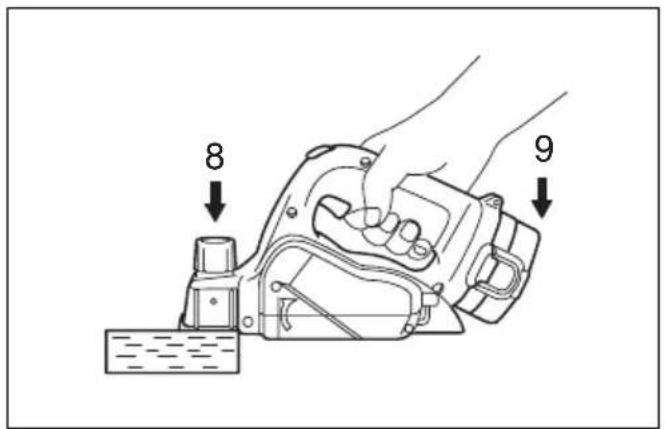
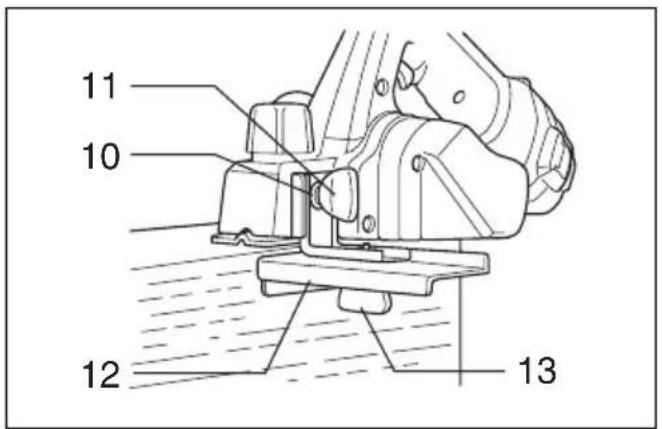
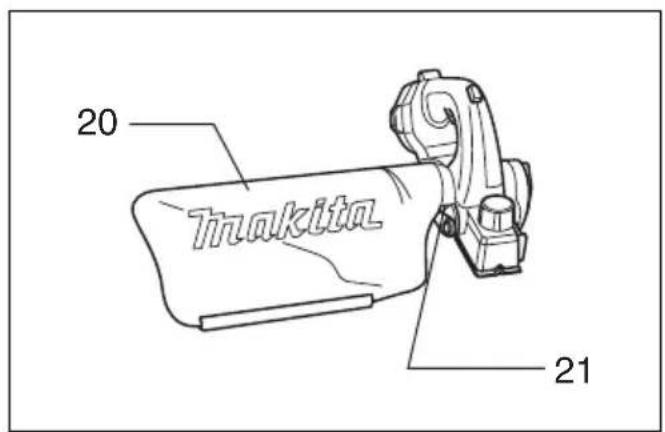
| 1 Button | 11 Thumb screw (A) | 20 Dust bag |
| 2 Battery cartridge | 12 Edge fence (Guide rule) | 21 Nozzle |
| 3 Knob | 13 Thumb screw (B) | 22 Fastener |
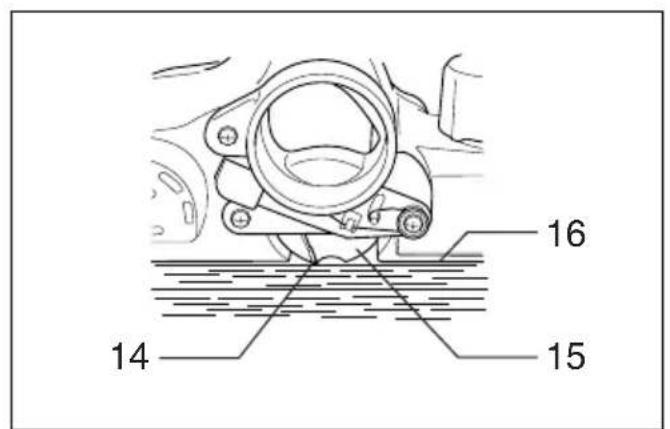
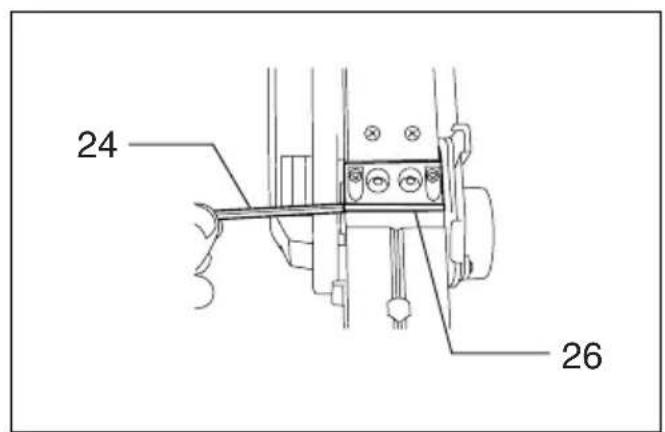
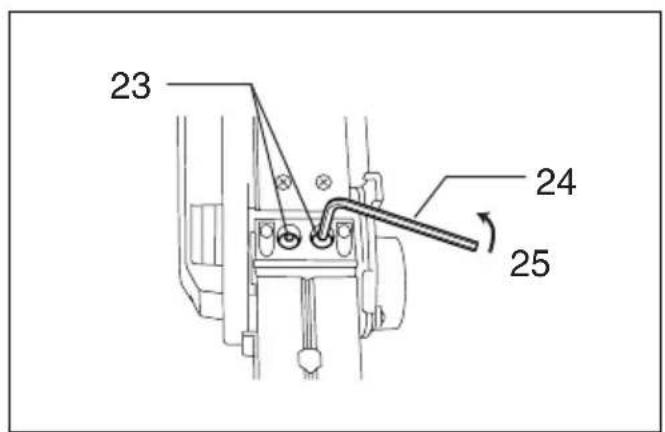
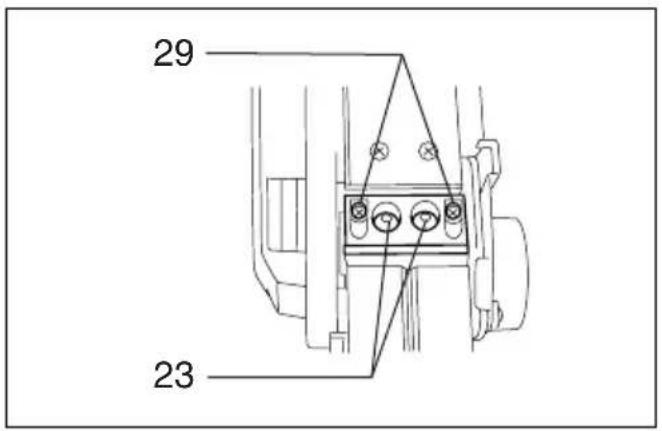
| 4 Scale | 14 Blade edge | 23 Installation bolts |
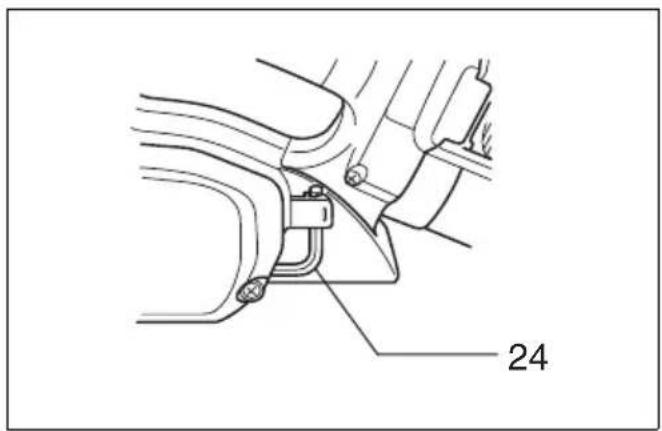
| 5 Pointer | 15 Side of drum | 24 Hex wrench |
| 6 Lock-off button | 16 Cutting line | 25 Loosen (counterclockwise) |
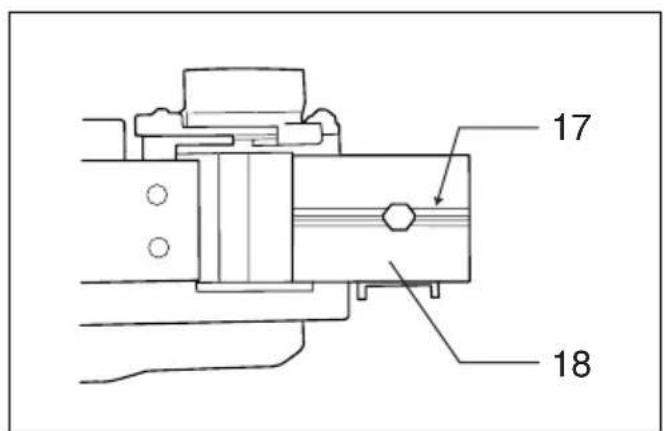
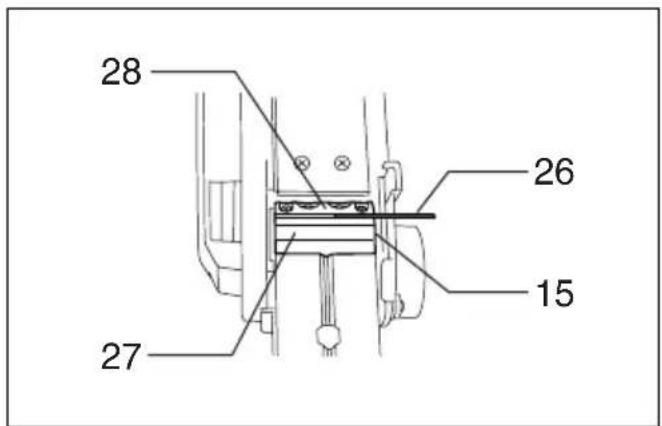
| 7 Switch trigger | 17 “V” groove | 26 Planer blade |
| 8 S t a r t | 18 Front base | 27 Drum |
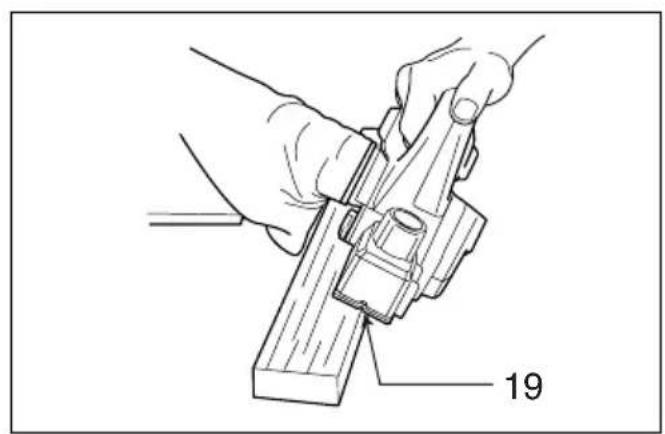
| 9 E n d | 19 Align “V” groove with edge of workpiece | 28 Drum cover |
| 10 Washer | 29 Pan head screws |
SPECIFICATIONS
Model 1051D
Capacities
Planing width 50 mm
Planing depth 0.5mm
Shiplapping (rabbeting) depth 15 mm
No load speed (min ^-1 ) .....9,000
Overall length 297mm
Net weight 2.2 kg
Rated voltage D.C. 14.4 V
- Due to our continuing program of research and development, the specifications herein are subject to change without notice.
- Note: Specifications may differ from country to country.
Intended use
The tool is intended for planing wood.
Safety hints
For your own safety, please refer to the enclosed safety instructions.
IMPORTANT SAFETY INSTRUCTIONS FOR CHARGER & BATTERY CARTRIDGE
ENC004-1
- Before using battery cartridge, read all instructions and cautionary markings on (1) battery charger, (2) battery, and (3) product using battery.
- Do not disassemble battery cartridge.
- If operating time has become excessively shorter, stop operating immediately. It may result in a risk of overheating, possible burns and even an explosion.
- If electrolyte gets into your eyes, rinse them out with clear water and seek medical attention right away. It may result in loss of your eyesight.
- Always cover the battery terminals with the battery cover when the battery cartridge is not used.
- Do not short the battery cartridge:
(1) Do not touch the terminals with any conductive material.
(2) Avoid storing battery cartridge in a container with other metal objects such as nails, coins, etc.
(3) Do not expose battery cartridge to water or rain.
A battery short can cause a large current flow, overheating, possible burns and even a breakdown.
- Do not store the tool and battery cartridge in locations where the temperature may reach or exceed 50°C (122°F).
- Do not incinerate the battery cartridge even if it is severely damaged or is completely worn out. The battery cartridge can explode in a fire.
- Be careful not to drop or strike battery.
SAVE THESE INSTRUCTIONS.
Tips for maintaining maximum battery life
- Charge the battery cartridge before completely discharged. Always stop tool operation and charge the battery cartridge when you notice less tool power.
- Never recharge a fully charged battery cartridge. Overcharging shortens the battery service life.
- Charge the battery cartridge with room temperature at 10^ C – 40^ C ( 50^ F – 104^ F). Let a hot battery cartridge cool down before charging it.
- Charge the Nickel Metal Hydride battery cartridge when you do not use it for more than six months.
ADDITIONAL SAFETY RULES FOR TOOL
ENB043-1
- Be aware that this tool is always in an operating condition, because it does not have to be plugged into an electrical outlet.
- Rags, cloth, cord, string and the like should never be left around the work area.
- Avoid cutting nails. Inspect for and remove all nails from the workpiece before operation.
- Use only sharp blades. Handle the blades very carefully.
- Be sure the blade installation bolts are securely tightened before operation.
- Hold the tool firmly with both hands.
- Keep hands away from rotating parts.
- Before using the tool on an actual workpiece, let it run for a while. Watch for vibration or wobbling that could indicate poor installation or a poorly balanced blade.
- Make sure the blade is not contacting the workpiece before the switch is turned on.
- Wait until the blade attains full speed before cutting.
- Keep at least 200mm away from the tool at all times.
-
Always switch off and wait for the blades to come to a complete stop before any adjusting.
-
Never stick your finger into the chip chute. Chute may jam when cutting damp wood. Clean out chips with a stick.
- Do not leave the tool running. Operate the tool only when hand-held.
- When leaving the planer, switch off and set it with the front base up on a wooden block, so that the blades do not contact anything.
- Always change both blades or covers on the drum, otherwise the resulting imbalance will cause vibration and shorten tool life.
- Wait for complete run-down before putting the tool aside.
- Use only Makita blades specified in this manual.
SAVE THESE INSTRUCTIONS.
OPERATING INSTRUCTIONS
Installing or removing battery cartridge (Fig.1)
- Always switch off the tool before insertion or removal of the battery cartridge.
- To remove the battery cartridge, withdraw it from the tool while pressing the buttons on both sides of the cartridge.
- To insert the battery cartridge, align the tongue on the battery cartridge with the groove in the housing and slip it into place. Always insert it all the way until it locks in place with a little click. If not, it may accidentally fall out of the tool, causing injury to you or someone around you.
- Do not use force when inserting the battery cartridge. If the cartridge does not slide in easily, it is not being inserted correctly.
Adjusting depth of cut (Fig. 2 & 3)
The depth of cut can be adjusted in 0.1 mm increments within a range of 0 - 0.5 mm. Turn the knob on the front of the tool until the pointer is aligned with the desired cutting depth on the scale.
CAUTION:
The knob can be turned beyond the 0.5 mm graduation. However, do not operate the tool with a depth of cut more than 0.5 mm. The motor may be burned out or the battery cartridge may be damaged.
Switch action (Fig. 4)
CAUTION:
Before inserting the battery cartridge into the tool, always check to see that the switch trigger actuates properly and returns to the "OFF" position when released.
To prevent the switch trigger from being accidentally pulled, a lock-off button is provided.
To start the tool, depress the lock-off button and pull the switch trigger. Release the switch trigger to stop.
Planing operation (Fig. 5)
First, rest the tool front base flat upon the workpiece surface without the blades making any contact. Switch on and wait until the blades attain full speed. Then move the tool gently forward. Apply pressure on the front of tool at the start of planing, and at the back at the end of planing. Planing will be easier if you incline the workpiece which is suitably clamped, so that you can plane somewhat downhill.
The speed and depth of cut determine the kind of finish. The power planer keeps cutting at a speed that ensures that wood chips do not cause the planer to jam. For rough cutting, the depth of cut can be increased, while for a good finish you should reduce the depth of cut and advance the tool more slowly.
Edge fence (Guide rule) (Fig. 6)
Use the edge fence when shiplapping (rabbeting) or cutting workpieces nearly 50mm wide. Install the edge fence on the tool and secure it with the washer and thumb screw (A). Loosen the thumb screw (B) and adjust the edge fence until it comes in contact with the side of the workpiece. Then tighten the thumb screw (B) securely.
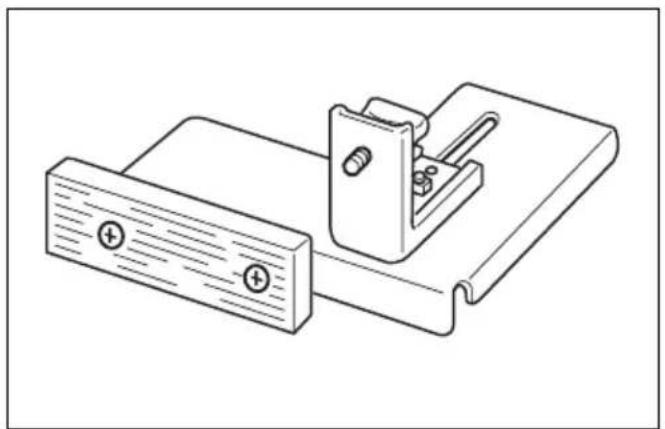
You may wish to add to the length of the fence by attaching an extra piece of wood. Convenient holes are provided in the fence for this purpose. (Fig.7)
Shiplapping (Rabbeting)
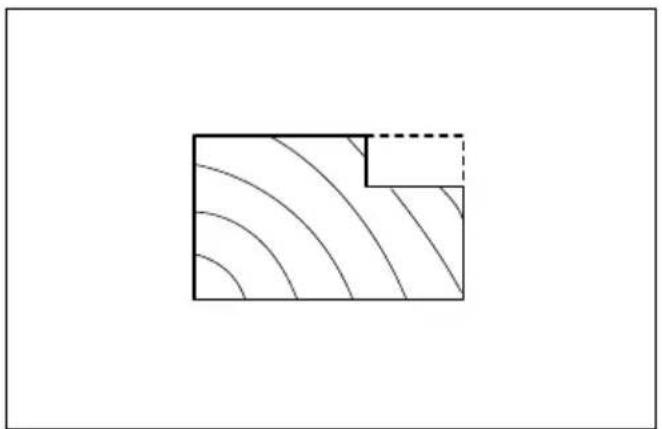
To make a stepped cut as shown in Fig. 8, use the edge fence (guide rule).
Draw a cutting line on the workpiece. Align the blade edge with the cutting line. (Fig. 9)
Then adjust the edge fence as explained in the "Edge fence" section. When planing, move the tool with the edge fence flush with the side of the workpiece. Otherwise uneven planing may result.
Max. shiplapping (rabbeting) depth is 15 mm.
CAUTION:
Before shiplapping, adjust the blade so that the end protrudes slightly from the side of the drum.
Chamfering (Fig. 10, 11 & 12)
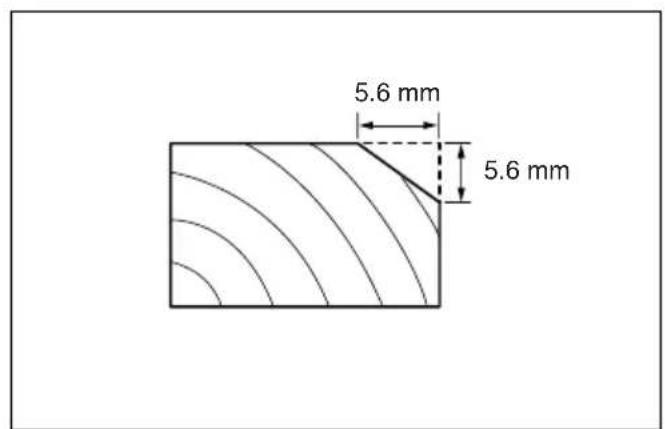
To make a cut as shown in Fig. 10, align the "V" groove in the front base with the edge of the workpiece and plane it as shown in Fig. 12. It chamfers up to 5.6 mm in a single pass.
Dust bag (Fig.13 & 14)
Install the dust bag on the nozzle of the tool. When installing it, push the bag's entry port toward the nozzle as far as it will go to prevent it from comming off during operation.
For the best results, empty the dust bag when it becomes about half full. Remove the dust bag from the tool and pull out the fastener.
NOTE:
If you connect a Makita vacuum cleaner Model 406 to this tool, more efficient and cleaner operations can be performed.
Removing or installing planer blades
CAUTION:
- Always be sure that the tool is switched off and the battery cartridge is removed before removing or installing the blades.
- Handle the blades very carefully. Use gloves or rags to protect your fingers or hands when removing or installing the blades.
To remove the blades, first loosen the two installation bolts one turn counterclockwise with the hex wrench provided. (Fig.15)
Push the blade from the belt side with the hex wrench.
(Fig. 16)
Remove the other blade in the same manner.
To install the blades, first clean out all chips or foreign matter adhering to the drum or blades. Insert the blade between the drum and the drum cover from the side opposite the belt so that the blade end will protrude slightly from the side of the drum. Tighten the two installation bolts securely with the hex wrench provided.
(Fig. 17)
CAUTION:
Use only the Makita hex wrench provided to remove or install the blades. Failure to do so may result in overtightening or insufficient tightening of the installation bolts. This could cause an injury.
Blade height adjustment (Fig. 18)
Blade height adjustment is usually not necessary. However, if you notice that the blade edge is below the level of the rear base or protrudes too far from the rear base, proceed as follows.
Loosen the two installation bolts. Turn the pan head screws clockwise to retract the blade or counterclockwise to protrude it. After adjusting the blade height, tighten the two installation bolts securely.
Hex wrench storage (Fig. 19)
When not in use, the hex wrench can be conveniently stored as shown in Fig. 19.
MAINTENANCE
CAUTION:
Always be sure that the tool is switched off and the battery cartridge is removed before carrying out any work on the tool.
To maintain product safety and reliability, repairs, maintenance or adjustment should be carried out by a Makita Authorized Service Center.
ACCESSORIES
CAUTION:
- These accessories or attachments are recommended for use with your Makita tool specified in this manual. The use of any other accessories or attachments might present a risk of injury to persons. Only use accessory or attachment for its stated purpose.
If you need any assistance for more details regarding these accessories, ask your local Makita service center.
- Mini planer blade
• Hex wrench - Edge fence (Guide rule) with thumb screw and washer
- Dust bag
- Plastic carrying case
- Various type of Makita genuine batteries and chargers
NEDERLANDS
EC-DECLARATION OF CONFORMITY
We declare under our sole responsibility that this product is in compliance with the following standards of standardized documents,
EN50260, EN55014
in accordance with Council Directives, 89/336/EEC and 98/37/EC.
FRANÇAISE
DÉCLARATION DE CONFORMITÉ CE
EU-DEKLARATION OM KONFORMITET
Michigan Drive, Tongwell, Milton Keynes,
Bucks MK15 8JD, ENGLAND
ENGLISH
Noise and Vibration
The typical A-weighted sound pressure level is 71 dB (A).
The noise level under working may exceed 85 dB (A).
- Wear ear protection. -
The typical weighted root mean square acceleration value is not more than 2.5 m/s^2 .
FRANÇAISE
Bruit et vibrations
- ENGLISH
- SPECIFICATIONS
- Model 1051D
- Intended use
- Safety hints
- IMPORTANT SAFETY INSTRUCTIONS FOR CHARGER & BATTERY CARTRIDGE
- SAVE THESE INSTRUCTIONS.
- Tips for maintaining maximum battery life
- ADDITIONAL SAFETY RULES FOR TOOL
- OPERATING INSTRUCTIONS
- Installing or removing battery cartridge (Fig.1)
- Adjusting depth of cut (Fig. 2 & 3)
- CAUTION:
- Switch action (Fig. 4)
- Planing operation (Fig. 5)
- Edge fence (Guide rule) (Fig. 6)
- Shiplapping (Rabbeting)
- Chamfering (Fig. 10, 11 & 12)
- Dust bag (Fig.13 & 14)
- NOTE:
- Removing or installing planer blades
- (Fig. 16)
- (Fig. 17)
- Blade height adjustment (Fig. 18)
- Hex wrench storage (Fig. 19)
- MAINTENANCE
- ACCESSORIES
- EC-DECLARATION OF CONFORMITY
- FRANÇAISE
- DÉCLARATION DE CONFORMITÉ CE
- EU-DEKLARATION OM KONFORMITET
- Noise and Vibration
- Bruit et vibrations
Brand : MAKITA
Model : 1051D
Category : Planer