
CLT 10 - Measuring devices PCE Instruments - Free user manual and instructions
Find the device manual for free CLT 10 PCE Instruments in PDF.

| Product Type | Cable Length Tester / Time Domain Reflectometer |
| Measuring Range (Cable Length) | 5 ... 3000 m (16.4 ... 9842.5 ft) depending on propagation speed |
| Measurement Units | m, ft |
| Resolution | 0.1 m |
| Measurement Accuracy | ±[2% of reading ± 0.2 m] (<100 m); ±[2% of reading ± 0.5 m] (≥100 m) |
| Measuring Principle | Time Domain Reflectometer (TDR) |
| Connector Types | BNC, RJ45 |
| Display | 2.4" LCD |
| Power Supply | 2 x 1.5V AA batteries |
| Battery Status Indicator | Yes (red battery icon) |
| Auto Power Off | Adjustable: 10, 20, 30, 40, 50, or 60 minutes |
| Pre-set Cable Types | 20 standard network and coaxial cables |
| User-defined Cable Memory | 99 memory slots with name, producer, VOP, impedance |
| Menu Languages | German, English |
| Operating Temperature | 0 ... 40 °C (32 ... 104 °F) |
| Storage Temperature | -10 ... 50 °C (14 ... 122 °F) |
| Relative Humidity | 0 ... 80% RH (non-condensing) |
| Dimensions | Not specified in manual |
| Weight | Not specified in manual |
| Delivery Contents | 1x meter, 2x test leads, 2x crocodile clips, 2x AA batteries, 1x transport bag, 1x user manual |
| Safety Certifications | Complies with EU directives; disposal per WEEE and battery directives |
Frequently Asked Questions - CLT 10 PCE Instruments
User questions about CLT 10 PCE Instruments
0 question about this device. Answer the ones you know or ask your own.
Ask a new question about this device
Download the instructions for your Measuring devices in PDF format for free! Find your manual CLT 10 - PCE Instruments and take your electronic device back in hand. On this page are published all the documents necessary for the use of your device. CLT 10 by PCE Instruments.
USER MANUAL CLT 10 PCE Instruments
User Manual
PCE-CLT 10 Electrical Tester

User manuals in various languages (français, italiano, español, português, nederlands, türk, polski, русский, 中文) can be found by using our product search on: www.pce-instruments.com
Last change: 19 September 2019
v1.0
Contents
1 Safety notes....1
2 Characteristics 2
3 Technical specifications .... 2
4 Delivery contents ...... 2
5 Device description .... 3
6 Operation 3
6.1 Preparation / inserting the batteries.... 3
6.2 Turn on/off cable length tester 4
6.3 Main menu 4
6.4 Cable length measurement 4
6.5 VOP library....6
6.6 Showing the history....11
6.7 Settings....12
7 Contact....13
8 Disposal 13
1 Safety notes
Please read this manual carefully and completely before you use the device for the first time. The device may only be used by qualified personnel and repaired by PCE Instruments personnel.
Damage or injuries caused by non-observance of the manual are excluded from our liability and not covered by our warranty.
- The device must only be used as described in this instruction manual. If used otherwise, this can cause dangerous situations for the user and damage to the meter.
- The instrument may only be used if the environmental conditions (temperature, relative humidity, ...) are within the ranges stated in the technical specifications. Do not expose the device to extreme temperatures, direct sunlight, extreme humidity or moisture.
- Do not expose the device to shocks or strong vibrations.
- The case should only be opened by qualified PCE Instruments personnel.
- Never use the instrument when your hands are wet.
- You must not make any technical changes to the device.
- The appliance should only be cleaned with a damp cloth. Use only pH-neutral cleaner, no abrasives or solvents.
- The device must only be used with accessories from PCE Instruments or equivalent.
- Before each use, inspect the case for visible damage. If any damage is visible, do not use the device.
- Do not use the instrument in explosive atmospheres.
- The measurement range as stated in the specifications must not be exceeded under any circumstances.
- Non-observance of the safety notes can cause damage to the device and injuries to the user.
We do not assume liability for printing errors or any other mistakes in this manual.
We expressly point to our general guarantee terms which can be found in our general terms of business.
If you have any questions please contact PCE Instruments. The contact details can be found at the end of this manual.
2 Characteristics
- Precise and quick cable length measurement
- Easy operation
- 2.4" LCD
- Auto zero and auto range
- 20 pre-set cable types
- Auto power off
- Automatic setting of sensitivity for more accurate cable length measurement
- Up to 99 individual cable types can be set
3 Technical specifications
| Measuring range cable length | Depending on the propagation speed of the tested cables5 ... 3000 m / 16.4 ... 9842.5 ftwith shortening factor ≤99.9%5 ... 2400 m / 16.4 ... 7874.0 ftwith shortening factor ≤80.0%5 ... 2000 m / 16.4 ... 6561.7 ftwith shortening factor ≤66.0%5 ... 1500 m / 16.4 ... 4921.3 ftwith shortening factor ≤50.0% |
| Measurement units | m, ft |
| Resolution | 0.1 m |
| Measuring principle | Time domain reflectometer |
| Selection area | Automatic control range |
| Measurement accuracy | ± [2% of reading ± 0.2 m] <100 m± [2% of reading ± 0.5 m] ≤100 m |
| Impedance selector | Automatic output of the impedance control |
| Shortening factor / propagation speed | Adjustable from 1.0 ... 99.9% |
| Cable types | 20 standard cables |
| Memory | 99 memory slots for individual cables |
| Connector type | BNC, RJ45 |
| Power supply | 2 x 1.5V AA battery |
| Battery status indicator | Yes |
| Automatic shutdown | Adjustable between 10 and 60 minutes |
| Menu languages | German, English |
| Operating temperatur | 0 ... 40°C / 32 ... 104°F |
| Storage temperature | -10 ... 50°C / 14 ... 122°F |
| Relative humidity | 0 ... 80 % RH |
4 Delivery contents
1 x Cable fault meter PCE-CLT 10
2 x Test leads
2 x Crocodile clip
2 x AA battery 1.5V
1 x Transport bag
1 x User manual
5 Device description
- BNC socket – to measure cable length via Coax option
- RJ45 socket - to measure cable length via network option
- LCD
- OK / measuring key
- Coax-network switch key
- Set key
- key (up / increase value)
- key (down / decrease value)
- key (On/off / in menu: back)

6 Operation
6.1 Preparation / inserting the batteries
To run the cable length meter, the included batteries must be inserted first. To do so, turn around the meter and open the battery compartment cover at the rear side. Insert the batteries as marked in the battery compartment. Then close the battery compartment cover.
Note:
Replace the batteries as soon as the battery icon in the display glows in red. Only use 1.5 V AA Alkaline batteries. If you will not use the cable fault tester for a longer period of time, remove the batteries.
6.2 Turn on/off cable length tester
Press and hold the key for approx. 3 seconds to turn on the meter. To turn off the meter, press and hold the key for approx. 3 seconds again.
Note:
The meter has an automatic power off function to save battery power. The cable length meter will turn off automatically after 10 minutes of inactivity.
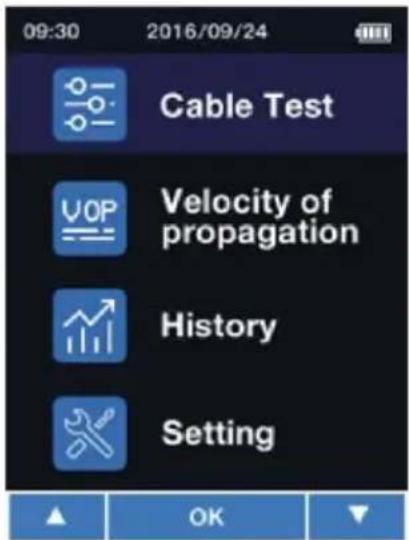
6.3 Main menu
After powering on, the cable fault meter will be in the mode to measure network cables. To enter the main menu, short-press the ⏻ key. To return to measuring mode, short-press ⏻ again. When you are in the main menu, you can use the ▲ and ▼ keys to select one of the following functions which you can confirm with TEST OK
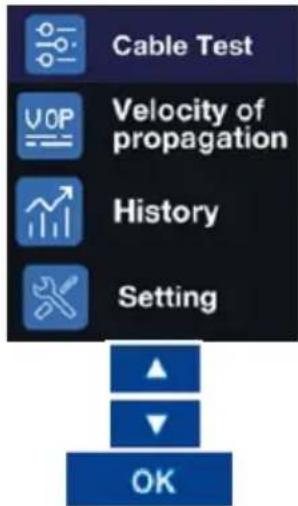
Cable length measurement
Setting the velocity of propagation
History of past measurements
System settings
Up in the menu
Down in the menu Confirm selection
with

6.4 Cable length measurement
6.4.1 Preparing the measurement
Connect the cable to be measured to the meter. If you wish to measure a network cable with RJ45, use the RJ45 socket. If you wish to measure a coaxial cable or measure a cable via the coaxial adaptors, use the BNC socket. Now use the key to enter the relevant mode, depending on the connected cable.
It is also possible to make a cable length measurement via the main menu. To do so, select the
upper menu item and confirm your selection with the key.
Now select in the following screen whether you wish to use the RJ45 or the BNC socket to measure a cable.


Confirm your selection with the Key. As soon as you have entered the mode for cable length measurements, the screen will look as follows after making a selection:
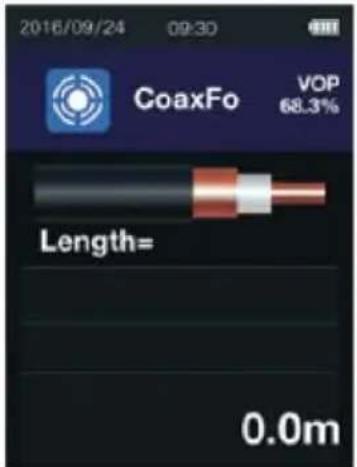
Measuring mode for coaxial cables and cables connected to the meter with a measuring adaptor
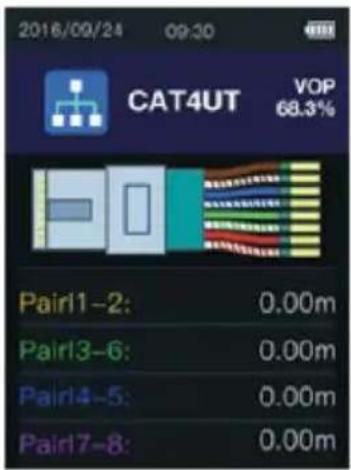
Measuring mode for the length measurement of cables connected to the RJ45 socket
Important:
Do not measure any current-carrying cables.
6.4.2 Selecting the cable type
To measure the cable length accurately, it is necessary to select the correct cable type and propagation velocity of the measuring signal (VOP) prior to the measurement.
- Press the key to be able to select the cable type from the database of the cable length tester with the key.
- The velocity of propagation of the selected cable can only be changed manually for this measurement. To do so, press and hold the SET key in measuring mode. In the upper right part of the display, the VOP value will now be displayed with a black background. This VOP value can now be changed via the ▲ and ▼ keys. To confirm the change, short-press the KEY.
6.4.3 Cable length measurement
If you have selected the correct cable as described in 6.4.2, you can now make a measurement by pressing the ☐ key. After the cable length measurement, the reading will be displayed. To leave measuring mode, short-press the ☐ key.
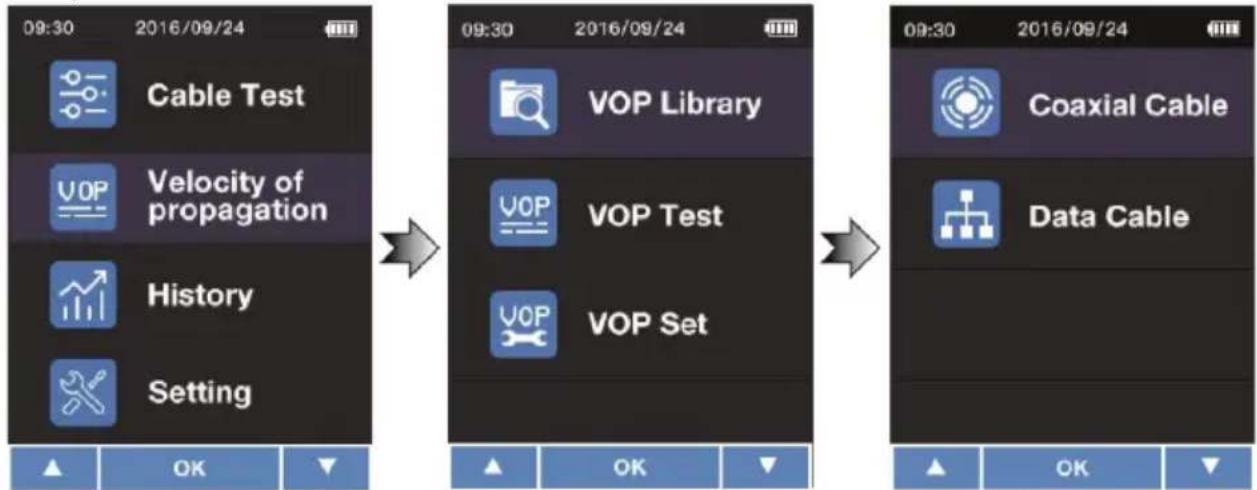
6.5 VOP library
To open the VOP library, first go to the menu. Select the menu item "Velocity of propagation". Then select "VOP Library". Then select the library you wish to open. You can select either the library "Coaxial Cable" or "Data Cable".
flowchart
graph LR
    A["Cable Test"] --> B["Velocity of propagation"]
    B --> C["History"]
    C --> D["Setting"]

    E["VOP Library"] --> F["VOP Test"]
    F --> G["VOP Set"]

    H["Coaxial Cable"] --> I["Data Cable"]


As a last step, select your cable with the key.

You can go back to the library by pressing the key. With the key, you can delete the current cable. To confirm the deletion, press . To cancel the deletion, press the exit key.
6.5.1 Pre-set cable types
The cable types pre-set in the PCE-CLT 10 are:
| Network cable | Coaxial cable | ||||
| No. | Name | Producer | No. | Name | Producer |
| 1 | CAT3UT | HANWEI | 1 | CW1308 | PE |
| 2 | CAT4UT | HANWEI | 2 | CFPE50 | FOAMED |
| 3 | CAT4ST | DINTEK | 3 | CFPE75 | FOAMED |
| 4 | CAT5UT | DINTEK | 4 | CSPE50 | SOLLD |
| 5 | CAT5ST | SHIP | 5 | CSPE75 | SOLLD |
| 6 | CAT6UT | SHIP | 6 | ET9901 | PVC |
| 7 | CAT6ST | DINTEK | 7 | ET9903 | PVC |
| 8 | CAT6ES | DINTEK | 8 | IBME3 | TELLON |
| 9 | CAT6EU | DINTEK | 9 | IBME9 | FOAMED |
| 10 | CAT7ST | DINTEK | 10 | BT2002 | FOAMED |
| 11 | CAT3UT | NEXAN | 11 | COR50 | AIR |
| 12 | CAT4UT | NEXAN | 12 | COR75 | AIR |
| 13 | CAT4ST | NEXAN | 13 | COR550 | AIRPE |
| 14 | CAT5UT | IBDN | 14 | COR575 | AIRPE |
| 15 | CAT5ST | IBDN | 15 | RG6U | FOAMED |
| 16 | CAT6UT | IBDN | 16 | RG59BU | VBFH |
| 17 | CAT6ST | SIEMON | 17 | RG62AU | PVC |
| 18 | CAT6ES | SIEMON | 18 | TPPVC | PVC |
| 19 | CAT6EU | SIEMON | 19 | EPPE | PE |
| 20 | CAT7ST | SIEMON | 20 | BS6500 | PP |
6.5.2 Adding cables of known lengths
Each cable has its own VOP. If the VOP of the cable is unknown, it can be determined by making a measurement. To do so, the cable length must be know.
To make a measurement, follow these steps:
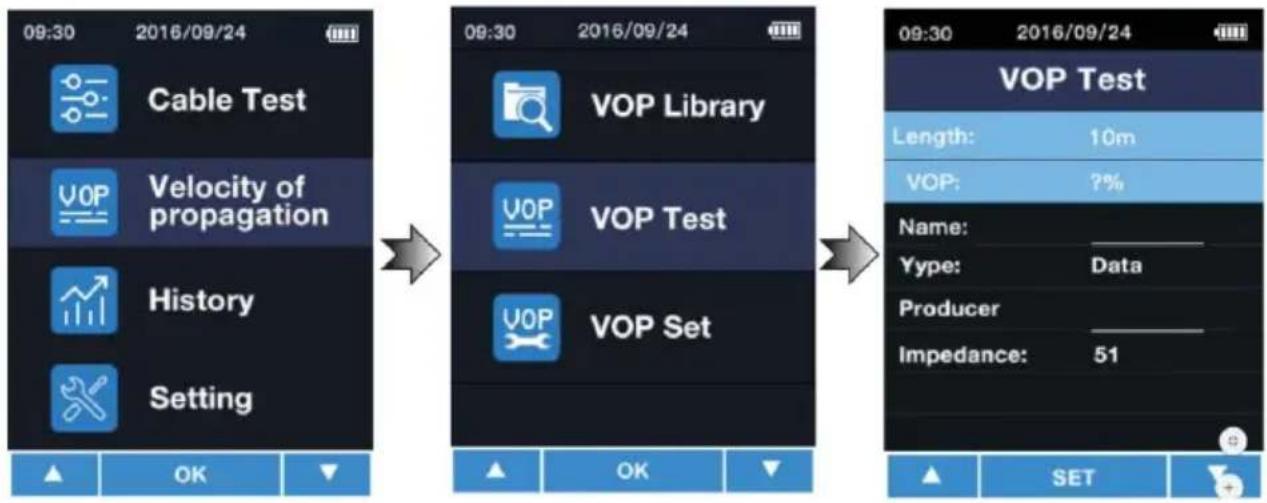
First connect the cable to be measured. It is recommended to use a cable that is longer than 10 m. Now enter the menu. Select "Velocity of propagation". Then select "VOP Test".
flowchart
graph LR
    A["Cable Test"] --> B["Velocity of propagation"]
    B --> C["History"]
    C --> D["Setting"]

    E["VOP Library"] --> F["VOP Test"]
    F --> G["VOP Set"]

    H["OK"] --> I["SET"]

    J["09:30 2016/09/24"] --> K["09:30 2016/09/24"]

    L["09:30 2016/09/24"] --> M["VOP Test"]
    M --> N["Length: 10m"]
    M --> O["VOP: ?%"]
    M --> P["Name: ________"]
    M --> Q["Yype: Data ________"]
    M --> R["Producer ________"]
    M --> S["Impedance: 51"]
Under "length", enter the length of the connected cable. You can select a value between 5 ... 999 m. To change the value, first press the SET key to select the box. The value can then be changed with the keys ▲ / ▼ . Press TEST OK to confirm the entered value. The VOP value will be displayed directly.
In the "Name" box, you can assign a name to the cable, for instance "NYM 1.5". Up to six digits are possible. To select the input field, press the SET key. With the ▲ / ▼ keys you can select the number or letter. You can go to the next digit with the SET key. Confirm your entry with the KEY.
In the "Type" box, you can select the type of cable. You can choose "Coaxial cable" or "Network cable". To change the value, press the SET key to select the box. The value can then be changed with the keys ▲. Press to confirm the entered value.
In the "Producer" box, you can enter the manufacturer of the cable. Up to six digits are possible. To select the input field, press the key. With the ▲ / ▼ keys you can select the number or letter. You can go to the next digit with the key. Confirm your entry with the key.
In the "Impedance" box, you can select the impedance of the cable. You can choose either 51 Ω, 75 Ω or 100 Ω. To change the value, press the SET key to select the box. The value can then be changed with the keys ▲. Press to confirm the entered value.
After making all desired settings, press to save the entered cable to the library.
6.5.3 Adding cables with known VOP values
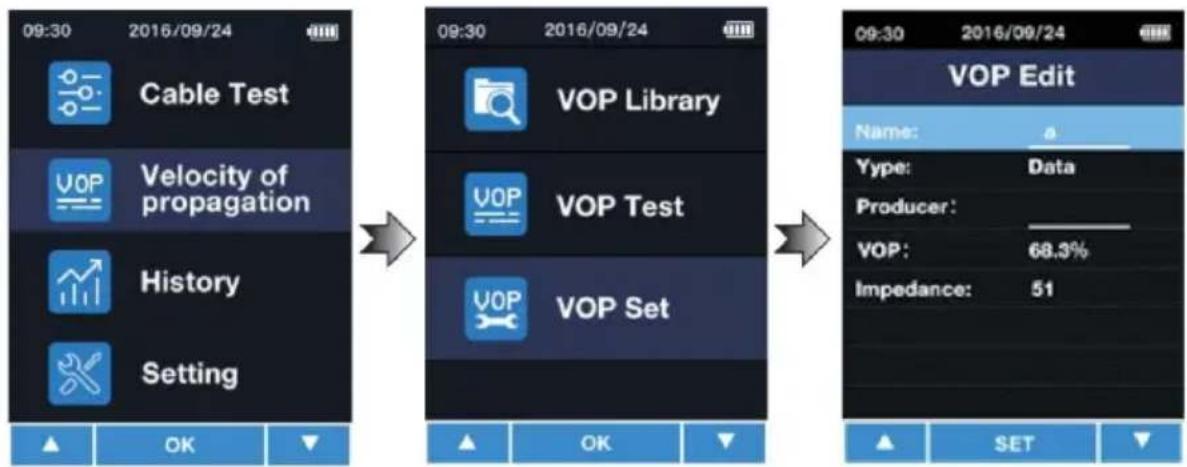
If the VOP value of the cable is known, you can add it without making a reference measurement. First enter the menu. Then select "Velocity of Propagation" and "VOP Set".
flowchart
graph LR
    A["Cable Test"] --> B["Velocity of propagation"]
    B --> C["History"]
    C --> D["Setting"]

    E["VOP Library"] --> F["VOP Test"]
    F --> G["VOP Set"]

    H["OK"] --> I["OK"]

    J["SET"] --> K["SET"]

    L["09:30 2016/09/24"] --> M["09:30 2016/09/24"]

    N["VOP Edit"] --> O["Name: a"]
    P["Type: Data"] --> Q["Producer:"]
    R["VOP: 68.3%"] --> S["Impedance: 51"]
In the "Name" box, you can assign a name to the cable, for instance "NYM 1.5". Up to six digits are possible. To select the input field, press the SET key. With the ▲ / ▼ keys you can select the number or letter. You can go to the next digit with the SET key. Confirm your entry with the KEY.
In the "Type" box, you can select the type of cable. You can choose "Coaxial cable" or "Network cable". To change the value, press the key to select the box. The value can then be changed with the keys ▲. Press to confirm the entered value.
In the "Producer" box, you can enter the manufacturer of the cable. Up to six digits are possible. To select the input field, press the key. With the ▲ / ▼ keys you can select the number or letter. You can go to the next digit with the key. Confirm your entry with the key.
In the "VOP" box, you can enter the known VOP value. To select the input field, press the key. With the ▲ / ▼ keys you can select the number or letter. You can go to the next digit with the SET key. Confirm your entry with the KEY.
After making all desired settings, press to save the entered cable to the library.
6.6 Showing the history
To view the history of the cables last used, first enter the menu. Then select "History". The cables last used will be displayed directly for your selection. You can select the desired cable
with the ▲ keys. To confirm your selection, press .

Note: Measured values will not be saved.
6.7 Settings
Enter the menu to make settings. Select "Setting".
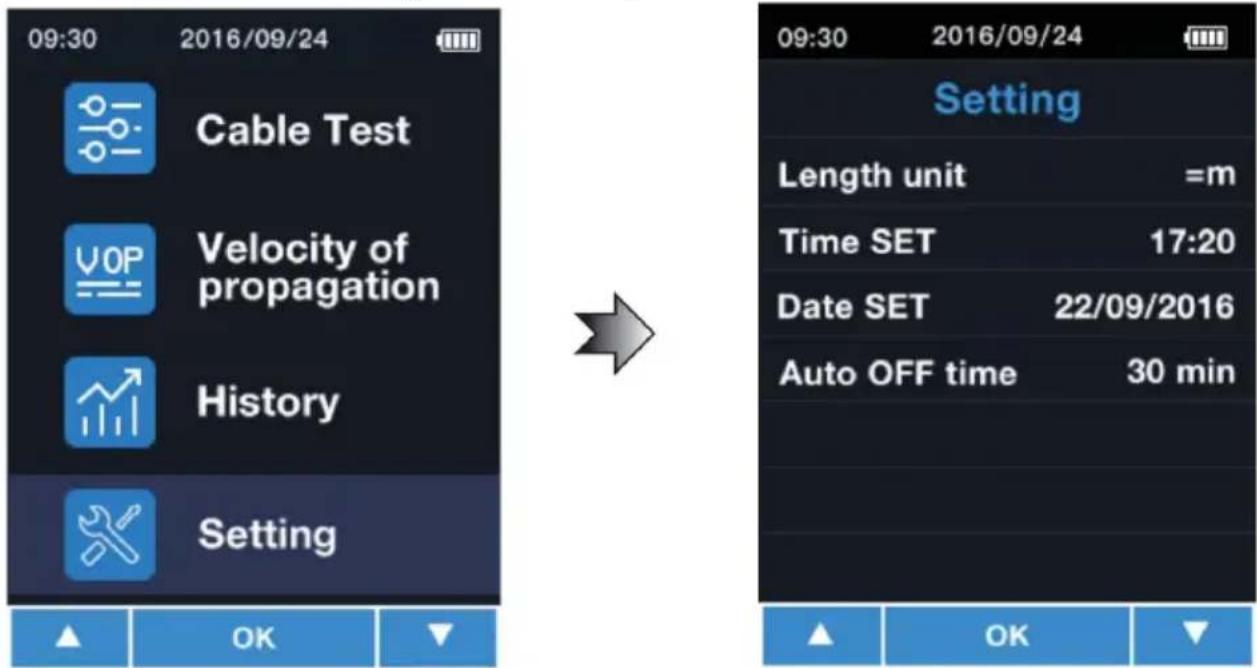
In this menu, the following settings can be made:
| Menu | Description |
| Length Unit | Here you can set the unit. You can select metres “m” or feet „ft“. |
| Time SET | Here you can set the time. Format HH:MM |
| Date SET | Here you can set the date. Format JJJJ/MM/TT |
| Auto OFF time | Here you can set the time of inactivity after which the meter turns off automatically. Possible options: 10,20,30,40,50 or 60 minutes |
| Language | Here you can set the language. Possible options: English or German |
With the ▲ / ▼ keys, you can select an item from the Setting menu. The input field can be
selected with the Ⓗ key. The parameter can now be changed with the ▲ / ▼ keys. Press
again to go to the next parameter or to confirm your setting. Press the key to confirm the setting directly.
7 Contact
If you have any questions, suggestions or technical problems, please do not hesitate to contact us. You will find the relevant contact information at the end of this user manual.
8 Disposal
For the disposal of batteries in the EU, the 2006/66/EC directive of the European Parliament applies. Due to the contained pollutants, batteries must not be disposed of as household waste. They must be given to collection points designed for that purpose.
In order to comply with the EU directive 2012/19/EU we take our devices back. We either re-use them or give them to a recycling company which disposes of the devices in line with law.
For countries outside the EU, batteries and devices should be disposed of in accordance with your local waste regulations.
If you have any questions, please contact PCE Instruments.


PCE Instruments contact information
Germany France Spain
PCE Deutschland GmbH PCE Instruments France EURL PCE Ibérica S.L.
Im Langel 4 23, rue de Strasbourg Calle Mayor, 53
D-59872 Meschede 67250 Soultz-Sous-Forets 02500 Tobarra (Albacete)
Germany United Kingdom Italy
Unit 11 Southpoint Business Park
Ensign Way, Southampton
Capannori (Lucca)
Italia
Tel: +44 (0) 2380 98703 0
Fax: +44 (0) 2380 98703 9
info@industrial-needs.com
www.pce-instruments.com/english
PCE Italia s.r.l.
Via Pesciatina 878 / B-Interno 6
55010 Loc. Gragnano
www.pce-instruments.com/dutch
China
PCE (Beijing) Technology Co., Limited
1519 Room, 6 Building
Zhong Ang Times Plaza
No. 9 Mentougou Road, Tou Gou District
102300 Beijing, China
Tel: +86 (10) 8893 9660
info@pce-instruments.cn
www.pce-instruments.cn
Hong Kong
PCE Instruments HK Ltd.
Unit J, 21/F., COS Centre
56 Tsun Yip Street
Kwun Tong
Kowloon, Hong Kong
Tel: +852-301-84912
jyi@pce-instruments.com
www.pce-instruments.cn
United States of America
PCE Americas Inc.
711 Commerce Way suite 8
Jupiter / Palm Beach
33458 FL
USA Türkiye
Tel: +1 (561) 320-9162
Fax: +1 (561) 320-9176
info@pce-americas.com
www.pce-instruments.com/us
Turkey
Pehlivan Sok. No.6/C
www.pce-instruments.com/turkish
- User Manual
- Contents
- Safety notes
- Characteristics
- Delivery contents
- Device description
- Operation
- Preparation / inserting the batteries
- Note:
- Turn on/off cable length tester
- Main menu
- Cable length measurement
- Preparing the measurement
- Important:
- Selecting the cable type
- Cable length measurement
- VOP library
- Pre-set cable types
- Adding cables of known lengths
- Adding cables with known VOP values
- Showing the history
- Settings
- Contact
- Disposal
- PCE Instruments contact information
- Germany France Spain
- Germany United Kingdom Italy
- China
- Hong Kong
- United States of America
- Turkey
Brand : PCE Instruments
Model : CLT 10
Category : Measuring devices