CAL H990 - Clock CITIZEN - Free user manual and instructions
Find the device manual for free CAL H990 CITIZEN in PDF.

User questions about CAL H990 CITIZEN
0 question about this device. Answer the ones you know or ask your own.
Ask a new question about this device
Download the instructions for your Clock in PDF format for free! Find your manual CAL H990 - CITIZEN and take your electronic device back in hand. On this page are published all the documents necessary for the use of your device. CAL H990 by CITIZEN.
USER MANUAL CAL H990 CITIZEN
Thank you for your purchase of this Citizen watch.
Before using the watch, read this instruction manual carefully to ensure correct use.
After reading, be sure to store this manual in a safe place should it be needed for future reference.
The model name of this watch is "H990" (Eco-Drive Satellite Wave).
Safety precautions
This manual may contain certain safety advisories. Your watch should be used in accordance with these advisories at all times to ensure optimal enjoyment of your watch and to prevent injury to yourself, other persons and/or damage to property.
■ Safety advisories are categorized and depicted in this manual as follows:
| ⚠️ DANGER | Highly likely to cause death or serious injury |
| ⚠️ WARNING | May cause serious injury or death |
| ⚠️ CAUTION | May or will cause minor or moderate injury or damage |
- Important instructions are categorized and depicted in this manual as follows:
 | Warning (caution) symbol followed by instructions that should be followed and/or precautions that should be observed. |
 | Warning (caution) symbol followed by prohibited use and/or operation advisory. |
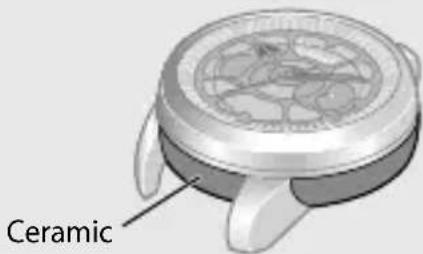
Case
Be careful not to knock or inflict strong shocks on the watch as part of the case is ceramic.
Protective stickers
Prior to the watch being shipped from the manufacturing plant, its glass, case, metal band, and metal parts of the clasp are covered with stickers to protect them from getting fingerprints or scratches during transit from the plant to the store.
If the watch is worn without first removing these stickers, perspiration or moisture may enter the gaps between the protective stickers and the parts, which may result in a skin rash and/or corrosion of the metal parts.
For this reason, please be sure to peel off the stickers before wearing the watch.
Before using the watch
The following must be done before using the watch:
- Checking the power reserve -Page 14
Check the charge level of the watch.
● Setting the World Time Page 17
Select the city or time difference for which you want to indicate the time and date.
● Receiving the satellite time signal -Page 28
Correct the time by receiving the satellite time signal.

natural_image
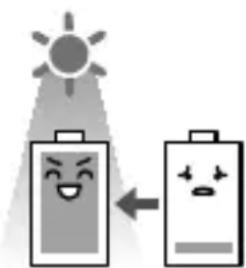
Illustration of two batteries with smiling faces under a sun, connected by an arrow (no text or symbols)This watch has a rechargeable cell which is charged by exposing the dial to light.
Expose the dial to direct sunlight regularly to charge the watch.
For details of charging, see pages 10 to 13.
Table of contents
Before using the watch ......4
Component identification......8
Recharging your watch ...... 10
Checking the power reserve ..... 14
Using the world time function... 16
Switching Summer Time and standard time 21
Before receiving the satellite time signal....24
Receiving the satellite time signal....28
Checking and adjusting the leap second 35
Checking and adjusting the rollover number .... 38
Adjusting the time/calendar manually....42
Checking and correcting the current reference position ..... 46
Troubleshooting......50
Resetting the watch —All Reset 55
Eco-Drive (solar powered) Watch Handling Precautions ...... 58
Water resistance 62
Precautions and usage limitations 65
Maintenance....70
Information 71
Specifications....72
Component identification
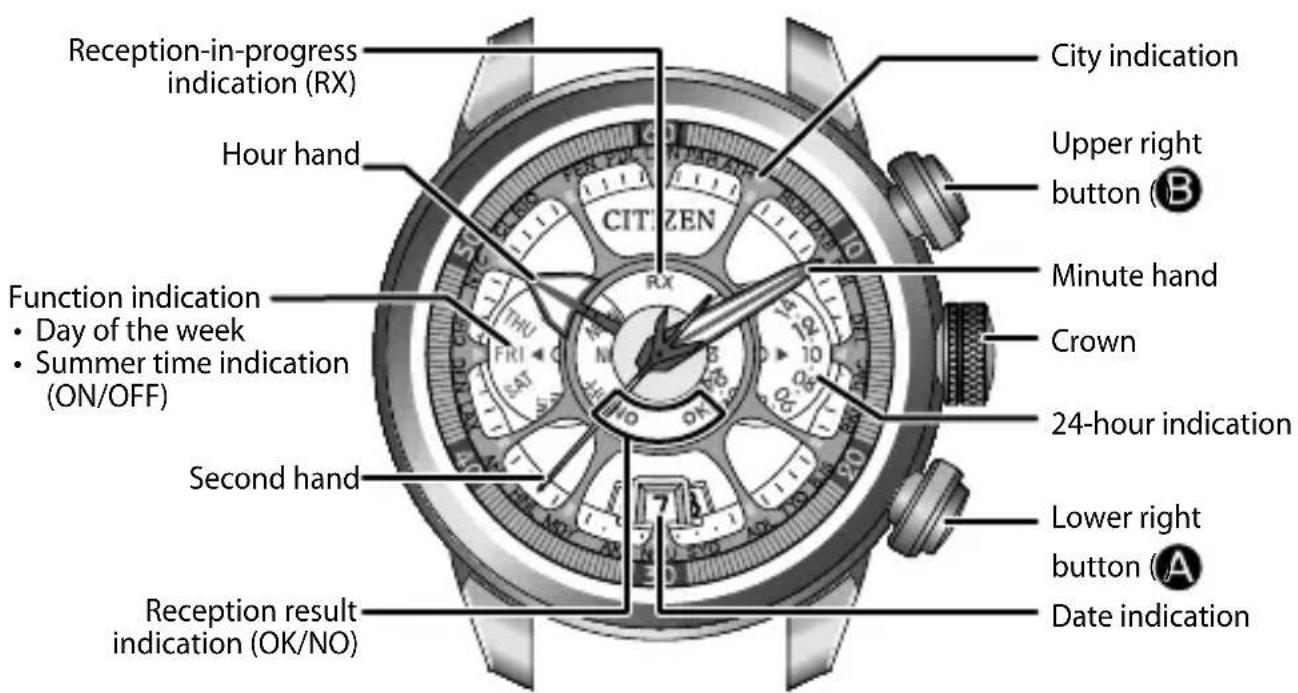
Component identification
Part of the case is ceramic. Handle with care.
The illustrations in this instruction manual may differ from the actual appearance of your watch.
Recharging your watch
This watch can store electrical energy generated from direct sunlight or light from a fluorescent lamp shining on the dial in the built-in rechargeable cell.
After taking off the watch, put it in a location where the dial is exposed to bright light, such as by a window.
natural_image
Illustration of two batteries with smiling faces, one emitting a sun and the other with a blank battery (no text or symbols)Caution
- Since a large amount of power is consumed when receiving the satellite time signal, this watch is equipped with a high capacity rechargeable cell. Therefore, it may take a while to sufficiently charge the watch.
- To ensure comfortable use, charge the watch for 5 or 6 hours every two weeks.
- Avoid leaving the watch in dark places where it cannot be exposed to light for long periods of time.
- If the watch is covered by long sleeves it may not be charged sufficiently. Ensure that the watch is exposed to light suitable for charging.
When the watch reaches a low charge state—insufficient charge warning function
When the power reserve becomes low, the second hand moves once every two seconds—This is the insufficient charge warning function. Charge the watch by exposing the dial to light.
- When the watch is sufficiently charged, the second hand will move normally.
- If you do not charge the watch for 10 days after the insufficient charge warning movement has begun, the watch will run out of power and stop.
Even when the second hand moves once every two seconds, the current time and date are indicated, and you can adjust the time and date. However, satellite time signal reception and other operations are not possible.
Charging time by environment
Below are the approximate times required for charging when exposing the watch dial to light continuously. Please use this table as a reference only.
| Environment Illuminance (Lx) | Charging time for the second hand to move normally for one day | Charging time for the second hand to start moving normally when the rechargeable cell is empty | Charging time for the rechargeable cell to become fully charged when the rechargeable cell is empty |
| Outdoor (Under direct sunlight) | 100 000 8 minutes 16 hours 150 hours | ||
| Outdoor (Cloudy weather) | 10 000 25 minutes 45 hours 390 hours | ||
| 20 cm (7-7/8 inches) away from a fluorescent lamp (30 W) | 3 000 1.5 hours 160 hours 1,360 hours | ||
| Interior lighting | 500 8 hours | — | — |
- To charge the rechargeable cell, it is recommended to expose the dial to direct sunlight. A fluorescent lamp or interior lighting does not have sufficient illumination to charge the rechargeable cell.
- When fully charged, the overcharging prevention function works automatically. The accuracy or parts of the watch will not be affected by extra charging.
Caution: This watch uses a special rechargeable cell.
- If the surrounding temperature falls below 0^ C/ 32^ F or exceeds 40^ C/ 104^ F, the “Charge suspension temperature detection function” will activate and charging will not be possible.
- If you do not charge the watch for 60 days after it has stopped, the “Over discharge detection function” will activate and charging will not be possible. If the watch does not work even after charging for more than one day under direct sunlight, request replacement of the rechargeable cell.
Run time
Fully charged to fully discharged: Approximately 2.5 years
(When receiving the satellite time signal once every two days)
Power reserve upon insufficient charge warning function (page 11): 10 days
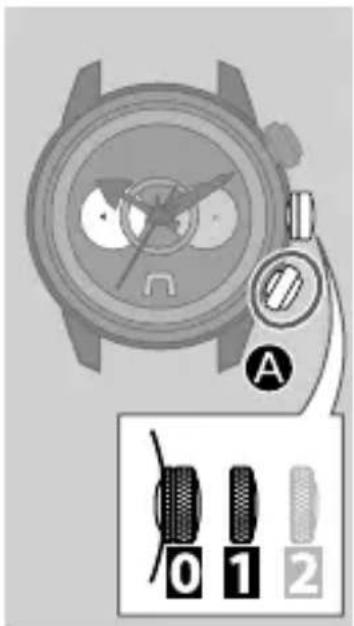
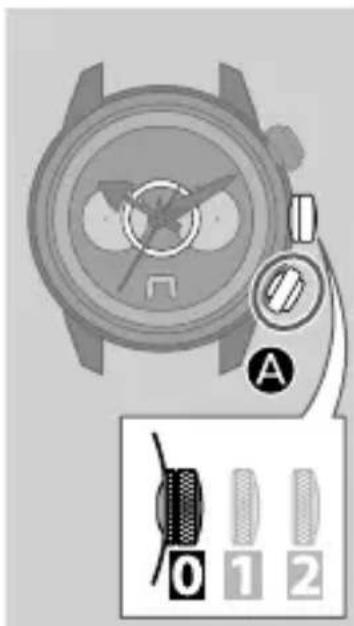
Checking the power reserve
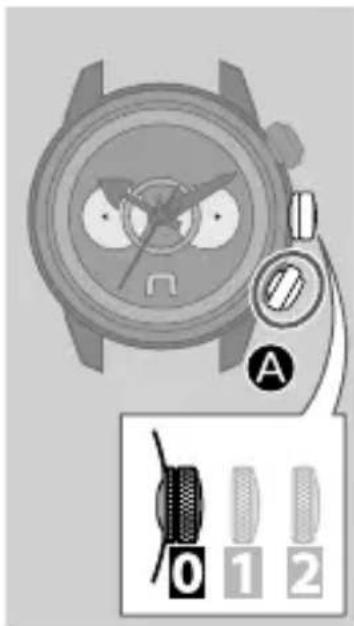
Check the charge level of the watch and be sure to maintain a sufficient amount of charge.
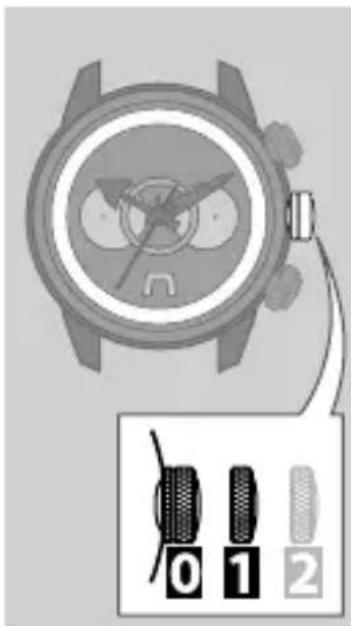
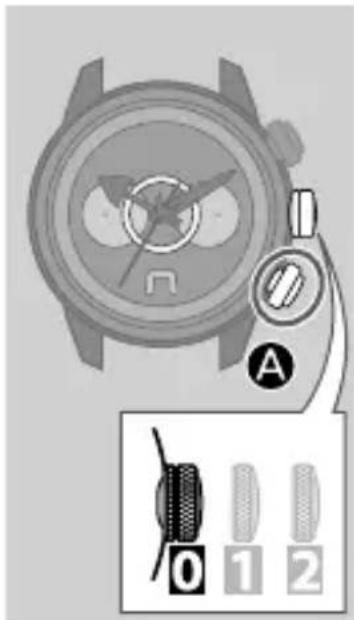
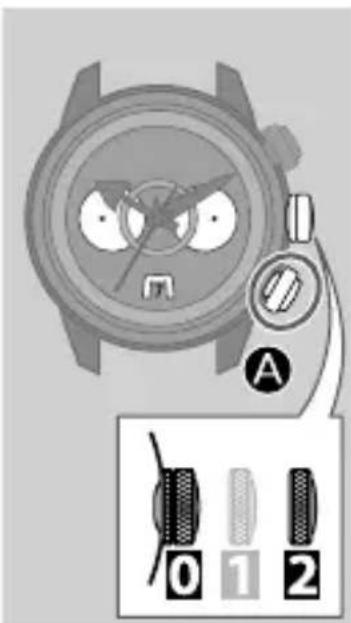
- Ensure that the crown is in position
- Press the lower right button Ⓐ briefly.

The second hand moves to indicate the power reserve.
| The second hand rotates clockwise, then indicates “OK” or “NO” | The watch is sufficiently charged. |
The second hand rotates counterclockwise, then indicates “OK” or “NO”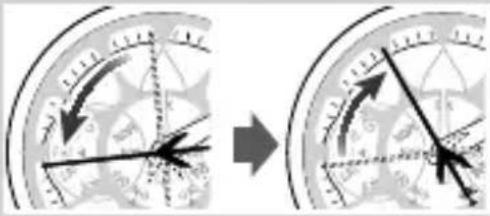 | The charge of the watch is low.Charge the watch.See pages 10 to 13. |
- “OK” and “NO” indicate the satellite time signal reception result. They have no relation to the charge level.
3. Press the lower right button Ⓐ briefly to finish the procedure.
The current time is indicated.
- The current time will be indicated automatically after 10 seconds even without pressing the button.

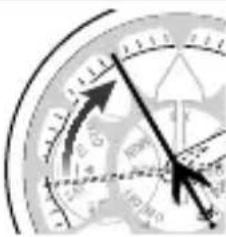
Using the world time function
Confirming the world time
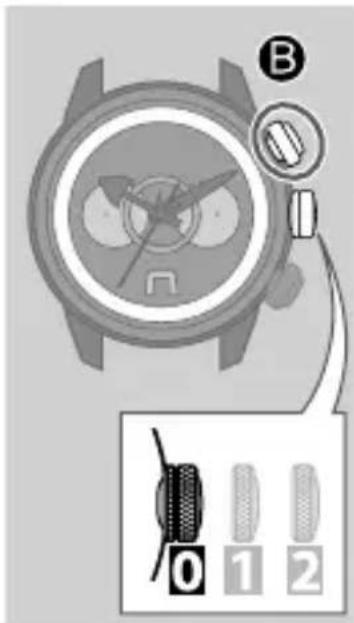
Check the current world time (city) setting.
- Ensure that the crown is in position 0
- Press the upper right button Ⓑ briefly.
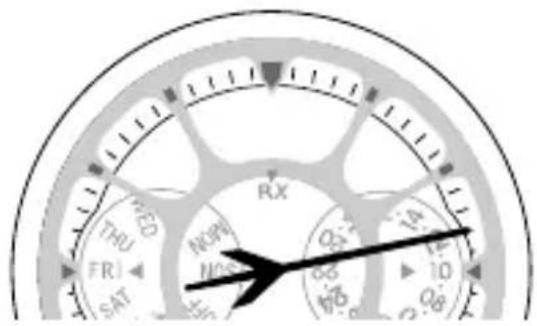
The second hand indicates the city currently selected.
When "New York" (49 seconds position) is selected
- Press the upper right button ①efly to finish the procedure.
- The current time is indicated automatically after 10 seconds even without pressing the button.
Setting the World Time
Select the city for which you want to indicate the time and date.
-
Pull the crown out to position
-
Rotate the crown to select the city for which you want to indicate the time and date.
-
For details of the selection of cities, see pages 18 to 20.
• Each time you select a city, the time and date of the city you have selected will be indicated. -
Push the crown in to position to finish the procedure.
After setting the World Time, check the displayed time—Summer Time or standard time. (See pages 21 to 23.)
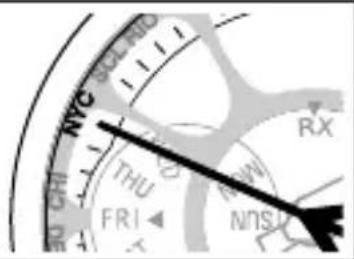
Table of selectable cities
- The indications in the table below are written differently on some models.
- When you use the watch in a place which is not shown in the table below, select the city in the same time zone as the city you want to indicate.
- The time difference in the table below is based on UTC.
- The standard time for each area or country may change according to their situation.
| City indication Second hand position Typical city Time difference | |||
| LON 0 London 0 | |||
| PAR2Paris +1 | |||
| ATH 4 Athens +2 | |||
| RUH 7 Riyadh +3 | |||
| DXB 9 Dubai | +4 | ||
| KHI | 11 | Karachi | +5 |
| DEL | 14 | Delhi | +5.5 |
| DAC | 16 | Dhaka | +6 |
Using the world time function
| City indication Second hand position Typical city Time difference | |||
| BKK 18 Bangkok +7 | |||
| BJS 21 Beijing +8 | |||
| TYO | 23 | Tokyo+9 | |
| ADL | 25 | Adelaide +9.5 | |
| SYD | 28 | Sydney +10 | |
| NOU | 30 | Noumea +11 | |
| AKL | 32 | Auckland +12 | |
| MDY 35 Midway Island -11 | |||
| HNL 37 Honolulu | -10 | ||

Continued on the next page

Using the world time function
| City indication Second hand position Typical city Time difference | |||
| ANC 39 Anchorage -9 | |||
| LAX 42 Los Angeles -8 | |||
| DEN 44 Denver -7 | |||
| CHI 46 Chicago -6 | |||
| NYC 49 New York -5 | |||
| SCL | 51 | Santiago -4 | |
| RIO | 53 | Rio de Janeiro | -3 |
| FEN | 56 | Fernando de Noronha | -2 |
| PDL | 58 | Azores (Ponta Delgada) | -1 |
Switching Summer Time and standard time
Summer Time is a system adopted in some countries/areas to gain an extra hour of daylight during summer by advancing clocks by one hour.
This watch can display summer time or standard time according to the city selected for world time.
- Summer time information is not contained in the satellite time signal. Adjust the setting manually for the appropriate period.
- The summer time rules may change depending on the country or area.
Switching Summer Time and standard time
Checking the type of time shown

Check whether the watch shows Summer Time or standard time.
-
Ensure that the crown is in position 0
-
Press the upper right button Ⓑ briefly.
The function indication will indicate the type of time currently shown.
ON: Summer time is shown.
OFF: Standard time is shown.
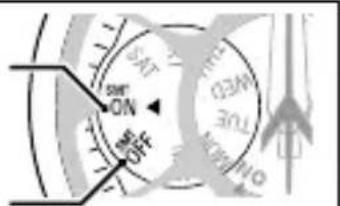
- Press the upper right button ☑efly to finish the procedure.
- The current time is indicated automatically after 10 seconds even without pressing the button.
Changing the type of time shown
- Pull the crown out to position 1
- Press the lower right button Ⓐ to change the type of time shown.
To show Summer Time:
Select "ON."
The hour hand moves forward by 1 hour.
To show the standard time:
Select "OFF."
The hour hand moves backward by 1 hour.
- Push the crown in to position to finish the procedure.
Before receiving the satellite time signal
This watch receives the clock time information sent by satellite.
This watch only receives time information. Location information cannot be acquired.
Receiving the satellite time signal
The satellite time signal can be received using the following three methods. You can also check whether the last attempt to receive the time signal was successful or not. (See page 32.)
| Reception type Method | Time taken | |
| Manual reception 1 | Normal reception (see page 28) | Approx. 6 to 26 seconds※ |
| Manual reception 2 | When the leap second has been updatedWhen all reset has been performed (see page 30) | Approx. 35 seconds to 13 minutes |
| Circumstantial reception | Automatic reception (see page34) | |
Before receiving the satellite time signal
- These reception methods can only be performed when the crown is in position 0.
※ When all reset has been performed or you have manually adjusted the calendar, reception may take up to 80 seconds.
Cautions regarding receiving the satellite time signal
Do not perform satellite time signal reception while operating a vehicle as doing so is extremely dangerous.
- If the second hand is moving once every two seconds (insufficient charge warning function), you cannot perform satellite time signal reception. Charge the watch sufficiently before attempting time signal reception.
-
Even when this watch receives the time signal successfully, the accuracy of the displayed time will be dependent on the reception environment and internal processing.
-
Even if the watch is not able to receive the satellite time signal, it will operate normally within an accuracy range of ± 15 seconds per month.
- The automatic correction feature of this watch is supported until 28/2/2100.
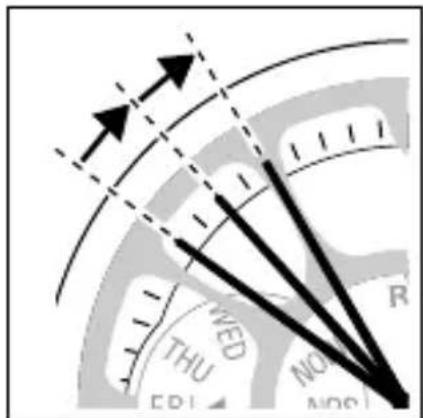
When receiving the satellite time signal
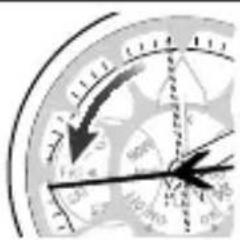
As shown in the picture below, make sure you are in an area with few surrounding trees, buildings, or other objects with may obstruct the satellite time signal. Face the dial towards the sky and perform time signal reception.
- Ideally, the sky directly above you should be clear (approx. 80^ as shown on the right) when attempting to receive the satellite time signal.
- If you will perform time signal reception with the watch on your wrist, keep it as far away from your body as possible.
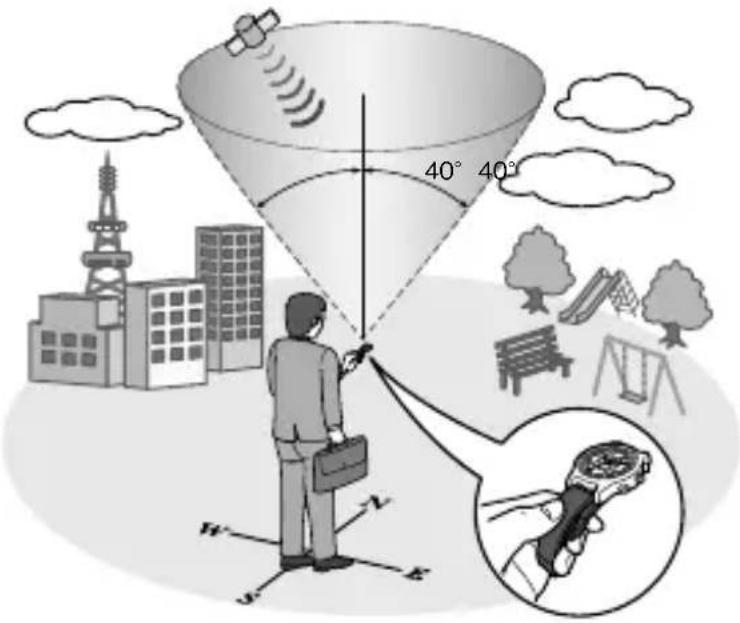
- If the time signal is difficult to receive...
- Remove the watch from your wrist and attempt reception again.
- Adjust the orientation of or lean the watch while keeping the dial facing towards the sky.
Poor reception areas
It may be difficult to receive the satellite time signal under certain environmental conditions or in certain areas.
Areas with obstructions above the watch
- Indoors or underground
- Areas surrounded by tall buildings or trees
- When the weather is cloudy or rainy, or during a thunderstorm
Nearby objects which emit magnetism or noise
- High-voltage electric cables, railway lines /overhead cables, airports, and transmission facilities.
• Electrical appliances and OA equipment - Mobile telephones in the process of calling/transmitting
- Mobile telephone base stations
Receiving the satellite time signal
Manual reception 1
Use this method for normal reception.
- Ensure that the crown is in position 0
- Press and hold the lower right button for two or more seconds.
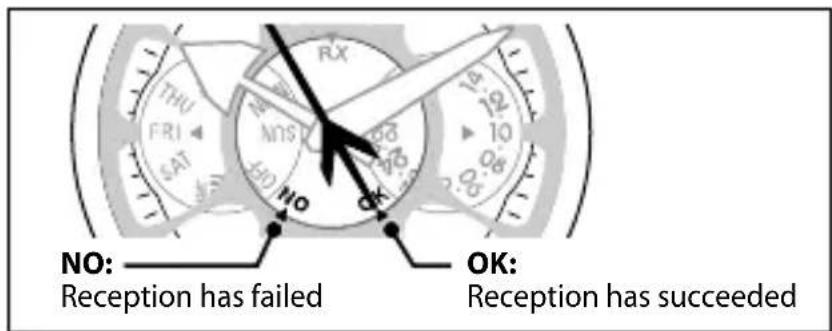
After indicating the previous reception result, the tail of the second hand moves to "RX" and the watch starts receiving.
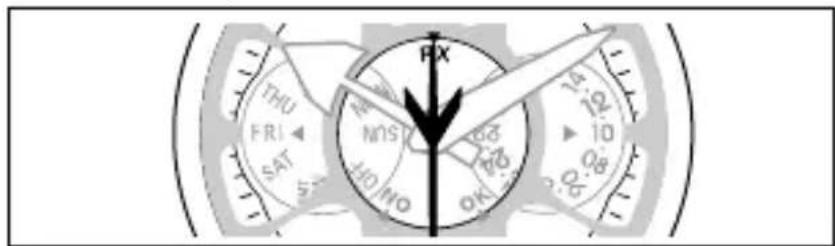
- It takes from 6 to 26 seconds to finish the satellite time signal reception. (When full reset has been performed or you have manually adjusted the
calendar, reception may take up to 80 seconds.) The second hand will move normally once reception is finished and the reception result has been displayed for 2 seconds.
| Successful signal reception Failed signal reception | |||
| Reception result (OK) | Reception result (NO) | ||
 | The time will be updated and the watch will resume normal operation. | 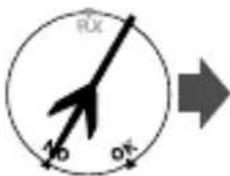 | Normal operation resumes with the previously set time. |
To cancel the reception
Press and hold the lower right button Ⓐ for two or more seconds.
The reception is canceled and the current time will be indicated.
- If the time is not correct even after performing signal reception, it is possible that the leap second has been updated. Perform manual reception 2. (See page 30.)
- Summer time information is not contained in the satellite time signal. Adjust the setting manually. (See page 23.)
Manual reception 2
Use this method when the leap second has been updated or when all reset has been performed.

- Ensure that the crown is in position ☐
- Press and hold the lower right button Ⓐ for 7 or more seconds.
- After indicating the previous reception result, the tail of the second hand moves to "RX." Continue holding the button until the second hand rotates around once more and indicates "RX."

- It takes from 35 seconds to 13 minutes to complete the satellite time signal reception.
The second hand will move normally once reception is finish and the reception result has been displayed for 2 seconds.
| Successful signal reception Failed signal reception | |||
| Reception result (OK) | Reception result (NO) | ||
 | The time will be updated and the watch will resume normal operation. | 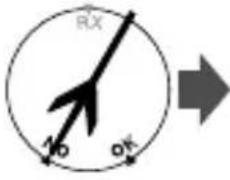 | Normal operation resumes with the previously set time. |
To cancel the reception
Press and hold the lower right button Ⓐ for two or more seconds.
The reception is canceled and the current time will be indicated.
Summer time information is not contained in the satellite time signal. Adjust the setting manually. (See page 23.)
Checking the satellite time signal reception
You can check the previous result of satellite time signal reception (Manual 1/ Manual 2/Circumstantial reception).
- Ensure that the crown is in position 0
- Press the lower right button Ⓐ briefly.
The tail of the second hand indicates the reception result.
- Even if reception has succeeded, “NO” will be indicated if more than 24 hours have passed since time signal reception was last performed.
3. Press the lower right button Ⓐ briefly to finish the procedure.
The current time is indicated.
- The current time will be indicated automatically after 10 seconds even without pressing the button.
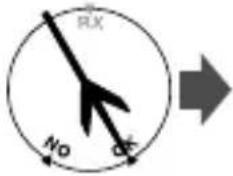
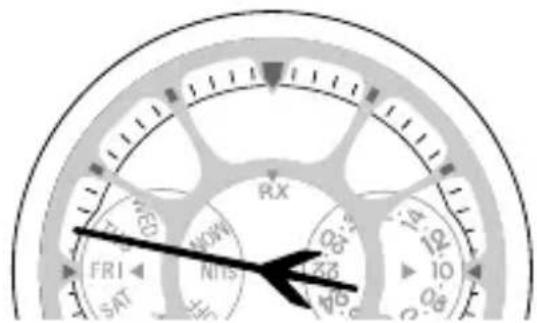
If the second hand rotates
counterclockwise before indicating the reception result, the charge of the watch is low.
Normal operation is possible. However, it is recommended that you charge the watch by exposing the dial to direct sunlight.
Rotates counterclockwise...

natural_image
Close-up of a clock face showing time, hour, minute, and second hands (no readable text or numbers)Then indicates the reception result

About circumstantial reception
If the satellite time signal has not been received for an extended period of time, this watch is equipped with a function which enables it to automatically receive the time signal (circumstantial reception).
When the following four conditions are met, the watch will start automatic reception.
- The watch is sufficiently charged and operating normally.
- The displayed time is between 6 a.m. and 6 p.m.
- The satellite time signal has not been received for more than 72 hours.
-
The watch is outside, or sunlight has been shining on the dial continuously.
-
When compared to manual reception, circumstantial reception is more greatly affected by positional and environmental conditions. Thus, the reception is far more likely to fail. To adjust the time by receiving the time signal, perform manual reception in an environment such as that described in “When receiving the satellite time signal” on page 26.
- While circumstantial reception is in progress, the watch will operate normally and the second hand will not indicate RX.
Checking and adjusting the leap second
This watch displays the time information by setting the leap second and time difference (manual adjustment) to the International Atomic Time information received from the satellite.
- The factory default leap second setting is “-34 seconds” (As of 1/6/2011).
- When the leap second information is received through performing manual reception 2 (see page 30), the leap second is automatically adjusted.
- The leap second can also be adjusted manually.
You can find a list of leap seconds at the homepage of IERS (INTERNATIONAL EARTH ROTATION & REFERENCE SYSTEMS SERVICE). http://hpiers.obspm.fr/eop-pc/earthor/utc/TAI-UTC_tab.html
Checking and adjusting the leap second
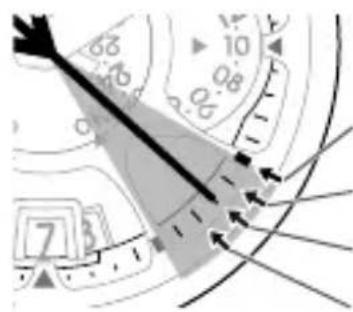
- Pull the crown out to position

- Press the upper right button

Using the "0:00:00" position as the starting point, the minute hand and second hand will indicate the leap second setting after a few seconds.
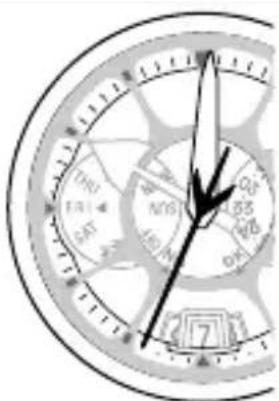
When 0 minutes and 34 seconds is indicated: The leap second setting is “-34 seconds.”
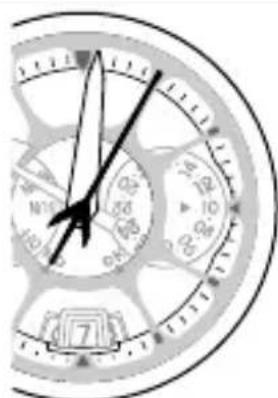
natural_image
Close-up of a analog clock face showing time, hour, minute, and second hands (no text or numbers visible)When 1 minute and 5 seconds is indicated: The leap second setting is "-65 seconds."
- Rotate the crown to adjust the leap second.
- The leap second can be adjusted in the range of 0 to -90 seconds.
- Push the crown in to position 0 to finish the procedure.
The factory default leap second setting is “-34 seconds” (As of 1/6/2011).
Checking and adjusting the rollover number
In order for this watch to correctly process the week information* received from the satellite, a rollover number for each time period is set. The rollover numbers will be updated automatically.
If the rollover number setting is incorrect, the time and date may not be displayed accurately.
Refer to the table on the right to check the rollover number. Adjust the setting if it is incorrect.
* Called the “Week number.” Weeks are represented with a number from 0 to 1023 (approx. 20 years).
Checking and adjusting the rollover number
| Time period (Coordinated Universal Time, GMT) Rollover number | |
| 22/8/1999 (Sun) 00:00 – 6/4/2019 (Sat) 23:59 | 0 |
| 7/4/2019 (Sun) 00:00 – 20/11/2038 (Sat) 23:59 | 1 |
| 21/11/2038 (Sun) 00:00 – 6/7/2058 (Sat) 23:59 | 2 |
| 7/7/2058 (Sun) 00:00 – 19/2/2078 (Sat) 23:59 | 3 |
| 20/2/2078 (Sun) 00:00 – 5/10/2097 (Sat) 23:59 | 4 |
| 6/10/2097 (Sun) 00:00 – 22/5/2117 (Sat) 23:59 | 5 |

Checking and adjusting the rollover number

- Pull the crown out to position
- Press the upper right button ◦lefly.

The minute hand and second hand will indicate the current leap second setting.
- Press and hold the upper right button five or more seconds.

The second hand will indicate the current rollover number setting.
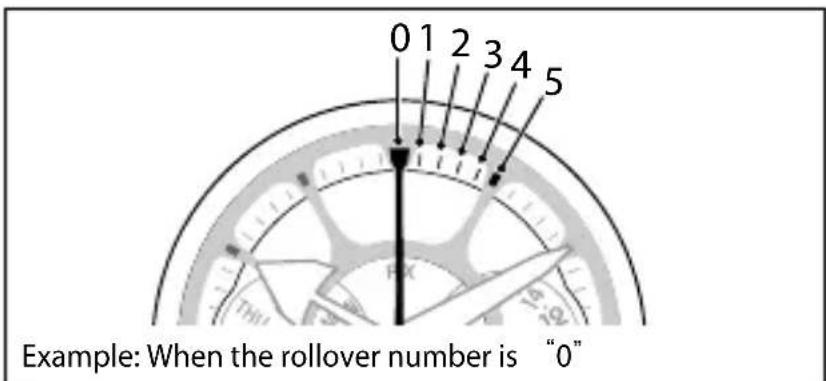
- When the setting is correct: Proceed to step 5.
- When the setting is incorrect: Proceed to step 4.
4. Rotate the crown to adjust the rollover number.
- The rollover number can be adjusted in the range of 0 - 5. See the table on page 39 for appropriate rollover number.
5. Push the crown in to position ① to finish the procedure.
Adjusting the time/calendar manually
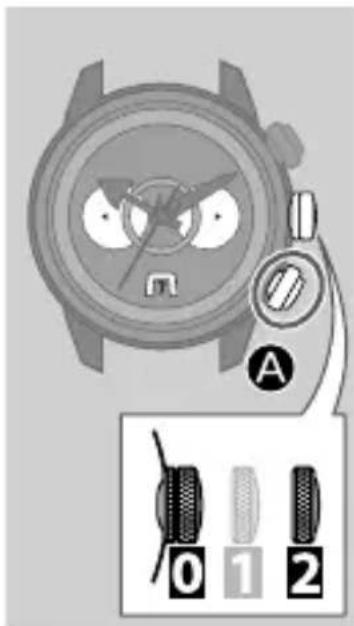
- Pull the crown out to position

- Press the lower right button

The second hand moves to the 0 second position.
- Rotate the crown to adjust the minute.
- If you spin the crown quickly a few times, the hands will move continuously. To stop them, rotate the crown in either direction.
-
Press the lower right button briefly.
-
Rotate the crown to adjust the hour.
-
The hour hand and the 24-hour indication move together.
- If you spin the crown quickly a few times, the hour hand and 24-hour indication will move continuously. To stop them, rotate the crown in either direction.
6. Press the lower right button briefly.
7. Rotate the crown to adjust the date.
- The date indication and function indication (day of the week) move together.
- If you spin the crown quickly a few times, the date indication and the function indication will move continuously. To stop them, rotate the crown in either direction.
8. Press the lower right button briefly.
9. Rotate the crown to adjust the month and year.
- The month and year are indicated by the second hand. See pages 44 and 45 for how to read the month and year.
10. Press the lower right button briefly.
11. Rotate the crown to adjust the day of the week.
12. Press the lower right button briefly.
The second hand moves to the 0 second position and the minute hand moves to the position adjusted in step 3.
13. Push the crown in to position ⏻ in accordance with the time signal to finish the procedure.
Adjusting the time/calendar manually
Month and year indications
The month and year are indicated by the second hand when you adjust the time and calendar manually. The date is corrected automatically at the end of each month if the number of years passed since the last leap year and month are set correctly.
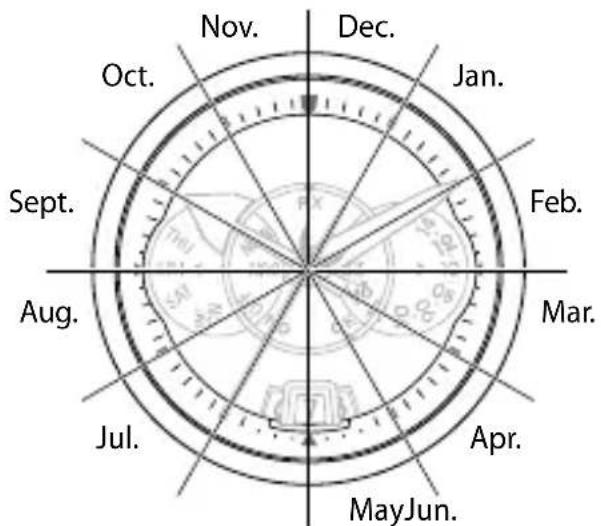
The position of the second hand shows the month.
Leap year
1st year since leap year
2nd year since leap year
3rd year since leap year
e.g.
When it is April in the second year since the last leap year.
Each minute mark denotes the number of years since the last leap year.
Adjusting the time/calendar manually
The figure shows February in the 3rd year since the last leap year.
The figure shows September in the 2nd year since the last leap year.
Quick reference chart for the number of years passed since the last leap year
| Indication of the second hand Passed year Year | |
| Hour marker Leap year 2012, 2016, 2020 | |
| 1st min. marker 1st year 2013, 2017, 2021 | |
| 2nd min. marker 2nd year 2014, 2018, 2022 | |
| 3rd min. marker 3rd year 2011, 2015, 2019 |
If the time or date is not shown correctly even after proper reception of the time signal, check whether the reference position is correct or not.
What is the reference position?
The base position for all indications to indicate the time and date.
• Hour hand: 12 o'clock
• Minute hand: 0 minute
• Second hand: 0 second
• 24-hour indication: 24 o'clock
- Date indication: Between "31" and "1"
• Day of the week: SUN (Sunday)
If any of the indications are off from the correct reference position, the watch will not indicate the time and date correctly even if the satellite time signal has been received successfully.
Correct reference position
Checking and correcting the current reference position

1. Ensure that the crown is in position 0
2. Press and hold the upper right button for seven or more seconds.
After indicating the World Time setting and the type of time shown (summer time/standard time), all indications move to the current reference position.
- No operations are available while the indications are moving.
- If no operations are performed for 2 minutes, the current time will be indicated.
| Reference position | Next operation |
| Correct | Press the upper right button B to finish the procedure.(You do not need to correct the reference position.) |
| Incorrect Correct the | reference position.(Proceed to step 3 on page 48.) |
Continued on the next page
Checking and correcting the current reference position
3. Pull the crown out to position

The function indication and date indication move slightly.
4. Rotate the crown to adjust the date and day of the week to the correct reference position.
- If you spin the crown quickly a few times, the date indication and the function indication will move continuously. To stop them, rotate the crown in either direction.
5. Press the lower right button

The hour hand and 24-hour indication move slightly.
6. Rotate the crown to adjust the hour hand and 24-hour indication to the correct reference position.
- If you spin the crown quickly a few times, the hour hand and the 24-hour indication will move continuously. To stop them, rotate the crown in
either direction.
7. Press the lower right button briefly.
The minute hand and second hand move slightly.
8. Rotate the crown to adjust the minute hand and second hand to the correct reference position.
- If you spin the crown quickly a few times, the hands will move continuously. To stop them, rotate the crown in either direction.
9. Push the crown in to position 0
Correction of the reference position is finished.
10. Press the upper right button Ⓑ to indicate the current time.
- Even without pressing the button, the current time will be indicated if no operation is performed for about 2 minutes.
Troubleshooting
If you have a problem with your watch, check the table below.
Symptoms Remedies Page
Problems with time signal reception.
| Reception is unsuccessful. | Push the crown in to position0. | - |
| Avoiding places where the satellite signal may be obstructed and objects which emit noise, face the dial towards the sky and start reception. | 26 and 27 | |
| Adjust the orientation of or lean the watch while keeping the dial facing towards the sky and start reception. | 26 and 27 | |
| Remove the watch from your wrist and try again. | - | |
| It may sometimes be difficult to receive the signal due to the influence of mobile telephone base stations or transmission facilities. Move away from any base stations and transmission facilities. | - | |
| When the second hand moves once every two seconds, the watch cannot receive the time signal. Charge the watch. | 10 to 13 |
Symptoms Remedies Page
| Reception is unsuccessful. (continued) | Since it may be difficult to meet all of the reception conditions required for circumstantial reception, perform manual reception. | 28 to 31 |
| If the remedies above do not solve the problems, consult your nearest Authorized Citizen Service Center. | - | |
| The correct time and date are not indicated after successful reception. | Check the World Time setting. | 16 to 20 |
| If the time is not indicated correctly after performing manual reception 1, perform manual reception 2. | 30 and 31 | |
| Check and correct the current reference position. | 46 to 49 | |
| Check the displayed time—Summer Time or the standard time—and change it if necessary. | 21 to 23 | |
| Check and correct the leap second and rollover number settings. | 35 to 37, 38 to 41 |
Troubleshooting
Symptoms Remedies Page
The hands do not work properly.
| The second hand rotates counterclockwise when you check the reception result. | Charge the watch. | 10 to 13 |
| The second hand moves once every two seconds. | Charge the watch. | 10 to 13 |
| All hands stop moving. | Push the crown in to position | - |
| Charge the watch by exposing it to direct sunlight until the second hand moves normally. | 10 to 13 | |
| If the remedies above do not solve the problems, consult your nearest Authorized Citizen Service Center. | - |
Symptoms Remedies Page
The time and/or date is incorrect.
| The time and/or date is incorrect. | Check the World Time setting. | 16 to 20 |
| Check and correct the current reference position. | 46 to 49 | |
| Receive the satellite time signal manually to adjust the time and date. | 28 to 31 | |
| Set the time and date manually. | 42 to 45 | |
| The time is incorrect even though the Wold Time setting is correct and the satellite signal reception was successful. | Check the displayed time—Summer Time or the standard time—and change it if necessary. | 21 to 23 |
| Check and correct the current reference position. | 46 to 49 |
Troubleshooting
Symptoms Remedies Page
Charge
| The watch does not work even though it is charged. | If the surrounding temperature falls below 0°C/32°F or exceeds 40°C/104°F, the “Charge suspension temperature detection function” will activate and charging will not be possible. | - |
| If the “Over discharge detection function” is activated, charging is not possible. If the watch does not work after exposing the dial to direct sunlight for more than one day, it is possible that the rechargeable cell has over discharged. Send the watch to your nearest Authorized Citizen Service Center. | 13 | |
| The watch stops immediately after it is charged. | Charge the watch for 2 to 3 days under direct sunlight. If the second hand starts moving once every two seconds the watch is being charged correctly. Continue charging even when the second hand starts moving normally. If there are no other defects, please contact the shop where you purchased the watch. | 10 to 13 |
Resetting the watch—All Reset
The watch may not work properly if it is affected by strong shock or static electricity; the hands do not stop or the watch does not work though the watch is charged. In this case, perform All Reset.
Caution
- Be sure to charge the watch for as long as possible before performing All Reset. (See pages 10 to 13.)
- After performing All Reset, the settings change as follows. You must correct the current reference position, then World Time setting and time before using the watch.
• Calendar: January (leap year)
- City: London
- Summer time: "OFF" for all cities
(The leap second and rollover number settings will remain even when all reset is performed.)
Troubleshooting
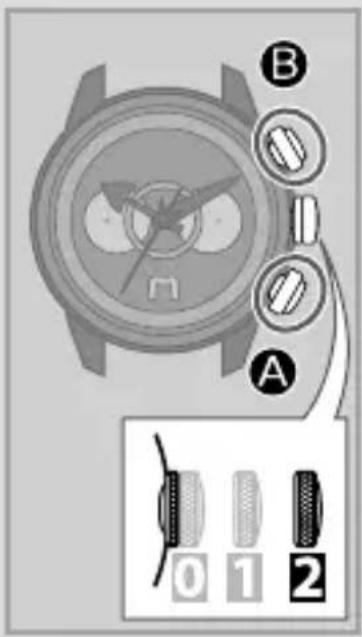
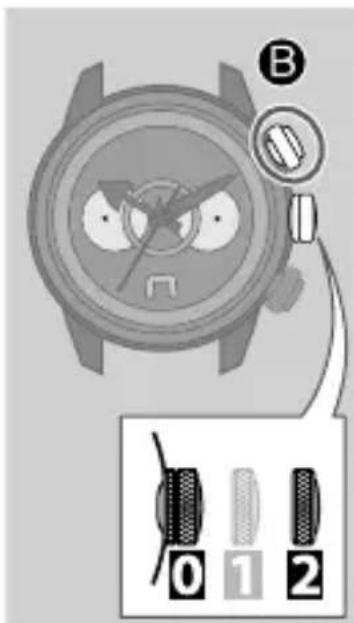
- Pull the crown out to position 2.
- Press the right buttons And at the same time for three or more seconds, then release.
The second hand moves to the “0” second position, the hour hand and date indication move slightly, and the watch is reset.
After performing All Reset
You must set the watch again following the procedure below.
1. Correct the current reference position.
After performing All Reset, the watch is in reference position correction mode. See from step 4 on page 48.
2. Set the World Time.
See pages 16 to 20.
3. Adjust the time/calendar.
- For adjustment through receiving the satellite time signal:
→ See pages 28 to 31. - For manual adjustment:
→ See pages 42 to 45.
Eco-Drive (solar powered) Watch Handling Precautions
- Please note that if you wear long sleeves, the watch may stop as a result of being covered by your sleeve and blocked from the light.
- When you take off the watch, try to place it in as bright a location as possible. This will ensure that it will continue to run properly.
Eco-Drive (solar powered) Watch Handling Precautions

CAUTION Recharging Precautions
- Do not charge your watch at high temperatures (60°C/140°F) as this may cause damage to sensitive components and the watch to malfunction.
Examples:
- Charging the watch too close to a light source which generates a large amount of heat such as an incandescent lamp or halogen lamp.
* When charging your watch under an incandescent lamp, be sure to leave 50 cm (19-11/16 inches) distance between the lamp and the watch to avoid excessive heat. Never use a halogen lamp for recharging as these generate excessive heat.
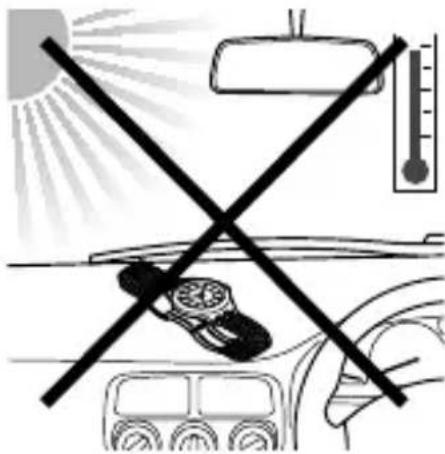
- Charging the watch in a location where the temperature may become extremely high such as on the dashboard of a vehicle.
If the surrounding temperature falls below 0^ C/ 32^ F or exceeds 40^ C/ 104^ F, the “Charge suspension temperature detection function” will activate and charging will not be possible.
Eco-Drive (solar powered) Watch Handling Precautions
- Your watch features a cell that does not need regular replacement.
However, after an extended period of time, power consumption may increase due to deterioration of lubrication in the movement. This may result in shorter than expected run time. Be sure to have your watch regularly inspected by an Authorized Service Center.
Note: Regular maintenance is not covered under the terms of the warranty.

WARNING Handling of Rechargeable Cell
- The rechargeable cell should never be removed from the watch.
If for any reason it becomes necessary to remove the rechargeable cell from the watch, keep out of the reach of children to prevent accidental swallowing.
If the rechargeable cell is accidentally swallowed, consult a doctor immediately.
- Do not dispose of the rechargeable cell with ordinary garbage. Please follow the instructions of your municipality regarding collection of batteries to prevent the risk of fire or environmental contamination.

WARNING Use Only the Specified Rechargeable Cell
- Never install a conventional battery in your watch. Only use the specified rechargeable cell. Your watch is designed to operate only with the original type of rechargeable cell. It is not designed to run or be used with a conventional type of battery. Installing such a battery may result in overcharging which may cause the battery to burst. This can cause damage to the watch and injury to the wearer. If for any reason the rechargeable cell needs replacement, be sure to use only the original type rechargeable cell. We recommend contacting your nearest Authorized Service Center for this service.

Water resistance

WARNING Water Resistance
- Refer to the watch dial and the case back for the indication of the water resistance of your watch. The following chart provides examples of use for reference to ensure that your watch is used properly.
(The unit "1bar" is roughly equal to 1 atmosphere.)
- WATER RESIST(ANT) × × bar may also be indicated as W.R. × × bar.
| Name | Indication | Specification |
| Dial or Case back | ||
| Non-water resistant Non-water resistant | water resistant | |
| Everyday-use water resistant watch | WATER RESIST(ANT) | Water-resistant to 3 atmospheres |
| Upgraded everyday use water-resistant watch | WATER RESIST(ANT)5 bar | Water-resistant to 5 atmospheres |
| WATER RESIST(ANT)10/20 bar | Water-resistant to 10 or 20 atmospheres |
| Water-related use | |||||
 |  |  |  |  | |
| Minor exposure to water (washing face, rain, etc.) | Swimming and general washing work | Skin diving, marine sports | Scuba diving using an air tank | Operate the crown or button when the watch is wet | |
| NO NO NO NO NO | |||||
| OK NO NO NO NO | |||||
| OK OK NO NO NO | |||||
| OK OK OK NO NO | |||||
Water resistance
- Non-water resistant watches cannot be used underwater or in environments in contact with water.
- Water-resistance for daily use (to 3 atmospheres) means that the watch may be worn while washing your face or in the rain, but is not to be immersed in water.
- Upgraded water-resistance for daily use (to 5 atmospheres) means that the watch may be worn while swimming, but is not to worn while skin diving.
- Upgraded water-resistance for daily use (to 10/20 atmospheres) means that the watch may be worn while skin diving, but not while scuba or saturated diving using helium gas.
- For a metallic, plastic or rubber watchband, wash any dirt off with water. Remove the small amounts of dirt trapped between the crevices of the metallic band with a soft brush. If your watch is not water resistant, be sure not to get the case of the watch wet.
Precautions and usage limitations

CAUTION To Avoid Injury
- Be particularly careful when wearing your watch while holding a small child, to avoid injury.
- Be particularly careful when engaged in strenuous exercise or work, to avoid injury to yourself and others.
- DO NOT wear your watch while in a sauna, jacuzzi or other location where it may become excessively hot. This may result in burns to the wearer and/or malfunction of your watch.
- Be careful when putting on or taking off your watch since there is a risk of pinching your skin or damaging your fingernails depending on the manner in which the band is fastened.

CAUTION Precautions
- Do not adjust the length of the band by yourself. If you fail to perform the work properly, the watch may fall off, or an injury may occur during adjustment. Consult the shop where you purchased the watch or your nearest Authorized Citizen Service center.
If you purchase a product which is sold with a special tool for band adjustment, you may carefully adjust the band yourself.
- Always wear your watch with the crown pushed in to the normal position. If your crown is a screw down type, be sure it is properly screwed down (locked) to the case.
- Do not operate the crown or any buttons when the watch is wet. This may allow the entrance of moisture and cause damage to sensitive components.
- If water enters the watch or the watch fogs up and does not clear up even after a long time, consult Authorized Service Center for inspection and/or repair.
- If a watch of upgraded water resistance for daily use is immersed in sea water or subjected to excessive perspiration, thoroughly rinse with fresh water and wipe completely dry with a soft cloth.
- If seawater enters the watch, place the watch in a box or plastic bag and immediately take it in for repair. Otherwise, pressure inside the watch will increase, and parts (crystal, crown, push button, etc.) may come off.
- A rubber type strap may become stained by dyes or soils found in clothing and other accessories. Since these stains may become permanent, take caution when wearing your watch with items that may transfer color (articles of clothing, purses, dyed bracelets, etc.).
- Solvents, moisture and perspiration may cause the strap to deteriorate. Be sure to replace a strap that has become dried, brittle, or cracked to prevent loss due to strap failure.
- The watch may stop or the function of the watch may be impaired in extremely high or low temperature. Do not use the watch in places where the temperature is outside the operating temperature range as stated in the specifications.
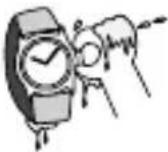
- The integrated circuits (IC) used in quartz watches are sensitive to static electricity. Please note that the watch may malfunction if exposed to intense static electricity.
- Analog type quartz watches are powered by a motor that utilizes a small magnet. The operation of this motor can be disturbed if the watch is subjected to magnetic items resulting in the malfunction of the watch. Do not allow the watch to come into close proximity to magnetic items such as “health” bracelets or necklaces, coin trays, latches found in cabinets and refrigerators, certain clasps of handbags and cell phone pouches, cell phone speakers, certain sporting accessories, MRI equipment, etc.
Precautions and usage limitations
- Avoid dropping the watch or subjecting it to other strong impact. It may cause malfunctions and/or performance deterioration as well as damage to the case and bracelet.
- If paint thinner, benzene or other solvents or products containing these solvents (including gasoline, nail-polish remover, cresol, bathroom cleaners and adhesives, water repellent, etc.) are allowed to come in contact with the watch, they may cause discoloration, deterioration and damage materials of the watch. Be careful when handling these chemicals. Contact with mercury such as that used in thermometers may also cause discoloration of the band and case.

CAUTION Always Keep Your Watch Clean
- Rotate the crown while it is pressed in fully and press the buttons periodically so they do not become stuck due to accumulations of foreign matter.
Note: Do not operate the crown or any buttons when the watch is wet.
- The case and band of the watch come into direct contact with the skin in the same manner as undergarments. Corrosion of the metal or unnoticed soiling such as that caused by perspiration and dirt can soil sleeves and other portions of clothing. Keep your watch clean at all times.
Precautions and usage limitations
- The case and band of the watch come in to direct contact with the skin. This may result in unnoticed accumulations of dirt and foreign matter caused by normal wear. Accumulated matter may cause rust, discoloration, and premature wear. Be sure to regularly clean your watch with a soft cloth. If severe accumulations occur, you may need to have your case and/or bracelet professionally cleaned.
- In some instances, accumulations of dirt and foreign matter may cause skin reactions. This may also occur due to certain allergies beyond our control. If this occurs, immediately discontinue use of your watch and consult your physician.
- Leather, cloth, and other natural skin straps may become discolored or brittle from moisture, perspiration and/or accumulated dirt. To maximize the life of your strap, be sure to keep your leather band clean and dry by wiping it with a soft cloth each day.

CAUTION Caring for Your Watch
- Wipe any dirt or moisture such as perspiration from the case and crystal with a soft cloth.
- If you will not be using your watch for an extended period of time, carefully wipe off any perspiration, dirt or moisture and store in a proper location, avoiding locations subject to excessively high or low temperatures and high humidity.
Maintenance
Daily maintenance
- Rotate the crown while it is pressed in fully and press the buttons periodically so they do not become stuck due to accumulations of foreign matter.
- Wipe off dirt, perspiration, and water from the case and glass with a clean soft cloth occasionally.
- To clean a metal, plastic, or rubber watchband, wash away dirt with water. Use a soft brush to remove dust and dirt stuck in the gaps in a metal band.
- Do not use a polishing type of cloth as this may damage the surface and certain treatments.
- Do not use solvents (thinner, benzine, etc.), as they may damage the finish.
Periodical inspections
Your watch needs an inspection once every two or three years for safety and longer usage. To keep your watch water-resistant, the gaskets and other components need to be replaced regularly. Other parts need to be inspected and replaced if necessary. Always ask for genuine Citizen parts upon replacement.
Information
About the satellite time signal
The satellite wave watch has no adverse effects on the human body or medical equipment.
About the Watch with Luminous Paint
Your watch may feature luminous treatment to the dial and hands to aid you in reading the watch in dimly lit environments. This luminous treatment stores light from both natural and artificial sources. It is free from any radioactive substance or any other material that may be harmful to the environment or human body.
- The light emission of the luminous material gradually decreases as time passes.
- The duration and amount of light emitted will vary depending on the brightness, type of and distance from the light source, exposure time and amount/size of luminous treatment.
- When not exposed to a light source, light emission from the luminous treatment will start off bright and gradually diminish over a period of hours. The duration of visible light emission will vary with type of and duration of light exposure as well as size of luminous features of your watch.
Specifications
| Model | H990 | Type | Analog solar-powered watch |
| Timekeeping accuracy (without the time signal reception) | Within ±15 seconds per month when worn at normal operation temperatures (between +5°C and +35°C) | ||
| Operating temperature range | -10°C to +60°C | ||
| Charging temperature range | 0°C to +40°C | ||
| Display functions | • Time: Hours, minutes, seconds, 24-hour• Calendar: Date, day of the week | ||
| Maximum run time from full charge | • Fully charged to fully discharged: Approximately 2.5 years (When receiving the satellite time signal once every two days)• Power reserve upon insufficient charge warning function: 10 days | ||
| Battery | Rechargeable cell (lithium button cell), 1pc. | ||
| Additional functions | Solar power functionPower reserve indication (The charge level is not displayed)Charge suspension temperature detection functionOvercharging prevention functionOver discharge detection functionInsufficient charge warning function (two-second interval movement)Satellite time signal reception function (manual reception 1/manual reception 2/circumstantial reception)Confirming reception status (RX)Indicating the result of the last reception (OK/NO)Summer Time (ON/OFF)City setting (26 cities)Perpetual calendar (until February 28th, 2100)Antimagnetic performance/Impact detection function/Automatic hand correction function | ||
Specifications are subject to change without prior notice.
CE
This product follows the provisions of EMC(2004/108/EC) amended by the Directive 93/68/EEC
EMC EN61000-6-1:2007
EN61000-6-3:2007
Model No.CC000 *
Cal.H990
CTZ-B8154