
VR601 - Freezer INVENTUM - Free user manual and instructions
Find the device manual for free VR601 INVENTUM in PDF.


| Product Type | Freezer |
| Brand | Inventum |
| Model | VR601 |
| Dimensions (H x W x D) | Approx. 85 x 60 x 65 cm |
| Weight | Approx. 35 kg |
| Power Supply | 220-240 V, 50 Hz |
| Energy Efficiency Class | E (typical) |
| Annual Energy Consumption | Approx. 220 kWh |
| Net Capacity | Approx. 100 L |
| Freezing Capacity | Up to 10 kg/24h |
| Defrost Type | Manual defrost |
| Noise Level | Approx. 42 dB |
| Climate Class | N-ST (16-38°C) |
| Fast Freeze Function | Yes |
| Door Alarm | No (typical for basic model) |
| Interior Light | No |
| Storage Drawers | 3 drawers |
| Reversible Door | Yes |
| Adjustable Feet | Yes |
| Refrigerant | R600a (isobutane) |
| Cleaning and Maintenance | Defrost regularly; clean interior with mild detergent; keep ventilation grilles dust-free. |
| Safety | Do not store flammable substances; ensure proper ventilation; disconnect before cleaning. |
| Spare Parts and Repairability | Parts available from manufacturer; repair by qualified technician recommended. |
Frequently Asked Questions - VR601 INVENTUM
User questions about VR601 INVENTUM
0 question about this device. Answer the ones you know or ask your own.
Ask a new question about this device
Download the instructions for your Freezer in PDF format for free! Find your manual VR601 - INVENTUM and take your electronic device back in hand. On this page are published all the documents necessary for the use of your device. VR601 by INVENTUM.
USER MANUAL VR601 INVENTUM
natural_image
Front view of a white stainless steel refrigerator with open door, showing food compartments including vegetables and ingredients (no text or symbols visible)NEDERLANDS

Legislation requires that all electrical and electronic equipment must be collected for reuse and recycling. Electrical and electronic equipment marked with the symbol indicating separate collection of such equipment must be returned to a municipal waste collection point.
Description of the appliance page 11
- Safety instructions
page 11
- Before first use
page 12
- Using the freezer
page 12
- Tips
page 13
- Defrosting
page 13
- Cleaning & maintenance
page 13
- Troubleshooting
page 13
-
Reversing the door opening page 14
-
Removing the top panel page 15
Technical specifications
page 16
Guarantee & after sales Service
page 17
NEDERLANDS

Stand MIN = minimale koeling, warm
Stand MAX = maximale koeling, koud
natural_image
Line drawing of a rectangular electronic device with a handle and button, no text or symbols presentnatural_image
Technical line drawing of a mechanical frame or support structure (no text or symbols)natural_image
Technical line drawing of a mechanical assembly with a tool and support bracket (no text or symbols)natural_image
Line drawing of an open refrigerator with doors and side compartments (no text or symbols)natural_image
Line drawing of a cabinet interior with slatted doors and a screwdriver inserted (no text or symbols)natural_image
Technical line drawing of two mechanical components with bolts and nuts, no text or symbols presentnatural_image
Line drawing of a cabinet interior with a screwdriver inserted, showing no text or symbolsnatural_image
Technical line drawing of a mechanical component with a tool and dimension annotations (no readable text or symbols)natural_image
Line drawing of a 3D refrigerator interior showing open door, compartments, and ventilation slots (no text or labels)natural_image
Line drawing of a mechanical device with a handle and internal compartments (no text or symbols)natural_image
Line drawing of a rectangular electronic device with a handle and keyhole (no text or symbols)natural_image
Line drawing of a mechanical frame or support structure with no visible text or symbolsnatural_image
Technical line drawing of a mechanical device with internal compartments and a tool (no text or symbols)natural_image
Line drawing of a rectangular electronic device with mounting bracket and side arm (no text or symbols)-
Top panel
-
Thermostat
-
Handle
-
Adjustable feet
-
Freezer compartment (3 or 4 - depending on the model)
VR551 - 4 freezer compartments
1 | SAFETY INSTRUCTIONS
- Please read these instructions before operating the appliance and retain for future use.
- The appliance is intended solely for domestic use within the home. The appliance is suitable for freezing food. You can also freeze fresh food in the freezer.
- Before plugging into a socket, check that the voltage in your home corresponds with the voltage printed on the bottom of the appliance.
- Do not use single/multiple adapters or extension cables.
- Always carry out regular checks of the appliance and the power cord to ensure no damage is evident. Should there be any signs that the appliance or the power cord is damaged in the slightest degree, the entire appliance should be returned to the Customer Service Department. For your own safety, only use the accessories and spare parts from the manufacturer which are suitable for the appliance.
- The appliance must be handled and installed by two or more persons.
- Be careful not to damage the floor when you move the appliance.
- During installation, make sure the appliance does not damage the power cable.
- Check the appliance is not positioned near a heat source.
- Make sure that there is sufficient ventilation, leave a space of 10 cm around the appliance.
- Keep the vent outlets of the appliance free.
- Do not damage the refrigerant circuit pipes of the appliance.
• Install the appliance on a firm and stable surface.
• Install the appliance in a dry and well ventilated area. The appliance is intended for operation in environments where ambient temperatures fall within the following ranges, depending on the climatic class indicated on the
rating label at the back of the appliance. The appliance may not work properly if it is left for a long time at a temperature outside the specified range.
| Climatic class Ambient temperature |
| SN From 10°C to 32°C |
| N From 16°C to 32°C |
| ST From 18°C to 38°C |
| T From 18°C to 43°C |
- Do not store or use petrol, flammable liquids or gas in the vicinity of this or other electrical appliances. The fumes can create a fire hazard or explosion.
- Do not keep any bottles containing fluids which will freeze in the freezer. The freezing may cause the bottles to break.
- Do not use mechanical, electric or chemical means to speed up the defrost process.
- Do not allow children to play or hide inside the appliance - there is a risk of becoming trapped and suffocating.
- This appliance is not intended for installation by persons (including children) with reduced physical, sensory or mental capabilities, or lack of experience and knowledge, unless they have been given supervision or instruction concerning use of the appliance by a person responsible for their safety.
- It is hazardous for anyone other than a competent person to carry out any service or repairs that involve the removal of the housing.
- Only use and place the appliance indoors.
- Do not let the cord hang over the edge of the table or counter and keep it away from the heated surface.
- Before moving or cleaning the appliance, make sure it is switched of and unplugged.
- For your own safety, only use the accessories and spare parts from the manufacturer which are suitable for the appliance.
- Never unplug it from the socket by pulling on the cable. Always ensure that your hands are dry before handling the plug or power cord.
- Should you decide not to use the appliance anymore, make it inoperative by cutting the power cord after removing the plug from the socket. We also recommend making all potentially dangerous parts of the appliance harmless, particularly for children who might be tempted to play with it.
- Do not eat ice cubes or ice lollies immediately after taking them out of the freezer since they may cause cold burns.
- Never immerse any part of the main body, lid, power cord and plug in water or any other liquid to protect against electrical hazards.
- If the appliance is used for other purposes than intended, or is it not handled in accordance with the instruction manual, the full responsibility for any consequences will rest with the user. Any damages to the product or other things are not covered by the warranty.
2 | bEfoRE fIRST uSE
Before you use the appliance for the first time, please do as follows: Carefully unpack the appliance and remove all the packaging material. Keep the material (plastic, polystyrene and cardboard) out of reach of children. Check the appliance after unpacking for any damage, possible from transportation. Place the appliance on a flat and stable surface. Make sure there is enough open space around the appliance for the intake and/or outlet vents. A minimum clearance of 10 cm is required between the appliance and any adjacent walls. The freezer needs good ventilation for easy dissipation of heat, high efficiency of refrigeration and low power consumption.
You can level the appliance using the adjustable feet. Do not place the appliance near a heat source such as a heater or furnace.
Mount the enclosed handle on the desired side of the door with the enclosed screws and place the enclosed caps on the other side for a nice finish. Attention: never lift the freezer by the handle.
Leave the appliance to stand for at least 3 hours before you insert the plug into the socket.
First clean the interior of the appliance. Use warm water and a neutral detergent. After cleaning, rinse the interior with clean water and rub dry. Leave the appliance to dry for 1 to 2 hours.
3 | uSING tHE fREEzER
The freezer compartment enables you to preserve frozen food, freeze fresh produce and to produce ice cubes.
Setting MIN = minimal cooling, warm
Setting MAX = maximal cooling, cold
In general setting "NORMAL" is used for freezing.
Check that the voltage in your home corresponds with the voltage printed on the back of the appliance and plug it in a socket. The appliance now cools continuously until the set temperature has been reached. Do not place anything in the freezer until the set temperature is reached. This usually takes 2 or 3 hours. Then place food into the freezer.
Note:
The ambient air temperature, how often the door is opened and the position of the appliance can affect the internal temperature. These factors must be taken into account when setting the thermostat.
- Do not freeze too large an amount of food at one time; the faster the food is frozen, the longer is preserves its qualities.
- Do not put hot food into the freezer.
- Never introduce volatile, inflammable or explosive fluids such as alcohol, acetone or petrol because of the risk of explosion.
- Do not store glass bottles or containers with liquids in the freezer which will freeze. The freezing may cause the bottles to break. Highly carbonated drinks can even explode. Never keep lemonade, fruit juice, beer, wine, champagne, etc. in the freezer.
- It is advisable to wrap meat and fish to avoid odours.
- Leave sufficient space between the food to enable air to circulate correctly between them. Similarly, when storing them, avoid putting food items in contact with each other.
- Do not place food items in contact with the cold wall at the back of the freezer. The shelves have a stop to avoid this.
- The door should not be left open any longer than necessary.
- To speed the freeze process up you can set the thermostat to the setting "SUPER" and return the setting to the normal position when the food is frozen.
- Place frozen food in the freezer as soon as possible after purchase. Make sure that it doesn't defrost during transport.
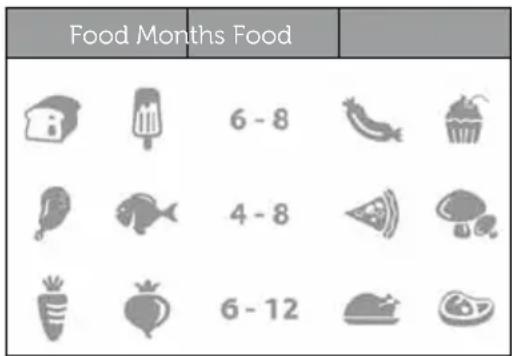
The length of time you can keep food depends very much on the quality of the food.
The table below gives the recommended storage times for frozen fresh foods.
4 | TIPS
- High ambient temperatures have a negative effect on energy use. Keep the freezer in a position away from direct sunlight or other sources of heat.
- Keep ventilation openings free. Clogged openings lead to higher use of energy.
- Try not to open the door too often, especially when the weather is wet and hot. Once you open the door, mind to close it as soon as possible.
- Turn the thermostat to a lower setting when the circumstances allow it.
- Before storing fresh cooked food, make sure the food has cooled at least to room temperature.
- Ice and frost layer increase energy consumption, so clean the appliance as soon as the layer is 3 to 5 mm thick.
- If the gasket is damaged or if it turns out that the sealing is poor, the energy consumption is substantially higher. To restore efficiency, replace the gasket.
- Keep the condensor on the rear wall always clean, free of dust or any impurities.
• Always consider the instructions, otherwise the energy consumption is substantially higher.
5 | DEFROSTING
Defrost the freezer compartment when the layer of ice reaches a thickness of 3 to 5 mm. Keep the contents of the freezer in a cool place and wrapped in blankets or newspapers.
Switch the thermostat off. Defrost the freezer compartment. You can speed up the defrosting process by placing a bowl of hot water in the freezer.
Clean and dry the freezer and the drawers. Switch the thermostat on to the right setting. When the freezer compartment reaches its correct temperature, replace the food items.
Warning: Never remove the ice with the aid of sharp objects, defrost sprays, a hair-drier, a heater, or similar items. This may lead to unsafe situations and may cause irreparable damage to the appliance.
6 | CLEANING & MAINTENANCE
Before cleaning the freezer always unplug the appliance. Clean the interior of the appliance. Use warm water and a neutral detergent to prevent any bad smells occurring. After cleaning, rinse the interior with clean water and rub dry. Leave the appliance to dry for 1 to 2 hours. Simply remove the drawers to clean them by hand. Do not clean the interior accessories in the dishwasher.
Clean the outside of the freezer and the gasket with a soft moist cloth.
We recommend that you dus the back of the appliance with a cloth or vacuum cleaner once a year in order to maintain a good output and low energy consumption.
7 | TROUBLESHOOTING
| ProblemCauseSolution | ||
| Appliance is not functioning | Aplliance is not plugged in | Plug the appliance in the socket |
| Temperature inside the freezer is too high or too low | Thermostat has been set incorrectly | Set the thermostat correctly |
| Air circulation vents are blocked | Clean the ventilation openings | |
| Appliance is excessively noisy | Has the appliance been installed correctly? | Check the installation |
| Are the pipes at the back touching or vibrating? | Check it and move the appliance forwards |
Note: gurgling and hissing noises due to expansion in the refrigerant circuit are normal.
8 | REVERSING THE DOOR OPENING
It is possible to change the door opening from either the left or the right side. The appliance is delivered with the door opening from the left side. To change the opening direction, please follow these instructions.
Note: Before reversing the door swing, unplug the appliance from the mains.
- Remove the screws at the back, holding the top panel to the appliance.

natural_image
Line drawing of a rectangular electronic device with a handle and keyhole (no text or symbols)- Lift the top panel at the backside and remove it.

natural_image
Technical line drawing of a mechanical frame or support structure (no text or symbols)- Remove the three screws holding the top hinge (right side) to the frame. Remove the top hinge.

natural_image
Technical line drawing of a mechanical assembly with a tool and screwdriver (no text or symbols)- Lift the door from the bottom hinge pin and place it on a non-scratching surface.
natural_image
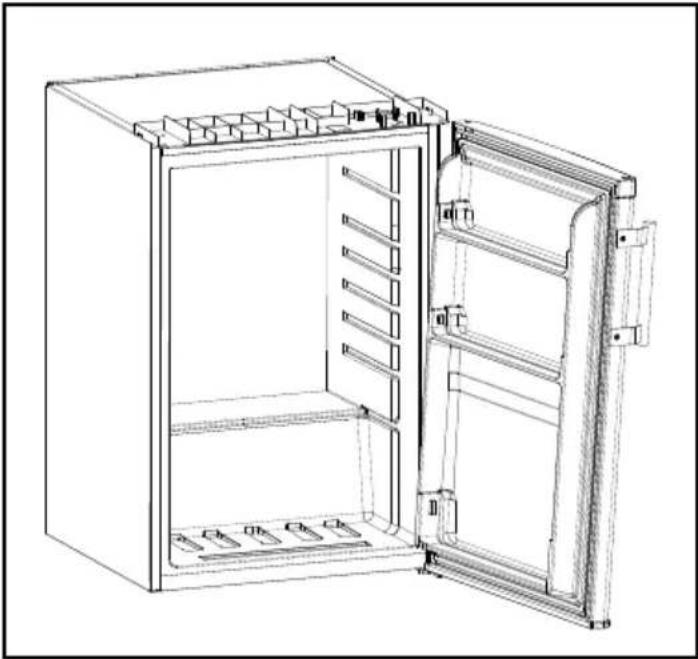
Line drawing of a single refrigerator with open door and side compartments (no text or symbols)- To easily remove the bottom hinge tilt the appliance at max. 45°.

natural_image
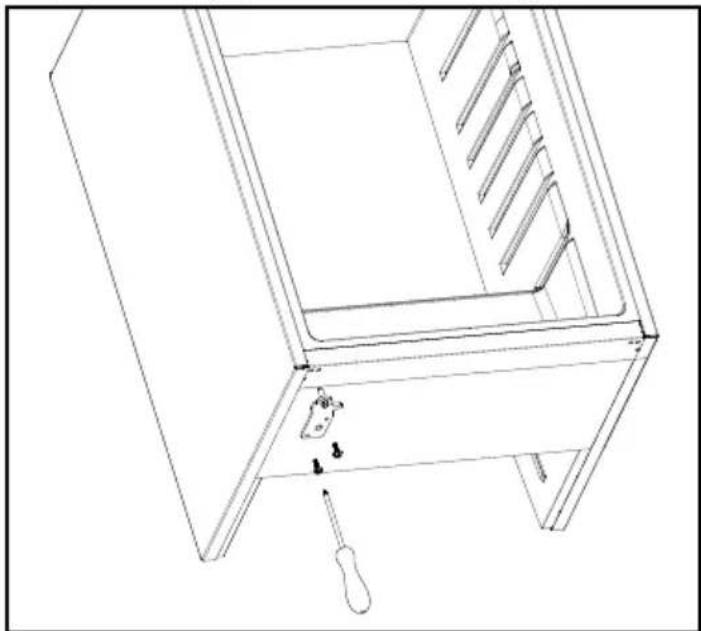
Line drawing of a cabinet interior with a screwdriver inserted, showing no text or symbols- Remove the front leg on the left by unscrewing it. - Remove the two screws holding the bottom hinge. Remove the bottom hinge. - Before replacing the bottom hinge, remove the hinge pin and reverse the direction of the hinge. Reassemble the bottom hinge on the left hand side using the two screws.

natural_image
Technical line drawing of two mechanical components with bolts and nuts, no text or symbols present- Replace the hinge pin into the bottom hinge.
natural_image
Line drawing of a cabinet interior with a screwdriver inserted, showing no text or symbols- Replace the front leg.
- Set the freezer carefully upright.
- Remove the handle, if it is already fitted, and place it on the other side of the door. Don't forget to also refit the white screw caps.

natural_image
Technical line drawing of a mechanical component with a screwdriver and pin (no text or symbols)- Lower the door onto the bottom hinge pin and hold it.

natural_image
Line drawing of a refrigerator interior showing the door, front panel, and side compartments (no text or symbols)- While holding the door in the closed position, reassemble the top hinge on the left hand side using the three screws. Do not tighten the screws until the top of the door is level with the counter top.

natural_image
Line drawing of a mechanical device with a handle and internal compartments (no text or symbols)- Refit the top panel using the screws.
- Leave the appliance to stand for at least 3 hours before you insert the plug into the socket.
9 | REMOVING THE TOP PANEL
To install the freezer beneath a counter top for example, you can easily remove the top panel.
Note: unplug the appliance.
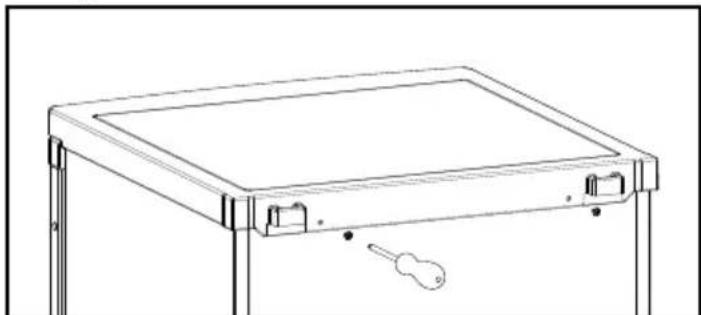
- Remove the screws at the back, holding the top panel to the appliance.
natural_image
Line drawing of a rectangular electronic device with a handle and small button, no text or symbols present- Lift the top panel at the backside and remove it.

natural_image
Line drawing of a mechanical frame or support structure with no visible text or symbols- Remove the screws on both the frame and the metal hinge.
- Remove the hinge and the frame.

natural_image
Technical line drawing of a mechanical device with internal compartments and a handle (no text or symbols)- Reassemble the metal hinge using the three screws.

natural_image
Line drawing of a rectangular refrigerator with a handle and side panel, showing internal components and a small inset view (no text or symbols)- Leave the appliance to stand for at least 3 hours before you insert the plug into the socket.
Technical specifications
Model VR551
External dimensions 55 x 58 x 85 cm
Energy rate A
Climat class N
Freezer compartment ****
Number of drawers 4
Net capacity freezer compartment 85 liter
Voltage 230Volt \~50Hz
Wattage 80 Watt
Net weight ± 32 kg
Model VR601
External dimensions 60 x 60 x 85 cm
Energy rate A
Climat class N
Freezer compartment ****
Number of drawers 3
Net capacity freezer compartment 93 liter
Voltage 230Volt \~50Hz
Wattage 80 Watt
Net weight ± 38 kg
Note: On the rating label - which you can find at the back on the freezer - you can also find the technical specifications.
- INVENTUM guarantees this product for a period of 2 years starting from the date of purchase. The warranty covers proven defects in material, manufacturing and functioning of components and includes material costs, travel- or shipping costs and labor.
- INVENTUM provides not only the 2 years standard warranty, but also gives 3 years extended warranty on spare parts and labor costs. We only bill the travel- or shipping costs. This way, the quality of your INVENTUM equipment is 5 years guaranteed.
-
To qualify for the extended 5 year warranty, please register your appliance within 45 days of purchase on www.inventum.eu
• Why is registration important for you? -
You get a 5-year warranty
- All details of your appliance are known by Inventum. No need to search for your model number when you contact us.
- Inventum can provide a faster and better service when you contact our service center.
- Guarantee can only be given if proof of purchase (e.g. till receipt or copy) can be shown. Therefore keep it in a safe place. The guarantee period starts at the date of purchase.
- Guarantee is not valid in case of:
- normal wear;
- damage through misuse use or when the instructions were not followed correctly;
- lack of maintenance;
- not following the operation- and safety instructions;
- incompetent montage or repairs made by yourself or others;
- using accessories and spare parts which are not suitable for the appliance;
for assessment by our technical department.
• The guarantee is not valid for:
- normal wear - such as plastic accessories;
- normal wear and tear – such as glass breakage, scratches on the equipment, discoloration of plastic or painted parts; Insufficient or incorrect maintenance can cause discolouration of surfaces and rubbers and plastics can deteriorate fast. This is also not covered under warranty.
- (interchangeable) signal- and controllamps;
- defects and consequential damage caused by strong contamination and incorrect maintenance; for assessment by our technical department.
Defects which do not significantly influence the value or operation of the device as are excluded by free repair and / or replacement.
Transport damage is not guaranteed. Therefore, check your new equipment before use. If any damage is found, please contact your supplier within 5 working days after purchase.
From warranty and/or replacement are excluded: defects, loss and damage to the appliance due to an event that usually is insured under the home contents insurance.
To whom can you turn to?
On www.inventum.eu you will find - besides advice on how to use the appliance and cleaning tips - all the answers to your service related questions. Please check the website before contacting our service center.
You can register your service request quickly and easily online at www.inventum.eu. It is also possible to do this by telephone via the INVENTUM service organization.
INVENTUM Service Organization: 0900-INVENTUM (0900-468 36 88) (just for Holland).
To provide the best possible service and to process your service request as soon as possible, we recommend that you always first contact INVENTUM.
These warranty conditions only apply to the Netherlands. For local warranty please contact your dealer.
In countries where INVENTUM has a distributor, you can turn to them if you need the INVENTUM service organization. In other countries, contact your dealer.
When the guarantee is no longer valid or when the period of guarantee has passed, we will charge any costs that flow out of an assessment and/or repairing.
On request we will supply a statement before repairing. Without requesting a statement, we assume that you, by sending the appliance, automatically order to repair the appliance.
A guarantee period of two months is valid for repairs done by our technical department and the used spare parts, counting from the repairdate. When a malfunction occurs within this period which directly flows out of the repairs and the used spare parts, the consumer has the right of repairs without any costs.
Modification and printing errors reserved. The latest version of the deposited guarantee conditions can be obtained through our service organization.


Brand : INVENTUM
Model : VR601
Category : Freezer