
AURA PP-7100 - Printer Posiflex - Free user manual and instructions
Find the device manual for free AURA PP-7100 Posiflex in PDF.


| Product Type | Thermal Receipt Printer |
| Brand | Posiflex |
| Model | AURA PP-7100 |
| Print Method | Direct Thermal |
| Paper Width | 80 mm (3.15 inches) |
| Print Speed | Up to 250 mm/s |
| Resolution | 203 dpi (8 dots/mm) |
| Interface | USB, Serial (RS-232), Ethernet |
| Auto Cutter | Yes, partial cut |
| Paper Roll Capacity | Up to 80 mm diameter |
| Supported Barcodes | 1D: UPC-A, UPC-E, EAN-8, EAN-13, Code39, Code128, etc.; 2D: QR Code, PDF417 |
| Power Supply | 24V DC, 2.5A (external adapter) |
| Power Consumption | Standby: 1.5W, Printing: 50W |
| Dimensions (W x D x H) | 145 x 200 x 130 mm |
| Weight | 1.2 kg (2.65 lbs) |
| Emulations | ESC/POS, Star, Epson |
| Operating Temperature | 0°C to 40°C (32°F to 104°F) |
| Humidity | 10% to 90% non-condensing |
| MTBF | 150,000 hours (print head) |
| Included Accessories | Power adapter, USB cable, starter paper roll, user manual |
Frequently Asked Questions - AURA PP-7100 Posiflex
User questions about AURA PP-7100 Posiflex
0 question about this device. Answer the ones you know or ask your own.
Ask a new question about this device
Download the instructions for your Printer in PDF format for free! Find your manual AURA PP-7100 - Posiflex and take your electronic device back in hand. On this page are published all the documents necessary for the use of your device. AURA PP-7100 by Posiflex.
USER MANUAL AURA PP-7100 Posiflex
PP-7100 POS Printer User Manual
POSIFLEX

natural_image
Black rectangular electronic device with a circular label and ventilation grille (no visible text or symbols)Package Contents
√ POS Printer....(x1)
√ 80mm-wide Thermal Paper.....(x1) (For operational testing)
√ 58mm Paper Spacer Plate....(x1)
√ 24V/60W Power Adapter.....(x1)
√ Power Cord....(x1)
√ USB Cable....(x1)
√ RS232 Cable (Optional)....(x1)
√ LAN Cable (Optional)....(x1)
√ User Manual....(x1)

To avoid paper jam occurring, do NOT press the printer's cover open lever or pull the printed paper during printing.

When a paper jam occurs, press the cover open lever to release the paper cover. Then, remove the jammed paper and reinstall the paper roll. Next, close the paper cover properly and firmly.
If the auto cutter is still jammed, the paper cover will be locked. Should the cutter jam be so serious to interfere the paper cover release operation, please push the paper cover back and press the cover open lever several times. If the problem cannot be solved none the less, please call your local service center for help right away.
FCC NOTES
This equipment has been tested and found to comply with the limits for a Class A digital device, pursuant to part 15 of the FCC Rules. These limits are designed to provide reasonable protection against harmful interference when the equipment is operated in a commercial environment. This equipment generates, uses, and can radiate radio frequency energy and, if not installed and used in accordance with the instruction manual, may cause harmful interference to radio communications. Operation of this equipment in a residential area is likely to cause harmful interference in which case the user will be required to correct the interference at his own expense. This device complies with part 15 of the FCC Rules. Operation is subject to the following two conditions: (1) This device may not cause harmful interference, and (2) this device must accept any interference received, including interference that may cause undesired operation.
19760903010 Ver. A0 http://www.posiflex.com
CE CLASS A WARNING
This equipment is compliant with Class A of CISPR 32. In a residential environment this equipment may cause radio interference.
AVERTISSEMENT CE CLASSE A
Warranty will terminate automatically when the machine is opened by any person other than the authorized technicians. The user should consult his/her dealer for the problem happening. Warranty voids if the user does not follow the instructions in application of this merchandise. The manufacturer is by no means responsible for any damage or hazard caused by improper application.
LIMITES DE GARANTIE
This equipment is not suitable for use in locations where children are likely to be present.
CONSIGNES DE SÉCURITÉ
Power cord shall be connected to a socket-outlet with earthing connection.
ATTENTION
Views of the PP-7100

| Part Names | Description |
| Power Button | This button turns the printer on or off. |
| Power LED Indicator | This indicator turns on when the printer is on. |
| Error LED Indicator | This indicator works when the printer has something wrong. For more details, refer to the Status LED Indicators section given below. |
| Paper-out LED Indicator | This indicator turns on when the paper-out issue occurs. |
| Feed Button | Press this button once to feed the paper roll for one line. Hold down this button to continue feeding the roll paper |
| Paper Cover | Open this cover when installing or replacing the paper roll. |
| Cover Open Lever | Push this lever to open the paper roll cover. |
| Paper Exit | An opening where the paper is outputted |
| Service Door | When paper jam occurs, you can open the service door and adjust the gear to release the jammed paper |
Bottom I/O View

Loading a Paper Roll
Before loading a paper roll, make sure you use a specified paper type. Follow the steps below to load a paper roll.
- Press down the cover open lever to release the paper cover.

natural_image
Two-step photo showing a hand pressing a button on a device, before and after assembly (no text or symbols visible)- Drop the 80mm-wide thermal paper inside the paper compartment of the printer, as shown in the right figure.

natural_image
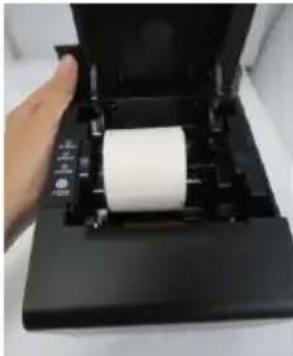
Two-step photo showing a hand inserting a device into a black box, then adding a separate view (no text or symbols visible)- If you want to use a paper roll of 58mm width, install the spacer plate in the compartment of the printer, as shown in the right figure, and then load the paper roll of 58mm width into the partition at the left side of the plate.
natural_image
Hand holding a cylindrical object inside a black printer or scanner device (no visible text or symbols)Next, set the paper width by using PP-7100 Series thermal Printer Software Utility for Windows. The software utility can be downloaded from the Posiflex' global website: http://www.posiflex.com/en-global/Download/download. To get more detailed information on the paper width setting, contact directly the Posiflex' technical service team.
Connecting Power Adapter and I/O Cables
- Connect the power adapter and the other I/O cables to the I/O ports of the printer.
- Please follow the instruction given below to connect I/O cables before powering on the printer.
- Connect the POS printer with either an USB cable, a RS-232 cable, or a LAN cable to your POS terminal. After being powered ON, the POS printer will automatically detect its connected I/O port. Reboot the printer if you switch the RS-232 interface of the printer to the USB interface and vice versa.
Mounting PP-7100 onto a Wall (Optional)
Please follow the steps described below to mount POS printer on the wall using wall-mount kits.
-
Define where the printer is mounted. Drill 2 holes about 3.5" or 90 mm apart. Each hole has to be at least 1/4" or 6.35 mm diameter and at least 1 and 3/16" or 30 mm in depth.
-
After inserting two plastic anchors into the holes you drilled in Step 1, slightly tap the plastic anchors with a hammer until they are fully inserted into the drilled holes.
-
Insert the screws into the plastic anchor, screw them in but leave them sticking out from the wall surface to mount the printer.
-
As shown in the figure, locate two holes on bottom of PP-7100. Then, carefully hang the printer onto the wall using the plastic anchors with screws.

natural_image
Close-up of a hand holding a white plastic object with a black arrow pointing to it, against a plain background (no text or symbols visible)
natural_image
Close-up of a white soap dispenser with a metallic knob and circular base (no text or symbols visible)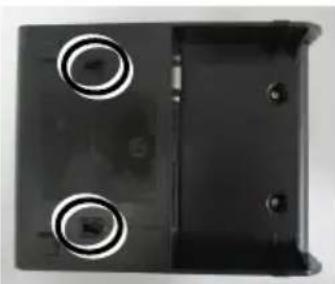
natural_image
Black rectangular electronic device with two circular buttons and a side panel (no visible text or symbols)Setting up the Printer
The PP-7100 can be set through the specific software setting utility for setup of other functions. Please visit our web site http://www.posiflex.com/en-global/Download/download to download the PP-7100 Thermal Printer Software Utility for Windows. After downloading the utility, please call your service center for support before operating the software setup. Please reboot the printer after the settings are done.
Installing the USB Virtual COM Port Driver
If you use software programs that communicate with your POS terminal via a serial interface, but your POS system does not have any serial port, you will require a so-called virtual COM port driver. This virtual COM port driver allows you to assign a virtual COM port connection number to your POS terminal connected via a USB port and enables bidirectional communication between your POS terminal and the printer.
To download the USB Virtual COM Port Driver, go to the Posiflex' global website: http://www.posiflex.com/en-global/Download/download to download the up-to-date driver of the POS printer.
After downloading the driver, start to install them. When you finish installing the driver, it is suggested to turn on your POS terminal again. The system will automatically detect the POS printer.
Performing a Self-Test of the Printer
- Power off the printer.
- Press and hold the feed button of the printer.
- Power on the printer. The printer will emit one short beep sound.
- Release the feed button of the printer.
- The printer performs a self-test and prints out the self-test result.
Doing Settings Reset
Among multiple built-in functions, Settings Reset mainly allows you to reset settings to factory default. The following steps are provided to help you complete the reset process.
- Power off the printer.
- Open the paper roll cover manually.
- Press the feed button of the printer 2 times.
- Close the paper roll cover manually.
-
The printer will restart by itself.
-
Keep pressing the feed button and then power on the printer. The printer will emit one short beep sound.
-
The printer will print a page displaying default settings.
Status LED Indicators
After powering ON the printer, you can read the printer operation status from the power LED indicator on the printer. The LED status is described below.
| LED | Status | Description |
| Power LED | Solid green | Printer powered on |
| Error LED | Flash red + several beeps | Cutter abnormal |
| Solid red | Cover open | |
| Flash red | Operation temp. high | |
| Paper-out LED | Solid red + continual beep | Paper out |
Troubleshooting
The printer cannot print
If you cannot print even though an error has not occurred, perform a self-test to check if printing is possible.
Follow the steps below.
- Turn off the printer and then close the paper cover.
-
While pressing the feed button, power on the printer. (Hold down the feed button until printing starts.) The current print status is printed.
-
Briefly press the feed button (less than one second) to continue the self-test. The printer prints using the built-in character set. After the self-test printing, the printer is reset and switches to standard mode.
➢ LED Indicators are On/Flashing/Off
No lights is given by the LED indicators
Check whether the power supply cable is correctly connected to the printer and the socket.
Error LED is on
√ Check whether the paper cover is closed.
√ Check if paper jam occurs or foreign substance enters the paper cutter.
√ The thermal head and its surroundings can be very hot. Printing stops if the thermal head is too hot. Printing starts again automatically when the thermal head temperature falls.
Paper-out LED indicator is on
√ Check whether the paper roll is correctly installed and any paper roll remains.
Error LED indicator is flashing
Power off the printer; after 10 seconds, power it back on. If the error LED indicator turns on again even after turning the power back on, malfunction may occurs. Contact your dealer or Posiflex' technical service team.
When Paper Jam Occurs
- Open the service door.

natural_image
Two-step photo showing hands assembling a black plastic device into a housing, with an arrow indicating the process (no text or symbols visible)- Manually rotate the gear inward to extend the cutter blade until the paper jam is eliminated.

- Manually rotate the gear outward until the cutter blade is retract back.

natural_image
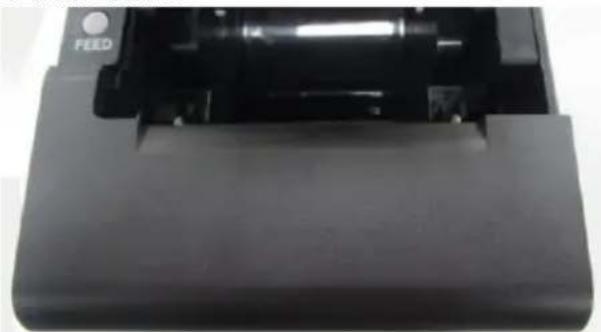
Close-up of a hand inserting a QR code into a printer's case (no text or symbols visible)- Close the service door back.
natural_image
Close-up of a black plastic electronic device with a metallic cylindrical component and a 'FEED' label (no other text or symbols visible)Driver Download
Please download the relevant driver that you need from the Posiflex website (http://www.posiflex.com/en-global/Download/download).
Specifications
| General | ||
| Life span at 25°C and rated energy) | Activation Pulse Resistance | 100 million pulses or more |
| Abrasion Resistance | 150 km or more | |
| Paper Cutting Resistance | 1,500,000 cuts or more | |
| NV Bit Image Memory | 24KB (max.) | |
| NV Graphics | 256KB (max.) | |
| Receive Buffer | 6KB | |
| Printer Driver | Windows Driver (APD), OPOS, JavaPOS (Win), CUPS Driver (Linux) | |
| Software | Posiflex Utility (Android), PP-7100 Utility (Windows Desktop), Development Tool (Android SDK), Monitoring Tool (RMS) | |
| LED Indicators | Green LED - On = PowerRed LED - Error and/or Paper Out | |
| Sensors | Cover Open / Out-of-paper | |
| Power Consumption | Approx. 1.5A (mean) | |
| Power Source | AC adapter (24V DC) | |
| Power Saving | N/A | |
| Temperature | Print quality assured: +5°C ~ +40°C/ Operating: 0°C ~ +40°C/ Non-operating: -20°C ~ +60°C | |
| Relative Humidity | Operating: 20 ~ 85%, non-condensing 35% above for auto cutter / Non-operating: 5% ~ 90%, non-condensing (paper excluded) | |
| Standards and Approvals | CE/FCC | |
| Dimension | 139.5 x 191.2 x 143.2 mm (WxDxH) | |
| Weight | 1.0kg | |
| Color | Black | |
| Print Method | Thermal dot line printing | |
| Print Speed | 220 mm/second (max) | |
| Print Resolution | 576 dots/line (W 8 dots/mm x H 8 dots/mm) | |
| Print Direction | Vertical and Horizontal | |
| Print Fonts | ||
| Fonts/Column capacity | Font A: 12 x 24 dots 48col (Default)Font B: 9 x 17 dots 64col | |
| Character Size | Font A: 1.25 x 3.00 mmFont B: 0.88 x 2.13 mm | |
| Character Set | 95 Alphanumeric, 18 International, 128 x 43 Graphic | |
| Barcode | UPC-A/E, EAN13/8, ITF, CODE39/93/128, CODABAR | |
| 2D Symbol Printing | PDF417, QR code | |
| Media Handling | ||
| Type | Thermal roll paper | |
| Print Width | 80mm paper width: 72 mm58mm paper width: 54 mm | |
| Paper Width | 80 or 58 + 0 / - 1 mm | |
| Roll Diameter (Max) | 80 + 0 / - 1 mm | |
| Core Inner Diameter (Min.) | ∅ 8 mm | |
| Paper Thickness | 60 ~ 80 um | |
| Auto Cutter | Partial Cut | |
| Connectivity | ||
| Serial Interface | RS-232 (DB9 connector) | |
| USB Interface | Built-in USB (Type-B connector) | |
| Ethernet Interface | Ethernet 10/100Base-T/TX (RJ-45 connector) | |
| CR port | Cash drawer port (RJ-11, 6P6C) | |
| DC Jack | 24V DC (3-pin) | |
| Operating System | ||
| OS support | Android / Windows / Linux | |
Outline Dimension

※ The product information and specifications are subject to change without prior notice. To get the detailed information on PP-7100, please check this model from Posiflex Global Website (http://www.posiflex.com/en-global/Download/download).
BSMI ROHS
| 設備名稱:熱感應式印表機,型號(型式):PP-7100Equipment nameType designation (Type) | ||||||
| 單元Unit | 限用物質及其化學符號Restricted substances and its chemical symbols | |||||
| 鉛Lead(Pb) | 汞Mercury(Hg) | 鎘Cadmium(Cd) | 六價鉻Hexavalent chromium( Cr-5 ) | 多溴聯苯Polybrominated biphenyls(PBB) | 多溴二苯醚Polybrominated diphenyl ethers(PBDE) | |
| 電源供應器 | ○ | ○ | ○ | ○ | ○ | ○ |
| 外殼 | ○ | ○ | ○ | ○ | ○ | ○ |
| 電路板 | ○ | ○ | ○ | ○ | ○ | ○ |
| 線材 | ○ | ○ | ○ | ○ | ○ | ○ |
| 配件 | ○ | ○ | ○ | ○ | ○ | ○ |
| 備考1. “超出0.1 wt %”及“超出0.01 wt %”係指限用物質之百分比含量超出百分比含量基準值。Note 1: “Exceeding 0.1 wt %” and “exceeding 0.01 wt %” indicate that the percentage content of the restricted substance exceeds the reference percentage value of presence condition.備考2. “○”係指該項限用物質之百分比含量未超出百分比含量基準值。Note 2: “○” indicates that the percentage content of the restricted substance does not exceed the percentage of reference value of presence.備考3. “—”係指該項限用物質為排除項目。Note 3: The “—” indicates that the restricted substance corresponds to the exemption. | ||||||


- PP-7100 POS Printer User Manual
- POSIFLEX
- Package Contents
- FCC NOTES
- CE CLASS A WARNING
- AVERTISSEMENT CE CLASSE A
- LIMITES DE GARANTIE
- CONSIGNES DE SÉCURITÉ
- ATTENTION
- Bottom I/O View
- Loading a Paper Roll
- Connecting Power Adapter and I/O Cables
- Mounting PP-7100 onto a Wall (Optional)
- Setting up the Printer
- Installing the USB Virtual COM Port Driver
- Performing a Self-Test of the Printer
- Doing Settings Reset
- Status LED Indicators
- Troubleshooting
- Error LED is on
- Paper-out LED indicator is on
- Error LED indicator is flashing
- When Paper Jam Occurs
- Driver Download
- Outline Dimension
Brand : Posiflex
Model : AURA PP-7100
Category : Printer