
DNTBOB88 - Processor Lectrosonics - Free user manual and instructions
Find the device manual for free DNTBOB88 Lectrosonics in PDF.


| Product Type | Dante Breakout Box (Audio Network Interface) |
| Model | DNTBOB88 |
| Brand | Lectrosonics |
| Analog Inputs | 8 balanced line-level (floating) on 5-pin Phoenix connectors; 0 dBu with 20 dB headroom |
| Analog Outputs | 8 balanced line-level (floating) on 5-pin Phoenix connectors; 0 dBu with 20 dB headroom |
| Sampling Rate | 48 kHz |
| Frequency Response | 20 Hz - 20 kHz (±0.1 dB) |
| THD+N | 0.02% (analog in to analog out) |
| Latency (Analog In to Dante) | 0.721 ms |
| Latency (Dante to Analog Out) | Network latency + 0.521 ms |
| Network Interface | Dante (2 RJ-45 ports; switchable switched/redundant modes) |
| Power Requirements | 15 VDC, 800 mA; external power supply included (100-240 VAC input) |
| Power Consumption | 12 W |
| Dimensions (W x H x D) | 13.36 x 1.73 x 4.6 in (339 x 44 x 117 mm) |
| Weight | 22.3 oz (631 g) |
| Operating Temperature | -20°C to +50°C (-4°F to 122°F) |
| Accessories Included | Power supply, power cord (USA plug), 5-pin Phoenix connectors (8), 1RU rack mount adapter |
| Certifications | CE, FCC Part 15 Class B, Industry Canada ICES-003 |
| Warranty | 3 years limited (from date of purchase, with authorized dealer) |
| Cleaning | Clean only with a dry cloth; do not use near water |
| Repairability | No user-serviceable parts; contact factory for repair |
Frequently Asked Questions - DNTBOB88 Lectrosonics
User questions about DNTBOB88 Lectrosonics
0 question about this device. Answer the ones you know or ask your own.
Ask a new question about this device
Download the instructions for your Processor in PDF format for free! Find your manual DNTBOB88 - Lectrosonics and take your electronic device back in hand. On this page are published all the documents necessary for the use of your device. DNTBOB88 by Lectrosonics.
USER MANUAL DNTBOB88 Lectrosonics
Set all DNTBOB 88 units to the Switched mode for initial setup. See page 7 for details.
Dante is a trademark of Audinate Pty Ltd.
Fill in for your records:
Serial Number:
Purchase Date:


SONICS
P.O: Box 10920 - Rio Ranchio, NM - 87174 - USA Phone: (000)821-1121 or (505)888-4501 - Fic: (003)802-6243 mail: www.bocsonics.com - email: ailex@bocsonics.com
25 June 2016
CE - Declaration of Conformity
We. Lectrosonics Inc.
581 Laser Road NE
Rio Rancho, New Mexico 87124 USA
declare under our sole responsibility that the product:
DNTBOB88
to which this declaration relates is in conformity with the following standards:
EN 55103-1: 2009
Test report no. R1504027-2
Date of test report: 28 May 2015
EN 55103-2: 2009
Test report no. R1504027-2
Date of test report: 28 May 2015
EN 60065: 2002 + A12:2011
Test report no. R1504027-3
Date of test report: 11 June 2015
and is in conformity with Directive 2011/65/EU of the European Parliament and of the Council of 8 June 2011 (RoHS Recast).
The product carries the CE mark:
CE
R. Linson
Robert Cunnings
V.P. Engineering
Lectrosonics, Inc.
FCC Part 15 Compliance
This device complies with Part 15 of the FCC Rules. Operation is subject to the following two conditions: (1) This device may not cause harmful interference, and (2) this device must accept any interference received, including interference that may cause undesired operation.
CAUTION: Changes or modifications not expressly approved by Lectrosonics, Inc. could void the user's authority to operate the equipment.
NOTE: This equipment has been tested and found to comply with the limits for a Class B digital device, pursuant to Part 15 of the FCC Rules. These limits are designed to provide reasonable protection against harmful interference in a residential installation. The equipment generates, uses and can radiate radio frequency energy and, if not installed and used in accordance with the instructions, may cause harmful interference to radio communications. However, there is no guarantee that interference will not occur in a particular installation.
If this equipment does cause harmful interference to radio or television reception, which can be determined by turning the equipment off and on, the user is encouraged to try to correct the interference by one or more of the following measures:
- Reorient or relocate the receiving antenna
- Increase the separation between the equipment and receiver
- Connect the equipment into an outlet on a circuit different from that which the receiver is connected
- Consult the dealer or an experienced radio/TV technician for help
Changes or modifications to this equipment not expressly approved by Lectrosonics, Inc. could void the user's authority to operate it.
Industry Canada Compliance
This Class B digital apparatus complies with Canadian ICES-003.
Important Safety Instructions

This symbol, wherever it appears, alerts you to the presence of uninsulated dangerous voltage inside the enclosure -- voltage that may be sufficient to constitute a risk of shock.

This symbol, wherever it appears, alerts you to important operating and maintenance instructions in the accompanying literature. Please read the manual.
When using your telephone equipment, basic safety precautions should always be followed to reduce the risk of fire, electric shock and injury to persons, including the following:
1) Read these instructions.
2) Keep these instructions.
3) Heed all warnings.
4) Follow all instructions.
5) Do not use this apparatus near water.
6) Clean only with a dry cloth.
7) Do not block any ventilation openings. Install in accordance with the manufacturer's instructions.
8) Do not install near any heat sources such as radiators, heat registers, stoves, or other apparatus (including amplifiers) that produce heat.
9) Do not defeat the safety purpose of the polarized or grounding-type plug. A polarized plug has two blades with one wider than the other. A grounding type plug has two blades and third grounding prong. The wider blade or the third prong are provided for your safety. If the provided plug does not fit into your outlet, consult an electrician for replacement of the obsolete outlet.
10) Protect the power cord from being walked on or pinched particularly at plugs, convenience receptacles, and the point where they exit from the apparatus.
11) Only use attachments/accessories specified by the manufacturer.
12) Use only with the cart, stand, tripod, bracket, or table specified by the manufacturer, or sold with the apparatus. When a cart is used, use caution when moving the cart/ apparatus combination to avoid injury from tip-over.
13) Unplug this apparatus during lightning storms or when unused for long periods of time.
14) Refer all servicing to qualified service personnel. Servicing is required when the apparatus has been damaged in any way, such as power-supply cord or plug is damaged, liquid has been spilled or objects have fallen into the apparatus, the apparatus has been exposed to rain or moisture, does not operate normally, or has been dropped.
15) WARNING -- TO REDUCE THE RISK OF FIRE OR ELECTRIC SHOCK, DO NOT EXPOSE THIS APPARATUS TO RAIN OR MOISTURE.
16) The AC mains plug, or appliance coupler shall be readily available to the operator as a means of power disconnection, if applicable.
17) Unit shall be connected to a MAINS socket outlet with a protective earthing connection.
18) Do not use this product near water for example, near a bathtub, washbowl, kitchen sink or laundry tub, in a wet basement or near a swimming pool.
19) Avoid using a telephone (other than a cordless type) during an electrical storm. There may be a remote risk of electric shock from lightning.
20) Do not use the telephone to report a gas leak in the vicinity of the leak.
21) Use only the power cord and batteries indicated in this manual. Do not dispose of batteries in a fire. They may explode. Check with local codes for possible special disposal instructions.
22) "CAUTION: To reduce the risk of fire, use only No. 26 AWG or larger (e.g., 24 AWG) UL Listed or CSA Certified Telecommunication Line Cord"
SAVE THESE INSTRUCTIONS

Table of Contents
Important Safety Instructions.... 3
Overview....5
Connector Panel....6
About Dante Software....6
Dante™ Software Installation 7
Initial Setup 7
Stand-alone Connections 8
Network Connections....10
Signal Routing 11
Channel Subscriptions 12
Accessories 13
Specifications 14
FCC Part 15 Compliance....14
Service and Repair 15
Overview
What is Dante?
Audinate's patent pending Dante™ technology is a flexible Internet Protocol (IP) and Ethernet based digital AV network technology that eliminates the many bulky cables needed to provide point-to-point wiring for analog AV installations.
With Dante, existing infrastructure can be used for high performance audio as well as for ordinary control, monitoring or business data traffic. Digital networks utilize standard IP over Ethernet offering high bandwidth capable of transporting hundreds of high quality channels over Gigabit Ethernet.
Set-up and configuring the system is made easy as well, saving enormous installation costs and long term cost of ownership on a digital network. The physical connecting point is irrelevant: audio signals can be made available anywhere and everywhere. Patching and routing now become logical functions configured in software, not via physical wired links
The Role of the DNTBOB 88 Breakout Box
The DNTBOB 88 is a hard wired appliance that enables routing and distribution of analog audio signals via a Dante network. High quality A-D converters are used to minimize distortion and noise, and low latency across the network minimizes delay issues.

Switched and Redundant Modes
The rear panel Dante ports allow operation in a switched mode through a single network using either port, or in a redundant mode through two separate networks, each using one of the ports. Redundancy is required in some applications where it is imperative that no audio is lost due to network problems, such as in courtroom recording. The secondary network duplicates real-time audio traffic. If the primary network fails for any reason, the secondary network's audio continues without losing even a single sample.
See pages 8 through 10 and also refer to the help files and documentation provided by Audinate for more information regarding the setup for switched and redundant modes.
IMPORTANT:
Set all DNTBOB 88 units to the Switched mode for initial setup. See page 7 for details.
Audinate ^® is a registered trademark of Audinate Pty Ltd.
Connector Panel

Power Supply
An external power supply is furnished with the break-out box. The LED next to the inlet jack on the connector panel glows to indicate power is ON.
Balanced Analog Audio Inputs
Floating balanced line level inputs; 0dBu level with 20dB headroom.
Balanced Analog Audio Outputs
Floating balanced line level outputs; 0dBu level with 20dB headroom.
About Dante Software
Dante Controller
This software is needed to route network audio signals between the SPNDNT and other nodes on a Dante network. The software is downloaded from the Audinate web site and will run on Windows and Mac platforms. Windows requires Bonjour Print Services from Apple Corporation.

Dante Controller is used to assign the transmit and receive signals between multiple Dante devices. When a device is set to receive a signal from another device that
is transmitting, it is said to subscribe to the transmitted signal. These subscriptions appear in the Dante Controller window as highlighted green check marks.
Browser based Help Files are provided to explain various icons and setup tabs.
Dante Ports
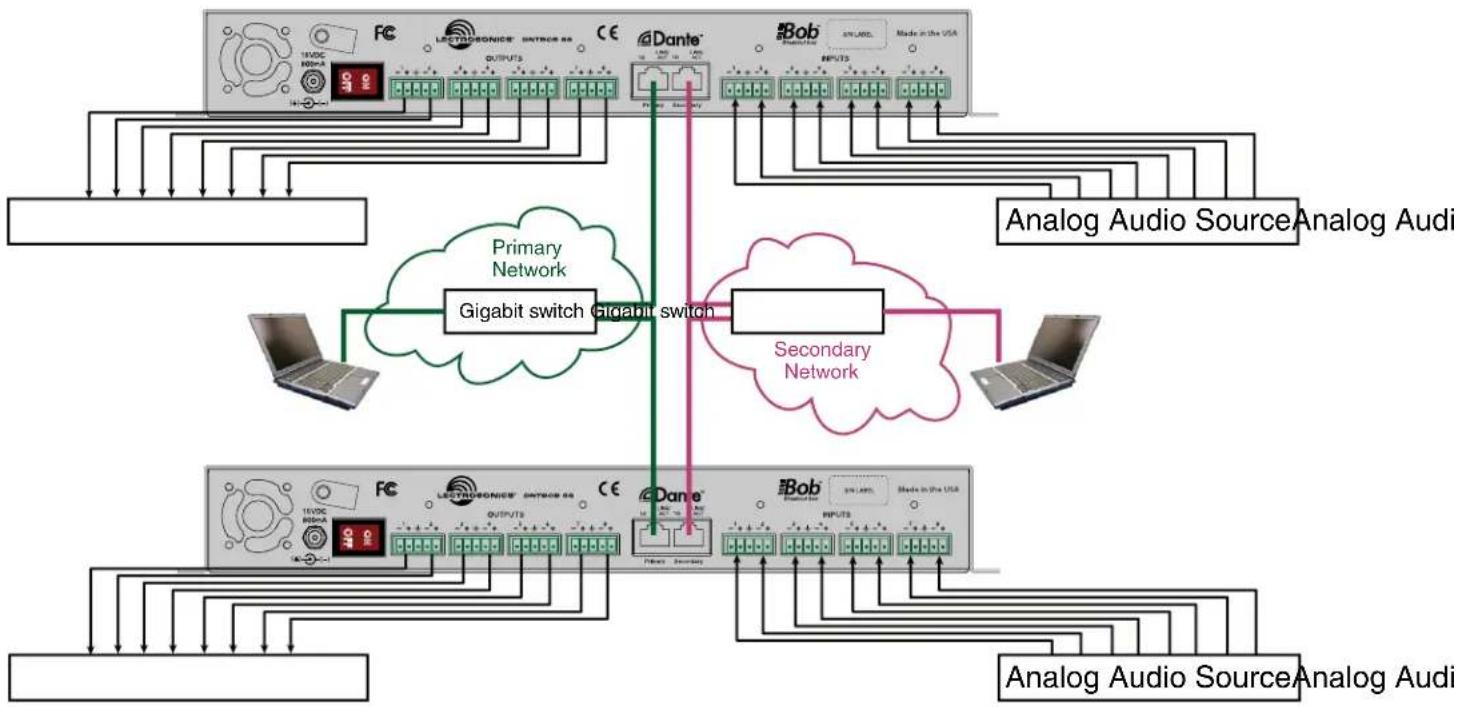
Either port can be used with a single network connection when the unit operates in the Switched mode. When a second network is configured for redundancy using a separate cable system, all processors connected to the network must have consistent connections – all Primary ports connected to one network and all Secondary ports connected to the other network.

Dante™ Software Installation
Bonjour Print Services (for Windows only)
Download the Bonjour Print Services for Windows installer into a temporary folder on your PC.
http://support.apple.com/kb/DL999
Double click on the file to open the installer. If the Security Warning dialog box opens, click on Run to launch the installer and follow the on screen prompts.

Set Up Audinate Account and Download the Dante Controller Installer
Set up an account with Audinate to gain access to the free Dante Controller software. Click on Login at the top of the screen and the forms page will open.
http://www.audinate.com
After your account is set up, return to the home page and click on Support->Software Downloads->Dante Controller. Log In on the next page and follow the on screen prompts to download the installer and store the file on your local drive.
Install Dante Controller
NOTE: Install Bonjour Print Services for Windows before installing Dante Controller.
Double click on the downloaded file to open the installer. If the Security Warning dialog box opens, click on Run to launch the installer and follow the on screen prompts.

Initial Setup
It is best practice to configure all units to operate in the Switched mode to simplify initial settings.
Connect each BOB 88 unit to a computer directly or via a network one at a time. Launch Dante controller and then double click on the name of the unit to open the Device View dialog box. Click on the Network Config tab and select the Switched mode.

In the switched mode, either the Primary or Secondary Dante port can be used interchangeably since the ports include an Ethernet switch.
NOTE: Connect only one or the other. If both ports are connected to the same network in the switched mode, you will not be able to control them with Dante Controller software.
Changing from Switched to Redundant Modes
When the units are changed from the Switched mode to the Redundant mode (and vice versa), they must be rebooted to enable and store the setting. It is generally best to make this change when connected individually to each unit. After the setting is changed, disconnect the power and then reconnect it to reboot the unit.
Stand-alone Connections
Multiple BOB 88 units can be connected directly to one another without an Ethernet switch to form an isolated Dante network between them. This requires that all units be set to the Switched mode.
Simply connect the units with CAT-6 cable in a "daisy chained" manner. A PC can be connected at either end of the chain to setup the channel assignments and signal routing.

flowchart
graph TD
    A["Analog Audio Source"] --> B["Analog Audio Destina"]
    C["Analog Audio Source"] --> D["Analog Audio Destina"]
    E["Analog Audio Source"] --> F["Analog Audio Destina"]
    G["Analog Audio Source"] --> H["Analog Audio Destina"]
    I["Analog Audio Source"] --> J["Analog Audio Destina"]
    K["Analog Audio Source"] --> L["Analog Audio Destina"]
    M["Analog Audio Source"] --> N["Analog Audio Destina"]
    O["Analog Audio Source"] --> P["Analog Audio Destina"]
    Q["Analog Audio Source"] --> R["Analog Audio Destina"]
    S["Analog Audio Source"] --> T["Analog Audio Destina"]
    U["Dante®"] --> V["Dante®"]
    W["Dante®"] --> X["Dante®"]
    Y["Dante®"] --> Z["Dante®"]
    AA["Dante®"] --> AB["Dante®"]
    AC["Dante®"] --> AD["Dante®"]
    AE["Dante®"] --> AF["Dante®"]
    AG["Dante®"] --> AH["Dante®"]
    AI["Dante®"] --> AJ["Dante®"]
    AK["Dante®"] --> AL["Dante®"]
    AM["Dante®"] --> AN["Dante®"]
    AO["Dante®"] --> AP["Dante®"]
    AQ["Dante®"] --> AR["Dante®"]
    AS["Dante®"] --> AT["Dante®"]
    AU["Dante®"] --> AV["Dante®"]
    AW["Dante®"] --> AX["Dante®"]
    AY["Dante®"] --> ZA["Dante®"]
    AZ["Dante®"] --> AAZ["Dante®"]
    BA["Dante®"] --> ARZ["Dante®"]
A combination of switches and direct connections can also be used to accommodate the physical locations of the BOB 88 units. Two or more units sitting next to one another can be connected directly, while other units in remote locations and a PC can be interconnected via a switch.

flowchart
graph TD
    A["Analog Audio Source"] --> B["Gigabit switch"]
    C["Analog Audio Source"] --> B
    D["Analog Audio Source"] --> B
    E["Analog Audio Source"] --> B
    F["Analog Audio Source"] --> B
    G["Analog Audio Source"] --> B
    H["Analog Audio Source"] --> B
    I["Analog Audio Source"] --> B
    J["Analog Audio Source"] --> B
    K["Analog Audio Source"] --> B
    L["Analog Audio Source"] --> B
    M["Analog Audio Source"] --> B
    N["Analog Audio Source"] --> B
    O["Analog Audio Source"] --> B
    P["Analog Audio Source"] --> B
    Q["Analog Audio Source"] --> B
    R["Analog Audio Source"] --> B
    S["Analog Audio Source"] --> B
    T["Analog Audio Source"] --> B
    U["Analog Audio Source"] --> B
    V["Analog Audio Source"] --> B
    W["Analog Audio Source"] --> B
    X["Analog Audio Source"] --> B
    Y["Analog Audio Source"] --> B
    Z["Analog Audio Source"] --> B
    AA["Analog Audio Source"] --> B
    AB["Analog Audio Source"] --> B
    AC["Analog Audio Source"] --> B
    AD["Analog Audio Source"] --> B
    AE["Analog Audio Source"] --> B
    AF["Analog Audio Source"] --> B
    AG["Analog Audio Source"] --> B
    AH["Analog Audio Source"] --> B
    AI["Analog Audio Source"] --> B
    AJ["Analog Audio Source"] --> B
    AK["Analog Audio Source"] --> B
    AL["Analog Audio Source"] --> B
    AM["Analog Audio Source"] --> B
    AN["Analog Audio Source"] --> B
    AO["Analog Audio Source"] --> B
    AP["Analog Audio Source"] --> B
    AQ["Analog Audio Source"] --> B
    AR["Analog Audio Source"] --> B
    AS["Analog Audio Source"] --> B
    AT["Analog Audio Source"] --> B
    AU["Analog Audio Source"] --> B
    AV["Analog Audio Source"] --> B
    AW["Analog Audio Source"] --> B
    AX["Analog Audio Source"] --> B
    AY["Analog Audio Source"] --> BA["Analog Audio Destir"]
    BB["Analog Audio Source"] --> BC["Analog Audio Destir"]
    BD["Analog Audio Source"] --> BE["Analog Audio Destir"]
    BF["Analog Audio Source"] --> BG["Analog Audio Destir"]
    BH["Analog Audio Source"] --> BI["Analog Audio Destir"]
    BJ["Analog Audio Source"] --> BK["Analog Audio Destir"]
    BL["Analog Audio Source"] --> BM["Analog Audio Destir"]
    BN["Analog Audio Source"] --> BO["Analog Audio Destir"]
    BP["Analog Audio Source"] --> BQ["Analog Audio Destir"]
    BR["Analog Audio Source"] --> BS["Analog Audio Destir"]
    BT["Analog Audio Source"] --> BU["Analog Audio Destir"]
    BV["Analog Audio Source"] --> BW["Analog Audio Destir"]
    BX["Analog Audio Source"] --> BYB["Analog Audio Destir"]
    BYC["Analog Audio Source"] --> BYD["Analog Audio Destir"]
    BYE["Analog Audio Source"] --> BYF["Analog Audio Destir"]
    BYG["Analog Audio Source"] --> BYH["Analog Audio Destir"]
    BYI["Analog Audio Source"] --> BYJ["Analog Audio Destir"]
    BYK["Analog Audio Source"] --> BYL["Analog Audio Destir"]
    BYM["Analog Audio Source"] --> BYN["Analog Audio Destir"]
    BYO["Analog Audio Source"] --> BYP["Analog Audio Destir"]
    BYQ["Analog Audio Source"] --> BYR["Analog Audio Destir"]
    BYS["Analog Audio Source"] --> BYT["Analog Audio Destir"]
    BYU["Analog Audio Source"] --> BYV["Analog Audio Destir"]
    BYW["Analog Audio Source"] --> BYX["Analog Audio Destir"]
    BYY["Analog Audio Source"] --> BYZ["Analog Audio Destir"]
    BYA["Analog Audio Source"] --> BYB["Analog Audio Destir"]
    BYC<fcel>Gigabit switch
Network Connections
A Dante network can share bandwidth with an existing data network. Consult with the network manager before connecting into an existing network to verify there is adequate bandwidth and for permission to make these connections.
The setup instructions for various network connections are provided in the documentation included with Dante Controller software.
When the BOB 88 units are set to the Switched mode, they can also be interconnected directly to one another and via gigabit switches at the same time since each Dante port includes an Ethernet switch.
A redundant network requires separate cabling for the second network. Each BOB 88 unit must be connected to the switches in a consistent manner. All Primary ports must be connected to one network and all Secondary ports must be connected to the other network.
NOTE: It is best practice to set up all the units in the Switched mode with one network connected, and then change them to the Redundant mode and connect the second network.
flowchart
graph TD
    A["Analog Audio Source"] --> B["Analog Audio Source Analog Audi"]
    C["Analog Audio Source"] --> D["Analog Audio Source Analog Audi"]
    E["Primary Network"] --> F["Gigabit switch"]
    G["Secondary Network"] --> H["Gigabit switch"]
    I["Dante"] --> J["Primary Network"]
    K["Dante"] --> L["Secondary Network"]
    M["Electronic Device"] --> N["Electronic Device"]
    O["Electronic Device"] --> P["Electronic Device"]
Enabling the Redundant and Switched Modes
When the units are changed from the Switched mode to the Redundant mode (and vice versa), they must be rebooted to enable and store the setting. It is generally best to make this change when connected individually to each unit. After the setting is changed, disconnect the power and then reconnect it to reboot the unit.
Signal Routing
When Dante Controller software is launched, all connected units will appear in the control panel. Click on the [+] next to the name of each unit to expand the view to assign subscriptions and establish the signal routing.
Channel subscriptions are made by clicking on the crosspoint between the desired transmit channel and the appropriate receiver channel. Receiver channels correspond to the analog outputs. In other words, receiver channel 1 delivers the signal to output 1 on that device. A green highlighted check mark will indicate that the subscription is in effect.
When a receive channel subscription is assigned, the corresponding transmitter channel will be enabled. If a crosspoint is left blank, no signal will be transmitted to minimize the bandwidth usage on the network.
This crosspoint subscription routes audio from input 1 on DNTBOB88 (the transmitter) to output 1 on BobC (the receiver) using one Dante channel.
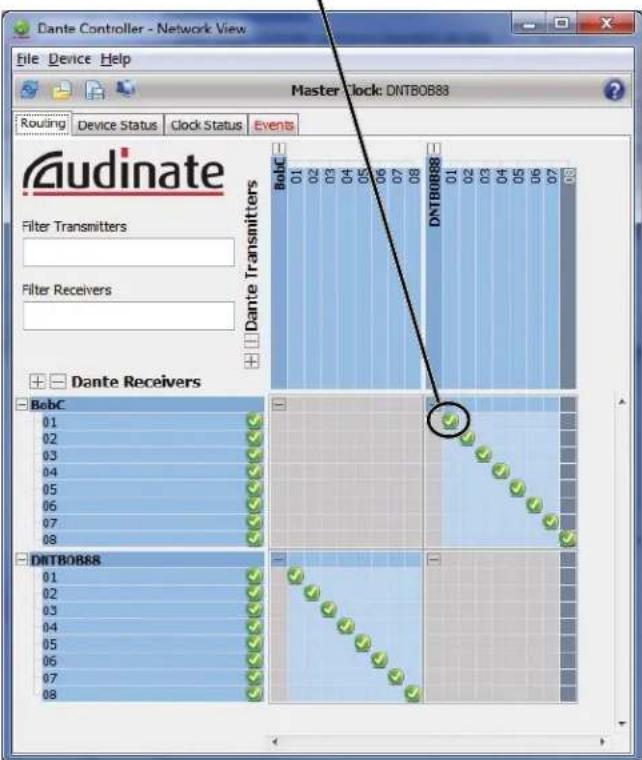
Multiple receivers can subscribe to a common transmit signal on a single Dante channel.
These subscriptions route the audio from input 1 on DNTBOB88 (the transmitter) to outputs 1 through 3 on BobC (the receivers).

Refer to the Help files in Dante Controller for additional information on channel assignments and the on-screen indicators that appear in the control panel and the additional settings and functions available.
Channel Subscriptions
Each input to a breakout box occupies a Dante channel. The total Dante channel usage, however, will vary depending upon the number of multiple receiver subscriptions.
The numbers in the diagrams are used to indicate the number of Dante channels being used.
1:1 Subscriptions
SYSTEM EXAMPLE - SIGNAL FLOW AND ROUTING DANTE CHANNELS AT CROSSPOINTS
In the upper diagram, 1:1 subscriptions use a Dante channel for each input to output signal path, so the total number of audio Inputs and outputs is equal to the Dante channels used.
Multiple Receiver Subscriptions
SYSTEM EXAMPLE - SIGNAL FLOW AND ROUTING DANTE CHANNELS AT CROSSPOINTS
In the lower diagram, multiple receiver subscriptions reduce the number of Dante channels used in the system. In this example, inputs 1 through 5 on BOB B are routed to outputs 1 through 8 on BOB A, using only 5 Dante channels. Inputs 4 through 8 on BOB A are routed to outputs 2 through 8 on BOB B, using 5 Dante channels.
1RU rack mount adapter
Attaches to the front panel of the DNTBOB88 housing. Includes six mounting screws.

Power Supply
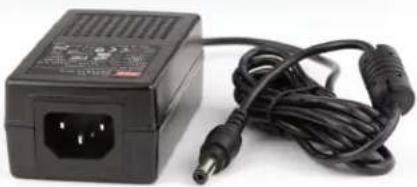
100-240 VAC input, 15VDC 1.66A output (25 Watt) output. Center pin pos. (+). See drawing.
natural_image
Black power adapter with attached cable and terminal outlet (no visible text or symbols)Lectrosonics part number 40094 power supply

Power Cord (USA NEMA Plug)

natural_image
Coiled black electrical power plug with two terminal connectors (no text or symbols visible)Lectrosonics part number 21499 power cord
Audio IN/OUT 5-Pin Connector

natural_image
Green terminal block with four slots and three circular holes (no text or symbols visible)Lectrosonics part number 21580 5-pin Connector
Specifications
Analog inputs:
Type Floating balanced
Level 0 dBu; 20 dB headroom
Impedance 15k ohm (differential); 3.75k ohm (common)
Connector 5-pin Phoenix
Analog outputs:
Type Floating balanced
Level 0 dBu; 20 dB headroom
Impedance 50 ohms
Connector 5-pin Phoenix
Sampling Rate: 48 kHz
Network Interface: Dante
Latency:
Analog in to Dante network: 0.721 ms
Dante network to analog out: Network latency + 0.521 ms
THD + Noise: 0.02%; analog in to analog out
Audio Frequency Response: 20Hz to 20kHz; ±0.1 dB
Input to Output Gain: 0 dB; ±1 dB
Ambient Operating Temperature: -20 C to +50 C; -36 F to +90 F
Power Requirements: 15 VDC; 800 mA
Power Switch Illuminated rocker
Power Consumption: 12 Watts
Dimensions (overall):
1.73 x 13.36 x 4.6 in.
44 x 339 x 117 mm.
Weight:
22.3 ozs.; 631 grams
FCC Part 15 Compliance
This device complies with Part 15 of the FCC Rules. Operation is subject to the following two conditions: (1) This device may not cause harmful interference, and (2) this device must accept any interference received, including interference that may cause undesired operation.
CAUTION: Changes or modifications not expressly approved by Lectrosonics, Inc. could void the user's authority to operate the equipment.
NOTE: This equipment has been tested and found to comply with the limits for a Class B digital device, pursuant to Part 15 of the FCC Rules. These limits are designed to provide reasonable protection against harmful interference in a residential installation. The equipment generates, uses and can radiate radio frequency energy and, if not installed and used in accordance with the instructions, may cause harmful interference to radio communications. However, there is no guarantee that interference will not occur in a particular installation. If this equipment does cause harmful interference to radio or television reception, which can be determined by turning the equipment off and on, the user is encouraged to try to correct the interference by one or more of the following measures:
• Reorient or relocate the receiving antenna
- Increase the separation between the equipment and receiver
- Connect the equipment into an outlet on a circuit different from that which the receiver is connected
- Consult the dealer or an experienced radio/TV technician for help
Changes or modifications to this equipment not expressly approved by Lectrosonics, Inc. could void the user's authority to operate it.
This Class B digital apparatus complies with Canadian ICES-003.
If your system malfunctions, you should attempt to correct or isolate the trouble before concluding that the equipment needs repair. Make sure you have followed the setup procedure and operating instructions. Check the interconnecting cables and then go through the Troubleshooting section in this manual.
We strongly recommend that you do not try to repair the equipment yourself and do not have the local repair shop attempt anything other than the simplest repair. If the repair is more complicated than a broken wire or loose connection, send the unit to the factory for repair and service. Don't attempt to adjust any controls inside the units. Once set at the factory, the various controls and trimmers do not drift with age or vibration and never require readjustment. There are no adjustments inside that will make a malfunctioning unit start working.
LECTROSONICS' Service Department is equipped and staffed to quickly repair your equipment. In warranty repairs are made at no charge in accordance with the terms of the warranty. Out-of-warranty repairs are charged at a modest flat rate plus parts and shipping. Since it takes almost as much time and effort to determine what is wrong as it does to make the repair, there is a charge for an exact quotation. We will be happy to quote approximate charges by phone for out-of-warranty repairs.
Returning Units for Repair
For timely service, please follow the steps below:
A. DO NOT return equipment to the factory for repair without first contacting us by e-mail or by phone. We need to know the nature of the problem, the model number and the serial number of the equipment. We also need a phone number where you can be reached 8 A.M. to 4 P.M. (U.S. Mountain Standard Time).
B. After receiving your request, we will issue you a return authorization number (R.A.). This number will help speed your repair through our receiving and repair departments. The return authorization number must be clearly shown on the outside of the shipping container.
C. Pack the equipment carefully and ship to us, shipping costs prepaid. If necessary, we can provide you with the proper packing materials. UPS or FEDEX is usually the best way to ship the units. Heavy units should be "double-boxed" for safe transport.
D. We also strongly recommend that you insure the equipment, since we cannot be responsible for loss of or damage to equipment that you ship. Of course, we insure the equipment when we ship it back to you.
Lectrosonics USA:
Mailing address: Shipping address: Telephone:
Lectrosonics, Inc. Lectrosonics, Inc. (505) 892-4501
PO Box 15900 581 Laser Rd. (800) 821-1121 Toll-free
Rio Rancho, NM 87174 Rio Rancho, NM 87124 (505) 892-6243 Fax
USA USA
Web:
E-mail:
www.lectrosonics.com
sales@lectrosonics.com
Lectrosonics Canada:
Mailing Address:
Telephone:
E-mail:
720 Spadina Avenue,
(416) 596-2202
Sales: colinb@lectrosonics.com
Suite 600 (877) 753-2876 Toll-free Service: joeb@lectrosonics.com
Toronto, Ontario M5S 2T9
(877-7LECTRO)
(416) 596-6648 Fax
LIMITED THREE YEAR WARRANTY
The equipment is warranted for three years from date of purchase against defects in materials or workmanship provided it was purchased from an authorized dealer. This warranty does not cover equipment which has been abused or damaged by careless handling or shipping. This warranty does not apply to used or demonstrator equipment.
Should any defect develop, Lectrosonics, Inc. will, at our option, repair or replace any defective parts without charge for either parts or labor. If Lectrosonics, Inc. cannot correct the defect in your equipment, it will be replaced at no charge with a similar new item. Lectrosonics, Inc. will pay for the cost of returning your equipment to you.
This warranty applies only to items returned to Lectrosonics, Inc. or an authorized dealer, shipping costs prepaid, within three years from the date of purchase.
This Limited Warranty is governed by the laws of the State of New Mexico. It states the entire liability of Lectrosonics Inc. and the entire remedy of the purchaser for any breach of warranty as outlined above. NEITHER LECTROSONICS, INC. NOR ANYONE INVOLVED IN THE PRODUCTION OR DELIVERY OF THE EQUIPMENT SHALL BE LIABLE FOR ANY INDIRECT, SPECIAL, PUNITIVE, CONSEQUENTIAL, OR INCIDENTAL DAMAGES ARISING OUT OF THE USE OR INABILITY TO USE THIS EQUIPMENT EVEN IF LECTROSONICS, INC. HAS BEEN ADVISED OF THE POSSIBILITY OF SUCH DAMAGES. IN NO EVENT SHALL THE LIABILITY OF LECTROSONICS, INC. EXCEED THE PURCHASE PRICE OF ANY DEFECTIVE EQUIPMENT.
This warranty gives you specific legal rights. You may have additional legal rights which vary from state to state.

- CE - Declaration of Conformity
- DNTBOB88
- CE
- FCC Part 15 Compliance
- Industry Canada Compliance
- Important Safety Instructions
- SAVE THESE INSTRUCTIONS
- Table of Contents
- Overview
- What is Dante?
- The Role of the DNTBOB 88 Breakout Box
- Switched and Redundant Modes
- IMPORTANT:
- Connector Panel
- Power Supply
- Balanced Analog Audio Inputs
- Balanced Analog Audio Outputs
- About Dante Software
- Dante Controller
- Dante Ports
- Dante™ Software Installation
- Bonjour Print Services (for Windows only)
- Set Up Audinate Account and Download the Dante Controller Installer
- Install Dante Controller
- Initial Setup
- Changing from Switched to Redundant Modes
- Stand-alone Connections
- Network Connections
- Enabling the Redundant and Switched Modes
- Signal Routing
- Channel Subscriptions
- 1:1 Subscriptions
- Multiple Receiver Subscriptions
- 1RU rack mount adapter
- Power Cord (USA NEMA Plug)
- Audio IN/OUT 5-Pin Connector
- Specifications
- Returning Units for Repair
- Lectrosonics USA:
- Lectrosonics Canada:
- LIMITED THREE YEAR WARRANTY
Brand : Lectrosonics
Model : DNTBOB88
Category : Processor