
LMS-335 - TV Stand Auray - Free user manual and instructions
Find the device manual for free LMS-335 Auray in PDF.


| Product Type | Studio Monitor Stands (Set of Two) |
| Brand | Auray |
| Model | LMS-335 |
| Minimum Height | 35" (88.9 cm) |
| Maximum Height | 58.5" (148.6 cm) |
| Load Capacity per Stand | 90 lb (40.8 kg) |
| Mounting Plate Size | 9" x 9" (22.9 x 22.9 cm) |
| Weight per Stand | 10.35 lb (4.69 kg) |
| Base Spread | 23" (58.4 cm) |
| Height Adjustment | 6 positions with locking knob and pin |
| Base Design | Wide, three-leg design with rubber feet and spikes |
| Materials | Steel shaft, aluminum mounting plate, rubber feet |
| Accessories Included | Touch-fastener straps, open-end wrench, Allen wrench, spikes, washers & nuts |
| Recommended Accessories | Auray IP-S Isolation Pad, Auray IPRS-S Recoil Stabilizer |
| Warranty | One-year limited warranty |
| Maintenance | Wipe with dry cloth; do not use abrasive cleaners |
| Safety | Do not exceed max load; keep fingers clear of telescoping joint; use on stable surface |
| Intended Use | Professional and home recording studios |
Frequently Asked Questions - LMS-335 Auray
User questions about LMS-335 Auray
0 question about this device. Answer the ones you know or ask your own.
Ask a new question about this device
Download the instructions for your TV Stand in PDF format for free! Find your manual LMS-335 - Auray and take your electronic device back in hand. On this page are published all the documents necessary for the use of your device. LMS-335 by Auray.
USER MANUAL LMS-335 Auray
Studio Monitor Stands
(Set of two)
Owner's Manual

natural_image
Two black outdoor speakers standing on poles, each with a speaker tower and adjustable legs (no text or symbols visible)Introduction
Thank you for choosing Auray LMS-335 Studio Monitor Stands. These sturdy monitor stands are an ideal solution for professional and home recording studios. Each stand has a top monitor mounting plate measuring 9" square and is capable of supporting monitors up to 90 lb. The sturdy, wide-base, three-leg design with rubber feet and included spikes ensure stability on all types of floor surfaces.
Each stand can be adjusted to six different heights. The ergonomic locking knob and the added security of the locking pin ensure solid steadiness at whatever height is selected. The foam strips on the mounting plate keep monitors securely in place and also help reduce unwanted vibrations.
Warnings

- Please read and follow these instructions and keep this manual in a safe place.
- Handle this product with care.
- Keep this product away from water and all flammable gasses or liquids.
- Make sure that this product is intact and that there are no missing parts.
- Make sure everything is secure before proceeding.
- Do not exceed the maximum load capacity.
- Keep fingers clear of the telescoping joint when adjusting height.
- To avoid damage to your monitor stand, be careful not to over tighten the locking knobs.
- All photos are for illustrative purposes only.
Overview
Monitor mounting plate 1
Telescoping shaft 2
Locking knob 3
Locking pin 4
Lag attachment plate cover 5
Top lag attachment plate 6
Bottom lag attachment plate 7
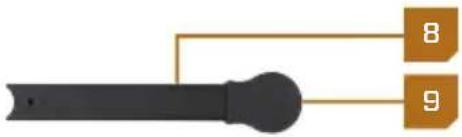
Legs 8
Rubber feet 9
Spikes 10
Washers & nuts 11
Touch-fastener straps12
Open-end wrench 13
Allen wrench 14
Socket screw 15
Carriage bolts 16
Locknuts 17

flowchart
graph LR
    A["Black Square Node"] --> B["1"]








Assembly Instructions
Attaching the legs
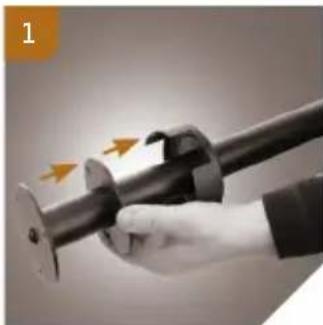
- Position the shaft horizontally.
- Slide the lag attachment plate cover and top lag attachment plate away from the bottom lag attachment plate.
1
-
With the open side of the rubber foot facing down, position the first leg against the shaft. Align the holes of the bottom lag attachment plate and the leg. Slide the top lag attachment plate into position above the leg so that all the holes are aligned. 2
-
Insert the carriage bolt from the top through the top lag attachment plate, leg, and bottom lag attachment plate. Make sure that the square head of the bolt fits into the square hole of the top lag attachment plate. 3
-
With the flat side of the locknut facing up toward the bottom lag attachment plate, screw the locknut onto the end of the carriage bolt from below the bottom lag attachment plate. Tighten the locknut with the open-end wrench.
4
- Repeat this process to attach the other legs.
natural_image
Close-up of a hand holding a black mechanical component with orange arrows indicating motion or force direction (no text or symbols visible)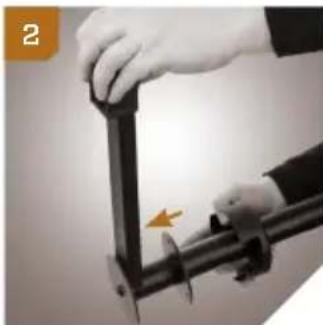
natural_image
Close-up of hands holding a black mechanical clamp or bracket, with an arrow pointing to a small component (no text or symbols visible)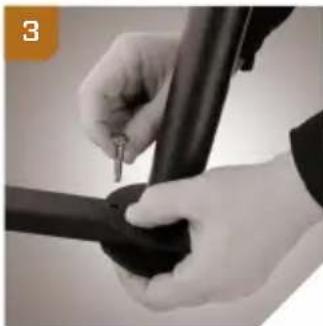
natural_image
Close-up of hands installing or adjusting a black cylindrical component with a tool (no visible text or symbols)
natural_image
Hand using a wrench to adjust a mechanical component (no text or symbols visible)-
If using the stand on a carpeted area, remove the rubber feet, insert the flat end of the spikes up through the bottom of the legs, and secure them with the washers and nuts on the top of the leg. 5
-
Slide the lag attachment plate cover down to cover the bolt heads, and place the stand into the upright position. 6

natural_image
Close-up of a mechanical assembly with a bolt and two bolts, showing internal components and directional arrows (no text or symbols)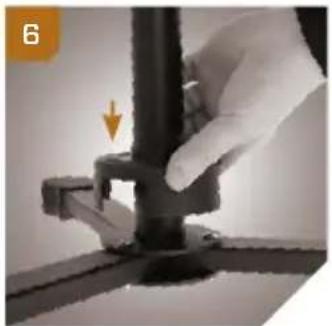
natural_image
Close-up of a hand adjusting a black mechanical component with an arrow indicating a downward motion (no text or symbols visible)Attaching the Monitor Mounting Plate
-
Align the monitor mounting plate on top of the shaft with the indented hole fitting into the top of the shaft, and insert the socket screw. 1
-
Tighten the socket screw with the Allen wrench. 2
Note: Do not over tighten. Tightening the socket screw until snug will adequately secure the mounting plate.

natural_image
Hand holding a small object above a dark rectangular object with a cylindrical rod, under spotlight (no text or symbols visible)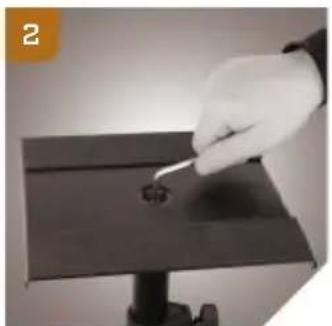
natural_image
Hand holding a small object on a dark surface, possibly a tool or device (no visible text or symbols)Operating Instructions
Important: Make all height and location adjustments before mounting your monitors onto the stands.
Adjusting the height
-
Loosen the locking knob.
-
Raise or lower the telescoping shaft to the desired height and insert the locking pin completely through the holes on both sides of the shaft. 1
-
Lower the shaft until it rests on the locking pin. Tighten the locking knob. 2

natural_image
Close-up of hands holding a black mechanical device with a yellow arrow indicating direction (no text or symbols visible)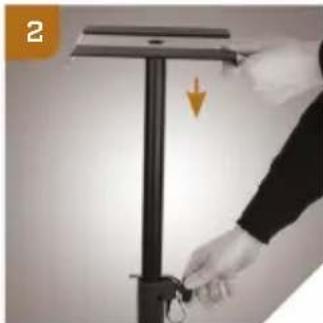
natural_image
Person holding a key next to a metal frame with an arrow indicating force (no text or symbols)Mounting the monitors
-
Once you've set the height of the stand, you can safely mount the monitor on the monitor mounting plate. 1
-
Use the touch-fastener straps to secure the speaker cables by wrapping them around the shaft and cable. 2

natural_image
Hand holding a black compact speaker with a circular head cover, mounted on a stand (no visible text or symbols)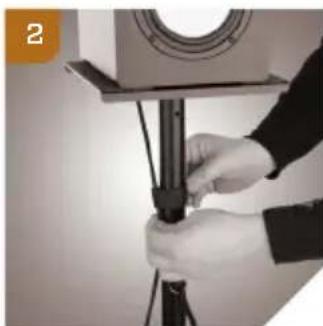
natural_image
Close-up of hands adjusting a camera lens mounted on a tripod stand (no text or symbols visible)Recommended accessories
- Auray IP-S Isolation Pad
- Auray IPRS-S Recoil Stabilizer
Specifications
Minimum height: 35" (88.9 cm)
Maximum height: 58.5" (148.6 cm)
Load capacity: 90 lb. (40.8 kg)
Plate size: 9'' × 9'' (22.9 × 22.9 cm)
Weight: 10.35 lb. (4.69 kg)
Base spread: 23" (58.4 cm)
One-Year Limited Warranty
This AURAY product is warranted to the original purchaser to be free from defects in materials and workmanship under normal consumer use for a period of one (1) year from the original purchase date or thirty (30) days after replacement, whichever occurs later. The warranty provider's responsibility with respect to this limited warranty shall be limited solely to repair or replacement, at the provider's discretion, of any product that fails during normal use of this product in its intended manner and in its intended environment. Inoperability of the product or part(s) shall be determined by the warranty provider. If the product has been discontinued, the warranty provider reserves the right to replace it with a model of equivalent quality and function.
This warranty does not cover damage or defect caused by misuse, neglect, accident, alteration, abuse, improper installation or maintenance. EXCEPT AS PROVIDED HEREIN, THE WARRANTY PROVIDER MAKES NEITHER ANY EXPRESS WARRANTIES NOR ANY IMPLIED WARRANTIES, INCLUDING BUT NOT LIMITED TO ANY IMPLIED WARRANTY OF MERCHANTABILITY OR FITNESS FOR A PARTICULAR PURPOSE. This warranty provides you with specific legal rights, and you may also have additional rights that vary from state to state.
To obtain warranty coverage, contact the Auray Customer Service Department to obtain a return merchandise authorization (“RMA”) number, and return the defective product to Auray along with the RMA number and proof of purchase. Shipment of the defective product is at the purchaser’s own risk and expense.
For more information or to arrange service, visit www.aurayaudio.com or call Customer Service at 212-594-2353.
Product warranty provided by the Gradus Group. www.gradusgroup.com

AURAY™ A Gradus Group Brand

Brand : Auray
Model : LMS-335
Category : TV Stand