
SMS-10CL - TV Stand Auray - Free user manual and instructions
Find the device manual for free SMS-10CL Auray in PDF.


| Product Type | TV Stand |
| Brand | Auray |
| Model | SMS-10CL |
| Color | Black |
| Material | Engineered wood with laminate finish |
| Dimensions (W x D x H) | 47.2" x 15.7" x 23.6" |
| Weight | 35.3 lbs |
| Max TV Size | 50 inches |
| Max TV Weight Capacity | 60 lbs |
| Shelf Weight Capacity | 20 lbs per shelf |
| Number of Shelves | 2 |
| Cable Management | Yes, rear cutouts |
| Assembly Required | Yes |
| Tools Included | Allen key, screws |
| Recommended Room | Living room, bedroom |
| Cleaning Instructions | Wipe with damp cloth, no abrasive cleaners |
| Safety Feature | Anti-tip bracket included |
| Warranty | 1 year limited |
Frequently Asked Questions - SMS-10CL Auray
User questions about SMS-10CL Auray
0 question about this device. Answer the ones you know or ask your own.
Ask a new question about this device
Download the instructions for your TV Stand in PDF format for free! Find your manual SMS-10CL - Auray and take your electronic device back in hand. On this page are published all the documents necessary for the use of your device. SMS-10CL by Auray.
USER MANUAL SMS-10CL Auray
natural_image
Black guoxy fishing platform with adjustable arm and base mount (no text or symbols visible)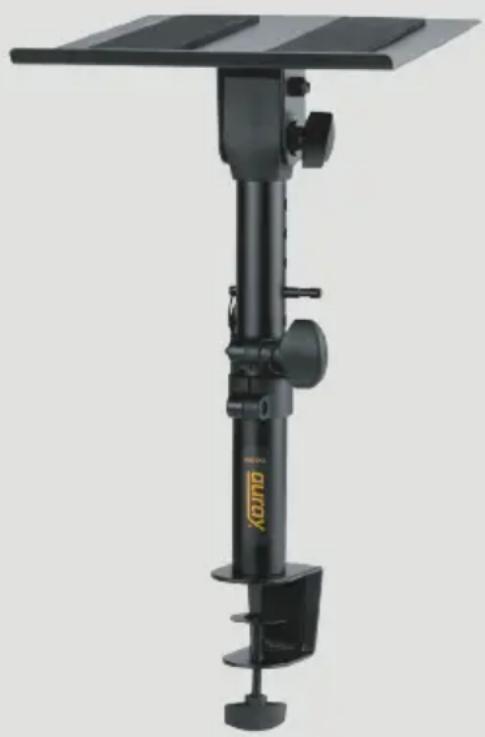
natural_image
Black XOING stand with adjustable arm and base mount (no text or symbols visible)Thank you for choosing Auray.
Auray's SMS-10CL sturdy clamp-on Studio Monitor Stands elevate your studio monitors off the desktop and into ideal monitoring position whether you're working in a home or pro studio. They'll help you find the audio sweet spot so you can record, mix, and master with confidence. And by getting your monitors off the desktop, your workstation will have a little more room and a little less clutter.
Ideal for 5-inch monitors, each stand features all-steel construction and can support monitors up to 45 pounds. A beefy C-clamp fits desktops up to 2 inches thick, and included EVA strips keep monitors in place and reduce unwanted vibrations. The height of each stand adjusts from 10 to 14.5 inches above the desk. Height and tilt are easily adjusted with ergonomic knobs, and a locking pin adds stability and security for your valuable monitors.
Precautions

- Please read and follow these instructions, and keep this manual in a safe place.
- Handle this product with care.
- Keep this product away from water and any flammable gases or liquids.
- Make sure that this product is intact and that there are no missing parts.
■ Make sure everything is secure before proceeding. - Do not exceed the maximum load capacity.
- Keep fingers clear of the telescoping joint when adjusting height.
- To avoid damage to your monitor stand, be careful not to overtighten the bolts or locking knobs.
- All images are for illustrative purposes only.
Overview
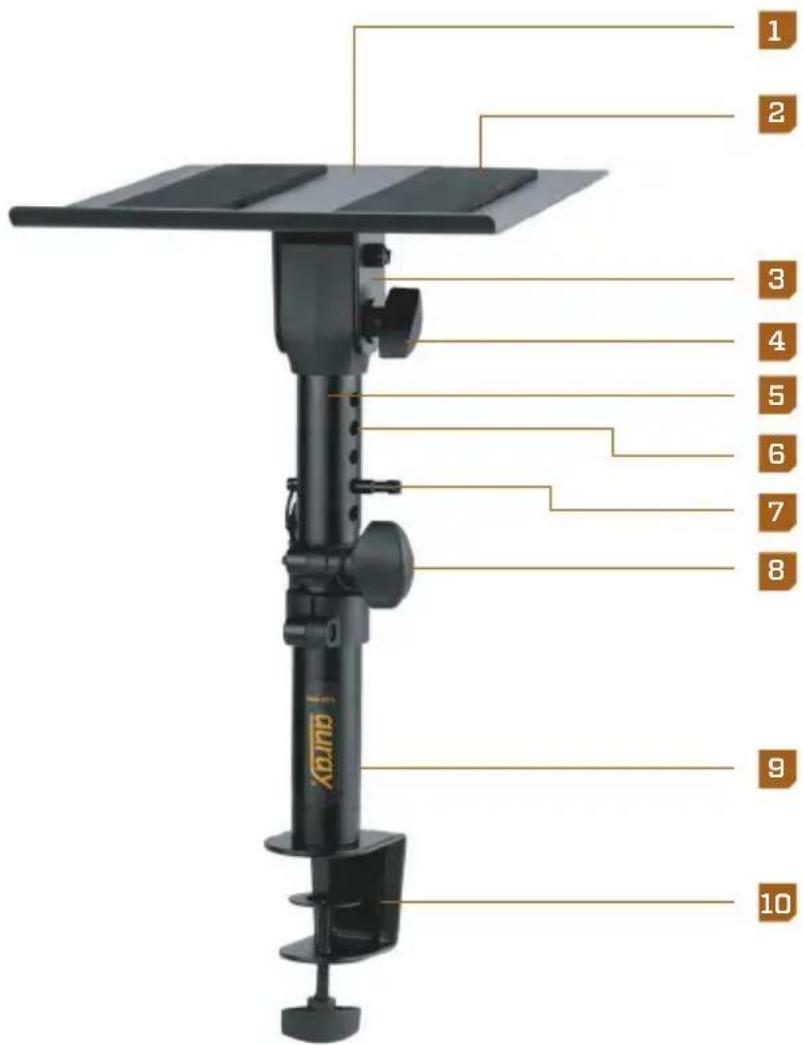
Monitor plate 1
EVA pads ^2
Bracket 3
Tilt lock 4
Adjustable shaft 5
Safety holes 6
Safety pin and lanyard 7
Locking knob 8
Base shaft 9
C-clamp 10
Also Included:
Open-end wrench Hex wrench
Assembly Instructions
- Remove the bolt from the adjustable shaft. Lay the monitor plate upside down on a flat surface. 1
- Slide the adjustable shaft's plastic fitting into the monitor plate bracket. Push the bolt through the hole nearest the monitor plate. Hold the nut in place with the open-end wrench, and tighten the bolt with the hex wrench. 2
- Unscrew the tilt locking knob, and slide the bolt through the bracket's tilt slot. Replace the tilt locking knob. 3
- Loosen the C-clamp lock so the clamp slides onto your desk or tabletop, and tighten the C-clamp until secure.
- Fit the monitor plate and adjustable shaft into the base shaft. 4
- Attach the EVA pads to the monitor plate by removing the protective strip to expose the glue surface. Place the pads on the monitor plate either in vertical or horizontal orientation. 5

natural_image
Hand holding a black padlock on a surface, with other components nearby (no visible text or symbols)
natural_image
Close-up of hands using a tool to adjust or install a mechanical component (no visible text or symbols)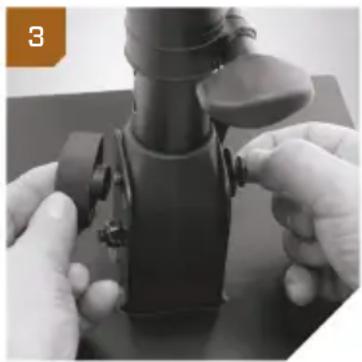
natural_image
Close-up of hands assembling or adjusting a mechanical component (no visible text or symbols)
natural_image
Close-up of hands using a handheld device to lift a black cylindrical object (no text or symbols visible)
natural_image
Close-up of hands handling a dark rectangular object with a camera mount (no visible text or symbols)Operating Instructions
Adjusting the Height
- Loosen the locking knob.
- Raise or lower the monitor plate, and insert the locking pin through the holes. 1
- Lower the shaft until it rests on the locking pin. Tighten the locking knob until secure. 2

natural_image
Close-up of hands adjusting a black mechanical device with a handle (no visible text or symbols)
natural_image
Close-up of hands adjusting a black cylindrical device with a handle (no visible text or symbols)Mounting Monitors
Important! Always support the monitor plate with one hand when you loosen the tilt lock to make an adjustment.
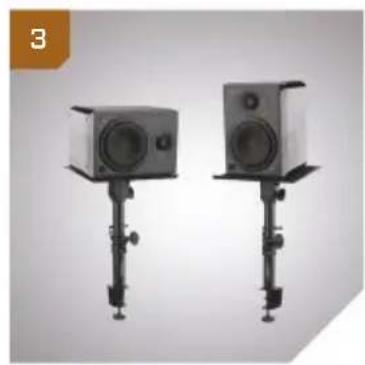
- Mount the monitor on the monitor plate in horizontal or vertical orientation. 3
- Loosen the tilt lock and adjust the monitor's angle. Make sure the mounting plate's lip is on the lower side of plate's angle to prevent slipping. 4
natural_image
Two identical studio-mounted audio equipment units mounted on a stand, no visible text or symbols
natural_image
Close-up of hands adjusting a camera lens mounted on a tripod stand (no visible text or symbols)One-Year Limited Warranty
This AURAY product is warranted to the original purchaser to be free from defects in materials and workmanship under normal consumer use for a period of one (1) year from the original purchase date or thirty (30) days after replacement, whichever occurs later. The warranty provider's responsibility with respect to this limited warranty shall be limited solely to repair or replacement, at the provider's discretion, of any product that fails during normal use of this product in its intended manner and in its intended environment. Inoperability of the product or part(s) shall be determined by the warranty provider. If the product has been discontinued, the warranty provider reserves the right to replace it with a model of equivalent quality and function.
This warranty does not cover damage or defect caused by misuse, neglect, accident, alteration, abuse, improper installation or maintenance. EXCEPT AS PROVIDED HEREIN, THE WARRANTY PROVIDER MAKES NEITHER ANY EXPRESS WARRANTIES NOR ANY IMPLIED WARRANTIES, INCLUDING BUT NOT LIMITED TO ANY IMPLIED WARRANTY OF MERCHANTABILITY OR FITNESS FOR A PARTICULAR PURPOSE. This warranty provides you with specific legal rights, and you may also have additional rights that vary from state to state.
To obtain warranty coverage, contact the Auray Customer Service Department to obtain a return merchandise authorization ("RMA") number, and return the defective product to Auray along with the RMA number and proof of purchase. Shipment of the defective product is at the purchaser's own risk and expense.
For more information or to arrange service, visit www.aurayaudio.com or call Customer Service at 212-594-2353.
Product warranty provided by the Gradus Group.
www.gradusgroup.com

AURAY® A Gradus Group Brand
AURAY is a registered trademark of the Gradus Group. © 2022 Gradus Group LLC.
All Rights Reserved.
GG3
Specifications
Minimum height: 10 in. (25.4 cm)
Maximum height: 14.25 in. (36.2 cm)
Load capacity: 45 lb. (20.4 kg)
Plate dimensions: 9.75 × 11.75 in (24.8 × 29.8 cm)
Max clamp width: 2 in. (5 cm)
Weight: 4.8 lb. (2.2 kg)

Brand : Auray
Model : SMS-10CL
Category : TV Stand