
FM-1327 - Uncategorized Gabor - Free user manual and instructions
Find the device manual for free FM-1327 Gabor in PDF.


| Product Type | Wireless Earbuds |
| Model | FM-1327 |
| Brand | Gabor |
| Dimensions (per earbud) | 2.5 x 1.8 x 1.2 cm |
| Weight (per earbud) | 5 g |
| Charging Case Weight | 40 g |
| Battery Capacity (earbud) | 50 mAh |
| Battery Capacity (case) | 500 mAh |
| Charging Port | USB-C |
| Charging Time | 1.5 hours |
| Battery Life (playback) | 5 hours per charge |
| Total Battery Life with Case | 20 hours |
| Connectivity | Bluetooth 5.0 |
| Range | 10 meters |
| Water Resistance | IPX5 (sweat and water resistant) |
| Controls | Touch capacitive |
| Voice Assistant Support | Siri, Google Assistant |
| Compatibility | iOS and Android |
| Included Accessories | Earbuds, charging case, USB-C cable, 3 sizes ear tips |
| Safety Notices | Do not use while driving or operating machinery; keep away from water; avoid extreme temperatures |
| Maintenance | Clean with dry cloth; store in case when not in use; charge regularly |
| Warranty | 1 year limited warranty |
Frequently Asked Questions - FM-1327 Gabor
User questions about FM-1327 Gabor
0 question about this device. Answer the ones you know or ask your own.
Ask a new question about this device
Download the instructions for your Uncategorized in PDF format for free! Find your manual FM-1327 - Gabor and take your electronic device back in hand. On this page are published all the documents necessary for the use of your device. FM-1327 by Gabor.
USER MANUAL FM-1327 Gabor
Thank you for choosing Gabor.
Thank you for choosing Gabor's fixed flat panel screen wall mount. This heavy-duty wall mount has been engineered to provide your 13"-27" flatscreen monitor with sturdy, long-lasting support that can be relied upon for years of viewing enjoyment.
With an impressive lineup of versatile mounting brackets possessing various functionalities - along with a resilient, user-friendly mounting method that simplifies the installation process - Gabor's reputation for providing quality viewing solutions and long-lasting dependability is readily apparent...from every angle.

natural_image
A couple watching a wall-mounted device on a sofa, with a video camera visible in the background (no text or symbols on the main image)3Welcome
Product Specifications
- For Mounting 13"-27" Flat Panel Screens On Wooden Studs & Concrete Walls
• Vesa Mounting Pattern 75/100
• Maximum Load Capacity 40lbs / 18kg
• Product Dimensions 5.5"x5"x0.5"
Tools Required For Installation
- Power Drill
- Scissors
- Phillips Screwdriver
- Socket Wrench
Product Contents
Supplied Parts & Hardware
A (4) Bolt M4x12
I (1) Bubble Level Device
B (4) Bolt M4x30
J (4) Spacer
C(4) Bolt M5x12
D (4) Bolt M5x30
E (2) Washer
F (2) Bolt M5x12
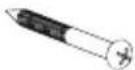
G (2) Screw M6x50
H (2) Wall Anchor

natural_image
Simple line drawing of a wall-mounted frame with circular holes, labeled 'Wall Mount' above (no other text or symbols)
natural_image
Simple line drawing of a rectangular frame with bolt holes and a label 'Bracket' (no other text or symbols)| M4 M5 M5 Screw/Anchor Bubble Level | ||||
 |  |  |  |  |
 |  |  |  |  |
 |  |  |  |  |
 |  |  |  |  |
Installation Instructions
STEP 1:
Installing Dual Mounting Brackets On Rear Of Flatscreen
- Begin by aligning square bracket on rear of flatscreen device, while ensuring that device screen is resting on a non-scratch surface.
- The appropriate bolts and washers should be selected by measuring the height, size and position of holes on rear of flatscreen device, and determining which bolts and washers fit best. This may vary according to specific brand, make and model of flatscreen device.
- Use the shortest configuration of bolts, washers and spacers for a secure fit. Spacers may or may not be required depending on curvature of flat screen device and rear dimensions.
- Ensure that bracket is in proper position by confirming that ridges on edge curve outwards and extend wider on top, then secure bolts tightly.
• Note that bolts must be hand-fastened into holes with a screwdriver or socket wrench to avoid overtightening and possible damage.
Hardware Configurations
For Display With Flat Back:
Install bracket directly to flatscreen device using only bolts and washers provided; align bolt with proper sized hole on washer. (Fig.1)
For Display With Curved Backs & Recessed Mountings:
Install appropriate sized spacer between bracket and flatscreen device; then fasten securely with bolts and washers. (Fig.2)

natural_image
Diagram showing two screws mounted on a TV with a screw and nut, labeled (Fig.1) (Fig.2) (no text or symbols on the diagram itself)
natural_image
Diagram showing screw and nut assembly with TV label (no text or symbols on components)
natural_image
Technical line drawing of a rectangular frame with internal components and mounting holes (no text or symbols)8 Installation Instructions
STEP 2: Positioning Mount Correctly On Wall
- The optimal height to position a flatscreen device is by mounting it at eye-level of viewer. This can be accomplished in one of two ways:
• Measure distance from seating area to viewing area to determine proper placement. The ideal position should place the center of the panel (where the diagonals meet) as close as possible to eye-level.

- For a simpler calculation, cut a piece of sturdy cardboard that's approximately the same size as flatscreen device and tape to wall; gaze at cardboard to determine if it is at a comfortable level; reposition the cardboard until it is sitting at a perfect height and mark location of cardboard on wall with a pencil.
STEP 3:
Installing Mount Directly On Wall
• After confirming height positioning is appropriate by marking wall with a pencil, hold wall mount firmly against wall and use pencil to mark exact location of drill holes, using included bubble level to ensure a proper balance; then remove wall mount and pre-drill holes.
Wall-Type Mounting Details
Mounting To Wood Studs Under Sheetrock Wall:
Pre-drill holes according to markings on wall with a 3mm drill bit; be sure pre-drilled holes are at least 30mm deep; use provided hardware to attach wall mount.

Mounting To Solid Concrete Wall:
Pre-drill holes according to markings on wall with a 12.7mm drill bit; be sure pre-drilled holes are at least 60mm deep; use appropriate wall anchors to attach wall mount (please verify that included anchors are appropriate).

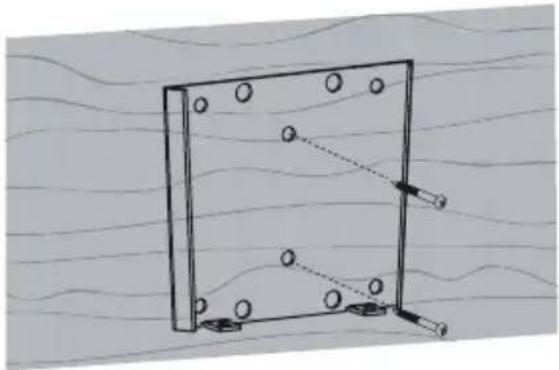
- Hold wall mount securely and begin inserting bolts into 2 center holes found on wall mount, ensuring 2 safety metal slots on bottom extend away from wall.
natural_image
Simple line drawing of a rectangular frame with circular holes and a dashed arrow pointing to it, set against a wavy background (no text or symbols)STEP 4: Hanging Flatscreen Device On Wall Mount
- With mounting bracket fastened to rear of flatscreen device, lift entire flatscreen display over wall mount at a parallel angle.
• Gently lower flatscreen panel downwards and slide track on mounting bracket into slot on wall mount ensuring they engage; continue sliding until flatscreen comes to a stop and is resting properly in track.
- Insert 2 M5x12 bolts into dual metal slots found on wall mount to safely secure in place.
- Warning: Ensure both plates are fully engaged before releasing grip on flatscreen!

Safety Warnings
1 Do not use this product for any flat panel screen device other than what it is intended for; the exact specifications, size parameters and weight limits are found both on the product box and in the instruction manual
2 It is strongly recommended that this product be installed by a qualified professional or installation contractor; Gabor takes no responsibility for any product damage or personal injury resulting from mishandling, incorrect mounting, faulty assembly or improper use of this product
3 This product has been designed specifically for mounting directly on wooden studs or concrete walls; depending on wall type and material, the use of additional appropriate mounting hardware and/or accessories such as heavy-duty anchors may be required
4 The supplied mounting hardware is not intended for use on metal studs or cinderblock walls, and may not be appropriate for old or weak walls; it is best to consult with a qualified professional to determine whether your walls are capable of supporting this bracket
5 Product must always be mounted directly to center of wooden wall studs or on a solid concrete wall to properly support the weight of the device; the wall may require reinforcement prior to mounting (i.e. metal studs; plaster on lath; or irregular spacing of studs), which should be determined by a qualified professional
6 Do not mount device on structures that may be affected by vibrations or noticeable impacts; do not install near heater, fireplace or any other source of direct heat energy
7 It is recommended that at least 2 people should perform the installation process to prevent injury from mishandling or dropping of the product and/or flatscreen device; proper safety gear and tools must be utilized at all times when installing product
8 When installing this product, be sure to refer to mounting instructions detailed in this manual; failure to abide by mounting instructions may void product warranty
9 This product may contain small parts which can possibly pose a choking hazard; keep out of reach of children and pets
10 Excessive exposure to liquids may damage the finish of this product; when cleaning this product, use only a mild detergent solution and quickly wipe dry with a soft cloth
Customer Support
For more information or to arrange service, visit www.madebygabor.com or call Customer Service at 212-594-2353.

GABOR™ A Gradus Group Brand
Product warranty is provided by the Gradus Group. www.gradusgroup.com
Gabor is a registered trademark of the Gradus Group.
© 2014 Gradus Group LLC. All Rights Reserved.
GG2
ONE-YEAR LIMITED WARRANTY:
This GABOR product is warranted to the original purchaser to be free from defects in materials and workmanship under normal consumer use for a period of one (1) year from the original purchase date or thirty (30) days after replacement, whichever occurs later. The warranty provider's responsibility with respect to this limited warranty shall be limited solely to repair or replacement, at the provider's discretion, of any product that fails during normal use of this product in its intended manner and in its intended environment. Inoperability of the product or part(s) shall be determined by the warranty provider. If the product has been discontinued, the warranty provider reserves the right to replace it with a model of equivalent quality and function.
This warranty does not cover damage or defect caused by misuse, neglect, accident, alteration, abuse, improper installation or maintenance. EXCEPT AS PROVIDED HEREIN, THE WARRANTY PROVIDER MAKES NEITHER ANY EXPRESS WARRANTIES NOR ANY IMPLIED WARRANTIES, INCLUDING BUT NOT LIMITED TO ANY IMPLIED WARRANTY OF MERCHANTABILITY OR FITNESS FOR A PARTICULAR PURPOSE. This warranty provides you with specific legal rights, and you may also have additional rights that vary from state to state.
To obtain warranty coverage, contact the Gabor Customer Service Department to obtain a return merchandise authorization ("RMA") number, and return the defective product to Gabor along with the RMA number and proof of purchase. Shipment of the defective product is at the purchaser's own risk and expense.
WWW.MADEBYGABOR.COM
- Thank you for choosing Gabor.
- Product Specifications
- Tools Required For Installation
- Product Contents
- Supplied Parts & Hardware
- Installation Instructions
- STEP 1:
- Installing Dual Mounting Brackets On Rear Of Flatscreen
- Hardware Configurations
- For Display With Flat Back:
- For Display With Curved Backs & Recessed Mountings:
- STEP 2: Positioning Mount Correctly On Wall
- STEP 3:
- Installing Mount Directly On Wall
- Wall-Type Mounting Details
- Mounting To Wood Studs Under Sheetrock Wall:
- Mounting To Solid Concrete Wall:
- STEP 4: Hanging Flatscreen Device On Wall Mount
- Safety Warnings
- Customer Support
- ONE-YEAR LIMITED WARRANTY:
Brand : Gabor
Model : FM-1327
Category : Uncategorized