
Exterior AC-Feeder - Battery charger MARTIN - Free user manual and instructions
Find the device manual for free Exterior AC-Feeder MARTIN in PDF.


| Product Type | Battery Charger |
| Brand | Martin |
| Model | Exterior AC-Feeder |
| Input Voltage | 100-240 V AC, 50-60 Hz |
| Output Voltage | 12 V DC |
| Output Current | 5 A |
| Dimensions (L x W x H) | 200 x 150 x 80 mm |
| Weight | 1.2 kg |
| Protections | Overcharge, Short Circuit, Reverse Polarity |
| Indicators | LED for Charging and Full Charge |
| Charging Mode | Automatic with constant current and float charge |
| Operating Temperature | 0°C to 40°C |
| Cooling | Natural convection |
| Power Cord Length | 2 m |
| Material | Plastic casing |
| Compliance | CE, RoHS |
| Spare Parts Available | Fuse, DC cables |
| Maintenance | Keep dry, clean terminals, check cables periodically |
| Safety | Use in dry environment, disconnect from mains when not in use |
Frequently Asked Questions - Exterior AC-Feeder MARTIN
User questions about Exterior AC-Feeder MARTIN
0 question about this device. Answer the ones you know or ask your own.
Ask a new question about this device
Download the instructions for your Battery charger in PDF format for free! Find your manual Exterior AC-Feeder - MARTIN and take your electronic device back in hand. On this page are published all the documents necessary for the use of your device. Exterior AC-Feeder by MARTIN.
USER MANUAL Exterior AC-Feeder MARTIN
Safety, Installation and User Manual
Exterior AC-Feeder
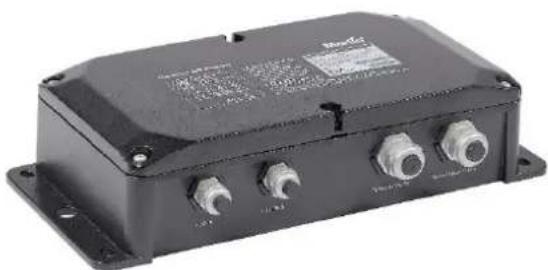
natural_image
Exterior view of a black industrial electronic device with four ports and mounting flanges (no visible text or symbols)Exterior DC-Feeder

Martin®
Dimensions
Exterior AC-Feeder

Exterior DC-Feeder

All measurements are in millimeters
©2023-2024 HARMAN PROFESSIONAL DENMARK ApS. All rights reserved. Features, specifications and appearance are subject to change without notice. HARMAN PROFESSIONAL DENMARK ApS and all affiliated companies disclaim liability for any injury, damage, direct or indirect loss, consequential or economic loss or any other loss occasioned by the use of, inability to use or reliance on the information contained in this document. Martin is a registered trademark of HARMAN PROFESSIONAL DENMARK ApS registered in the United States and/or other countries.
HARMAN PROFESSIONAL DENMARK ApS, Olof Palmes Allé 44, 8200 Aarhus N, Denmark HARMAN PROFESSIONAL, INC., 8500 Balboa Blvd., Northridge CA 91325, USA
www.martin.com
Exterior AC-Feeder and Exterior DC-Feeder Safety, Installation and User Manual, English, Rev. A,
Contents
Dimensions....2
Safety information 4
Introduction....7
Unpacking 7
Exterior AC-Feeder 8
Overview 8
Installing 9
Power management switch.... 12
Exterior DC-Feeder 13
Overview 13
Installing 13
Test/Reset button and status LED 14
Service and maintenance.... 15
Cleaning 15
Compliance and environmental.... 16
Safety information

WARNING!
Read the safety precautions in this section before installing, operating or servicing this product.
The following symbols are used to identify important safety information on the product and in this manual:

Warning!
Safety hazard. Risk of severe injury or death.

Warning!
Hazardous voltage. Risk of lethal or severe electric shock.

Warning!
See user documentation.

Warning! These products present risks of severe injury or death due to electric shock if the safety precautions in this manual are not followed. Read this manual before installing, operating or servicing the product. Follow the safety precautions given not only in this user manual but also in the manuals of all the devices you connect to the product. Observe all warnings given in the manuals and printed on devices.
The products are for professional use only. They are not for household applications. They must be installed and serviced by professional technicians only. Respect all locally applicable laws, codes and regulations when installing, operating or servicing the products.
Refer any service operation that is not described in this user manual to Martin® Service or an authorized Martin Service partner.

Install, operate and service Martin products only as directed in their user documentation, or you may create a safety hazard or cause damage that is not covered by product warranties.
Follow the safety precautions listed in the following section and observe all warnings in this manual and printed on the product.
The latest version of this User Manual is available for download from the Martin website at www.martin.com. Before you install, operate or service the product, check the Martin website and make sure that you have the latest user documentation for the fixture. Document revisions are indicated at the bottom of page 2.
Technical Support
If you have questions about how to install or operate the fixture safely, please contact Harman Professional Technical support:
For technical support in North America, please contact:
HProTechSupportUSA@harman.com
Phone: (844) 776-4899
For technical support outside North America, please contact your national distributor.

Protection from electric shock
Ensure that Exterior AC-Feeder and Exterior DC-Feeder devices are electrically connected to ground (earth).
Use only a source of mains power that complies with local building and electrical codes and has both overload and ground-fault (earth-fault) protection.
Do not attempt to open an Exterior DC-Feeder. There are no user-serviceable parts inside it.
Provide a means of locking out AC mains power so that power to the installation can be shut down and made impossible to reapply, even accidentally, during work on the installation.
Isolate the product from power immediately if the power plug or any seal, cover, cable, or other component is damaged, defective, deformed or showing signs of overheating. Do not reapply power until repairs have been completed.
Do not expose connectors or cable glands to stresses caused by lengths of cable hanging from them or by tight cable bends. Support the weight of cables running to and from products.
Keep the supplied plugs installed in all unused cable glands to protect from humidity.
The Exterior AC-Feeder and Exterior DC-Feeder are IP66-rated and may be used in permanent indoor and outdoor installations. Do not expose these products to high-pressure water jets from any direction.
When installing cable, create a 'drip loop' (see illustration on right) so that the cable arrives at cable glands or connectors from below.
Do not allow water to pool around the Exterior AC-Feeder's pressure equalization valve. Make a visual check of the pressure equalization valve periodically. If a valve appears to be dirty it may be blocked. Consult your Martin supplier for replacement.
Before using a device, check that all power distribution equipment and cables are in perfect condition and rated for the electrical requirements of all connected devices.

natural_image
Pure diagram of a pipe with water droplets and a valve, no text or symbols presentDrip loop
Disconnect products from AC mains power and ensure that power cannot be reconnected before carrying out any installation or maintenance work and when the product is not in use.
Do not connect products to mains power in a daisy chain that will exceed the electrical ratings of any device, cable or connector in the chain.
Check and respect the directions given in the user manuals of all the devices that you intend to connect to an Exterior AC-Feeder or Exterior DC-Feeder. Pay particular attention to the instructions and warnings that apply to:
- system layout,
- connections to other devices,
- specified cables,
• maximum cable lengths, and
• maximum number of devices that can be connected.
The external diameter of the cables used to connect Exterior AC-Feeder devices to power and data must be suitable for the cable glands provided, or water can enter the product and create a safety hazard or cause damage. The cables must have the following external diameter:
• AC mains power in: 8-13 mm (0.32-0.51 in.)
• Network data in: 5-8 mm (0.2-0.32 in.)
To connect an Exterior AC-Feeder to AC mains power – or to connect Exterior AC-Feeder devices to AC mains power in a chain that takes power from one source – use minimum 18 AWG or 0.75 mm 2 conductor size power input cable that is suitable for the current draw, environment and application. In the USA and Canada the cables must be UL/CSA-recognized, hard usage, type SJTW, SJOOW or better. In the EU the cables must be type H05RN-F, H07RN-F or better.
If you connect Exterior AC-Feeder devices to AC mains power in a chain that takes power from one source, respect the following limits:
- When operating at 100-120 V\~ do not link more than eight (8) fully loaded AC-Feeders in total in a chain.
- When operating at 200-240 V\~ or 277 V\~ do not link more than sixteen (16) fully loaded AC-Feeders in total in a chain.
If you connect Exterior DC-Feeder devices to each other in a daisy-chain that takes DC power from one source, respect the following limit:
- Do not link more than sixteen (16) DC-Feeders in total in a chain.
Keep the supplied cable gland caps and connector caps installed on unused cable glands and connectors at all times to maintain a seal against humidity and dirt.

Protection from burns and fire
Do not operate an Exterior AC-Feeder or Exterior DC-Feeder if the maximum ambient temperature ( Ta max.) exceeds 55° C (131° F)

Protection from injury
Fasten the product securely to a fixed surface or structure when in use. The product is not portable when installed.
Ensure that any supporting structure and/or hardware used can hold at least four (4) times – or more if required by local regulations – the weight of all the devices and other items that they support.
Use rigging hardware and fasteners that are in perfect condition, approved for the weight that they will support, and suitable for their application and the installation environment. Do not use safety cables as the primary means of support.
If you install an Exterior AC-Feeder or Exterior DC-Feeder on a truss or similar tubular structure using a rigging clamp in a location where it may cause injury or damage if it falls, install as directed in this manual a secondary attachment such as a safety cable that will hold the product if a primary attachment fails. The secondary attachment must be approved by an official body such as TÜV as a safety attachment for the weight that it secures, must comply with EN 62368-2-17 Section 8.7 and must be capable of bearing a static suspended load that is four (4) times – or more if required by local regulations – the weight of the product and all installed accessories.
Check that all external covers and rigging hardware are securely fastened.
Block access below the work area and work from a stable platform whenever installing, servicing or moving an overhead product.
Do not operate a product with missing or damaged covers.
In the event of an operating problem, stop using the product immediately and disconnect it from power. Do not attempt to use a product that is obviously damaged.
Do not modify the product in any way not described in this manual. Install genuine Martin parts only.
Refer any service operation not described in this manual to Martin Service or one of its authorized agents.
Introduction
Thank you for selecting a product from the Martin® Creative LED range. This manual covers two products that can be used to supply DC power and data to Martin Exterior Dot-1/4/9 Pro lighting fixtures:
- Exterior AC Feeder – accepts AC mains power at 100-120 / 200-277 V, 50 / 60 Hz and Martin P3 or DMX/RDM data. The AC-Feeder sends 15 volt DC power and data to Martin Exterior Dot-1/4/9 Pro fixtures.
- Exterior DC-Feeder – accepts DC power at 48 V from a Martin DCE PSU 240 IP, Martin P3 PowerPort or generic 48 V PSU and data from a Martin P3 or DMX/RDM source. The DC-Feeder sends 15 volt DC power and data to Martin Exterior Dot-1/4/9 Pro fixtures.
The Exterior AC-Feeder and Exterior DC-Feeder will forward any Art-Net, sACN or Martin P3 data to the fixtures connected to them.
For possible system layouts when using AC-Feeders and DC-Feeders with Martin Exterior Dot-1/4/9 Pro fixtures, please see the user documentation for those fixtures and the system layout diagrams available on the Martin website at www.martin.com. Martin user documentation is supplied with products and available for download from the Martin website, where you can also find the latest specifications, firmware updates and support information for all Martin products.
Unpacking
The following items are included with devices:
Exterior AC-Feeder
- This manual
- Blanking plugs in all pre-installed cable glands
- Internal connectors for AC mains power, DC power and data
- Pre-installed hybrid (DC power and data) output cable tail.
PDE hybrid mains power and data in and thru cable tails are available from Martin as optional accessories for the Exterior AC-Feeder. Your Martin supplier can give details.
Exterior DC-Feeder
- This manual
- Pre-installed hybrid (DC power and data) input and thru cable tails.
- Pre-installed hybrid (DC power and data) output cable tail.
Exterior AC-Feeder
Overview
AC mains power input, AC mains power thru, network data input and network data thru connections are made using connectors inside the device. The hybrid (DC power and data) output connection to a daisy-chain of Martin lighting fixtures is made via a cable tail with a connector suitable for connection to Martin Exterior Dot-1/4/9 fixtures.


A - Hybrid output cable tail
B - Power management switch
C - Network data IN and THRU terminals
D - AC mains power IN terminals
E - Network data cable gland
F – Network data cable gland
G - AC mains power or hybrid PDE* cable gland
H - AC mains power or hybrid PDE* cable gland
I-Holes for M6 mounting fasteners (x4)
J – Hole for M12 fastener on rigging clamp and for safety cable attachment
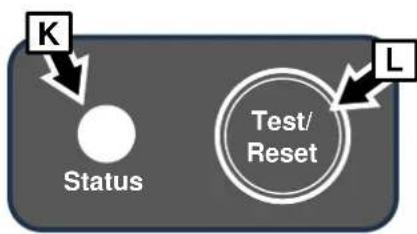
K-Status LED
L - Test/Reset button
M - Hybrid output cable tail
N - Pressure equalization valve
*Mains power and Data via Ethernet
Installing
Read the ‘Safety Information’ section starting on page 4 before installing, applying power to or operating the device.
Physical installation
The Exterior AC-Feeder is designed to be mounted on a flat surface in any orientation with four M6 screws or other suitable fasteners. Four holes (see I on previous page) for fasteners are provided in the flanges at the corners of the device. Use fasteners that are suitable for the application and for the installation environment.
The Exterior AC-Feeder can also be fastened to a rigging clamp with an M12 bolt passed through one of the two holes J and installed on a rigging truss. If you install the AC-Feeder using a rigging clamp in a location where it may cause injury or damage if it falls, attach a safety cable that is approved for the weight of the device to one of the holes J and anchor the safety cable securely (by looping it around the rigging truss, for example). Remove as much slack as possible from the safety cable, looping it more than once around the truss if necessary. Make sure that the safety cable will catch the device if the rigging clamp fails.
Using cable glands
Where cable glands are used for cable entry, follow the instructions in this section to ensure that the product's IP66-rating is maintained.
To install a cable using a cable gland:
- Ensure that the installation is isolated from power.
- See illustration on right. Holding the cable entry A to prevent it from turning, loosen the compression nut B on the cable gland.
- Pass the cable through the cable gland and into the device. When you have finished making the connections inside the device, hold the cable entry A to prevent it from turning and tighten the compression nut B until the cable is held securely in the gland.

Opening and closing the Exterior AC-Feeder
To open the Exterior AC-Feeder, see drawing on right. Remove the six screws (arrowed) from the Feeder's cover and remove the cover.
As soon as you have finished making connections, check that the mating surface on the Exterior AC-Feeder and the seal in the cover are clean, dry and in perfect condition, then reinstall the cover using the original six screws. Use a torque driver and tighten the screws to between 0.8 and 0.9 Nm in order to ensure that the cover is correctly sealed.

natural_image
Technical line drawing of a mechanical device with mounting flanges and a lever (no text or symbols)Making connections
Make sure that the weight of cable runs is supported so that lengths of cable do not hang from connectors.
Follow this color coding guide when connecting AC mains power cables:
| Live or L | Neutral or N | Earth, Ground or ⊕ | |
| US system | Black | White | Green |
| EU system | Brown | Blue | Yellow/green |
There are two options for connecting to AC mains power and data:
- Connecting to separate AC mains power and data sources using the terminals inside the AC-Feeder
- Connecting to AC mains power and data using the hybrid PDE cable tails available as an accessory from Martin (your Martin supplier can provide details).
Option 1. Connecting to separate AC mains power and data sources
Check that AC mains power to the installation is shut down and cannot be reapplied during installation work.
Connecting AC mains power
- See the instructions on using cable glands in the previous section of this manual. Loosen one of the mains power input cable gland compression nuts and pass the mains power input cable through the cable gland and into the Exterior AC-Feeder.
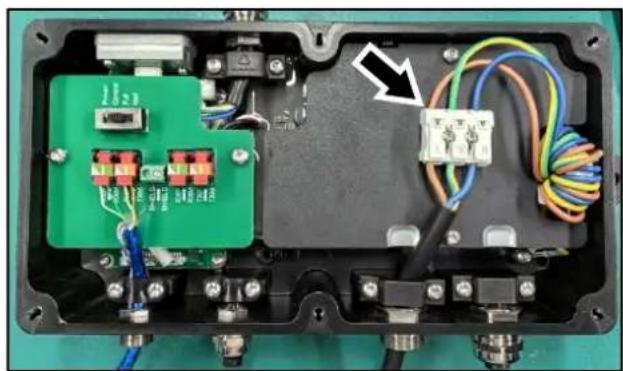
- See illustration on right. Strip 8–9 mm (0.32–0.35 in.) of insulation from the power cable wires and fasten the wires into the mains power quick-connectors (arrowed) as follows:
• Live to the connector marked L
• Neutral to the connector marked N
• Ground/earth to the connector marked ⊕
To fasten a wire into a quick-connector, push down the lever on the quick-connector, insert the bare wire end into the connector, then release the lever so that the connector grips the wire. Check that the wire is held securely.
natural_image
Interior view of an electronic device housing with visible wiring and components (no text or symbols)8–9 mm (0.32–0.35 in.)

AC mains power input connections
If you need to release a wire, push down on the lever on the quick-connector.
- Tighten the compression nut on the cable gland until the mains power input cable is held tightly.
To daisy-chain power to another Exterior AC-Feeder, pass the AC mains power output cable through the unused AC mains power cable gland, strip 8–9 mm (0.32–0.35 in.) of insulation from the power output cable wires and fasten the wires into the quick-connectors as described above for the power cable input wires.
Connecting network data
- See the instructions on using cable glands in the previous section of this manual. Loosen the compression nuts on one of the Ethernet cable glands and pass the data input cable through the gland and into the Exterior AC-Feeder.
- Pass the data input cable through one of the data cable glands and into the Exterior AC-Feeder.
- Untwist the wires in the data cable. Do not strip insulation from the wires.
- See illustration on right. Fasten the shield wire (the wire that has no insulation) into one of the screw terminals marked SHIELD.
-
Lift the levers on one set of data quick-connectors and slide the wires into the connectors as follows:
-
Green/white to RXP
- Green to RXM
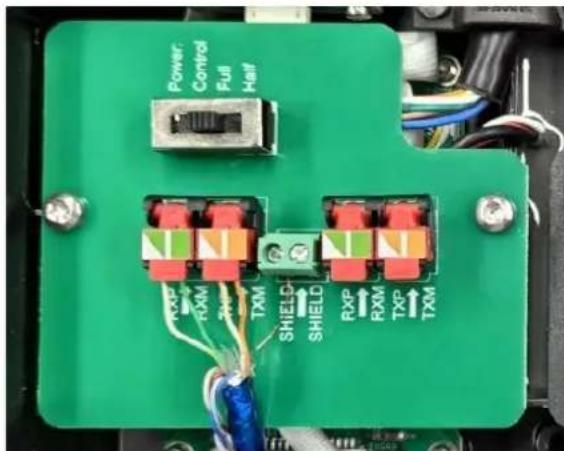
- Orange/white to TXP
-
Orange to TXM.
-
Push the levers on the quick connectors all the way down firmly and check that the wires are held securely.
- Tighten the compression nut on the data cable gland until the mains power input cable is held tightly.
To daisy-chain data to another Exterior AC-Feeder, pass the data output cable through the unused data cable gland and fasten the wires into the unused data connectors as described above.
When you have finished making connections, reinstall the cover on the Exterior AC-Feeder as described earlier.
Option 2. Connecting to AC mains power and data via PDE cable tails
Check that AC mains power to the installation is shut down and cannot be reapplied during installation work.

The PDE cable tail set (see illustration above) available as an optional accessory from Martin lets you set up the Exterior AC-Feeder for quick connection and disconnection to AC mains power and data either alone or as an element in a daisy-chain.
Connecting a PDE input cable tail
-
See the instructions on using cable glands in the previous section of this manual. Loosen one of the mains power input cable gland compression nuts and pass the PDE input cable tail through the cable gland and into the Exterior AC-Feeder.
-
Connect the thick mains power wires in the PDE input cable tail to the quick-connectors inside the AC-Feeder as follows:
- Yellow/green to the connector marked ⏻ (protective earth/ground)
- White (Live) to the connector marked L
- Black (Neutral) to the connector marked N
To fasten a wire into a quick-connector, push down the lever on the quick-connector, insert the bare

PDE cable tail connections
wire end into the connector, then release the lever so that the connector grips the wire. Check that the wire is held securely.
If you need to release a wire, push down on the lever on the quick-connector.
- Untwist the thin data wires in the PDE input cable tail. Do not strip insulation from the wires.
- Fasten the shield wire (the wire that has no insulation) into one of the screw terminals marked SHIELD.
-
Lift the levers on one set of data quick-connectors and slide the data wires into the connectors as follows:
-
Green/white to RXP
- Green to RXM
- Orange/white to TXP
-
Orange to TXM.
-
Push the levers on the quick-connectors all the way down firmly and check that the wires are held securely.
-
Tighten the compression nut on the cable gland until the PDE input cable is held tightly.
Connecting a PDE throughput cable tail
To connect a PDE throughput cable, follow the instructions above but pass the cable through the unused mains power cable gland, use the same mains power quick-connectors as the PDE input cable, and connect the data wires to the unused data connectors.
When you have finished making connections, reinstall the cover on the Exterior AC-Feeder as described earlier.
Connecting hybrid (data and DC power) output to fixtures
The Exterior AC-Feeder is supplied with a cable tail for sending data and DC power to a daisy-chain of Martin Exterior Dot-1/4/9 Pro fixtures.
Power management switch
The Exterior AC-Feeder features a POWER management switch on the PCB next to the network data terminals. The switch has the following settings:
| FULL | Forces the connected Martin lighting fixtures to run in full-power mode, overriding any power mode commands from the P3 System Controller, Art-Net controller, sACN controller or RDM controller. |
| HALF | Forces the connected Martin lighting fixtures to run in half-power mode, overriding any power mode commands from the P3 System Controller, Art-Net controller, sACN controller or RDM controller. |
| CONTROL | Allows the P3 System Controller, Art-Net controller, sACN controller or RDM controller to set the Martin fixtures' power modes. |
Setting fixtures to HALF power can be useful for applications where full power is not needed or may be undesirable. The HALF setting also lets you connect a higher number of fixtures to the hybrid output, meaning that an installation will require fewer power supply and feeder devices.
Note that when the POWER management switch is set to FULL or HALF, it is not possible to adjust the power mode from the P3 System Controller, Art-Net controller, sACN controller or RDM controller.
Exterior DC-Feeder
Overview
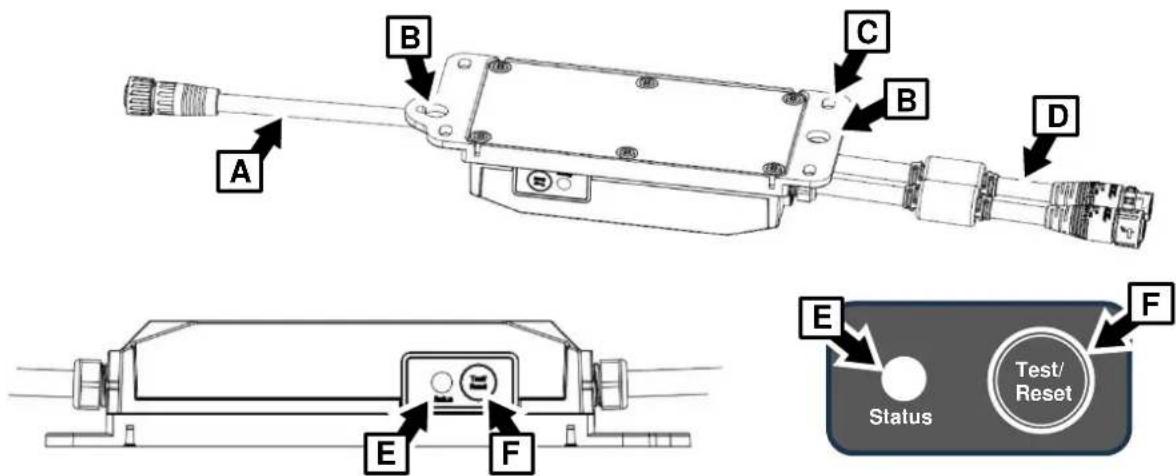
A - Hybrid output cable tail with connector
B – Holes for M12 fastener on rigging clamp and for safety cable (x2)
C - Holes for M6 fasteners (x4)
D - Hybrid input and thru cable tails with DCE connectors
E-Status LED
F-Test/Reset button
Installing
Physical installation
Read the 'Safety Information' section starting on page 4 before installing, applying power to or operating the device.
The Exterior DC-Feeder is designed to be mounted on a flat surface in any orientation with four M6 screws or other suitable fasteners. Four holes (see C above) for fasteners are provided in the flanges at the corners of the device. Use fasteners that are suitable for the application and for the installation environment.
The DC-Feeder can also be fastened to an approved rigging clamp with an M12 bolt passed through one of the two holes provided (see B above) and installed on a rigging truss. If you install the DC-Feeder using a rigging clamp in a location where it may cause injury or damage if it falls, attach a safety cable that is approved for the weight of the device to the other hole B and anchor the safety cable securely (by looping it around the rigging truss, for example). Remove as much slack as possible from the safety cable, looping it more than once around the truss if necessary. Make sure that the safety cable will catch the device if the rigging clamp fails.
Make sure that the weight of cable runs is supported so that lengths of cable do not hang from connectors.
Making connections
Connect the Exterior DC-Feeder as follows:
- Connect to a source of 48 VDC power and data via one of the hybrid input cable tails (D in drawing above).
- Connect 15 VDC power and data output to one or two daisy chains of Martin Exterior Dot-1/4/9 Pro fixtures via the hybrid power and data cable tail (A in drawing above).
Test/Reset button and status LED
The Test/Reset button and the Status LED on both the AC-Feeder and the DC-Feeder have the following functions:
Test/Reset button
- Press once briefly – Activate test patterns. Continue pressing briefly to scroll through test patterns and de-activate.
- Press and hold – Reboot the device.
Status LED
- Blue constant – Busy.
- Red constant – Error.
- Red flashing – Data disconnected.
- Green flashing – P3 ready.
- Green constant – P3 running.
- Magenta flashing – ArtNet/sACN ready.
- Magenta constant – ArtNet/sACN running.
- Fast RGB cycling – Test patterns running.
- Yellow constant – Overtemperature protection.

Service and maintenance

Warning! Read "Safety information" on page 4 before carrying out service or maintenance work.
Disconnect all devices from AC mains power before servicing.
Refer any service operation not described in this user manual to Martin Service or an authorized Martin service agent.
Important! Excessive dirt buildup causes overheating and will damage the product. Damage caused by inadequate cleaning is not covered by the product warranty.
The user will need to clean the device periodically. other service operations must be carried out by Martin Professional or an authorized Martin service agent.
Installation, on-site service and maintenance can be provided worldwide by the Martin Professional Global Service organization and its approved agents, giving owners access to Martin's expertise and product knowledge in a partnership that will ensure the highest level of performance throughout the product's lifetime. Please contact your Martin supplier for details.
Cleaning
Cleaning schedules vary greatly depending on the operating environment. It is therefore impossible to specify precise cleaning intervals. Check products frequently and clean when necessary.
To clean an Exterior AC-Feeder or Exterior DC-Feeder:
- Shut down power to the installation and allow devices to cool for at least 15 minutes.
- Wipe the outside of the device with a cloth lightly moistened in a mild detergent solution. You can rinse an IP66-rated device with water, but do not direct a high-pressure water jet at the device. Do not use any product that contains abrasives or solvents.
- Dry the device with a soft cloth before reapplying power.
Compliance and environmental
FCC Compliance
This equipment has been tested and found to comply with the limits for a Class A digital device, pursuant to part 15 of the FCC Rules. These limits are designed to provide reasonable protection against harmful interference in a residential installation. This equipment generates, uses and can radiate radio frequency energy and, if not installed and used in accordance with the instructions, may cause harmful interference to radio communications. However, there is no guarantee that interference will not occur in a particular installation. If this equipment does cause harmful interference to radio or television reception, which can be determined by turning the equipment off and on, the user is encouraged to try to correct the interference by one or more of the following measures:
- Reorient or relocate the receiving antenna.
- Increase the separation between the equipment and receiver.
- Connect the equipment into an outlet on a circuit different from that to which the receiver is connected.
- Consult the dealer or an experienced radio/TV technician for help.
FCC Supplier's Declaration of Conformity
These devices comply with part 15 of the FCC Rules. Operation is subject to the following two conditions:
- This device may not cause harmful interference, and
- this device must accept any interference received, including interference that may cause undesired operation.
Canadian Interference-Causing Equipment Regulations
This Class A digital apparatus meets all requirements of the Canadian Interference-Causing Equipment Regulations.
EU Declaration of Conformity
An EU Declaration of Conformity covering these products is available for download from the product's area of the Martin website at www.martin.com.
Disposing of the product

Martin products are supplied in compliance with Directive 2012/19/EC of the European Parliament and of the Council of the European Union on WEEE (Waste Electrical and Electronic Equipment), where applicable.
Help preserve the environment! Ensure that this product is recycled at the end of its life. Your supplier can give details of local arrangements for the disposal of Martin products
- Dimensions
- Contents
- Safety information
- WARNING!
- Read the safety precautions in this section before installing, operating or servicing this product.
- Technical Support
- Protection from electric shock
- Protection from burns and fire
- Protection from injury
- Introduction
- Unpacking
- Exterior AC-Feeder
- Exterior DC-Feeder
- Overview
- Installing
- Physical installation
- Using cable glands
- Opening and closing the Exterior AC-Feeder
- Making connections
- Option 1. Connecting to separate AC mains power and data sources
- Connecting AC mains power
- Connecting network data
- Option 2. Connecting to AC mains power and data via PDE cable tails
- Connecting a PDE input cable tail
- Connecting a PDE throughput cable tail
- Connecting hybrid (data and DC power) output to fixtures
- Power management switch
- Test/Reset button and status LED
- Test/Reset button
- Status LED
- Service and maintenance
- Cleaning
- Compliance and environmental
- FCC Compliance
- FCC Supplier's Declaration of Conformity
- Canadian Interference-Causing Equipment Regulations
- EU Declaration of Conformity
- Disposing of the product
Brand : MARTIN
Model : Exterior AC-Feeder
Category : Battery charger