
TH-85MX800G - Television PANASONIC - Free user manual and instructions
Find the device manual for free TH-85MX800G PANASONIC in PDF.


| Product Type | 4K LED TV |
| Screen Size | 85 inches (215.9 cm) |
| Resolution | 3840 x 2160 (4K UHD) |
| HDR Support | HDR10+, Dolby Vision, HLG |
| Smart TV Platform | My Home Screen 7.0 |
| Refresh Rate | 120 Hz (native) |
| Audio Output | 20 W (10 W x 2), Dolby Atmos |
| Connectivity | HDMI x3, USB x2, Ethernet, Wi-Fi, Bluetooth |
| Dimensions (without stand) | 189.2 x 108.9 x 7.6 cm (W x H x D) |
| Dimensions (with stand) | 189.2 x 115.5 x 38.6 cm |
| Weight (without stand) | 41.5 kg |
| Weight (with stand) | 42.5 kg |
| Power Consumption (typical) | 250 W |
| Standby Power Consumption | 0.5 W |
| VESA Mount | 600 x 400 mm |
| Remote Control | Bluetooth voice remote included |
| Cleaning Instructions | Use a soft dry cloth; avoid liquid cleaners |
Frequently Asked Questions - TH-85MX800G PANASONIC
User questions about TH-85MX800G PANASONIC
0 question about this device. Answer the ones you know or ask your own.
Ask a new question about this device
Download the instructions for your Television in PDF format for free! Find your manual TH-85MX800G - PANASONIC and take your electronic device back in hand. On this page are published all the documents necessary for the use of your device. TH-85MX800G by PANASONIC.
USER MANUAL TH-85MX800G PANASONIC
Covered by patents at patentlist.accessadvance.com
HDMI™
HIGH-DEFINITION MULTIMEDIA INTERFACE
natural_image
Technical line drawing of a rectangular panel with mounting feet and a labeled inset showing a bolt (no text or symbols present)natural_image
Diagram of a device with two connectors and a central panel, connected by wires to a checkmark (no text or symbols present)
natural_image
Diagram showing a device with wires and connectors connected to a panel, no text or symbols presentPemutar Blu-Ray

flowchart
graph LR
    TV["TV"] -->|HDMI 1/2/3| Kabel["HDMI"]
    Kabel -->|Kabel HDMI| Pemutar["Premutar Blu-Ray"]
AV/Peralatan Permainan

Langkah 10: Masukkan kode pos lokal.


Langkah 14: Masukkan kode pos lokal

Mini, 1,0 V [p-p] (75 Ω)
EARPHONE
Mini, 150 mV rms \~ 250 mV rms
Input HDMI 1/2/3
Konektor TIPE A
USB
Konektor USB 2.0/3.0 TIPE A
USB 2.0 DC 5 V, Maks. 500 mA
USB 3.0 DC 5 V, Maks. 900 mA
Keluaran Speaker
Model 85 inci
Keluaran audio
20 W (10 W + 10 W)
Sistem penerima/Nama band
9 Sistem
This product incorporates the following software:
(1) The software developed independently by or for Panasonic Entertainment & Communication Co., Ltd.,
(2) The software owned by third party and licensed to Panasonic Entertainment & Communication Co., Ltd.,
(3) The software licensed under the GNU General Public License, Version 2.0 (GPL V2.0),
(4) The software licensed under the GNU LESSER General Public License, Version 2.1 (LGPL V2.1), and/or
(5) Open source software other than the software licensed under the GPL V2.0 and/or LGPL V2.1.
The software categorized as (3) - (5) are distributed in the hope that it will be useful, but WITHOUT ANY WARRANTY, without even the implied warranty of MERCHANTABILITY or FITNESS FOR A PARTICULAR PURPOSE. Please refer to the detailed terms and conditions thereof 【Settings > System > Device Preferences > Settings > OSS License】
At least three (3) years from delivery of this product, Panasonic will give to any third party who contacts us at the contact information provided below, for a charge no more than our cost of physically performing source code distribution, a complete machine-readable copy of the corresponding source code covered under GPL V2.0, LGPL V2.1 or the other licenses with the obligation to do so, as well as the respective copyright notice thereof.
Contact Information: osd-cd-request@gg.jp.panasonic.com
Diimpor oleh:
Operating Instructions
LED TV
85-inch model

natural_image
Simple diagram of a blank rectangular panel with two side supports at the bottom (no text or symbols)English
Thank you for purchasing this Panasonic product.
Please read these instructions carefully before operating this product and retain them for future reference.
The images shown in this manual are for illustrative purposes only.
Some illustrations are presented as conceptual images and may be different from the actual products.
Illustrations shown may be different between models and countries.
Transport only in upright position

Advance™
Covered by patents at patent list.accessadvance.com

HIGH-DEFINITION MULTIMEDIA INTERFACE
The Adopted Trademarks HDMI, HDMI High-Definition Multimedia Interface, HDMI trade dress and the HDMI Logos are trademarks or registered trademarks of HDMI Licensing Administrator, Inc. in the United States and other countries.


VISION
Dolby, Dolby Vision, Dolby Atmos, Dolby Audio, and the double-D symbol are trademarks of Dolby Laboratories Licensing Corporation. Manufactured under license from Dolby Laboratories. Confidential unpublished works. Copyright ©1992-2022 Dolby Laboratories. All rights reserved.

This mark indicates the product operates on AC voltage.

This equipment is a Class II or double insulated electrical appliance. It has been designed in such a way that it does not require a safety connection to electrical earth.
WARNING: To reduce the risk of fire or electric shock.

CAUTION
RISK OF ELECTRIC SHOCK. DO NOT OPEN.

- This lightning flash with arrowhead symbol within an equilateral triangle is intended to alert the user to the presence of non-insulated "dangerous voltage" within the product's enclosure that may be of sufficient magnitude to constitute a risk of electric shock.
- Warning: To reduce the risk of electric shock, do not remove cover (or back) as there are no user-serviceable parts inside. Refer servicing to qualified personnel.
- The exclamation point within an equilateral triangle is intended to alert the user to the presence of important operating and maintenance instructions in the literature accompanying the appliance.
Panasonic does not guarantee operation and performance of peripheral devices made by other manufacturers; and we disclaim any liability or damage arising from operation and/or performance from usage of such other maker's peripheral devices.
Damages
- Excepting cases where responsibility is recognised by local regulations, Panasonic accepts no responsibility for malfunctions caused by misuse or use of the product, and other problems or damages caused by use of this product.
- Panasonic accepts no responsibility for the loss, etc., of data caused by disasters.
- External devices separately prepared by the customer are not covered by the warranty. Care for the data stored in such devices is the responsibility of the customer. Panasonic accepts no responsibility for abuse of this data.
Notice for Digital terrestrial broadcasting functions
• Function related to Digital broadcasting will work in the areas where the digital terrestrial broadcasting services are received. Consult your local Panasonic Dealer with coverage areas.
• Not all the features are available depending on the country, area, broadcaster and service provider
- This TV has the capability for Digital broadcasting specifications. But future Digital broadcasting services cannot be guaranteed.
Even if no special notation has been made of company or product trademarks, these trademarks have been fully respected.
- The mains plug/appliance coupler is used as disconnect device, the disconnect device shall remain readily operable.
- The battery (battery or batteries or battery pack) shall not be exposed to excessive heat such as sunshine, fire or the like.
- To prevent injury, this apparatus must be securely attached to the floor/wall in accordance with the installation instruction.
Contents
Safety Precautions 3
Setting Up the TV 4
Connecting the TV 6
Initial Setup 8
Operating the TV 12
General Operation 15
Using the Menu Functions 16
Using Media Player 21
Additional Information 22
Troubleshooting 24
Maintenance 24
Specifications 25
Safety Precautions
To help avoid risk of electrical shock, fire, damage or injury, please follow the warnings and cautions below:
Mains plug and lead
(Warning)
If you detect anything unusual, immediately remove the mains plug.
Mains plug types vary between countries.

This TV is designed to operate on AC 220 - 240 V, 50/60 Hz.
Insert the mains plug fully into the socket outlet.
Ensure that the mains plug is easily accessible.
Disconnect the mains plug when cleaning the TV.
Do not touch the mains plug with wet hands.

Do not damage the mains lead.
- Do not place a heavy object on the lead.


- Do not place the lead near a high temperature object.


- Do not pull on the lead. Hold onto the mains plug body when disconnecting the plug.


- Do not move the TV with the lead plugged into a socket outlet.
- Do not twist the lead, bend it excessively or stretch it.
- Do not use a damaged mains plug or socket outlet.
- Ensure the TV does not crush the mains lead.
Do not use any mains lead other than that provided with this TV.
Take care
( Warning )
Do not remove covers and never modify the TV yourself as live parts are accessible when they are removed. There are no user serviceable parts inside.

Do not expose the TV to rain or excessive moisture. This TV must not be exposed to dripping or splashing water and objects filled with liquid, such as vases, must not be placed on top of or above the TV.

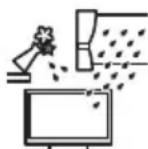
Do not insert foreign objects into the TV through the air vents.
Do not use an unapproved pedestal / mounting equipment. Be sure to ask your local Panasonic dealer to perform the setup or installation of approved wall-hanging brackets.
Do not apply strong force or impact to the display panel.
Do not place the TV on sloped or unstable surfaces, and ensure that the TV does not hang over the edge of the base.

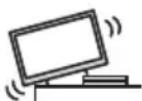
This TV is designed for table-top use.
Do not expose the TV to direct sunlight and other sources of heat.

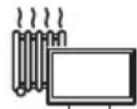
To prevent the spread of fire, keep candles or other open flames away from this product at all times

Warning Stability Hazard
A TV may fall, causing serious personal injury or death. Many injuries, particularly to children, can be avoided by taking simple precautions such as:
- ALWAYS use cabinets or stands or mounting methods recommended by the manufacturer of the TV.
- ALWAYS use furniture that can safely support the TV.
- ALWAYS ensure the TV is not overhanging the edge of the supporting furniture.
- ALWAYS educate children about the dangers of climbing on furniture to reach the TV or its controls.
- ALWAYS route cords and cables connected to your TV so they cannot be tripped over, pulled or grabbed.
- NEVER place a TV in an unstable location.
- NEVER place the TV on tall furniture (for example, cupboards or bookcases) without anchoring both the furniture and the Monitor to a suitable support.
- NEVER place the TV on cloth or other materials that may be located between the Monitor and supporting furniture.
- NEVER place items that might tempt children to climb, such as toys and remote controls, on the top of the TV or furniture on which the TV is placed.
If the existing TV is going to be retained and relocated, the same considerations as above should be applied.
■ Dangerous part / Small object
Warning
This product contains possibly dangerous parts such as plastic bags, that can be breathed in or swallowed by young children accidentally. Keep these parts out of reach of young children.
Pedestal
Warning
Do not disassemble or modify the pedestal.
Caution
Do not use any pedestal other than the one provided with this TV.
Do not use the pedestal if it becomes warped or physically damaged. If this occurs, contact your nearest Panasonic dealer immediately.
During setup, make sure that all screws are securely tightened.
Ensure that the TV does not suffer any impact during installation of the pedestal.
Ensure that children do not climb onto the pedestal. Install or remove the TV from the pedestal with at least two people.
Install or remove the TV by the specified procedure.

Ventilation
Caution
Allow sufficient space around the TV in order to help prevent excessive heat, which could lead to early failure of some electronic components.
Minimum distance (cm)
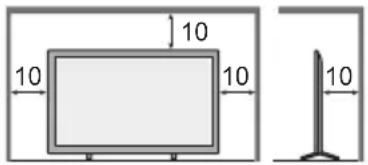
Ventilation should not be impeded by covering the ventilation openings with items such as newspapers, tablecloths and curtains.

Whether you are using a pedestal or not, always ensure the vents at the bottom of the TV are not blocked and there is sufficient space to enable adequate ventilation.

Built-in wireless LAN
Caution
- Do not use the built-in wireless LAN to connect to any wireless network (SSID *) for which you do not have usage rights. Such networks may be listed as a result of searches. However, using them may be regarded as illegal access.
* SSID is a name for identifying a particular wireless network for transmission. - Do not subject the built-in wireless LAN to high temperatures, direct sunlight or moisture.
- Data transmitted and received over radio waves may be intercepted and monitored.
- The built-in wireless LAN uses 2.4 GHz and 5 GHz frequency bands. To avoid malfunctions or slow response caused by radio wave interference when using the built-in wireless LAN, keep the TV away from other devices that use 2.4 GHz and 5 GHz signals such as other wireless LAN devices, microwave ovens, and mobile phones.
- When problems occur due to static electricity, etc., the TV might stop operating to protect itself. In this case, turn the TV off at the Mains power On / Off switch, then turn it back on.

Bluetoothwireless technology
Caution
- The TV use the 2.4 GHz radio frequency ISM band (Bluetooth®). To avoid malfunctions or slow response caused by radio wave interference, keep the TV away from the devices such as other wireless LAN devices, other Bluetooth devices, microwaves, mobile phones and the devices that use 2.4 GHz signal.

Moving the TV
Caution
V, disconnect all cables. Before moving the T
- Move the TV with at least two people. Support as shown to avoid injury by the TV tipping or falling.

natural_image
Illustration of two workers assembling a large electronic device (no text or symbols visible)
When not in use for a long time
Caution
This TV will still consume some power even in the Off mode, as long as the mains plug is still connected to a live socket outlet.
Remove the mains plug from the wall socket when the TV is not in use for a prolonged period of time.

Use conditions
Caution
This appliance is intended for use in tropical climates.

Battery for the Remote Control
Caution
Incorrect installation may cause battery leakage, corrosion and explosion.
Replace only with the same or equivalent type.
Do not mix old and new batteries.
Do not mix different battery types (such as alkaline and manganese batteries).
Do not use rechargeable batteries (Ni-Cd, etc.).
Do not burn or break up batteries.
Do not expose batteries to excessive heat such as sunshine, fire or the like.
Make sure you dispose of batteries correctly.
Setting Up the TV
Supplied accessories
Accessories may not be placed all together. Take care not to throw them away unintentionally.
Operating Instructions
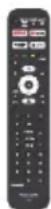
Remote Control
- RC731P
Batteries (AAA) × 2


Mains Lead


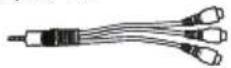
Mini Jack Adapter
- Adapter AV
Pedestal
85-inch model
• Assembly screws
(M6 × 35) × 4

Base

Note
Illustrations shown may be different between models and countries.
Preparation
Take out the pedestal and the TV from the packing case and put the TV onto a work table with the screen panel down on the clean and soft cloth (blanket, etc.)
• Use a flat and firm table bigger than the TV.
- Do not hold the screen panel part.
• Make sure not to scratch or break the TV.
Attaching the pedestal
Assemble the pedestal

natural_image
Technical line drawing of a rectangular panel with mounting feet and a labeled component 'A' (no text or symbols beyond label)Removing the pedestal from the TV
Be sure to remove the pedestal in the following way when using the wall-hanging bracket or repacking the TV.
1 Lay the TV on a foam mat or thick soft cloth on a table.
2 Remove the assembly screws from the TV.
Inserting remote's batteries

Wall mounting the TV (optional)
Please contact your local Panasonic dealer to purchase the recommended wall-hanging bracket.
Rear of the TV
(View from the side)

Screw for fixing the TV onto the wall-hanging bracket(not supplied)
■ Holes for wall-hanging bracket installation
| Model | a | b |
| 85-inch | 500 mm | 200 mm |
Screw specification
| Model | Type | Depth of screw | |
| Minimum | Maximum | ||
| 85-inch | M8 | 22 mm | 32 mm |
Warning
- When optional accessories such as wall brackets etc. are used, always read and follow the manufacturer installation and usage instructions.
- Do not mount the unit directly below ceiling lights (such as spotlights or halogen lights) which typically give off high heat. Doing so may warp or damage plastic cabinet parts.
- When installing wall brackets you must ensure the wall bracket is not electrically grounded to metal wall studs. Always ensure that there are no electrical cables, pipes etc. in the wall before you begin the wall bracket installation.
- To prevent fall and injury, remove the TV from its fixed wall position when it is no longer in use.
Connecting the TV
- Please ensure the TV is disconnected from the mains socket/ power point before attaching or disconnecting any RF/ AV leads.
- External equipment and cables are for illustrative purposes only and not supplied with this TV.
- Check the type of terminals and cable plugs are correct when connecting.
- When using an HDMI cable, use the fully wired one.
- Keep the TV away from electronic equipment (video equipment, etc.) or equipment with an infrared sensor. Otherwise, distortion of image/ sound may occur or operation of other equipment may be interfered.
- Also read the manual of the equipment being connected.
Terminals

Connections
Aerial
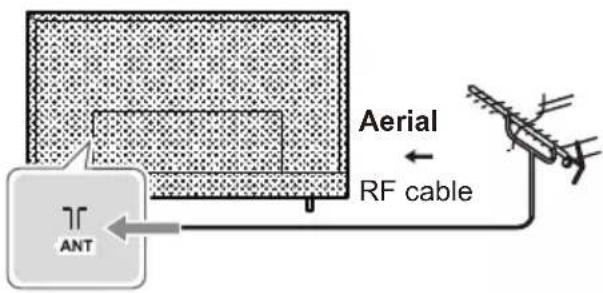
flowchart
graph TD
    A["Antenna"] --> B["Aerial"]
    B --> C["RF cable"]
    C --> D["Aerial"]
Keep RF (aerial) cable away from the mains lead to avoid and minimise mains interference pickup.
Do not place the RF cable under the TV.
An aerial, correct cable (75 Ω coaxial) and correct terminating plug are required to obtain optimum quality picture and sound.
If a communal aerial system is used, you may require the correct connection cable and plug between the wall aerial socket and the TV.
Your local Television Service Centre or dealer may be able to assist you in obtaining the correct aerial system for your particular area and the accessories required.
Any matters regarding aerial installation, upgrading of existing systems or accessories required, and the costs incurred, are the responsibility of you, the customer.
If the aerial is placed in the wrong location, interference might happen.


natural_image
Diagram of a TV setup with cable and antenna connections, no text or symbols presentBlu-Ray Player

flowchart
graph LR
    A["TV"] --> B["HDMI 1/2/3"]
    B --> C["HDMI cable"]
    C --> D["Blu-Ray Player"]
AV / Game equipment
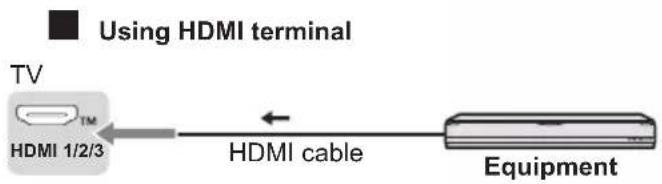
flowchart
graph LR
    A["TV"] --> B["HDMI 1/2/3"]
    B --> C["HDMI cable"]
    C --> D["Equipment"]
    style A fill:#f9f,stroke:#333
    style D fill:#bbf,stroke:#333

flowchart
graph TD
    A["TV"] -->|Using AV terminals| B["Equipment"]
    B --> C["MiNi AV Cable"]
    C --> A
DVD Recorder / VCR
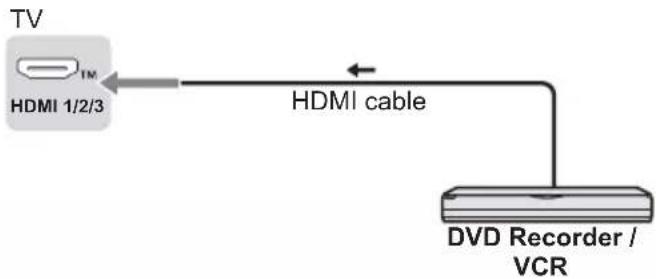
flowchart
graph LR
    TV["TV"] -->|HDMI 1/2/3| HDMI_Cable["HDMI cable"]
    HDMI Cable -->|HDMI| DVD[" DVD Recorder / VCR "]
Set top box

flowchart
graph LR
    A["TV"] --> B["HDMI 1/2/3"]
    B --> C["HDMI cable"]
    C --> D["Set top box"]
    D --> E["Satellite dish"]
Speaker system

flowchart
graph LR
    A["TV"] --> B["Optical cable"]
    B --> C["Amplifier with speaker system"]
    D["DIGITAL AUDIO OUT"] --> B
To enjoy the sound from the external equipment in multi-channel sound (e.g. Dolby Digital 5.1ch), connect the equipment to the amplifier. For the connections, read the manuals of the equipment and amplifier.
Amplifier

flowchart
graph TD
    A["TV"] --> B["HDMI 1 (eARC)"]
    B --> C["HDMI cable"]
    C --> D["Amplifier with speaker system"]
    D --> E["Equipment"]
- Use HDMI1 to connect the TV to an amplifier which has eARC/ARC(Audio Return Channel) function. If connecting to an amplifier without eARC/ARC function, use DIGITAL AUDIO OUT.
Initial Setup
When you first turn on the TV, a series of steps will pop-up to guide you to setup your TV.
These steps are not necessary if the setup has been completed by your local dealer.
Plug the mains plug into the socket outlet and turn on the TV.
It may take a few seconds before the screen is displayed.

Google - Initial Setup
When you turn on the TV for the first time, there will show a wizard to guide you to finish the following initial settings:
Step 1: This function is used for the remote control pair code. After the code is successful, you can use the Bluetooth remote control to operate the TV.

Step 2: Select the menu language as you need.
Note: English(United States) is recommended. Illustrations within this publication are provided for reference only.

Step 3: Select your Country/Region.

Step 4: (Only for some countries) Select whether or not to use and Google device to setup the TV.
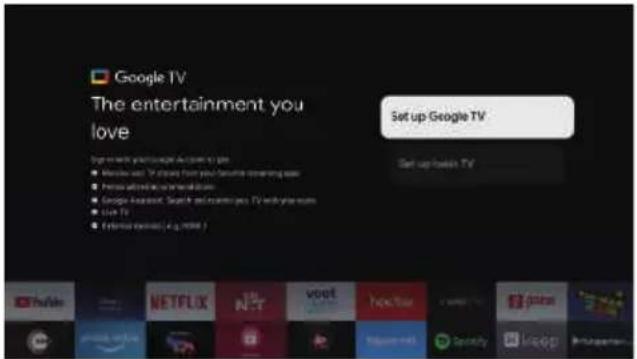
- When we select "Set up basic TV".

Step 5: Select whether or not to connect your TV set to the WIFI network.
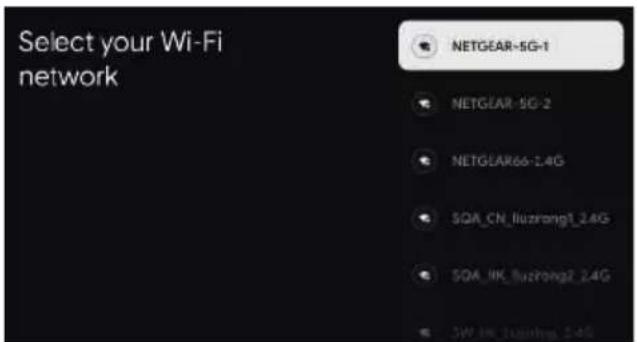
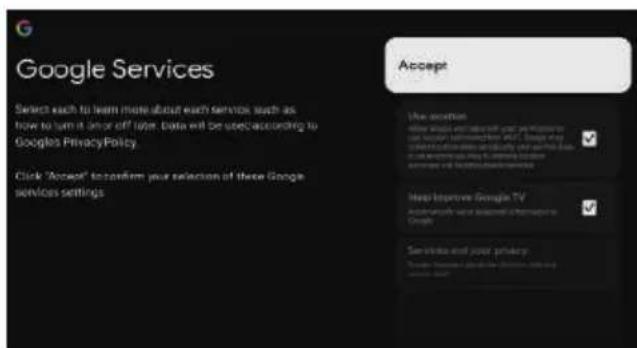
Step 6: Read to accept the Google terms of service and privacy policy.

Step 7: Environment
Press ▲/▼ to select your environment, then press OK to enter next step.
Home: You Would be able to view the standard settings for Picture and sound modes.
Shop: You can enjoy enhanced setting for Picture and Sound modes.

Step 8: Terms & Conditions
Use ▲/▼ to read Terms & Conditions, then press OK to confirm and move to next step.

Step 9: Channel installation
Use ▲/▼ to select Tuner mode: Antenna, Cable;
Type: Digital, Analogue and All, then press OK to confirm and move to next step.

Step 10: Input local postal codes
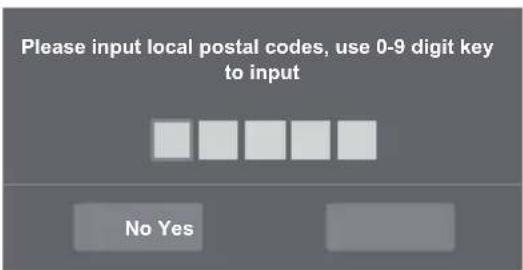
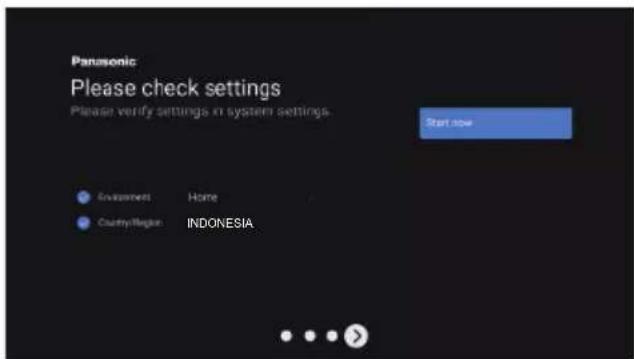
Step 11: Please check settings
When all setup is done, the [Please check settings] interface displays on the screen, and press OK to finish the initial setup. You can also go back to former step and make any changes by using ← button.
- When we select "Set up Google TV".

Step 5: Select Connect your TV to a WIFI network.

Note: To use GOOGLE TV, must connect to WIFI.
Step 6: Enter your Google account and password.
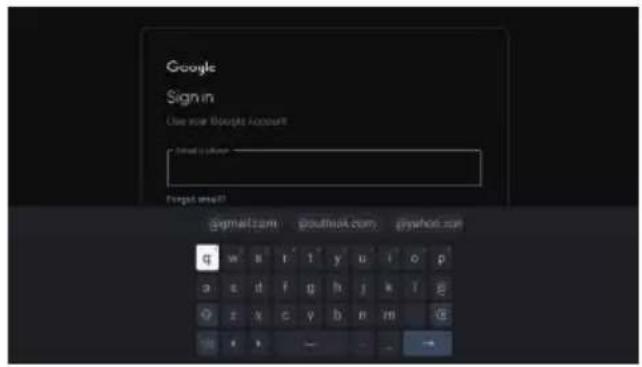
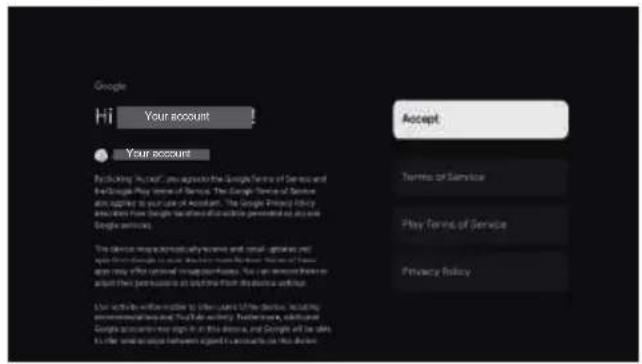
Step 7: Read to accept the Google terms of service and privacy policy.

Step 8: Use Google Assistant.
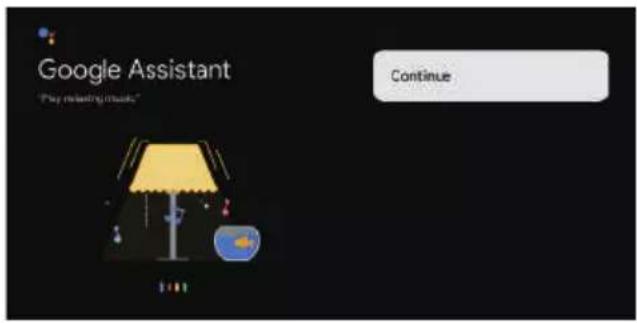
Step 9: Search across all your TV apps.
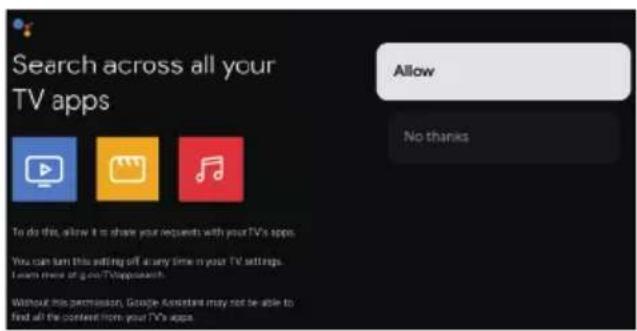
Step 10: Choose your subscriptions.

Step 11: Environment
Press ▲/▼ to select your environment, then press OK to enter next step.
Home: You Would be able to view the standard settings for Picture and sound modes.
Shop: You can enjoy enhanced setting for Picture and Sound modes.

Step 12: Terms & Conditions
Use ▲/▼ to read Terms & Conditions, then press OK to confirm and move to next step.

Step 13: Channel installation
Use ▲/▼ to select Tuner mode: Antenna, Cable;
Type: Digital, Analogue and All, then press OK to confirm and move to next step.
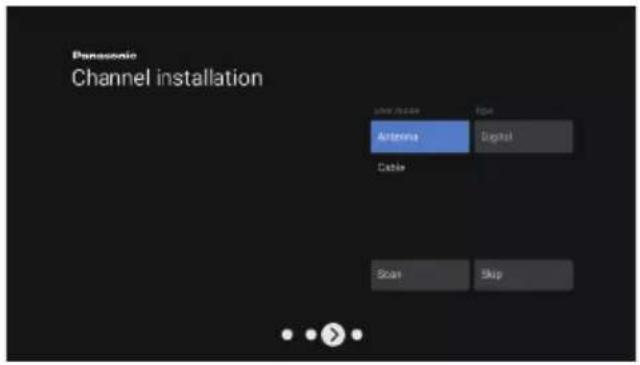
Step 14: Input local postal codes

Step 15: Please check settings
When all setup is done, the [Please check settings] interface displays on the screen, and press OK to finish the initial setup. You can also go back to former step and make any changes by using ← button.

Step 16: Installing your apps
Please notice that this will take some time. Note:
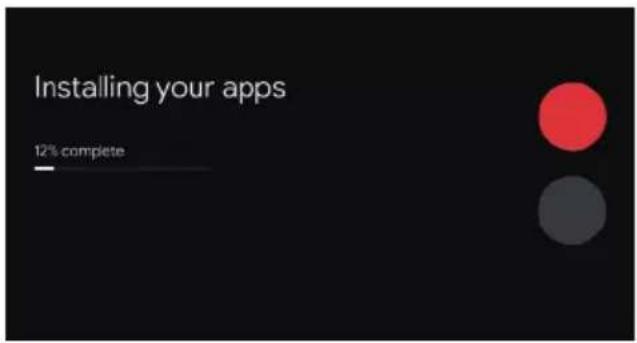
Step 17: Your Google TV experience is ready.

Setup is now complete and your TV is ready for viewing.
Note
- If tuning has failed, check the connection of the RF cable, then follow the on-screen instructions.
Operating the TV
Using the remote control
Remote Control Functions
Most of your television's functions are available via the menus that appear on the screen. The remote control supplied with your set can be used to navigate through the menus and to configure all the general settings.
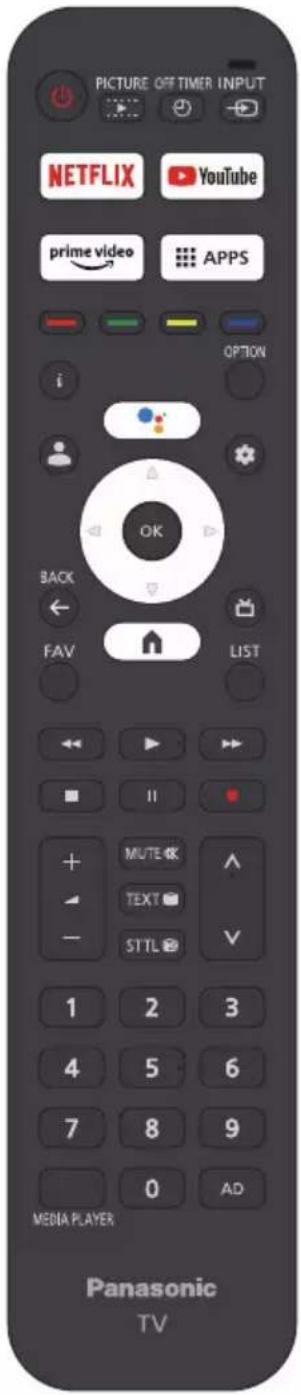
POWER ⏻ (On/Off button) Turns the TV on or off
PICTURE ➤ To enter the picture mode
OFF TIMER ⏻ To enter the sleep timer
INPUT ➤ To enter source selection interface
NETFLIX Goes to the NETFLIX homepage
YouTube Goes to the YouTube homepage
prime video Goes to the prime video homepage
■■ APPS To select the apps
Colour buttons Performs multiple operations which correspond to the operation guide displayed on the menu screen
i Display to the information
OPTION Displays the options menu of selected functions


(When setting up basic TV, this key has no effect)
Press to open the settings menu
OK Confirms your selection
(up, down, left and right direction buttons) Highlights
▲/▼ different items in the menu system and adjusts the menu controls
BACK ← Exit the menu and return to the previous menu
Press to display the electronic programme guide
Goes to the smart TV homepage
FAV To enter the Favorite shows
LIST To enter the channel list
← To fast backward
▶ To play
To fast forward
To end the running program
II To pause
Start recording
+ - - Increases or decreases the volume
MUTE ✗ To mute and un-mute the sound
TEXT ☐ To show the text
STTL To show the subtitles


How to Pair Remote Control with the TV
This is a Bluetooth remote control, and before using it, please pair it with the TV firstly. When TV is turned on for the first time, a pairing process for your remote will be performed during the initial setup. Your remote control should automatically pair with your TV at this point.
You can add an additional Voice Remote with Google to your TV, or you may also need to replace one if your old one broke. Other Bluetooth devices like speakers, games controllers can also be connected via Bluetooth.
The following steps are for your reference:
Step 1: Press 📂 button to enter the home page.
Step 2: Press ▲/▼/◄/► to choose 🔒 to enter.
You can also directly select the ⏻ button on the remote control.
Step 3: Press ▲/▼/◄/► to choose Remotes & Accessories, and press OK to enter.
Step 4: Press ▲/▼/◄/► to choose Pair accessory and press OK to enter.
NOTE: Under this menu, you can choose turn Bluetooth on or off, Add a new Remote & Accessories or set up a remote control or accessory that's already connected to your TV.
Follow the on screen instructions to pair it.(Press hold ← and ↑ for 5 seconds on the "new" remote. Once it is discovered, it will appear in the list. And then press OK on your "old" remote to confirm adding this new remote).
NOTE: If you experience difficulties in pairing your remote with your TV you can turn off other wireless devices and try again.
If you want to unpair the Bluetooth remote, follow these steps:
Step 1: Press button to enter the home page.
Step 2: Press ▲/▼/◄/► to choose 🔒 to enter.
You can also directly select the ⏻ button on the remote control.
Step 3: Press ▲/▼/◄/► to choose you need to remove the remotes or accessory and press OK to enter.
Step 4: Press ▲/▼ to choose Forget and choose Yes.
Using the TV controls

1 Power On / Power Off
- The TV is off, short press the button to turn on the power.
- The TV is on, short press the button, the virtual button will display as shown below.

- When the virtual button appears, press the button briefly to switch the button key functions.
- When the virtual button is present, press the button long enough (for more than 1 second), can perform the following functions.

Power off
To turn Off the apparatus completely, you must pull the mains plug out of the mains socket.

Next channel

Previous channel

Volume increase

Volume reduction

Input source
Long press display input source option, release the button when the cursor jumps to the source to be switched.
2 Voice On / Voice Off
Turn it left to set it On, the indicator light will lighting and then go off, follow the steps below to set the Voice:
- Pair the Bluetooth remote first.
- Press the remote-control voice button four times, pausing at least 3 to 4 seconds between each keystroke.
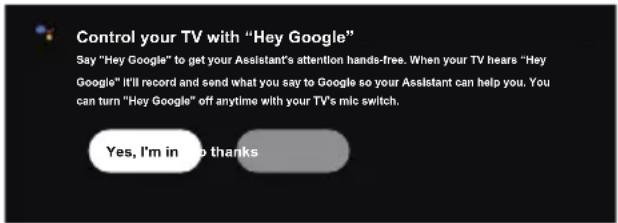
-
Select "Yes, I'm in" to activate the system to start the voice module, and the prompt disappears, and it can be used.
-
Follow the steps that appear on the screen, you can say "Ok Google" to use voice function, and the indicator will lighting when the TV receives the voice, then directly say your request.
- Turn it right to set it Off to exit voice function, indicator light will go to yellow.
Note
- Make sure the TV is connected to the Internet before using Voice.
- Please set it to On before using Voice.
- Please log in to your GOOGLE account before using Voice.
3 Power LED
- White: Standby
4 Remote control signal receiver
5 Voice signal receiver
- Yellow: Off
General Operation
Using Homepage
Note: This manual is for common use. Figures and illustrations in this User Manual are provided for reference only and may differ from actual product appearance. And for some models, certain options are not available.
You can select all the features from homepage. (First of all, make sure you are logged in to your Google account.)
Press ⬆ to display homepage.
Press ▲/▼/◄/► to select icons from the screen list.
Press OK to enter each option.
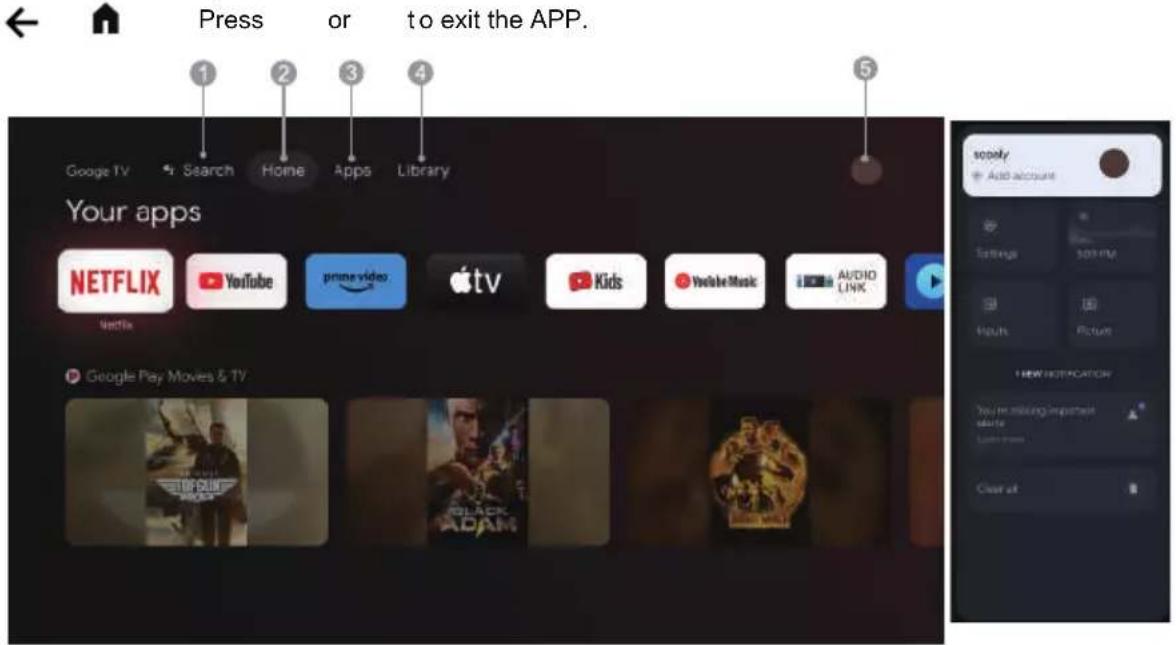
- Search: Hold the Assistant button down and talk Search movies shows, apps and more.
- Home: Select icons from the screen list.
- Apps: Show the list of favorite applications, or access the application center.
- Library: Your Library is empty, Find your purchases, rentals, and watchlisted content across TV mobile, and web here.
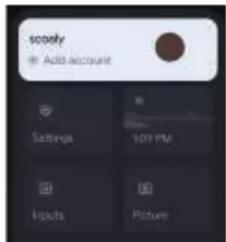
- ●: You can select Settings, Inputs, Picture and view notifications.
Note:
1) The functions and contents of "Home Page" may vary by different countries or models.
2) Before using network functions in home page like network applications and so on, please connect the TV to the network firstly.
3) Icon copyrights are owned by the application providers.
Note: The images shown for illustration and reference only.
Using the Menu Functions
Using Quick Access Menu
Note: Some of the functions might be unavailable in certain sources. And for some models, certain options are not available.
This section explores the menus and settings of your TV. Each menu is outlined and detailed to help you get the most from your TV. To access the menu system:
- In TV mode, press OK on the remote control to display the quick access list.
- Press ▲/▼ to select the desired item, then press OK to open the corresponding submenu.
- In submenu, use ◀/▶ and OK buttons to make the adjustments, or use ▲/▼ to select an item, use OK to enter and operate according to the on-screen display or guide.
- Press to return to the previous menu.
Menu
Note: Depending on the signal source, the menu that appears may be different, please refer to the actual situation.
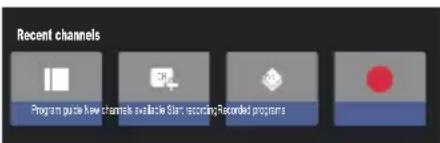
Program guide: Go to the EPG interface, only under DTV sources.
New channels available: New Channels available, including CABLE, ANTENNA and ATV.
Recorded programs: View burned videos, or burned content that has been set up, etc.
Start recording: Press it to start recording.
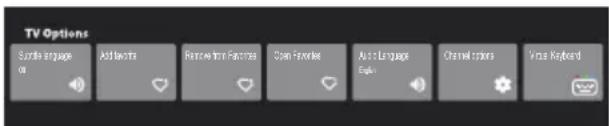
Subtitle language: Select the subtitle language.
Add favorite: Add as a favorite show.
Remove from Favorites: Remove the show from your favorite list.
Open Favorites: Open your favorites list.
Audio Language: Select the audio language.
Channel options: Set channel function options, select to Hide Channels, Parental controls, Audio Language, Timeshift config, Select recording storage device, Signal Condition, Open source licenses and Version.
Virtual Keyboard: Turn the virtual keyboard on, press BACK key to close.
The input
Press → then press ▲/▼ to select your desired source, and then press OK to confirm.
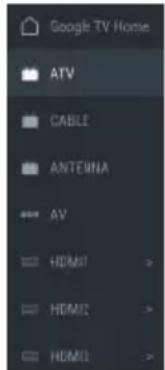
Note: The available source might differ depending on the model.
Using System Settings
The Settings menu allows you to configure the TV with your preferences.
Note: Some of the functions might be unavailable in certain sources. And for some models, certain options are not available.
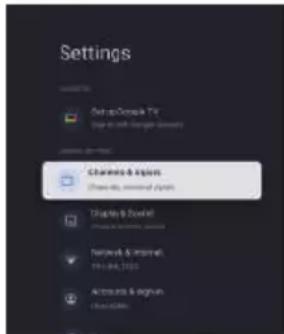
Each menu is outlined and detailed to help you get the most from your TV. To access the menu system:
- Press ▲/▼ to select the desired item, then press OK to open the corresponding submenu.
- In submenu, use ▲ and ▼ OK buttons to make the adjustments, or use ▲/▼ to select an item, use OK to enter and operate according to the on-screen display or guide.
- Press return the previous menu.
Set up Google TV
If you selected "Set up basic TV" during setup, you can log in to your Google account here.
There are two ways to enter. First, in the HOME interface, press the ▲/▼ to select "Set up Google TV" and proceed to the next step.
Note: The images shown for illustration and reference only.

Second, Select "Set up Google TV" in the settings.

Follow the prompts to log in to your Google account.
Add a Google account
If you are already logged in to your Google account, select "Accounts & sign-in" in the settings.
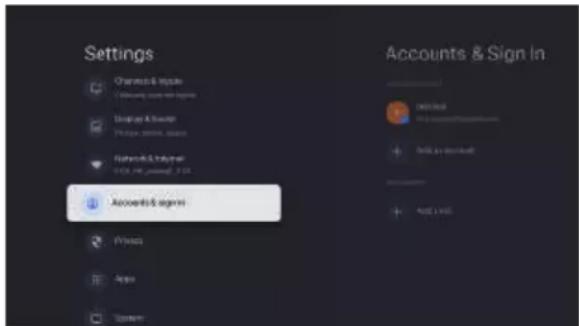
You can also add an account by pressing the ▶ to select the circular icon on the HOME interface.
Channels & Inputs
Note: This function is only available in TV mode. Depending on the signal source, the menu that appears may be different, please refer to the actual situation.
Select ATV and enter.
- Country and Region: Show your country or region.
- Analog Auto Scan: Press OK to start the automatic search process. The search may take a few minutes.
- Analog Manual Scan: Press OK to enter the interface.
Press▲/▼ to set program, Audio system or color system item, then Press▲/▼ select frequency and press OK to search channel.
Setup favorite channel list. - Favorite:
- Channel Organizer: This option allows you to organize channels.
- Teletext : Press OK and then use ▲/▼ to select preferred teletext.
Select Antenna and enter.
- Country and Region: Show your country or region.
- Auto Scan: Press OK to start the automatic search process. The search may take a few minutes. During the process, you can press Back and choose YES to exit.
- Manual Scan: Select the channel number and start to scan
- Digital Channel Setup:
Subtitle Setup:
(1) Subtitle Setting: Include off, Basic, Hearing impaired.
(2) Primary Preferred Language: Press OK and then use
▲/▼ to select Primary Preferred Language.
(3)Secondary Preferred Language: Press OK and then use
▲/▼ to select Sencond Preferred Language.
Teletext Setup: Press OK and then use ▲/▼ to select preferred teletext or Decoding Page Language. Audio Setup:
(1)Audio Description: Include Off and On.
(2)Audio Description Mixing Level: Press OK and then use
◀/▶ to set Audio Description Mixing Level.
(3)Audio Type: You can set the audio type.
(4) Primary Preferred Language: Press OK and then use
▲/▼ to select Primary Preferred Language.
(5)Secondary Preferred Language: Press OK and then use
▲/▼ to select Sencond Preferred Language.
LCN: Select on or off.
Auto service Update: Select On or Off.
Update Scan: Include Off and On.
- EPG: Press OK to enter the Program Guide menu.
Setup favorite channel list.- Favorite:
- Channel Diagnostic:
Press OK/▶ to display some signal information on current digital channel, such as signal strength, Frequency, etc.
- Channel Organizer: This option allows you to organize channels.
Select Cable and enter.
- Auto Tune: Press OK to start the automatic search process. The search may take a few minutes. During the process, you can press Back and choose YES to exit.
- Manual Tune: Select the channel number and start to scan
- LCN: Select on or off.
- Auto service Update: Select on or off.
Inputs
HDMI CEC Settings:
- CEC control: To select on or off.
- Device Auto Power Off: To select on or off.
- TV Auto Power On: To select on or off.
- CEC Device List: Turn devices on and select [Enable] to enable control of HDMI devices.
HDMI Signal Format: To select HDMI 1.4 or HDMI 2.1.

Display & Sound
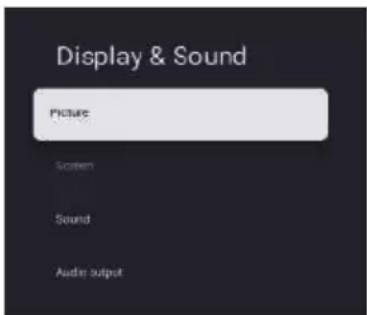
Picture: Enter to adjust picture mode or advanced settings. Picture Mode: To select Normal, Dynamic, Filmmaker, Sport, Game and Custom.
ECO: To select Off, Low and High. Backlight: To select the level of 0-100.
Advanced Settings: Color Temperature: To select the Standard, Warm and Cool. Dynamic Contrast: To select ON or OFF. HDMI PC/ AV Mode: To select Video, PC and Auto.
Overscan: To select ON or OFF Noise Reduction: To select Off, Low, Middle, High and Auto. Picture Reset: To reset the picture. Motion Estimate and Motion Compensation (MEMC): To select Off, Low, Middle and High. Gamma: To select 2.2 or 2.4.
Screen: To select this option to adjust the picture size.
Sound: Select this option to set the sound adjustments.
Sound Mode: To select the mode of Standard, Speech, Music, Stadium and User.
Dolby Atmos: To select ON or OFF.
Surround Mode: To select Pure Sound or Surround.
Night Mode: To select ON or OFF.
Sound Only: To select it and the TV screen will turn off in 10 seconds.
Advanced Settings:
- Dialogue Enhancer
- Dialogue Enhancer Level 1-7
- Balance
- Sound Reset
Audio output: Select this option to set the Audio adjustments.
Output Device: To select TV Speaker, SPDIF/Optical and HDMI-ARC.
Digital Output: To select PCM, ByPass and Auto.
Digital Audio Delay(ms): To select the level of 0 - 1000.
Digital Audio Volume: To select the level of 0-100.
eARC: To select Off or Auto.
Network & Internet
Select Wi-Fi or Ethernet to connect the monitor to the network environment and adjust network Settings.
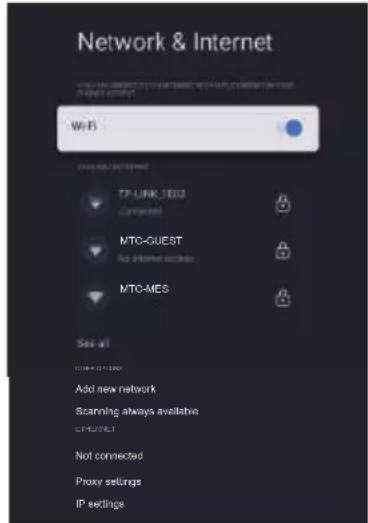
- Press to select the desired item.
- Press OK to open the corresponding submenu.
- After finishing your adjustment, Press OK to save and BACK to previous menu.
Privacy
View or adjust privacy Settings for devices, accounts, and applications.

- Press ▲/▼select the desired item.
- Press OK to open the corresponding submenu.
- After finishing your adjustment, press OK to save and BACK to previous menu.
Apps
View or adjust application-specific Settings.

- Press ▲/▼ select the desired item.
- Press OK to open the corresponding submenu.
- After finishing your adjustment, press OK to save and BACK to previous menu.
System

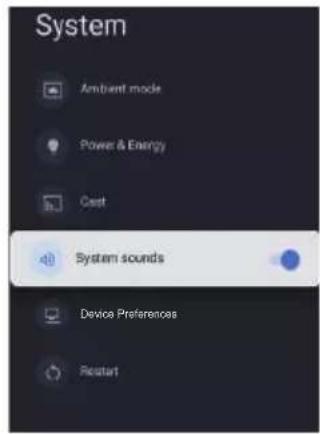
In this menu, you can read the information and settings of TV.
Accessibility: To select Captions, High contrast text, Text to speech, Accessibility shortcut, TalkBack, Switch Access and TVServiceManager.
About: You can update the system, view or change Device name, reset and read the information of TV.
- System update: Update TV system.
- Device name: View and can change the TV name.
- Reset: Google reset. After reset, your Google Account and the app you installed will be cleared.
Date & Time: To select Automatic date &time, Set date, Set time, Set time zone and Use 24-hour format.
Note: Set date and set time are available when Automatic date & time is set to OFF.
Language: To select the menu language as you need.
Keyboard: To select Current keyboard, Gboard Settings and Manage keyboards.
Storage: Display internal shared storage, if there is an external device, you can also display external settings Storage.
Ambient mode: Screensavers settings, you can select the picture, the picture switching time, whether to show the weather and date, etc
Power & Energy: To select Power on behavior, Screen saver and Energy saver.
Cast: To select Always, While casting or Never.
System sounds: To select ON or OFF.
Device Preferences:
To select Sleep Timer, Idle TV Standby, Settings Exit Timer, Settings, Environment, RCU Firmware Update, Software Version and UserId.
Restart: Restart your TV.
Help & Feedback
Provide feedback to Google or use the web search screen to access the Google Description Center.

Media Player allows you to enjoy photo, music or video recorded on a USB Flash Memory.
- The picture may not appear correctly on this TV depending on the digital cameras used.
- Display may take some time when there are many files and folders in the USB Flash Memory.
- Partly degraded files might be displayed at a reduced resolution.
- The folder and file names may be different depending on the digital camera used.
Inserting / Removing the USB Flash Memory

Starting Media Player
1 Insert the USB Flash Memory.
2 In the HOME interface, press ▲/▼◀/▶ to select the Media Player application. Or press the MEDIA PLAYER button on the remote control directly.
3 Select the mode.
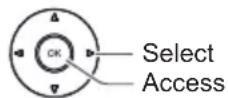
[DOCUMENT]: Displays the thumbnail of all documents in the USB Flash Memory.
[VIDEO]: Displays the thumbnail of video titles in the USB Flash Memory.
[PHOTO]: Displays the thumbnail of all photos in the USB Flash Memory.
[MUSIC]: Displays the thumbnail of music folders in the USB Flash Memory.
[DISK]: Displays the thumbnail of all documents in the USB Flash Memory.
[Contents Display]
Follow the operation guide to perform available operations.
When the cursor stays on the icon, it displays the information of the highlighted content.

natural_image
Six white outlined squares arranged in two rows on a black background (no text or symbols)Document:
- Select Document icon.
- Press Up, Down, Left or Right direction button to select your desired file and press OK to Play.
- Use OK key to see more option: ZOOM+, ZOOM-.
- Press BACK key of remote to stop playing.
Video:
- Select Video icon, then press OK button to view movie file.
- Press Up, Down, Left or Right direction button to select your desired file and press OK to Play.
- While playing a Video, press OK Menu of remote to display the play console. For the Play console, Press OK key of remote to Play and Pause the video file. Left key of remote to Fast backward. Right key of remote to Fast forward.
- Use OPTION key to see more option: Photo scale, Looping mode, Subtitle, Subtitle code, Audio track, information and video list.
- Press BACK key of remote to stop playing and Press BACK to exit.
Photo:
- Select Photo icon, then press OK button to view the picture.
- Press Up, Down, Left or Right direction button to select your desired picture file and press OK to show.
- While showing picture, press OK to display the play console. For Previous and Next use remote left and Right key.
- Use OK key to see more option: Left rotation, Right rotation, ZOOM+, ZOOM-, Manual play/Auto play, Information, Play mode, Play interval, BGM:on or off.
Music:
- Select Music icon, then press OK button to listen to Music.
- Press Up, Down, Left or Right direction button to select your desired file and press OK to Play.
- The Play console includes Previous, Play/Pause, Fast backward/Fast forward, Next and and Repeat. Press OPTION key to see PlayList.
- Press BACK key of remote to stop playing.
Disk:
- Select Disk icon, then press OK button to choose folder.
- Press Up, Down, Left or Right direction button to select your desired file and press OK to Play.
- Press BACK key of remote to stop playing.
Additional Information
Auto power standby function
The TV will automatically go into Standby mode in the following conditions:
No signal is received for 15 minutes.
[Sleep timer] is active in the [System] menu (p. 19).
Input signal that can be displayed
| Signal name HDMI | |
| 525 (480) / 60i, 60p | ○ |
| 625 (576) / 50i, 50p | ○ |
| 750 (720) / 60p, 50p | ○ |
| 1,125 (1,080) / 60i, 50i | ○ |
| 1,125 (1,080) / 60p, 50p, 24p | ○ |
| 2,250 (2,160) / 60p, 50p, 24p | ○ |
○ Mark : Applicable input signal
Signals other than above may not be displayed properly.
The above signals are reformatted for optimal viewing on your display.
HDMI connection
This TV incorporates HDMI ^™ technology. HDMI (high-definition multimedia interface) is the worlds first complete digital consumerAV interface complying with a non-compression standard.
HDMI allows you to enjoy high-definition digital images and high-quality sound by connecting the TV and the equipment.
■ Applicable HDMI features
Input audio signal:
2ch Linear PCM (sampling frequencies - 48 kHz, 44.1 kHz, 32 kHz)
Input video signal:
→ "Input signal that can be displayed" (p. 22)
Match the output setting of the digital equipment.
USB Flash Memory
For playing back in Media Player
Format: FAT32
Compliance:
USB2.0 port: Supports only USB1.1 or USB2.0 standard.
USB3.0 port: Supports only USB1.1 or USB2.0 or
USB3.0 standard.
Maximum USB capacity supported is 1TB.
Note
Data modified with a PC may not be displayed.
Do not remove the device while the TV is accessing data. Otherwise this can damage the device or TV.
Do not touch the pins on the device.
Insert the device in the correct direction. Otherwise this can damage device or TV.
Electrical interference, static electricity, or erroneous operation may damage the data or device. Panasonic is not liable for any deterioration or damage of data or device during operations with the TV.
It is recommended to connect the USB Flash Memory directly to the TV's USB port.
Some USB devices or USB HUB may not be used with this TV.
You cannot connect any devices by using the USB port.
Additional information for USB devices may be on the following website. (English only)
http://panasonic.jp/support/global/cs/tv/
- If you need to expand the memory, you can format the USB expansion memory.
Home > Settings > System > Storage >VendorCo
USB drive > Delete and format as device storage
If want to restore USB functionality, following below format again.
Home > Settings > System > Storage > VendorCo
USB drive > Erase & format as removable storage
* This operation has the risk of damaging the USB, please proceed with caution.
Supported file format in Media Player
age Decoder
JPEG; PNG; BMP; GIF
deo Decoder
MPEG1/2/4; H.264; H.265; AVI; WMV; VP8 ; M-JPEG
Audio Decoder
PCM; LPCM; MPEG1/2/4; AAC; WMA; AC3; EAC3; FLAC
btitles
- The video file and subtitles text file are inside the same folder, and the file names are the same except for the file extensions.
-If there are more than one subtitles text file inside the same folder, they are displayed in the following order of priority: ".srt", ".sub".
Note
Even if these conditions are fulfilled, some files may not play depending on how they are encoded.
Do not use two-byte characters or other special codes for data.
Connected devices may become unusable with this TV if the file or folder names are changed.
Read this information before playing media content.
Limitations on use of photo, video, and music files
The TV supports MSC(Mass Storage Class) USB devices only. MSC is a class designation for mass storage devices. Types of MSC devices include external hard drives, flash card readers, and digital cameras. (USB hubs are not supported.) These kinds of devices must be connected directly to the USB port. The TV may not be able to recognise a USB device or read the files on the device if it is connected with a USB extension cable. Do not disconnect USB devices while they are transferring files.
When connecting an external hard drive, use the USB(HDD) port. We recommend that you use an external hard drive with its own power adapter.
Certain digital cameras and audio devices may not be compatible with the TV.
The TV supports the FAT file systems.
After sorting files in the Folder view mode, the TV can display up to 1,000 files per folder. If the USB device contains more than 8,000 files and folders, however, some files and folders might not be accessible.
Certain files, depending on how they are encoded, may not play on the TV.
Certain files are not supported on all models.
DivX and DTS codecs are not supported by the Panasonic.
Troubleshooting
Before requesting service or assistance, please follow these simple guides to resolve the problem.
If an error message appears, follow the message's instructions.
If the problem still persists, please contact your local Panasonic dealer for assistance.
Screen
Red, blue, green or black spots on the screen.
This is the characteristic of liquid crystal panels. The liquid crystal panel is built with very high precision technology. Occasionally, a few non-active pixels may appear on the screen as points of red, green, blue or black. This does not affect the performance of your TV and it is not a quality problem.
Chaotic image, noisy.
Set [Noise reduction] in the [Picture] menu to remove noise (p. 18).
Check nearby electrical products (car, motorcycle, fluorescent lamp).
No image is displayed.
Check the settings of [Contrast] or [Brightness] in the [Picture] menu (p. 18).
Check the TV is in AV mode. If the TV is in AV mode, check the selected input mode match the output of the external equipment (p. 16).
Unusual image is displayed.
Turn the TV off with Mains power On / Off switch (p. 14), then turn it on again.
Pictures from equipment connected via HDMI are unusual.
Check the HDMI cable is connected properly.
Turn the TV and equipment off, then turn them on again.
Check an input signal from the equipment (p. 22).
Use equipment compliant with EIA/CEA-861/861D.
Sound
No sound is produced.
Check the sound mute setting (p. 18) and volume.
Low level or distorted sound.
Sound signal reception may be deteriorated.
Sound output via HDMI connection is unusual.
Set the sound setting of the connected equipment to "2ch L.PCM".
General
The TV goes into Standby mode.
This TV is equipped with auto power standby function (p. 22).
The remote control does not work or is intermittent.
Replace the batteries (p. 5).
Point the remote control directly at the remote control signal receiver of the TV (within about 7 m and 30 degree angle).
Situate the TV away from sunshine or block sources of bright light from shining on the remote control signal receiver of the TV.
Parts of the TV become hot.
Even if the temperature of parts of the front, top and rear panels has risen, these temperature rises do not cause any problems in terms of performance or quality.
The TV panel moves slightly when it is pushed with a finger.
Clattered sound might be heard.
There is some flexibility around the panel to prevent damage. This is not a malfunction.
Overcurrent error message appears.
The connected USB device might cause this error. Remove the device and turn the TV off with Mains power On / Off switch, then turn it on again.
Check foreign objects are not inside the USB port.
Maintenance
First, remove the mains plug from the socket outlet.
Regular care
Gently wipe the surface of the display panel, cabinet and pedestal by using a soft cloth.
Wipe the mains plug with a dry cloth at regular intervals. Moisture and dust may lead to fire or electrical shock.
For stubborn dirt
First clean the dust on the surface. Dampen a soft cloth with clean water or diluted neutral detergent (1 part detergent to 100 parts water). Wring the cloth and wipe the surface. Finally, wipe away all the moisture.
Caution
Do not use a hard cloth or rub the surface too hard as this could scratch the surface.
Do not subject the TV's surfaces to water or detergent. Liquid inside the TV could lead to product failure.
Do not subject the surfaces to insect repellent, solvent, thinner or other volatile substances. This may degrade surface quality or cause peeling of the paint.
The surface of the display panel is specially treated and may be easily damaged. Take care not to tap or scratch the surface with your fingernail or other hard objects.
Do not allow the cabinet and pedestal to make contact with a rubber or PVC substance for a long time. This may degrade surface quality.
Specifications
Model no.
85-inch model
TH-85MX800G
Power source
AC 220 - 240 V, 50/60 Hz
Power consumption
(Rated power / Standby power)
85-inch model
375 W / 0.5 W
Display panel
Panel
LCD panel (LED backlight)
Visible screen size (diagonal)
85-inch model: 215 cm
Display resolution
85-inch model: 3,840 (W) × 2,160 (H)
Dimensions (W × H × D)
85-inch model
1894 x 1198 x 479 mm (With Pedestal)
1894 x 1097 x 110 mm (TV only)
Mass
85-inch model
42.6 kg (With Pedestal)
38.6 kg (TV only)
Connection terminals
AV in
Mini, 1.0 V[p-p] (75 Ω)
EARPHONE
Mini, 150mV rms\~ 250mV rms
HDMI 1 / 2 / 3 input
TYPE A Connectors
USB
USB 2.0/3.0 TYPE A Connectors
USB 2.0 DC 5V, Max.500 mA
USB 3.0 DC 5V, Max.900 mA
Speaker Output
85-inch model
Audio output
20 W (10 W + 10 W)
Receiving systems / Band name
Systems
| Systems Function | ||
| 1 | PAL B, G | |
| 2 | PAL I | |
| 3 | PAL D, K | Reception of broadcast |
| 4 | SECAM B, G | |
| 5 | SECAM D, K | |
| 6 | PAL | Playback from Special VCR's or DVD |
| 7 | PAL 60 Hz/5.5 MHz | Playback from Special |
| 8 | PAL 60 Hz/6.0 MHz | Disc Players and Special |
| 9 | PAL 60 Hz/6.5 MHz | VCR's or DVD |
Digital TV
DVB-T/T2 Standard
Aerial input
VHF / UHF
Operating conditions
Temperature
0^-45^
Humidity
20% - 80% RH (non-condensing)
Note
Design and Specifications are subject to change without notice. Mass and Dimensions shown are approximate.
Built-in wireless LAN
Standard compliance and Frequency range
IEEE 802.11 a/b/g/n/ac
2.4\~2.5GHz and 5.15\~5.825GHz
Security
Support for WPA/WPA2
Built-in Bluetooth
Bluetooth V5.0
2.4\~2.485GHz
OSS License
This product incorporates the following software:
(1) The software developed independently by or for Panasonic Entertainment & Communication Co., Ltd.,
(2) The software owned by third party and licensed to Panasonic Entertainment & Communication Co., Ltd.,
(3) The software licensed under the GNU General Public License, Version 2.0 (GPL V2.0),
(4) The software licensed under the GNU LESSER General Public License, Version 2.1 (LGPL V2.1), and/or
(5) Open source software other than the software licensed under the GPL V2.0 and/or LGPL V2.1.
The software categorized as (3) - (5) are distributed in the hope that it will be useful, but WITHOUT ANY WARRANTY, without even the implied warranty of MERCHANTABILITY or FITNESS FOR A PARTICULAR PURPOSE. Please refer to the detailed terms and conditions thereof 【Settings > System > Device Preferences > Settings > OSS License】
At least three (3) years from delivery of this product, Panasonic will give to any third party who contacts us at the contact information provided below, for a charge no more than our cost of physically performing source code distribution, a complete machine-readable copy of the corresponding source code covered under GPL V2.0, LGPL V2.1 or the other licenses with the obligation to do so, as well as the respective copyright notice thereof.
Contact Information: osd-cd-request@gg.jp.panasonic.com
Diimpor oleh:
Information on Disposal in other Countries outside the European Union

This symbol is only valid in the European Union. If you wish to discard this product, please contact your local authorities or dealer and ask for the correct method of disposal.
Customer's Record
The model number and serial number of this product may be found on its rear panel. You should note this serial number in the space provided below and retain this book, plus your purchase receipt, as a permanent record of your purchase to aid in identification in the event of theft or loss, and for Warranty Service purposes.
Model Number
Serial Number
- AV/Peralatan Permainan
- Keluaran Speaker
- Sistem penerima/Nama band
- Operating Instructions
- LED TV
- English
- CAUTION
- Damages
- Notice for Digital terrestrial broadcasting functions
- Contents
- Safety Precautions
- (Warning)
- ( Warning )
- To prevent the spread of fire, keep candles or other open flames away from this product at all times
- Warning Stability Hazard
- Warning
- Ventilation
- Built-in wireless LAN
- Bluetoothwireless technology
- Moving the TV
- When not in use for a long time
- Use conditions
- Battery for the Remote Control
- Setting Up the TV
- Supplied accessories
- Remote Control
- Batteries (AAA) × 2
- Mains Lead
- Mini Jack Adapter
- Pedestal
- Note
- Preparation
- Attaching the pedestal
- Assemble the pedestal
- Removing the pedestal from the TV
- Inserting remote's batteries
- Wall mounting the TV (optional)
- Connecting the TV
- Connections
- Initial Setup
- Plug the mains plug into the socket outlet and turn on the TV.
- Google - Initial Setup
- Step 7: Environment
- Step 8: Terms & Conditions
- Step 9: Channel installation
- Step 11: Please check settings
- Step 11: Environment
- Step 12: Terms & Conditions
- Step 13: Channel installation
- Step 15: Please check settings
- Step 16: Installing your apps
- Setup is now complete and your TV is ready for viewing.
- Operating the TV
- Using the remote control
- Remote Control Functions
- How to Pair Remote Control with the TV
- Using the TV controls
- Power On / Power Off
- Power off
- Next channel
- Previous channel
- Volume increase
- Volume reduction
- Input source
- Voice On / Voice Off
- Power LED
- Remote control signal receiver
- Voice signal receiver
- General Operation
- Using Homepage
- Note:
- Using the Menu Functions
- Using Quick Access Menu
- Menu
- The input
- Using System Settings
- Set up Google TV
- Add a Google account
- Channels & Inputs
- Select ATV and enter.
- Select Antenna and enter.
- Select Cable and enter.
- Inputs
- Network & Internet
- Privacy
- Apps
- System
- Help & Feedback
- Starting Media Player
- [Contents Display]
- Follow the operation guide to perform available operations.
- Document:
- Video:
- Photo:
- Music:
- Disk:
- Additional Information
- Auto power standby function
- HDMI connection
- ■ Applicable HDMI features
- USB Flash Memory
- Supported file format in Media Player
- age Decoder
- deo Decoder
- Audio Decoder
- btitles
- Limitations on use of photo, video, and music files
- Troubleshooting
- Screen
- Red, blue, green or black spots on the screen.
- Chaotic image, noisy.
- No image is displayed.
- Unusual image is displayed.
- Pictures from equipment connected via HDMI are unusual.
- Sound
- No sound is produced.
- Low level or distorted sound.
- Sound output via HDMI connection is unusual.
- General
- The TV goes into Standby mode.
- The remote control does not work or is intermittent.
- Parts of the TV become hot.
- The TV panel moves slightly when it is pushed with a finger.
- Clattered sound might be heard.
- Overcurrent error message appears.
- Maintenance
- First, remove the mains plug from the socket outlet.
- Regular care
- For stubborn dirt
- Specifications
- Model no.
- Power source
- Power consumption
- (Rated power / Standby power)
- Display panel
- Visible screen size (diagonal)
- Display resolution
- Dimensions (W × H × D)
- Mass
- Connection terminals
- EARPHONE
- USB
- Speaker Output
- Receiving systems / Band name
- Digital TV
- Aerial input
- Operating conditions
- Temperature
- Humidity
- Standard compliance and Frequency range
- Security
- Built-in Bluetooth
- OSS License
- Information on Disposal in other Countries outside the European Union
- Customer's Record
Brand : PANASONIC
Model : TH-85MX800G
Category : Television