
INTPJ-STK1 - Video projector ACER - Free user manual and instructions
Find the device manual for free INTPJ-STK1 ACER in PDF.


| Product Type | Video Projector |
| Brand | Acer |
| Model | INTPJ-STK1 |
| Dimensions (W x D x H) | 12.0 x 8.5 x 3.0 inches (305 x 216 x 76 mm) |
| Weight | 5.5 lbs (2.5 kg) |
| Power Consumption | 240W (typical) |
| Lamp Type | UHP Lamp |
| Lamp Life | Up to 5000 hours (Eco mode) |
| Resolution | 1920 x 1080 (Full HD) |
| Brightness | 3000 ANSI Lumens |
| Contrast Ratio | 20000:1 |
| Projection System | DLP |
| Keystone Correction | Vertical ±40°, Horizontal ±30° |
| Input Ports | HDMI 1.4, VGA, Composite, USB-A, Audio In |
| Output Ports | Audio Out, USB-A (power) |
| Built-in Speaker | 10W Mono |
| Noise Level | 30 dB (Eco mode) |
| Supported Screen Size | 30 - 300 inches |
| Projection Distance | 3.3 - 32.8 ft (1.0 - 10.0 m) |
| Cleaning | Use soft dry cloth; do not use liquid cleaners |
| Safety | Class 1 laser product; avoid direct eye exposure |
| Spare Parts | Replacement lamp and remote available via Acer support |
| Warranty | 2 years limited warranty (check local terms) |
Frequently Asked Questions - INTPJ-STK1 ACER
User questions about INTPJ-STK1 ACER
0 question about this device. Answer the ones you know or ask your own.
Ask a new question about this device
Download the instructions for your Video projector in PDF format for free! Find your manual INTPJ-STK1 - ACER and take your electronic device back in hand. On this page are published all the documents necessary for the use of your device. INTPJ-STK1 by ACER.
USER MANUAL INTPJ-STK1 ACER
Hardware Installation....5
System Debugging......8
Calibration Software....13
Gesture recognition Introduction......21
Application Software....22
Troubleshooting....28
Important information....29
Sales Feedback Form 30
Introduction
Smart Touch Kit is the first product in the world that supports finger touch and is easy to carry around. It can make any projector or LCD screen controllable by touch of the fingers. Compared with the traditional Whiteboard, the key features of Smart Touch Kit are: easy portability and finger touch control; sense any non-transparent objects in addition to fingers; no specified requirement for the display device, make any flat surface interactive; no limit on the interactive area, sizes range from 40"-100"; can work with whiteboards, save and record both marker pen and finger writing on the same board. Smart Touch Kit includes: Laser Emitter, Camera, Calibration Software, Whiteboard Software.

natural_image
Exterior view of a rectangular electronic device with a black top and silver side (no text or symbols visible)
natural_image
Black rectangular electronic device with a circular button (no visible text or symbols)Laser Emitter Camera
Features
- Support finger touch: Use fingers instead of pens to write or control;
- Support Multi-touch: Ten People can write and erase simultaneously;
- Minimum installation distance is 35cm: For example, if the size is 80 inch, then the installation distance is around 100cm;
- Portable and easy to install. Total weight is around 1.6kg. Just put the emitter above the projection screen by double adhesive tape, and mount the Camera on the projector or ceiling. No need for professional technicians.
- Turn ordinary boards or walls into finger touch screens. Our product can turn any flat surface (like boards, walls, LCDs) into finger touch screens; just fix the emitter above the projection screen.
- Able to operate on any non-transparent objects. In the active area, any non-transparent object can be used as a pen.
- Convert normal LED screens into finger touch screens. Support active screen sizes ranging from 40-100inch. When using it, add one sheet of glass on the screen surface and fix the IWB hardware on the glass to convert LED screen into a finger touch screen. Compared to the add-on infrared technology solution, it has lower cost and there's no need to customize. The cost will not increase with the screen size.
Specifications
| Smart Touch Kit | ||
| Calibration | Automatic (5s) / Manual (25/36 points) | |
| Gesture Recognition | In Education Software: Write with single fingers, Erase with the palm fingers for movements, Two fingers away for zooming in and out, St with the palm for opening spotlight, Double slap with the palm for g the desktop.In Windows: Max, Min windows, Zoom in or Zoom out or Rotate th One finger as a scroll bar, Display all the windows, Shift windows. | |
| Multi-touch | Ten point touch, writing and erasing at the same time. | |
| Latency | <30ms | |
| Filter | Software auto-control that enhances stability. | |
| Minimum Active Size | 40 inches | |
| Max Active Size | 120 inches (rooms without sunlight); 100 inches(rooms with sunlight, c throw ratios for different models) | |
| Technology | Laser Image Calibration Technology | |
| Positional Accuracy | ±3 Pixel (Resolution: 4096*4096) | |
| Aspect Ratio | 4:3,16:9, 16:10 | |
| Projection ratio | Ultra-short throw:0.28, Short throw: 0.34, Long throw:1.34 | |
| Laser Beam | 2 | |
| Wavelength of Laser | 940nm | |
| Power | 5w | |
| Power of Laser Bean | 280mw*2 | |
| Power Requirements | 3.3V/2A | |
| Signal Refresh Rate | 120fps | |
| Connection | Camera connected to computer by USB cable; emitter just needs po the connection between emitter and camera is wireless by IR signal; | |
| Weight | 0.5kg | |
| OS Requirement | Win7、win8、win8.1、win10 | |
| Software | Calibration software (driver) and GLBoard (education software) | |
| Package | 1. Camera2. Emitter3. Mounts4. USB cable (12m*1) | 5. Pionter Pen6. Power Adapter7. User Manual |
Hardware Installation
Connection Topological graph:
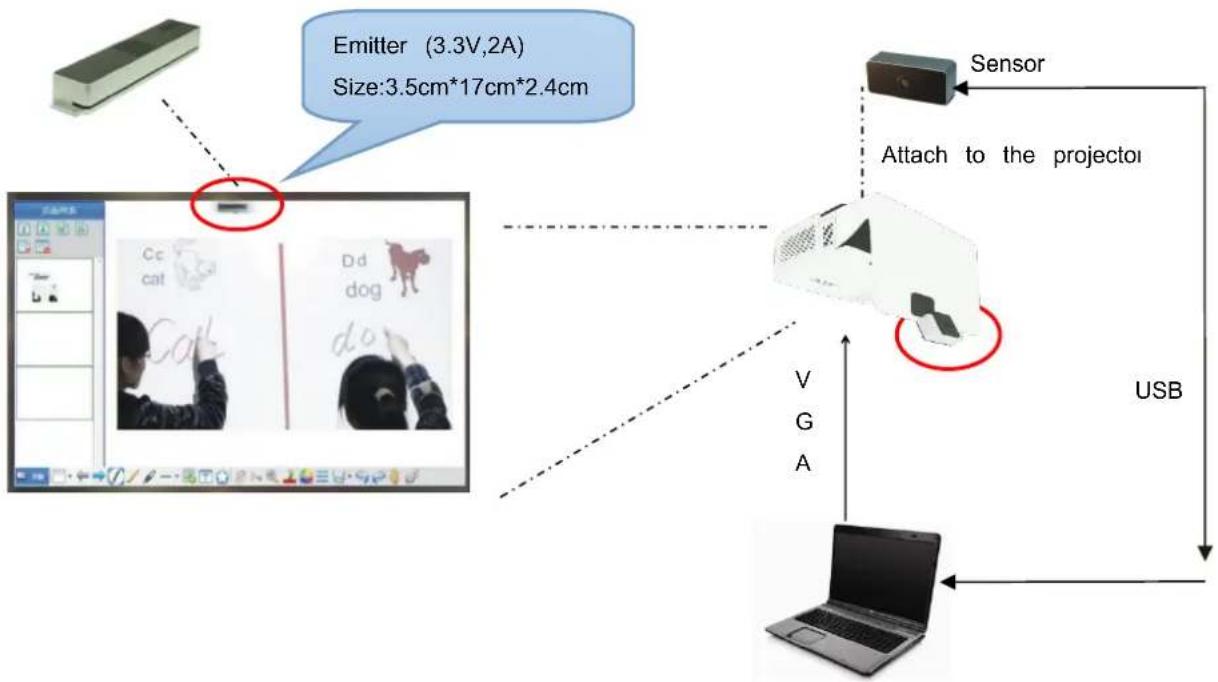
flowchart
graph TD
    A["Sensor"] -->|Attach to the projector| B["Device"]
    B -->|USB| C["Laptop"]
    D["Emittler (3.3V,2A) Size:3.5cm*17cm*2.4cm"] --> E["Image Panel"]
    E --> F["Camera Image"]
    F --> G["Image Panel"]
    G --> H["Computer"]
Installation requirements
- The display surface for installation should be flat. For a better touch performance, the flatter the surface is, the easier the adjustment will be.
- Take care of interference from sunlight when install it. We recommend using dark curtains for better results.
- The USB cable or adapter cable cannot be cut or spliced.
- Before installing the projector, please leave 7cm between the top side of projection screen and the inner frame of the whiteboard for emitter installation.
- Before installing the emitter, please put one piece of 3M adhesive tape on the back side of emitter body. Measure the central point of the top side of projection screen, paste and fix emitter 3cm above the central point.(Note: the central point of emitter and the central point of projection screen should be on the same straight line.)

- Please secure emitter by 4 screws for long term use.
- Mount camera on top of the projector, please fix camera firmly after adjusting the camera's image in correct position and leave no parts loose.
Installation
Step 1: Emitter
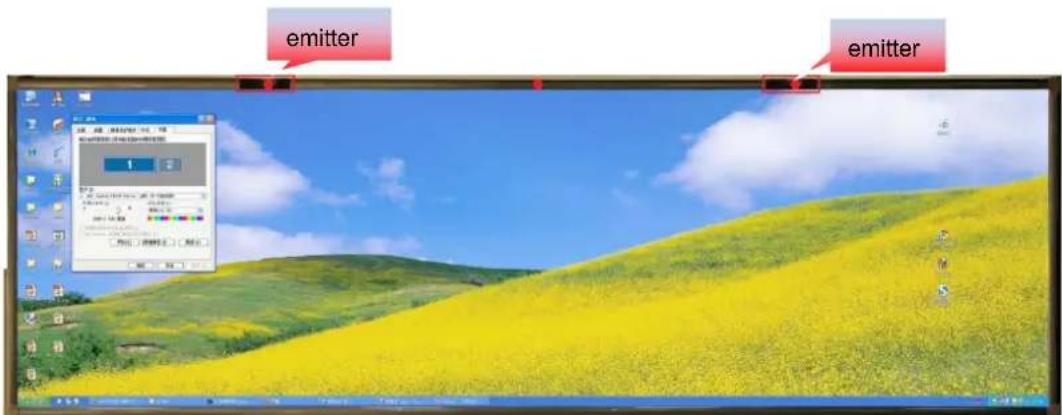
Put an adhesive tape on the back side of the emitter, attach emitter 3cm above top center of the projection screen, and secure the emitter by 4 screws (as shown in Pic).

Note: if it's a Dual-Screen Smart Touch Kit, one emitter should be installed 3cm above the top of projection screen on the left side of whiteboard, the other emitter should be installed 3cm above the top of projection screen on the right side of whiteboard(red mark refers to the central point) (as shown in pic).

natural_image
Large screen displaying a landscape image with a blue sky and green field, no visible text or symbols on the screen or surroundings.Step 2: Camera
1st installation method (BracketInst) all the camera on the top of projector by mounting component, fix the camera firmly to prevent it from moving wobbly. Adjust the angle of camera to ensure that it can be detect the emitter (as shown in pic).
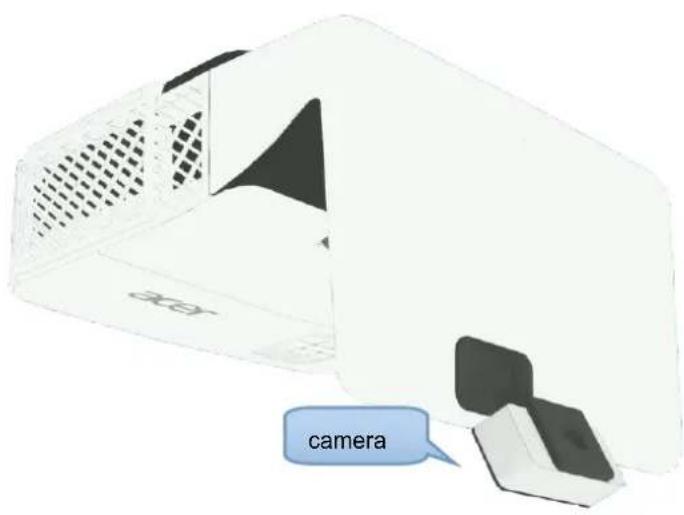
Note: If it is a Dual-Screen Smart Touch Kit, please install two cameras on two projectors respectively.
2nd installation method (Bracket 2):
Fix the sensor to projector by using matched black supporting bracket, as following:
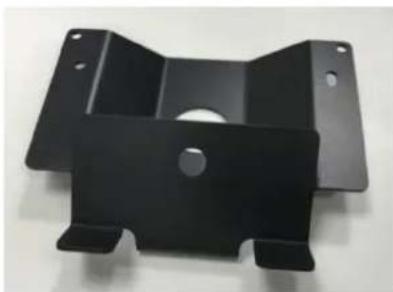
natural_image
Black metal bracket component with mounting holes and a central hole (no text or symbols visible)First, fix the sensor to the black supporting bracket with the matched screw by screwdriver, as following:
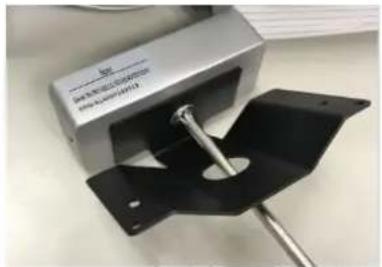
natural_image
Close-up of a mechanical clamp or bracket with a metallic rod inserted, no visible text or symbols.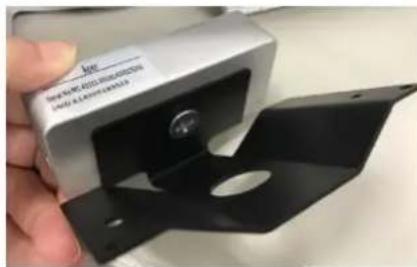
natural_image
Close-up of a hand holding a silver electronic device with a black metal clip, no visible text or symbols on the device itself.At last, fix the supporting bracket to the projector with matched small screws, as following:

natural_image
Close-up of a black mechanical device with a circular hole and adjustment knobs, placed on a white surface (no visible text or symbols)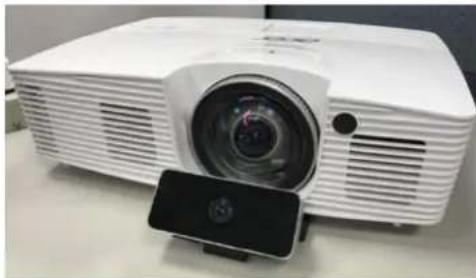
natural_image
White projector with a mounted screen, shown on a plain surface (no visible text or symbols)Step 3:Cable connection:
Connect the sensor with computer by using the USB cable. Emitter is connected to the power adapter.
Note:
- Bracket 1 and bracket 2 are optional. Please kindly refer to actual packaging accessories.
2.if it is a Dual-Screen Smart Touch Kit, two sensors are connected to one computer by a USB cable respectively.
System Debugging
Software installation
Step 1 : Our software support win7, win8, and win10 OS. Put the software CD into computer and start the software by double click. Choose the language by prompt message, and select the throw ratio type according to product model.
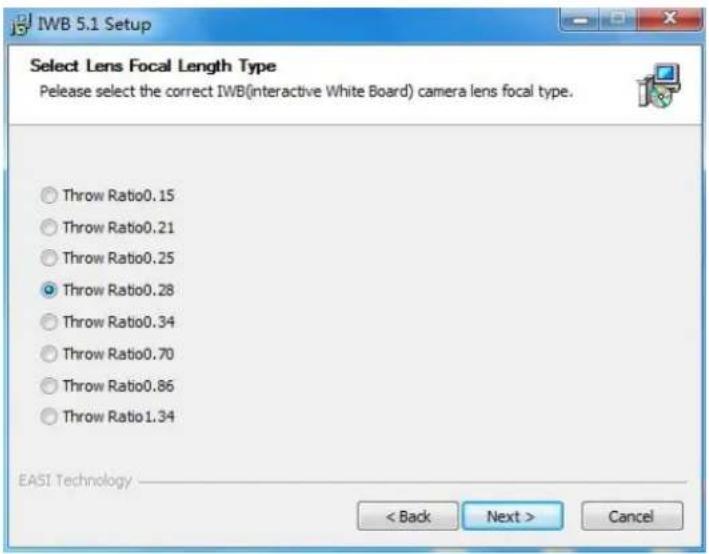
Step 2: Choose the installation path to continue it.

Step 3: Be patient to wait the installation for several minutes.


Step 4: After installation, the shortcut icon will be added to desktop.

After the installation of education software, the shortcut icon as picture will be added to desktop:
Software Uninstall
Uninstall software: Open the computer control panel, and click the "software and function" to choose and uninstall it by right click. Restart your computer after uninstall.

Adjust the sensor
Chose "Installation and debugging"-“Mode 1”, then you can see the whole screen is projected clearly (as shown in Pic).
***Adjust the camera's position to make projection screen image show 60-80% of the software interface.
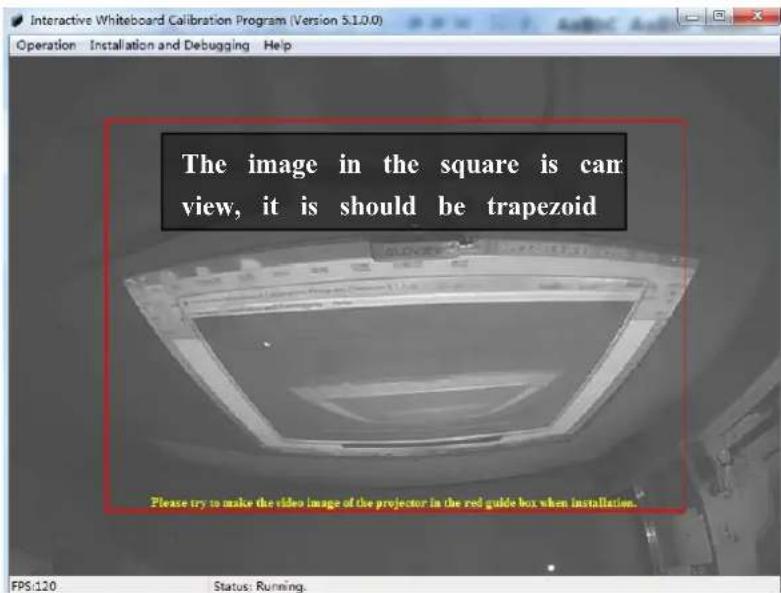
Note: If it is a Dual-Screen Smart Touch Kit, Left camera should show the image of left projection screen, and right camera should show the right projection screen.
When it is in camera mode, the image is in the opposite way as shown in Pic 4:
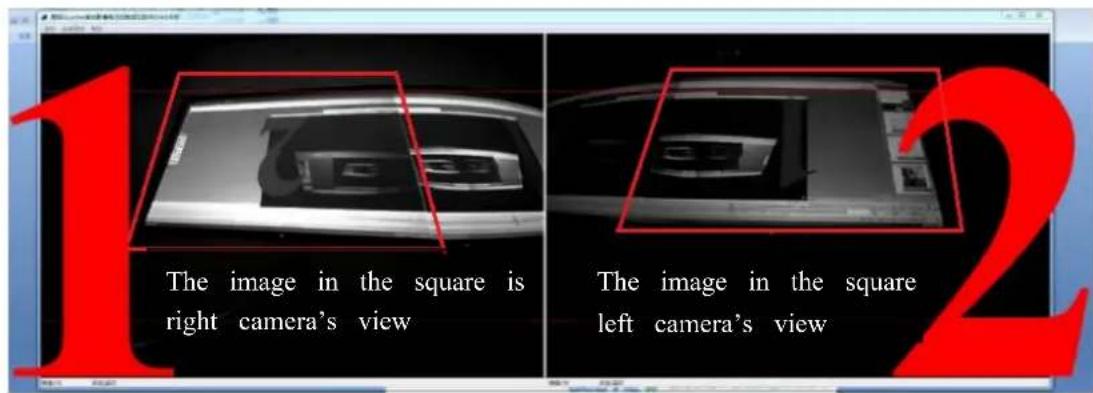
Pic 4
Then please right click on the image, chose "exchange the image", then it will be on the right as in Pic5:

Pic 5
Adjust the emitter
1. Standard adjustment:
Choose "Installation and debugging"-“Mode 2”. In this mode, the emitter emits a invisible laser film to
cover the whole projection screen. Please keep at least 5mm vertical distance between the beam and the projection screen.
2. Principle of adjustment:
Tighten the bottom screw to tilt down laser light. Perform this step when the light is way above the board. Tighten the top side screw to tilt up laser light. Perform this step when the light hits the board.
3. Best way of adjusting emitter:
After installing the emitter, tighten the screws on the bottom first, and let the laser hit the board as shown in Pic6.
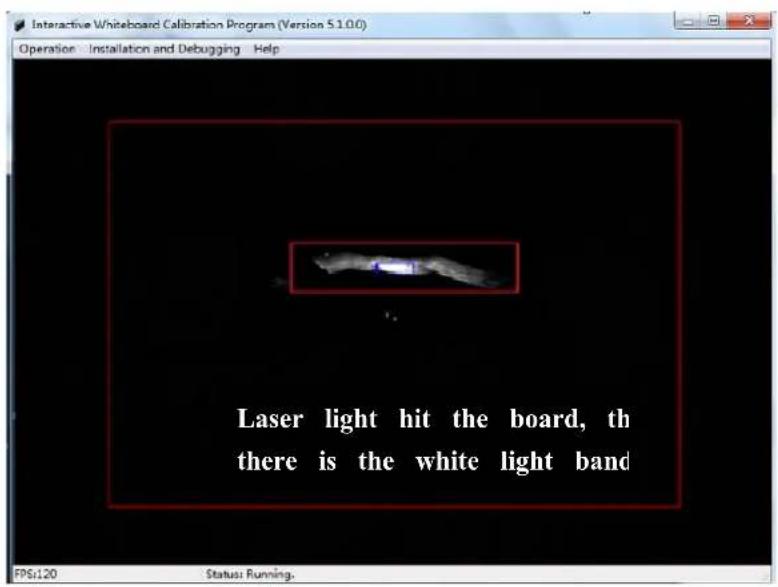
Pic 6
Then tighten the screws on the top, until white light appears as shown in Pic 7
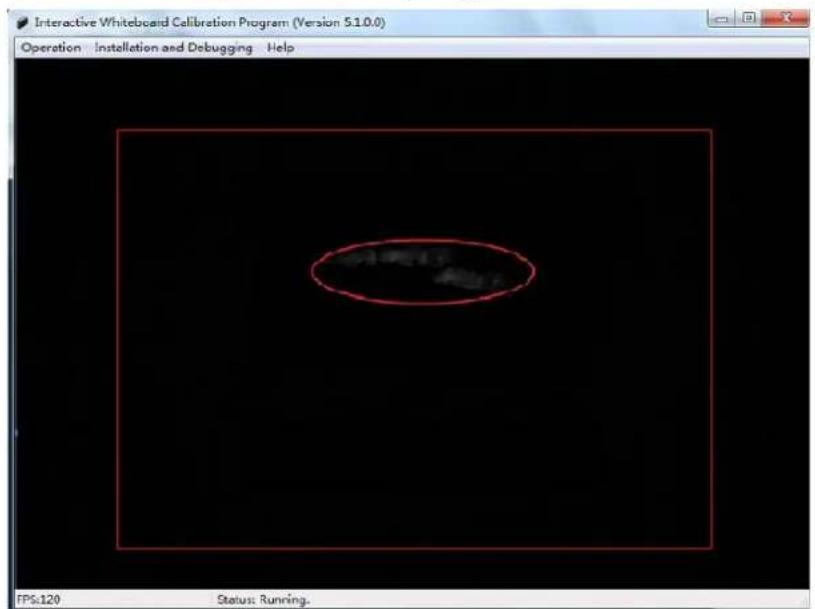
Pic 7
Note: If it is a Dual-Screen Smart Touch Kit, adjust emitters by the same way.
Calibration Software
Introduction
Start IWB calibration software, click "operation" menu

Run: Run the calibration program to start the sensor icon.
Stop: Close the sensor icon, then no more touch functions.
Parameter Setting: Software parameters Setting
Auto Mask Clutter: Auto shield the interference point from out side environment. After the auto mask clutter, the auto calibration can only be continued.
Manual Mask Area: After the auto mask clutter, if there is still some interference light spots, manual shied the interference light spot by adding mask area.
Manual Calibration: After auto mask clutter, do manual calibration. It will realize the touch function after success calibration.
Auto Calibration: The software realizes auto calibration without manual click. The calibration will finish within 5 seconds, and it realizes the touch function after success calibration.
Light spot Sampling: The light spot sampling can only be continued after manual calibration or auto calibration, which make our product adapt with current usage environment and user experience effect will be better.
Disable Optical Pen Control: After choosing it, the touch function will pause.
Exit: After software exit, the touch function will stop.
Parameter setting
Image Sensor Settings

(1) Normal Use Setting
Set the Proportion of the spot (20%-80%): refers to the sensitivity of mouse reaction to lightspot sizes, the larger the value is, the worse the sensitivity becomes.
The Brightness coefficient (0-255): refers to the sensitivity of sensor to light in normal mode. The larger the value is, the better the sensitivity becomes, but when the sensitivity increase, the anti-light interference decrease.
Touch Mode: The pen touch and the finger touch. The software will auto select it.
(2) Auto Calibration Setting
Average Brightness (2-255): refers to the sensor receiving the overall picture brightness of "black and white checkerboard" presented in software during the process of automatic calibration. The larger the value is, the brighter the brightness is.
Light Gray (0-255): refers to the "black and white checkerboard" overall picture contrast presented during automatic calibration process by the calibration software. The larger the value is, the greater the contrast between the black area and the white area in the "black and white Checkerboard."
Video record: Record the auto calibration process after selected, and the record video will be saved in the installation menu of calibration software.
(3) Other setting: refers to the focal length type of product, and it should be selected according to product model.
(4) Other mode
Rear Projector: if your projector is a rear projector, please choose it.
Double Screen: two Smart Touch Kits work with two projectors to become a big touch screen.
Finish installation and connection, then the program will be in double screen mode automatically.
Parameter Settings:Gesture settings
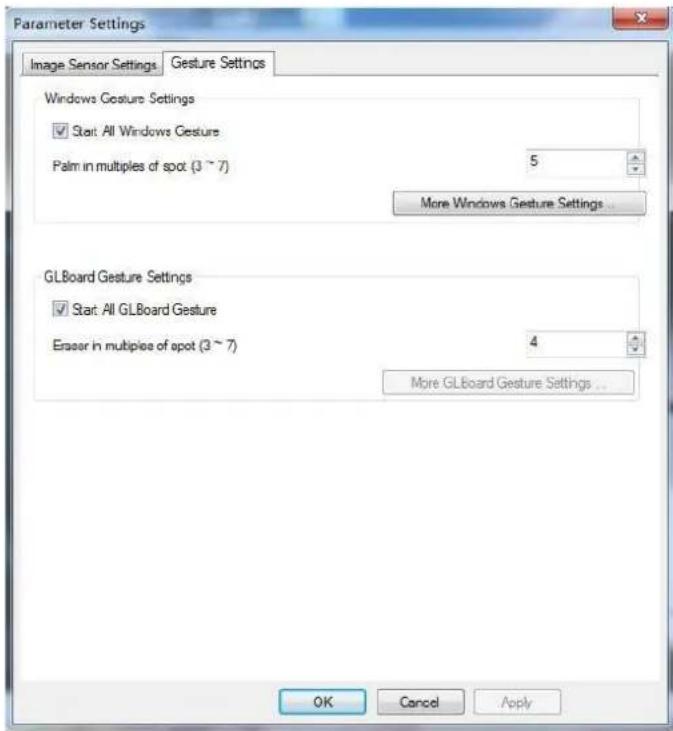
(1) Windows Gesture Settings
Start All Windows Gesture: refers to the switcher of Windows Gesture.
Palm in multiples of spot (3\~7): refers to the sensitivity of palm gesture. The lower the value is, the better the sensitivity is.
(2) GLBoard Gesture Settings
Start All GLBoard Gesture: refers to the switcher of GLBoard gesture.
Eraser in multiples of spot (3\~7): refers to the sensitivity of palm eraser gesture. The lower the value is, the better the sensitivity is.
More Windows Gestures

General Process: In General Process, you can see all the gestures recognition based on palm and finger. The user can start and close any gesture recognition based on their requirements.
Exceptional Process: In Exceptional Process, you can add exceptions. Click "Add exception" to select the process to be added to Exceptional List. Select the process added in Exceptional List, and then Gesture recognition can be applied to the program you want to use. The user can start and close any gesture recognition based on their requirements. This function is setting gesture recognition for third party software.
Auto Mask Clutter (Ctrl+Shift+A)
Auto mask clutter is the first step to do before performing manual calibration. Please select "Auto Mask Clutter" from "Mask Bitmap Edit" or press "Ctrl+Shift+A". The program will specify the active area automatically.

Manual Calibration
After auto mask clutter, click manual calibration,and Then you will see ,Use finger or IR pen tip to do calibration by touching crosshair. When it finishes, the software will be minimized to taskbar, and it will realize the touch function.
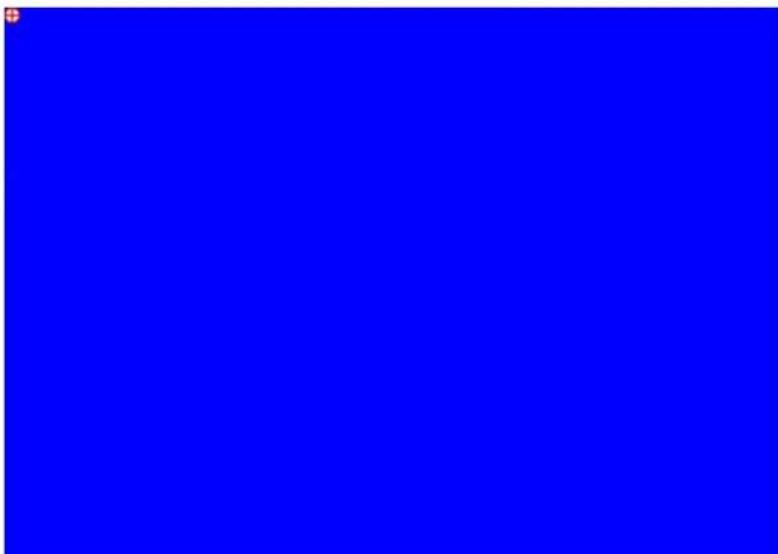
natural_image
Solid blue background with no visible text, symbols, or patternsAuto Calibration
Click auto calibration, the projection image will change to auto calibration interface.

natural_image
Grid of white dots on a black background, no text or symbols presentAfter 5 seconds, the auto calibration finished, the screen image will return to projection image. When you open the software, the image is as below and hint auto calibration succeeded.
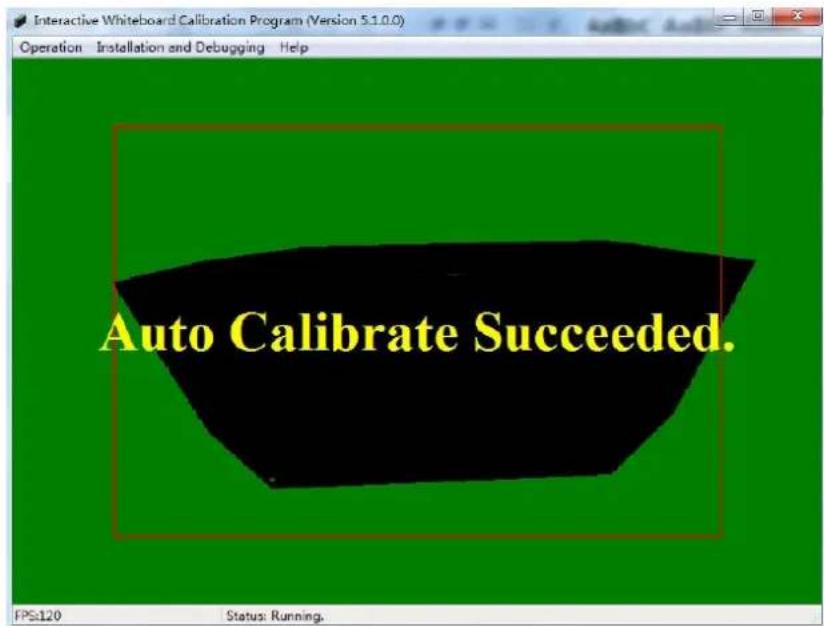
Lightspot Sampling
After the auto calibration and manual calibration, click lightspot sampling, and the projection image will change to lightspot sampling interface. Use finger or IR pen to touch the red box, and continue the next one when the red box change to green.

Installation and debugging
Click "installation and debugging" menu

(1) Tuning Webcam Image Mode: The projection image which caught by camera will be showing in software interface. Adjust the projection image into the red frame according to the camera debugging requirement.
(2) Tuning Laser Transmitter Image Mode: In this mode, emitter emits a set of invisible laser film 4mm above the whiteboard, and the beam should be parallel with the whiteboard. The light spot size should be not less than 9 pixels when you use finger to touch 4 corners.
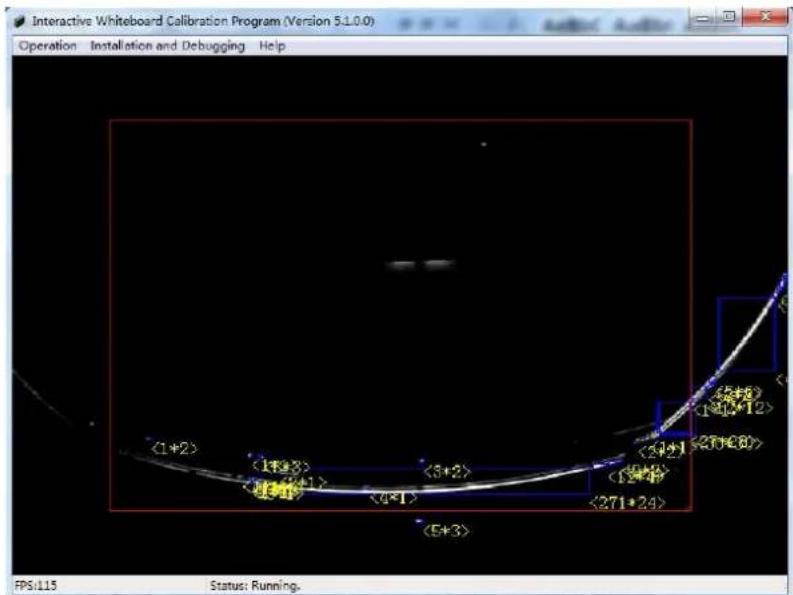
(3) Normal Usage Image Mode: after the calibration, all operations can be done by the finger instead of the mouse.
(4) Mouse: click mouse, then you can only do single touche in Windows.
(5) Touch Pad: click touch pad, then you can do multi-touches in Windows.
(6) Touch Pad Aspect Ratio: The default mode is auto selected. When the deviation of touch pad accuracy is more than 3cm, you can try following 3 aspect ratios (16:9, 16:10, 4:3) to rectify it.
(7) Update Firmware: Don't use it in normal usage condition. When you meet the abnormal image in camera mode, such as black screen, white screen, etc, please contact our technical person for guidance.
Gesture recognition Introduction
Mouse operations
Single Click: single finger tap
Double Click: single finger tap twice quickly at the same position.
Right Click: single finger stays for 2 or 3 seconds at the same position for right click function.
Scroll Bar: open a website, scroll the page up and down by single fingers directly.
Gesture recognition in Windows

Slide up with 5 fingers for maximizing or backing to the windows

natural_image
Silhouette of a person pointing at a large screen with a red arrow pointing downward (no text or symbols visible)Slide down with 5 fingers for minimizing the windows

natural_image
Silhouette of a person holding up a large document or paper, with no visible text or symbols on the document or background.Two fingers rotate the picture

natural_image
Person interacting with a large screen displaying a cartoon character (no visible text or symbols)Two fingers away from or closer for zoom in and zoom out the picture or the website

Slide up the bottom of screen with palm for displaying all the windows

natural_image
Person interacting with a large screen displaying a white object, no visible text or symbolsSlide from left or right with 5 fingers for shifting the windows

Stay 1s with palm in one window for moving it

natural_image
Silhouette of a person with raised hands against a gradient background (no text or symbols visible)Slide down with 10 fingers for minimizing all the windows
Gesture recognition in education software GLBoard

Erase with palm

2 fingers away for moving the page

natural_image
Person pointing at a presentation screen displaying a Windows logo (no visible text or symbols on screen)Double slap with palm for backing to the desktop

Stay 1s with palm for spotlight

In any non-writing operation, double click with single finger for shifting to write
Application Software
Introduction of the main toolbar

When you use GLBoard for the first time, double click GLBoard
to start the program, the interface includes three areas, shown as the following:

Function of each button on the tool bar
| Icon | Name | Function |
 | Start menu | Open the menu list |
 | Resource | Local resource: Click to find many pictures.Network resource: Click to search any picture likeon the web. |
 | New page | There are four options:New white pageNew black pageNew image pageNew desktop page |
| Back | Go back to the previous page | |
 | Forward | Forward to the next page |
 | Pen | Write like a ball pen | |
 | Brush | Write like a Chinese brush pen | |
 | Smart pen | Convert drawings to geometric shapes. | |
 | Multi-writing mode | Support ten persons writing simultaneously | |
 | Insert shape | Several shapes can be chosen, such as triar square, and circle | |
 | Import picture | Insert pictures from your computer | |
 | Import text | Insert text frame, then edit the words | |
 | Fill | Fill geometric shapes with different colors | |
 | Select stroke | Select the handwriting on the page, and “dra zoom” | |
 | Select picture | Move geometric shapes, text and pictures | |
 | Zoom in and out | Zoom in or zoom out the picture | |
 | Pen color | Adjust color of the pen | |
 | Fill color | Choose the color to fill | |
 | Pen width | Set stroke width and line type. | |
 | Eraser | Three options:Erase By StrokeErase By PointErase By Picture | |
 | Undo | Cancel the last operation | |
 | Redo | Redo the operation just canceled by undo | |
 | Move | Move the edit screen | |
 | Windows | Go back to the desktop |
When you click to go back to the desktop, GLBoard will appear as a floating toolbar.

| Icon | Name | Function |
 | Windows | Back to the desktop |
 | Pen | Write like a ball pen |
 | New page | Open a new white page |
 | New page | Open a new black page |
 | Back | Go back to the previous page |
| [UKT4] | Forward | Forward to next page |
 | Eraser | Erase by stroking |
 | Back | Go back to the main page of GLBoard |
 | Note page | Make the window screen as the background |
 | Preview Note page | Go back to the previous note page |
 | Close | Close GLBoard |
 | Width | Set stroke width |
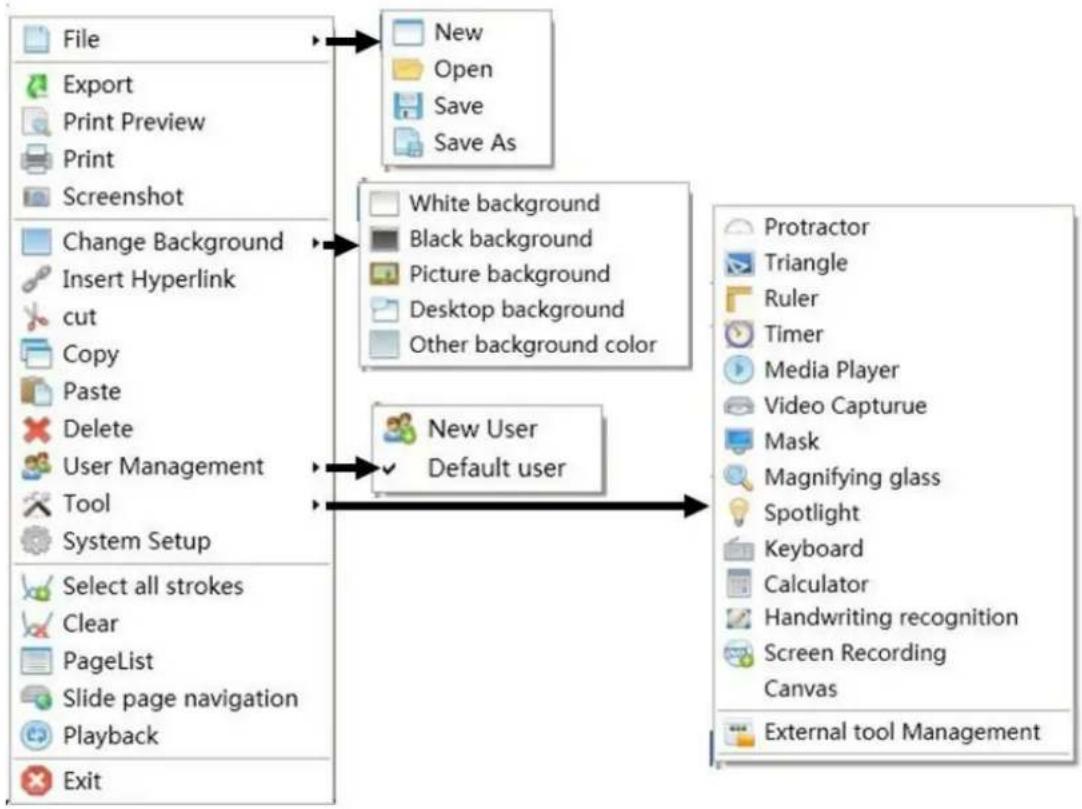
Start Menu List
flowchart
graph TD
    A["File"] --> B["New"]
    A --> C["Open"]
    A --> D["Save"]
    A --> E["Save As"]
    F["Export"] --> G["Change Background"]
    H["Print Preview"] --> I["Insert Hyperlink"]
    J["Print"] --> K["cut"]
    L["Screenshot"] --> M["Copy"]
    N["Paste"] --> O["Delete"]
    P["User Management"] --> Q["Tool"]
    R["System Setup"] --> S["Select all strokes"]
    T["Clear"] --> U["PageList"]
    V["Slide page navigation"] --> W["Playback"]
    X["Exit"] --> Y["End"]
    Z["White background"] --> AA["Black background"]
    AB["Picture background"] --> AC["Desktop background"]
    AD["Other background color"] --> AE["End"]
    AF["New User Default user"] --> AG["End"]
    AH["Protractor"] --> AI["Triangle"]
    AJ["Ruler"] --> AK["Timer"]
    AL["Media Player"] --> AM["Video Capturue"]
    AN["Mask"] --> AO["Magnifying glass"]
    AP["Spotlight"] --> AQ["Keyboard"]
    AR["Calculator"] --> AS["Handwriting recognition"]
    AT["Screen Recording"] --> AU["Canvas"]
    AV["External tool Management"] --> AW["End"]
| Menu | Submenu | Function Description |
| File | New | Create a blank file. If any file has not been sa before, a save message will be shown. |
| Open | Open an existed PPT, PDF, PTS file. | |
| Save | Save the file under editing. | |
| Save As | Save as a new file. | |
| Export | Export as an image file to Windows. | |
| Print Preview | After print settings for the document are set, th can preview the print result of the document. | |
| Any words, images, or visible data in GLBoard, be output on media like paper through the print | ||
| Screenshot | Go back to Windows interface, select the areayou want to capture, and then click OK. | |
| Change background | White background | Background color is white. |
| Black background | Background color is black. | |
| Picture background | Background is a picture. | |
| Desktop background | Choose the Desktop as background. | |
| Other background color | Chose the background color yourself. | |
| Insert a hyperlink | Insert a hyperlink that could open a linked page directly. | |
| Cut | Cut the selected word and image. | |
| Copy | Copy a file from one place to another place; void one remained. | |
| Paste | Paste the copied and cut content directly. | |
| Delete | Delete the selected word or image from the system. | |
| User management | New user | Used to add a new user. |
| Default user | Default user on the system. | |
| Tool | Protractor | Common teaching tool for math. |
| Triangle | Common teaching tool for math. | |
| Ruler | Common teaching tool for math. | |
| Timer | Timing tool. | |
| Media Player | Media player. | |
| Video Capture | The window for playing video in GLBoard. | |
| Mask | Similar to a movie screen for the teacher to e examples. Questions and answers are displayed separately. | |
| Magnifying glass | Magnify the important part to facilitate teaching. | |
| Spotlight | Spotlight can highlight a circular area, high bright display, and other regions of translucent display. | |
| Keyboard | Same as the Windows on-screen keyboard. | |
| Calculator | Same as the Windows Calculator. | |
| Handwriting recognition | Handwriting input (see “gesture recognition” introduction). | |
| Screen Recording | Record the activities on the GLBoard as a vide | |
| System Setup | Startup setting and page setting, etc. | |
| Select all strokes | Select all strokes in the screen area. | |
| Clear | Clear all strokes in the screen area. | |
| PageList | Show all pages of GLBoard in a list. | |
| Slide page navigation | Show the slides in the PPT. First open a PPT then use this function to show. | |
| Playback | Replay. | |
| Online resource | Pep.com.cn | Connect to pep.com.cn |
| Exit | Exit GLBoard | |
Troubleshooting
- Open the program and an error is shown as "No valid USB Key for hand touch whiteboard found".
(1) First check if the connection of USB cable is correct.
(2) Please confirm if the USB cable has not been cut or spliced.
(3) Please confirm if the system is equipped with a recovery card. Please add the calibration program to the recovery card.
(4) See if the system uses a solid state disk. If so please contact technical support.
(5) Change to another one USB port or another computer and test again.
- After the auto-calibration, the cursor does not synchronize with the finger.
(1) Open "tuning webcam image mode", confirm whether the proportion of projection screen (photoed by camera) meets the requirement.
(2) Open “tuning laser transmitter image mode”, confirm whether the laser film is within 5mm above whiteboard surface, and the image appears to touch the board lightly.
(3) If the two steps above meet the requirements and the problem persists, contact technical support.
- When doing auto-calibration, it prompts failure?
(1) Open “tuning webcam image mode”, observe whether the projection screen (photoed by camera) is within the calibration interface or not, and if the proportion of the image meets the requirements, and whether the image is clear or not.
(2) Toggle “tuning webcam image mode” and “tuning laser transmitter image mode” repeatedly to observe if the brightness of the image changes. If the image is always black, please change the sensor.
(3) Observe the picture after the calibration failure and analyze the overall brightness of the "black and white checkerboard". If it is too bright, please adjust the value of the average brightness down to 40, and adjust the value of gray down to 250; if it is totally black, please adjust the value of the average brightness up to 140, and adjust the value of gray down to 250.
(4) If auto-calibration still cannot be performed after adjusting the parameters, please perform manual calibration or contact technical support.
- Device is installed according to the requirements, and auto-calibration is successful. Yet the operation
is not sensed well in top right corner, and the writing is non-continuous.
(1) Open the calibration program, write in the non-continuous area, and observe whether there is a lightspot in the non-continuous area. If not, please change the emitter.
(2) If there is a spot, and the spot is small. Firstly adjust the bright coefficient, adjust the value up to around 170.
(3) Do lightspot sampling
In the calibration program installation directory, change the value of the Light Spot. Minimum Width and Light Spot Minimum Height to 1 in the config file.
Important information
Note: If you are a user of the product, please read the related warning information and product maintenance methods as below carefully. Before you install the product, please fully understand safety information in the guide. It could prevent you from making mistakes, leading to product damage and safety issues.
Warning:

Please do not look into the bulb of the projector as it will harm your eyes.
Warning:

When installing the projector brackets, two persons are needed to work together.
Warning:

When fixing the camera on the projector at a high position, extra caution is needed
Warning:

The product cannot be installed in a place exposed to direct sunlight.
Warning:

When installing, the USB cable and the cable of the adapter should be securely fixed being tripped and causing damage to the product.
Warning:

Do not install the product in a dark, wet place. Doing so will damage product functional lifetime.
Sales Feedback Form
Dear user:
Thank you for using our products. In order to make our products to better serve you, please help us to fill in details about our product completely. Your opinion about our company product will continuously help to improve product quality. plays a very important role for your cooperation, our heartfelt thanks to we can further cooperation. Thank you for your cooperation with us and hope we can reach further cooperation in the future.
| User Name | Add | ||||||||
| Tel | Fax | Contact Person | Delivery Date | ||||||
| Product Name | Quantity | Specification | Contract No. | ||||||
| Project Name | Usage Time | ||||||||
| Usage Description: | |||||||||
| Service Description: | |||||||||
| Others: | |||||||||
| Suggestion: | |||||||||
- Introduction
- Features
- Hardware Installation
- Installation requirements
- Installation
- Step 1: Emitter
- Step 2: Camera
- Step 3:Cable connection:
- Note:
- System Debugging
- Software installation
- Software Uninstall
- Adjust the sensor
- Standard adjustment:
- Principle of adjustment:
- Best way of adjusting emitter:
- Calibration Software
- Parameter setting
- Image Sensor Settings
- Normal Use Setting
- Auto Calibration Setting
- Parameter Settings:Gesture settings
- Windows Gesture Settings
- GLBoard Gesture Settings
- More Windows Gestures
- Auto Mask Clutter (Ctrl+Shift+A)
- Manual Calibration
- Auto Calibration
- Lightspot Sampling
- Installation and debugging
- Gesture recognition Introduction
- Mouse operations
- Gesture recognition in Windows
- Gesture recognition in education software GLBoard
- Application Software
- Introduction of the main toolbar
- Troubleshooting
- Important information
- Sales Feedback Form
Brand : ACER
Model : INTPJ-STK1
Category : Video projector