
Love Your Day EKM3437W - Kitchen appliances ELECTROLUX - Free user manual and instructions
Find the device manual for free Love Your Day EKM3437W ELECTROLUX in PDF.


| Product Type | Built-in Microwave Oven |
| Brand | Electrolux |
| Model | Love Your Day EKM3437W |
| Color | White |
| Installation Type | Built-in |
| Dimensions (H x W x D) | 388 x 595 x 388 mm |
| Cutout Dimensions (H x W x D) | 382 x 560 x 550 mm |
| Net Weight | 21.5 kg |
| Power Supply | 230 V, 50 Hz |
| Microwave Power | 900 W |
| Grill Power | 1000 W |
| Combined Power | 1500 W |
| Functions | Microwave, Grill, Combination, Auto Cook, Defrost |
| Display Type | LED Digital |
| Interior Capacity | 34 L |
| Interior Material | Stainless steel with easy-clean coating |
| Turntable Diameter | 360 mm |
| Safety Features | Child lock, automatic shut-off, overheat protection |
| Accessories Included | Glass turntable, metal rack for grilling |
| Cleaning | Removable glass tray and wipe-clean interior |
| Spare Parts Available | Door seal, turntable motor, glass tray, control board |
| Energy Efficiency Class | A |
| Noise Level | 55 dB(A) |
| Warranty | 2 years |
Frequently Asked Questions - Love Your Day EKM3437W ELECTROLUX
User questions about Love Your Day EKM3437W ELECTROLUX
0 question about this device. Answer the ones you know or ask your own.
Ask a new question about this device
Download the instructions for your Kitchen appliances in PDF format for free! Find your manual Love Your Day EKM3437W - ELECTROLUX and take your electronic device back in hand. On this page are published all the documents necessary for the use of your device. Love Your Day EKM3437W by ELECTROLUX.
USER MANUAL Love Your Day EKM3437W ELECTROLUX
Love Your Day Collection
Kitchen Machine
EKM3407K
EKM3407R
EKM3437W

natural_image
Exterior view of a black electrician mixer with stainless steel bowl (no visible text or symbols)EN INSTRUCTION BOOK
CNS 说明书
CNT 說明手冊
KR사용 설명서
ID Buku Panduan
natural_image
Line drawing of a kitchen mixer with handle and control panel (no text or symbols)
natural_image
Mechanical diagram showing a sewing machine with blue directional arrows indicating motion or force (no text or symbols)

natural_image
Line drawing of a kitchen mixer with blue arrows indicating motion (no text or symbols)

natural_image
Illustration of a kitchen mixer with a circular dial showing the number 3 (no text or symbols on the main device)
natural_image
Illustration of a faucet with water flowing through it, surrounded by kitchen utensils (no text or symbols)
natural_image
Illustration of a toilet with a paper towel and a cross symbol (no text or labels)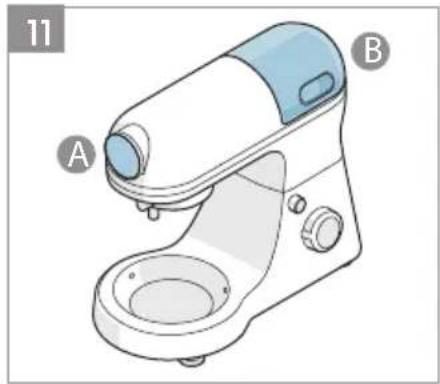
natural_image
Line drawing of a kitchen mixer with labeled parts A and B (no text or symbols beyond labels)
natural_image
Illustration of a mechanical device with arrows indicating motion, showing a cylindrical component and a close-up of a circular component (no text or symbols)
natural_image
Illustration of a kitchen mixer with a downward arrow indicating compression or disassembly (no text or symbols present)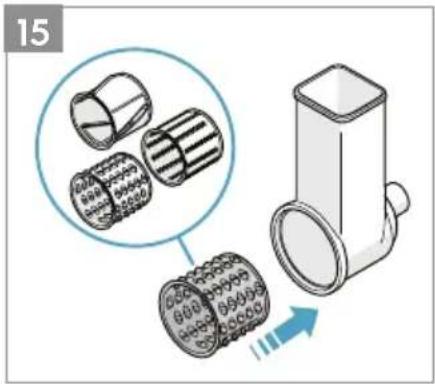

natural_image
Illustration of a handwashing device with arrows indicating rotation and adjustment (no text or symbols)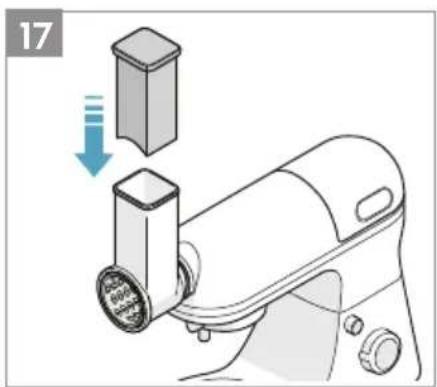
natural_image
Illustration of a kitchen mixer with a downward arrow indicating compression or disassembly (no text or symbols present)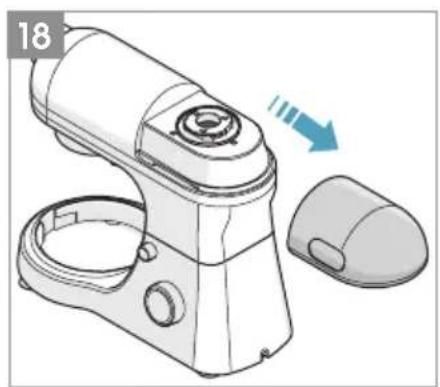
natural_image
Technical illustration of a mechanical device with a mouse and a cylindrical component, showing no text or symbols.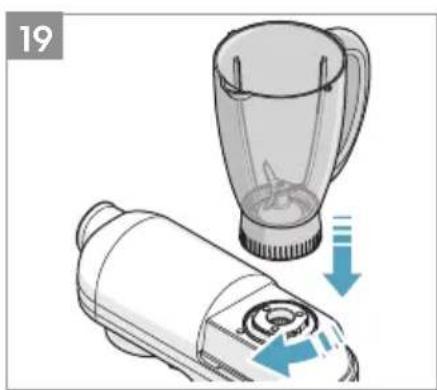
natural_image
Illustration of a blender with a handle and a side view showing the blade and lid (no text or symbols)
natural_image
Illustration of a blender with a handle and lid, showing a downward arrow indicating compression or disassembly (no text or symbols present)
INSTRUCTION MANUAL
Graphics and drawings in this manual are solely for illustration purposes and are subject to variations from actual product.
Read all instructions carefully before using the appliance for the first time.
Keep this manual for future reference.
SAFETY ADVICE
- Remove and safely discard any packaging materials before using the appliance.
- This appliance is not intended for use by persons (including children) with reduced physical, sensory or mental capabilities, or lack of experience and knowledge, unless they have been given supervision or instruction concerning the use of the appliance by a person responsible for their safety.
- Keep the appliance and its power cord out of reach of children. Children should be supervised to ensure that they do not play with the appliance.
- Cleaning and user maintenance shall not be performed by children without supervision.
- The appliance can only be connected to a power supply which voltage and frequency comply with the specifications on the rating plate. CAUTION: In order to avoid a hazard due to inadvertent resetting of the thermal cut-out, this appliance must not be supplied through an external switching device, such as a timer, or connected to a circuit that is regularly switched on and off by the utility.
- The appliance must only be connected to an earthed mains socket.
- Never use or pick up the appliance if
- the power cord is damaged, or
- the housing is damaged.
- If the appliance or its power cord is damaged, it must be replaced by the Electrolux or its service agent in order to avoid hazard.

Do not immerse the appliance, its power cord or plug in water or any liquid.
- Do not use or place the appliance near edge of the table or counter, near hot gas, stove, electric burner or heated oven.
• Always place the appliance on a flat, level and dry surface. - Always switch off the appliance and disconnect it from the power supply if it is left unattended and before changing of accessories, cleaning or maintenance.
- Ensure that the motor has completely stopped and the appliance is switched off before changing of accessories, cleaning or maintenance.
- Avoid contact with moving parts. Keep hands and utensils away from the appliance during operation to avoid the risk of severe injury to persons or damage to the appliance.
- Care shall be taken when handling the sharp cutting blades, emptying the bowl and during cleaning.
- Never operate appliance with the accessory attachments without the bowl is in place.
- Ensure that all loose matters and your clothes/accessories are kept away while using this product.
- Do not leave this product out of your sight when it is running.
- Be careful if hot liquid is poured into the appliance as it can be ejected out of the appliance due to a sudden steaming.
- Never process boiling liquids (max 90^ ).
- Do not use this appliance to stir paint. Danger, could result in an explosion!
- Do not let the power cord come into contact with hot surfaces or hang over the edge of a table or counter.
- Never use accessories or parts made by other manufacturers not recommended or sold by Electrolux as it may cause a risk of injury to persons.
• This appliance is for indoor use only. - This appliance is intended for domestic use only. Electrolux will not accept any liability for possible damage caused by improper or incorrect use.
COMPONENTS
A. Motor head (tiltable)
B. Speed selector
C. Main body
D. Tilt head locking button
E. Front attachment hub
F. Front attachment hub release lever
G. Rear attachment hub cover
H. Attachment shaft
I. Stainless steel bowl
J. Pouring shield
K. Pouring hole
L. Bowl locking plate
M. Non-slip feet
N. Power cord
O. Whisk
P. Flat beater
Q. Dough hook
R. Salad maker *
S. Food pusher (salad maker)*
T. Meat grinder *
U. Food tray*
V. Food pusher (meat grinder)*
W. Blender*
X. Blender lid with measuring cup*
* Certain models only
GETTING STARTED
1 Before using your appliance for the first time: Remove all packing material such as plastics, labels, stickers or tags that may be attached to the main body, bowl or attachments.
Clean the appliance and accessories, see instructions: "Cleaning and Care".
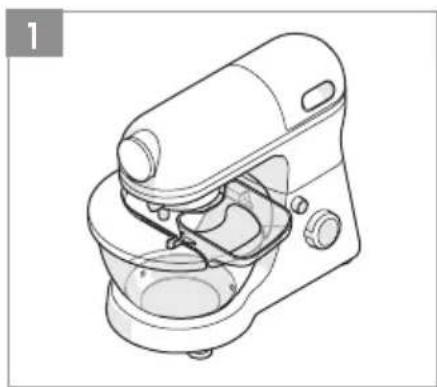
2 Place the appliance on a dry, level, stable surface. Keep it away from the countertop edge. Push the tilt head locking lever with one hand and tilt the motor head up with the other hand. Once in up position, it is locked with a "click".
Caution! Ensure that the power cord is unplugged.
Warning: Keep fingers and hands away from areas with movable parts.
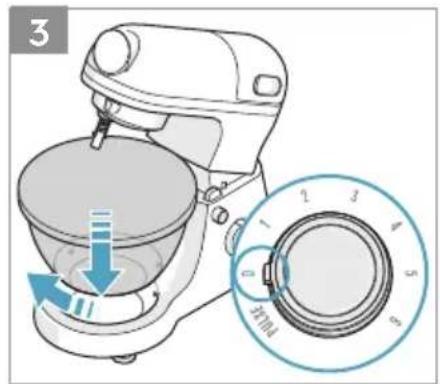
3 Set the speed selector to "0". Place the stainless steel bowl on the bowl locking plate. Rotate the bowl clockwise to lock it into position.
Warning: Never operate the appliance with the whisk, flat beater or dough hook unless the bowl is in place.
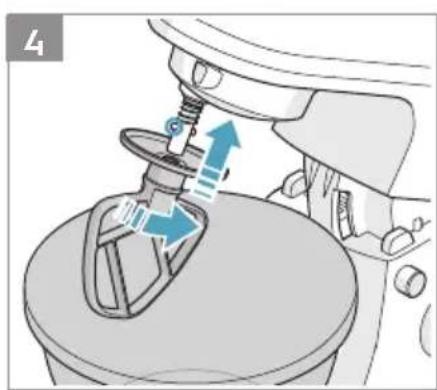
4 Place an attachment on the attachment shaft: Align the slot at the top of the attachment with the pin on the attachment shaft. Push the attachment up and turn it anti-clockwise until the pin is locked into position. To remove the attachment, push the attachment upwards, move it clockwise and pull down and out.
5 Tilting the motor head down: Push the tilt head locking button with one hand and tilt the motor head down with the other hand. Plug in and switch on the appliance.
Warning: Keep fingers and hands away from areas with movable parts.
6 Gently place the pouring shield on top of the bowl. Attach the pouring hole by hooking it to the catch of the pouring shield. Only add ingredients using the pouring hole.
7 Move the speed selector from "0" to desired speed (1-6).
Note: Always start on the slowest speed to avoid splashing ingredients out of the bowl.
Once mixing is complete, turn the speed selector to "0" and unplug the appliance.
8 If the speed selector is left in speed mode (1-6) before the appliance is plugged in and, the appliance will not start automatically. Turn the speed selector to "0", then turn it to the desired speed.
CLEANING AND CARE
9 Switch off the appliance, remove the plug from the wall socket and wait until the appliance stopped completely. Wash all parts, except for the motor head and main body, in warm soapy water. Dry each part thoroughly before the next use.

The bowl, flat beater and dough hook are dishwasher-safe. If using the dishwasher, place parts on the top rack of the dishwasher.

Warning! Never immerse the motor head, main body, plug, or cord in water or any other fluid.
10 The motor head and main body should only be cleaned with a soft damp cloth, then dried with a cloth.
Note: Do not use abrasive cleansers or scouring pads to clean the surfaces of your appliance.
OTHER FUNCTIONS
11 Attachment hub: The appliance comes with two built in multi-purpose attachment hubs, one in front (A) and one at the back (B). The front attachment hub is designed for the meat grinder and salad maker accessories. The rear attachment hub is designed for blender jar accessory.
It is possible to purchase meat grinder, salad maker and blender jar as additional accessories, please contact your local sales office for more details. Read and carefully follow the instructions that comes with each attachment for correct and safe use.
HOW TO USE THE MEAT GRINDER\*
12 Insert the grind screw (B) into the grinder housing (A). Place the knife (C) over the square shaft at the end of the grind screw. Place the grinding plate (D) (medium or coarse) over the knife. Tighten the ring (E) by hand until the meat grinder is secured.
Note: Do not over tighten the ring.
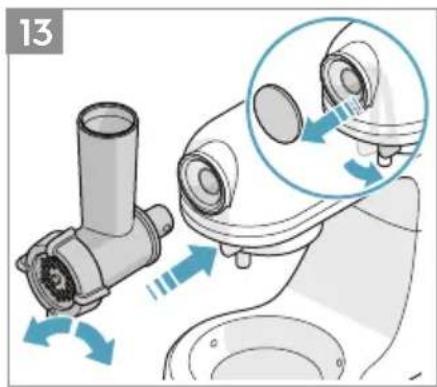
13 Push the front attachment hub release lever to the right and remove the front attachment hub cover. Continue pushing the lever while fitting the power shaft of the meat grinder in the front attachment hub socket. Once the meat grinder is securely attached, release the front attachment hub lever.
Note: The lever will click into position once the attachment is securely attached.
14 Place the food tray over the grinder housing. Cut raw meat into small pieces and place it on the food tray. Plug in the appliance and turn the speed selector to desired speed (recommended speed: 3-4). Feed the meat into the feed chute by using the pusher.
Caution: Do not put your fingers or other utensils in the feed chute.
Note: Meat should not contain bones, muscles or skin.
After using the attachment, push the front attachment hub release lever to the right, remove the attachment from the front attachment hub socket, then fit the front attachment hub cover into the front attachment hub socket.
Caution: Switch off and unplug the appliance before removing the accessories.
How to clean: Loosen the ring to remove the grinding plate, knife and grind screw from the grind housing. All parts of the meat grinder should only be washed by hand in warm soapy water.
HOW TO USE THE SALAD MAKER\*
15 Choose a cylindrical slicer (medium or course) or a shredder knife. Insert the attachment by turning it clockwise into the salad maker housing. Make sure the attachment is fully inserted.
Caution: The blades and inserts are very sharp!
16 Push the front attachment hub release lever to the right and remove the front attachment hub cover. Continue pushing the lever while fitting the power shaft of the salad maker in the front attachment hub socket. Once the salad maker is securely attached, release the front attachment hub lever.
Note: The lever will click into position once the attachment is securely attached.
Place a container under the salad maker.
Caution: Switch off and unplug the appliance before attaching the accessories.
17 Feed the food into the feed chute by using the pusher. Cut the food into small pieces. Plug in and switch on the appliance and turn the speed selector to desired speed (recommended speed: 4).
Feed the food into the feed chute by using the pusher.
Caution: Do not put your fingers or other utensils in the feed chute.
After using the attachment, push the front attachment hub release lever to the right, remove the attachment from the front attachment hub socket, then fit the front attachment hub cover into the front attachment hub socket.
Caution: Switch off and unplug the appliance before removing the accessories.
How to clean: Remove the slicer or shredder knife from the salad maker housing. All parts of the salad maker should only be washed by hand in warm soapy water.
Caution: The blades and inserts are very sharp!
HOW TO USE THE BLENDER\*
18 Remove the rear attachment hub cover by pulling it straight backwards. Place the bottom of the blender on the three rubber rings. Align the arrows on the blender to the arrows on the main body. Caution: Switch off and unplug the appliance before attaching the accessories.
19 Rotate the blender clockwise to lock it in position. The blender handle should point towards the back of the machine when properly fixed. Place the blender lid and measuring cup. Insert the plug in the mains socket. Adjust the speed selector to the desired speed (recommended speed: 6), mix until the right consistency of the blend is reached.
Caution: Never operate blender without ingredients.
Rotate the blender anti-clockwise to unlock and remove it from the rear attachment hub. Take off the lid and pour the mixture from the blender into a container.
Put the rear attachment hub cover back after removing the blender from the appliance.
20 How to clean:
Add a drop of dishwashing soap and one litre of warm water. Attach the blender on the appliance (see point 18 and 19). Adjust the speed selector to speed 6 and let it run for half a minute, then pour out the water. Rinse the blender and dry it thoroughly before the next use.
Caution! The blades and inserts are very sharp and can cause injury.
RECIPES
| Accessory: Whisk | |||||
| Ingredients Quantity Time Speed setting | |||||
| Cream 200 - 400 g 2 - 2.5 min 5 - 6 | |||||
| Egg- white | 60 -240 g (2- 8eggs) | At least 2 min | 5 - 6 | ||
| Note: The temperature of the cream should be between 4 and 8 Degree Celsius. | |||||
| Accessory: Flat beater | |||||
| Recipe Ingredients | Quantity Time Speed | setting | Method | ||
| Chocolate cake | Flour 300 g | 5 - 6 min | 3 - 4 | The butter should be soft not hard. Stir the soft butter with sugar until creamy. Add the eggs one after another. While stirring, add the sour cream and vanilla sugar. Finally stir in the flour together with baking soda. | |
| Egg 3 pcs | |||||
| Butter 150 g | |||||
| Sugar 150 g | |||||
| Vanilla sugar 2 tsp | |||||
| Sour cream 100 g | |||||
| Nougat raw mixture 100 g | |||||
| Baking soda 3 tsp | |||||
| Butter cake | Flour 150 g | 3.5 - 4 min | 3 - 4 | Place all ingredients in the bowl, and mix them, till it is ready. | |
| Margarine 150 g | |||||
| Sugar 150 g | |||||
| Egg 3 pcs | |||||
| Baking powder | 1 tsp | ||||
| Accessory: Dough hook | |||||
| Recipe Ingredients Quantity Time Speed | setting | Method | |||
| Yeast dough (bread) | Flour 750 g | 5 - 6 min | 1 - 2 | Place all the ingredients into the bowl and knead until satisfactory. | |
| Warm water | 400 ml | ||||
| Sugar 20 g | |||||
| Margarine 20 g | |||||
| Salt | 10 g | ||||
| Dry yeast | 3 g | ||||
| Yeast dough (pizza dough) | Flour 700 g | At least 6 min | 1 - 2 | 1. In a container mix the half of yeast with the salt and the sugar and set aside;2. In the bowl of stand mixer put the remaining yeast, the water and the oil;3. This dough should be mixed with common beaters, at minimum speed until obtain a smooth mixture;4. After, add the egg and the yeast mixed with salt and sugar;5. The speed should be increased to medium and the flour should be added gradually;6. After realizing that the mass tends to rise by the beaters, they must be changed by the beaters for heavy mass;7. Put all the flour and mix until obtain a homogenous mixture;8. At this point you will need to monitor the input power of stand mixer, so that it not exceed the maximum value determined by the manufacturer;9. The mass reaches the point when no more paste in the hand. | |
| Warm water | 300 ml | ||||
| Oil | 75 ml | ||||
| Egg 1 pc | |||||
| Salt | 3 tsp | ||||
| Sugar 1 tsp | |||||
| Dry yeast | 10 g | ||||
| * Do not exceed Speed 2 when preparing yeast dough. This may damage the appliance.Maximum dough mass should not exceed 1.2 kg. | |||||
TROUBLESHOOTING
| Problem Possible Solution | ||
| The motor slows down during operation. | Amount of dough may exceed maximum capacity. | Remove half and process in two batches. |
| Dough may be too wet, it sticks onto the side of the bowl. | Add more flour, 1 tablespoon at a time until the motor speeds up. Process until dough cleans the side of the bowl. | |
| The appliance does not work. The appliance | is not connected to the mains. | Make sure to plug in the appliance before operation. |
| The speed selector was not in “0” position when the machine was unplugged. | Turn to speed selector to “0” position, and then to the desired speed. | |
| The rear attachment hub cover is not in place. | Make sure that the rear attachment hub cover is securely attached. | |
| The appliance vibrates/moves during operation. | The suction feet are not fixed to the surface properly. | Make sure the suction feet are clean. Place the machine on a smooth and shiny surface. |
| It is normal for heavy loads (e.g heavy dough, cheese). | Remove half and process in two batches. |
Disposal
Packaging materials
The packaging materials are environmentally friendly and can be recycled. The plastic components are identified by markings, e.g. >PE<, >PS<, etc. Please dispose the packaging materials in the appropriate container at the community waste disposal facilities.
Old appliance

The symbol — on the product or on its packaging indicates that this product may not be treated as household waste. Instead it shall be handed over to the applicable collection point for the recycling of electrical and electronic equipment. By ensuring this product is disposed of correctly, you will help prevent potential negative consequences for the environment and human health, which could otherwise be caused by inappropriate waste handling of this product. For more detailed information about recycling of this product, please contact your local city office, your household waste disposal service or the shop where you purchased the product.
说明书
Electrolux Korea limited
9F, Pine Avenue B,
100 Euljiro, Jung-gu, Seoul, Korea 04551
Korea
Tel: +82 2 6020-2200
Fax: +82 2 6020-2271-3
Customer Care Services : +82 1566-1238
Email: homecare.krh@electrolux.com
Website: www.electrolux.co.kr
INDONESIA
Electrolux Building 2nd Floor
Electrolux Philippines, Inc.
10th Floor. W5th Avenue Building
5th Avenue Corner 32nd Street
Bonifacio Global City,
Taguig Philippines 1634
Trunkline: +63 2 737 4756
Domestic Toll Free: 1 800 10 845 care 2273
Customer Care Services: +63 2 845 care 2273
Email: wecare@electrolux.com
Website: www.electrolux.com.ph
THAILAND
Electrolux Thailand Co Ltd
Electrolux Building
14th Floor 1910 New Petchburi Road
Bangkapi, Huay Kwang
Bangkok 10310
Thailand
Tel: +66 2 725 9100
Fax: +66 2 725 9299
Customer Care Services: +66 2 725 9000
Email: customercarethai@electrolux.com
Website: www.electrolux.co.th
VIETNAM
Electrolux Vietnam Ltd
Floor 9th, A&B Tower
76 Le Lai Street
Ben Thanh Ward - District 1
Ho Chi Minh City
Vietnam
Tel: +84 8 3910 5465
Fax: +84 8 3910 5470
Customer Care Services: 1800-58-8899
Email: vncare@electrolux.com
Website: www.electrolux.vn
MALAYSIA
Electrolux Home Appliances Sdn Bhd
Lot C6, No. 28, Jalan 15/22,
Taman Perindustrian Tiong Nam,
40200 Shah Alam, Selangor
Malaysia
Customer Care Services Tel: +60 3 5525 0800
Customer Care Services Fax: +60 3 5524 2521
Email: malaysia.customercare@electrolux.com
Website: www.electrolux.com.my
SINGAPORE
Electrolux SEA Pte Ltd
1 Fusionopolis Place, Galaxis
07-10 (West Lobby)
Singapore 138522
Customer Care Services: +65 6727 3699
Fax: +65 6727 3611
Email: customer-care.sin@electrolux.com
Website: www.electrolux.com.sg
AUSTRALIA
Electrolux Home Products Pty Ltd
ABN 51 004 762 341
163 O'Riordan Street, Mascot, NSW 2020, Australia
Customer Service Phone: 1300 365 305
Website: www.electrolux.com
NEW ZEALAND
Electrolux Small Appliances
A division of Electrolux (NZ) Limited
3-5 Niall Burgess Road, Mt. Wellington, Auckland,
New Zealand
Phone: (09) 9573 2220
Customer Service Phone: 0508 730 730
Website: www.electrolux.com
HONG KONG
大昌貿易行有限公司
電器維修中心
香港九龍灣啟祥道20號
大吕行集團大廈5樓
natural_image
Abstract geometric design with three white petal-like shapes on a black background (no text or symbols)Share more of our thinking at www.electrolux.com

- INSTRUCTION MANUAL
- SAFETY ADVICE
- COMPONENTS
- GETTING STARTED
- CLEANING AND CARE
- OTHER FUNCTIONS
- HOW TO USE THE MEAT GRINDER\*
- HOW TO USE THE SALAD MAKER\*
- HOW TO USE THE BLENDER\*
- How to clean:
- Disposal
- Packaging materials
- Old appliance
- 说明书
- INDONESIA
- THAILAND
- VIETNAM
- MALAYSIA
- SINGAPORE
- 07-10 (West Lobby)
- AUSTRALIA
- NEW ZEALAND
- HONG KONG
- 大昌貿易行有限公司
Brand : ELECTROLUX
Model : Love Your Day EKM3437W
Category : Kitchen appliances