
NVR-715MCDU - Microwave NEVIR - Free user manual and instructions
Find the device manual for free NVR-715MCDU NEVIR in PDF.


| Product Type | Microwave Oven |
| Brand | Nevir |
| Model | NVR-715MCDU |
| Capacity | 20 liters |
| Dimensions (W x D x H) | 45.5 x 37.5 x 28.5 cm |
| Weight | 11.5 kg |
| Power Supply | 230 V, 50 Hz |
| Power Consumption | 1150 W |
| Microwave Power | 800 W |
| Control Type | Digital with LED display |
| Functions | Defrost, Auto Cook, Multi-stage Cooking |
| Turntable | Yes, 25 cm diameter |
| Interior Light | Yes |
| Child Lock | Yes |
| Timer | Up to 95 minutes |
| Door Opening | Push-button with handle |
| Cleaning | Wipe with damp cloth, mild detergent |
| Spare Parts Available | Turntable plate, roller ring, fuse |
| Repair Index | 8.5 / 10 |
Frequently Asked Questions - NVR-715MCDU NEVIR
User questions about NVR-715MCDU NEVIR
0 question about this device. Answer the ones you know or ask your own.
Ask a new question about this device
Download the instructions for your Microwave in PDF format for free! Find your manual NVR-715MCDU - NEVIR and take your electronic device back in hand. On this page are published all the documents necessary for the use of your device. NVR-715MCDU by NEVIR.
USER MANUAL NVR-715MCDU NEVIR
natural_image
Black electronic audio workstation with two speakers and a digital display (no visible text or symbols on main components)natural_image
Black electronic audio workstation with two speakers and a digital display (no visible text or symbols on main components)MANUAL DO USUÁRIO
natural_image
Recycling symbol composed of three chasing arrows forming a triangle (no text or labels)CLASSE 1 PRODUTO LASER

natural_image
Illustration showing a hand holding a circular object with a finger, and a hand holding a rectangular object with an X mark (no text or symbols present)Controle remoto ....1
nevir®
MICROSYSTEM NVR-715MCDU

natural_image
Black electronic audio workstation with two speakers and a digital display (no visible text or symbols on main components)USER MANUAL
PLEASE READ THIS OPERATING MANUAL COMPLETELY BEFORE OPERATING THIS UNIT AND RETAIN IT FOR FUTURE REFERENCE
Know these
safety symbols

CAUTION
RISK OF ELECTRIC SHOCK DO NOT OPEN

CAUTION: TO REDUCE THE RISK OF ELECTRIC SHOCK, DO NOT REMOVE COVER (OR BACK). NO USER-SERVICEABLE PARTS INSIDE. REFER SERVICING TO QUALIFIED SERVICE PERSONNEL.

This "bolt of lightning" indicates uninsulated material within your unit which may cause an electrical shock. For the safety of everyone in your household, please do not remove product covering.

The "exclamation point" calls attention to features for which you should read the enclosed literature closely to prevent operating and maintenance problems.
Dripping warning:
The product shall not be exposed to dripping or splashing and that no objects filled with liquids, such as vases, shall be placed on the product.
For Customer Use Enter below the Serial No. which is located On the bottom of the cabinet. Retain this In formation for future reference.
Mode No. Serial No.
WARNING: TO PREVENT FIRE OR SHOCK HAZARD, DO NOT EXPOSE THIS EQUIPMENT TO RAIN OR MOISTURE.
CAUTION: TO PREVENT ELECTRIC SHOCK, MATCH WIDE BLADEOF PLUG TO WIDE SLOT, AND FULLY INSERT.
Ventilation warning:
The normal ventilation of the product shall not be impeded for intended use.

natural_image
Recycling symbol composed of three chasing arrows forming a triangle (no text or labels)CLASS 1 LASER PRODUCT

The European Directive 2002/96 /EC on Waste Electrical and Electronic Equipment (WEEE) required that old household electrical appliances must not be disposed of in the normal unsorted municipal waste stream. Old appliances must be collected separately in order to optimize the recovery and recycling of the material they contain, and reduce the impact on human health and the environment. The crossed out "wheeled bin" symbol on the product r e mind you of your obligations that when you dispose of the appliance, it must be separately collected.
Besides that, waste batteries and/or accumulator must be removed prior to delivery of WEEE, thought the separated collection channels provided for this purpose (distributors and/or facilities from Local Authorities)
In order to fulfill ruling UNE EN-60335, we indicate that if the flexible wire is damaged, it can only be replaced or repaired by a technical service recognized by NEVIR S.A. as per special tooling is required.
Welcome
Thank you for purchasing our Micro system Player NVR-715MCDU. In order to fully benefit from this product, please follow the instructions in this user manual very carefully. Store this user manual in a safe place for future reference. We are sure your new Micro system will satisfy your needs
PREPARATION FOR USE
Unpacking and Setup
* Carefully remove the unit from the display carton and remove all packing material from the unit itself.
* Remove any descriptive labels that may be found on either the front or top cabinet of the unit. Do not remove any labels located on either the back or button cabinet of the unit.
* Press the CD door OPEN Button to open the CD compartment door. There is a white card in the CD compartment which is intended to prevent the CD pickup from moving during shipment of the product, Remove this card from the CD compartment before use.
POWER SUPPLY
Using AC Power
-
Check if the power voltage, as shown on the type plate located on the bottom of the set, corresponds to your local AC power supply. If it does not, consult your dealer or service centre.
-
Connect the power cord to the AC socket inlet and the wall outlet, the power supply is now connected and ready for use.
-
To switch off completely, unplug the power cord from the wall outlet.
-
Unplug the power cord from the wall outlet to protect your set during heavy thunderstorms.
Description
1
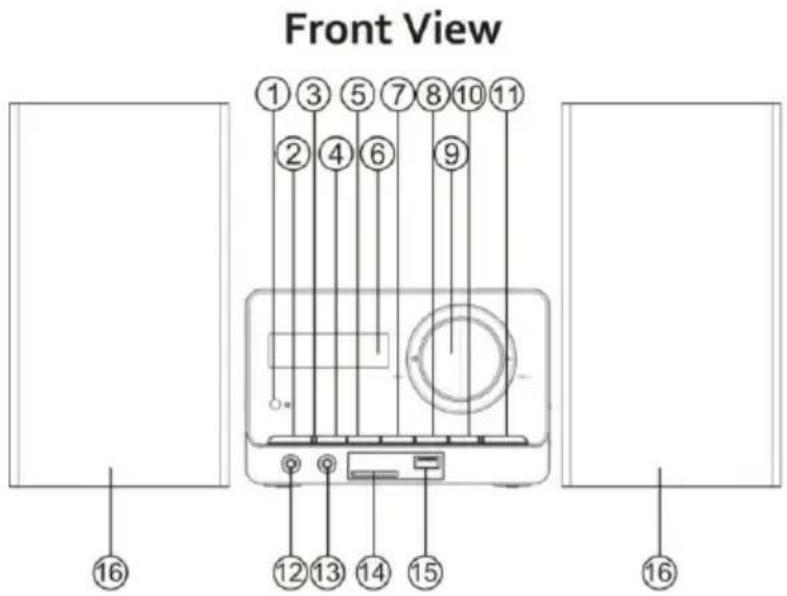
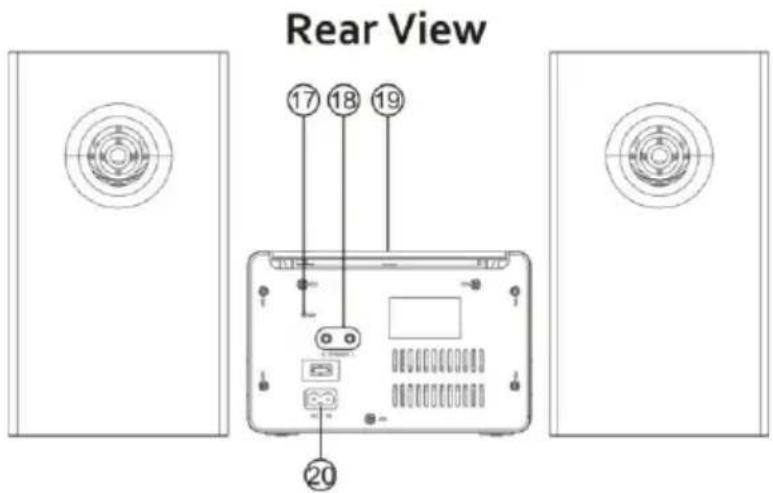
- REMOTE SENSOR
- POWER BUTTON
- STANDBY INDICATOR
- PLAY/PAUSE BUTTON
- STOP/USB/SD BUTTON
- LCD DISPLAY
- BACK BUTTON
- NEXT BUTTON
- VOLUME BUTTON
-
REPEAT/PROG./TIME BUTTON
-
FUNCTION BUTTON
- AUX IN JACK
- PHONE JACK
- SD/MMC SLOT
- USB PORT
- LEFT & RIGHT WOODEN SPEAKERS
- FM ANTENNA WIRE
- SPEAKER WIRE CONNECTORS (L/R)
- CD DOOR
- AC SOCKET
BASIC FUNCTION (See 1)
1. REMOTE SENSOR
2. POWER BUTTON
-Press to power on or off.
3. STANDBY INDICATOR
4. PLAY/PAUSE BUTTON
- Play or pause MP3/CD/USB/SD.
-In radio mode, press the play/pause button To enter the automatic channel scan mode.
5. STOP/USB/SD BUTTON
- Stop CD/MP3/USB/SD playback;
Erase a CD program.
- Press and hold more than 1.5 sec
To change playback between SD and USB.
6.LCD DISPLAY
- Displays the FM frequency.
- Displays the track number.
7. BACK BUTTON
- Return to previous track.
- Press and hold more than 1.5 sec to Rewind backwards.
- In radio mode, press BACK to search a channel automatically.
8. NEXT BUTTON
- Advance to the next track.
- Press and hold more than 1.5 sec forward.
- In the radio mode, press NEXT to search a Channel automatically.
9. VOLUME KNOB
- Adjust volume level.
- Turn left or right once to adjust the volume level.
10. REPEAT/PROGRAM/TIME BUTTON
-Repeat a track in CD/MP3/USB/SD mode.
-Play modes: normal->repeat 1->repeat all->
Repeat album ->normal.
-In standby mode, allows to setup the time of the unit.
-Program and review programmed track numbers.
-In working status, press this button to enter the program mode in CD/MP3/USB/SD/RADIO.
11. FUNCTION BUTTON
- Select the source of sound: CD/USB/SD/AUX/RADIO.
12. AUX JACK
-Select AUX mode to playback from an external audio device.(MP3, Discman, Walkman)
13.PHONE JACK
- 3.5 mm stereo headphone jack.
14. SD/MMC SLOT
-
USB PORT
-
LEFT&RIGHT WOODEN SPEAKERS
-
FM ANTENNA
-
SPEAKER WIRE CONNECTORS(L/R)
-
CD DOOR
-
AC LINE CORD
Remote Control
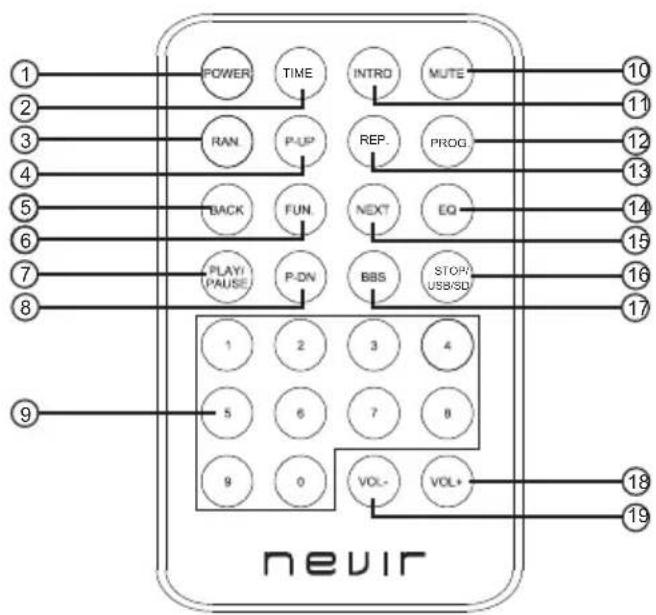
flowchart
graph TD
    A["1"] --> B["POWER"]
    C["2"] --> D["RAN"]
    E["3"] --> F["BACK"]
    G["4"] --> H["FUN"]
    I["5"] --> J["PLAY(Pause)"]
    K["6"] --> L["P-ON"]
    M["7"] --> N["BBS"]
    O["8"] --> P["STOP(USB/SD)"]
    Q["9"] --> R["VOL-"]
    S["10"] --> T["MUTE"]
    U["11"] --> V["INTRO"]
    W["12"] --> X["PROG"]
    Y["13"] --> Z["NEXT"]
    AA["14"] --> AB["EQ"]
    AC["15"] --> AD["OPEN"]
    AE["16"] --> AF["START"]
    AG["17"] --> AH["OUTPUT"]
    AI["18"] --> AJ["NEUTRAL"]
    AK["19"] --> AL["NEUTRAL"]
-
POWER BUTTON
-
TIME BUTTON
-
RANDOM BUTTON
-
P-UP BUTTON
-
BACK BUTTON
-
FUNCTION BUTTON
-
PLAY/PAUSE BUTTON
-
P-DN BUTTON
-
NUMBER KEY
-
MUTE BUTTON
-
INTRO BUTTON
-
PROGRAM BUTTON
-
REPEAT BUTTON
-
EQ BUTTON
-
NEXT BUTTON
-
STOP/USB/SD BUTTON
-
BBS BUTTON
-
VOL+ BUTTON
-
VOL- BUTTON
* Please pull out the plastic paper from the battery door before using the remote control.
* In case the remote control operation becomes unstable or the distance from which the remote Control works is shorter; replace the batteries with new ones.
* Using the remote control unit
To use the remote control unit, always point at the REMOTE SENSOR and press the buttons gently and firmly.
Remote control operations are possible within approximate 18ft(6m). However, since the remote Control range shortens when the unit is used at an angle, it is recommended to use it directly in front of the REMOTE SENSOR for a better performance.
Do not expose the REMOTE SENSOR to strong light (direct sunlight or artificial lighting) and make sure that there are no obstacles between the REMOTE SENSOR and the remote control unit.
CLOCK ADJUSTMENT
To setup the time of the unit:
- Connect the AC power cord (The following operation must be done in standby mode).
- Press the TIME/PROGRAM button to enter into time setting mode. The time will flash on the LCD display.
- Press the BACK or NEXT buttons to select the time format 12h or 24h to adjust the time.
- After setting the time, press the TIME/PROGRAM button to confirm.
- Then you can set the hour and the minute with the same method of steps 3-4.
- After setup the unit time, long press TIME/PROGRAM button to set the time to working automatically, with the same method of steps 3-4.
RADIO FUNCTION
Radio reception
-
Press the FUNCTION button to select the "RADIO" mode.
-
Tune to the required station by pressing BACK or NEXT
Manual Tuning: Press BACK or NEXT and then release within 1 sec.
Auto Tuning: Press the Play/Pause button to enter the automatic channel search mode.
Preset Channel:(FM 30 Preset memories)
(1) Press the BACK or NEXT to select the desired station.
(2) Press the PROGRAM button once and the MEMORY number indicator will begin to flash on the display.
(3) Press the PRE-UP or PRE-DN buttons to select the desired station number.
(4) Press the PROGRAM button to save the station.
(5) Repeat steps (1) to (4) procedures for storing the rest of the stations.
- After storing the stations, press PRE-UP or PRE-DN to play the selected frequency.
- Press [VOL-] or [VOL +] to adjust the volume level.
- Extend the telescopic antenna to its full length while listening in FM mode and for better reception.
- Turn off the radio by pressing the FUNCTION button. Select any other mode or press the power button to off the unit.
- The preset memories will be stored even though the unit is switched off and on.
PROGRAM TRACKS IN CD/MP3
(1)Press the PROGRAM key while in STOP mode.
The PRG icon and P01 will start to blink. This prompts the user to enter the first track in the program playlist.
(2) Select the desired tracks by using [NEXT] or [BACK] keys.
Once done, the display will indicate the selected track.
(3) After selecting the desired track, press the [PROGRAM] key once again to store it in memory. For MP3 discs you can program up to a maximum of 99 tracks while in CD disc a maximum of 20 tracks can be programmed.
Repeat steps (2) to (3) for the rest of the tracks.
(4) If the [STOP] key is pressed during the program mode, the selected tracks will be stored in the memory and the unit will return to STOP mode (Continuous Play mode)
(5)If the [PLAY] key is pressed during the program mode, the unit will start the program PLAY mode.
Playback will start from P01 track.
Erasing a Program
Follow the below steps to delete a Program:
- While playing, press the STOP button twice.
- Open the CD door
- Select any other mode.
AUX IN
NVR-715MCDU includes an Aux in jack which enables connection to any external audio device such as MP3, Discman or Walkman.
- Connect your external audio device to the AUX in of the micro system.
- Select the function to AUX. Play the music from your audio device to hear it through the speakers.
- Adjust the volume level to your desire.
Note: The Micro system buttons cannot control the external device. All functions must be operated from the external audio device.
Power Off Erp2 function
When the unit idles on CD /AUX/USB/SD mode over 10 minutes, then the unit will switch into standby mode automatically.
CD/MP3 PLAYER
NVR-715MCDU Micro system can playback the following formats: Audio Discs, MP3, CD-R.
Do not attempt to play CD-ROM, CDI, VCD, DVD or computer CD's.
- Press the function button to select CD mode.
- To open the CD door, press the CD open button.
- Insert an MP3/CD or CD-R, with the printed side facing up and press the CD door gently to close.
- Press Play/Pause button on the unit to start playback. Press the pause button to pause at any time. Press the play button once again to resume playback.
- Press STOP, to end CD playback.
Note: CD/MP3 playback will also stop when:
-You open the CD compartment;
- You select the Radio source;
- The CD/MP3 has reached to the end.
Play back modes: normal, repeat, random.
Normal: Plays the track in normal order.
Repeat 1: Plays the current track continuously.
Repeat all: Plays the entire media continuously.
Repeat album: Plays the tracks in the same folder continuously.
Random: Plays the tracks in random order.
EQ function
Press the EQ button on remote to select audio mode as follow: CLASSIC -> ROCK
$$ - > \text { POP } - > \text { JAZZ } - > \text { FLAT } $$
Playing a USB/SD
USB Audio functions
- Select the USB/SD function to enter USB/SD mode.
- Press NEXT or BACK to advance or go back.
- Program up to 99 tracks in MP3 mode.
- Play Modes: there are 4 different play modes: Normal->Repeat 1->Repeat all ->Repeat album->
- A maximum of 99 folders can be read from the USB.
- Maximum files supported in 1 folder: 999
- Maximum capacity supported: 32GB
Note: The unit does not support any external HDD.
Selecting a different track.
During playback you can use the Back or Next Buttons to select a particular track.
If you have selected a track number while in stop or pause position, press play to start playback.
Press next once briefly for the next track, or press repeatedly until the desired track number appears on the display.
Press back once briefly to return to the beginning of the current track.
Press back twice to access to the previous track.
Finding a passage within a track
- Press and hold down the back or next button. The CD will move at higher speed.
- When you recognize the passage you want Simply, release the back or next button.
Precautions & General Maintenance
* Place the unit on a hard and flat surface so that the unit does not tilt.
* Do not expose the unit, batteries or CD's to humidity, rain, sand or excessive heat caused by heating equipment or direct sunlight.
* Do not cover the unit. Adequate ventilation with a minimum gap of 6 inches between the ventilation holes and surrounding surfaces is necessary to prevent heat build-up.
* The mechanical parts of the unit contain self-lubricating bearings and must do not be oiled or lubricated.
* To clean the set, use a soft dry cloth. Do not use any cleaning agents containing alcohol, ammonia, benzene or abrasives as these may harm the cabinet.
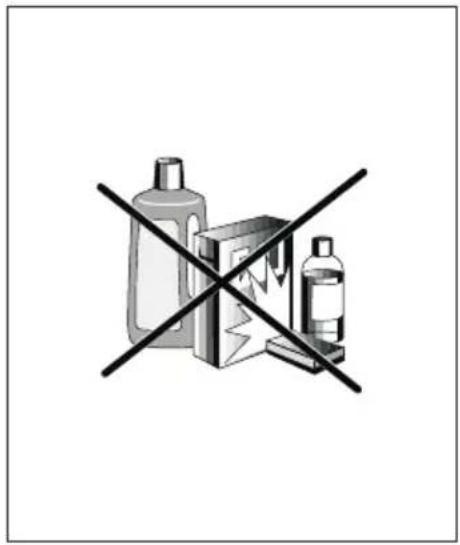
CD player and CD handling
* The lens of the CD player should never be touched!
* Sudden changes in the surrounding temperature can cause condensation to form and the lens of your CD player or cloud over. Playing a CD is then not possible. Do not attempt to clean the lens but leave the set in a warm environment until the moisture evaporates.
* Always close the CD door to keep the CD compartment dust-free. To clean, dust the compartment with a soft dry cloth.
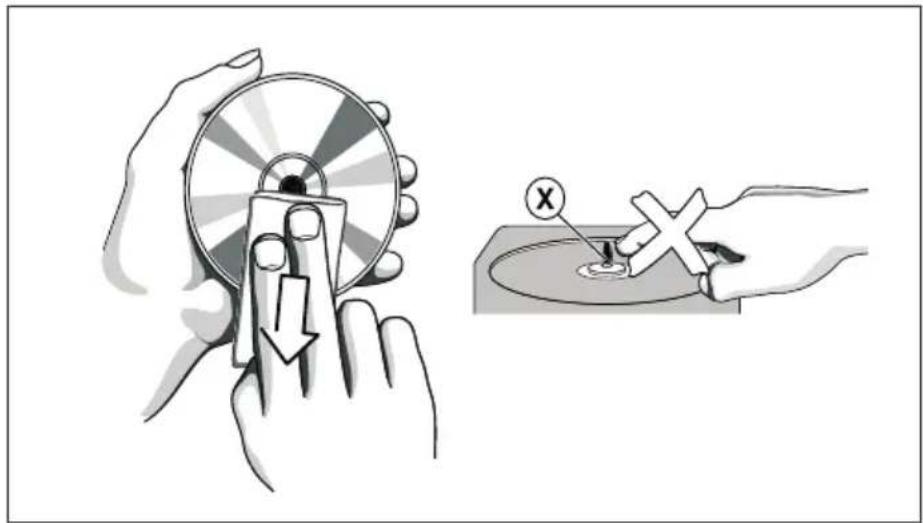
* To clean the CD, wipe in a straight line from the center towards the edge using a soft, lint-free cloth. Do not use cleaning agents as they may damage the disc.
Never write on a CD or attach any stickers to it.
natural_image
Illustration showing a hand using a compass to interact with a circular device, and a hand holding a cross-shaped object (no text or symbols present)TROUBLE SHOOTING
Trouble shooting
If a fault occurs, it is important you first check the points listed below before taking the unit for repair.
Do not open the unit as there is a risk of electric shock.
If you are unable to remedy a problem by following these hints, consult your dealer or service center.
WARNING: Under no circumstances should you try to repair the unit yourself, as this will invalidate the warranty.
- Problem
- Solution
No Sound / Power
- Volume not adjusted Adjust the VOLUME
- Power cord not securely connected Connect the AC power cord properly
- Batteries dead/ incorrectly inserted Insert new batteries correctly
Display does not function properly. No reaction to operation of any of the controls
- Electrostatic discharge Switch off and unplug the unit. Connect it after a few seconds
No disc indication
-No CD inserted Insert a CD, MP3, CD-R.
-CD badly scratched or dirty
Replace/clean CD. See Maintenance.
-CD-R is blank or the disc is not finalized
Use a finalized CD-R.
The CD/MP3 skips tracks
-CD/MP3 damaged or dirty
Replace or clean CD/MP3
-Program is active
Quit Program mode(s)
CD/MP3/USB/SD playback does not work
-CD/MP3/USB/SD badly scratched/dirty
Replace/clean CD/MP3/USB/SD (see maintenance)
-Laser lens steamed up
Wait until lens has adjusted to room temperature.
TECHNICAL SPECIFICATIONS
GENERAL
Power Requirement..... AC: 100-240V \~ 50/60Hz
Power consumption ......AC 15Watts(MAX)
Dimensions.....Approx..480 mm(L)x221mm(W)x229mm(H)
Operation temperature....+5 °C - +35°C
RECEIVER SECTION
Receiving Bands.... FM ST
Tuning Range..... FM: 87.5-108MHz
FM Radio presets....30
COMPACT DISC SECTION
Optical Pick-up....3-Beam Laser
Frequency Response....100Hz - 16KH z
AUDIO SECTION
Output Power......Maximum 4Watt x 2
Headphone Impedance ....4 \~ 32 Ohms
ACCESSORIES
Instruction Booklet....1
Ac line cord....1
Remote control....1
- nevir®
- MICROSYSTEM NVR-715MCDU
- USER MANUAL
- Know these
- CAUTION
- Dripping warning:
- Ventilation warning:
- Welcome
- PREPARATION FOR USE
- POWER SUPPLY
- Using AC Power
- Description
- BASIC FUNCTION (See 1)
- REMOTE SENSOR
- POWER BUTTON
- STANDBY INDICATOR
- PLAY/PAUSE BUTTON
- STOP/USB/SD BUTTON
- 6.LCD DISPLAY
- BACK BUTTON
- NEXT BUTTON
- VOLUME KNOB
- REPEAT/PROGRAM/TIME BUTTON
- FUNCTION BUTTON
- AUX JACK
- 13.PHONE JACK
- SD/MMC SLOT
- Remote Control
- CLOCK ADJUSTMENT
- RADIO FUNCTION
- PROGRAM TRACKS IN CD/MP3
- AUX IN
- Power Off Erp2 function
- CD/MP3 PLAYER
- Play back modes: normal, repeat, random.
- EQ function
- Playing a USB/SD
- USB Audio functions
- Selecting a different track.
- Finding a passage within a track
- Precautions & General Maintenance
- CD player and CD handling
- TROUBLE SHOOTING
- No Sound / Power
- Display does not function properly. No reaction to operation of any of the controls
- No disc indication
- The CD/MP3 skips tracks
- CD/MP3/USB/SD playback does not work
- TECHNICAL SPECIFICATIONS
- GENERAL
- RECEIVER SECTION
- COMPACT DISC SECTION
- AUDIO SECTION
- ACCESSORIES
Brand : NEVIR
Model : NVR-715MCDU
Category : Microwave