
KF311 - Mobile Phone LG - Free user manual and instructions
Find the device manual for free KF311 LG in PDF.


| Product Type | Mobile Phone (Feature Phone) |
| Brand | LG |
| Model | KF311 |
| Dimensions (H x W x D) | Approx. 100 x 50 x 15 mm |
| Weight | Approx. 80 g (with battery) |
| Display | 2.0-inch TFT color display, 176x220 pixels |
| Power Supply | Li-Ion rechargeable battery, 800 mAh |
| Charging | Via micro USB or travel charger |
| Main Functions | Voice calls, SMS/MMS, FM radio, MP3 player, VGA camera, Bluetooth |
| Memory | Internal ~20 MB, expandable via microSD (up to 2 GB) |
| Camera | VGA (640x480) CMOS sensor |
| Connectivity | GSM 900/1800/1900, GPRS, Bluetooth 2.0 |
| Audio | Speaker, 3.5mm headphone jack, FM radio with RDS |
| Battery Life | Standby up to 300 h, talk time up to 4 h |
| Maintenance & Cleaning | Wipe with dry cloth; avoid liquids and abrasive cleaners |
| Safety | Keep away from water and heat; use only approved chargers |
| Spare Parts & Repairability | Battery and charger available; limited repairability due to sealed design |
| General Information | User manual included; supports multiple languages |
Frequently Asked Questions - KF311 LG
User questions about KF311 LG
0 question about this device. Answer the ones you know or ask your own.
Ask a new question about this device
Download the instructions for your Mobile Phone in PDF format for free! Find your manual KF311 - LG and take your electronic device back in hand. On this page are published all the documents necessary for the use of your device. KF311 by LG.
USER MANUAL KF311 LG
This document is the user guide for the LG KF311 3G Video Mobile Phone. All rights for this document are reserved by LG Electronics. Copying, modifying and distributing this document without the consent of LG Electronics are prohibited.

natural_image
Front view of a LG mobile phone with control buttons and display screen (no visible text or symbols)Table of Contents
| For Your Safety 6 | |
| Guidelines for Safe and Efficient Use | 7 |
| KF311 Features 12Parts of the phone | |
| Getting Started 16Installing the USIM card and battery | |
| Charging the Battery 18 | |
| Disconnecting the charger 19How to use a microSD memory card | |
| Memory card formatting 20Turning Handset ON/OFF | |
| General Functions 22Making and answering calls | |
| Answering a call 23 | |
| Entering text 24 | |
| Overview of Menu Functions 26 | |
| Games & Apps 28 | |
| My games & apps Settings | |
| Calling 29 | |
| Make video call | |
| Call logs | |
| All calls | |
| Dialled calls | |
| Received calls | |
| Missed calls | |
| Call durations | |
| Data volume | |
| Call costs | |
| Call divert | 30 |
| Call barring | |
| Fixed dial numbers | 31 |
| Call waiting | |
| Common setting | |
| Video call setting | 32 |
| Organiser | 33 |
| Calendar | |
| To do | |
| Memo | |
Secret memo 34
Date finder
Settings
Calendar
Send all calendar & to do via Bluetooth
Backup calendar & To do
Restore calendar & To do
Memory info.
Clear all
Multimedia 35
Camera
Video camera 36
Music 38
Recently played
All tracks
Artists
Albums
Genres
Playlists
Shuffle tracks
Voice recorder 39
Messaging 40
Create new message
Message
Email 41
Inbox 42
Mailbox
Drafts 43
Outbox
Sent items
My folders 44
Templates
Text templates
Multimedia templates
Emoticons
Settings
Text message
Multimedia message 45
Email 46
Videomail 47
Voicemail
Service message
Info. service
Table of Contents
| My stuff 48 | |
| My images | |
| My sounds | |
| My videos | 49 |
| My games & apps | 50 |
| Others | |
| My memory card | |
| Yahoo | 51 |
| Contacts | 52 |
Add new
Search
Speed dials
Groups
Service dial numbers 53
Own number
My business card
Settings
Contact list settings
Synchronise contact
Copy
Move 54
Send all contacts via Bluetooth
Backup contacts
Restore contacts
Clear contacts
Memory info.
Tools 55
Quick menu
Alarms
Calculator
Stopwatch 56
Converter
World time
STK(USIM service)
Browser 57
Home
Enter address
Bookmarks
RSS reader
Saved pages
History
Settings
| Profiles | 57 |
| Appearance settings | |
| Cache | 58 |
| Cookies | |
| Security | |
| Reset settings | |
Connectivity 59
Bluetooth
Server sync 61
USB connection mode
Settings 62
Profiles
Phone
Auto key lock
Language
Power save
Handset info.
Screen
Screen theme
| Menu style | 63 |
| Font | |
| Backlight | |
| Handset theme | |
| Greeting message | |
| Date & Time | |
| Network | 64 |
| Select Network | |
| Network mode | |
| Preferred lists | |
| Internet profiles | |
| Access points | |
| Packet Data Conn. | 65 |
| Security | |
| Memory manager | 67 |
| Handset common memory | |
| Handset reserved memory | |
| USIM memory | |
| External memory | |
| Primary storage setting | |
| streaming settings | |
| Reset settings |
Accessories 68
Technical data 69
For Your Safety
Please read these simple guidelines. Not following these guidelines may be dangerous or illegal. Further detailed information is given in this manual.
WARNING!
- Mobile Phones must be switched off at all times in aircrafts.
- Do not hold the phone in your hand while driving.
- Do not use your phone near petrol stations, fuel depots, chemical plants or blasting operations.
- For your safety, use ONLY specified ORIGINAL batteries and chargers.
- Do not handle the phone with wet hands while it is being charged. It may cause an electric shock or seriously damage your phone.
- Keep the phone in a safe place out of small children's reach. It includes small parts which, if detached, may cause a choking hazard.
CAUTION!
- Switch off the phone in any area where required by special regulations. For example, do not use your phone in hospitals or it may affect sensitive medical equipment.
- Emergency calls may not be available under all mobile networks. Therefore, you should never depend solely on your mobile phone for emergency calls.
- Only use ORIGINAL accessories to avoid damage to your phone.
- All radio transmitters carry risks of interference with electronics in close proximity. Minor interference may affect TVs, radios, PCs, etc.
- Batteries should be disposed of in accordance with relevant legislation.
- Do not dismantle the phone or battery.
Guidelines for Safe and Efficient Use
Please read these simple guidelines. Not following these guidelines may be dangerous or illegal.
Exposure to radio frequency energy
Radio wave exposure and Specific Absorption Rate (SAR) information
This mobile phone model KF311 has been designed to comply with applicable safety requirements for exposure to radio waves. These requirements are based on scientific guidelines that include safety margins designed to assure the safety of all persons, regardless of age and health.
The radio wave exposure guidelines employ a unit of measurement known as the Specific Absorption Rate, or SAR. Tests for SAR are conducted using standardised methods with the phone transmitting at its highest certified power level in all used frequency bands.
▶ While there may be differences between the SAR levels of various LG phone models, they are all designed to meet the relevant guidelines for exposure to radio waves.
The SAR limit recommended by the International Commission on Non-Ionizing Radiation Protection (ICNIRP) is 2W/kg averaged over 10g of tissue.
The highest SAR value for this model phone tested by DASY4 for use at the ear is 0.562 W/Kg (10g). and when worn on the body is 1.31 W/Kg (10g).
▶ SAR data information for residents in countries/regions that have adopted the SAR limit recommended by the Institute of Electrical and Electronics Engineers (IEEE), which is 1.6 W/kg averaged over 1g of tissue.
Product care and maintenance
WARNING!
Only use batteries, chargers and accessories approved for use with this particular phone model. The use of any other types may invalidate any approval or warranty applying to the phone, and may be dangerous.
Do not disassemble this unit. Take it to a qualified service technician when repair work is required.
Guidelines for Safe and Efficient Use
- Keep away from electrical appliances such as TVs, radios, and personal computers.
The unit should be kept away from heat sources such as radiators or cookers.
▶ Do not drop.
▶ Do not subject this unit to mechanical vibration or shock.
▶ Switch off the phone in any area where you are required by special regulations. For example, do not use your phone in hospitals as it may affect sensitive medical equipment.
Do not handle the phone with wet hands while it is being charged. It may cause an electric shock and can seriously damage your phone.
▶ Do not to charge a handset near flammable material as the handset can become hot and create a fire hazard.
▶ Use a dry cloth to clean the exterior of the unit (do not use solvents such as benzene, thinner or alcohol).
▶ Do not charge the phone when it is on soft furnishings.
▶ The phone should be charged in a well ventilated area.
▶ Do not subject this unit to excessive smoke or dust.
▶ Do not keep the phone next to credit cards or transport tickets; it can affect the information on the magnetic strips.
▶ Do not tap the screen with a sharp object as it may damage the phone.
▶ Do not expose the phone to liquid or moisture.
▶ Use the accessories like earphones cautiously. Do not touch the antenna unnecessarily.
Efficient phone operation
Electronics devices
All mobile phones may get interference, which could affect performance.
Do not use your mobile phone near medical equipment without requesting permission. Avoid placing the phone over pacemakers, for example, in your breast pocket.
▶ Some hearing aids might be disturbed by mobile phones.
▶ Minor interference may affect TVs, radios, PCs, etc.
Road safety
Check the laws and regulations on the use of mobile phones in the area when you drive.
▶ Do not use a hand-held phone while driving.
▶ Give full attention to driving.
▶ Use a hands-free kit, if available.
▶ Pull off the road and park before making or answering a call if driving conditions so require.
RF energy may affect some electronic systems in your vehicle such as car stereos and safety equipment.
When your vehicle is equipped with an air bag, do not obstruct with installed or portable wireless equipment. It can cause the air bag to fail or cause serious injury due to improper performance.
If you are listening to music whilst out and about, please ensure that the volume is at a reasonable level so that you are aware of your surroundings. This is particularly imperative when near roads.
Avoid damage to your hearing
Damage to your hearing can occur if you are exposed to loud sound for long periods of time. We therefore recommend that you do not turn on or off the handset close to your ear. We also recommend that music and call volumes are set to a reasonable level.
Blasting area
Do not use the phone where blasting is in progress. Observe restrictions, and follow any regulations or rules.
Guidelines for Safe and Efficient Use
Potentially explosive atmospheres
- Do not use the phone at a refueling point.
▶ Do not use near fuel or chemicals.
▶ Do not transport or store flammable gas, liquid, or explosives in the same compartment of your vehicle as your mobile phone and accessories.
In aircraft
Wireless devices can cause interference in aircraft.
▶ Turn your mobile phone off before boarding any aircraft.
▶ Do not use it on the ground without permission from the crew.
Children
Keep the phone in a safe place out of the reach of small children. It includes small parts which may cause a choking hazard if detached.
Emergency calls
Emergency calls may not be available under all mobile networks. Therefore, you should never depend solely on the phone for emergency calls. Check with your local service provider.
Battery information and care
You do not need to completely discharge the battery before recharging. Unlike other battery systems, there is no memory effect that could compromise the battery's performance.
▶ Use only LG batteries and chargers. LG chargers are designed to maximize the battery life.
▶ Do not disassemble or short-circuit the battery pack.
- Keep the metal contacts of the battery pack clean.
▶ Replace the battery when it no longer provides acceptable performance. The battery pack maybe recharged hundreds of times until it needs replacing.
▶ Recharge the battery if it has not been used for a long time to maximize usability.
▶ Do not expose the battery charger to direct sunlight or use it in high humidity, such as in the bathroom.
▶ Do not leave the battery in hot or cold places, this may deteriorate the battery performance.
There is risk of explosion if the battery is replaced by an incorrect type.
▶ Dispose of used batteries according to the manufacturer's instructions. Please recycle when possible. Do not dispose as household waste.
If you need to replace the battery, take it to the nearest authorized LG Electronics service point or dealer for assistance.
▶ Always unplug the charger from the wall socket after the phone is fully charged to save unnecessary power consumption of the charger.
KF311 Features
Parts of the phone
Open view


Left soft key/ Right soft key
Performs the function indicated at the bottom of the display.
Call End key
▶ You can end a call.
▶ You can go back to standby mode by pressing this key when activating the menu.
Clear key
You can delete a letter.
Send key
▶ Dials a phone number and answers a call.
In standby mode: Shows a history of calls made, received, and missed.
KF311 Features
Right side view Left side view

Rear view

KF311 Features
Getting Started
Installing the USIM card and battery
1. Installing the USIM card.
Your USIM card contains your phone number, service details and contacts and must be inserted into your handset. If your USIM card is removed then your handset becomes unusable (except for emergency calls) until a valid one is inserted. Always disconnect the charger and other accessories from your handset before inserting and removing your USIM card. Slide the USIM card into the USIM card holder. Make sure that the USIM card is properly inserted and the gold contact area on the card is facing downwards. To remove the USIM card, press down lightly and pull it in the reverse direction.

natural_image
3D cutaway view of a mobile phone showing internal components and casing (no text or symbols)To remove the USIM card
Note
The metal contact of the USIM card can easily be damaged by scratches. Pay special attention to the USIM card while handling. Follow the instructions supplied with the USIM card.
▶ After removing the battery, insert USIM card.

natural_image
3D rendering of a mobile phone casing with internal circuitry and an arrow indicating rotation (no text or symbols)To insert the USIM card
2. Installing the battery.
Slide the battery upwards until it snaps back into place.
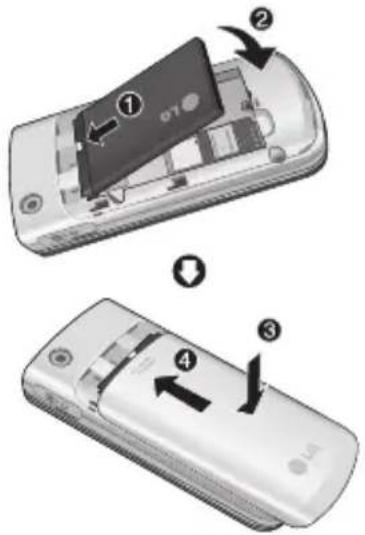
3. To remove the battery.
Turn the power off. (If the power is left on, there is a chance you could lose the stored telephone numbers and messages.)
Press and hold down the battery release button and slide the battery down.
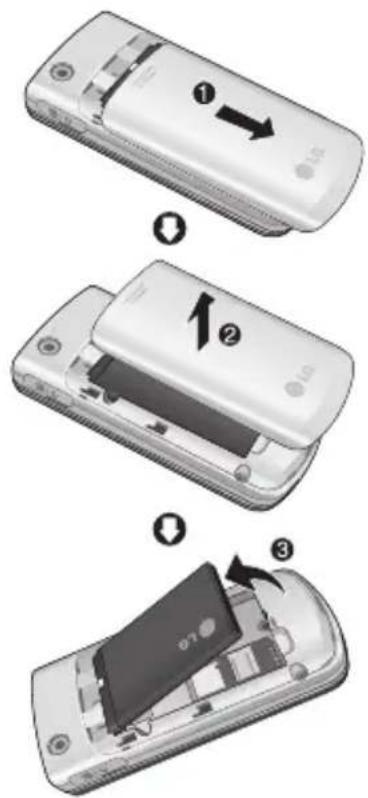
Getting Started
Charging the Battery
Before connecting the travel adapter to the phone you must first install the battery.

natural_image
Close-up of a smartphone with an attached cable and a magnified inset showing internal components (no text or symbols visible)- With the arrow facing you as shown in the diagram push the plug on the battery adapter into the socket on the right side of the phone until it clicks into place.
- Connect the other end of the travel adapter to the mains socket.

Note
▶ Only use the charger included in the box.
- The moving bars on the battery icon will stop after charging is complete.
- Ensure the battery is fully charged before using the phone for the first time.
CAUTION!
- Do not force the connector as this may damage the phone and/or the travel adapter.
- If you use the battery pack charger when abroad, use an attachment plug adaptor for the proper configuration.
- Do not remove your battery or the USIM card while charging.
WARNING!
- Unplug the power cord and charger during lightning storms to avoid electric shock or fire.
• Make sure that no sharp-edged items such as animal teeth or nails, come into contact with the battery. This may cause a fire.
Disconnecting the charger
Disconnect the travel adapter from the phone as shown in the diagram below.

natural_image
Close-up of a hand inserting a USB into a smartphone (no visible text or symbols)How to use a microSD memory card

-
Turn the phone off. Inserting or removing the microSD when the phone is on may damage the files stored in the memory card.
-
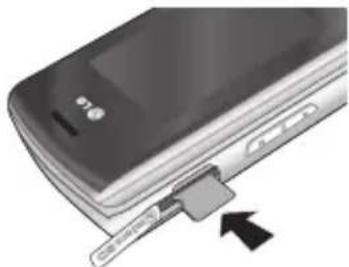
Lift the plastic cover which protects the microSD slot.

natural_image
Close-up of a mobile phone with a scroll wheel and a USB tag, showing no visible text or symbols.-
Insert the memory card into the slot. The gold contacts must be kept on the back of the microSD. Don't push the microSD too much. If it doesn't go into the slot easily, you may be trying to insert it in the wrong way or there could be a foreign object in the slot.
-
Once inserted, push the memory card until you hear a Click, meaning that the microSD has been correctly engaged.
Getting Started
natural_image
Close-up of a mobile phone's front panel showing a USB cable inserted into a slot (no text or symbols visible)-
Close the plastic slot protection.
-
To remove the memory card, turn the phone off, open the slot protection and push the microSD to unlock it. Carefully extract the memory card.
Attention:
- Avoid using the Flash Memory Card when the battery is low.
When writing to the card, wait for the operation to complete before removing the card.
The card is designed to fit easily into the system one way only.
▶ Do not bend the card or force it into the slot.
▶ Do not insert any memory cards other than those made by microSD.
▶ If the microSD has been formatted using FAT32, format the microSD using FAT16 again.
For more information on the microSD, please refer to the memory card instruction manual.
Memory card formatting
Before you start to use the memory card you have to format it. After you insert the memory card, select Menu → Settings → Memory manager → External memory, then press ☐ the left soft key.
This operation should only be done when you insert the memory card for the first time. During formatting various folders will be created for different data types.
Turning Handset ON/OFF
Turning your handset on
Ensure that your USIM card is in your handset and the battery is charged. Press and hold until the power comes on. Enter the USIM PIN code that was supplied with your USIM card if the PIN code request is set to On. After a few seconds you will be registered on the network.
Turning your handset off
Press and hold until the power goes off. There may be a few seconds delay while the handset powers down. Do not turn the handset on again during this time.
Emergency call function
The right soft key is represented by "Inactive/ Emergency call" on the screen. Press the right soft key or dial your emergency number using the number keys, and then press 📋 to make an emergency call.
General Functions
Making and answering calls
Making a voice call
- Enter the number including the full area code.
▶ To delete a digit press □ key. To delete all digits press and hold □ key. - Press to make the call.
- Press ☐ to finish the call, or close the handset.
Note
To activate the speakerphone during a call, activate the touch keys and press OK.
Making a video call
You can make and receive video calls when both you and the other person have 3G coverage. To make/answer a video call, do the following.
- Input the phone number using the keypad, or select the phone number from the calls made/received lists.
▶ To correct mistakes, press c briefly to delete the last number, or press and hold c to delete all numbers. - If you do not want to use the speakerphone, ensure you have the headset plugged in.
- To start the video function, press the left soft key [Options] and select Make video call.
▶ You will be notified that you will need to close other applications to make the video call.
Making a call from the call logs
- In standby mode, press and the latest incoming, outgoing and missed phone numbers will be displayed.
- Select the desired number by using (\overline{\overline{\overline{\overline{\overline{\overline{\overline{\overline{\overline{\overline{\overline{\overline{\overline{\overline{\overline{\overline{\overline{\overline{\overline{\overline{\overline{\overline{\overline{\overline{\overline{\overline{\overline{\overline{\overline{\overline{\overline{\overline{\overline{\overline{\vee}}}}}}}}}}}}}}}}}}}}}}}}}}.
- Press 📄 to call the number.
Note
The video call may take some time to connect. Please be patient. The connection time will also depend on how quickly the other party answers the call. While the video call is connecting, you will see your own image; after the other party has answered, their image will be displayed on the screen.
- Adjust the camera position if necessary.
- Press ☐ to finish the call, or close the handset.
Making a voice/video call from Contacts
It is easy to call anyone whose number you have stored in your Contacts.
- Press ✕ to access the contacts list.
- Scroll to the contact to make a call.
- Press 📋 to make a voice call. Press the left soft key and select Make video call to make a video call.
- Press 📋 to finish the call.
Making international calls
- Press and hold 0± for the international prefix. The '+' character prefixes the international access code.
- Enter the country code, area code, and the phone number.
- Press
Answering a call
When you receive a call, the phone rings and the flashing phone icon appears on the screen. If the caller can be identified, the caller's phone number (or name if stored in your Contacts) is displayed.
- Open the slider to answer an incoming call.
Note
To reject an incoming call, press or the right soft key twice.
If you set Answer mode as Press send key (Menu 2.0.4), you can answer the call by pressing 📋 after opening the slider.
If the answer mode is set to Press any key, any key will answer a call except for 📋.
General Functions
- End the call by closing the handset or pressing 📋.
Note
▶ You can answer a call while using the Contacts or other menu features.
When the compatible headset is connected, you can also answer a call using the headset key, as well as using the phone. To reject an incoming call, press 📋.
▶ You can mute the ringtone when a call comes in by pressing and holding the right soft key.
Shortcut to activate silent mode
You can activate the silent only mode by pressing and holding down #** after opening the phone.
Signal strength
You can check the strength of your signal by the signal indicator on the LCD screen of your phone. Signal strength can vary, particularly inside buildings. Moving close to a window may improve reception.
Entering text
You can enter alphanumeric characters using the keypad.
For example, storing names in Contacts, writing a message, creating a personal greeting or scheduling events in the calendar all require entering text.
Changing the text input mode
- When you are in a field that allows characters to be entered, you will notice the text input mode indicator in the upper right corner of the LCD screen.
- If T9 is on, you can change the mode to T9Abc, T9ABC, 123, T9abc by pressing *\$. When T9 is off, the mode will be changed to Abc, ABC, 123, abc.
Using the T9 Mode
The T9 predictive text input mode allows you to enter words easily with a minimum number of key presses. As you press each key, the handset begins to display the characters that it thinks you are typing based on a built-in dictionary. As new letters are added, the word changes to reflect the most likely candidate from the dictionary.
Using the ABC Mode
Use 2abc to 9 mag to enter your text.
- Press the key labelled with the required letter:
▶ Once for the first letter.
▶ Twice for the second letter.
And so on.
- To insert a space, press 0± once. To delete letters, press c .
Refer to the following table for more information on the characters available using the alphanumeric keys.
| Key | Characters in the order display | |
| Upper case Lower case | ||
| 1_can | .,?!:@1/°()_;;,. | ?!:@1/°()_;;` |
| 2_abc | ABC2ÀÄÄÄÄÄEÇa b c2àáääääæç | |
| 3^def | DEF3ÉÉÉEdef3éèêë | |
| 4_ghi | GHI4ÌÌÏghI4ìíïi | |
| 5 | JKL5ŁjkI5ł | |
| 6^mno | MNO6ÑOÓÖÖŒm n o6ñòóööøe | |
| 7_mp | PQRS7ßpqrs7ß | |
| 8_tuv | TUV8ÙÜÜÜtuv8ùúüü | |
| 9^nws | WXYZ9xyz9 | |
| 0± | Space,0 Space,0 | |
Note
The characters assigned to the keys and their order of appearance depends on the language selected using the option Input method. The table above provides the characters set for English language.
Using the 123 (Number) mode
The 123 mode enables you to enter numbers in a message(a telephone number, for example). Press the keys corresponding to the required digits before manually switching back to the appropriate text entry mode.
Using the symbol mode
The symbol mode enables you to enter various symbols or special characters. To enter a symbol, select Options → Insert → Symbols. Use the navigation and numeric keys to select the desired symbol and press OK.
Overview of Menu Functions
You can launch a menu by pressing OK in the idle screen. Move to the desired item and press OK to go into the sub menu. From the main menu you can also go into a submenu by directly pressing the corresponding numeric key as follows. The main menu consists of the following top menus and sub menus.
| 1. Games & Apps |
| 1.1 My games & apps |
| 1.2 Settings |
| 2. Calling |
| 2.1 Make video call |
| 2.2 Call logs |
| 2.3 Call durations |
| 2.4 Data volume |
| 2.5 Call costs |
| 2.6 Call divert |
| 2.7 Call barring |
| 2.8 Fixed dial Numbers |
| 2.9 Call waiting |
| 2.0 Common settings |
| 2.* Video call setting |
| 3. Organiser |
| 3.1 Calendar |
| 3.2 To do |
| 3.3 Memo |
| 3.4 Secret memo |
| 3.5 Date finder |
| 3.6 Settings |
| 4. Multimedia |
| 4.1 Camera |
| 4.2 Video camera |
| 4.3 Music |
| 4.4 Voice recorder |
| 5. Messaging |
| 5.1 Create new message |
| 5.2 Inbox |
| 5.3 Mailbox |
| 5.4 Drafts |
| 5.5 Outbox |
| 5.6 Sent items |
| 5.7 My folders |
| 5.8 Templates |
| 5.9 Emoticons |
| 5.0 Settings |
| 6. My stuff |
| 6.1 My images |
| 6.2 My sounds |
| 6.3 My videos |
| 6.4 My games & apps |
| 6.5 Others |
| 6.6 My memory card |
| 7. Yahoo |
| 8. Contacts |
| 8.1 Add new |
| 8.2 Search |
| 8.3 Speed dials |
| 8.4 Groups |
| 8.5 Service dial numbers |
| 8.6 Own number |
| 8.7 My business card |
| 8.8 Settings |
| 9. Tools |
| 9.1 Quick menu |
| 9.2 Alarms |
| 9.3 Calculator |
| 9.4 Stopwatch |
| 9.5 Converter |
| 9.6 World time |
| 9.7 STK(USIM service) |
| *. Browser |
| *.1 Home |
| *.2 Enter address |
| *.3 Bookmarks |
| *.4 RSS reader |
| *.5 Saved pages |
| *.6 History |
| *.7 Settings |
| 0. Connectivity |
| 0.1 Bluetooth |
| 0.2 Server sync |
| 0.3 USB connection mode |
| #. Settings |
| #.1 Profiles |
| #.2 Phone |
| #.3. Screen |
| #.4 Date & Time |
| #.5 Network |
| #.6 Internet profiles |
| #.7 Access points |
| #.8 Packet data conn. |
| #.9 Security |
| #.0 Memory manager |
| #.* Streaming setting |
| #.# Reset settings |
Overview of Menu Functions
Games & Apps [Menu 1]
My games & apps Menu 1.1
You can easily download games and other applications in this menu. It may have two folders, no folders at all, or Games and Applications. The default folder can be dependent on the operator/country. Each folder has an embedded link for downloading games or applications. Please note that additional costs may be incurred when using online services.
Settings
Menu 1.2
- profile: You can see profile and add new profile.
- Certificates list: You can see the certification list for using java application
Calling [Menu 2]
Make video call
Menu 2.1
You can make a video phone call in this menu. For details, refer to page 22 to 23.
Call logs
Menu 2.2
All calls (Menu 2.2.1)
Allows you to view the missed, received, and dialled call records. You can make a call, or send a message to the number you have selected from the records. You can also save the number in Contacts.
Dialled calls (Menu 2.2.2)
Allows you to view dialled call records, make a call, send a message, and save the number in Contacts.
Received calls (Menu 2.2.3)
Allows you to view received call records, make a call, send a message, and save the number in Contacts.
Missed calls (Menu 2.2.4)
Allows you to view missed call records, make a call, send a message, and save the number in Contacts.
Call durations
Menu 2.3
You can view call time by types. Press the left soft key [Options] to initialize call duration values. Initialization will require your Security code.
Data volume
Menu 2.4
Allows you to check the sent, received and all data volume transferred. Press the left soft key to initialize Data volume values. Initialisation will require your Security code.
Call costs
Menu 2.5
- This function displays the call costs of the Last call and All calls.
- To edit, press the centre key [Edit] and enter the PIN2 code.
- You can select either Units or Currency in Set call cost. Depending on your settings, USIM and operator, the call cost is displayed during a call.
- In the Set limit configuration, select On to configure the cost limit. When a cost limit is configured, and the call costs reach the limit, making a call will not be allowed.
Calling
Call divert
Menu 2.6
Call divert menus for voice and video calls are provided.
1. When no call diverts exist
You can input the number to divert a call directly or search for it in phonebook. If you press [OK], the phone will send the request to your service provider after entering the number. While waiting for the result from the network, a Requesting message and animation appears.
2. When call diverts are already set
View a list of the call diverts already set up. While waiting for the result from the network, a Requesting message and animation appears.
3. Option menu
After activating All voice calls menu, select the Options menu at the bottom of the menus to display the Deactivate, Deactivate all, View status and clear list menus.
The View status menu shows the settings on the network. If you select this menu, Requesting. message and animation appear. Then the network settings are displayed when the information is received from the network. If you select the Deactivate menu, the call divert numbers registered in the network are deleted after user confirmation. Clear list menu will delete all divert number list.
Call barring
Menu 2.7
Call barring menus for Voice and Video calls are provided.
The menu consists of Voice calls, Video calls and Deactivate all. The Voice calls and Video calls menus have the following submenus.
The Call barring menu consists of All outgoing, Outgoing international, Outgoing international calls except home country, All incoming and Incoming when abroad submenus.
The All outgoing menu bars dialling all outgoing calls, the Outgoing international menu bars dialling outgoing international calls, and the Outgoing international calls except home country menu bars dialling outgoing international calls except for the Home PLMN country. All incoming rejects all incoming calls and the Incoming when abroad menu rejects incoming calls when roaming.
Voice and Video calls
-
If you want to activate barring service, press ok Oand then input the barring password. The Phone will request the network to activate barring service and receive the result of the operation. After receive the result from the network, the result is displayed.
-
When the Options menu is selected, it activates the Outgoing calls menu. Select the Options menu from the soft menus on the lowest menu. Then Deactivate, Deactivate all, View status and Change password menus appear. The Deactivate menu deactivates the barring service after the user's Barring password is entered. The Deactivate all menu deactivates all barring services configured in the network after the user's Barring password has been entered.
The View status menu enables users to view the current network configuration. Selecting View status menu displays the Requesting message with animation and the result of the operation when the network answers. Change password menu enables users to change the current barring password.
Deactivate all
You can select to deactivate all or not.
Fixed dial numbers Menu 2.8
▶ Turn on/ Turn off
- On: Select whether to activate FDN or not. PIN2 authentication is required.
- OFF: Select whether to activate FDN or not. PIN2 authentication is required.
▶ FDN list: Displays the current FDN list. You can edit, add, or delete fixed dial numbers. PIN2 authentication is required to edit, add, or delete the list. And the configuration information is saved on the USIM. The information saved on the USIM is used when FDN restricts outgoing calls.
Call waiting
Menu 2.9
Activates waiting service. Selecting this item, displays Requesting message and animation. When the network answers, the result of the operation is displayed.
Common setting
Menu 2.0
Call reject
You can set whether to reject incoming calls.
Send my number
▶ Set by network: Configures with the default settings determined by the service provider.
On: Configures to send my phone number when making an outgoing call.
▶ Off: Configures not to send my phone number when making an outgoing call.
Calling
Auto redial
Allows you to set the auto redial function when a call attempt has failed.
Answer mode
Allows you to set the answering method. You can choose between Press send key, Slide up and Press any key.
Minute minder
Determines whether to sound a 1 minute tone every 1 minute when you are on the phone.
BT answer mode
▶ Hands-free: You can answer a call using the Bluetooth headset, when the Bluetooth is connected.
▶ Handset: If you press on the handset to answer a call, you can talk on the handset. If you press the Bluetooth headset key to answer a call, you can talk using the Bluetooth headset. This is the initial answer mode selection. And while talking, you can switch from handset to headset or from headset to handset.
Save new number
In this menu, you can save the phone number when ending a call if the phone number is not saved in a phonebook.
Slide close setting
When the slide is down, you can set the call is ended or not.
Select line (SIM dependent)
Depending on the support or not of 2 line services on your SIM card, you can select the line you wants.
Video call setting
Menu 2.*
You can set the screen display when making /receiving a video call.
▶ Use private image: Determine whether to show the private image or not.
▶ Select private image: Select the still image to be displayed.
▶ Mirror: Select to activate the mirror effect or not.
- On: Displays the image flipped side to side.
- Off: Displays the image as it is.
Organiser [Menu 3]
Calendar
Menu 3.1
Schedule inquiry and search
1. Reference by Months
You can check out your schedule by months. when you select this menu, the cursor is on the current date.
The schedule saved for the date where the cursor is located is represented by a blue colored arrow on the top left corner of box. Pressing the shortcut key 100 moves to the previous year and pressing 3def move to the next year and pressing 5jul moves to today. Pressing 7mow or *or moves to the previous month, and 9mow or #** moves to the next month. You can move the date using ^/√
2. Detailed reference
You can refer to a detailed schedule, that is the whole contents of the schedule configured by the user.
Add new event
You can add an event. You can configure the start date, end date, start time, end time, contents, type of event, repetition, alarm of the schedule.
Delete all schedules
You can delete all saved schedule contents using this function.
Set up and release holiday
You can set up or release user holidays. Press the left soft key [Options] and select Set holiday. The selected date will be displayed in red.
To release the holiday, press the left soft key [Options] and select Clear holiday.
Schedule notification
If the user has configured the alarm setting, the specified alarm sound will ring. If the notification time is before the schedule start time, you can set up the alarm again.
To do
Menu 3.2
You can view, edit and add tasks to do. Tasks are displayed in time order. Tasks that have been completed or not completed are displayed in different ways.
Memo
Menu 3.3
Using the memo management function, you can view and manage saved memo contents, and add new memo.
Organiser
Secret memo
Menu 3.4
You can write the private memo to protect your privacy. You enter the security code to use this menu.
Date finder
Menu 3.5
You can register the dates such as birthdays. You can check how many days remain before an event occurs or how many days have passed since an event.
Settings
Menu 3.6
Calendar (Menu 3.6.1)
You can set the configurations to view the calendar.
▶ Default view: You can set the default value to view a calendar; Month view, Week view
▶ Week start time: 1AM, 2AM, 3AM, 4AM, 5AM, 6AM, 7AM, 8AM, 9AM, 10AM, 11AM, 12PM
▶ Week starts on: You can set the default day to start a week; Sunday, Monday
Send all calendar & to do via Bluetooth (Menu 3.6.2)
You can send all the data in your calendar and/or to do list from your phone to other phones by using Bluetooth.
Backup calendar & To do
(Menu 3.6.3)
You can create the backup files of the calendar or to do list saved in the phone when you insert an external memory.
Restore calendar & To do
(Menu 3.6.4)
You can reset the backup files of calendar or tasks when you insert an external memory.
Memory info. (Menu 3.6.5)
You can view the information of available memory regarding Calendar, Tasks, Memo and Secret memo.
Clear all (Menu 3.6.6)
You can delete all data regarding Calendar, Tasks, Memo and Secret memo.
Multimedia [Menu 4]
Camera
Menu 4.1
This application enables you to take a still picture. You can take a picture in the size you want, and use it for the address book photo, home screen and other more general purposes. Once taken, the picture can be sent by Message, Email or Bluetooth.
- Press the left soft key to access Options and set the desired environment as follows.
▶ Move between the options menus with [< (/).>]
▶ Select the desired value with and confirm the selection with OK.
| Menu Description | |
| Go to The Pictures folder is launched and displays existing pictures as thumbnails.You can view pictures by pressing OK. You can also send the selected picture to another party via Message, Email, or Bluetooth. | |
| Size 1600x12 | 00, 1280x960, 640x480,320X240, Wallpaper, 176x144, Contacts |
| Quality Super fine, Fine, Standard | |
| Burst shot One, Three, Six, Nine (Note: Available Burst shot depends on the size.) | |
| Brightness From -2.0 to 2.0 at 0.5 intervals. The higher the level, the brighter the screen. | |
| White balance | You can adjust the tone of the background photo according to the weather. Auto, Daylight, Cloudy, Illuminate, Indoors |
| Night mode | You can take better pictures at night by selecting On. |
Multimedia
| Menu Description | |
| Frame Shot | You can apply one of 10 frame effects when taking a picture. (available only in case of Wallpaper size) |
| Timer You can delay the camera shutter time. None, 3 secs, 5 secs, 10 secs. is shown when the timer is activated. | |
| Effect None, | Black & White, Negative, Sepia |
| Sound Select | the desired shutter sound. |
| Memory Select | the desired memory in use, either in use Handset or External. |
| Mirror You can activate the mirror effect by selecting On. | |
| Swap cam You can switch the camera to activate either the Internal or the External camera. | |
| Preview screen | Select the desired preview method, either Full image or Full screen. |
- After finishing all the settings, press the right soft key [Close].
- Focus the camera on what you want to take and press OK.
- Press OK to save the picture. It is saved in the Pictures folder of My Files.
Note
▶ Press the right soft key [Back] to go back to the preview mode.
Video camera
Menu 4.2
This application enables you to record a video clip. You can play and watch a saved video file in this menu. Once recorded, a video clip can be sent by Message, Email or Bluetooth.
- Press the left soft key to access Options and set the desired environment as follows.
▶ Move between the options menus with
[< (/).>]
▶ Select the desired value with and confirm the selection with OK.
| Menu Description | |
| Go to The Videos folder is launched and displays existing videos as thumbnails. You can view videos by pressing OK . You can also send the selected video to another party via Message, Email or Bluetooth. | |
| Size 176x144, 128x96 | |
| Quality Super fine, Fine, Standard | |
| Brightness From -2.0 to 2.0 at 0.5 intervals. The higher the level, the brighter the screen. | |
| White balance | You can adjust the tone of the background video according to the weather. Auto, Daylight, Cloudy, Illuminate, Indoors |
| Menu Description | |
| Night mode | You can take better shots at night by selecting On. |
| Effect None, | Black & White, Negative, Sepia |
| Duration Select the desired recording time. MMS, 30 sec, 1 mins, 2 mins, 5 mins, 60 mins. | |
| Memory Select the desired memory, either Handset or External. | |
| Mirror You can activate the mirror effect by selecting On. | |
| Voice Decide whether to record the sound or not. | |
| Swap cam You can switch the camera to activate either the Internal or the External. | |
Multimedia
- After finishing all the settings, press the right soft key [Close].
- Focus the camera on what to record and press OK to start recording.
And press OK to stop recording.
▶ You can pause the recording by pressing the left soft key [Pause]. - Press OK to save the video clip. It is saved in the Videos folder of My Files.
Note
▶ Press the right soft key [Back] to go back to the preview mode without saving the video clip.
Music
Menu 4.3
Recently played (Menu 4.3.1)
You can replay the music which you recently listened to in "My music".
All tracks (Menu 4.3.2)
You can view all the music files stored in the phone/external memory.
Artists (Menu 4.3.3)
You can view and play music sorted by Artists.
Albums (Menu 4.3.4)
You can view and play music sorted by Albums.
Genres (Menu 4.3.5)
You can view and play music sorted by Genres.
Playlists (Menu 4.3.6)
You can create your own playlists by choosing tracks from the All tracks menu list.
Shuffle tracks(Menu 4.3.7)
If you want to play the music continuously and randomly, select this option.
Voice recorder
Menu 4.4
- Press the left soft key [Option] to display the option pop up menu before recording.
- Move to the desired menu item using / and press .
▶ Duration: You can set the recording duration to MMS msg. size, 30 secs, , 1 min, or No limit.
Quality: You can select a recording quality from Super fine, Fine, and Normal.
▶ Memory in use: Choose whether to save your voice recordings to the Handset memory or to the External memory.
▶ Go to my sounds: Opens the Voice recordings folder in Sounds.
3. Pressing OK starts recording. When a recording is started, the recording time appears on the LCD. To cancel the recording, press the Back.
4. When you finish the recording, press OK to exit. The recorded file is automatically saved in the Voice recordings folder in My files. If you press OK again, you can start recording new voice.
- Press the left soft key to select the various options after the voice recording.
- Select the desired menu using and press OK.
▶ Play: You can play the voice.
▶ Send: To send the recorded file choose one from Message, Email and Bluetooth using 📄/ 📋 and press . OK
▶ File: You can change the name of a file and view the file information.
▶ Delete: Select this menu to delete a recorded file.
▶ Use as: You can set the recorded file as a Voice Ringtone or Video Ringtone.
▶ Go to my sounds: Opens the Voice recordings folder in My Files.
7. Press the right soft key to close the sub-menu popup window.
Messaging [Menu 5]
Create new message
Menu 5.1
Message(Menu 5.1.1)
You can write and edit a message containing a combination of text, image, video and audio.
- Enter your message in the Message field.
Option menus in Message field
▶ Insert: You can perform the following actions:
1. Image: You can insert an image. (Existing image/Take picture)
2. Video: You can insert a video clip. (One video clip per slide)
3. Sound: You can insert a sound file. (One sound per slide)
4. Symbols: You can insert symbols. After entering the corresponding number keys, press OK.
5. Template: You can insert a text template saved on the phone. After selecting a template, press OK. The selected template is inserted into the Message window.
6. Emoticon: You can insert an emoticon on writing a message.
- Name & Number: After searching the name and the number in phonebook, you can insert the entry.
- New slide: Select this to add a new slide.
- Subject: Select this to insert a subject.
-
More: Select this to add a Business card, Schedule, Memo, To do, and My business card.
▶ Save to drafts: Select this to save the message to drafts.
▶ Input method: Select the desired dictionary mode.
▶ Writing language: You can select the language for writing a message.
▶ Add to dictionary: You can add a word to the dictionary. -
Press the right soft key [Back] to exit the menu or go to previous menu after setting submenus.
-
Press the center key [Send] to insert recipients address. After filling at least one recipient fields, press the confirmation key [Send] to send the message. The message will automatically be saved in the Sent Items folder. If the message has not been sent, it will remain in the Outbox with a failed status.
Email (Menu 5.1.2)
To send/receive an Email, you should set up the Email account.
- Enter the Email addresses of the recipients in the To, Cc, Bcc fields. You can search the Contacts by pressing OK.
Note
▶ Enter the reference Email address to forward the Email in Cc(Carbon copy) field.
▶ Enter a hidden reference Email address to forward the Email without forwarding information in Bcc(Blind Carbon Copy) field.
Only valid Email addresses are allowed for the recipient (To), reference address (Cc) and hidden reference address (BCC) fields. When an Email address has been specified, another field where you can specify another address appears. You can specify up to 20 recipients for the To and Cc address fields and 10 recipients for the BCC address field.
- Move the cursor to the Subject field and key in the subject.
-
You can enter the message contents by moving the cursor to the Message field.
-
Use the following functions by using the left soft key [Options].
▶ Insert: Select this menu to insert special characters, templates, and contacts. It is also possible to attach multimedia files (pictures, videos and sounds).
▶ Search contacts: Select this menu to insert Email addresses saved in Contacts. (Only shown in Option menu when cursor is located in To/Cc/Bcc fields.)
Recently used: You can use the latest Email address you sent.
▶ Save to drafts: Select this menu to save the message in Drafts.
▶ View attachment: Shows the attached files. (This item is only available when some files have been attached.)
▶ Remove: Deletes the attachment file. (This item is only available when the files are already attached.)
▶ Input method: Select the desired dictionary mode.
▶ Add to dictionary: You can add a new word to the dictionary.
▶ Writing language: You can change the writing language.
▶ Set mail priority: You can configure the priority of the Email you wish to send.
5. When you have finished writing an Email, press OK to send the Email.
Messaging
Inbox
Menu 5.2
- You can view received messages. Select a message and then press OK to view the message.
- You can view the previous or next message by using (·, ·)
- To view a multimedia message (Notification), select Retrieve in the message notification view screen. The file is then transmitted, and you can view the file when the transmission is complete.
Note
Not supported for multimedia message (Notification) and WAP push messages.
Mailbox
Menu 5.3
- Select an Email account and then press to view the received Email list.
- In Email list, you can use the following functions by using the left soft key [Options].
▶ Reply: Creates a reply to the selected Email.
▶ Forward: Forwards the selected Email message to others.
▶ Retrieve (POP3 only): Retrieves new Email messages.
▶ Copy to (IMAP only): Copies the selected email.
▶ Search: Searches for the Email you want to find.
▶ Delete: Deletes the Email.
▶ Delete from server (POP3 only): Deletes the message or Email from server.
▶ Message synchronisation (IMAP only): Synchronises Email to retrieve Email server.
▶ Create new message: Creates a Message, Email or Voice message.
Mark/Unmark: Use mark/unmark option for multiple deletion.
▶ Set as read/unread: You can set the selected Email to read or unread.
Sort by: You can sort Email according to the conditions.
▶ Expunge (IMAP only): Removes the selected Email data.
▶ Message info.: Brief information on the message including size, type, date, time and filenames.
Drafts
Menu 5.4
You can view saved messages. Select a message and then press OK to edit the message.
You can use the following functions by using the left soft key [Options].
▶ Send: Sends the selected message.
▶ Call: You can make a voice call or a video call.
▶ Delete: Deletes the selected message.
▶ Create new message: You can write a new message or an Email.
Mark/Unmark: You can select one or more messages for multiple deletion.
▶ Filter: Displays messages by desired message types.
▶ Message info.: You can check the message type, date and time.
Outbox
Menu 5.5
The Outbox is a temporary storage place for messages waiting to be sent. Failed messages are also placed in Outbox. For example, Emails will be placed in Outbox if the Email account is not correctly configured.
- Select a message.
- You can use the following functions by using the left soft key [Options].
[For sending / waiting messages]
▶ Cancel sending: You can stop sending/waiting status.
▶ Create new message: You can write a new message or an Email.
▶ Message info.: Message information: You can check the message type, date, time, size and where it's saved.
[For a failed message]
▶ Resend: Resends the selected message.
▶ Save to drafts: You can send the message to drafts.
▶ Delete: Deletes the current message.
▶ Create new message: You can write a new message or an Email.
▶ Message info.: You can check the message type, date and time.
Sent items
Menu 5.6
Shows the messages you sent (Message/Email).
[Options]
▶ Forward: Forwards the selected message.
▶ Call: You can make a voice call or a video call.
▶ Delete: Deletes the selected message.
▶ Edit: You can edit the selected message.
▶ Create new message: You can write a new message.
Mark/Unmark: You can select one or more messages for multiple deletion.
Messaging
▶ Copy&Move: In case of SMS, you can copy the message into USIM or move the message into my folders/USIM
▶ Filter: Displays messages by desired message types.
▶ Message info.: You can check the message type, date and time.
My folders
Menu 5.7
You can move messages existed in Inbox or Sent messages into My folders, and then you can move those messages existed in My folders into the original message box.
Templates
Menu 5.8
Text templates (Menu 5.8.1)
You can add, edit, and delete frequently used useful phrases using the left soft key [Options].
Note
Depending on your service provider, useful phrases are saved as a default.
Multimedia templates
(Menu 5.8.2)
You can create, edit and view available templates when creating multimedia messages. Five types of template (Birthday, Greeting, Holiday, Thanks, Sorry) are saved by default.
Emoticons
Menu 5.9
You can add, edit and delete emoticons. You can insert the emoticon which you preferred on writing a message. If you press confirmation key, you can view the icon.
Settings
Menu 5.0
Text message (Menu 5.0.1)
You can configure text message related options.
- Text message centre: Input the address of the Text message centre.
- Delivery report: By enabling this option, you can verify whether your message has been sent successfully.
-
Validity period: This network service allows you to set how long your text messages will be stored at the message centre.
-
Message types: Text, Voice, Fax, X.400, Email Usually, the type of message is set to Text. You can convert your text into alternative formats. Contact your service provider for the availability of this function.
- Character encoding: Auto/ Default alphabet /Unicode.
▶ Auto: Message with single byte character is normally encoded in Default alphabet(GSM7). Message with double-byte character is automatically encoded in unicode(UCS2).
▶ Default alphabet: Message with even double byte character is encoded in single byte. Please note that double byte characters with accent may be converted into single byte character without accent.
▶ Unicode: Message is encoded in double byte. Please note that you may be charged double.
6. Send long text as: Select a long text message as Multiple SMS or MMS.
Multimedia message
(Menu 5.0.2)
You can configure Multimedia message related options.
- Retrieval mode: You can set the retrieval mode using Home network and Roaming network respectively. If you select Automatic, you will receive multimedia messages automatically. If you select Manual, you will only receive a notification message in the inbox and then you can decide whether to download multimedia messages or not.
- Delivery report: Allows you to determine whether to request a delivery confirmation mail to a recipient, and whether to allow sending a delivery confirmation mail to a sender.
▶ Request report: Determines whether to request a delivery confirmation mail for a Multimedia message.
▶ Allow report: Determines whether to allow sending a delivery confirmation mail for a delivery confirmation mail request. - Read reply: Allows you to determine whether to request a read confirmation mail to a recipient, and whether to allow sending a read confirmation mail to a sender.
Messaging
▶ Request reply: Determines whether to request a read confirmation mail for a Multimedia message.
▶ Allow reply: Determines whether to allow sending a read confirmation mail for a read confirmation mail request.
4. Priority: You can select the priority level of the messages (Low, Normal and High).
5. Validity period: Allows you to configure the term of validity for a message when transmitting a multimedia message. The message would be saved in the multimedia message server only for the configured term.
6. Slide duration: Allows you to configure the duration of each page when writing a message.
7. Delivery time: Configures the delivery time of message to the recipient. The Multimedia message centre will deliver the message after the delivery time.
8. Multimedia msg. centre: Allows you to configure network information such as the MMSC and the Internet profile, to send a multimedia message.
Email (Menu 5.0.3)
You can configure settings for receiving and transmitting emails.
- Email accounts: You can create or configure an Email account including the Email server and user ID.
- Allow reply Email: Determines whether to allow sending a read confirmation mail for a read confirmation mail request.
- Request reply Email: Determines whether to request a read confirmation mail.
- Retrieve interval: You can configure Retrieve interval to retrieve emails automatically from the incoming mail server. Please note that additional charges may be incurred using the Retrieve interval feature.
- Include message in Fwd. & Reply: Determines whether to include the original message when you forward the message or reply to it.
- Include attachment: Determines whether to include the attachment file when you forward the message.
-
Auto retrieval in Roaming: Retrieves Email account automatically when you move in roaming area.
-
New email notification: Receives the notification information when arriving new Email.
- Signature: You can configure a text signature to be attached to the end of an Email. The configured signature text is automatically or manually attached to the end of the Email when it is sent.
- Priority: You can select the priority level of Emails (Low, Normal and High).
You can send or receive the mail with a video file.
Voicemail (Menu 5.0.5)
You can send or receive the mail with a voice file.
Service message (Menu 5.0.6)
You can configure the option settings such as Push(SI/SL) messages.
▶ Service message: If you set On, all service messages will be received.
▶ Service security: You can manipulate the overall receipt options related to Push (SI/SL) messages.
Info. service (Menu 5.0.7)
Cell broadcast: You can set the reception status.
▶ Channels: You can add or modify the channels.
▶ Languages: You can select the language you want by pressing OK. Then, the info service message will be shown in the language that you have selected.
My stuff [Menu 6]
My images
Menu 6.1
The Pictures folder consists of embedded links for downloading pictures through the Internet and Default images.
Pictures taken using the camera are stored in the Pictures folder and you can create new folders to manage them.
When a file is selected, the following options will be displayed by pressing the left soft key [Options].
▶ Send: You can send the selected image via Message, Email or Bluetooth.
▶ Use as
- Wallpaper: You can set an image as the home screen theme.
- Contacts image: Assign a picture to a contact. You will see this picture when they are calling or you are dialling them.
- Start-up: You can set an image as the start up screen theme.
- Shut down: You can set an image as the shut down image.
▶ Move: Enables the file to be moved to another folder.
▶ Copy: Copies the file to another folder.
▶ Delete: Deletes the selected image.
▶ Mark/Unmark: Using the Mark function, you can send, delete, move and copy multiple files.
▶ File
- Rename: You can rename the image.
- Edit: Enables the image to be edited.
Note
The edit menu is not displayed in the default images folder.
- File info.: Shows information on the selected image file.
▶ Create new folder: You can create a new folder within the folder currently selected.
▶ Slide show: You can view the images as a slide show.
▶ Sort by: You can sort the files by date, file type or name.
▶ List view/Grid view: You can view the images as a List view or a Grid view.
▶ Memory manager: You can view the memory status (handset or external memory card).
My sounds
Menu 6.2
The Sounds folder consists of embedded links for downloading ringtones and music as well as folders containing the Default sounds and Voice recordings. Here you can manage, send or set sounds as ringtones.
When a file is selected, the following options will be displayed by pressing the left soft key [Options].
▶ Send: You can send the selected sound via Message, Email or Bluetooth.
▶ Use as
- Voice ringtone: You can set the sound file as a ringtone for incoming calls.
- Video ringtone: You can set the sound file as a ringtone for incoming video calls.
- Message tone: You can set the sound file as a new message alert.
- Start-up: You can set the sound file as your start up tone.
- Shut down: You can set the sound file as your shut down tone.
▶ File info.: Shows the information on the selected sound file.
▶ Sort by: You can sort the files by date, file type or name.
▶ Memory manager: You can view the memory status (handset or external memory card).
My videos
Menu 6.3
Here you can manage or send downloaded or captured videos clips.
If you press OK, you can activate the video file.
The following are available using the left soft key [Options] in the Video list.
▶ Send: You can send the selected video clip via Message, Email or Bluetooth.
▶ Use as: You can set the video file as voice ringtone or video ringtone.
▶ Move: Moves the file into handset memory or external memory.
▶ Copy: Copies the file in handset memory or external memory.
▶ Delete: Deletes the selected video.
Mark/Unmark: Using the Mark function, you can send, delete, move and copy multiple files.
▶ File
- Rename: You can rename the video.
- File info.: Shows information on the selected video file.
▶ Create new folder: You can create a new folder.
Sort by: You can sort files by name, date, or file type.
List view/Grid view: You can view the images as a List view or Grid view.
▶ Memory manager: Displays the memory status (handset or external memory card).
You can view a video using the video player. Video files are displayed in the list as thumbnails. You can select a desired video by using the / / . Select
a desired video and select Play to view the recorded video.
My stuff
▶ Landscape view: You can view the video in wide view mode.
Note
▶ You can also view the video in wide view mode by pressing #**.
▶ Mute/Unmute: Switch the sound on/off.
▶ Capture: You can save what is on the paused screen as an image file (only possible in Pause mode).
▶ Repeat: You can set the repeat option (Off/One/All).
▶ File info.: You can check information on files being played.
▶ Send: You can send the video via Message, Email or Bluetooth.
▶ Delete: Deletes the selected video.
▶ Use as: You can set the video file as a voice ringtone or video ringtone. This menu will change and is dependent upon the type of file selected.
My games & apps
Menu 6.4
You can easily download games and other applications in this menu. It may have two folders, no folders at all, or Games and Applications. The default folder can be dependent on the operator/country. Each folder has an embedded link for downloading games or applications. Please note that additional cost may be incurred when using online services.
Others
Menu 6.5
Other files except pictures, sounds, videos, games & applications are stored in this folder.
My memory card
Menu 6.6
If you purchase an optional external microSD memory card, you can manage more content. Refer to the section how to use a microSD memory card on page 19 and 20 to learn how to insert and remove the memory card.
You can manage content as you do on your phone.
Yahoo [Menu 7]
You can access Yahoo Mobile Internet Service.
▶ oneSearch: You can search for instant answers.
▶ Email: Shows your email account.
▶ Weather: Shows current conditions and forecasts for various locations worldwide. View the weather summary for your saved cities. Selecting Open, a detailed weather forecast for several cities.
▶ Local & Maps: Searching and browsing for local addresses, restaurants, bar, hotels and more.
▶ Content readers: Offer the variety of different contents: News, Finance, Entertainment and Sports
▶ Calendar and Address Book: You can access your appointments and all contact details on the go. Appointments and events from the calendar are also included in the Today view.
▶ Flickr: The Flickr widget allows you to share and maintain your photos on the go. When a user is signed up for Flickr you can see all photos of Flickr and your contacts.
Note
Some of countries are unable to access Yahoo! Go Service cause of network service.
Contacts [Menu 8]
Add new
Menu 8.1
You can register a new contact address. You can enter the name, different phone numbers and Email addresses of a new contact. You can also assign the contact to groups, include an image or avatar, assign a specific ringtone and even enter a memo for the contact.
Other available fields include Home page URL, Home address, Company name, Job title and company address.
You can enter and manage contact addresses depending on the memory usage.
Search
Menu 8.2
Performs the contact address search function. The search operation is performed based on a first name as a default. The current search method and results found are displayed in the Search window. You can make a phone call or send a message to the selected phone number. A Contacts search can be performed based on the phone number or group information.
Note
In Settings menu, the search operation can be performed based on the last name.
Speed dials
Menu 8.3
Using this menu you can manage speed dials. Speed dials are configured between 2-9. You can register speed dials for a specific contact address up to 5 different numbers, and a contact address may have multiple speed dials.
Groups
Menu 8.4
Using this menu you can manage group information (both stored in the Handset and the USIM). You can add, edit and delete groups. When a ringtone for a number is not specified, a call from the number sounds the group ringtone assigned to the number for the group.
Service dial numbers
Menu 8.5
You can view the list of Service Dialling Numbers (SDN) assigned by your service provider (if supported by the USIM card). Such numbers include emergency, directory enquiries and voice mail numbers. After selecting a service number, press to dial the service.
Own number
Menu 8.6
Allows you to display your phone number in the USIM card. You can save own numbers being used in the USIM card.
My business card
Menu 8.7
You can create your own business card by pressing the left soft key Add. After entering the name, number, Email and image, you can use it as a business card when sending the message.
Settings
Menu 8.8
Contact list settings (Menu 8.8.1)
▶ View contacts from: Select which contact information shall be displayed (from handset memory, from USIM card or both). All is the default setting.
▶ Namedisplay: You can set the display order by name.
▶ Showpicture: Select whether to display picture or not.
Synchronise contact (Menu 8.8.2)
You can send the contents of phonebook to the server directly.
Note
This service is not available in all countries. Please contact your service provider for further information.
Copy (Menu 8.8.3)
You can copy contacts from the phone memory to the USIM or from the USIM to the phone memory. You can copy all or selected entries at a time.
Contacts
Move (Menu 8.8.4)
You can move contacts from the phone memory to the USIM or from the USIM to the phone memory. You can move all or selected items at a time.
Send all contacts via
Bluetooth (Menu 8.8.5)
You can send all phonebook data in handset to other handset by using Bluetooth.
Backup contacts (Menu 8.8.6)
You can save all the phonebook data in the handset to an external memory card by the form of vcard.
Restore contacts (Menu 8.8.7)
You can restore all the phonebook data in an external memory card to the phone memory by the form of vcard.
Clear contacts (Menu 8.8.8)
Clears all contact information. You can delete all contacts in the mobile phone memory as well as on the USIM card.
Memory info. (Menu 8.8.9)
You can check the status of contacts memory in this menu.
Tools [Menu 9]
Quick menu
Menu 9.1
You can specify functions to save in the Quick menu. If you save the functions frequently used in the Quick menu, you can quickly start the functions simply by pressing key.
Alarms
Menu 9.2
If you set the alarm, the appears on the indicator bar. The specified alarm sounds at the scheduled time.
Press ☑ to stop the alarm, and the alarm is released. Press the left soft key [Snooze] and choose the snooze interval. The alarm sound stops and resumes after the selected Snooze duration. You can configure up to 5 alarms.
- Select your desired alarm to configure in the alarm list. If there is no alarm, press the left soft key [Add] to add a new alarm.
- Set/Cancel alarm: Set or cancel the alarm using the options for specifying whether the alarm is on or by choosing the alarm time.
-
Input alarm time: Input your desired alarm time by specifying Hour and Minute. Choose either 'AM' or 'PM' which is visible if 12 hour format is specified for the phone.
-
Select repeat mode: Select the desired repeat mode using [< (/) or select the desired one from the list by pressing left soft key [List].
- Select bell: Select the bell to ring at the alarm time opening the list by pressing left soft key [Edit].
- Input memo: Input alarm name.
- Snooze: You can set the snooze duration for the alarm.
Note
The alarm will go on even when the phone is switched off.
Calculator
Menu 9.3
The calculator module allows you to perform basic arithmetic functions such as addition, subtraction, multiplication, and division as well as some scientific functions. (sin, cos, tan, log, ln, exp, sqrt, deg, rad)
Tools
Stopwatch
Menu 9.4
This menu allows you to record the elapsed time of an event.
Converter
Menu 9.5
Using this menu, users can convert Currency, Surface, Length, Weight, Temperature, Volume and Velocity.
World time
Menu 9.6
The World time function provides time information on major cities worldwide.
STK(USIM service)
Menu 9.7
Depending on whether you have SAT support services or not (i.e. USIM Application Toolkit) on the USIM card, this menu (Menu 9.7) may be different. If the USIM card supports SAT services, this menu will be the operator-specific service name stored on the USIM card, for instance "Special". Please refer in that case to the information provided with your USIM card for further information on how to use the related options.
Browser [Menu \*]
Home
Menu *.1
You can launch the web browser and access the homepage of the activated profile on Browser settings.
Enter address
Menu *.2
You can manually enter a URL address and access the associated web page.
Bookmarks
Menu *.3
You can store frequently accessed or favourite URLs/Pages. Send, Add new, Edit, Mark/Unmark or Delete operations can be performed on Bookmarks. Several preconfigured URLs are stored as bookmarks.
RSS reader
Menu *.4
RSS reader provide news updates from websites registered in phone You read these files in Rss reader, which collects news from registered websites registered in your phone and provides it to you in a simple form.
Saved pages
Menu *.5
The phone can save the page on display as an offline file. Up to 20 pages can be saved.
History
Menu *.6
You can view the list of the pages you've already connected.
Settings
Menu *.7
You can change the settings for browser connectivity and display.
Profi les(Menu \*.7.1)
Select the appropriate profile by pressing. This will activate the profile to initiate the browser launch.
Appearance settings (Menu \*.7.2)
▶ Character encoding
Sets the browser default character.
▶ Scrolling control
Allows you to set the scroll speed by selecting the number of lines to scroll. Select from the menu either 1 line, 2 lines or 3 lines.
▶ Show image
Allows you to enable or disable the image display during browsing.
Browser
Note
Enabling this function will delay displaying images until the completion of transmission. Disabling this function will prevent the browser from downloading images from the server, thus allowing faster transmission.
▶ Java script
Select whether to turn JavaScript On or Off.
Cache (Menu \*.7.3)
Enabling Cache allows you to store accessed pages to your phone. Once a page has been stored in the Cache it will greatly enhance the page loading speed on subsequent browsing of the same page.
Cookies (Menu \*.7.4)
Enabling Cookie allows you to store cookies sent from the server. Disabling this function will prevent cookies from being stored on your phone.
Security (Menu \*.7.5)
Certifi cates list
Certificates can be viewed from the list.
Session clear
Secure (WTLS/TLS) session data can be cleared using this option.
Reset settings (Menu \*.7.6)
Select this to reset your phone to its default browser configuration.
Connectivity [Menu 0]
Bluetooth
Menu 0.1
Bluetooth connection
Your phone has built-in Bluetooth wireless technology which makes it possible for you to connect your phone wirelessly to other Bluetooth devices such as a handsfree, PC, PDA or other phones.
You can, for example, have a conversation via a cordless Bluetooth handsfree or browse the Internet, wirelessly connected via a mobile phone. You can also exchange, for example, business cards, calendar items and pictures.
Note
We recommend that your phone and the Bluetooth device you are communicating with be within a range of 10 meters. The connection may be improved if there are no solid objects between your phone and the other Bluetooth device.
- Getting started
- Menu → Connectivity → Bluetooth → Turn on/off
To use the Bluetooth function, you must first set Turn on.
- Configuring Bluetooth settings
- Menu → Connectivity → Bluetooth → Settings
- My device visibility: Set [My handset's visibility] to [Visible] so that other devices can detect your phone when they are searching for a Bluetooth device. If you select [Hidden], other devices will not be able to detect your phone when they are searching for a Bluetooth device.
- My device name: You can name or rename your phone as it will appear on other devices. Your phone's name will be shown on other devices only when [My handset's visibility] is set to [Visible].
- Supported services: You can view the list of devices such as hedsets and handsfree kits supported by this Bluetooth enabled phone.
- My address: You can check the address of Bluetooth.
Note
When user uses Bluetooth Device in the handset, the security of the handset is at risk. Therefore, we recommend that Bluetooth visibility be set to Hidden after configuration or device pairing. For incoming files via Bluetooth regardless of paired devices, you can choose to accept or reject the connection, after checking the sender details.
Connectivity
3. Search and pair new device
You can search new device as following menu.
- Menu → Connectivity → Bluetooth → Search new device
- To search for a Bluetooth device to pair, press New.
- Screen shows Searching for devices. Bluetooth devices within a range of 10m will be found.
- If Bluetooth devices are found, these devices are listed on the screen. If no Bluetooth device is found, you will be asked if you want to search again.
4. Pairing procedure
- Press OK. A window will appear on the screen asking you to enter your password.
- After creating a password (of 1 to 16 digits), the user of the other device must enter the password for pairing. The user of the other device must know the password in advance for authentication.
- Select a device to delete from the Paired devices screen.
- You can delete a device by pressing the Delete key or by selecting Options > Delete. To delete all paired devices, select Options > Delete All.
- To transmit data from your phone to another Bluetooth device, first select the application where the target data is saved. For example, to send data in the My Files to another device, select Menu → My stuff → My images / My Sounds / My Videos/ Others / External memory → Select data to transmit → Send → Bluetooth
2. Transmitting data
1) Paired device found is displayed. If the desired device does not exist in the list, select [Refresh].
2) Select the device to which you want to transmit data from the devices on the screen and press OK.
3) If the other party selects [Yes] for [Connection request], the data is transmitted.
Server sync
Menu 0.2
Note
This service is not available in all countries. Please contact your service provider for further information.
If Sync service is supported by your network operator, this service function synchronizes the data in a phone and the data on a server such as Contacts, Calendar, To do, and Memo via a wireless network.
USB connection mode Menu 0.3
You can activate USB connection mode of your phone for serveral usages. If you use Mass storage function like USB memory card, select Mass storage in this menu. Mass storage is available for only external memory card. If you use Data service such as PC suite application, select Data service in this menu.
Settings [Menu #]
Profiles
Menu #.1
You can select ringtone or vibration for an incoming call and configure the sound and volume of the ringtone, key tone, and sound effect, according to a profile.
Phone
Menu #.2
Auto key lock(Menu #.2.1)
If you activate this function, the keypad will be locked automatically after predefined delay time when the slide is closed.
Language(Menu #.2.2)
Select the display language. You can select Automatic language option to change display language to the USIM card supported language.
Power save(Menu #.2.3)
When you don't use a phone, you can save the power activating this menu.
Handset info. (Menu #.2.4)
This functions shows the USIM card telephone number, model name and software version of the mobile phone.
Screen
Menu #.3
This menu allows you to personalise the display options of the screens and of the menus entire graphic interface.
Screen theme (Menu #.3.1)
You can set the screen theme to be displayed on the main screen.
Home screen
▶ Wallpaper: You can select an image to be displayed on the main screen.
▶ Display items: You can select which items to display on the screen: Clock, Clock + Key guide, Dual clock, Key guide, Do not show, Calendar + Clock or Calendar
▶ Clock type: You can select the type of clock.
Clock font colour: You can select the colour of the clock's display.
Start up
You can select the image to be displayed while the phone is being switched on.
Shut down
You can select the image to be displayed while the phone is being switched off.
Menu style (Menu #.3.2)
You can select the desired menu style from Grid style and List Style.
Font (Menu #.3.3)
You can set the font style, dialling font size, and dialling font colour using [< (/) >]
Backlight (Menu #.3.4)
You can set the backlight duration and the brightness on the Home screen and the duration on the Keypad individually.
Handset theme (Menu #.3.5)
You can set the theme of handset: White or Black
Greeting message (Menu #.3.6)
You can insert the message when switching on the phone.
Date & Time
Menu #.4
Although the current time is automatically configured when the phone is registered to the network, users can configure the time and date directly using this menu. The time configured by the user is valid only while the phone is turned on.
Time
- Select the Time item from the Date & time list, and then press Done.
- Move to your desired field, Hour, Minute, or am/pm field using the navigation keys. (When you have selected 12 hour as Time format)
- Enter Hour, and Minutes using the number keys.
- Select the time format using [(/),]
- Scroll down to select the hour indicator format i.e. Off, Cuckoo clock or Chime bell.
- Press the Right soft key to set the time with the specified value.
Date
- Select the Date item from the Date & time list, and then press Done.
- Select the date format using (\/). >
- Enter Day, Month and Year using the number keys.
- Press the Right soft key to set the date with the specified value.
Auto update date/time
When Auto Update is configured to On, the time and date are automatically updated according to the current time zone. If Confirm first is selected, the time and date update is confirmed before it is updated automatically.
Daylight saving
Select whether to activate the daylight saving function or not. You can set the Summer time difference of selected home city for 1 hour or 2 hours.
Network
Menu #.5
Select Network (Menu #.5.1)
Select between Automatic and Manual.
▶ Automatic: Automatically searches for the network and registers the handset to the network. This is recommended for best service and quality.
▶ Manual: All the currently 2G(GSM) and 3G(UMTS) available networks are shown and you can select one of them for registration. If the registration of the network has failed, the network lists are listed again and you can select any other one for registration.
Note
When your handset lose the network in manual mode, the popup message to select the available network will be shown in the Idle screen.
Network mode (Menu #.5.2)
You can set a type of network to search for when networks are searched in the Select network menu.
Preferred lists (Menu #.5.3)
If the network is searching automatically, you can add a preferable network to be connected to.
Internet profiles
Menu #.6
This menu shows the Internet profiles. You can create new profiles, delete or edit them by using the Option Menu. However, you cannot delete or edit default configurations depending on country variant.
Access points
Menu #.7
This menu shows the access point list. You can create new profiles, delete or edit them by using the Option Menu. However, you cannot delete or edit default configurations depending on country variant.
Packet Data Conn. Menu #.8
If you select 'When available' menu, the phone is automatically registered to a GPRS network when you switch the phone on. But you select "When needed", the GPRS connection is established when you connect a WAP or application service and closed when you end the WAP or application connection.
Security
Menu #.9
PIN code request
When this is set to On, you are requested to enter your PIN each time you switch the phone on.
Note
▶ Press the right soft key in the PIN code entry window to return to the previous step.
▶ 3 incorrect PIN code entries would invalidate the PIN code. And you have to enter the PUK (PIN Unblock Key) code to configure the PIN code again.
The maximum number of times you may enter the PUK code is 10. (Note: If you enter an incorrect PUK code 10 times, the USIM card will be blocked and must be replaced.)
If the PIN code request cannot be disabled by operator settings, you will not be able to choose this menu item.
Handset lock
You can lock your phone. The following 4 lock functions are available.
When switching on: Locks the handset whenever the handset is switched on. If USIM changed: Locks the handset when the phone's USIM card has been changed.
Immediate: Locks the handset immediately.
None: Deactivates the lock function. You are requested to enter the security code to confirm the selection.
▶ To unlock the handset, you need to enter the security code.
Change codes
You can change the PIN, PIN2, and the mobile phone password.
PIN code
PIN is the abbreviation for Personal Identification Number, and is used to restrict use by an unauthorised user.
Note
Three incorrect PIN code entries in the PIN code entry window would invalidate the PIN code. In this case, you have to enter the PUK (PIN Unblock Key) code to configure the PIN code again. The maximum number of times you may enter the PUK code is 10. (Note: If you enter an incorrect PUK code 10 times, the USIM card will be blocked and must be replaced.)
PIN2 code
PIN2 is the abbreviation for Personal Identification Number 2, and is used to restrict use by unauthorised users as with the PIN. The PIN2 code change procedure is the same as the one for the PIN code. 3 incorrect PIN2 code entries would invalidate the PIN2 code. In this case, you have to enter the PUK2 code in order to use the PIN2 code again. The maximum number of times you may try to enter the PUK2 code is 10, like PUK1. 10 incorrect PUK2 code entries would invalidate the PIN2 code.
Security code
The security code is used to change the mobile phone password. The maximum number of attempts to enter the security code is not limited as it is with PIN and PIN2.
Memory manager Menu #.0
Handset common memory
(Menu #.0.1)
This function shows the status of the user memory of the mobile phone. Since this function scans the overall file system for statistics, a few seconds are required.
Handset reserved memory
(Menu #.0.2)
This function shows the status of the User reserved memory. The usual contents are Text msg, Contacts, Calendar, To do, Memo, Alarms, Call history, and Bookmarks. And it gives a clear illustration of the actual amount compared with the total amount for each item.
USIM memory (Menu #.0.3)
This function shows the status of the USIM card user memory.
External memory (Menu #.0.4)
This function shows the status of the External card user memory. This function displays the In-use and free memory usage statistics.
Primary storage setting
(Menu #.0.5)
You can select the storage to download the file: Handset memory or External memory.
Streaming settings Menu #.\*
If you want to set different network setting to play streaming content, you can set different network settings.
Reset settings Menu #.#
Select this to reset your phone to its default configuration. You are requested to enter the security code.
Accessories
There are various accessories for your mobile phone. You can select these options according to your personal communication requirements.
Travel Adapter
This charger allows you to charge the battery while away from home or your office.
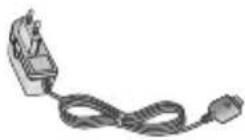
Stereo headset

natural_image
Line drawing of a handheld electronic device with earbuds and leads (no text or symbols)Standard Battery

Note
▶ Always use genuine LG accessories.
▶ Failure to do so may invalidate your warranty.
Accessories may vary in different regions: please check with our regional service company or agent for further information.
Technical data
General
Product name: KF311
System: GSM900/DCS1800/PCS 1900/WCDMA
Net weight: 67.5g (Without battery)
Ambient temperatures
Max: +55°C (Normal) / +45°C (Charging)
Min: -10^


natural_image
Blank white image with no visible content, text, or symbols简体中文
KF311 | 用户手册
natural_image
Front view of a LG mobile phone with control buttons and display screen (no visible text or symbols)目录
为了您的安全 6
关于安全有效使用手机的准则 7
KF311 功能 1 0
手机部件
使用入门 1 4
安装 USIM 卡和电池
为电池充电 1 6
断开充电器 1 7
如何使用 microSD 存储卡
存储卡格式化 1 8
开机/关机
常规功能 2 0
拨打电话和接听电话
接听电话 2 1
输入文本 2 2
菜单功能概览 2 4
游戏与应用程序 2 6
我的应用程序
设置
通话 27
拨打视频电话
通话记录
所有通话
拨出电话
已接来电
未接来电
通话时间
数据音量
通话费用
呼叫转接 28
呼叫限制
固定拨号 29
呼叫等待
常用设置
视频通话设置 30
管理器 3 1
日程表
任务
备忘录
私人备忘录 32
日期计算器
设置
日程表
通过蓝牙发送所有日程表和任务
备份日历和任务
恢复日历和任务
内存信息
全部清除
多媒体 3 3
照相机
摄像机 34
音乐 36
最近播放
所有曲目
艺术家
专辑
流派
播放列表
随机曲目
语音备忘录
信息 3 8
创建新信息
信息
电子邮件 39
收件箱 40
邮箱
草稿箱 41
发件箱
发件箱 42
我的文件夹
模板
文本模板
多媒体模板
图释
设置 43
文本信息
多媒体信息
电子邮件 44
视频信箱中心
语音邮件
服务信息 45
小区服务
[Figure]
[Unreadable]
目录
左软键/右软键
执行显示屏底部所示的功能。
呼叫结束键
natural_image
3D rendering of a mobile phone casing with internal components and an arrow indicating rotation (no text or symbols)插入 USIM 卡

natural_image
3D cutaway view of a mobile phone showing internal components and casing (no text or symbols)取出 USIM 卡
备注
3. 卸下电池。
natural_image
Close-up of a smartphone cable connector with an inset close-up showing internal components (no text or symbols visible)natural_image
Close-up of a hand inserting a cable into a smartphone (no visible text or symbols)如何使用 microSD 存储卡

<如何插入 microSD 存储卡>
natural_image
Close-up of a black flip phone with a USB cable inserted, showing the right side of its screen (no text or symbols visible)natural_image
Close-up of a mobile phone's front panel showing the door and cable connector (no text or symbols visible)natural_image
Line drawing of a pair of earphones with attached wires (no text or symbols)标准电池

备注

natural_image
Blank white image with no visible content, text, or symbolsMalay
natural_image
Front view of a LG mobile phone with control buttons and display screen (no visible text or symbols)Daftar Kandungan
Bahagian-bahagian telefon
Bermula 16
Memasang kad USIM dan bateri
Mengecas Bateri 18
Memutuskan sambungan pengecas 19
MENGHIDUPKAN/MEMATIKAN
Telefon 21
Fungsi Umum 22
Bahagian-bahagian telefon
Paparan terbuka

Kekunci lembut kiri/ Kekunci lembut kanan
natural_image
3D cutaway view of a mobile phone showing internal components and casing (no text or symbols)natural_image
3D rendering of a mobile phone casing with internal compartments and an arrow indicating rotation (no text or symbols)Bermula
Bermula
Mengecas Bateri
natural_image
Close-up of a smartphone with a magnified inset showing internal components (no text or symbols visible)natural_image
Hand inserting a plug into a smartphone (no text or symbols visible)natural_image
Close-up of a mobile phone with a scroll wheel and a USB tag, showing no visible text or symbols.natural_image
Close-up of a mobile phone's front panel showing a scroll and a USB tag, with no visible text or symbols.natural_image
Line drawing of a handheld electronic device with earbuds and leads (no text or symbols)Bateri Piawai

Nota

natural_image
Blank white image with no visible content, text, or symbols
LIMITED WARRANTY CARD
LG ELECTRONICS SINGAPORE PTE LTD
To benefit from the limited warranty, the customer is advised to read LG Electronics Singapore Pte Ltd Limited Warranty terms together with the Important and Care & Maintenance sections provided in the User's Manual
Limited Warranty
LG Electronics Singapore Pte Ltd warrants that LG Mobile Phones ("Lca") cellular products and/or genuine LG accessories ("Product") are free from defects in material and workmanship, according to the following terms and conditions:
-
The limited warranty for the mobile phone product, data products and all genuine LG accessories (except battery packs) extends for the first twelve (12) months beginning on the date of purchase of the Product.
-
The limited warranty for genuine LG battery packs extends for the first six (6) months beginning on the date of purchase of Product.
-
The limited warranty extends only to the original purchaser ("Customer") of the Product. It is not assignable or transferable to any subsequent purchaser-end user:
-
The limited warranty extends to only Product purchased in Singapore and distributed by LG Electronics Singapore Pte Ltd.
-
During the limited warranty period, LG Electronics Singapore Pte Ltd or its authorized service centres will repair or replace, at LG Electronics Singapore Pte Ltd option, any defective Products or parts thereof with new or factory rebuilt replacement items, and return the Product to the Customer in working condition. Customer will not be required to pay for other parts or labor in repairing or replacing the Product provided such defects are covered under the terms and conditions of this limited warranty card.
All replaced parts, boards and equipment shall become property of LG Electronics Singapore Pte Ltd. The external housing and cosmetic parts shall be
free of defects at the time of shipment and, therefore, shall not be covered under these limited warranty terms.
-
Repaired Product will be warranted for the balance of the original warranty period.
-
Upon request from LG Electronics Singapore Pte Ltd or authorized service centre, the Customer must provide purchase receipt or other information to prove the date and place of purchase.
-
WHAT THIS WARRANTY DOES NOT COVER:
(1) Defects or damages resulting from use of the product in other than its normal and customary manner.
(2) Defects or damages from abnormal use, abnormal conditions, improper storage, exposure to moisture or dampness, unauthorized modifications, unauthorized connections, unauthorized repair, misuse, neglect, abuse, accident, alteration, improper installation, or other acts which are not the fault of LG Electronics Singapore Pte Ltd, including damage caused by dropping, blown fuses, spills of food or liquid.
(3) Breakage or damage to antennas
(4) Defects or malfunctions of the Product not notified by customer during the warranty period.

LG ELECTRONICS SINGAPORE PTE LTD
(5) Products which have had the serial number or IMEI number removed or tampered with.
(5) This limited warranty is in lieu of all other warranties, express or implied either in fact or by operations of law, statutory or otherwise, including, but not limited to any implied warranty of marketability or fitness for a particular use.
(7) Damage resulting from use of non-LG approved accessories.
(8) All plastic surfaces and all other externally exposed parts that are scratched or damaged due to normal customer use.
(B) Products operated outside published maximum ratings.
(10) Products used or obtained in a rental program.
(11) Consumables (such as fuses).
(12) The defect or damage was caused by defective function of the cellular system or by inadequate signal reception by external antenna.
(13) The Product was used with or connected to accessory not supplied by LG, not fit for use with LG mobile phones or used in other than its intended use.
(14) The battery was short circuited or seals of the battery enclosure or cells are broken or show evidence of tampering or the battery was used in equipment other than its intended use.
9. CONDITIONS:
No other express warranty is applicable to this product. THE DURATION OF ANY IMPLIED WARRANTIES, INCLUDING THE IMPLIED WARRANTY OF MARKETABILITY, IS LIMITED TO THE DURATION OF THE EXPRESS WARRANTY HEREIN. LG ELECTRONICS SINGAPORE PTE LTD SHALL NOT BE LIABLE FOR THE LOSS OF THE USE OF THE PRODUCT, INCONVENIENCE, LOSS OR ANY OTHER DAMAGES, DIRECT OR CONSEQUENTIAL, ARISING OUT OF THE USE OF, OR INABILITY TO USE, THIS PRODUCT OR FOR ANY BREACH OF ANY EXPRESS OR IMPLIED WARRANTY, INCLUDING THE IMPLIED WARRANTY OF MARKETABILITY APPLICABLE TO THIS PRODUCT.
-
LG Electronics Singapore Pte Ltd neither assumes nor authorizes any authorized service centre or any person or entity to assume for it any other obligation or liability beyond that which is expressly provided for in this limited warranty.
-
All warranty information, product features and specifications are subject to change without notice.

LG ELECTRONICS SINGAPORE PTE LTD
Customer's Copy
LIMITED WARRANTY CARD
LG Mobile Phone Customer Care Centre
3 Lang Kee Road Singapore 150087
Tel: 08516512-0557
Web: www.lgs.com.sg
Operating hours
Mon - Fri : 8:30am - 5:30pm
Sat: 8:30am - 2:00pm
The customer must produce this Limited Warranty Card and the original proof of purchase when sending in the LG mobile phone to LG Mobile Phone Customer Care Centre for repair. In the event that either of these documents is not produced, service charges together with the payment for any parts being replaced are applicable and the Customer will be charged accordingly.
| Model No. | Owner's Name | |
| Address | Contact No(H) | |
| IMEI No. | ||
| Serial No. | (O) | |
| Date of Purchase | Authorized Dealer's StampFor limited warranty provided by LO to be valid, the Dealer's stamp must be ordered on this card | |
| Handphone No. | ||
| Remarks | ||

LG ELECTRONICS SINGAPORE PTE LTD
Please
Affix
Stamp
Here

LG Mobile Phone Customer Center
3 Leng Kee Road
Singapore 159087
Tel : 65120577
Fax:64795598
LG Electronics Singapore Pte Ltd's copy
LIMITED WARRANTY CARD
Please fill up the following and mail back to LG Electronics Singapore Pte Ltd within 7 days from date of purchase to validate the limited warranty for your LG mobile phone.
| Model No. | Owner's Name | |
| Address | Contact No(H) | |
| IMEI No. | ||
| Serial No. | (O) | |
| Date of Purchase | Authorized Dealer's StampFor limited warranty provided by LG to be valid, the Dealer's stamp must be endorsed on this card | |
| Handphone No. | ||
| Remarks | ||

LG ELECTRONICS SINGAPORE PTE LTD

LIMITED WARRANTY CARD
LG Electronics (M) Sdn Bhd
To benefit from the limited warranty, the customer is advised to read LG Electronics (M) Sdn Bhd. Limited Warranty terms together with the Important and Care & Maintenance sections provided in the User's Manual.
Limited Warranty
LG Electronics (M) Sdn Bhd warrants that LG Mobile Phones ("@u") cellular products and/or genuine LG accessories ("Product") are free from defects in material and workmanship, according to the following terms and conditions:
-
The limited warranty for the mobile phone product, data products and all genuine LG accessories (except battery packs) extends for the first twelve (12) months beginning on the date of purchase of the Product.
-
The limited warranty for genuine LG battery packs extends for the first six (6) months beginning on the date of purchase of Product.
-
The limited warranty extends only to the original purchaser ("Customer") of the Product. It is not assignable or transferable to any subsequent purchaser/end user.
-
The limited warranty extends to only Product purchased in Malaysia and distributed by Authorized distributors.
-
During the limited warranty period, LG Electronics (M) Sdn Bhd or its authorized service centres will repair or replace, at LG Electronics (M) Sdn Bhd option, any defective Products or parts thereof with new or factory rebuilt replacement items, and return the Product to the Customer in working condition. Customer will not be required to pay for either parts or labor in repairing or replacing the Product provided such defects are covered under the terms and conditions of this limited warranty card.
All replaced parts, boards and equipment shall become property of LG Electronics (M) Sdn Bhd. The external housing and cosmetic parts shall be
free of defects at the time of shipment and, therefore, shall not be covered under these limited warranty terms.
-
Repaired Product will be warranted for the balance of the original warranty period.
-
Upon request from LG Electronics (M) Sdn Bhd or authorized service centre, the Customer must provide purchase receipt or other information to prove the date and place of purchase.
-
WHAT THIS WARRANTY DOES NOT COVER:
(1) Defects or damages resulting from use of the product in other than its normal and customary manner.
(2) Defects or damages from abnormal use, abnormal conditions, improper storage, exposure to moisture or dampness, unauthorized modifications, unauthorized connections, unauthorized repair, misuse, neglect, abuse, accident, alteration, improper installation, or other acts which are not the fault of LG Electronics (M) Scn Bhd, including damage caused by dropping, blown fuses, spills of food or liquid.
(3) Breakage or damage to antennas
(4) Defects or malfunctions of the Product not notified by customer during the warranty period.

LG Electronics (M) Sdn Bhd
(5) Products which have had the serial number or IMEI number removed or tampered with.
(6) This limited warranty is in lieu of all other warranties, express or implied either in fact or by operations of law, statutory or otherwise, including, but not limited to any implied warranty of marketability or fitness for a particular use.
(7) Damage resulting from use of non-LG approved accessories.
(6) All plastic surfaces and all other externally exposed parts that are scratched or damaged due to normal customer use.
(5) Products operated outside published maximum ratings.
(10) Products used or obtained in a rental program.
(11) Consumables (such as fuses).
(12) The defect or damage was caused by defective function of the cellular system or by inadequate signal reception by external antenna.
(13) The Product was used with or connected to accessory not supplied by LG, not fit for use with LG mobile phones or used in other than its intended use.
(14) The battery was short circulated or seals of the battery enclosure or cells are broken or show evidence of tampering or the battery was used in equipment other than its intended use.
-
CONDITIONS: No other express warranty is applicable to this product. THE DURATION OF ANY IMPLED WARRANTIES, INCLUDING THE IMPLED WARRANTY OF MARKETABILITY, IS LIMITED TO THE DURATION OF THE EXPRESS WARRANTY HEREIN. LG ELECTRONICS (M) SDN BHD SHALL NOT BE LIABLE FOR THE LOSS OF THE USE OF THE PRODUCT, INCONVENIENCE, LOSS OR ANY OTHER DAMAGES, DIRECT OR CONSEQUENTIAL, ARISING OUT OF THE USE OF, OR INABILITY TO USE, THIS PRODUCT OR FOR ANY BREACH OF ANY EXPRESS OR IMPLIED WARRANTY, INCLUDING THE IMPLIED WARRANTY OF MARKETABILITY APPLICABLE TO THIS PRODUCT.
-
LG Electronics (M) Sdn Bhd neither assumes nor authorizes any authorized service centre or any person or entity to assume for it any other obligation or liability beyond that which is expressly provided for in this limited warranty.
-
All warranty information, product features and specifications are subject to change without notice.

LG Electronics (M) Sdn Bhd
Customer's Copy
LIMITED WARRANTY CARD
© LG Electronics (M) Sdn Bhd (50666-U)
Level 1 & 2, Kelana Brem Tower 2, Jalan Stadium SS 7/15, 47301 Kelana Jaya, Selangor Darul Ehsan, Malaysia. LG Customer Care Line 1800-822-822 Opening Hours: 9.00am to 6.00pm (Mon-Fri)
The customer must produce this Limited Warranty Card and the original proof of purchase when sending in the LG mobile phone to LG Mobile Phone. Customer Care Centre for repair. In the event that either of these documents is not produced, service charges together with the payment for any parts being replaced are applicable and the Customer will be charged accordingly.
| Model No. | Owner's Name | |
| Address | Contact No(H) | |
| IMEI No. | ||
| Serial No. | (O) | |
| Date of Purchase | Authorized Dealer's StampFor limited warranty provided by LG to be valid, the Dealer's stamp must be enforced on this card | |
| Handphone No. | ||
| Remarks | ||
| Authorized Service Centre – Hello Service Centre | ||||
| HeadquartersLared 1 & 2, Kalara Drive Tower 2,Jalan Stadium 55719,4700 Kalara Jaya, Selenger | Penang Branch30A, Julan Ar Khan,1050 Penang | Johore Banara Branch20T, Taman Janor Jaya,81106 Janor Bara, Jahan. | Headquarters1st Floor, Menara 904,Pilata Haryana, Selon Hio,55700 KL | Malacca BranchNo. 561, Ged Floor,Jalan Haryana Plaza 8,Taman Medina Plaza,75000 Malacca. |
| Itoh BranchNo. 6, Medan Itoh 4,Medan Iton, Itoh31400 Itoh, Pansh | Malacca Branch357A & 357K-1, Penirggi Centre,Taman Penirggi Plaza,75400 Malacca. | Kuaritan BranchA-205, Jalan Puhu,25300 KuaritanPahang | Kuaritan BranchNo. 5-300, Fren Beach Hills,Jh Desarah, 25000 KuaritanPenang. | Itoh BranchNo. 26A, Pensionsn Greentown 1,Pasi Perdagapan Greentown30450 Iton, Pansh |
| Sabah BranchLot 7, Grid 1st Floor,(DBOX Shop No 5-3-6-5-1),(Dib 8, Bananda Centre,Oll Ring Road,84500 Kana Kirabak, Sabah, | Earamak BranchLot 9835, Ged A 1st Floor,Sedion 84, KTLO, Jahan Pending,30400 Kuching, Earamak. | K/Kinabaka BranchSuite 1-0-211, 5th Floor,CPS Tower,No 1, Jr. Center Point,88000 K, Kinabaka. | Kuching BranchLot 2080, No 240, Grid Floor,Tehr Tower Centre,P., Milb, Rock Road,90200 Kuching. | |
Please
Affix
Stamp
Here

LG Electronics (M) Sdn Bhd (50566-U)
Level 1 & 2, Kelana Brem Tower 2, Jalan Stadium SS 7/15, 47301 Kelana Jaya, Selangor Darul Ehsan, Malaysia.
Tel: 603-7491 2888 Fax: 603-7491 9209
LG Electronics (M) Sdn Bhd
LIMITED WARRANTY CARD
Please fill up the following and mail back to LG Electronics (M) Sdn Bhd within 7 days from date of purchase to validate the limited warranty for your LG mobile phone.
| Model No. | Owner's Name | |
| Address | Contact No(H) | |
| IMEI No. | ||
| Serial No. | (O) | |
| Date of Purchase | Authorized Dealer's StampFor limited warranty provided by LG to be valid, the Dealer's stamp must be endorsed on this card | |
| Handphone No. | ||
| Remarks | ||

LG Electronics (M) Sdn Bhd
MemoMemo
MemoMemo
- Date finder
- Settings
- Camera
- Messaging 40
- Create new message
- Mailbox
- Outbox
- Sent items
- Templates
- Emoticons
- Tools 55
- Browser 57
- Connectivity 59
- Bluetooth
- Settings 62
- Profiles
- Phone
- Screen
- Technical data 69
- For Your Safety
- WARNING!
- CAUTION!
- Guidelines for Safe and Efficient Use
- Exposure to radio frequency energy
- Radio wave exposure and Specific Absorption Rate (SAR) information
- Product care and maintenance
- Efficient phone operation
- Electronics devices
- Road safety
- Avoid damage to your hearing
- Blasting area
- Potentially explosive atmospheres
- In aircraft
- Children
- Emergency calls
- Battery information and care
- KF311 Features
- Parts of the phone
- Left soft key/ Right soft key
- Call End key
- Clear key
- Send key
- Getting Started
- Installing the USIM card and battery
- Installing the USIM card.
- Note
- Installing the battery.
- To remove the battery.
- Charging the Battery
- Disconnecting the charger
- How to use a microSD memory card
- Attention:
- Memory card formatting
- Turning Handset ON/OFF
- Turning your handset on
- Turning your handset off
- Emergency call function
- General Functions
- Making and answering calls
- Making a voice call
- Making a video call
- Making a call from the call logs
- Making a voice/video call from Contacts
- Making international calls
- Answering a call
- Shortcut to activate silent mode
- Signal strength
- Entering text
- Changing the text input mode
- Using the T9 Mode
- Using the ABC Mode
- Using the 123 (Number) mode
- Using the symbol mode
- Overview of Menu Functions
- Games & Apps [Menu 1]
- My games & apps Menu 1.1
- Calling [Menu 2]
- Make video call
- Call logs
- All calls (Menu 2.2.1)
- Dialled calls (Menu 2.2.2)
- Received calls (Menu 2.2.3)
- Missed calls (Menu 2.2.4)
- Call durations
- Data volume
- Call costs
- Calling
- Call divert
- When no call diverts exist
- When call diverts are already set
- Option menu
- Call barring
- Voice and Video calls
- Deactivate all
- Fixed dial numbers Menu 2.8
- ▶ Turn on/ Turn off
- Call waiting
- Common setting
- Call reject
- Send my number
- Auto redial
- Answer mode
- Minute minder
- BT answer mode
- Save new number
- Slide close setting
- Select line (SIM dependent)
- Video call setting
- Organiser [Menu 3]
- Calendar
- Schedule inquiry and search
- Reference by Months
- Detailed reference
- Add new event
- Delete all schedules
- Set up and release holiday
- Schedule notification
- To do
- Memo
- Organiser
- Secret memo
- Calendar (Menu 3.6.1)
- Send all calendar & to do via Bluetooth (Menu 3.6.2)
- Backup calendar & To do
- Restore calendar & To do
- Memory info. (Menu 3.6.5)
- Clear all (Menu 3.6.6)
- Multimedia [Menu 4]
- Multimedia
- Video camera
- Music
- Recently played (Menu 4.3.1)
- All tracks (Menu 4.3.2)
- Artists (Menu 4.3.3)
- Albums (Menu 4.3.4)
- Genres (Menu 4.3.5)
- Playlists (Menu 4.3.6)
- Shuffle tracks(Menu 4.3.7)
- Voice recorder
- Messaging [Menu 5]
- Message(Menu 5.1.1)
- Option menus in Message field
- Email (Menu 5.1.2)
- Messaging
- Inbox
- Drafts
- [For sending / waiting messages]
- [For a failed message]
- [Options]
- My folders
- Text templates (Menu 5.8.1)
- Multimedia templates
- Text message (Menu 5.0.1)
- Multimedia message
- Email (Menu 5.0.3)
- Voicemail (Menu 5.0.5)
- Service message (Menu 5.0.6)
- Info. service (Menu 5.0.7)
- My stuff [Menu 6]
- My images
- My sounds
- My videos
- My stuff
- My games & apps
- Others
- My memory card
- Yahoo [Menu 7]
- Contacts [Menu 8]
- Add new
- Search
- Speed dials
- Groups
- Service dial numbers
- Own number
- My business card
- Contact list settings (Menu 8.8.1)
- Synchronise contact (Menu 8.8.2)
- Copy (Menu 8.8.3)
- Contacts
- Move (Menu 8.8.4)
- Send all contacts via
- Bluetooth (Menu 8.8.5)
- Backup contacts (Menu 8.8.6)
- Restore contacts (Menu 8.8.7)
- Clear contacts (Menu 8.8.8)
- Memory info. (Menu 8.8.9)
- Tools [Menu 9]
- Quick menu
- Alarms
- Calculator
- Tools
- Stopwatch
- Converter
- World time
- STK(USIM service)
- Browser [Menu \*]
- Home
- Enter address
- Bookmarks
- RSS reader
- Saved pages
- History
- Profi les(Menu \*.7.1)
- Appearance settings (Menu \*.7.2)
- Browser
- ▶ Java script
- Cache (Menu \*.7.3)
- Cookies (Menu \*.7.4)
- Security (Menu \*.7.5)
- Certifi cates list
- Session clear
- Reset settings (Menu \*.7.6)
- Connectivity [Menu 0]
- Connectivity
- Search and pair new device
- Pairing procedure
- Transmitting data
- Server sync
- USB connection mode Menu 0.3
- Settings [Menu #]
- Auto key lock(Menu #.2.1)
- Language(Menu #.2.2)
- Power save(Menu #.2.3)
- Handset info. (Menu #.2.4)
- Screen theme (Menu #.3.1)
- Home screen
- Start up
- Shut down
- Menu style (Menu #.3.2)
- Font (Menu #.3.3)
- Backlight (Menu #.3.4)
- Handset theme (Menu #.3.5)
- Greeting message (Menu #.3.6)
- Date & Time
- Time
- Date
- Auto update date/time
- Daylight saving
- Network
- Select Network (Menu #.5.1)
- Network mode (Menu #.5.2)
- Preferred lists (Menu #.5.3)
- Internet profiles
- Access points
- Packet Data Conn. Menu #.8
- Security
- PIN code request
- Handset lock
- Change codes
- PIN code
- PIN2 code
- Security code
- Memory manager Menu #.0
- Handset common memory
- Handset reserved memory
- USIM memory (Menu #.0.3)
- External memory (Menu #.0.4)
- Primary storage setting
- Streaming settings Menu #.\*
- Reset settings Menu #.#
- Accessories
- Travel Adapter
- Stereo headset
- Standard Battery
- Technical data
- General
- Ambient temperatures
- KF311 | 用户手册
- 目录
- 左软键/右软键
- 呼叫结束键
- 备注
- 卸下电池。
- 如何使用 microSD 存储卡
- <如何插入 microSD 存储卡>
- 标准电池
- Daftar Kandungan
- Bermula 16
- Fungsi Umum 22
- Bahagian-bahagian telefon
- Paparan terbuka
- Kekunci lembut kiri/ Kekunci lembut kanan
- Bermula
- Mengecas Bateri
- Bateri Piawai
- Nota
- LIMITED WARRANTY CARD
- Limited Warranty
- CONDITIONS:
- Customer's Copy
- LG Mobile Phone Customer Center
- LG Electronics Singapore Pte Ltd's copy
- LG Electronics (M) Sdn Bhd (50566-U)
- LG Electronics (M) Sdn Bhd
- MemoMemo
Brand : LG
Model : KF311
Category : Mobile Phone