
WH903P - Water heater Khind - Free user manual and instructions
Find the device manual for free WH903P Khind in PDF.


| Product Type | Storage Water Heater |
| Brand | Khind |
| Model | WH903P |
| Capacity | 90 liters |
| Power Rating | 3000 W |
| Voltage | 220-240 V ~ 50 Hz |
| Water Connection | G 1/2 inch |
| Max Water Pressure | 0.6 MPa |
| Temperature Range | 30°C - 75°C |
| Heating Element | Copper immersion heater |
| Tank Material | Enamel-coated steel |
| Insulation | Polyurethane foam |
| Safety Features | Thermostat, thermal cut-off, pressure relief valve |
| Dimensions (H x W x D) | 860 x 460 x 460 mm |
| Weight (empty) | 25 kg |
| Control Type | Dial knob |
| Water Tank Protection | Magnesium anode rod |
| Color | White |
| Mounting | Wall-mounted |
| Warranty | 1 year (parts & labor), 5 years on tank |
Frequently Asked Questions - WH903P Khind
User questions about WH903P Khind
0 question about this device. Answer the ones you know or ask your own.
Ask a new question about this device
Download the instructions for your Water heater in PDF format for free! Find your manual WH903P - Khind and take your electronic device back in hand. On this page are published all the documents necessary for the use of your device. WH903P by Khind.
USER MANUAL WH903P Khind
Please read this manual carefully before operating this product. Keep this manual handy for further reference.
This manual is also available online.
Parts identification
External Parts Identification


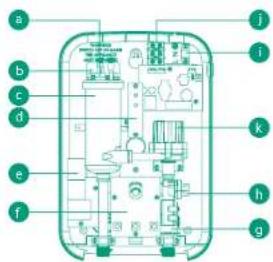
Internal Parts Identification


- Power ON Indicator
- ELSD ON Indicator
- Power/Temperature Control Knob
- ELSD Test Button
- ELSD Reset Button
- Shower Head
- Shower Rail
- Shower Hose
- Filter Valve
- Flow Regulator Valve
- Pump ON/OFF Button (for WH903P only)
- Pump Indicator (for WH903P only)
a. 2-in-1 Manual Reset Thermal-cut-out
&Thermostat
b. Thermistor
c. HeaterTank
d. PCB (Indicator)
e. PCB (ELSD)
f. PCB (Push Button & Control)
g. Flow Switch
h. Triac
i. Cable Clip
J. Terminal Block
k. Pump (for WH903P)
Specifications
| Model | : WH803 | WH903P |
| Voltage | : 240V~50/60Hz | 240V~50/60Hz |
| Heater Power | : 3.75kW | 3.75kW |
| Pump Type | : - | DC Pump |
| Pump Power rating | : - | 50W |
| Noise Level | : - | <40dB |
| Water Connection | : 15mm (1/2" BSP),Single Point System | 15mm (1/2" BSP),Single Point System |
| Operating Connection | : Open Outlet | Open Outlet |
| Protection Against Electric Shock | : Class I | Class I |
| Degree of Protection | : IP25 | IP25 |
| Minimum Water Flow Rate | : 3 Litres / minute | 3 Litres / minute |
| Minimum Water Pressure | : 20 kPa (0.2 bar/ 2.9 psi) | 20 kPa (0.2 bar/ 2.9 psi) |
| Maximum Water Pressure | : 0.3 Mpa (3bar/43.5psi) | 0.3 Mpa (3bar/43.5psi) |
| Product Dimension (WxLxH) | : 340x240x95mm | 340x240x95mm |
| Net Weight (kg) | : 1.8kg | 2.5kg |
*Specifications are subject to change without prior notice.
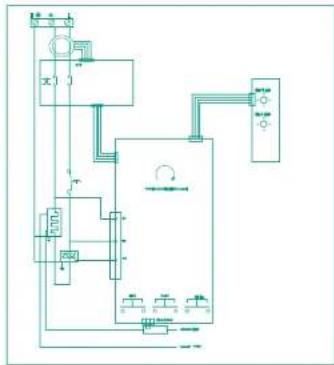
Schematic diagram
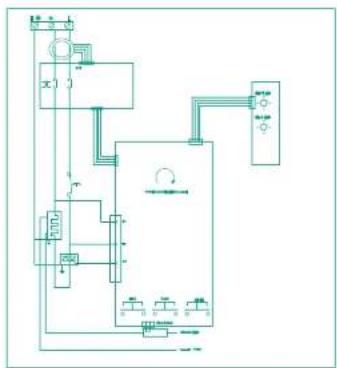
flowchart
graph TD
    A["Power Source"] --> B["Switch 1"]
    B --> C["Capacitor"]
    C --> D["Measurement Instrument"]
    D --> E["Ground"]
    F["Current Source"] --> G["Switch 2"]
    G --> H["Capacitor"]
    H --> I["Measurement Instrument"]
    I --> J["Ground"]
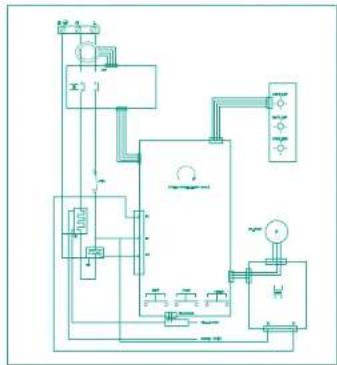
flowchart
graph TD
    A["Power Source"] --> B["Switch"]
    B --> C["Measurement Instrument"]
    C --> D["Control Unit"]
    D --> E["Output"]
    style A fill:#f9f,stroke:#333
    style E fill:#bbf,stroke:#333
WH903P (DC Pump)WH803
General product information
This is continuous flow instantaneous water heater. Flow-controlled and designed to withstand the full main pressure, and the continuous flow instantaneous water heater will supply hot water whenever you need it.
The main features of our continuous flow water heaters are:
• High energy conversion efficiency
- Small size
- Point-of use installation for single tap connection
Safety precaution
- Please read this manual thoroughly and understand the content before use.
- Check if the main supply voltage is matched with the voltage stated on the rating plate of the water heater.
- Installation of water heater must be carried out by an authorised or qualified technician.
- DO NOT attempt to repair the water heater without qualified technician.
- DO NOT switch on the water heater if there is a possibility that the water in the heater is frozen.
-
DO NOT install INLET & OUTLET of water heater reversely.
-
DO NOT install the water heater where there is consistent spray directly over the unit.
-
DO NOT connect the OUTLET to any tap or fitting that is not recommended by the manufacturer.
-
DO NOT block the water heater outer in any way.
-
The spray head (shower head) must be descaled regularly.
-
To ensure perfect functioning of the heater, certain minimum water flow level must be guaranteed (Refer Product Specification).
-
Separate electric circuits must be provided for the water heater.
-
Test water temperature with hand before using the the water heater. Be careful to avoid scalding by hot water.
-
Check the ELSB once a month and consult professional for repair if there is any malfunction.
-
Metallic/chromed flexible hose and conductive control valve shall not be used.
-
This appliance is not intended for use by persons (including children) with reduced physical, sensory or mental capabilities, or lack of experience and knowledge, unless they have been given supervision concerning use of the appliance by a person responsible for their safety. Children should be supervised to ensure that they do not play with the appliance.
-
DO NOT leave the hand shower idle in the pail.
-
Do not use plumbing cement on connection. If necessary, use only thread or sealing tape.
-
This appliance must be earthed.
-
This appliance is intended for household use only. Not for commercial use or outdoor use.
-
It is forbidden to place flammable and explosive materials near the water heater.
-
Please install the water heater on a secure and solid wall.

Cleaning & maintenance
Clean filters regularly
Remove the Regulator Valve Insert from the regulator valve assembly. Take out the Filter Plate Unit as shown and flush it with water to remove any trapped particle. Slot back the Filter Plate Unit to its original position and secure it.
Adjustment of Regulator Valve
Turn the knob clockwise to have the maximum water volume in low water pressure areas. In high water pressure areas, turn the knob anticlockwise until the desired shower temperature is attained.

General Maintenance
• DO NOT use thinner, alcohol or petrol.
Clean the heater with a damp cloth and mild detergent but do not use thinner, alcohol, petrol or any other organic solution.
• Shower head must be periodically clean to ensure no blockage occurred.
- Check and clean the filter mesh inside the regulator valve regularly.
Installation

CAUTION: THIS APPLIANCE MUST BE EARTHED.
General Installation Instructions
- Installation must be carried out by a qualified electrician with close reference to the operation manual and in compliance with the local regulations.
- The water heater must only be installed and operated in a room free from frost.
- The screws and wall plugs required for mounting the water heater are included in the delivery. Note: The control knob(s) are integral part of the cover, do not attempt to remove them.
- Mark mounting position
- Unscrew the bottom retained screw and lift the cover from the back plate.
- Use the back plate as the template and mark the three fixing holes.
- Drill the holes and insert the wall plugs.
- Insert the cables through the cable entry of the water heater.
• Fit the water heater to the secure solid wall.
Heater INLET and OUTLET Connection
- All the plumbing works should be completed before proceeding to electrical wiring connection.
- INLET and OUTLET connection of the heater unit should not be reversed, with Flow Regulator Valve Assembly installed on INLET.

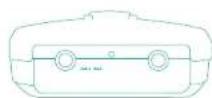
Bottom View
Flow Regulator Valve Assembly installed on INLET
Installation Installation
- Turn off the water supply at the isolating regulator valve. Connect the main water supply to the inlet of the water heater using 15mm Air Inlet Hose.
- Turn on the main water supply and check for leaks in the pipe work connection to the water heater.
- Connect Flexible Shower Hose to water heater OUTLET. Turn on the water mains to drain out all the plumbing dirt and fill up the heater tank.
Then, connect the Flexible Shower Hose to the hand shower head.
Note : The conical end of the Flexible Shower Hose should be fitted to the shower head.
- Place the shower head in the holder.
- Shower head must be periodically clean to ensure no blockage occurred.
WARNING: Metallic / chromed hose and conductive control valve shall not be used.
Fitting the Shower set
• Fit the two end brackets to the Rod
- Place the brackets with rod onto the wall and mark the position on the two screw holes.
- Fit the end brackets, holder and rod onto the wall with the wall plugs and screws.
• Fit the Flexible Shower Hose to the shower head.
Electrical Connections
IMPORTANT NOTE!
SWITCH OFF THE MAIN SUPPLY BEFORE ELECTRICAL WORK
Note:
- The water heater must be permanently connected to the electricity supply, direct from the consumer unit via a double poles linked switch with a minimum contact gap of 3mm in both poles.
- The main switch of the water heater must be located outside the bathroom.
- The wiring must be connected to the main switch without the use of a plug or socket outlet.
- The cable size required is determined by the kW rating of the water heater and the distance between the water heater and the consumer unit. If you are in any doubt, consult a qualify electrician.
- The electrical rating of the water heater is shown on the rating label within the unit. (Refer to schematic wiring diagram)
Procedure
- Ensure electricity supply is switched off. The cable can be surface clipped, hidden or via conduit. Note : Conduit entry can only from rear.
- Route the cable into the water heater and connect to the terminal block as follows:-
Live Cable (White or Red) to terminal marked L
Neutral cable (Blue or Black) to terminal marked N
Earth cable (Green or Green/Yellow) to terminal marked E
Important: Ensure that the terminal block screws are fully tightened and that no cable insulation is trapped under the screws.
- The cable clamp must be used to secure the cable, the clamp is suitable for 6mm^2 cable or can be reversed for 10mm^2 cable.
- If cable larger than 10mm^2 is used, do not use the cable clamp but the cable must then be secure either by routing through conduit or in trunking or embedding in the wall, in accordance with IEE regulation.

• This appliance must be earthed.
- Do not switch on the electricity supply until the cover had been fitted.
- Notice: User is advised to test the built-in ELSD at least once a month.
Replacing the cover
- Note: It is necessary to engage the knobs in the correct position onto the spindles before the cover is located.
- Secure the cover with the screw provided. Remove the shower head from the flexible hose and point it to waste.
- Important: Turn the water valve fully open and let the water flow through the water heater to release any air which may be in the system and fill the water heater with water. The water heater must be full of water before heat setting are used.
- The water heater is now ready to use. We recommend that you allow your water heater to reach a stable temperature before you commence showering.
Test Run of Heater
a. Turn on the regulator valve and water should spray out from the shower head.
b. Switch on the main power supply - "POWER" LED would light up.
c. Turn on the temperature control knob clockwise to accelerate water flow.
d. The water should be warmed in a few seconds.
e. Test the ELSD by pressing "TEST" button. The unit should be tripped.
f. "POWER" and "ELSD" LED would light off.
g. Press "RESET" button. The unit will resume the earth leakage fault back to normal and the ELSD light on.
h. The heater is now ready for use.
How to use
Operating the heater
Power/ Temperature Control Knob

• The Control Knob has variable settings: OFF, MIN to MAX
• The OFF setting is cold water only.
Adjustment of the external valve flow volume at this setting will only alter the force of the water from the spray head.
It will not alter the water temperature.
How to use
- The low power settings allow you to reduce the power used by the water heater.
- "MAX" is the full power setting, further adjustment of the temperature is via external valve control knob.
- The water temperature will be increased accordingly as the knob being turned clockwise from "MIN" to "MAX".
Note: Switch off the power supply when not in use.
Operating Features
Light Indicators:
POWER Indicator
- Indicates when the heating element is switch on and water is flowing on the heat settings.
- The light will not come on when the power setting is at the OFF position or insufficient water to activate the heater.
PUMP Indicator (for model WH903P only)
• Indicates the booster pump is running.
• The light will not come on when pump speed control is switched off.
ELSD Indicator (Electricity Leakage Sensor Device)
- Indicates there is no earth leakage in the system and the shower unit is safe to operate.
Knob & Buttons Functions:
POWER/Temperature Control Knob
- When the POWER control knob is set to OFF, it provides for cold shower.
• The shower unit will get warmer as the control knob is turned clockwise towards position MAX.
PUMP ON/OFF Button (for model WH903P only)
- When the pump control is turned on, the pump will automatically start when there is sufficient water flow through the shower unit and stop when water supply is turned off.
- If the water flow is too low to start the heater or pump, just press this button and hold it for a few second to build up the pressure and the shower unit and pump will start up automatically.
TEST Button
- Press the TEST button will simulate a earth leakage in the system and the unit will trip with ELSD indicator off.
RESET Button
- Press the RESET button will resume the earth leakage fault back to normal and the ELSD light on.
IMPORTANT NOTICES:
- The ELSD detects a very small fault (leakage current) which may occur in a circuit and isolate the electric supply to the heater, thus protect the users.
• The heater, all exposed metal surface and pipe works within the bathroom MUST BE bonded and earthed. - Improper earthing may result in malfunction to the ELSD. Never use the heater is there is doubt on the earthing installation.
- Test ELSD regularly to ensure the heater is safe to use.
Troubleshooting
| SYMPTOM POSSIBLE CAUSE(S) | ACTION(S) / SOLUTION(S) | |
| Water too cool or cold | Too much water flowing through the heater | Reduce the flow rate |
| Reduction In the ambient temperature | Reduce the flow rate, switch to higher temperature setting | |
| Defective heating element | Renew heating element tank assembly | |
| Open circuit in wiring | Check wiring | |
| Defective pump | Test and repair / renew | |
| Water too hot | Temperature settling too high | Reduce temperature settling |
| Defective PCB | Check and repair / renew | |
| Unit switch off during use | Interruption of mains electrical supply | Check loss of power, MCB, switches and supply cabling |
| ELSD trip, possible earth leakage | Check earth leakage and reset ELSD | |
| Water ceases to flow | Blockage of spray head, twisted or blocked flexible shower hose | Clean / renew spray head, check for free passage of water through hose. Replace as necessary |
| No water supply | Check water supply, regulator valve open and no blockage | |
| Water flow too low, “POWER” light OFF | Flow rate too low to activate the heater | Press PUMP button until “POWER” ON |
零件名称
外部零件名称


内部零件名称

清洗和保养

滤网清洁过滤网
: 0.3 Mpa (3bar/43.5psi)
340×240×95mm
1.8kg
WH903P
240V\~50/60Hz
3.75kW
Pam DC
50W
<40dB
15mm (1/2" BSP),
20 kPa (0.2 bar/2.9 psi)
0.3 Mpa (3bar/43.5psi)
340×240×95mm
2.5kg
Gambarajah skematik
flowchart
graph TD
    A["Power Source"] --> B["Switch"]
    B --> C["Measurement Instrument"]
    C --> D["Control Unit"]
    D --> E["Output"]
    style A fill:#f9f,stroke:#333
    style E fill:#bbf,stroke:#333

flowchart
graph TD
    A["Power Source"] --> B["Switch"]
    B --> C["Measurement Instrument"]
    C --> D["Control Unit"]
    D --> E["Output"]
    style A fill:#f9f,stroke:#333
    style E fill:#bbf,stroke:#333
WH903P (Pam DC) WH803
Knob & Buttons Functions:
Tombol KUASA
Butang SET SEMULA/RESET
- Parts identification
- Specifications
- General product information
- Safety precaution
- Cleaning & maintenance
- Clean filters regularly
- Adjustment of Regulator Valve
- General Maintenance
- Installation
- CAUTION: THIS APPLIANCE MUST BE EARTHED.
- General Installation Instructions
- Heater INLET and OUTLET Connection
- Installation Installation
- Fitting the Shower set
- Electrical Connections
- IMPORTANT NOTE!
- SWITCH OFF THE MAIN SUPPLY BEFORE ELECTRICAL WORK
- Procedure
- Replacing the cover
- Test Run of Heater
- How to use
- Operating the heater
- Operating Features
- Light Indicators:
- Knob & Buttons Functions:
- IMPORTANT NOTICES:
- 零件名称
- 清洗和保养
Brand : Khind
Model : WH903P
Category : Water heater