
Runsense iOS - Wristwatch EPSON - Free user manual and instructions
Find the device manual for free Runsense iOS EPSON in PDF.


| Product Type | GPS Sports Monitor (Watch) |
| Brand | Epson |
| Model | Runsense iOS (SF-710) |
| Operating System Compatibility | Android 4.3 or later |
| Connectivity | Bluetooth 4.0 |
| GPS | Built-in with AGPS support for faster positioning |
| Heart Rate Monitoring | Optional (requires optional HR monitor) |
| Battery | Rechargeable lithium-ion |
| Data Upload | Via Bluetooth to smartphone app (Run Connect) and web application (RUNSENSE View) |
| Supported Activities | Running, Walking, Cycling |
| Training Features | Interval, AT Lap, Target Pace, Waypoint |
| User Settings | Height, Weight, Date of Birth, Gender, HR Zones (1-5) |
| System Settings | Distance Units (km/mile), Time Format (12h/24h), DST, Time Zone, Date Format, Display Inversion, Contrast, Auto Sleep, Auto Light, Alarm Tones, Key Tones |
| Measurement Settings | Auto Pause, Tap Function, Screen Layout, Activity Type, Interval, AT Lap, Target Pace, Waypoint, Heart Rate |
| App Functions | Upload measurement data, view dashboard, manage account, update GPS time (AGPS), change watch settings |
| Memory | Stores workout data (capacity not specified) |
| Safety | Do not disassemble; keep away from heat, moisture, and small children |
| Maintenance | Clean with a soft, dry cloth; avoid contact with water |
| Package Contents | Watch, charging cradle, USB cable (assumed); refer to manual |
Frequently Asked Questions - Runsense iOS EPSON
User questions about Runsense iOS EPSON
0 question about this device. Answer the ones you know or ask your own.
Ask a new question about this device
Download the instructions for your Wristwatch in PDF format for free! Find your manual Runsense iOS - EPSON and take your electronic device back in hand. On this page are published all the documents necessary for the use of your device. Runsense iOS by EPSON.
USER MANUAL Runsense iOS EPSON
Smartphone User's Guide
for Android
«Run Connect Ver. 1.3.0»

Introduction
Thank you very much for purchasing this GPS Sports Monitor "RUNSENSE".
To use the product correctly, make sure you read the Smartphone User's Guide with the Quick Start Guide and User Manual.
The illustrations and screens shown in the Smartphone User's Guide are for the SF-710.
Descriptions in the Smartphone User's Guide
| Important: | Indicates things you must or must not do. Ignoring these instructions or mishandling this device could cause malfunction or operational problems to the device. |
| Note: | Indicates additional explanations and related information. |
| Menu Name Indicates menu items displayed on the screen of the device. | |
| A/B/C/D | Indicates the device buttons. |
| Indicates related pages. Click the link in blue text to display the related page. | |
Trademarks
EPSON and EXCEED YOUR VISION are registered trademarks of the Seiko Epson Corporation.
Android and Google Play are the trademarks or registered trademarks of Google Inc.
The Bluetooth® word mark and logos are the registered trademarks owned by Bluetooth SIG, Inc. and any use of such marks by the Seiko Epson Corporation is under licence.
Other product names are the trademarks or registered trademarks of their respective companies.
Cautions:
☐Unapproved copying of part or all of this guide is strictly forbidden. ☐The content of this guide is subject to change without prior notice. ☐ Although every effort has been made to ensure the accuracy of this guide, contact us if you have any questions or notice any errors in descriptions in the content of this guide. Despite the preceding clause, we cannot accept any responsibility for mishandling due to errors in this guide. ☐ We cannot accept any responsibility for any injuries or obstructions that were caused by ignoring the contents of this guide, inappropriate handling of the device, or repairs or modifications performed by a third party who is not appointed by us.
Introduction
What you can do with this smartphone APP
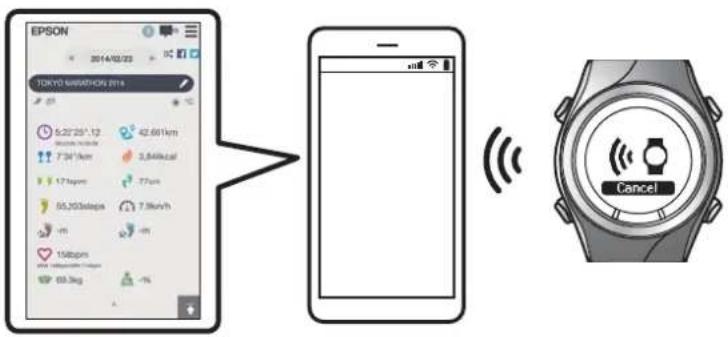
This app allows you to review your workout in the RUNSENSE View web application and upload your data to the RUNSENSE View Portal for further analysis by establishing a Bluetooth connection between your Runsense watch and smartphone.
Note:
This guide describes how you can transfer the data to your Android smartphone and manage it with the web application (RUNSENSE View).
Refer to the User Manual for how you can manage the data via a personal computer.
Supported devices
OS: Android 4.3 or later Resolution: Full HD or higher Bluetooth 4.0
Note:
This does not guarantee operations of all Android devices. For the latest information on supported models, visit our website. http://www.epson.eu/runsense
Introduction
Smartphone application (Run Connect)
Run Connect has the following features.
Upload measurement data to the web application (RUNSENSE View) Access the web application (RUNSENSE View) to view the measurement data Access the web application (RUNSENSE View) to enter the body weight and body fat information. Update measurement settings such as AT Lap, Target Pace, Waypoint, and Interval, user settings, and system settings. Reduces the GPS positioning time Pairs RUNSENSE device and smartphone to communicate via Bluetooth Manage your RUNSENSE account settings.

Contents
Contents
Introduction
What you can do with this smart
Operations on the Product.....
phone App and About this Product.....
Preparation
Install the Run Connect app to your smartphone 7
Create and configure your RUNSENSE View
account....8
Creating an account....8
Configuring the account....9
Enabling Bluetooth on your smartphone.....11
Pair the RUNSENSE device with your
smartphone....12
Uploading and Checking
Measurement Data
Uploading Measurement Data....15
Checking Uploaded Measurement Data....18
About Web Application (RUNSENSE View)
19
Entering Weight and Body Fat....20
Reducing the GPS Positioning Time (AGPS)
Reducing the GPS Positioning Time (AGPS)....22
Changing the Settings
Checking/Editing Watch Settings. 25
How to Configure....25
Setting the Interval Function... 28
Setting the AT Lap Function....|....30
Setting the Target Pace Function 34
Setting the Waypoint Function. 38
List of Settings....42
Retrieving Saved Watch Settings.47
Creating New Settings....47
Selecting a Saved Settings....48
Troubleshooting
Problem Solving....52
Unpairing Devices....54
Operations on the smartphone. 54
Preparation
For important safety and operation instructions for RUNSENSE devices please refer to the main product User Manual.
You need to make the following preparations before use.
"Install the Run Connect app to your smartphone" on page 7 "Create and configure your RUNSENSE View account" on page 8 "Enabling Bluetooth on your smartphone" on page 11 "Pair the RUNSENSE device with your smartphone" on page 12
Preparation
Install the Run Connect app to your smartphone
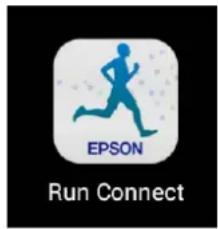
Access the Google Play (Play Store) and install Run Connect.
Preparation
Create and configure your RUNSENSE View account
Creating an account
You need to create an account for the Web application (RUNSENSE View.)
Note:
If you already have a RUNSENSE View account, you can use it with this device.

"Configuring the account" on page 9
1
Start Run Connect on your smartphone.

2
Tap OK.

Note:
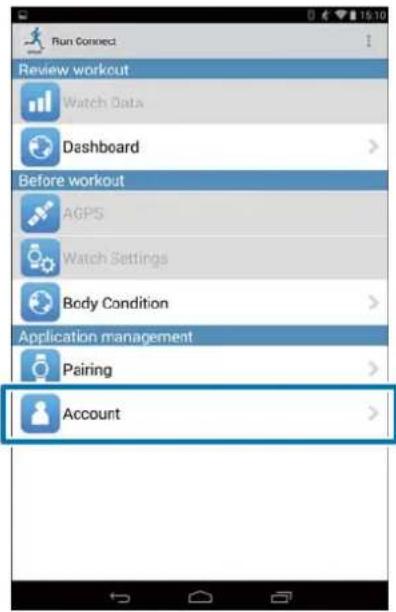
The following screen is displayed if you start Run Connect the second time onwards. Tap Account and proceed to step 3.
Preparation
3
Tap Create Account.
![Account Enter the RUNSENSE View login ID and password when uploading the measurement data from the watch. Login ID Password Set Clear When using RUNSENSE View for the first time, tap [Create Account] and create an account. Create Account Forgotten Login ID Forgotten Password](/content/2026/05/1107134/images/753fa0c7e74e54a57ceef457108080fdae2f65f7d17b9c9525b2829c2ba8ff42.jpg)
4
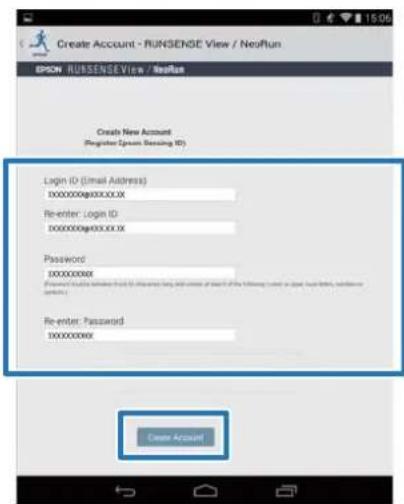
Create an account.
Enter Login ID (e-mail address) and Password.
Read the Terms of Use, select the checkbox, and tap Create Account.
Note:
If an entry field is highlighted in red, check the error message on the screen and correct your entry as required.
5
When you have created an account, follow the instruction on the screen to configure the account.
Configuring the account
Configure the account you have created.
1
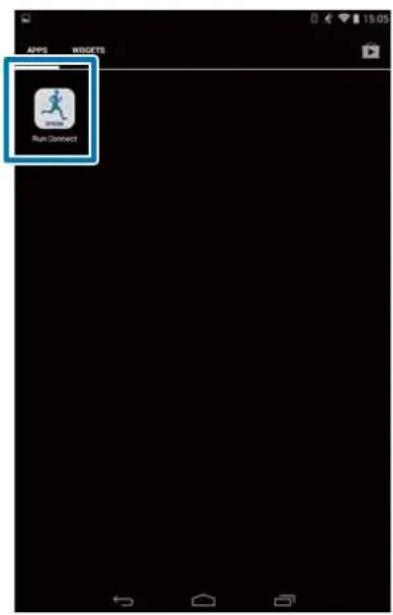
Start Run Connect on your smartphone.
2
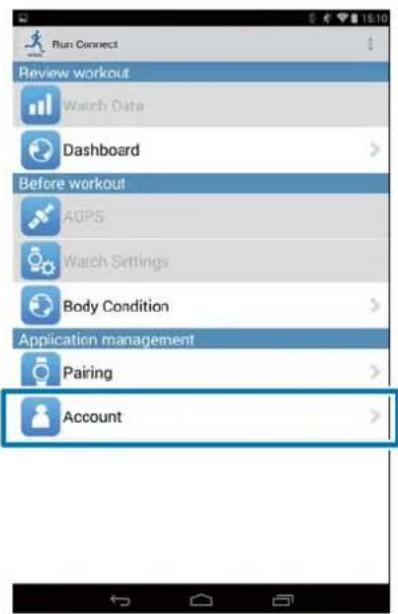
Tap Account.
Preparation
3 Enter Login ID and Password, and then tap Set.
![Account Enter the RUNSENSE View login ID and password when uploading the measurement data from the watch. Login ID Password Set Other When using RUNSENSE View for the first time, tap [Create Account] and create an account. Create Account Forgotten Login ID Forgotten Password](/content/2026/05/1107134/images/d748c2748e7ecff59a8aef410b51644ca038e372d9deb258a54e64d919ec08f5.jpg)
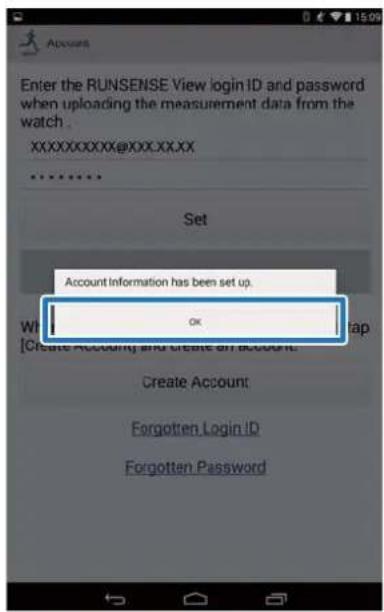
4 Once the account has been set up, click OK to confirm.
Preparation
Enabling Bluetooth on your smartphone
You need to enable Bluetooth settings on your smartphone before communicating with this device.
Note:
The layout and operation may vary depending on the smartphone you are using. Refer to your smartphone's user manual for details.
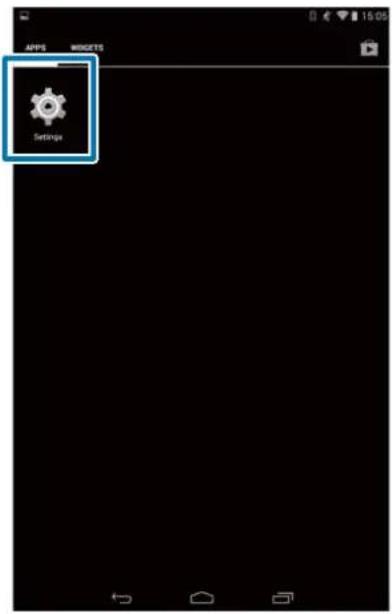
1 Tap Settings on the smartphone.
2 Set Bluetooth to On.

Preparation
Pair the RUNSENSE device with your smartphone
You need to register this product to your smartphone before communicating with the smartphone.
1
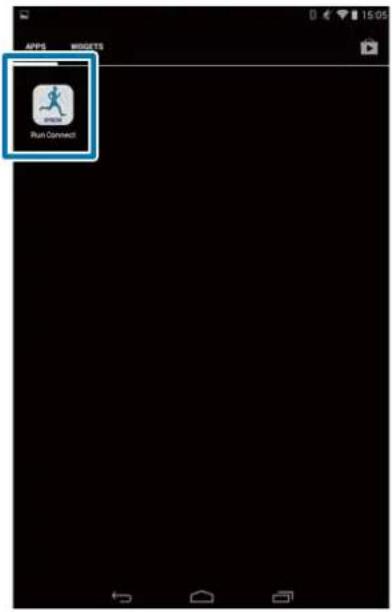
Start Run Connect on your smartphone.
2
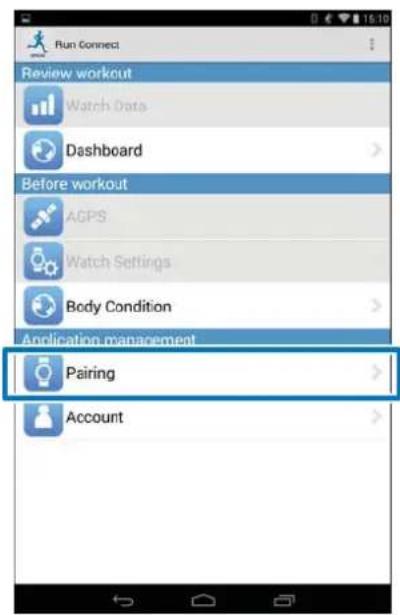
Tap Pairing.
3
Tap Start Pairing.
![Perform [Start Pairing] if you have not paired the watch that you want to connect. You need to perform [Release Pairing] and then [Start Pairing] if you want to connect a watch other than the already paired watch.](/content/2026/05/1107134/images/b4dde936edc00d507fe32dd153fa275eba9edac129f49b42902be6eab19b0b56.jpg)
4
Hold down D on this product.
Bluetooth communication starts.
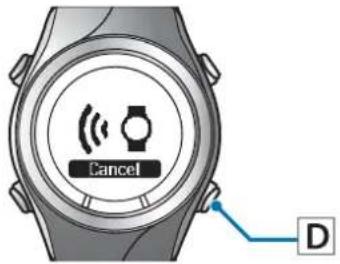
Note:
You can also start Bluetooth communication from the Settings menu on this product. Refer to "Settings" in the User Manual for details.
Preparation
5
Tap OK on the smartphone.
![Perform [Start Pairing] if you have not paired the watch that you want to connect. You need to perform [Release Pairing] and then [Start Pairing] if you want to connect a watch other than the already paired watch. Start pairing... Start communication with the Bluetooth watch OK Start Pairing](/content/2026/05/1107134/images/623f0546e10a9627a2922946d8e3e88aa878801812d3d440697214b22ddadc1e.jpg)
6
Enter the Passcode (6-digit number) to the smartphone and tap OK.

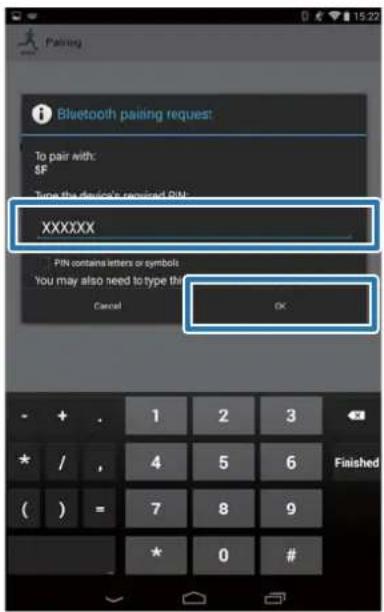
Note:
The screen to initiate pairing and enter the Pairing Passcode may not be displayed automatically depending on the smartphone you are using. If this happens, display the screen from the notification bar at the top status bar.
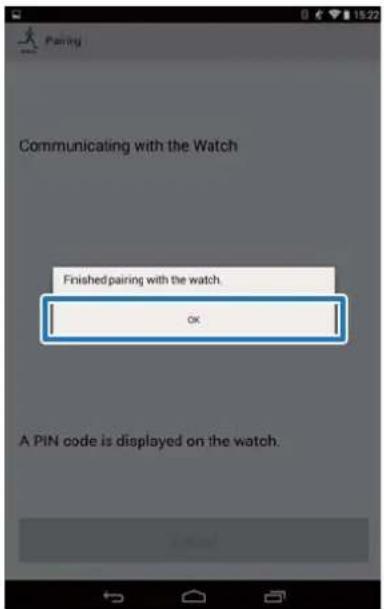
7
Tap OK once pairing has been completed.
Uploading and Checking Measurement Data
This chapter describes how to upload and check measurement data.
"Uploading Measurement Data" on page 15 "Checking Uploaded Measurement Data" on page 18 "Entering Weight and Body Fat" on page 20
Uploading and Checking Measurement Data
Uploading Measurement Data
Upload measurement data to the web application (RUNSENSE View.)
Take the following two steps to upload data via a smartphone.
Uploading basic data
Upload data such as the distance, speed, HR, and calories.
Uploading detailed data
Upload the running route in addition to the outline data.

Important:
You need to log in to RUNSENSE View and register this product to the smartphone.
"Preparation" on page 6
Enable Bluetooth on the smartphone before uploading measurement data.
Enabling Bluetooth on your smartphone" on page 11
Note:
It is recommended to upload the data via a personal computer by setting this device in the cradle when uploading data worth several hours such as measurement data of a full marathon (uploading 4-hour worth data with smartphone takes roughly 12 minutes.*) Refer to "Data Management Using the Web Application (RUNSENSE View)" in the "User Manual" for how to upload data via a personal computer.
*The uploading time varies depending on the smartphone you are using.
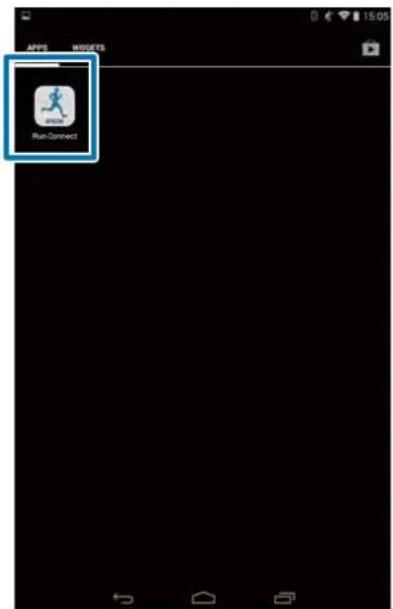
1
Start Run Connect on your smartphone.
2
Tap Watch Data.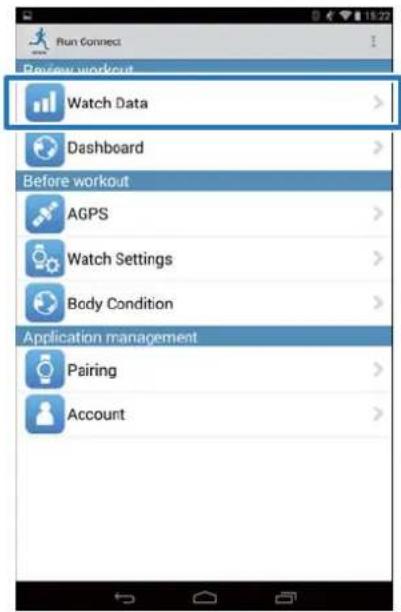
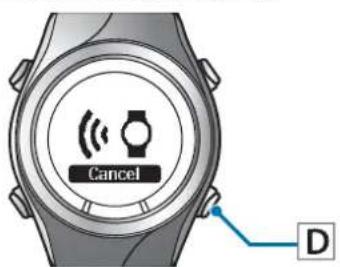
3
Hold down D on this product.
Bluetooth communication starts.
Uploading and Checking Measurement Data
Note:
You can also start Bluetooth communication from the Settings menu on this product. Refer to "Settings" in the User Manual for details.
4 Tap OK on the smartphone.
The alarm on the product sounds and the basic data upload starts.

Note:
Try again if the communication fails.
5 Tap Get Next Data when you have a large volume of measurement data.
Get Next Data is displayed only when there is a large volume of measurement data.
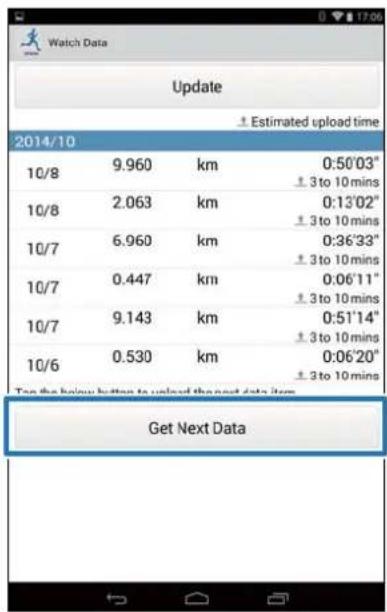
Uploading basic data is complete.
To review the basic data select the item you want to check from the Watch Data List and tap Browse the workout.
“About Web Application (RUNSENSE View)” on page 19
Proceed to step 6 if uploading detailed data.
Uploading and Checking Measurement Data
6
Tap the data item you want to upload and tap Upload.

7
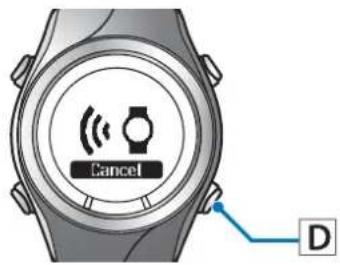
Hold down D on this product.
Bluetooth communication starts.
Note:
You can also start Bluetooth communication from the Settings menu on this product. Refer to "Settings" in the User Manual for details.
8
Tap OK on the smartphone.
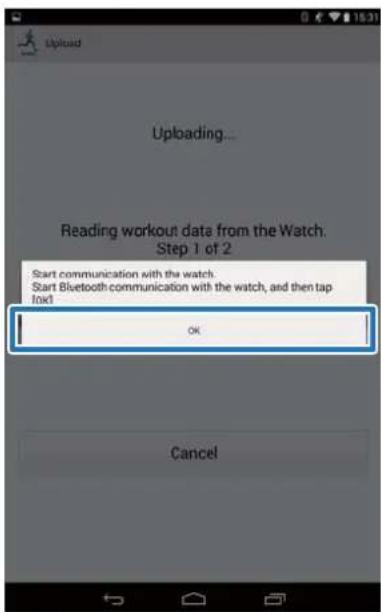
The alarm on the product sounds and the detailed data upload starts.
The RUNSENSE View screen is displayed when the upload has completed.
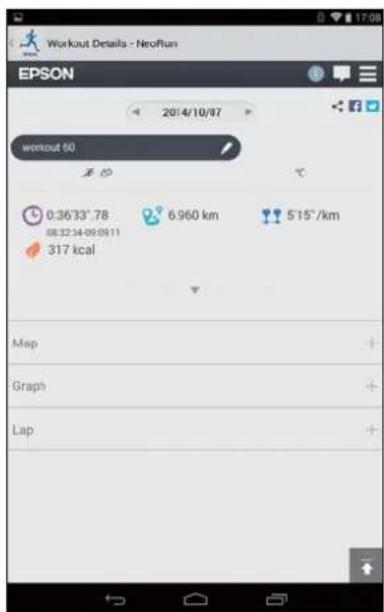
Note:
Try again if the communication fails. The uploaded detailed data item is deleted from the Watch Data List. Repeat steps 6 to 8 if you are uploading more than one detailed data item from the Watch Data List.
Uploading and Checking Measurement Data
Checking Uploaded Measurement Data
Access the web application (RUNSENSE View) to check the uploaded measurement data.
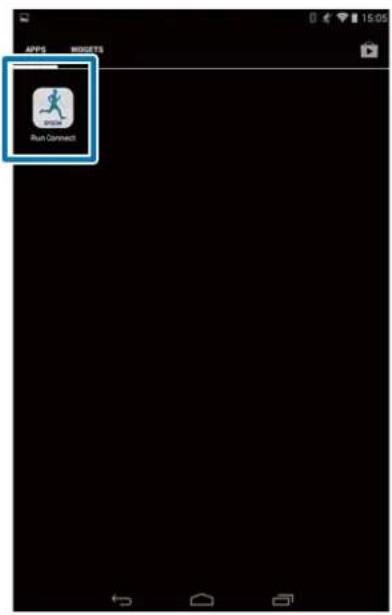
1
Start Run Connect on your smartphone.
2
Tap Dashboard.

3
Tap the data item you want to check.
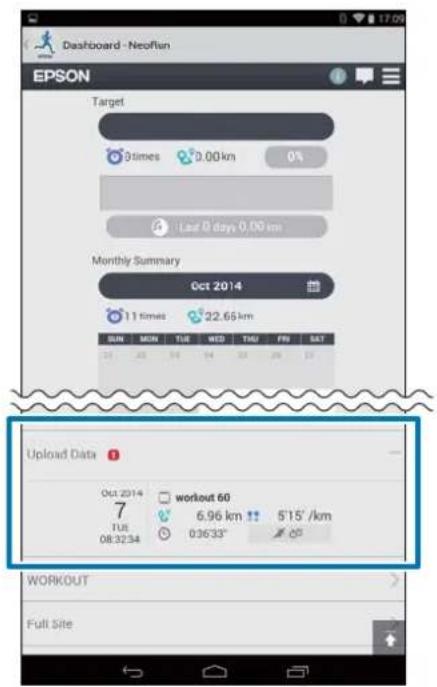
Note:
Measurement data items with the icon indicate they only contain basic data. Upload the detailed data if you want to check the running route.
"Uploading Measurement Data" on page 15
Uploading and Checking Measurement Data
About Web Application (RUNSENSE View)
You can view the data in the following ways with the web application (RUNSENSE View) on the smartphone.
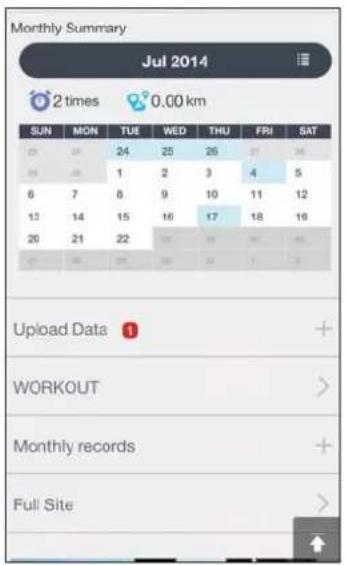
Dashboard
Manage records in calendar format. This allows you to easily review past runs.
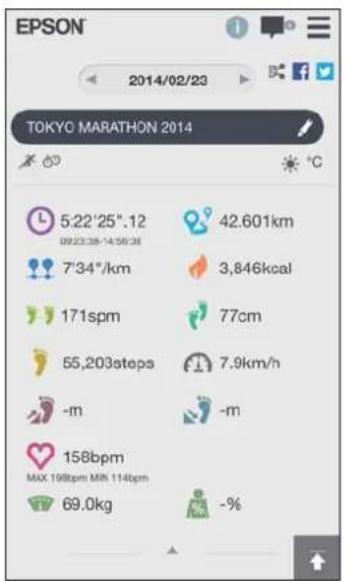
Workout
This displays your workout data including distance, pace, HR, running route, calories, etc. This allows you to analyse training from different angles.
Map
Review your run route on the map.
Uploading and Checking Measurement Data
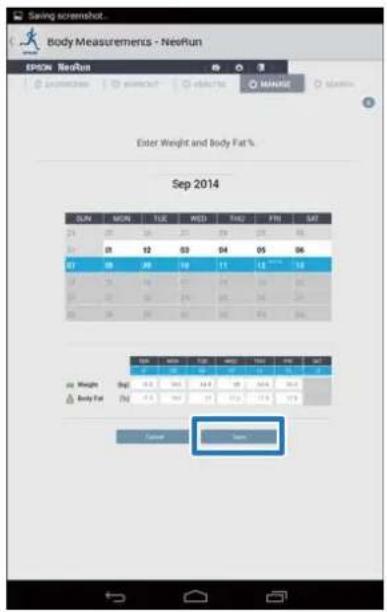
Entering Weight and Body Fat
You can register your weight and body fat data to the web application (RUNSENSE View.)
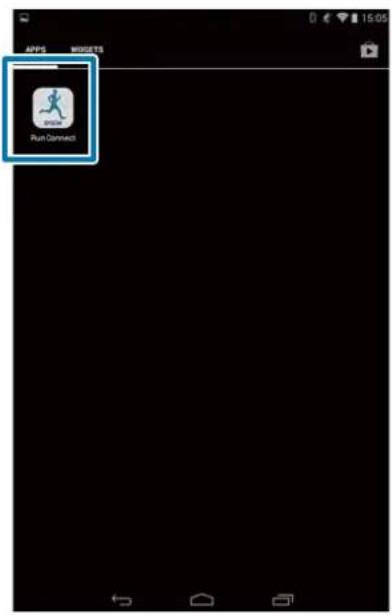
1 Start Run Connect on your smartphone.
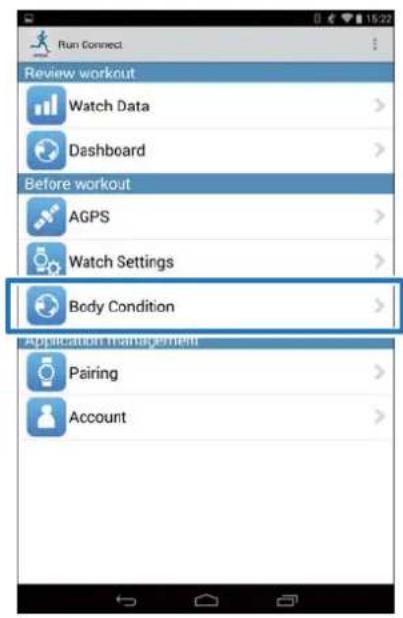
2 Tap Body Condition.
3 Tap the entry field of Weight and/or Body Fat and enter the value.

4 Tap Save.
Reducing the GPS Positioning Time (AGPS)
You can reduce the positioning time by downloading assistance data for the GPS satellites before running.
"Reducing the GPS Positioning Time (AGPS)" on page 22
Reducing the GPS Positioning Time (AGPS)
Reducing the GPS Positioning Time (AGPS)

Important:
You don't need to be outdoors for this operation.

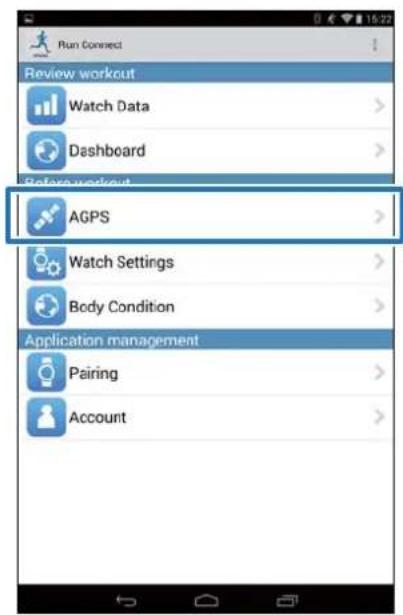
Start Run Connect on your smartphone.


Tap AGPS.

Tap Update.


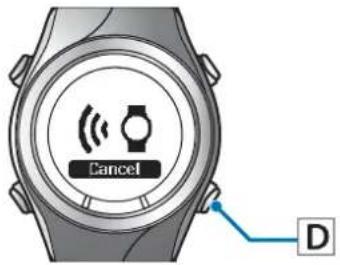
Hold down D on this product. Bluetooth communication starts.

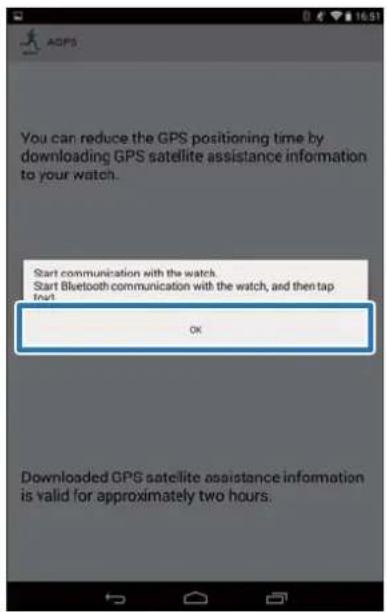
Tap OK on the smartphone.
Reducing the GPS Positioning Time (AGPS)
Note:
Try again if the communication fails.
6
Check that writing to the watch has completed and tap OK.
Changing the Settings
You can change the measurement settings such as AT Lap, Target Pace and Interval, user settings, and system settings.

Important:
Functions may not be available if the firmware version on your device is old. Check the firmware version on the device.
http://www.epson.eu/runsense
"Checking/Editing Watch Settings" on page 25 "Retrieving Saved Watch Settings" on page 47
Changing the Settings
Checking/Editing Watch Settings
You can change various device and measurement settings.
The following items can be configured.

"List of Settings" on page 42
Note:
Available settings may differ depending on the smartphone you are using.
| Category Setting items | |
| User Settings Height | |
| HR Zone 1 to 5 | |
| Sys. Settings Distance Units | |
| Category Setting items | |
| Meas. Settings AT | Pause |
| Tap | |
| Screen | |
| Activity Type | |
| Interval | |
| AT Lap | |
| Target Pace | |
| Waypoint | |
| HR | |
How to Configure

Start Run Connect on your smartphone.
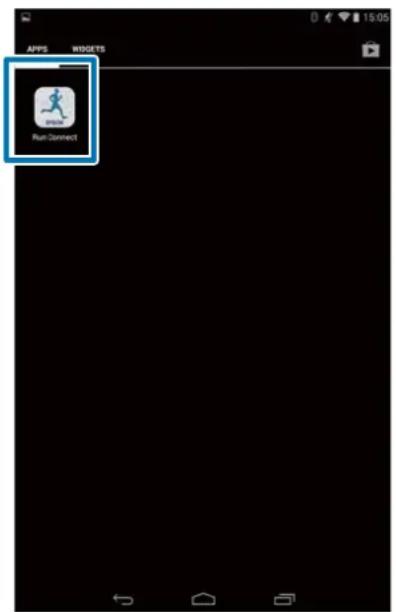
Changing the Settings
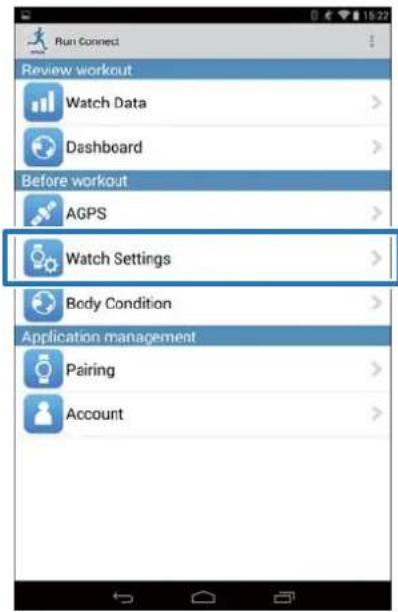
2 Tap Watch Settings.
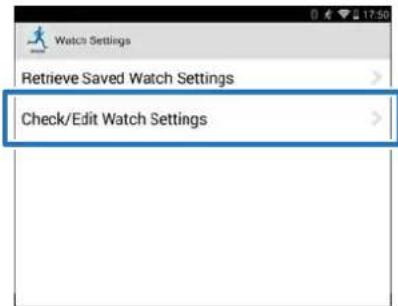
3 Tap Check/Edit Watch Settings.
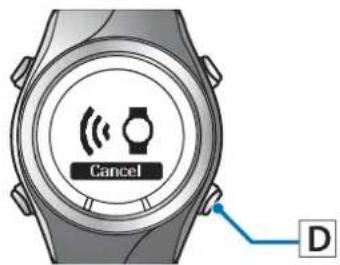
4 Hold down D on this product.
Bluetooth communication starts.
Note:
You can also start Bluetooth communication from the Settings menu on this product. Refer to "Settings" in the User Manual for details.
5 Tap OK on the smartphone.
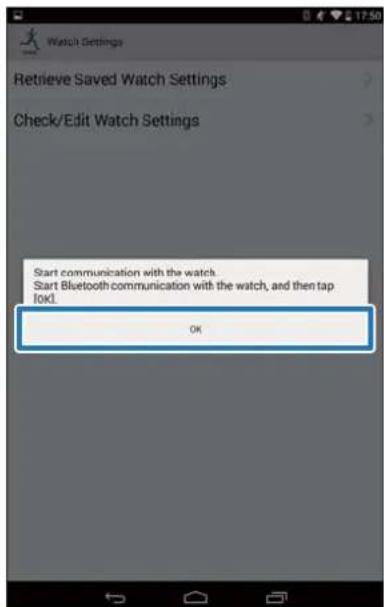
Note:
Try again if the communication fails.
6 Tap the item you want to configure.
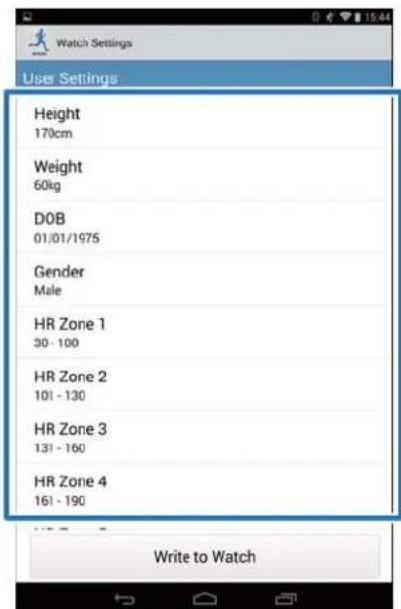
Changing the Settings
Note:
Refer to the relevant page for setting the following items in measurement settings.
Interval:
"Setting the Interval Function" on page 28
AT Lap:
"Setting the AT Lap Function" on page 30
Target Pace:
Setting the Target Pace Function" on page 34
□Waypoint:
"Setting the Waypoint Function" on page 38
7
Change the setting, and then tap OK.
The screenshot shows Height.
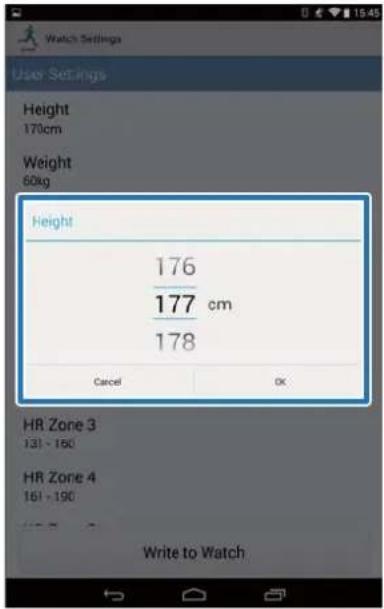
8
Tap Write to Watch.
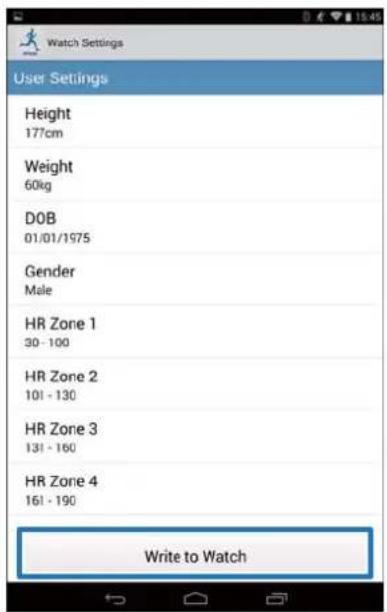
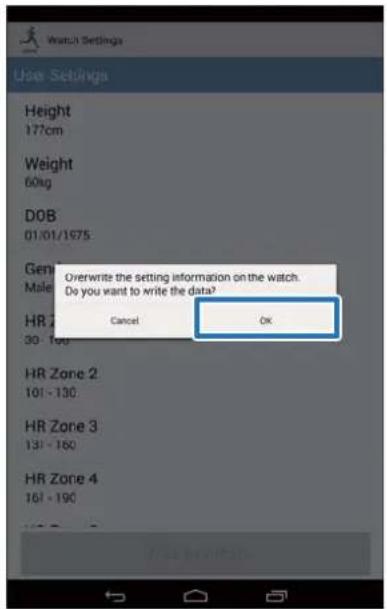
9
Tap OK.
10
Check that writing to the watch has been completed and tap OK.
Changing the Settings
Setting the Interval Function
You need to specify the settings of sprint and recovery activities to use the Interval function.
1 Tap Interval.
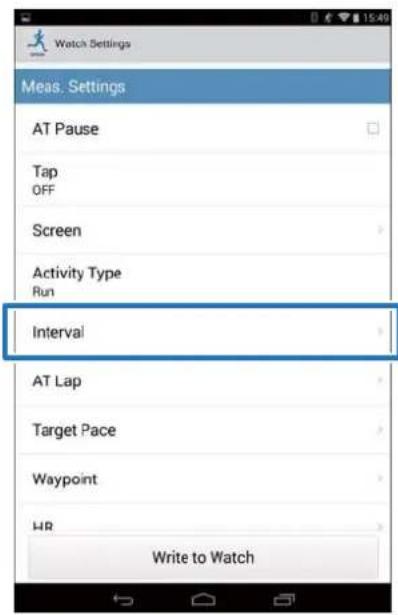
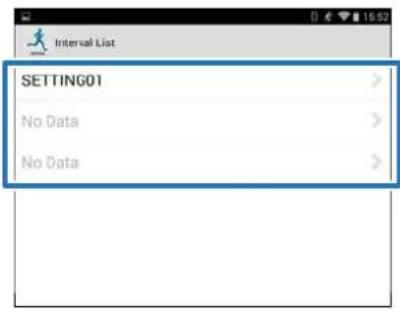
2 Tap No Data when you are adding a new setting.
Tap the setting if you want to edit an existing setting.
3 Enter or edit the title.
Enter the title using letters, numbers, spaces, hyphens, and underscores.

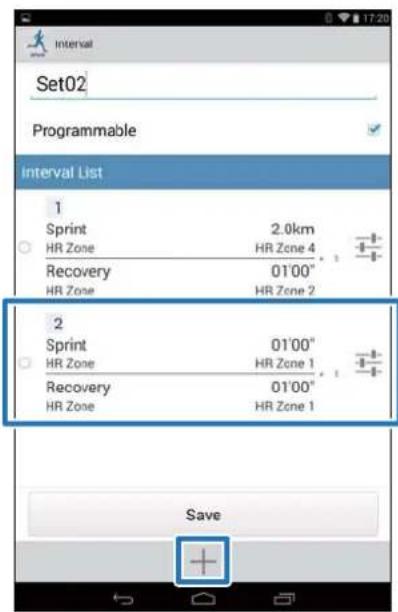
4 Turn Programmable ON if you want to combine multiple interval lists.

Note: The Programmable function and + in step 7 may not be available depending on the model you are using.
5 Tap the interval list setting button.

Changing the Settings

Specify the Sprint, Recovery, and Repeat items, and tap Back.
Go to step 8 if you are not setting more than one lap.


Tap + to add a new interval workout, specify the necessary items, and tap Back.
Note:
When multiple interval workouts are registered, you can delete and reorder the interval lists by tapping ○ on the left side of the list.

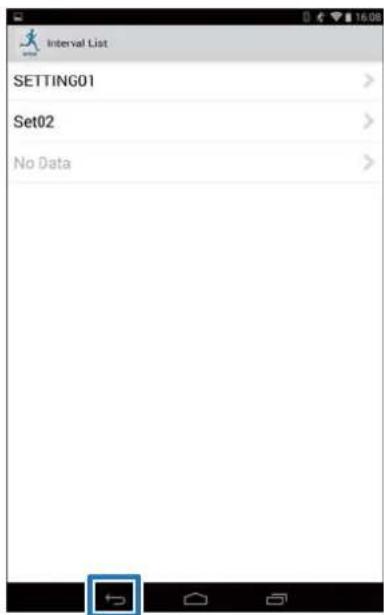
Tap Save.


Tap Back.
Changing the Settings
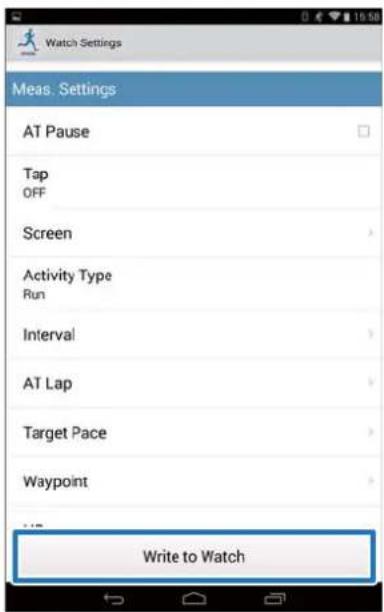
10
Tap Write to Watch.
11
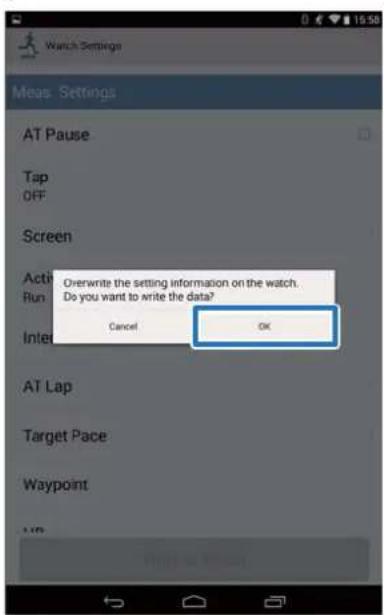
Tap OK.
Settings are written to the device.
12
Check that writing to the watch has completed and tap OK.
Setting the AT Lap Function
You can specify the time or distance to divide laps using the AT Lap function.
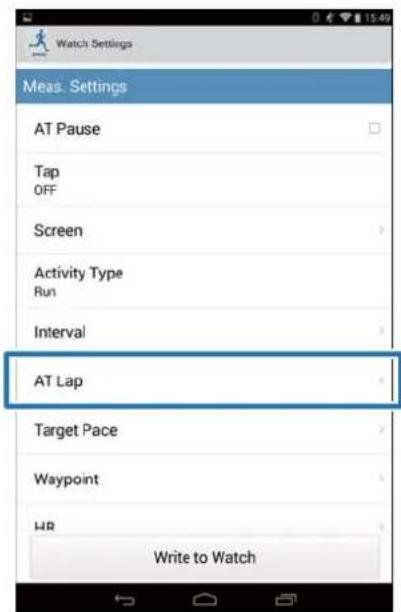
1
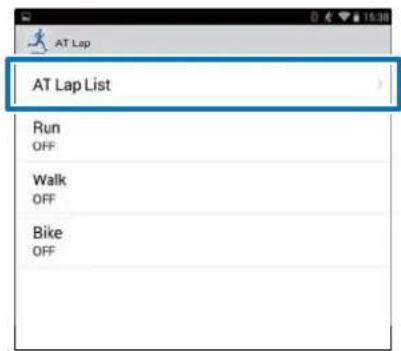
Tap AT Lap.
2
Tap AT Lap List.
3
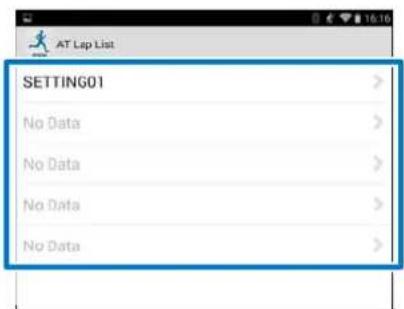
Tap No Data when you are adding a new setting.
Tap the setting if you want to edit an existing setting.
Changing the Settings
4 Enter or edit the title.
Enter the title using letters, numbers, spaces, hyphens, and underscores.
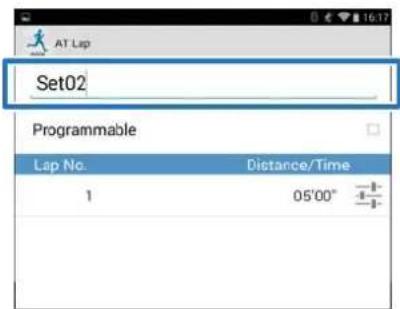
5 Turn Programmable ON if you want to combine multiple laps.

Note:
The Programmable function and + in step 8 may not be available depending on the model you are using.
6 Tap the lap setting button.

7 Specify the Distance or Time, and then tap Back.
Go to step 9 if you are not setting more than one lap.

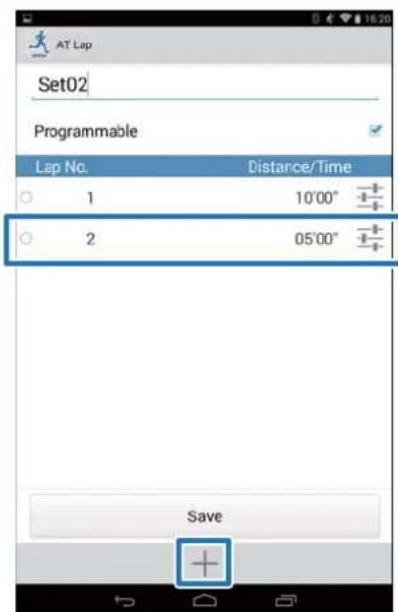
8 Tap + to add a lap and specify the Distance or Time for the lap.
Note:
When multiple laps are registered, you can delete and reorder laps by tapping ○ on the left side of the list.
Changing the Settings

Tap Save.


Tap Back.
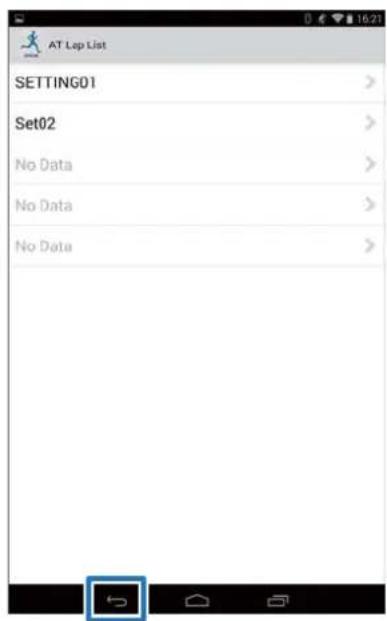

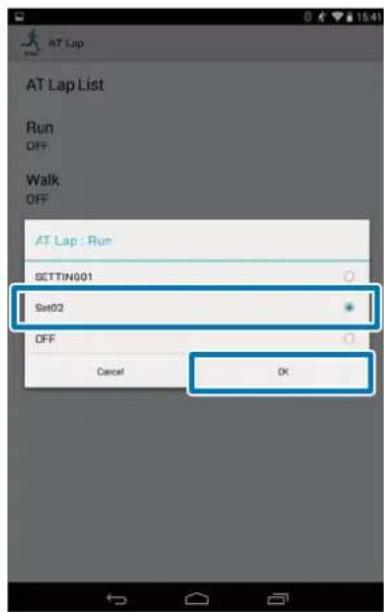
Tap Activity Type to apply the set AT Lap.
The screen used here is for Run.


Select the set AT Lap, and then tap OK.
Changing the Settings
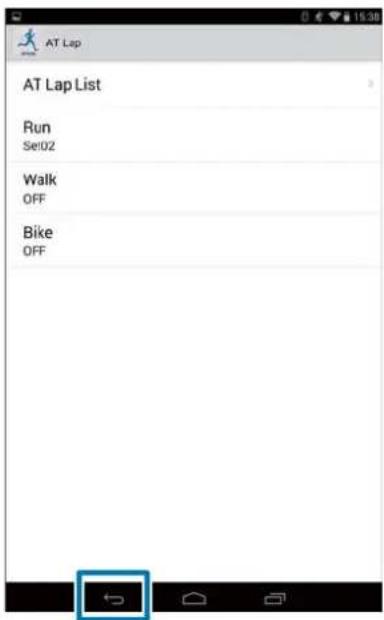
13
Tap Back.
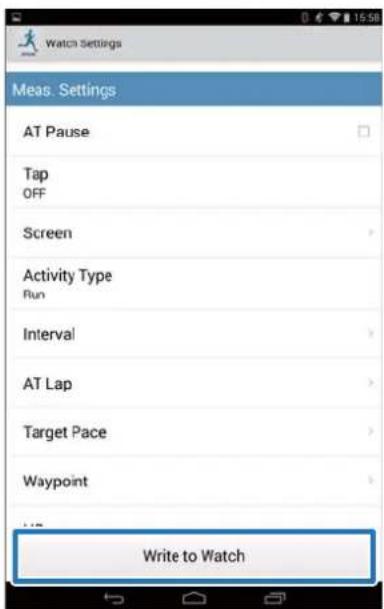
14
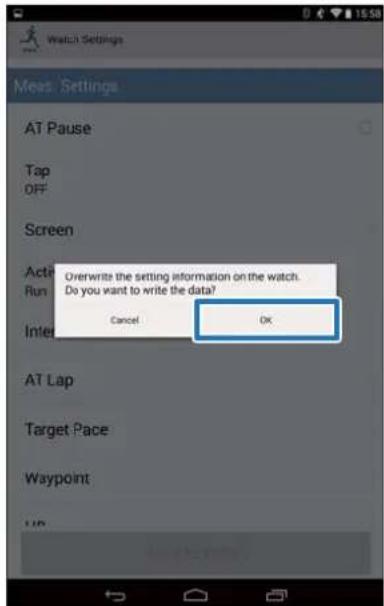
Tap Write to Watch.
15
Tap OK.
Settings are written to the device.
16
Check that writing to the watch has been completed and tap OK.
Changing the Settings
Setting the Target Pace Function
You can specify the target pace and an alarm will notify you when you fall outside the target pace window.
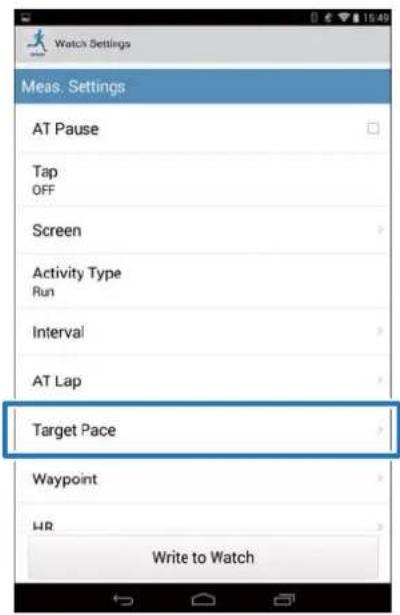
1 Tap Target Pace.
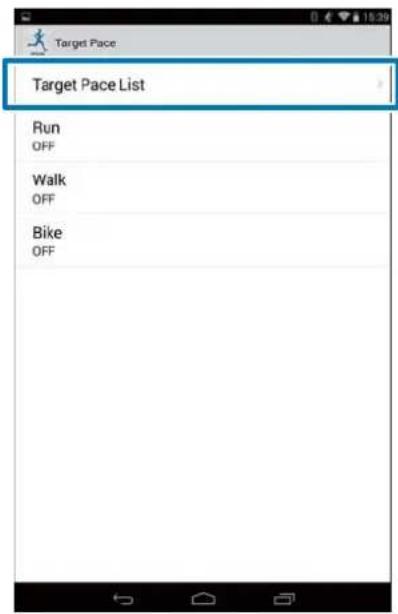
2 Tap Target Pace List.
3 Tap No Data when you are adding a new setting. Tap the setting if you want to edit an existing setting.

4 Enter or edit the title.
Enter the title using letters, numbers, spaces, hyphens, and underscores.
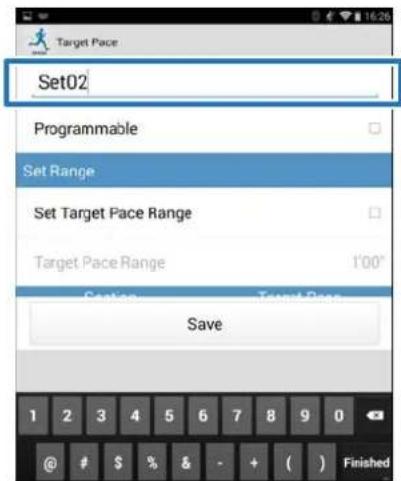
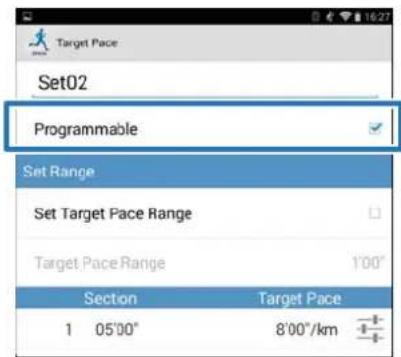
5 Turn Programmable ON if you want to combine multiple target paces.
Changing the Settings
Note:
The Programmable function and + in step 8 may not be available depending on the model you are using.
6
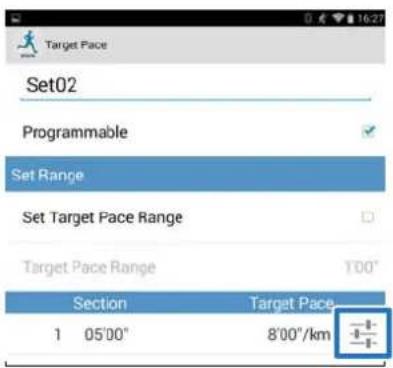
Tap the target pace setting button.
7
Specify the Time or Distance of the Section and Target Pace, and tap Back.
Go to step 10 if you are not setting more than one lap.

8
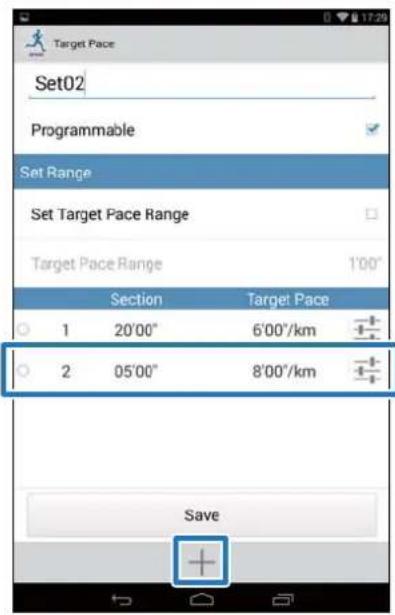
Tap + to add a target pace, and then specify the Time or Distance and Target Pace, and tap Back.
Note:
When multiple target paces are registered, you can delete and reorder target paces by tapping ○ on the left side of the list.
9
Turn Set Target Pace Range ON to enable the alarm that notifies you when you are off the specified pace.

Changing the Settings
10 Specify Target Pace Range, and then tap OK.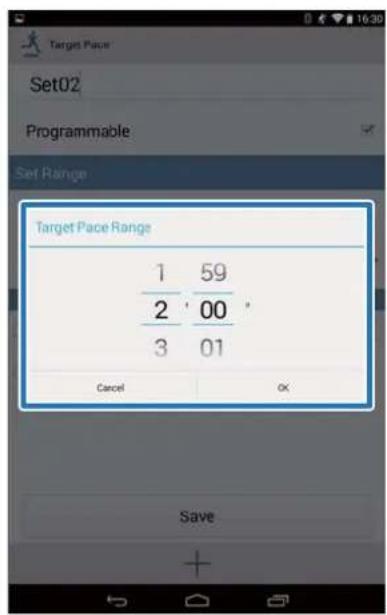
11 Tap Save.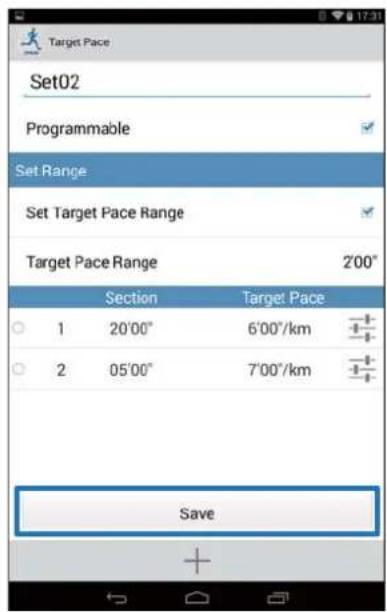
12 Tap Back.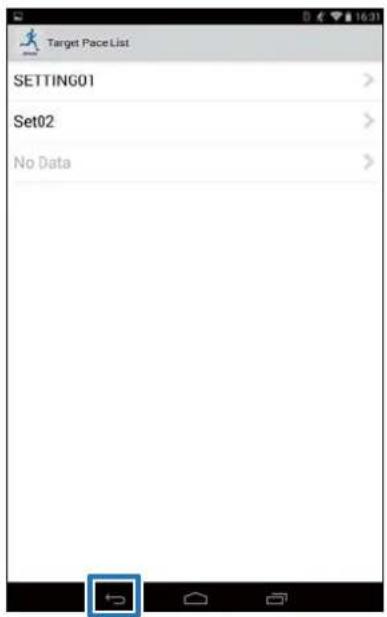
13
Tap Activity Type to apply the set Target Pace.
The screen used here is for Run.

Changing the Settings
14 Select the set Target Pace, and then tap OK.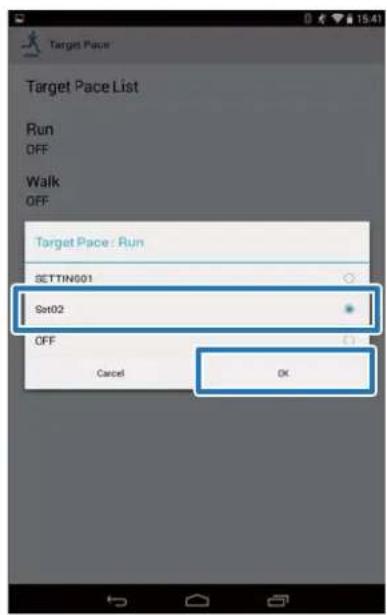
15 Tap Back.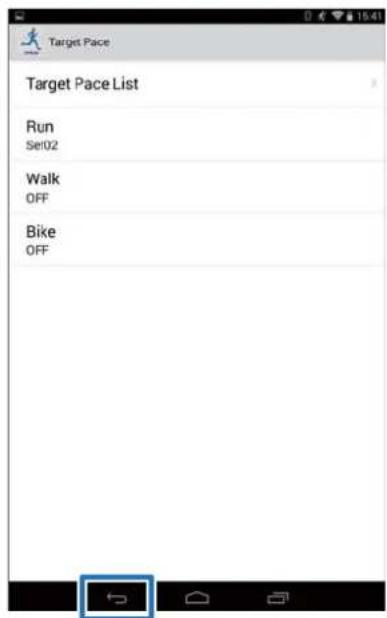
16 Tap Write to Watch.
17 Tap OK.
Settings are written to the device.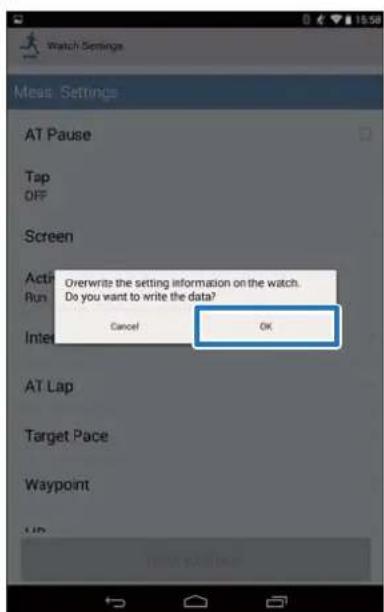
18 Check that writing to the watch has completed and tap OK.
Changing the Settings
Setting the Waypoint Function
You can add waypoints on the map.
Note:
The Waypoint function may not be available depending on the model you are using.
1 Tap Waypoint.

2 Tap Waypoint List.
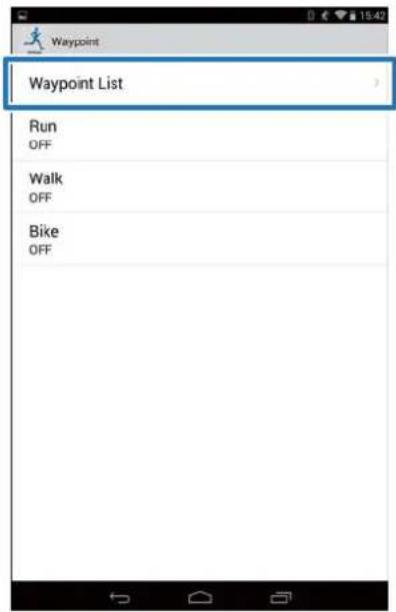
3 Tap No Data when you are adding a new setting. Tap the setting if you want to edit an existing setting.
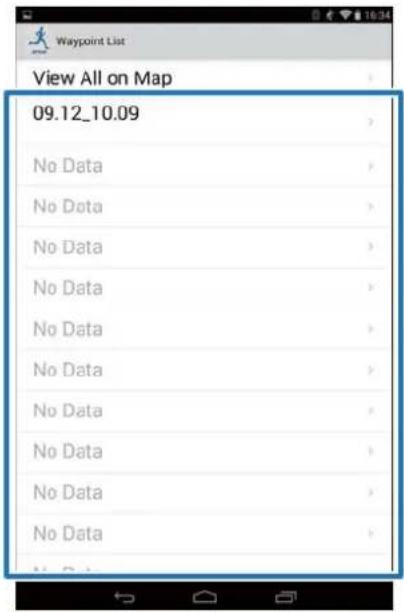
Note:
You can check all registered waypoints by tapping View All on Map.
4 Enter or edit the title.
Enter the title using letters, numbers, spaces, hyphens, and underscores.

Changing the Settings
5 Either press and hold the screen at the point on the map where you would like to set the waypoint.
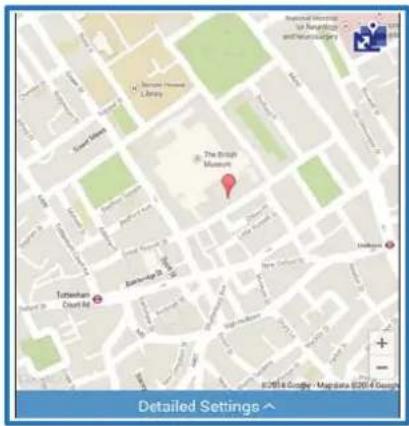
Note:
You can specify the altitude by tapping Detailed Settings. Turn Altitude ON, enter the value, and tap Save.

6 Tap Save.
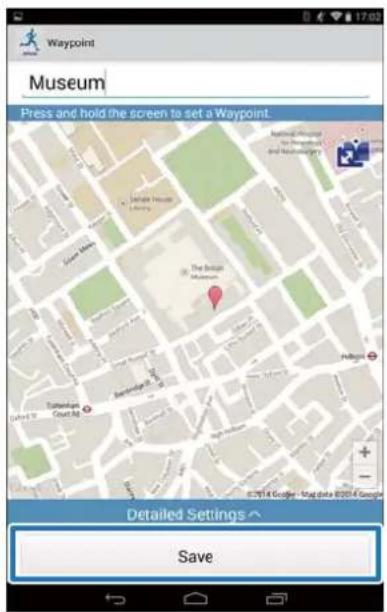
7 Tap Back.
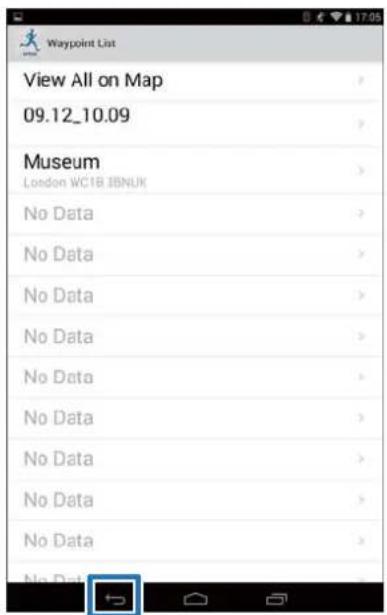
Changing the Settings

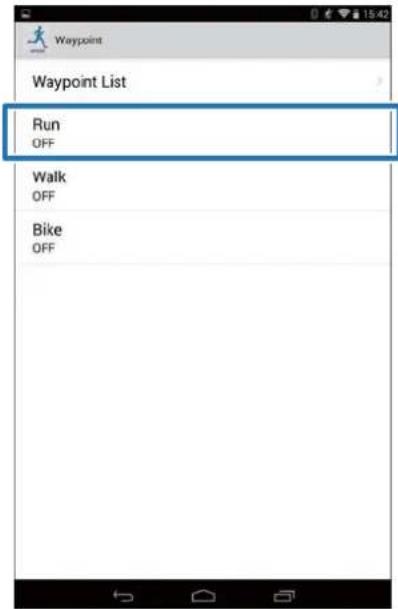
Tap Activity Type to apply the set waypoint.
The screen used here is for Run.

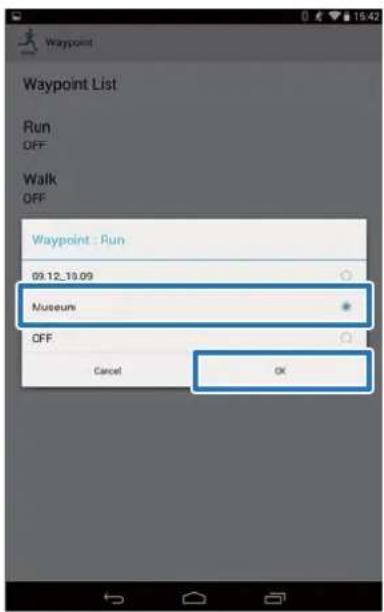
Select the set waypoint, and then tap OK.

Tap Back.
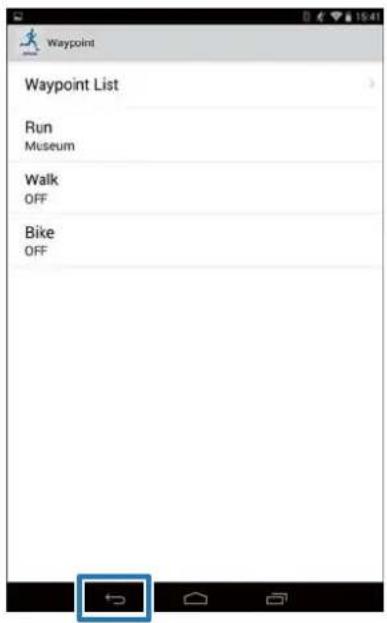

Tap Write to Watch.

Changing the Settings

Tap OK.
Settings are written to the device.
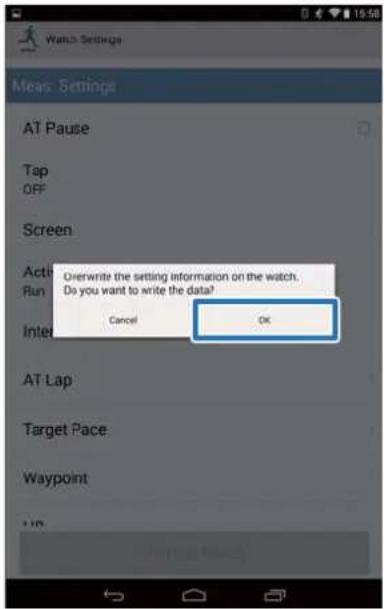

Check that writing to the watch has been completed and tap OK.
List of Settings
User Settings
Set the user information.
The value in brackets () is the default setting.
Note:
Available settings may differ depending on the model you are using.
| Setting items Value Explanation | ||
| Height (170 cm) Set the height. | ||
| Weight (60 kg) Set the weight. | ||
| DOB (1975.01.01) Set your date of birth. | ||
| Gender Male (default) Set your gender. | ||
| HR Zone HR Zone 1 | (30 to 100 bpm) | Set the maximum and minimum heart rate.You can set five zones to suit the exercise intensity. |
| HR Zone 2(101 to 130 bpm) | ||
| HR Zone 3(131 to 160 bpm) | ||
| HR Zone 4(161 to 190 bpm) | ||
| HR Zone 5(191 to 240 bpm) | ||
Changing the Settings
System Settings (Sys. Settings)
Make settings for the device's system.
The value in brackets () is the default setting.
Note: Available settings may differ depending on the model you are using.
| Setting items Value Explanation | ||
| Distance Units km (default) | Set the display units for distance. | |
| mile | ||
| Clock 12 Hour (default) | Set the format for the display time. | |
| 24 Hour | ||
| DST ON Set summer time. | ||
| Time Zone Auto (default) | Sets the time zone for your location.When you specify Auto the time zone is automatically set as you perform time adjust.When Auto is turned off, you can specify Time Difference with a value between -12:00 and +14:00. | |
| Date Format Day. Month | Set the display format for the date. | |
| Month. Day (default) | ||
| Invert Disp. ON Set the display format for the screen. | ||
| When ON is selected, white text is displayed over a black background.When OFF is selected, black text is displayed over a white background. | ||
| Contrast (4) | Set the contrast for the screen. | |
| Auto Sleep | ON (default) | When you leave the device for a while, this function automatically puts the device into sleep status.Entering sleep status reduces the amount of power consumption. |
| OFF | ||
| AT Light | ON | When the screen changes, this function automatically turns on the light. When a specified time has passed, the light automatically turns off. |
| OFF (default) | ||
Changing the Settings
| Setting items Value Explanation | ||
| Alarm Tones (default) Set the alarm type. | ||
| Key Tones ON (default) Turn on or off the Key Tones. | ||
Changing the Settings
Measurement Settings (Meas. Settings)
Note:
Available settings may differ depending on the model you are using.
| Setting items Value Explanation | ||
| AT Pause ON This function | on automatically stops me | asuring when you stop running, and resumes when you continue running. |
| OFF (default) | ||
| Tap(Only for the measurement screen) | Lap You can perform one of the functions specified in this item by tapping the screen while measuring.When Bike is selected as the Activity Type, the tap function may operate automatically depending on the condition of the road surface. If this occurs, we recommend to change the setting to OFF. | |
| Light | ||
| Screen Chg. | ||
| OFF (default) | ||
| Screen Screen1 You can | display up to four measure | rement screens. You can change the screen pattern and the measurement items displayed for each screen.You can also change the Display Lap Screen, but this is not displayed for the interval function. |
| Screen2 | ||
| Screen3 | ||
| Screen4 | ||
| Display Lap Screen | ||
| Activity Type Run (default) | It Set when running or jogging. | |
| Walk Set when walking. | ||
| Bike Set when performing exercises that do not require you to swing your arms, such as riding a bike. | ||
| Interval SETTING 01 to 03 | Set the contents of high-intensity training (sprint) and low-intensity training (recovery) and the number of times they are repeated. | |
| AT Lap SETTING 01 to 05 | When a time or distance set in advance is reached, this function records laps automatically. | |
| OFF (default) | Set the lap time or distance.You can set five times or distances within the following range.Time: 01'00" to 60'00" (in increments of 1 minute)Distance: 0.1 to 10.0 km (in increments of 0.1 km) | |
Changing the Settings
| Setting items Value Explanation | ||
| Target Pace SETTING 01 | to 03 Set the target time and pace range for one kilometer/ mile. An alarm sounds if you are outside the set pace range. You can set three target paces within the following range. Target Pace: 1'00" to 15'00"/km (in increments of 1 second) Pace Range: 00'05" to 03'00"/km (in increments of 1 second) | |
| OFF (default) | ||
| Waypoint Depends on your settings | You can specify a registered waypoint to display the direction, distance, and altitude difference* to that point. As you approach the specified point, an alarm sounds. | |
| OFF (default) | ||
| HR ON You can measure your heart rate. You need the optional heart rate monitor depending on the model you are using. For more information, see the User Manual. The default is set to ON for SF-810. | ||
* You need to enter the altitude when setting a waypoint on the smartphone.
Changing the Settings
Retrieving Saved Watch Settings
You can switch between settings to suit your training contents by re-uploading previously saved settings.
Creating New Settings
1 Start Run Connect on your smartphone.
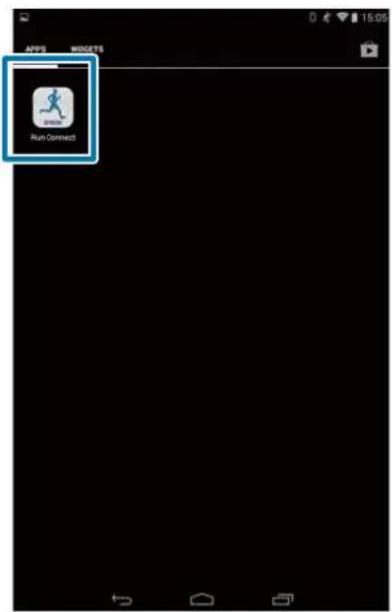
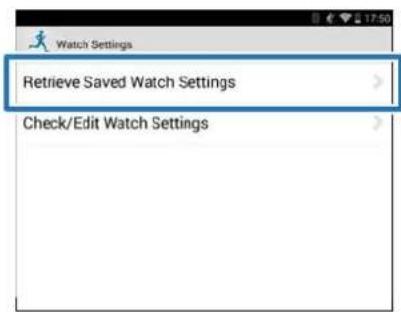
2 Tap Watch Settings.
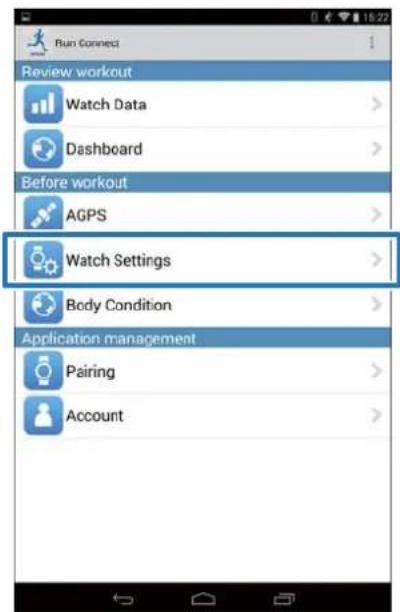
3 Tap Retrieve Saved Watch Settings.
4 Hold down D on this product.
Bluetooth communication starts.
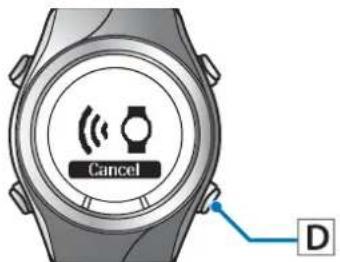
Note: You can also start Bluetooth communication from the Settings menu on this product. Refer to "Settings" in the User Manual for details.
5 Tap OK on the smartphone.
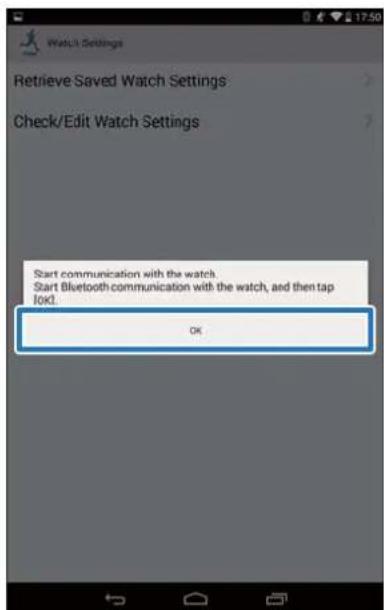
Changing the Settings
Note:
Try again if the communication fails.
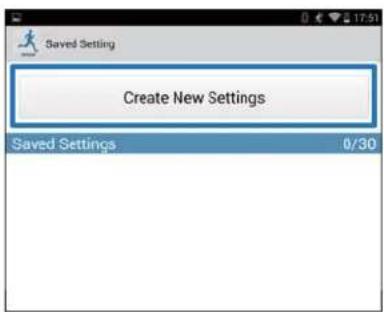
6
Tap Create New Settings.
7
Select from the below options.

8
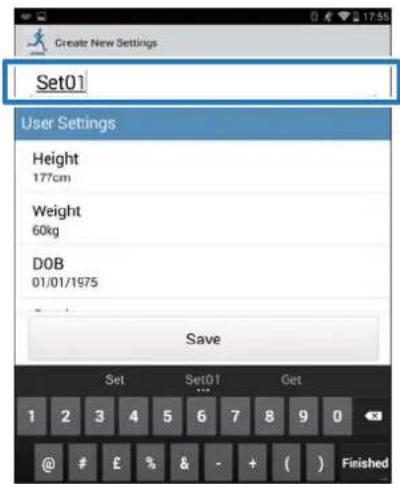
Enter the setting name.
9
Change the settings, and tap Save.

Selecting a Saved Settings
1
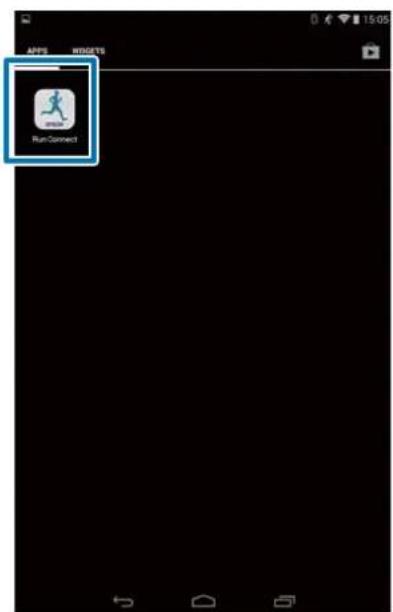
Start Run Connect on your smartphone.
Changing the Settings
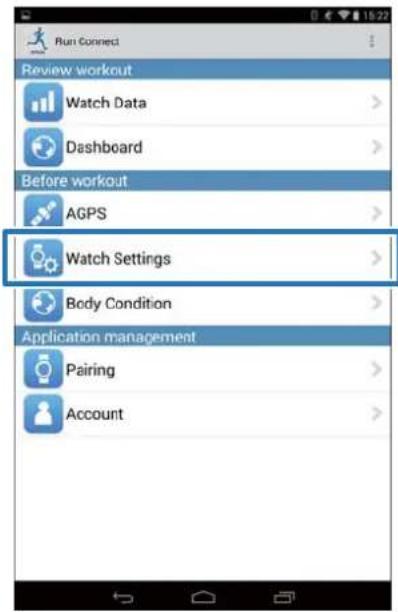
2 Tap Watch Settings.
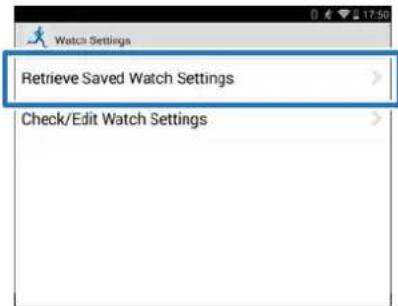
3 Tap Retrieve Saved Watch Settings.
4 Hold down D on this product.
Bluetooth communication starts.
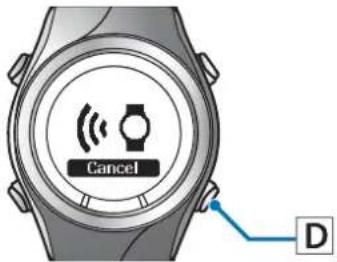
Note:
You can also start Bluetooth communication from the Settings menu on this product. Refer to "Settings" in the User Manual for details.
5 Tap OK on the smartphone.
![Watch Settings Retrieve Saved Watch Settings Check/Edit Watch Settings Start communication with the watch. Start Bluetooth communication with the watch, and then tap [ok]. OK](/content/2026/05/1107134/images/4ba957ef382c6b82e676a9713bb30da5d48c5bacf3c3609b2efc6bd8e92320ab.jpg)
Note: Try again if the communication fails.
6 Tap the saved settings, and then tap Write to Watch.

Changing the Settings
7 Tap OK.

8 When writing to watch is complete, tap OK.
Troubleshooting
This section explains how to solve problems that occur during use.
"Problem Solving" on page 52 "Unpairing Devices" on page 54 "Contacting us About this Product" on page 57
Troubleshooting
Problem Solving
Check each item.
| Screen Problem Message contents Solution | |||
| Watch Data ListUploadWatch SettingsAGPS | Communications to the watch was cut off. | Cannot communicate with the watch. Check that the Bluetooth setting on the Android device is on, and then try again. If the error continues to occur, start the pairing procedure again. | Try the following and tap the menu item again.☐Charge the watch☐Establish the communications with the watch and keep close to you☐Turn Bluetooth ON in the AndroidIf the problem persists even after you have tried the above, unpair and pair the devices again, and then tap the menu☐“Unpairing Devices” on page 54 |
| Watch Data List Watch Settings AGPS | Cannot communicate with the watch. | Cannot communicate with the watch. Check that the Bluetooth setting on the Android device is on, and then try again. If the error continues to occur, start the pairing procedure again. | Try the following and tap the menu item again.☐Charge the watch☐Establish the communications with the watch and keep close to you☐Turn Bluetooth ON in the AndroidIf the problem persists even after you have tried the above, unpair and pair the devices again, and then tap the menu☐“ Unpairing Devices” on page 54 |
| Cannot read information on the paired watch. Upload again. | |||
Troubleshooting
| Screen Problem Message contents Solution | |||
| Upload Cannot communicate with the watch. | Cannot communicate with the watch. Check that the Bluetooth setting on the Android device is on, and then try again. If the error continues to occur, start the pairing procedure again. | Try the following and tap Upload again.☐Charge the watch☐Establish the communications with the watch and keep close to you☐Turn Bluetooth ON in the AndroidIf the problem persists even after you have tried the above, unpair and pair the devices again, and then tap Upload.“Unpairing Devices” on page 54 | |
| Cannot read information on the paired watch. Upload again. | |||
If you cannot solve the problem even after trying the points above, contact our service center.
Troubleshooting
Unpairing Devices
Unpair the devices if the smartphone and this product are not communicating properly or you want to pair the smartphone with another product.
Operations on the smartphone
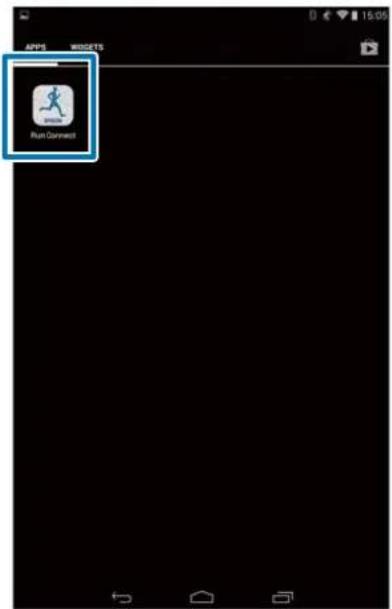
1
Start Run Connect on your smartphone.
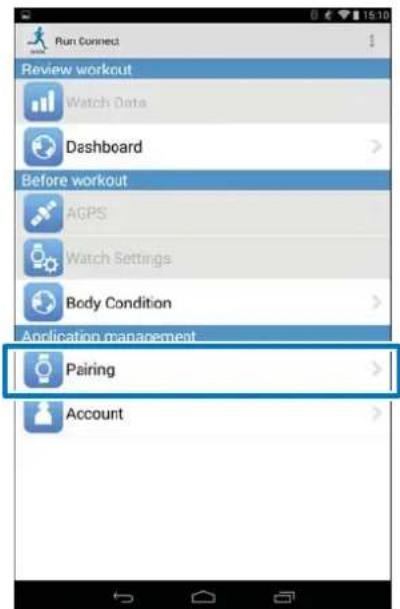
2
Tap Pairing.
3
Tap Release Pairing.
![Perform [Start Pairing] if you have not paired the watch that you want to connect. You need to perform [Release Pairing] and then [Start Pairing] if you want to connect a watch other than the already paired watch.](/content/2026/05/1107134/images/1d133790a32f8d541f482eb4088161d5de4238201feb54a28637b70262708508.jpg)
4
Check that the devices are unpaired and tap OK.
![Perform [Start Pairing] if you have not paired the watch that you want to connect. You need to perform [Release Pairing] and then [Start Pairing] if you want to connect a watch other than the already paired watch. Release pairing of your Android device and the watch? Remove information on the watch…](/content/2026/05/1107134/images/8ab6e8de624507a4b6a07db736fa6d1530fd257a400a8d6c2af41ad06884f9db.jpg)
Troubleshooting
5
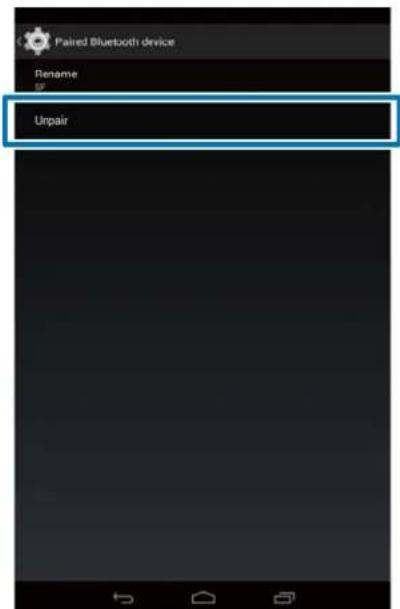
Tap the SF setting icon.
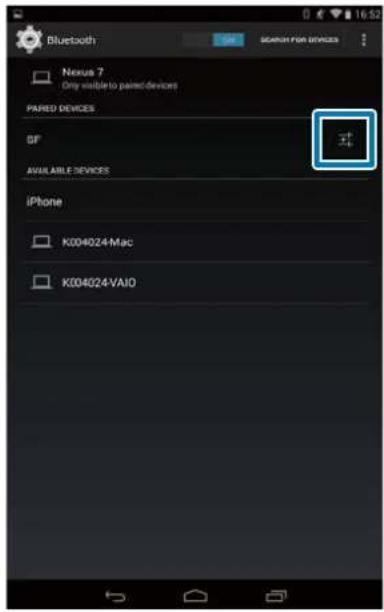
Note:
Operations may vary depending on the smartphone you are using. Refer to your smartphone's user manual for details.
6
Tap Unpair.
Operations on the Product
Operation buttons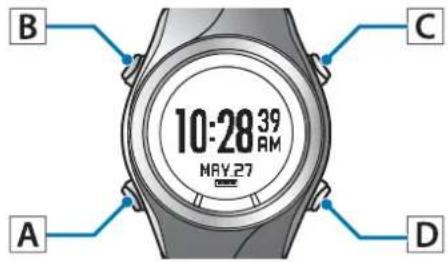
1
Displays the Settings menu.
Hold down B on the time screen.
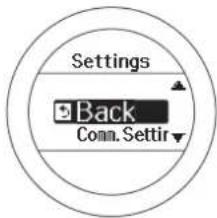
2
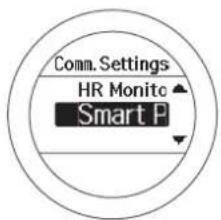
Select Comm. Settings.
Use C/D to select, and then press A.
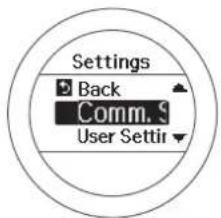
3
Select Smart Phone.
Use C/D to select, and then press A.
Troubleshooting
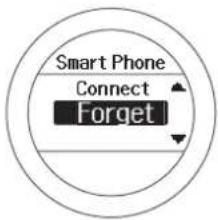
4 Select Forget Device.
Use C/D to select, and then press A.
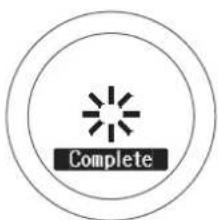
5 Complete the communication settings.
Press A.
6 Complete the settings.
Hold down A.
Displays the time screen.
Troubleshooting
Contacting us About this Product
Go to http://www.epson.eu/runsense for service contact details.
EPSON EUROPE B.V.
Address: Atlas Arena, Asia Building, Hoogoorddreef 5, 1101 BA Amsterdam Zuidoost, The Netherlands http://www.epson.com/europe.html
GPS Sports Monitor
RUNSENSE
www.epson.eu/runsense

412805800
©2014 Seiko Epson Corporation. All rights reserved.
- SMARTPHONE USER'S GUIDE
- INTRODUCTION
- TRADEMARKS
- CAUTIONS
- WHAT YOU CAN DO WITH THIS SMARTPHONE APP
- NOTE
- SUPPORTED DEVICES
- SMARTPHONE APPLICATION (RUN CONNECT)
- CONTENTS
- PREPARATION
- UPLOADING AND CHECKING
- MEASUREMENT DATA
- REDUCING THE GPS POSITIONING TIME (AGPS)
- CHANGING THE SETTINGS
- TROUBLESHOOTING
- INSTALL THE RUN CONNECT APP TO YOUR SMARTPHONE
- CREATE AND CONFIGURE YOUR RUNSENSE VIEW ACCOUNT
- CREATING AN ACCOUNT
- TAP CREATE ACCOUNT
- CREATE AN ACCOUNT
- CONFIGURING THE ACCOUNT
- TAP ACCOUNT
- ENTER LOGIN ID AND PASSWORD, AND THEN TAP SET
- ONCE THE ACCOUNT HAS BEEN SET UP, CLICK OK TO CONFIRM
- ENABLING BLUETOOTH ON YOUR SMARTPHONE
- TAP SETTINGS ON THE SMARTPHONE
- SET BLUETOOTH TO ON
- PAIR THE RUNSENSE DEVICE WITH YOUR SMARTPHONE
- TAP OK ON THE SMARTPHONE
- UPLOADING AND CHECKING MEASUREMENT DATA
- UPLOADING MEASUREMENT DATA
- UPLOADING BASIC DATA
- UPLOADING DETAILED DATA
- IMPORTANT
- TAP GET NEXT DATA WHEN YOU HAVE A LARGE VOLUME OF MEASUREMENT DATA
- CHECKING UPLOADED MEASUREMENT DATA
- ABOUT WEB APPLICATION (RUNSENSE VIEW)
- DASHBOARD
- WORKOUT
- MAP
- ENTERING WEIGHT AND BODY FAT
- CHECKING/EDITING WATCH SETTINGS
- HOW TO CONFIGURE
- TAP WATCH SETTINGS
- TAP CHECK/EDIT WATCH SETTINGS
- HOLD DOWN D ON THIS PRODUCT
- TAP THE ITEM YOU WANT TO CONFIGURE
- CHANGE THE SETTING, AND THEN TAP OK
- TAP WRITE TO WATCH
- TAP OK
- SETTING THE INTERVAL FUNCTION
- TAP INTERVAL
- TAP NO DATA WHEN YOU ARE ADDING A NEW SETTING
- ENTER OR EDIT THE TITLE
- TURN PROGRAMMABLE ON IF YOU WANT TO COMBINE MULTIPLE INTERVAL LISTS
- TAP THE INTERVAL LIST SETTING BUTTON
- SPECIFY THE SPRINT, RECOVERY, AND REPEAT ITEMS, AND TAP BACK
- TAP SAVE
- TAP BACK
- SETTING THE AT LAP FUNCTION
- TAP AT LAP
- TAP AT LAP LIST
- TURN PROGRAMMABLE ON IF YOU WANT TO COMBINE MULTIPLE LAPS
- TAP THE LAP SETTING BUTTON
- SPECIFY THE DISTANCE OR TIME, AND THEN TAP BACK
- TAP + TO ADD A LAP AND SPECIFY THE DISTANCE OR TIME FOR THE LAP
- SETTING THE TARGET PACE FUNCTION
- TAP TARGET PACE
- TAP TARGET PACE LIST
- TURN PROGRAMMABLE ON IF YOU WANT TO COMBINE MULTIPLE TARGET PACES
- SETTING THE WAYPOINT FUNCTION
- TAP WAYPOINT
- TAP WAYPOINT LIST
- LIST OF SETTINGS
- USER SETTINGS
- SYSTEM SETTINGS (SYS. SETTINGS)
- MEASUREMENT SETTINGS (MEAS. SETTINGS)
- RETRIEVING SAVED WATCH SETTINGS
- CREATING NEW SETTINGS
- TAP CREATE NEW SETTINGS
- SELECT FROM THE BELOW OPTIONS
- ENTER THE SETTING NAME
- CHANGE THE SETTINGS, AND TAP SAVE
- SELECTING A SAVED SETTINGS
- START RUN CONNECT ON YOUR SMARTPHONE
- TAP RETRIEVE SAVED WATCH SETTINGS
- TAP THE SAVED SETTINGS, AND THEN TAP WRITE TO WATCH
- WHEN WRITING TO WATCH IS COMPLETE, TAP OK
- PROBLEM SOLVING
- UNPAIRING DEVICES
- OPERATIONS ON THE SMARTPHONE
- OPERATIONS ON THE PRODUCT
- SELECT FORGET DEVICE
- COMPLETE THE COMMUNICATION SETTINGS
- COMPLETE THE SETTINGS
- CONTACTING US ABOUT THIS PRODUCT
Brand : EPSON
Model : Runsense iOS
Category : Wristwatch