NL-X4 - Coffee maker Mr. Coffee - Free user manual and instructions
Find the device manual for free NL-X4 Mr. Coffee in PDF.


| Product Type | Coffee Maker |
| Brand | Mr. Coffee |
| Model | NL-X4 |
| Capacity | 12 Cups (60 oz) |
| Programmable Timer | Yes |
| Auto Shut-Off | Yes, 2 hours |
| Brew Pause | Yes |
| Carafe Type | Glass |
| Water Reservoir | Removable, 60 oz |
| Filter Type | Basket, #4 cone paper filter |
| Dimensions (W x D x H) | 12.0 x 10.0 x 14.0 inches |
| Weight | 5.0 lbs |
| Power | 900 Watts |
| Voltage | 120 V |
| Frequency | 60 Hz |
| Color | Black |
| Controls | Buttons with LED display |
| Cord Length | 3 feet |
| Cleaning | Wipe exterior; hand wash carafe and filter basket |
| Descaling | Use vinegar or descaling solution every 3 months |
| Safety Features | Auto shut-off, cool-touch handle |
Frequently Asked Questions - NL-X4 Mr. Coffee
User questions about NL-X4 Mr. Coffee
0 question about this device. Answer the ones you know or ask your own.
Ask a new question about this device
Download the instructions for your Coffee maker in PDF format for free! Find your manual NL-X4 - Mr. Coffee and take your electronic device back in hand. On this page are published all the documents necessary for the use of your device. NL-X4 by Mr. Coffee.
USER MANUAL NL-X4 Mr. Coffee
©2003 Sunbeam Products, Inc. All rights reserved. MR. COFFEE® is a registered trademark of Sunbeam Products, Inc. Distributed by Sunbeam Products, Inc., Boca Raton, Florida 33431.
Visit us at www.mrcoffee.com. You will find exciting entertaining tips and ideas including great recipes!
©2003 Sunbeam Products, Inc. Todos los derechos reservados. MR. COFFEE® os una marca registrada de Sunbeam Products, Inc. Distribuido por Sunbeam Products, Inc., Boca Raton, Florida 33431.
natural_image
Illustration of two coffee ovens with digital display (no text or symbols on the devices themselves)IMPORTANT SAFEGUARDS
When using electrical appliances, to reduce the risk of fire, electric shock, and/or injury to persons, basic safety precautions should always be followed, including the following:
- Read all instructions carefully before using the coffeemaker.
- Do not touch the coffeemaker's hot surfaces. Use handles or knobs.
- To protect against electric shock, do not place cord, plug or coffeemaker in water or any other liquid.
- Close supervision is necessary when any appliance is used by or near children.
- Unplug from outlet when not in use and before cleaning. Allow to cool before putting on or taking off parts and before cleaning the appliance.
-
Do not operate any appliance with a damaged cord or plug or after the appliance malfunctions or has been damaged in any manner. Return appliance to an authorized service facility for examination, repair or adjustment.
-
The use of accessory attachments not recommended by MR. COFFEE may cause injuries.
-
Do not use outdoors.
-
Do not let cord hang over edge of table or counter or touch hot surfaces.
-
To reduce the risk of fire or electric shock, do not remove rating label cover. No user-serviceable parts inside. Repairs should be done by authorized service personnel only.
-
Do not place on or near hot gas or electric burner, or in a heated oven.
-
Always plug cord into the wall outlet before turning on any controls. To disconnect, turn power off, then remove plug from wall outlet.
-
Always use cold water to make coffee. Warm water or other liquids could cause damage to the coffeemaker.
-
Scalding may occur if the cover is lifted or brew basket is removed during the brewing cycle.
-
Do not use this appliance for other than intended use.
-
Do not immerse appliance in any liquid.
WARNING
TO AVOID DAMAGE OF, OR INJURY FROM DECANTER, FOLLOW THESE PRECAUTIONS:
- Do not set a hot decanter on a wet or cold surface.
- Do not place hot decanter on or near paper, cloth or other flammable material.
- Never use the decanter on a range top or in a microwave oven.
- Do not allow liquid to evaporate from decanter. Do not heat decanter when empty.
- Do not move entire unit when decanter contains hot liquid.
- Use the lid on the decanter while brewing and pouring coffee.
- Discard decanter if damaged in any manner, or if the decanter has a loose or weakened handle.
- Do not clean decanter with scouring powders, steel wool pads or other abrasive materials.
WARNING: To reduce the risk of fire or electric shock, do not remove any service covers. There are no user-serviceable parts inside the coffeemaker. Only authorized personnel should repair the coffeemaker.
Special Cord Set Instructions
A short power supply cord is provided to reduce the hazards resulting from entanglement or tripping over a longer cord.
- An extension cord may be used if care is exercised in its use. If an extension cord is used, the marked electrical rating of the extension cord should be at least as great as the electrical rating of the appliance. The extension cord should be arranged so that it does not drape over the counter or tabletop where it can be pulled on by children or tripped over accidentally. The electrical rating of the coffeemaker is listed on the bottom panel of the unit.
- This appliance has a polarized plug (one blade is wider than the other). To reduce the risk of electric shock, this plug will fit in a polarized outlet only one way. If the plug does not fit fully in the outlet, reverse the plug. If it still does not fit, contact a qualified electrician. Do not modify the plug in any way.
SAVE THESE INSTRUCTIONS
Precautions When Using This Coffeemaker Things To Do –
- Avoid areas of the coffeemaker that may become hot or emit steam when the machine is ON, particularly the filter basket and the water reservoir.
- Avoid jerking or straining the power cord when unplugging. Grasp the molded plug to unplug.
- Unplug the unit when not in use.
- Unplug the unit when wiping the exterior. Use only a damp cloth to wipe.
- Place machine well back from edge of counter.
Things Not To Do -
- Do not place a cloth or otherwise restrict airflow beneath the coffeemaker.
- Never reheat a beverage by passing it through the brewing system.
- Do not use abrasive or caustic cleaning compounds to clean the exterior of the unit.
- Do not store the machine until warming plate has cooled.
- In order to avoid contact with any fluid, do not place your hand underneath the filter basket.
- Do not permit children to use this machine without close adult supervision.
- The use of chemically softened water can inhibit proper filtration. This will affect the beverage flavor and will cause a long drip time from the filter basket. Avoid using chemically softened water.

natural_image
Simple line drawing of a teapot and a mug with steam, no text or symbols presentIntroduction
Congratulations! You are the owner of a MR. COFFEE® 4-Cup Coffeemaker. Please read all of the instructions in this booklet carefully before you begin to use this appliance. Proper care and maintenance will insure the long life of this appliance and its trouble-free operation. Save these instructions and refer to them often for cleaning and care tips.
Table of Contents
Important Safeguards 2
Special Cord Set Instructions 3
Precautions When Using This Coffeemaker 4
Introduction.... 5
Table of Contents 5
Setting Up Your Coffeemaker 6
Coffeemaker Features. 7
Adjusting the Power Cord Length 8
Setting the Clock 8
Operation and Use....9
Before First Use 9
Preparing Coffeemaker for Brewing 9
Suggested Coffee Measurement Chart 9
Brewing Coffee Now....10
Brewing Coffee Later 11
Cleaning the Coffeemaker Between Brew Cycles 12
Maintaining Your Coffeemaker....13
Cleaning the Coffeemaker....13
Using MR. COFFEE® Cleaner....13
Cleaning the Decanter 15
Troubleshooting 16
Service and Maintenance 17
Replacement Parts 17
Repairs. 17
Warranty Information 18
Setting Up Your Coffeemaker
Coffeemaker Features
- Pause 'n Serve
Allows you to interrupt the brewing cycle and pour a cup of coffee before the entire decanter is finished brewing. To restart the brewing process, return decanter to warming plate and coffee will automatically begin flowing through filter basket. Make sure decanter is placed all the way on the warming plate.
CAUTION: DO NOT REMOVE DECANTER FOR LONGER THAN 30 SECONDS OR THE FILTER BASKET MAY OVERFLOW.

- Removable Filter Basket
The filter basket will lift out of the outer brew basket for ease of cleaning and filling.
• 2-Hour Auto-Off (NLX4 and NLX5 only)
This feature keeps your coffee warm for two hours after brewing and then automatically shuts off your coffeemaker.
- Programmable Controls(NLX4 and NLX5 only)
Clock: The LED clock serves as a handy kitchen clock, and also allows you to set the timer.
Delay Brew: Would you like to wake up to a fresh pot of coffee? The timer allows you to preset when you would like the coffeemaker to brew your coffee automatically, up to 24 hours in advance.
- Cord Storage
Allows you to store extra cord length for a tidy countertop.

Coffeemaker Features


MODELS NL4 AND NL5
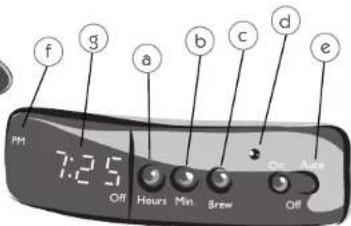

MODELS NLX4 AND NLX5
-
ON/OFF Switch (NL4 and NL5 Only)
-
Control Panel (NLX4 and NLX5 Only)
a. Hours Button
b. Minutes Button
c. Brew Button
d. On-Off Indicator
e. Auto Indicator
f. PM Indicator
g. Clock Display
- Swing Out Brew Basket
- Water Reservoir
- Power Cord
- MR. COFFEE® Brand 4-Cup Basket Style Coffee Filters (not included)
- Warming Plate
- Decanter
- Removable Filter Basket


Adjusting the Power Cord Length
You can customize the length of the power cord so that it is the exact length you desire.
To increase the length of the power cord: Grasp the power cord (not the power plug) and gently pull it away from the coffeemaker.
To decrease the length of the power cord: Grasp the power cord and feed into the coffeemaker.
Setting the Clock
(NLX4 and NLX5 only)
The clock flashes on the control panel to indicate that it has not been set.

You must set the clock if you want to use the timer feature.
To set the clock:
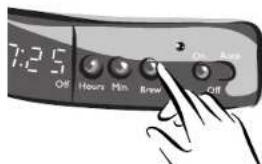
1) Press and hold the HOURS button until the clock displays the correct hour. See Figure A-1. The PM indicator will light to indicate a PM time; if the PM indicator is not lit, the time is AM.
2) Press and hold the MIN. button until the clock displays the correct minute. See Figure B-1. The clock is now set.

natural_image
Illustration showing two hand positions on a curved surface with arrows indicating movement direction (no text or symbols)FIGURE A-1

FIGURE B-1

Operation and Use
Before First Use
Before using your coffeemaker for the first time, wash decanter/lid and removable filter basket using a mild, non-abrasive detergent and water. Rinse each thoroughly. Follow the cleaning instructions on Page 13 to clean the inside of your coffeemaker.
Preparing Coffeemaker for Brewing
- Open the swing-out brew basket. Insert a MR. COFFEE ® 4-cup paper or permanent filter into the removable filter basket.
-
Add desired amount of coffee, referring to the Coffee Measurement Chart. (See Below) Shake lightly to level coffee.
-
Be sure the filter is centered before closing the brew basket.
-
Fill the decanter with cold water to desired capacity as marked on the side of the decanter (1 cup = 5 oz). To brew 4 cups of coffee, fill the decanter to the bottom of the metal band.
-
Pour the water into the water reservoir. NOTE: For easy and accurate filling, refer to cup markings inside the reservoir.
-
Place the decanter on the warming plate.

Make sure the decanter is accurately centered on the warming plate or the water and grounds will overflow from the brew basket. An overflow may cause personal injury or damage to property.
To reduce the risk of damaging the decanter and/or the risk of personal injury, do not add cold water to the decanter if the decanter is already hot. Allow the decanter to cool before using.
Do not brew coffee while the brew basket is open.
Suggested Coffee Measurement Chart
For best results, use freshly ground coffee.
Use level tablespoons (Tbsp.) or level coffee scoops of drip grind or a grind recommended for automatic drip coffeemakers.
To Brew
USE THIS AMOUNT OF GROUND COFFEE
4 cups 5 tablespoons or 2-1/2 scoops
2 cups 3 tablespoons or 1-1/2 scoops
Use more or less coffee to suit your taste 2 level tablespoons = 1 level coffee scoop
Brewing Coffee Now
For Models NL4 and NL5:
Push the switch to ON.
The ON/OFF switch will light, indicating that the coffeemaker is On and the brew cycle will begin. When the coffee stops flowing, the brew cycle is complete.

While the coffee is brewing, the Pause 'n Serve feature allows you to sneak a cup of coffee from the decanter. REPLACE THE DECANTER ON THE WARMING PLATE WITHIN 30 SECONDS TO PREVENT OVERFLOW AND POSSIBLE INJURY.
To turn Off the coffeemaker, push the ON/OFF switch to OFF.

If the brew basket overflows or fails to empty into the decanter, do not open the brew basket. Unplug the coffeemaker and wait for the contents to cool before handling.
For Models NLX4 and NLX5:
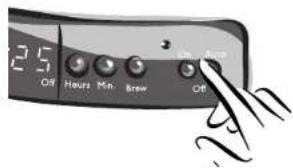
Slide the switch to ON. Press the brew button when ready to start brewing.
Your coffeemaker will keep your coffee hot for 2 hours, then automatically shut off.
To turn the coffeemaker Off, slide the switch to OFF.

Brewing Coffee Later
For Models NLX4 and NLX5:
You must set the time for when you would like the coffeemaker to begin brewing your coffee.
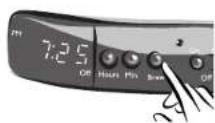
1) While the switch is in the OFF position, press and hold the BREW button.
2) While still pressing and holding the brew button, press and hold the HOURS button until the clock displays the hour you desire. The PM indicator will light to indicate a PM time; if the PM indicator is not lit, the time is AM.
3) While still pressing and holding the brew button, press and hold the MIN. button until the clock displays the correct minute.
4) Release the brew button.
5) Slide the switch to AUTO.
The Delay Brew timer is set and the coffeemaker will begin brewing the coffee at the time you selected.

If you want your coffee to brew at the same time the following day, simply add the desired amount of ground coffee, fill the water reservoir and slide the button from OFF to AUTO.


Cleaning the Coffeemaker Between Brew Cycles
To clean the used coffee grounds and filter:
1) Discard the grounds and paper filter and, if necessary, rinse the filter basket. You may also wash the filter basket in the dishwasher.
2) Rinse the decanter with warm water. You may also wash the decanter in the dishwasher (top rack dishwasher safe only).

Make sure the coffeemaker is turned Off when the decanter is empty.
Brewed coffee and grounds are both very hot. Handle them with care to avoid scalding injuries.
Unplug the coffeemaker's power cord when not in use.
Maintaining Your Coffeemaker
Maintaining your coffeemaker and its parts will help extend the life of the appliance.
Cleaning the Coffeemaker
Your coffeemaker must be cleaned when you notice any of the follow conditions:
- Excessive steaming
• Increased brew cycle times - The pumping action stops before all of the water has been pumped from the water reservoir
These conditions are caused by lime or other mineral deposits most commonly found in tap water.
How frequently you clean your coffeemaker depends upon the hardness of your tap water. The following table gives suggested cleaning intervals.
| Type of Water Cleaning Frequency | |
| Soft water Every 80 brew cyclesHard water Every 40 brew cycles |
MR. COFFEE®
COFFEEMAKER CLEANER
Using MR. COFFEE® Cleaner
Please refer to MR. COFFEE® Cleaner box for instructions. Read caution statement on side panel of box before use.
To Clean Your Coffeemaker:
1) Pour four cups of undiluted, white household vinegar into the water reservoir.

natural_image
Illustration of a blender with a lid pouring liquid from a cup (no text or symbols)2) Place a paper filter into the removable filter basket and close the brew basket.
3) Place the empty decanter on the warming plate.

Make sure to accurately place the decanter on the warming plate to avoid the possibility of overflow.
4) Start the brew cycle:
For Models NL4 and NL5:
Push the ON/OFF switch to ON to begin the brew cycle.
For Models NLX4 and NLX5:
Slide the switch to ON. Then, press the brew button to begin the brew cycle.
5) When 3 cups of vinegar have flowed into the decanter, turn the coffeemaker Off and let the vinegar stand for 30 minutes.
6) After the 30-minute period, turn coffeemaker back On and let remainder of vinegar flow through.

natural_image
Illustration of a coffee maker with handle and lid (no text or symbols)

7) Discard both the vinegar and paper filter.
8) Fill the decanter with tap water and pour it into the water reservoir.
9) Place the decanter on the warming plate and begin the brew cycle.
10) When the brew cycle is complete, discard the water in the decanter and turn the coffeemaker. Off. If necessary, repeat steps 8 through 10 to flush all traces of vinegar from the coffeemaker.

natural_image
Illustration of a shoe being poured into a container (no text or symbols)
natural_image
Illustration of a coffee maker with handle and control panel (no text or symbols)Cleaning the Decanter
Hard water can leave a whitish stain on the decanter. Coffee and tea may then turn this stain brown.
To remove decanter stains:
1) Fill the decanter with a solution of equal parts tap water and vinegar and let the solution stand in the decanter for approximately 20 minutes.
2) Discard the solution and wash and rinse the decanter.

Do not use harsh abrasive cleansers that may scratch the decanter; scratches may cause the decanter to break.

natural_image
Illustration of a coffee maker with a bottle beside it (no text or symbols visible)TROUBLESHOOTING
| POTENTIAL PROBLEMS | PROBABLE CAUSE |
| “ON” LIGHT DOES NOT ILLUMINATE | UnpluggedPower outage |
| COFFEE IS NOT BREWING | UnpluggedPower outageThe water reservoir is emptyThe filter basket is not properly insertedDecanter is not placed all the way on the warming plate |
| COFFEEMAKER ONLY BREWS WATER | No grounds in filter basket |
| COFFEEMAKER BREWS SLOWLY | Coffeemaker needs cleaning |
| FILTER BASKET OVERFLOWS | The filter basket is not properly insertedDecanter is not placed all the way on the warming plateDecanter lid not on carafeToo many grounds placed in filterDecanter was removed from warming plate longer than 30 seconds |
| BURNING COFFEE SMELL | Empty decanter was left on hot warming plateCoffee was spilled on the warming plate |
| COFFEE IS NOT HOT | Power outageAutomatic shut-off was activated (NLX4 & NLX5 Only) |
| COFFEE TASTES BAD | Coffee ground other than for automatic-drip coffeemaker was usedGround coffee-to-water ratio was unbalancedCoffeemaker needs cleaning |
| GROUNDS ARE IN COFFEE | Paper filter not properly seated in basketFilter collapsed |
Questions? You can call us toll-free at 1-800-672-6333.
Service and Maintenance
Replacement Parts
- Filters
For better tasting coffee and tea, we recommend that you use MR. COFFEE® brand 4-cup paper filters or MR. COFFEE® brand permanent filters. These filters are available at most grocery stores.
- Decanters
You can usually purchase a replacement decanter from the store where you purchased your coffeemaker. If you are unable to find a replacement, please call 1-800 MR COFFEE (1-800-672-6333) in the U.S. or 1-800-667-8623 in Canada for information on where you can find a store that carries replacement decanters.
Repairs
If your coffeemaker requires service, do not return it to the store where you purchased it. All repairs must be made by Sunbeam or by an authorized MR. COFFEE® Service Center. If you live in the U.S. or Canada, please call us at the following toll-free telephone numbers to find the location of the nearest authorized service center:
U.S. 1-800 MR COFFEE (1-800-672-6333)
Canada 1-800-667-8623
To assist us in serving you, please have the model number (NL4, NL5, NLX4 or NLX5) and date of purchase information when you call.
Visit our website and discover the secret to brewing the perfect cup of coffee. You'll also find a rich blend of gourmet recipes, entertaining tips and the latest information on MR. COFFEE® products.
www.mrcoffee.com

natural_image
Illustration of a coffee mug with steam rising next to a cup (no text or symbols)1-YEAR LIMITED WARRANTY
Sunbeam Products, Inc., or if in Canada, Sunbeam Corporation (Canada) Limited (collectively "Sunbeam") warrants that for a period of one year from the date of purchase, this product will be free from defects in material and workmanship. Sunbeam, at its option, will repair or replace this product or any component of the product found to be defective during the warranty period. Replacement will be made with a new or remanufactured product or component. If the product is no longer available, replacement may be made with a similar product of equal or greater value. This is your exclusive warranty.
This warranty is valid for the original retail purchaser from the date of initial retail purchase and is not transferable. Keep the original sales receipt. Proof of purchase is required to obtain warranty performance. Sunbeam dealers, service centers, or retail stores selling Sunbeam products do not have the right to alter, modify or any way change the terms and conditions of this warranty.
This warranty does not cover normal wear of parts or damage resulting from any of the following: negligent use or misuse of the product, use on improper voltage or current, use contrary to the operating instructions, disassembly, repair or alteration by anyone other than Sunbeam or an authorized Sunbeam service center. Further, the warranty does not cover: Acts of God, such as fire, flood, hurricanes and tornadoes.
What Are the Limits on Sunbeam's Liability?
Sunbeam shall not be liable for any incidental or consequential damages caused by the breach of any express, implied or statutory warranty or condition.
Except to the extent prohibited by applicable law, any implied warranty or condition of merchantability or fitness for a particular purpose is limited in duration to the duration of the above warranty.
Sunbeam disclaims all other warranties, conditions or representations, express, implied, statutory or otherwise. Sunbeam shall not be liable for any damages of any kind resulting from the purchase, use or misuse of, or inability to use the product including incidental, special, consequential or similar damages or loss of profits, or for any breach of contract, fundamental or otherwise, or for any claim brought against purchaser by any other party.
Some provinces, states or jurisdictions do not allow the exclusion or limitation of incidental or consequential damages or limitations on how long an implied warranty lasts, so the above limitations or exclusion may not apply to you.
This warranty gives you specific legal rights, and you may also have other rights that vary from province to province, state to state or jurisdiction to jurisdiction.
How to Obtain Warranty Service
In the U.S.A.
If you have any question regarding this warranty or would like to obtain warranty service, please call 1 800 672-6333 and a convenient service center address will be provided to you.
In Canada
If you have any question regarding this warranty or would like to obtain warranty service, please call 1 800 667-8623 and a convenient service center address will be provided to you.
In the U.S.A., this warranty is offered by Sunbeam Products, Inc. located in Boca Raton, Florida 33431.
In Canada, this warranty is offered by Sunbeam Corporation (Canada) Limited, located at 5975 Falbourne Street, Mississauga, Ontario L5R 3VB.
PLEASE DO NOT RETURN THIS PRODUCT TO ANY OF THESE ADDRESSES OR TO THE PLACE OF PURCHASE.
PRECAUCIONES IMPORTANTES
natural_image
Simple line drawing of a teapot and a mug with steam, no text or symbols presentIntroducción

natural_image
Illustration of two hand positions on a curved surface, showing finger placement and movement direction (no text or symbols)FIGURA A-1

FIGURA B-1

Operación y Uso
natural_image
Illustration of a blender being poured into a cup (no text or symbols)natural_image
Illustration of a modern coffee maker with a handle and lid (no text or symbols visible)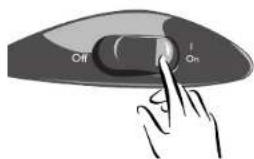
natural_image
Illustration of a shoe being poured into a container (no text or symbols)
natural_image
Illustration of a coffee maker with handle and lid (no text or symbols)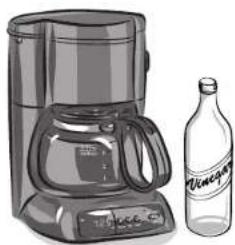
natural_image
Illustration of a coffee maker with a bottle beside it (no text or symbols visible)PROBLEMAS Y SOLUCIONES
natural_image
Illustration of a coffee cup and a steaming mug with the word 'café' on its side (no additional text or symbols)- IMPORTANT SAFEGUARDS
- WARNING
- TO AVOID DAMAGE OF, OR INJURY FROM DECANTER, FOLLOW THESE PRECAUTIONS:
- Special Cord Set Instructions
- SAVE THESE INSTRUCTIONS
- Precautions When Using This Coffeemaker Things To Do –
- Things Not To Do -
- Introduction
- Table of Contents
- Setting Up Your Coffeemaker
- Coffeemaker Features
- - Pause 'n Serve
- CAUTION: DO NOT REMOVE DECANTER FOR LONGER THAN 30 SECONDS OR THE FILTER BASKET MAY OVERFLOW.
- - Removable Filter Basket
- • 2-Hour Auto-Off (NLX4 and NLX5 only)
- - Programmable Controls(NLX4 and NLX5 only)
- - Cord Storage
- Adjusting the Power Cord Length
- Setting the Clock
- Operation and Use
- Before First Use
- Preparing Coffeemaker for Brewing
- Suggested Coffee Measurement Chart
- Brewing Coffee Now
- Brewing Coffee Later
- Cleaning the Coffeemaker Between Brew Cycles
- Maintaining Your Coffeemaker
- Cleaning the Coffeemaker
- COFFEE®
- Using MR. COFFEE® Cleaner
- To Clean Your Coffeemaker:
- For Models NL4 and NL5:
- For Models NLX4 and NLX5:
- Cleaning the Decanter
- Service and Maintenance
- Replacement Parts
- - Filters
- - Decanters
- Repairs
- U.S. 1-800 MR COFFEE (1-800-672-6333)
- Canada 1-800-667-8623
- 1-YEAR LIMITED WARRANTY
- What Are the Limits on Sunbeam's Liability?
- How to Obtain Warranty Service
- PLEASE DO NOT RETURN THIS PRODUCT TO ANY OF THESE ADDRESSES OR TO THE PLACE OF PURCHASE.
- PRECAUCIONES IMPORTANTES
- Introducción
- Operación y Uso
Brand : Mr. Coffee
Model : NL-X4
Category : Coffee maker