
JCV-8002D - Broom Jocel - Free user manual and instructions
Find the device manual for free JCV-8002D Jocel in PDF.


| Product Type | Stick Vacuum Cleaner (Electric Broom) |
| Model | JCV-8002D |
| Brand | Jocel |
| Power Source | Rechargeable Li-ion battery |
| Battery Voltage | 22V |
| Battery Capacity | 2000mAh |
| Dust Container Capacity | 0.5L |
| Weight | 2.5 kg |
| Dimensions (folded) | 110 x 25 x 15 cm |
| Runtime (normal mode) | 30 minutes |
| Charging Time | 4-5 hours |
| Noise Level | <75 dB |
| Filtration System | HEPA washable filter |
| Accessories Included | Crevice tool, brush, wall mount, charging cable |
| LED Headlights | Yes, for cleaning under furniture |
| Wall Mountable | Yes |
| Detachable Handheld Unit | Yes |
| Maintenance | Washable filter, easy empty dust cup |
| Safety Features | Overheat protection, battery BMS |
| Certifications | CE, RoHS |
| Spare Parts Available | Replacement battery, filter, brush roll |
Frequently Asked Questions - JCV-8002D Jocel
User questions about JCV-8002D Jocel
0 question about this device. Answer the ones you know or ask your own.
Ask a new question about this device
Download the instructions for your Broom in PDF format for free! Find your manual JCV-8002D - Jocel and take your electronic device back in hand. On this page are published all the documents necessary for the use of your device. JCV-8002D by Jocel.
USER MANUAL JCV-8002D Jocel
natural_image
Exterior view of a silver vacuum cleaner (no text or symbols visible on the device body)JCV-8002D
Read the Instruction Manual carefully.
natural_image
Close-up of a mechanical component with a screwdriver inserted, no visible text or symbolsnatural_image
Three identical grayscale image of a three-wheeled device with control buttons, no visible text or symbols.natural_image
Close-up of hands cleaning a large object with a circular pattern (no text or symbols visible)natural_image
Close-up of a hand holding a black rectangular object, with an arrow indicating downward motion (no text or symbols visible)natural_image
Close-up of a hand holding a small electronic device with a screwdriver inserted, showing internal components (no text or symbols visible)natural_image
Close-up of a gray gaming controller with two white buttons and a handle (no text or symbols visible)natural_image
Close-up of a mechanical component with angular features and directional arrows (no text or symbols)natural_image
Close-up of a hand pressing down on a textured, metallic object with a triangular cutout (no visible text or symbols)natural_image
Two hands holding a device with a slide and a perforated cover, showing a change in the shape (no text or symbols visible)natural_image
Close-up of hands assembling a mechanical component with a directional arrow (no text or symbols visible)natural_image
Close-up of hands holding a mechanical component with a cylindrical shaft and flange (no visible text or symbols)natural_image
Close-up of a hand holding a device with a curved handle and arrow indicating motion (no visible text or symbols)natural_image
Close-up of a mechanical device with a handle and lever mechanism (no visible text or symbols)natural_image
Close-up of a robotic arm with a wrench inserted, showing mechanical components and a tool (no text or symbols visible)natural_image
Close-up of a mechanical component with visible structural ribs and mounting holes (no text or symbols)natural_image
Close-up of a metallic mechanical component with a blade being cut, showing internal grooves and mounting holes (no text or symbols visible)natural_image
Close-up of a robotic arm with a tool inserted, showing no visible text or symbolsnatural_image
Close-up of a mechanical component with a screwdriver inserted, no visible text or symbolsnatural_image
Close-up of hands using a power shaver to clean or store items (no visible text or symbols)natural_image
Three identical grayscale image of a three-wheeled device with control switches, no visible text or symbols.natural_image
Close-up of a hand holding a black rectangular object with an arrow indicating downward motion (no text or symbols visible)natural_image
Close-up of a hand holding a small electronic device with a screwdriver inserted, showing internal components (no text or symbols visible)natural_image
Close-up of a gray gaming controller with two white buttons and a handle (no text or symbols visible)natural_image
Close-up of a mechanical component with angular motion arrows (no text or symbols)DEPÓSITO DE POLVO Y FILTRO
natural_image
Close-up of a hand pressing down on a mechanical component with a warning symbol (no text or labels visible)natural_image
Two hands performing a 3D printing or cutting process: one pressing down on a flat surface, the other holding a perforated metal component (no text or symbols visible)natural_image
Close-up of hands assembling a mechanical component with a directional arrow (no text or symbols visible)natural_image
Close-up of hands holding a mechanical component, showing a shaft and flange assembly (no text or symbols visible)natural_image
Close-up of a hand holding a cylindrical device with a black handle, no visible text or symbolsnatural_image
Close-up of a handheld vacuum cleaner with a handle and blade (no visible text or symbols)natural_image
Close-up of a hand using a screwdriver to adjust a mechanical component (no visible text or symbols)natural_image
Close-up of a mechanical component with visible mounting holes and wheels (no text or symbols)afuera.
natural_image
Close-up of a metal mechanical component with two blades inserted, showing internal grooves and mounting holes (no text or symbols visible)natural_image
Close-up of a mechanical component with a tool inserted, no visible text or symbolsCongratulations on your purchase of your new vacuum cleaner. There are many useful features built into your cleaner and we recommend that you carefully read this instruction book so that you may take best advantage of them.
BEFORE YOU BEGIN
This product must be operated in accordance with these instructions and used only for domestic cleaning to remove DRY dirt and dust from household carpets, fl ooring and fabrics. This cleaner is intended for domestic household use only and is not designed for the collection of vitreous building material including particle board construction products and similar products such as wood/fi bres, sand, cement, fi llers, fi bre glass etc. The pick-up of these materials may be harmful to your cleaner and will void the manufacturer's warranty.
PLEASE READ THESE INSTRUCTIONS THOROUGHLY. This will ensure you obtain full benefit from your new cleaner. Keep this Instruction Book in a handy place for future reference.
IMPORTANT
Always switch the cleaner off and remove the plug from the electricity supply before cleaning your appliance, when not in use, or attempting any maintenance task. The cleaner must only be connected to an AC supply at the voltage shown on the rating plate. This cleaner should only be used for its intended purpose as described in these instructions. Never operate the vacuum cleaner without fi Iters.
DO NOT pick up hard or sharp objects, matches, hot ashes, cigarette ends or similar items.
DO NOT pick up flammable liquids such as cleaning fluids, petrol etc., or use in the presence of such vapors.
DO NOT use your cleaner out of doors or on any wet surface or for WET pick-up.
DO NOT use your cleaner over the power cord.
This appliance is not intended for use by persons (including children) with reduced physical, sensory or mental capabilities, or lack of experience and knowledge, unless they have been given supervision or instruction concerning use of the appliance by a person responsible for their safety. Young children should be supervised to ensure that they do not play with the appliance.
DO NOT direct the appliance towards people or animals.
Always disconnect the cleaner from the power outlet by pulling out the plug directly, NEVER by pulling on the supply cord. If using an extension cord please make sure that it is of an approved type and that it is fully extended. Failure to do so could cause your cleaner to overheat and damage it.
FAULTS
Do not continue to use this appliance if it appears to be faulty or the supply cord is damaged. If a fault cannot be rectified, please return to the point of purchase. If damaged, return the cleaner for repair by an authorized Service Centre in order to avoid a safety hazard. Consult the trouble shooting guide in this manual if your vacuum cleaner fails to operate properly. Contact an authorized service agent if the problem persists.
AFTER USE
Switch the cleaner off and remove the plug from the electricity supply. Always switch off and remove the plug before attaching any accessories or cleaning the appliance.
PROTECTING THE ENVIRONMENT
When you have unpacked the unit, do not simply throw the packing into the household waste. Take them to an appropriate collecting point for the recycling.
PARTS

PREPARING THE APPLIANCE

natural_image
Close-up of a mechanical component with a screwdriver inserted, no visible text or symbols-
Make sure the hand-held vacuum cleaner has been correctly fitted to the appliance.
-
Attached the floor nozzle by inserting the connector into the terminal at the point of the appliance and screwing the mounting screw into the connector on the floor nozzle.

natural_image
Three identical grayscale image of a mobile phone control panel with labeled buttons (no readable text or symbols beyond labels)- Turn on the appliance by pushing the on/off button on the foldable handle forward. The appliance has two settings:
- CHÃO (FLOOR) - Is for cleaning hard surfaces - CARPETE (CARPET) - Is for cleaning carpets and rugs.
- Push the on/off button backward to the "O" OFF position to switch off the appliance.

natural_image
Close-up of hands pressing down on a mechanical component with a circular feature (no text or symbols visible)-
Detach the hand-held vacuum cleaner from the appliance by pressing the release button whilst simultaneously pulling the hand-held vacuum cleaner upwards.
-
Push the on/off button forward to switch on the appliance and backward to switch it off.

natural_image
Close-up of a hand holding a black rectangular object with a downward arrow indicating motion (no text or symbols visible)-
The crevice nozzle is fitted to the handheld vacuum cleaner and can be extended from the nozzle tip when cleaning difficult to reach spots.
-
Attach the hand-held vacuum into the hollow on the appliance until you hear a click, once you have finished using it.
NOTE:
- If the appliance loses suction power during use, the battery may need to be recharged.
- Lack of suction power may also be caused by the filter being blocked and needing cleaning.
- If the appliance still does not have full suction power after cleaning or replacing the filter, the nozzle tip or the nozzle may be blocked.
• We recommend that you empty the dust container after each vacuuming.
USING THE APPLIANCE
For safety reasons, the battery is only partially charged when the appliance leaves the factory. Therefore, you must always start by charging the battery fully. Charge the appliance for at least 20 hours before first use.
CHARGING THE BATTERY

natural_image
Close-up of a hand holding a small electronic device with a screwdriver inserted, showing internal components (no text or symbols visible)- Make sure the appliance is switched off.
- Insert the charger into the mains socket and connect the cord to the charger socket on the hand-held vacuum cleaner.
- Switch on the power. The red recharging indicator on the appliance lights up.

natural_image
Close-up of a gray gaming controller with two white buttons and a handle (no text or symbols visible)- Leave the battery to fully charge - approx. 20 hours. If the battery is completely discharged, the recharging indicator remains lit while the appliance is connected to the charger.
- Switch off the power and remove the charger from the mains socket after recharging is completed.
HANDLOE FOLDING FOR STORAGE
Firmly press the handle release button located half way down the handle shaft, to enable the handle to rotate freely in the vertical plane, and rotate the handle to the folded state. If you want to use the cleaner, rotate the handle to the vertically upward position to make the handle fixed through automatic locking.

natural_image
Close-up of a mechanical component with angular motion arrows (no text or symbols)DOST CONTAINER AND FILTER
This appliance is not equipped with a dust bag. The dust/dirt is sucked up into the transparent dust holder instead. Once the dust is in this container, it whirls around so that it does not block suction. The air sucked in is cleaned by means of a two-component washable permanent filter in the dust container.
EMPTYING THE DUST CONTAINER AND CLEANING THE FILTER
IMPORTANT: if the appliance loses suction power during use, the filter pad may be dirty, and needs cleaning or replacing. Never use the appliance, when the filter is dirty or when it has not been replaced.

natural_image
Close-up of a hand pressing down on a mechanical component with a circular vent pattern (no text or symbols visible)- Detach the hand-held vacuum cleaner from the appliance by pressing the release button whilst simultaneously pulling the hand-held vacuum upwards.

natural_image
Two hands performing a 3D printing or cutting process: one pressing a component, the other holding a perforated metal part (no text or symbols visible)- Grab the dust container with one hand and press the opening button to release the dust container from the motor section.
natural_image
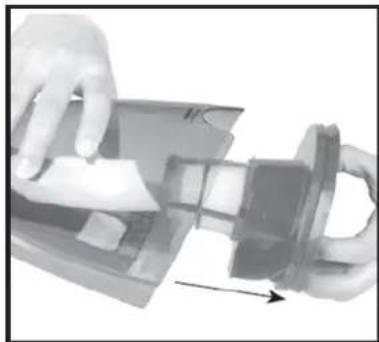
Close-up of hands assembling a mechanical component with a curved arrow indicating motion (no text or symbols visible)- Pull the two parts of the filter out of the dust container and empty the container. If necessary rinse the dust container with clean water and wipe the container with a dry cloth.
natural_image
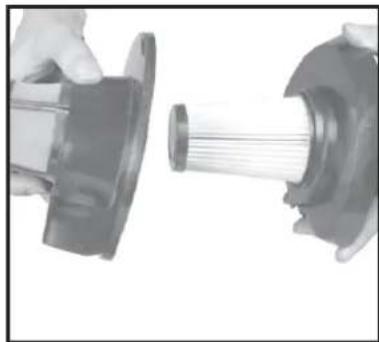
Close-up of hands holding a mechanical component, showing a flanged shaft and a circular housing (no text or symbols visible)- The filter consists of two sections, both of which must be cleaned. Brush the parts with a small brush and/or wash them in tepid water. Add a little detergent if necessary. Check the filter pad is completely dry before replacing into the appliance. NEVER insert a wet filter into the appliance.

natural_image
Close-up of a hand holding a cylindrical device with internal components, no visible text or symbols- Place the top part of the filter on the bottom part, and place the filter in the dust container. Press down the filter far enough so that it fits tightly to the sides of the dust container. The filter can only be fitted in one position.

natural_image
Close-up of a mechanical device with a handle and internal component, no visible text or symbolson the motor section clicks into place in the hole on the dust container so that the dust container is firmly mounted on the motor section.
-
Replace the hand-held vacuum cleaner on the appliance
-
Mount the dust container by pressing it firmly onto the motor selection. Check that the lock tab
CLEANING
- Clean the appliance by wiping it with a damp cloth. A little detergent can be added if the appliance is heavily soiled.
- Never use a scouring pad, steel wool or any form of strong solvents or abrasive cleaning agents to clean the appliance, as those may damage the outside surfaces of the appliance.
- Clean the filter as described above. When the filter pads are worn or cannot be properly cleaned, replace them with pads of the same type.
- Check that the dust container and the filter are completely dry before the appliance is assembled and used again.
CLEANING THE BRUSH OF THE FLOOR
There is a rotating brush in the floor nozzle. The brush must be cleaned if it becomes covered in hair or other substances.

natural_image
Close-up of a robotic arm with a wrench inserted, showing mechanical components and a tool (no text or symbols visible)- Switch the appliance off.
- Detach the floor nozzle from the appliance by loosening the mounting screw at the back of the connector on the floor nozzle and sliding off the floor nozzle.

natural_image
Close-up of a mechanical component with visible mounting holes and wheels (no text or symbols)- Turn the floor nozzle upside down so that you can see the rotating brush.

natural_image
Close-up of a metallic mechanical component with a blade being cut (no visible text or symbols)- Remove hair, fibers and dust from the brush. Use scissors to cut hair from the roller brush.

natural_image
Close-up of a robotic arm with a tool inserted, showing no visible text or symbols- Reattach the back of the floor nozzle so that the screw holes fit together and press it into position until a click is heard, Make sure, the two parts fit tightly all the way round.
- Screw back all the screws.
Due to our program of continuous product improvement and innovation, sometimes the product you buy may differ slightly from the one shown on this product carton.
FAULT AND REPAIR
In Case of Faults, please check the below guild. If the fault continues, return to your place of purchase.
| Faults | Solution |
| Cleaner refuses to work. | 1. Check whether the power plug is plugged in firmly. Unplug it, and insert it the socket again.2. Check whether the socket is powered on.3. Check whether the switch of cleaner is set at “ON” position. |
| Suction force is decreased | 1. Check for blockages & remove.2. Check filters are clean3. Check the dust container is fitted correctly to the machine. |
| Abnormal sound is heard while the motor is rotating | 1. Stop using the cleaner immediately.2. Check for blockages & remove.3. Return to the supplier |
| Roller brush refuses to rotate | 1. Check whether the hand held unit is fitted correctly.2. Check for blockages around the brush bar & remove.3. Check the belt is still fitted correctly. |
GENERAL WARRANTY TERMS
- The warranty is valid only on presentation of invoice of purchase.
- This WARRANTY is limited exclusively to parts substitution ineffective due to faulty manufacture, made in our workshops.
- The elimination of several faults of the scope of the guarantee is made for repair or replacement of defective parts, according to the discretion of our technical services. Defective parts are our property.
- Are not covered under warranty damage caused by transportation, neglect or poor use, improper assembly or installation, as well as external influences such as: lightning strikes or power, flooding, humidity, etc..
- Lose warranty, all appliances that are not being used according to the instructions, or connected to FEEDING NETWORKS not guarantee a constant voltage of 220/240Volts.
- The warranty does not cover damages for personal injury or damage caused directly or indirectly in any capacity whatsoever.
- This warranty terminates when it is found to have been undergoing repairs, alterations or interventions by any person not authorized by Jocel.
THE WARRANTY BECOMES VOID
- With the modification or disappearance of the nameplate of the appliance.
- Exceeded 24 months for home appliances and 06 months for industrial appliances date of acquisition, warranty expires and assistance will be made by debiting the costs of manpower, according to the task force.
TECHNICAL ASSISTANCE
-
To get any information our TECHNICAL SERVICES are available to help the users of our products.
-
When prompted, elaborate prior estimate of repair.
WARRANTY PERIOD:
• 02 YEARS FOR DOMESTIC APPLIANCES
• 06 MONTHS FOR INDUSTRIAL APPLIANCES
ASSISTÊNCIA TÉCNICA ASISTENCIA TÉCNICA TECHNICAL ASSISTANCE
Telef. 00 351 252 910351
Fax: 00 351 252 910367
E-mail: assistencia@jocel.pt
http://www.jocel.pt
- DEPÓSITO DE POLVO Y FILTRO
- BEFORE YOU BEGIN
- IMPORTANT
- FAULTS
- AFTER USE
- PROTECTING THE ENVIRONMENT
- PARTS
- PREPARING THE APPLIANCE
- NOTE:
- USING THE APPLIANCE
- CHARGING THE BATTERY
- HANDLOE FOLDING FOR STORAGE
- DOST CONTAINER AND FILTER
- EMPTYING THE DUST CONTAINER AND CLEANING THE FILTER
- CLEANING
- CLEANING THE BRUSH OF THE FLOOR
- FAULT AND REPAIR
- GENERAL WARRANTY TERMS
- THE WARRANTY BECOMES VOID
- TECHNICAL ASSISTANCE
- WARRANTY PERIOD:
Brand : Jocel
Model : JCV-8002D
Category : Broom