
20PF1000 - Television PHILIPS - Free user manual and instructions
Find the device manual for free 20PF1000 PHILIPS in PDF.


| Product Type | Television |
| Brand | Philips |
| Model | 20PF1000 |
| Screen Size (Diagonal) | 20 inches (approx. 51 cm) |
| Display Technology | CRT (Cathode Ray Tube) |
| Resolution | 640 x 480 pixels (standard definition) |
| Aspect Ratio | 4:3 |
| Power Supply | 220-240 V, 50 Hz |
| Power Consumption (Typical) | 75 W |
| Weight (approx.) | 18 kg |
| Dimensions (W x H x D) approx. | 500 x 450 x 450 mm |
| Audio Output | 2 x 5 W stereo speakers |
| Connectivity | SCART (Euroconnector), Antenna input |
| Remote Control | Included (Philips RC-xxx) |
| On-Screen Display (OSD) | Yes, multi-language menu |
| Teletext | Yes, up to 1000 pages |
| Child Lock | Yes |
| Auto Power Off | Yes (adjustable timer) |
| Cleaning Instructions | Wipe with a soft dry cloth; avoid liquid cleaners |
| Spare Parts Availability | Remote control, power cord, SCART cable (optional) |
| Repair Information | Refer to service manual; user-replaceable fuses only |
| Manual Format | PDF (71 pages, English) |
Frequently Asked Questions - 20PF1000 PHILIPS
User questions about 20PF1000 PHILIPS
0 question about this device. Answer the ones you know or ask your own.
Ask a new question about this device
Download the instructions for your Television in PDF format for free! Find your manual 20PF1000 - PHILIPS and take your electronic device back in hand. On this page are published all the documents necessary for the use of your device. 20PF1000 by PHILIPS.
USER MANUAL 20PF1000 PHILIPS
Teletext Dili seçmek
Teletext

PC Modu
natural_image
Blue background with white icons including a speaker, TV, grid, and mechanical symbols (no text or labels)
bar
| Value | Category | |---|---| | 7 | İsim | | 8 | Taşı | | 9 | Sil | | 10 | Atla | | 11 | | 12 | The image contains no explicit title or axis labels visible in the image. The color legend is not explicitly labeled in the image.LCD TV'NIN SUNUMU
natural_image
Line drawing of a rectangular electronic device with a grid-patterned top panel and a curved base, mounted on a table (no text or symbols)
natural_image
Technical line drawing of a mechanical component with no visible text or symbolsnatural_image
Technical line drawing of a mechanical assembly with supports and internal components (no text or symbols)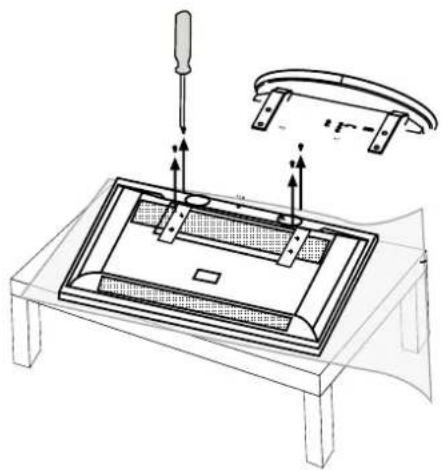
natural_image
Technical line drawing of a mechanical assembly with a tool and bracket (no text or symbols)natural_image
Blue background with white icons representing audio, video, and security symbols (no text or labels)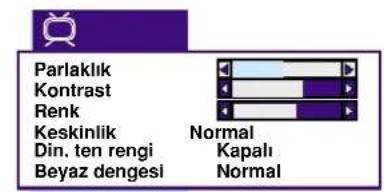
TV SES MENÜ KONTROLLERİ
natural_image
Blue background with white icons including speaker, audio, battery, wrench, and monitor (no text or symbols)
natural_image
Blue background with white icons including speaker, TV, grid, screwdriver, and megaphone (no text or symbols)
ZAMANLAYICI MENÜSÜ
Registering your model with PHILIPS makes you eligible for all of the valuable bene.ts listed below, so don't miss out. Complete and return your Warranty Card at once to ensure:
\*Proof of Purchase
Returning the enclosed card guarantees that your date of purchase will be on .le, so no additional paperwork will be required from you to obtain warranty service.
\*Product Safety Notification
By registering your product, you'll receive notification - directly from the manufacturer - in the rare case of a product recall or safety defect.
\*Additional Benefits of Product Ownership
Registering your product guarantees that you'll receive all of the privileges to which you're entitled, including special money-saving offers.
PHILIPS
Congratulations on your purchase, and welcome to the "family!"
Dear PHILIPS product owner:
Thank you for your confidence in PHILIPS. You've selected one of the best-built,best-backed products available today.
We'll do everything in our power to keep you happy with your purchase for many years to come.
As a member of the PHILIPS "family," you're entitled to protection by one of the most comprehensive warranties and outstanding service networks in the industry. What's more, your purchase guarantees you'll receive all the information and special offers for which you qualify, plus easy access to accessories from our convenient home shopping network.
Most importantly, you can count on our uncompromising commitment to your total satisfaction.
All of this is our way of saying welcome -and thanks for investing in a PHILIPS product.
P.S. To get the most from your PHILIPS purchase, be sure to complete and return your Warranty Registration at once.
Know these safety symbols
CAUTION: TO REDUCE THE RISK OF ELECTRIC SHOCK, DO NOT REMOVE COVER (OR BACK). NO USER SERVICE-ABLE PARTS INSIDE. REFER SERVICING TO QUALIFIED SERVICE PERSONNEL.
This "bolt of lightning" indicates uninsulated material within your unit may cause an electrical shock. For the safety of everyone in
your household, please do not remove product covering.
The "exclamation point" calls attention to features for which you should read the enclosed literature closely to prevent erating and maintenance problems.
WARNING : To reduce the risk of fire or electric shock, this apparatus should not be exposed to rain or moisture and objects filled with liquids, such as vases, should not be placed on this apparatus.
CAUTION : To prevent electric shock, match wide blade of plug to wide slot, fully insert.
Enter below the Serial No.which is located on the rear of the cabinet .Retain this information for future reference. Model No.
Serial No.
PHILIPS
Visit our World Wide Web Site at http://www.philips.com.tr
IMPORTANT SAFETY INSTRUCTIONS READ BEFORE OPERATING EQUIPMENT
- Read these instructions.
- Keep these instructions.
- Heed all warnings.
- Follow all instructions.
- Do not use this apparatus near water.
- Clean only with a dry cloth.
- Do not block any of the ventilation openings. Install in accordance with the manufacturers instructions.
- Do not install near any heat sources such as radiators, heat registers, stoves, or other apparatus (including amplifiers) that produce heat.
- Do not defeat the safety purpose of the polarized or grounding-type plug. A polarized-plug has two blades with one wider than the other. A grounding type plug has two blades and third grounding prong. The wide blade or third prong are provided for your safety.
When the provided plug does not fit into your outlet, consult an electrician for replacement of the obsolete outlet. - Protect the power cord from being walked on or pinched particularly at plugs, convenience receptacles, and the point where they exit from the apparatus.
- Only use at t achments /accessories specified by the manufacturer.

-
Use only with a cart, stand, tripod, bracket, or table specified by the manufacturer, or sold with the apparatus. When a cart is used, use caution when moving the cart/apparatus combination to avoid injury from tip-over.
-
Unplug this apparatus during lightning storms or when unused for long periods of time.
-
Refer all servicing to qualified service personnel. Servicing is required when the apparatus has been damaged in anyway, such as power-supply cord or plug is damaged, liquid has been spilled or objects have fallen into apparatus, the apparatus has been exposed to rain or moisture, does not operate normally, or has been dropped.
-
This product may contain lead and mercury. Disposal of these materials may be regulated due to environmental considerations. For disposal or recycling information, please contact your local authorities or the Electronic Industries Alliance: www.eiae.org
-
Damage Requiring Service - The appliance should be serviced by qualified service personnel when:
A. The power supply cord or the plug has been damaged;
B. Objects have fallen, or liquid has been spilled into the appliance;
C. The appliance has been exposed to rain
D. The appliance does not appear to operate normally or exhibits a marked change in performance;
E. The appliance has been dropped, or the enclosure damaged.
17. Tilt/Stability - All televisions must comply with recommended international global safety standards for tilt and stability properties of its cabinet design.
* Do not compromise these design standards by applying excessive pull force to the front, or top, of the cabinet which could ultimately overturn the product.
* Also, do not endanger yourself, or children, by placing electronic equipment/toys on the top of the cabinet. Such items could unsuspectingly fall from the top of the set and cause product damage and/or personal injury.
18. Wall or Ceiling Mounting - The appliance should be mounted to a wall or ceiling only as recommended by the manufacturer.
19. Power Lines - An outdoor antenna should be located away from power lines.
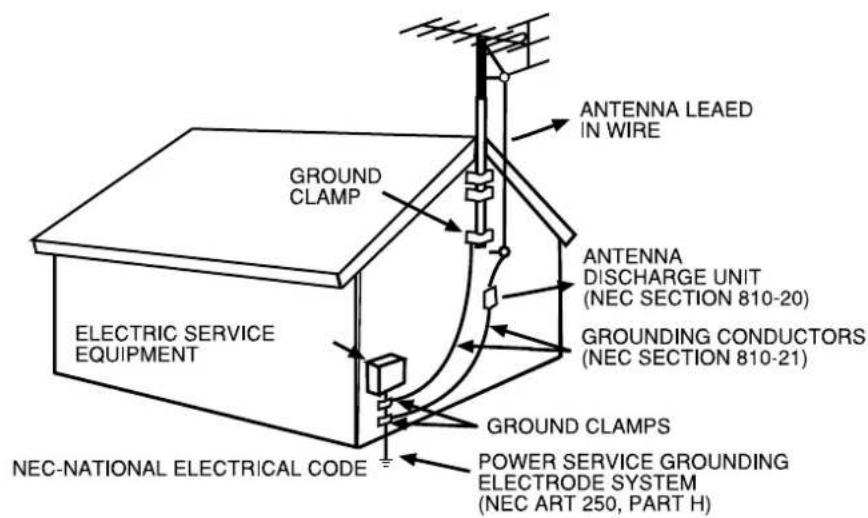
20. Outdoor Antenna Grounding - If an outside antenna is connected to the receiver, be sure the antenna system is grounded so as to provide some protection against voltage surges and built up static charges.
Section 810 of the National Electric Code, ANSI/NFPA No. 70-1984, provides information with respect to proper grounding of the mast and supporting structure, grounding of the lead-in wire to an antenna discharge unit, size of grounding connectors, location of antenna-discharge unit, connection to grounding electrodes, and requirements for the grounding electrode. See Figure below.
21. Object and Liquid Entry - Care should be taken so that objects do not fall and liquids are not spilled into the enclosure through openings.
22. Battery Usage CAUTION - To prevent battery leakage that may result in bodily injury, property damage, or damage to the unit:
* Install all batteries correctly, with + and - aligned as marked on the unit.
* Do not mix batteries (old and new or carbon and alkaline, etc.).
* Remove batteries when the unit is not used for a long time.
IMPORTANT SAFETY INSTRUCTIONS
Note to the CATV system installer: This reminder is provided to call the CATV system installer's attention to Article 820-40 of the NEC that provides guidelines for proper grounding and, in particular, species that the cable ground shall be connected to the grounding system of the building, as close to the point of cable entry as practical.
Example of Antenna Grounding as per NEC - National Electric Code
PRECAUTION
ADDITIONAL SAFETY PRECAUTIONS
* ENSURE that LCD TV stand is tightened properly to the set (See Quick Guide on the right way of tightening of the screw of the stand to the set. Improper tightening of screw may render the set unsafe.
* If LCD TV is installed on the wall, installation should be carried out by qualified servicemen. Improperor incorrect installation may render the set unsafe.
* Disconnect main plug when :
- cleaning the TV screen, never use abrasive cleaning agents.
- there is a lightning storm.
- the set is left unattended for a prolonged period of time.
* Do not shift or move the LCD TV around when it is powered on.
* Do not touch, push or rub the surface of the LCD screen with any sharp or hard objects.
* When the surface of the LCD screen becomes dusty, wipe it gently with an absorbent cotton cloth or other soft material like chamois. DO NOT USE acetone, toluene or alcohol to clean the surface of the screen. These chemicals will cause damage to the surface.
* Wipe off water or saliva as soon as possible. These liquids can cause deformation and color fading of the LCD screen when left exposed for some time.
* Be careful of condensation when temperature changes occur. Condensation can cause damage to the LCD screen and electrically parts. After condensation fades, spots or blemishes will be present on the LCD screen.
* CAUTION information is located on the inside of the VESA cover (see diagram below). To read information, open the VESA cover.
POSITIONING THE LCD TELEVISION
* Place the LCD TV on a solid, sturdy base or stand. Be sure the stand is strong enough to handle the weight of the LCD TV.
* Try to leave at least 6" of space around each side of the LCD TV cabinet to allow for proper ventilation.
* Do not place the LCD TV near a radiator or other sources of heat.
* Do not place the LCD TV where it can be exposed to rain or excessive moisture.
RECYCLING PROCEDURE/END OF LIFE DISPOSAL
* To minimize harm to the environment, the batteries supplied with the LCD TV do not contain mercury or nickel cadmium. If possible, when disposing of batteries, use recycling means available in your area.
* The LCD TV uses materials that can be recycled. To minimize the amount of waste in the environment, check your area for companies that will recover used televisions for dismantling and collection of reusable materials, or contact your dealer for TV recycling tips.
* Please dispose of the carton and packing material through the proper waste disposal management in your area.
CONTENTS
Introduction
Welcome / Registering your TV 36 IMPORTANT SAFETY INSTRUCTIONS PRECAUTIONS 39
Contents 40
37

Setup Menu
Country and Language Setup 41

Installation
Automatic Programming (Channel Setup) 42 Manuel TV Channel Setup 44
Program Editing 46
LCD TV Presentation 48
Mounting LCD TV on the wall 50
Using the TV and Remote Control 51
Remote Control 52

Picture Menu
TV Picture Menu Controls
53

Volume Menu
TV Volume Menu Controls
55

Setup Menu
Child Lock/Lock Function Timer Setup Timing Setup Using Screen Format Teletext Language Setup Teletext
57

PC Mode
PC Picture Controls
61

General Information
Troubleshooting 66 Maintenance and Cleaning 68 Technical Specifications 69
Below are the features of your new LCD
Sound / Display Jacks: Use these jacks to connect other devices to your LCD TV quickly Automatic Channel Programming (Automatic Programming): Fast and easy adjustment of the existing channels
Menus (OSD): Beneficial Messages, for setting the TV Controls
Remote Control: Operates the LCD TV features
Switching Off Timer: Switches Off the LCD TV in the time programmed by you (from 5 to 120 minutes after current time)
Standard Broadcasting (VHF/UHF) or Cable TV Channel
Stereo: This contains internal amplifier and double speaker system, and provides receiving of the stereo broadcasting TV channels
Treble, Bass and Balance: Improves the sound of the LCD TV
Note: This manual contains different versions and models. All features stated here may not comply with your LCD TV. This is normal. There is no need to contact with your dealer or service.
At the end of the Service Life
Your new LCD TV and its packing are made of recyclable material. Expertized companies may recycle the wastes of your product and reduce the waste amount. There are batteries in the equipment, which should not be disposed as normal waste when consumed. These should be disposed as small chemical wastes. When you replace the current unit, please check how to recycle the batteries and packing material, from the regulations.
INSTALLATION
You can make the installation setup you LCD TV easily as defined below.
Country and Language Setup
Users can change the menu language as follows:
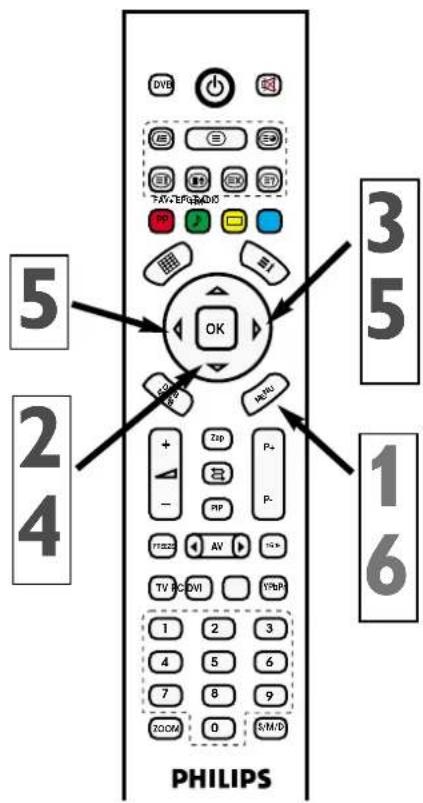
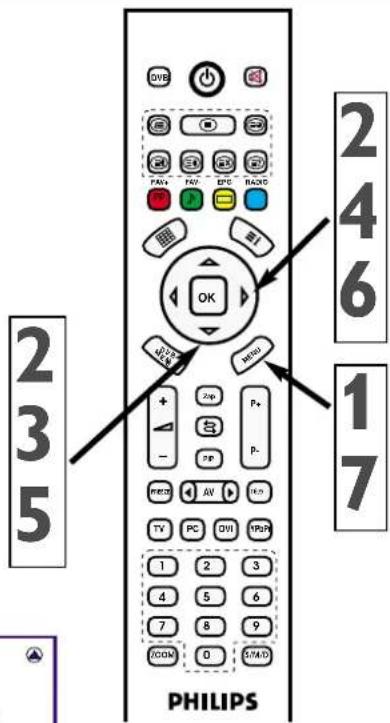
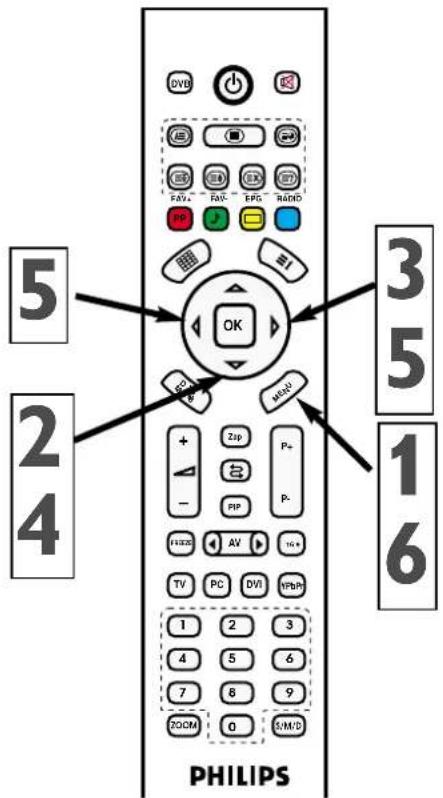
1 Press the menu button on the remote control. The menu appears on the screen.
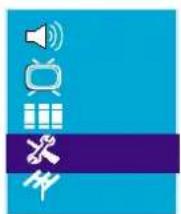
2 Press down (▼) arrow button repeatedly until SETUP menu is selected on the screen and Press right (▶) arrow button to enter the menu.
3 Press down (▼) arrow button repeatedly until "Language" is selected.
4 Select the desired menu language using Left (◀) and Right (▶) tarrow keys.
5 Press down (▼) arrow button repeatedly until "Country is selected.
6 Select the abbreviation of your country using Left (◀) and Right (▶) arrow keys.
7 Press Menu button repeatedly to exit from the menus
HELPFUL HINT
When you change the language you can change only the menu subjects. No other OSD text characteristics are changed.


AUTOMATIG PROGRAMMING (SETTING THE CHANNELS)
Your LCD TV might be setup for the local channels (or cable TV) automatically. In this way you can select the TV stations only in your own region by pressing P+/P- buttons.
1 Press the menu button on the remote control. The menu appears on the screen.
2 Press down (▼) arrow button repeatedly until PROGRAMS menu appears on the screen
3 Press right (▶) arrow button to enter the menu.
4 Press down (▼) arrow button repeatedly until "System" is selected.
5 Select the system using Left and Right (◄/►) arrow keys.
6 Press down (▼) arrow button repeatedly until "Automatic Search" is selected.
7 When you press Right (▶) key automatic search starts.
HELPFUL HINT
* Right after you take your new television take out of its package and plug it into the socket, use the automatic programming option to setup your TV for the existing broadcasting or cable channels in your region. If you do not setup the channels using automatic programming function, your televisions might not operate properly.
* Check the results after you operate automatic programming. See which channels you can select by pressing P(+) and P(-) buttons.
* Don't forget that an antenna our cable connections of your LCD TV should be made first
AUTOMATIG PROGRAMMING (SETTING THE CHANNELS)


MANUAL SETTING OF TV CHANNELS
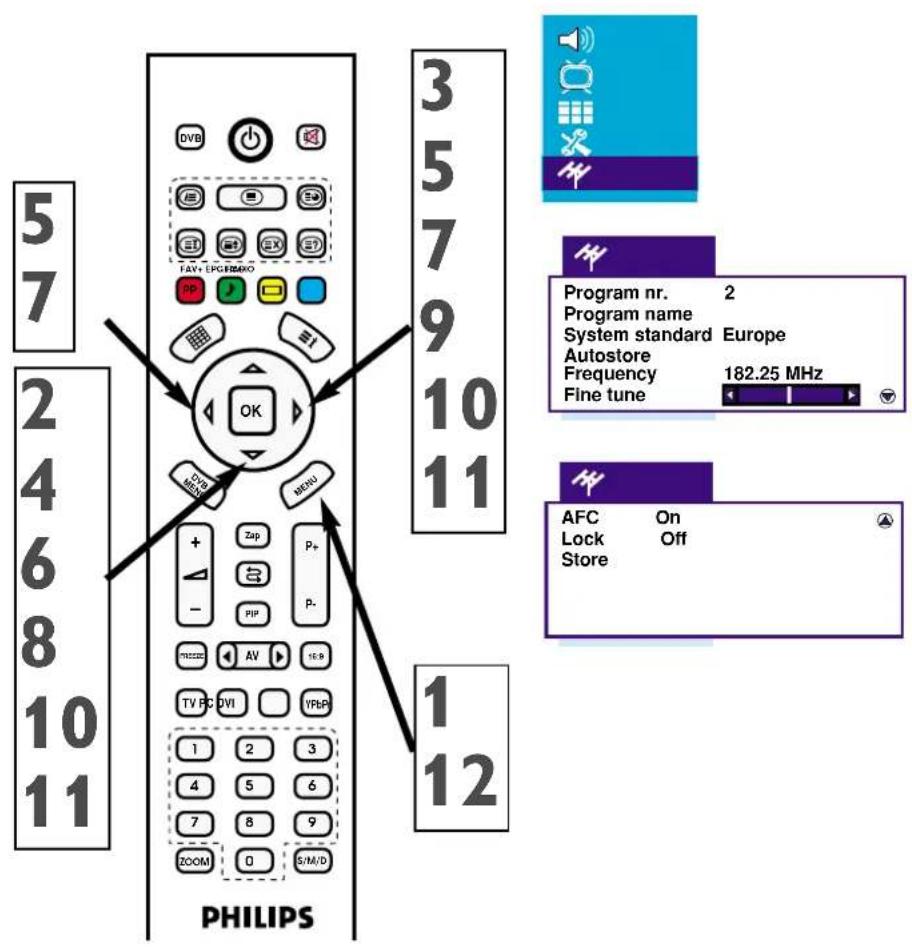
You can also set the TV channel manually. Manual setting allows you to store any program manually.
1 Press Menu button on the RC, menu will appear on the screen
2 Press down (▼) arrow button repeatedly until PROGRAMS menu appears on the screen
3 Press right ▶arrow button to enter the menu.
4 Press down (▼) arrow button repeatedly until "Program No" is selected.
5 Press the numeric buttons or use Left and Right (◀/▶) arrow keys to assign a channel number.
6 Press down (▼) arrow button repeatedly until "System" is selected.
7 Select the system using Left and Right (◄/►) arrow keys.
8 Press down (▼) arrow button repeatedly until "Frequency Setup" is selected.
9 Activate automatic search channel frequency by pressing Right (▶) arrow key or use the numeric keys to enter the desires channel frequency.
10 When the channel is not clear in order to select fine tuning Press down ▼) arrow key and then use the right arrow (▶) key.
11 Press down (▼) arrow button repeatedly until "Store" is selected and use the Right arrow (▶) key to store.
12 Exit the menus pressing "Menu" key repeatedly.
HELPFUL HINT
* The system should be chosen as “Europe” for all the countries in Europe except France. “France” should be selected for France.
* If you turn the AFC function in the same menu during manual programming, your LCD TV can perceive the tinny frequency shifts stem from the transmitter and correct them automatically.
MANUAL SETTING OF TV CHANNELS
PROGRAM EDITING
You can make other changes on the channels.
1 Press Menu button on the RC, menu will appear on the screen.
2 Press down (▼) arrow button repeatedly until PROGRAMS menu appears on the screen
3 Press Right (▶) arrow button to enter the menu.
ASSIGNING A TITLE
In the program table, use up and down arrow keys (▲,▼) to select the channel you want to assign a name for. Select the program using the blue key and select the first character of the title using arrow keys (◀,▶) and then press right arrow (▶) key for the next character. When you finish, press the blue button to approve the transaction.
B PROGRAM SWITCH
In the program table, use up and down arrow keys (▲,▼) to select the channel you want to replace. Select the program using the green key. Replace its place using arrow keys (▲,▼) and complete the transaction pressing the green button again.
PROGRAM DELETING
In the program table, use up and down arrow keys (▲,▼) to select the channel you want to delete. Select the program using the red key and confirm the transaction pressing the red button again.
CHANNEL SKIP
In the program table, use up and down arrow keys (▲,▼) to select the channel you want to skip during zapping. Confirm the transaction pressing the yellow button. This channel shall not be seen in the screen when you toggle among the channels using P+ and P-.
4 Exit the menus pressing "Menu" key repeatedly.
HELPFUL HINT
* You can not see the skipped channels using P+ or P- keys but access them using numeric keys.
PROGRAM EDITING


natural_image
Blue background with a purple horizontal bar and icons of speaker, TV, satellite, and Wi-Fi symbols (no text or labels)
heatmap
| | 1 | 2 | 3 | 4 | 5 | 6 | |---|---|---|---|---|---|---| | Name | 7 | 8 | 9 | 10 | 11 | 12 | | Move | 0 | 0 | 0 | 0 | 0 | 0 | | Delete | 0 | 0 | 0 | 0 | 0 | 0 | | Skip | 0 | 0 | 0 | 0 | 0 | 0 |LCD TV PRESENTATION
Placing your LCD TV
* Place your LCD TV on a flat and sound surface. Be careful that the surface is sound enough to carry the load of LCD TV.
* Leave 15 cm clearance in both sides of your LCD TV in order to achieve good ventilation.
* Keep the LCD TV away from the radiators and heat sources.
* Avoid the LCD TV from rain and humidity.
DESCRIPTION OF ALL SOCKETS


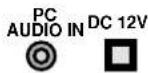
5 1
8
4
6 7 9
DESCRIPTION OF ALL SOCKETS (REAR PANEL)
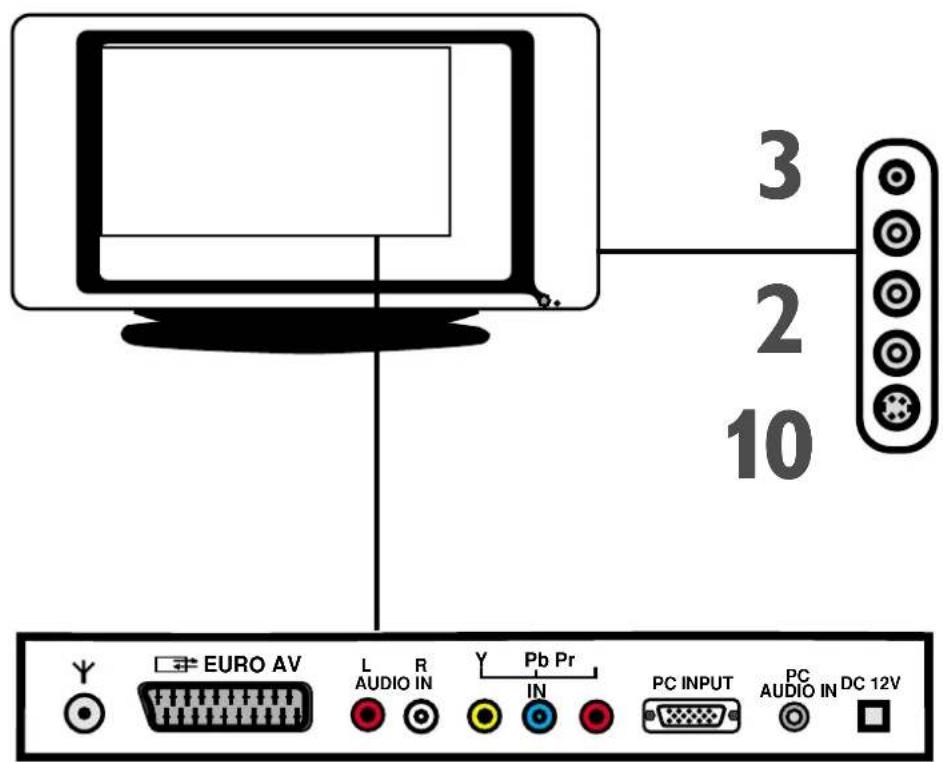
1 EURO AV: Connects the scard outputs of your VCR or other video devices.
6 PC IN: Connects your PC having VGA type video output
2 SIDE AV: Connects the outputs of your VCR or other video devices.
7 PC AUDIO IN: Connects the audio of your PC having VGA type video output
3 Earphone Jack: connects the earphones.
8 L/R AUDIO IN: Y Pb Pr Audio input
4 Y Pb Pr IN: Connects the Digital Satellite Receiver or other video device supporting YPbPr video format.
9 12 V DC Adaptor Input
5 VHF/UHF: Connects to VHF/UHF antenna or cable.
10 SVHS Input
ACCESSORIES
Please ensure that followings are included in your device package.
1 Remote Control and its batteries.
2 User's Guide
3 Quick Start Guide
4 Warranty Card
5 World Wide Warranty Card
MOUNTING LCD TV ON THE WALL
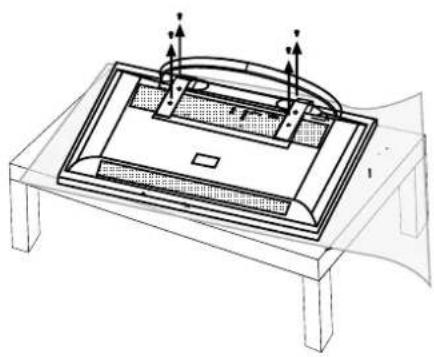
Before mounting you LCD TV on the wall, you have to remove the bottom cover first as defined below.
1 1 Place the device on a flat surface covered with protective layer or cloth as in the figure below.
22Remove the bottom screws.

natural_image
Line drawing of a simple electronic device with a grid-patterned top panel and base, no text or symbols present.
natural_image
Technical line drawing of a mechanical component with no visible text or symbols- Remove the bottom screws.
44Hold the bottom cover and pull it outwards.
natural_image
Technical line drawing of a mechanical assembly with supports and internal components (no text or symbols)
natural_image
Technical line drawing of a mechanical assembly with a tool and bracket (no text or symbols)Stand of your LCD TV is in compliance with VESA standard. Consult an expert technician to mount your LCD TV on the wall. The Manufacturer shall have no responsibility if the mounting is not carried out by an expert technician.
USING THE TV AND REMOTE CONTROL
TV AND REMOTE CONTROL
1 Connect the power cable to the AC inlet on the LCD TV. Plug the power cable on a socket and turn your TV on.
2 Press on Stan-by button to turn your TV on.
3 Press ( + ) to turn the volume up and ( - ) to turn the volume down.
4 Select the channels using P +/- .
5 To operate your LCD TV using remote control keeps the remote control in front of the TV.
INSTALLING THE BATTERIES
6 Take the battery cover under the remote control away.
7 Install two AAA batteries into to remote control. Be careful to place the (+) and (-) ends properly.
8 Close the battery compartment cover again.


REMOTE CONTROL

TV PICTURE CONTROLS
Choose the channel and follow the following stages in order to setup the LCD TV picture.
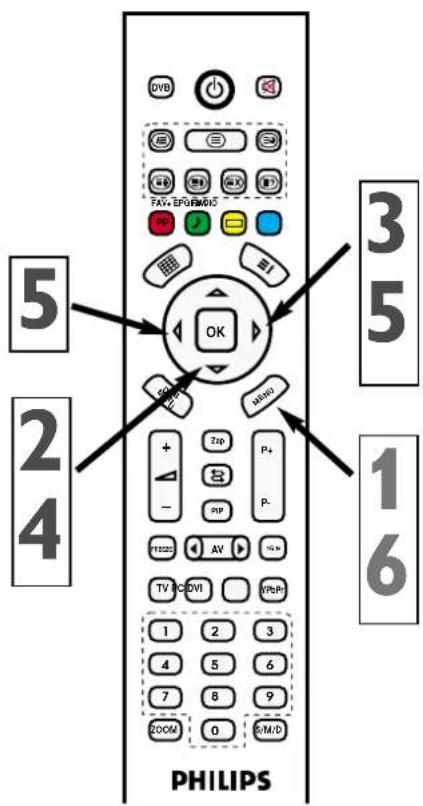
5 You can change the image subject using Left (◀) and Right (▶) arrow keys.
1 Press the menu button on the remote control. The menu appears on the screen.
6 Exit the menus pressing "Menu" key repeatedly.
2 Press down (▼)arrow button repeatedly until PICTURE menu appears on the screen
3 Press Right (▶) arrow button to enter the PICTURE menu.
4 Picture menu contains the followings: Brightness, Contrast, Color, Sharpness, Din. Complexion color and White Balance.
Brightness: Setup in order to make the dark sides of the picture brighter. The color shall be whitened.
Contrast: Setup in order to sharpen the image quality. While the black parts enrich in the dark parts, white becomes brighter.
Color: Setup to increase or decrease the color.
Sharpness: Setup to improve the details, Din. Complexion color: You can turn this function on in order to approach the complexion color to the real tone.
White Balance: You can change the white value on the image.
TV PICTURE CONTROLS


TV AUDIO MENU CONTROLS
Choose the channel and follow the following stages in order to setup the LCD TV audio.
1 Press the menu button on the remote control. The menu appears on the screen.
2 Press down (▼)arrow button repeatedly until AUDIO menu appears on the screen
3 Press Right (▶)arrow button to enter the AUDIO menu.
4. Select the Sound Menu Subjects you want to set using (▼) button
Sound menu contains the followings subjects: Volume, Balance, Bas, Pitch and Equalizer.
Volume: you can turn the volume up or down.
Balance: You can arrange the balance level.
Bass: you can arrange the bass level.
Pitch: you can arrange the pitch level
Equalizer: you can enter using the Right
(▶) arrow key and arrange the equalizer.
5 You can setup the selected audio subject using Left (◀) and Right (▶) arrow keys. (You should use the down ◆) and up (▲) keys to arrange equalizer frequency values).
6 Exit the menus pressing "Menu" key repeatedly.
HELPFUL HINT
If there is no stereo characteristic in the selected broadcasting and TV is in the stereo mode, the voice from the TV shall be in mono mode.
TV AUDIO MENU CONTROLS


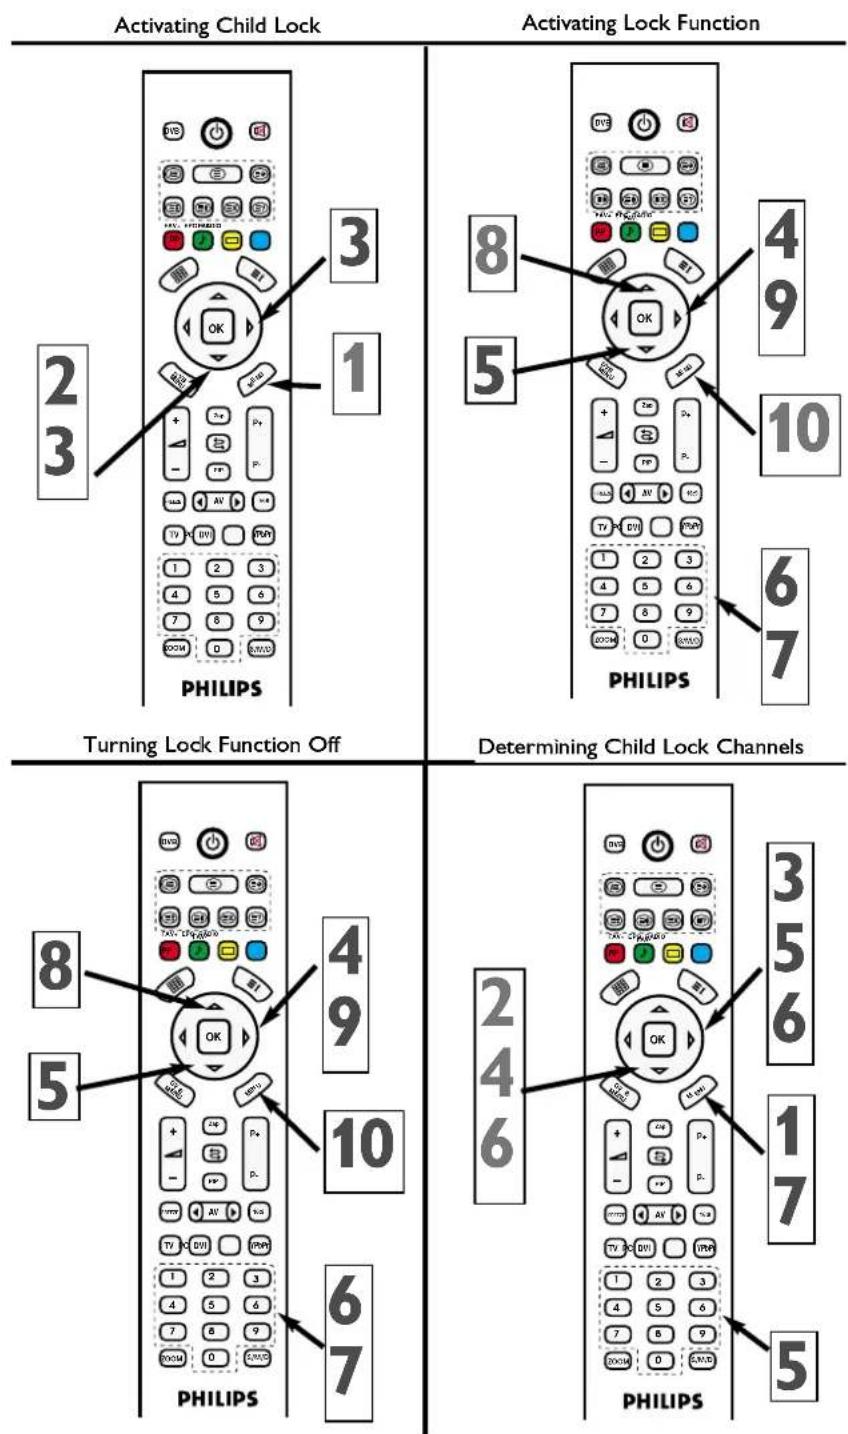
CHILD LOCK
Child lock function enables you to lock the channels and avoid your children to watch channels with an unsuitable content.
Activating child lock:
1 Press the menu button on the remote control. The menu appears on the screen.
2 Press down (▼) arrow button repeatedly until SETUP ✗ menu appears on the screen. Press Right (▶) arrow button to enter the menu.
3 Press down (▼) arrow button repeatedly until Child Lock is selected.
Activating lock function:
4 Press Right arrow (▶) key a new menu appears on the screen.
5 Press down(▼) arrow button repeatedly until Password is selected.
6 Enter the 4 digit lock password using numeric keys (0-9).
7 Reenter the lock password. The password is determined.
8 Press up (▲) arrow and select the Lock line.
9 Press Right (▶)arrow button and select "ON"
10 Exit the menus pressing "Menu" key repeatedly.
Turning the Lock Function off.
4 Press Right (▶) arrow button, a menu appears on the screen.
5 Press down (▼) arrow button repeatedly until the password is selected.
6 Enter the 4-digit lock password (0-9).
7 Reenter the lock password.
8 Press up (▲) arrow and select the Lock line.
9 Press Right (▶) arrow button and select "ON"
10 Exit the menus pressing "Menu" key repeatedly.
CHILD LOCK
Activating child lock:
When you turn the child lock on, you should define the channels to be locked.
1 Press the menu button on the remote control. The menu appears on the screen.
2 Press down (▼).arrow button repeatedly until PROGRAMS menu appears on the screen.
3 Press Right (▶) arrow button to enter the menu.
4 Press down (▼)arrow button repeatedly until "Lock" is selected.
5 Press Right arrow (▶) key to turn the function ON. The channel you watched or setup is locked. You must enter the password when you watch this channel.
6 Press down (▼) arrow button repeatedly until "Store" is selected and complete the store transaction by pressing right arrow (▶) key.
7 Exit the menus pressing "Menu" key repeatedly.


HELPFUL HINT
0711 is the standard Lock Password. If you access password is changed by someone else by any person other than you (for example a child) or if you forget the password. You can enter anytime using the standard code.
LOCK FUNCTIONS
TIMER SETUP
1 You can setup the turning off time off time for your device by using this menu.
2 Press down (▼) arrow button repeatedly until SETUP menu appears on the screen. Press Right (▶) arrow button to enter the menu.
3 Press down (▼)arrow button repeatedly until Time is selected.
4 Press Right arrow (▶) key to enter the menu.
5 Toggle the timer mode using Right (▶) arrow button.
6 Press Down arrow ▼) key to go to Time line.
7 Setup the time using the numeric keys.
8 Exit the menus pressing "Menu" key repeatedly.


natural_image
Pure graphical icons without any text or symbols
TIMING MENU
You can setup the turning off time off time for your device by using this menu.
1 Press the menu button on the remote control. The menu appears on the screen.
2 Press down (▼) arrow button repeatedly until SETUP menu appears on the screen. Press Right (▶) arrow button to enter the menu.
3 Press down (▼)arrow button repeatedly until Timer Sub Menu is selected.
4 Press Right arrow (▶) key to display Timer menu on the screen.
Automatic Turn off (Sleep Timer)
5 Press Down arrow (▼).key to select "Sleep Timer" function.
6 Use Right (▶) key to setup the sleep time for your TV (within 5 minute intervals).
7 Exit the menus pressing "Menu" key repeatedly.
Turn off time setup
5 Press Down arrow (▼): key to select "Turn of Time" function.
6 Enter the turn off time using numeric keys (0-9).
7 Exit the menus pressing "Menu" key repeatedly.
Channel Switch Setup
5 Press Down arrow (▼) key to select "Switch" function.
6 Enter the turn off time using numeric keys (0-9).
7 Press Down arrow (▼) key to select "To Channel" line.
8 Enter the Channel Number using (◀◀◀◀◀)arrow keys or numeric keys (0-9).
9 Exit the menus pressing "Menu" key repeatedly. Your device will automatically passed to the determined channel at the determined time.


HELPFUL HINT
* Avoid to give the same time to sleep timer and channel transfer functions.
* When you arrange the reminding function with the Right (▶) arrow key, a warning shall appear on the screen before the Turn Off or Program Switch Time.
TIMING MENU

USING SCREEN FORMAT
You can change the Screen Format Size on the basis of the program type watched. In order to switch among the screen formats press 16:9 key repeatedly.
You can select any one of Normal, Wide, Narrow, Auto Screen formats.
You can delete the menu from the screen by pressing MENU key.
USEFUL HINT
Standard screen format in PC and YPbPr mode is FULL SCREEN. Screen format function can not be accessed in this mode.
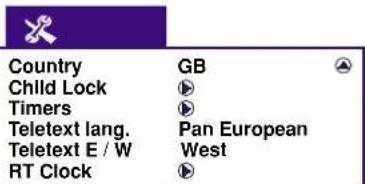
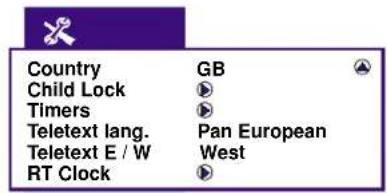
SELECTING TELETEXT LANGUAGE
1 Press the menu button on the remote control. The menu appears on the screen.
2 Press down (▼)arrow button repeatedly until SETUP menu appears on the screen. Press Right (▶)arrow button to enter the menu.
3 Press down (▼).arrow button repeatedly until Teletext Language is selected.
4 Press Right arrow (▶) key to select Teletext language character.
5 Press Down arrow (▼) key to select "Teletext D/B (East/West)".
6 Use Right (▶) key to select your country region for Teletext.
7 Exit the menus pressing "Menu" key repeatedly.
HELPFUL HINT
* If some characters do not appear properly in teletext mode, this might stem from unsuitable selection of Teletext language and Teletext D/B modes.
TELETEXT
Teletext is an information system broadcasting through certain channels as if in a newspaper. It also provides access subtitles for the hearing disordered watchers, or the ones who do not know the language (cable networks, satellite channels etc.)
Press
Teletext

Selecting a page


Result
Provides access to the teletext broadcasting of the channel you select. In 2nd press, it shifts to mix. In 3rd press, you can shift to TV broadcasting.
Enter the required page number by a number from 0 to 9, or P± buttons
Example: For page 120, enter 120
The number is displayed on upper left, the counter counts and the page is displayed. Repeat this procedure to examine another page. If the counter continues to search, the page is not transmitted. Select another number
Direct access to subjects


Colored areas appear below the screen. 4 colored button is used to shift subjects or corresponding pages
Content

Stopping access to sub-pages

Confidential information

Enlarging the page

Teletext Hour

Updating

Mix (mixed TV and TELE-TEXT information display)

This returns to contents page (generally, page 100)
Certain pages have sub-pages which are displayed successively. This button is used to stop or continue the subpage. Its icon is on the upper left
For displaying or hiding confidential information (game solutions)
This provides displaying upper or lower part of the page, then returning to normal size
Displays the hour from the teletext of the current channel in TV mode, on the upper right corner of the screen
When pressing teletext button while teletext page is open, the subpage of teletext page is displayed on the lower part of the screen, those pages can be changed by pressing P± button. Press the same button to leave
Pressing this button in teletext mode, the current TV broadcasting is displayed. But teletext is still active, and if a new page number is entered, page search will continue. When the required page is found, a message showing the page number appears on the screen. Pressing this button again will bring teletext page.
You can watch channel and teletext information side to side. For that purpose, press once to MIX button. So, teletext page and TV picture can be displayed side to side. 2nd press will change the size of TV display on the right. 3rd press will cause teletext page to be full site. Press teletext button to leave this mode.
PC DISPLAY CONTROLS
This TV is also available as PC Monitor. PC Display controls allows you to adjust the display.
Ensure that the TV is in PC Mode
MONITOR IMAGE MENU
Follow the step below to setup LCD Monitor image.
Information: You can see the information about your device.
Factory: Restores the factory defaults.
Color Temperature: You can setup the color temperature value.
Red: You can arrange the red color level.
Green: You can arrange the green color level.
Blue: You can arrange the blue color level.
1 Press the menu button on the remote control. The menu appears on the screen.
2 Press down (▼) arrow button repeatedly until SETUP menu appears on the screen.
3 Press Right (▶)arrow button to enter the Picture menu.
4 Press down (▼) arrow button to select the picture menu subjects desired to be setup.
Picture Menu subjects: Brightness, Contrast, Position, Auto Setup, Information, Factory, Color Temperature, Red, Green and Blue.
Brightness: Setup in order to make the dark sides of the picture brighter. The color shall be whitened.
Contrast: Setup in order to sharpen the image quality. While the black parts enrich in the dark parts, white becomes brighter.
Position: You can enter this sub menu using Right arrow (▶) key and setup vertical and horizontal picture values using (◀,▶,▼,▲) arrow keys.
Picture Setup: You can setup picture phase and frequency values using (▲, ▶, ▼, ▲) keys in the submenu.
Sharpness: Setup to improve the details.
Auto setup: Your device automatically makes the picture setup automatically with the help of this function.
5 You can change the image subject using Left (◀) and Right (▶) arrow keys.
6. Exit the menus pressing "Menu" key repeatedly.
TROUBLE SHOOTING TIPS
| No Power | ·Check the TV power cord. Unplug the TV, wait 10 seconds, then reinsert the plug into the outlet and push the POWER button again.·Check that the outlet is not on a wall switch.·Be sure the fuse is not blown on the AC power strip, if one is being used. |
| No Picture | ·Check antenna/cable connections. Are they properly secured to the TV's ANT75Ω plug?·Try running the Auto Program feature to find all available channels.·Press the AV button on the remote to make sure the correct signal source is selected.·If using an accessory device, be sure that it i functioning properly.·If in PC Mode, a video signal MUST BE present or the TV will turn off. |
| No Sound | ·Check the VOLUME buttons.·Check the MUTE button on the remote control.·If you're attempting to hook up auxiliary equipment, check the audio jack connections. |
| No AV Signal | ·Check whether AV and S-Video sockets connected simultaneously. If they are, disconnect the S-Video socket. AV signal automatically overrides the S-Video signal if both sockets are connected simultaneously. |
| S-VHS Color Becomes Faint | ·Unplug socket for S-Video connection. Reconnect the S-Video socket of the TV carefully to the VCR socket. |
| TV Only Produces MONO Sound | ·If using a cable box with RF only type connections, the signal coming from the cable box will be produced in MONO only.·Check Sound control setting. Change setting to Stereo. |
TROUBLE SHOOTING TIPS
Remote Does Not Work
- Check the batteries. Place lithium cell in the remote. Be sure the (+) and (-) ends of the batteries line up as marked inside the battery compartment.
- Clean the remote control and the remote control sensor window on the TV.
- Check the TV power cord. Unplug the TV, wait 10 seconds, then reinsert the plug into the outlet and push the POWER button again.
- Be sure the fuse is not blown on the AC power strip, if one is being used.
- Check to be sure the TV outlet is not on a wall switch.
- Be sure that the remote is in the correct operating mode.
- Be sure the remote is pointed at the Remote Sensor Window on the TV. See page 2 of the Quick Use Guidefor details.
TV Displays Wrong Channel or No Channels
- Repeat channel selection.
- Add the desired channel numbers (using the CHANNEL EDIT control) into the TV's memory.
- Run the Auto Program feature to find all available channels.
CARE AND CLEANING
WARNING concerning stationary images on the TV
Screen: Do not leave fixed images on the screen for extended periods of time. This can cause uneven aging of the LCD panel. Normal use of the TV should involve viewing of programs that have constantly moving or changing images. Do not leave still images on screen for extended periods of time. Do not display the same images too frequently; if you do, subtle “ghost” images can be left on the LCD screen. Sources of stationary images may be Laser discs, video games,
Compact Discs Interactive (CD-i), or paused Digital Video Discs (DVDs) or video tapes.
Here are some common examples of stationary images:
• DVD menus list DVD content.
- Letterbox black bars appear at the top and bottom of the TV screen when a wide screen (16:9) movie is viewed on a
TV with standard (4:3) aspect ratio. This is available with some DVDs.
• Video game images and scoreboards
- Television station logos cause a problem if they are bright and stationary. Moving or low-contrast graphics are less likely to damage the picture tube.
- Stock market tickers may appear at the bottom of the TV screen if the TV programming covers this news.
- Shopping channel logos, pricing displays may be bright and may appear constantly during the show.
These are usually in the same location on the TV screen.
TV Location
- To avoid cabinet warping, cabinet color changes, and an increased chance of TV failure, do not place the TV where temperatures can become excessively hot (for example, in direct sunlight or near a heating appliance).
- Allow a free flow of air around the TV.
Cleaning
- To avoid possible shock hazard, remove the TV's power cord from the electrical outlet before cleaning.
- Regularly dust the TV with a dry, non-scratching duster.
- When cleaning the TV, take care not to scratch or damage the screen surface. Avoid wearing jewelry or using anything abrasive. Do not use household cleaners. Wipe the screen with a clean cloth dampened with water.
Use even, easy, vertical strokes when cleaning.
- Occasionally vacuum the vents on the rear of the TV.
- Never use thinners, insecticide sprays, or other chemicals on or near the cabinet. They may blemish the cabinet permanently.
TECHNICAL SPECIFICATIONS
Screen Size
20"
Standard Size 51 cm
Power Consumption 70 W
Operating Voltage 230 V (AC) 50 Hz
TV System PAL BG / NTSC PLAYBACK
Band VHF I Band 2 - 4
VHF III Band 5 - 12
UHF Band 21 - 69
S Band S1 - S41
Aerial Input 75 ohm Standard Antenna Socket
Program Capacity 100 + AV
Picture Panel TFT LCD Panel 640 x 480 resolution
Sound Output (rms 10% THD) 2 x 2 W
065001056911 20"LOC-1 CFULL LCD 17/7/06 9:47 Page 70


The image contains no discernible text or characters.
ish
TÜRK PHILIPS TİC. A.Ş.
Yukarı Dudullu Organize Sanayi
- LCD TV'NIN SUNUMU
- TV SES MENÜ KONTROLLERİ
- ZAMANLAYICI MENÜSÜ
- \*Proof of Purchase
- \*Product Safety Notification
- \*Additional Benefits of Product Ownership
- PHILIPS
- Congratulations on your purchase, and welcome to the "family!"
- Dear PHILIPS product owner:
- IMPORTANT SAFETY INSTRUCTIONS READ BEFORE OPERATING EQUIPMENT
- IMPORTANT SAFETY INSTRUCTIONS
- PRECAUTION
- ADDITIONAL SAFETY PRECAUTIONS
- POSITIONING THE LCD TELEVISION
- RECYCLING PROCEDURE/END OF LIFE DISPOSAL
- CONTENTS
- Introduction
- Setup Menu
- Installation
- Picture Menu
- Volume Menu
- PC Mode
- General Information
- At the end of the Service Life
- Country and Language Setup
- HELPFUL HINT
- AUTOMATIG PROGRAMMING (SETTING THE CHANNELS)
- MANUAL SETTING OF TV CHANNELS
- PROGRAM EDITING
- ASSIGNING A TITLE
- B PROGRAM SWITCH
- PROGRAM DELETING
- CHANNEL SKIP
- LCD TV PRESENTATION
- Placing your LCD TV
- DESCRIPTION OF ALL SOCKETS (REAR PANEL)
- ACCESSORIES
- MOUNTING LCD TV ON THE WALL
- USING THE TV AND REMOTE CONTROL
- TV AND REMOTE CONTROL
- INSTALLING THE BATTERIES
- TV PICTURE CONTROLS
- TV AUDIO MENU CONTROLS
- CHILD LOCK
- TIMER SETUP
- TIMING MENU
- USING SCREEN FORMAT
- USEFUL HINT
- SELECTING TELETEXT LANGUAGE
- TELETEXT
- Press
- Result
- PC DISPLAY CONTROLS
- MONITOR IMAGE MENU
- TROUBLE SHOOTING TIPS
- Remote Does Not Work
- TV Displays Wrong Channel or No Channels
- CARE AND CLEANING
- WARNING concerning stationary images on the TV
- Here are some common examples of stationary images:
- TV Location
- Cleaning
- TECHNICAL SPECIFICATIONS
Brand : PHILIPS
Model : 20PF1000
Category : Television