P7 Lite - Smartphone Allview - Free user manual and instructions
Find the device manual for free P7 Lite Allview in PDF.


| Product Type | Smartphone |
| Brand | Allview |
| Model | P7 Lite |
| Dimensions (approx.) | 143 x 71 x 8.5 mm |
| Weight (approx.) | 140 g |
| Battery Capacity (approx.) | 2000 mAh |
| Battery Type | Non-removable Li-Ion |
| Display | 5.0 inch, capacitive touchscreen |
| Operating System | Android |
| Processor (approx.) | Quad-core 1.3 GHz |
| RAM (approx.) | 1 GB |
| Storage (approx.) | 8 GB |
| Expandable Storage | MicroSD up to 32 GB |
| Main Camera | 8 MP with flash |
| Front Camera | 5 MP |
| SIM | Dual SIM (Mini-SIM) |
| Connectivity | Wi-Fi 802.11 b/g/n, Bluetooth 4.0, GPS, Micro USB 2.0, 3.5mm jack |
| Sensors | Proximity, Light, Accelerometer |
| SAR Value | 0.969 W/kg (head) |
| Power Supply | Micro USB charger, 5V/1A (approx.) |
| Safety Features | Overheat protection, non-removable battery, approved accessories only |
| Maintenance | Clean with dry soft cloth; avoid liquids and abrasives |
| Spare Parts & Reparability | Battery not user-replaceable; repair only by authorized service centers |
Frequently Asked Questions - P7 Lite Allview
User questions about P7 Lite Allview
0 question about this device. Answer the ones you know or ask your own.
Ask a new question about this device
Download the instructions for your Smartphone in PDF format for free! Find your manual P7 Lite - Allview and take your electronic device back in hand. On this page are published all the documents necessary for the use of your device. P7 Lite by Allview.
USER MANUAL P7 Lite Allview
EN USER MANUAL.... 4
RO MANUAL DE UTILIZARE....19
BG РЪКОВОДСТВО ЗА УПОТРЕБА.... 36
CZ UŽIVATELSKÝ MANUÁL....52
ES MANUAL DE USUARIO....69
HU HASZNÁLATI UTASÍTÁS....85
PL INSTRUKCJA OBSŁUGI....97
RU РУКОВОДСТВО ПОЛЬЗОВАТЕЛЯ.... 115
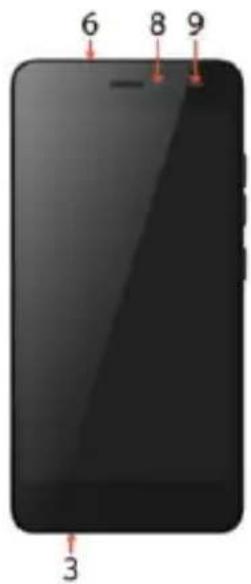


| EN | RO | BG | CZ | ||||
| 1 | Power button | 1 | Buton pornire | 1 | Бутонът за захранване | 1 | ON/OFF Tlačítko |
| 2 | Speaker | 2 | Difuzor | 2 | говорител | 2 | Reproduktor |
| 3 | Micro USB | 3 | Mufă micro USB | 3 | Микро USB | 3 | Micro USB |
| 4 | Flash | 4 | Flash | 4 | флаш | 4 | Blesk |
| 5 | Volume buttons | 5 | Butoane volum | 5 | сила на звука | 5 | Tlačítka hlasitosti |
| 6 | Earphones jack | 6 | Mufă căști | 6 | слушалки жак | 6 | Sluchátka jack |
| 7 | Main camera | 7 | Cameră principală | 7 | Назад камера | 7 | Zadní fotoaparát |
| 8 | Front camera | 8 | Cameră frontală | 8 | Предна камера | 8 | Přední fotoaparát |
| 9 | Proximity sensor and light | 9 | Senzor de proximitate și lumină | 9 | Сензор за близост И светлина | 9 | Senzor přibližení a světlo |
| ES | HU | PL | RU | ||||
| 1 | Botón de encendido | 1 | Bekapcsoló gomb | 1 | Przycisk zasilania | 1 | Кнопка включения |
| 2 | Altavoz | 2 | Hangszóró | 2 | Głośnik | 2 | Динамик |
| 3 | Micro USB | 3 | Micro USB | 3 | Micro USB | 3 | Разъем Микро USB |
| 4 | Flash | 4 | Vaku | 4 | Błyskać | 4 | Вспышка |
| 5 | Volumen | 5 | Hangerő gombok | 5 | Przyciski głośności | 5 | Клавиша громскости |
| 6 | Enchufe auriculares | 6 | Fülhallgató jack | 6 | Słuchawki jack | 6 | Разъем гарнитуры |
| 7 | Cámara trasera | 7 | Hátulsó kamera | 7 | Tylna kamera | 7 | Основная камера |
| 8 | Cámara frontal | 8 | Elülső kamera | 8 | Aparat z przodu | 8 | Передняя камера |
| 9 | Sensor de proximidad Y luz | 9 | Közelség érzékelő És könnyű | 9 | Czujnik zbliżeniowy I świa | 9 | Световой сензор |
Notices for the use of phone
CAUTION! Please read carefully these instructions and follow them, in the case of dangerous situations.
Driving safety: It is recommended not to use the phone while driving. If you use it however, turn on the Handsfree mode.
Turn off your phone while in an aircraft.
Interference caused by mobile phones affects aviation safety, and thus is illegal to use it on the plane. Please make sure that your mobile phone is turned off when you are on the plane.
In hospital: When using the phone in a hospital must submit to the relevant rules specified by the hospital. Any interference caused by wireless devices may affect the performance of the phone.
Approved service: Only approved repair shops can repair mobile phones. If you open the phone and try to fix it yourself you will void the warranty of the product.
Accesories and batteries: Only accessories and batteries approved by the producer can be used.
Emergency calls: Make sure the phone is turned on and enabled if you wish to make an emergency call, press the call key and confirm the location, explain what happened and do not close the call. The battery and charging the battery: It is recommended to fully charge before first use of the device.
The battery is not removable. Do not puncture or damage the battery in any way. Do not expose / keep / store close to heat sources / in sunlight. Risk of explosion.
Do not expose the battery/product to temperatures above 40° C. Do not dispose the battery/product in fire or drop anywhere. Return defective batteries/products in special centers or to the supplier center.
Warning: We take no responsibility for situations where the phone is used other than as provided in the manual. Our company reserves the right to make changes in the content of the manual without making this public. These changes will be posted on the company website to the product it amends.
The contents of this manual may be different from that in the product. In this last case will be considered. To avoid the problems that might occur with the service shops approved by Visual Fan Ltd. (because Visual Fan reserves the right to stop the collaboration with any service shop which was previously approved and mentioned in the warranty card on the date on which the product batch was sold on the market), before taking a product to the service shop, please check the updated list of approved service ships on Allview website at the section: "Support&Service – Approved service".
For more product details visit www.allviewmobile.com. Do not cover the antenna with your hand or other objects Failure to comply resulting in connectivity issues and rapid discharge of the battery.
All applications provided by third parties and installed in this device, may be modified and/or stopped at any moment. Visual Fan Ltd will not be responsible in any way for modifications of the services or
content of these applications. Any request or question regarding third party applications may be addressed to owners of these applications.
Due to the used enclosure material, the product shall only be connected to a USB
Interface of version 2.0 or higher. The connection to so called power USB is prohibited.
The adapter shall be installed near the equipment and shall be easily accessible.
Do not use the mobile phone in the environment at too high or too low temperature, never expose the mobile phone under strong sunshine or too wet environment.
The maximum operating ambient temperature of the equipment is 40° C
CAUTION RISK OF EXPLOSION IF BATTERY IS REPLACED BY AN INCORRECT TYPE. DISPOSE OF USED BATTERIES ACCORDING TO THE INSTRUCTIONS
This device has been tested and meets applicable limits for Radio Frequency (RF) exposure. Specific Absorption Rate (SAR) refers to the rate at which the body absorbs RF energy. SAR limits are 1.6 Watts per kilogram (over a volume containing a mass of 1 gram of tissue) in countries that follow the United States FCC limit and 2.0 W/kg (averaged over 10 grams of tissue) in countries that follow the Council of the European Union limit. Tests for SAR are conducted using standard operating positions with the device transmitting at its highest certified power level in all tested frequency bands. To reduce exposure to RF energy, use a hands-free accessory or other similar option to keep this device away from your
head and body. Carry this device at least 5 mm away from your body to ensure exposure levels remain at or below the as-tested levels. Choose the belt clips, holsters, or other similar body-worn accessories which do not contain metallic components to support operation in this manner. Cases with metal parts may change the RF performance of the device, including its compliance with RF exposure guidelines, in a manner that has not been tested or certified, and use such accessories should be avoided.
For your safety, it is recommended that, during charging, you don't keep the device near your body, and that you place it on an inflammable stand. We recommend that, during nighttime, you put the phone away from you at a minimal distance of 1 meter.
Device power on/off and standby
After inserting the SIM card, memory card and battery (optional), start the phone by holding down the Power button for 3 seconds. To power off, press and hold the same button and confirm. If you press the Power button you will set phone in standby mode, to return shortly press the same button.
Unlocking, idle screen and applications menu
To unlock the screen when resuming from standby, slide your finger from the bottom to the top of the screen. The main screen will be displayed
Home screen pages can be customized with shortcuts and widgets. At the top of the screen is placed the notification bar that contains information about the mobile network signal, WiFi, Bluetooth, battery level, time and events.
To display the applications menu, touch the Menu icon from the bottom of the main screen. Slide the screen UP to scroll main menu. Touch the desired application icon to access it. Use the Back button to return to the main screen.
Dialing
To call a number, from the main screen open the dialer, dial the number and press the call key.
To answer a call drag the icon to the right, and to reject the call drag the icon to the left.
You can call numbers directly from Call log, touch the dial symbol from the right side of the desired number.
Messaging
To create and send an SMS, proceed as follows:
- Open the applications menu;
- Open the Messaging application;
- From the bottom-right side of the screen touch Compose new message symbol;
- Write the message;
Note: You create an MMS by touching the “+” symbol and adding media content: images, sound or movies.
- In the top text box add the number or the name of the recipient;
- Tap the arrow -> symbol from the right side of the text box to send the message.
Contacts
Access the Contacts from menu applications.
Add new contact:
- Open Contacts from main menu;
- Tap the + symbol from the bottom-right side of the screen;
- Select the memory where you will store: account or phone entry;
- Enter contact information;
- Finally, tap Save.
Add new contact from call log:
- From the applications menu, open the Dialer,
- Tap the phone number you want to save;
- Tap New contact button;
-
Select the memory where you will store: account or phone entry;
-
Enter contact information;
- Finally, tap Save.
Import/export contacts
You can import or export contacts between memories and accounts available, as follows:
- Open Contacts;
- Press the Options button and select Import / Export;
- Choose memory from which to copy contacts;
- Choose in which memory to copy the contacts;
- Select contacts to copy;
- Press the Copy button;
Synchronize contacts with an account
Note: If you don't have an account, you can create one which is also necessary for the Google Play.
You can synchronize the contacts of an account by following the next steps:
- Open the applications menu -> Settings -> Applications -> ACCOUNTS;
- Touch the desired account; if you don't have allready set, you can add a new one by touching the button Add new account;
- Tick the option Sync contact;
Customize contacts with photo
Note: The contacts from SIM card cannot be customized with photo.
To add a photo to one contacts follow the steps:
- Open Contacts;
- Touch the desired contact name;
- On the top-right of the screen touch the contact editing symbol;
- In the left corner of the screen touch the symbol to add image;
- Select the input method of image: photo shoot or from gallery.
Google Play
Google Play provides a multitude of applications from various categories: games, business, communication, shopping, travel, entertainment, books, education, finance, photography, tools, media, social, sports, news.
The first time you open Google Play, you will be prompted to authenticate. If you already have a Google™ account, enter the data. If not, click the Create button to create a new account and follow the steps on the screen.
Settings
Your service provider may default some device settings, so you may not be able to change these settings.
WLAN Touch Wi-Fi switch to activate. Open Wi-Fi to search for available networks automatically. Networks without password can be used directly, for others you need to enter the password first.
Bluetooth
Touch Bluetooth switch to activate. Touch Bluetooth to enter the device searching screen. You can modify settings by pressing the Menu button.
Data usage
Here you can activate or deactivate the data connection and see a chart of data usage status. You can also set the data mobile limit for each SIM.
More
Airplane mode
Virtual Private Networks (VPN) Settings.
Tethering & portable hotspot
Mobile network
Sounds
This option allows you to set audio tones for incoming calls, e-mail alerts and SMS notifications.
Settings include: Vibration, Volume, Tone Audio, Reviews
Select General / Silent / Meeting / Outdoor profile by touching the right side circle.
Power Saving
You can choose one of the three power schemes:
-Closed
-Normal: calling and messaging are available; data connection remains the same state
-Super-long standby: calling and messaging services remains in the same state.
Display
a. Brightness: adjust the brightnessb. Wallpaper: change the wallpaper picture for idle screen, lock screen and main menu
c. Auto rotating screen: rotate phone to change direction
d. Sleep: adjust the delay before the screen automatically locks
e. Font size
Battery
Displays information about the charging status and usage of the battery.
Applications
Shows the list of the installed and downloaded applications, which of them are installed on SD CARD.
Location
Access to my location: enable applications to use your location information.
GPS satellites: switch on/off the GPS receiver.
Google Location Service: let applications to use the WiFi or mobile network connection to get localization.
Security
1) Set up screen locks: you can choose slide, pattern, PIN or password to unlock the screen.
2) Set up SIM card lock: enter 4-8 numbers PIN to set the lock of SIM. If you enter 10 times wrong PUK code, the SIM card will be permanently locked.
3) Password visible: password visible when enter it
4) Select device administration: add or delete device manager.
5) Unknown sources: install apps from unknown sources
6) Trusted credentials: show the trusted credentials
7) Install from SD card: install the encrypted certificate from SD card.
Languages and input
1) Selecting Language: includes all the languages on the phone
2) Spell checker
3) Personal Dictionary: add words to custom dictionary or delete.
4) Input method
5) Text to speech settings
6) Pointer speed
Reset to factory settings
Backup my data: backup my settings and data of other applications.
Factory data reset: clear all data stored on the phone.
Accounts
Add, manage and change synchronization options for the used accounts.
Date and Time
1) Automatic date & time : use date and time provided by network or by GPS
2) Automatic time zone : check to use network-provided time zone
3) Set Date / Set time : touch to set date / time.
4) Selecting time zone : Select Time Zone according to where you are.
4) Use 24 hour time format : ON/OFF
Schedule power on/off
You can set time of boot or off the phone.
Accessibility
- Power button end call
- Touch and hold delay
About phone
You can check the information about: phone status, legal informations, software version.
DECLARATION OF CONFORMITY
No. 1505
We, S.C. Visual Fan S.R.L., with the headquarters in Brasov, 61, Brazilor St., CP 500313 Romania, registered at the Trade Commerce Brasov under no. J08/818/2002, CUI RO14724950, as the importer, assure, guarantee and declare on our own responsibility, according to the provisions from article 4 HG no. 1.022/2002, regarding the regime of the products and services, which can be harmful for life and health, security and labor protection, that the product P7 Lite from ALLVIEW, does not jeopardize the life, health and labor protection, does not produce a negative impact over the environment and is in accordance with:
- Directive no. 2011/65/UE, modified by 2014/8/UE regarding the usage restrictions of certain dangerous substances in electric and electronic equipment
- Directive regarding the radio and telecommunication equipment RED 2014/53/CEE (HG 487/2016)
- Directive 2014/35/UE regarding the assurance of users of low voltage equipment
- Directive regarding the electromagnetic compatibility 89/336/CEE, modified by Directive 92/31/CEE and 93/68/CEE (HG982/2007); RoHS: EN50581:2012; 2014/30/EU(HG 487/2016)
- The safety requests of the European Directive 2001/95/EC and the EN 60065:2002/A12:2011 and EN 60950-1:2006/ A1:2010 /A11:2009/A12:2011 standards, regarding the level of decibels emitted by the sold appliances.
The product has been assessed according to the following standards:
Health: 2014/35/EU; EN 50360:2001, EN 50361; EN 62209-1 : 2006
Safety: 2014/35/EU; EN 60950-1:2001+A11:2004; EMC EN 301 489-01 V1.6.1 (09-2005)
EN 301 489-07 V1.3.1 (11-2005); EN 301 489-17 V1.2.1 (08-2002)
Radio spectrum: 2014/35/EU; EN 300 328 V1.7.1 (10-2006)
The evaluation procedure of the conformity was made according to Directive 2014/53/CEE, the documentation being stored at S.C. Visual Fan S.R.L., Brasov, 61, Brazilor St., PO 500313, Romania and will be offered at request.
The product has the CE mark on it. The declaration of conformity is available at www.allviewmobile.com.
Director
SAR:0.969W/kg
Brasov
08.09.2017

Cotuna Gheorghe

Măsuri de siguranță
| AT | BA | BE | BG | CH | CY |
| CZ | DE | DK | EE | EL | ES |
| FI | FR | GR | HR | HU | IE |
| IS | IT | LT | LU | LV | ME |
| MK | MT | NL | NO | PL | PT |
| RO | SE | SI | SK | TR | UK |

Excessive sound pressure from earphones and headphones can cause hearing loss.
To prevent possible hearing damage, do not listen at high volume levels for long periods.
The device is restricted to indoor use only when operating in the 5150 to 5350 MHz frequency range.

Google, Android, Google Play and other marks are trademarks of Google Inc.
Romanian (ro)
- NOTICES FOR THE USE OF PHONE
- DEVICE POWER ON/OFF AND STANDBY
- UNLOCKING, IDLE SCREEN AND APPLICATIONS MENU
- DIALING
- MESSAGING
- CONTACTS
- ADD NEW CONTACT
- ADD NEW CONTACT FROM CALL LOG
- IMPORT/EXPORT CONTACTS
- SYNCHRONIZE CONTACTS WITH AN ACCOUNT
- CUSTOMIZE CONTACTS WITH PHOTO
- GOOGLE PLAY
- SETTINGS
- BLUETOOTH
- DATA USAGE
- MORE
- SOUNDS
- POWER SAVING
- DISPLAY
- BATTERY
- APPLICATIONS
- LOCATION
- SECURITY
- LANGUAGES AND INPUT
- RESET TO FACTORY SETTINGS
- ACCOUNTS
- DATE AND TIME
- SCHEDULE POWER ON/OFF
- ACCESSIBILITY
- ABOUT PHONE
- DECLARATION OF CONFORMITY
- NO. 1505
- MĂSURI DE SIGURANȚĂ
- ROMANIAN (RO)
Brand : Allview
Model : P7 Lite
Category : Smartphone