
LU-U450 - Projector ACER - Free user manual and instructions
Find the device manual for free LU-U450 ACER in PDF.


| Product Type | DLP Projector |
| Model | LU-U450 |
| Brand | Acer |
| Native Resolution | WUXGA (1920 x 1200) |
| Brightness | High (exact lumen value not specified, estimated 4500 ANSI lumens) |
| Contrast Ratio | High (e.g., 20000:1 typical) |
| Display Technology | Single-chip DLP |
| Projection Lens | Motorized focus, F = 2, f = 24.85 mm, 1.0x zoom, throw ratio 0.252 |
| Projection Screen Size | 70" - 150" (1.78 m - 3.81 m) |
| Keystone Correction | Vertical & Horizontal, ±5 degrees manual |
| Audio | 2 x 10W speakers |
| Power Supply | Universal AC 100-240 V, 50/60 Hz |
| Power Consumption | Standard: 504 W, ECO: 350 W, Standby: < 0.5 W |
| Dimensions (W x D x H) | 429 x 389 x 143 mm (16.9" x 15.3" x 5.6") |
| Weight | Approx. 7.7 kg (16.98 lbs) |
| I/O Connectors | 2x HDMI, VGA in/out, S-Video, Composite, Audio in/out, RS232, LAN, USB, DC 12V out |
| 3D Support | DLP Link Technology, Blu-Ray 3D, 24p 3D |
| Color Processing | 1.07 billion colors |
| Digital Zoom | 0.8 - 2X |
| Operating Temperature | 0°C to 40°C (32°F to 104°F) |
| Lamp/Light Source | Laser (Laser class 1), adjustable power |
| Network Control | LAN (RJ45), Crestron, AMX, PJLink compatible |
| Package Contents | Projector, Power cord, Remote control (with batteries), Quick start guide, Optional: VGA/HDMI cable, Security card, Carrying case, WirelessHD dongle |
| Safety Features | Automatic shutdown on overheat, fan fail detection, security lock, child lock |
Frequently Asked Questions - LU-U450 ACER
User questions about LU-U450 ACER
0 question about this device. Answer the ones you know or ask your own.
Ask a new question about this device
Download the instructions for your Projector in PDF format for free! Find your manual LU-U450 - ACER and take your electronic device back in hand. On this page are published all the documents necessary for the use of your device. LU-U450 by ACER.
USER MANUAL LU-U450 ACER
Acer DLP Projector UL5630/RL260/LU-U450/ SL470/FL-530/AWU2003 Series User's Guide
Copyright © 2020. Acer Incorporated.
All Rights Reserved.
Acer Projector User's Guide
Original Issue: 08/2020
Changes may be made periodically to the information in this publication without obligation to notify any person of such revisions or changes. Such changes will be incorporated in new editions of this manual or supplementary documents and publications. This company makes no representations or warranties, either expressed or implied, with respect to the contents hereof and specifically disclaims the implied warranties of merchantability or fitness for a particular purpose.
Record the model number, serial number, purchase date and place of purchase information in the space provided below. The serial number and model number are recorded on the label affixed to your projector. All correspondence concerning your unit should include the serial number, model number and purchase information.
No part of this publication may be reproduced, stored in a retrieval system, or transmitted, in any form or by any means, electronically, mechanically, by photocopy, recording or otherwise, without the prior written permission of Acer Incorporated.
Acer Projector
Model number: ____
Serial number: ____
Date of purchase: ____
Place of purchase: ____
Acer and the Acer logo are registered trademarks of Acer Incorporated. Other companies' product names or trademarks are used herein for identification purposes only and belong to their respective companies.
"HDMI™, the HDMI logo and High-Definition Multimedia Interface are trademarks or registered trademarks of HDMI Licensing LLC."
Information for Your Safety and Comfort
Read these instructions carefully. Keep this document for future reference.
Follow all warnings and instructions marked on the product.
Turning the product off before cleaning
Unplug this product from the wall outlet before cleaning. Do not use liquid cleaners or aerosol cleaners. Use a damp cloth for cleaning.
Caution for plug as disconnecting device
Observe the following guidelines when connecting and disconnecting power to the external power supply unit:
• Install the power supply unit before connecting the power cord to the AC power outlet.
- Unplug the power cord before removing the power supply unit from the projector.
- If the system has multiple sources of power, disconnect power from the system by unplugging all power cords from the power supplies.
Caution for Accessibility
Be sure that the power outlet you plug the power cord into is easily accessible and located as close to the equipment operator as possible. When you need to disconnect power to the equipment, be sure to unplug the power cord from the electrical outlet.

Warnings!
- Do not use this product near water.
- Do not place this product on an unstable cart, stand or table. If the product falls, it could be seriously damaged.
- Slots and openings are provided for ventilation to ensure reliable operation of the product and to protect it from overheating. These openings must not be blocked or covered. The openings should never be blocked by placing the product on a bed, sofa, rug or other similar surface.
This product should never be placed near or over a radiator or heat register, or in a built-in installation unless proper ventilation is provided.
- Never push objects of any kind into this product through cabinet slots as they may touch dangerous voltage points or short-out parts that could result in a fire or electric shock. Never spill liquid of any kind onto or into the product.
iv
- To avoid damage of internal components and to prevent battery leakage, do not place the product on a vibrating surface.
- Never use it under sporting, exercising, or any vibrating environment which will probably cause unexpected short current or damage rotor devices.
Using electrical power
- This product should be operated from the type of power indicated on the marking label. If you are not sure of the type of power available, consult your dealer or local power company.
- Do not allow anything to rest on the power cord. Do not locate this product where people will walk on the cord.
- If an extension cord is used with this product, make sure that the total ampere rating of the equipment plugged into the extension cord does not exceed the extension cord ampere rating. Also, make sure that the total rating of all products plugged into the wall outlet does not exceed the fuse rating.
- Do not overload a power outlet, strip or receptacle by plugging in too many devices. The overall system load must not exceed 80% of the branch circuit rating. If power strips are used, the load should not exceed 80% of the power strip's input rating.
- This product's AC adapter is equipped with a three-wire grounded plug. The plug only fits in a grounded power outlet. Make sure the power outlet is properly grounded before inserting the AC adapter plug. Do not insert the plug into a non-grounded power outlet. Contact your electrician for details.

Warning! The grounding pin is a safety feature. Using a power outlet that is not properly grounded may result in electric shock and/or injury.

Note: The grounding pin also provides good protection from unexpected noise produced by other nearby electrical devices that may interfere with the performance of this product.
- Use the product only with the supplied power supply cord set. If you need to replace the power cord set, make sure that the new power cord meets the following requirements: detachable type, UL listed/CSA certified, VDE approved or its equivalent, 4.5 meters (14.76 feet) maximum length.
Product servicing
Do not attempt to service this product yourself, as opening or removing covers may expose you to dangerous voltage points or other risks. Refer all servicing to qualified service personnel.
Unplug this product from the wall outlet and refer servicing to qualified service personnel when:
- the power cord or plug is damaged, cut or frayed
- liquid was spilled into the product
• the product was exposed to rain or water - the product has been dropped or the case has been damaged
- the product exhibits a distinct change in performance, indicating a need for service
- the product does not operate normally after following the operating instructions

Note: Adjust only those controls that are covered by the operating instructions, since improper adjustment of other controls may result in damage and will often require extensive work by a qualified technician to restore the product to normal condition.

Warning! For safety reasons, do not use non-compliant parts when adding or changing components. Consult your reseller for purchase options.
Your device and its enhancements may contain small parts. Keep them out of the reach of small children.
Additional safety information
- Do not look into the projector's lens when the light source is on. The bright light may hurt your eyes.
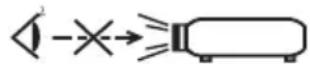
RG2 IEC/EN 62471-5:2015
• Turn on the projector first and then signal sources.
- Do not place the product in the following environments:
• Space that is poorly ventilated or confined. At least 50cm clearance from walls and free flow of air around the projector are necessary.
- Locations where temperatures may become excessively high, such as inside of a car with all windows rolled up.
- Locations where excessive humidity, dust, or cigarette smoke may contaminate optical components, shorten the life span and darken the image.
- Locations near fire alarms.
- Locations with an ambient temperature above 40^ / 104^ . Such environment
may cause the fan(s) to operate in standby mode.
- Locations where the altitudes are higher than 10000 feet.
- Unplug immediately if there is something wrong with your projector. Do not operate if smoke, strange noise or odor comes out of your projector. It might cause fire or electric shock. In this case, unplug immediately and contact your dealer.
- Do not keep using this product to break or drop it. In this case contact your dealer for inspection.
- Do not face the projector lens to the sun. It can lead to fire.
- When switching the projector off, please ensure the projector completes its cooling cycle before disconnecting power.
- Do not frequently turn off the main power abruptly or unplug the projector during operation. The best way is to wait for the fan to stop before turning main power off.
- Do not touch the air outlet grille and bottom plate which become hot.
- Clean the air filter frequently. The temperature inside may rise and cause damage when the filter/ventilation slots are clogged with dirt or dust.
- Do not look into the air outlet grille when projector is operating. It may hurt your eyes.
• Always open the lens shutter or remove the lens cap when the projector is on.
- Do not block the projector lens with any object when the projector is under operation as this could cause the object to become heated and deformed or even cause a fire. To temporarily turn off the light source, press HIDE on the remote control.
- Do not attempt to disassemble this projector. There are dangerous high voltages inside which may hurt you.
- Do not stand the projector on end vertically. It may cause the projector to fall over, causing injury or damage.
- This product is capable of displaying inverted images for ceiling mount installation. Only use acer ceiling mount kit for mounting the projector and ensure it is securely installed.
- Images can be projected over a full 360^ range along the vertical axis, including reproduction on a ceiling or floor. Do not use the projector with it leaning to the left and right. This may result in a malfunction.


natural_image
Icon showing a black camera with a red 'X' symbol and surrounding sound waves, no text or symbols present.Caution for Listening
To protect your hearing, follow these instructions.
- Increase the volume gradually until you can hear clearly and comfortably.
- Do not increase the volume level after your ears have adjusted.
- Do not listen to music at high volumes for extended periods.
- Do not increase the volume to block out noisy surroundings.
• Decrease the volume if you can't hear people speaking near you.
Disposal instructions
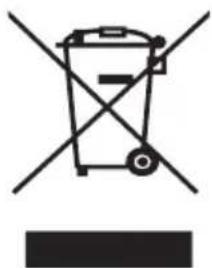
Do not throw this electronic device into the trash when discarding. To minimize pollution and ensure utmost protection of the global environment, please recycle. For more information on the Waste from Electrical and Electronics Equipment (WEEE) regulations, visit http://www.acer-group.com/public/Sustainability/index.htm
natural_image
Symbol of a trash bin crossed with diagonal lines, no text or numbers presentLaser caution
This product belongs to CLASS I laser product and complies with IEC 60825-1:2014.

Above laser cautions are located on the bottom of this apparatus.
- Notice is given to supervise children and to never allow them to stare into the projector beam at any distance from the projector.
- Notice is given to use caution when using the remote control for starting the projector while in front of the projection lens.
- Notice is given to the user to avoid the use of optical aids such as binoculars or telescopes inside the beam.
viii
First Thing First
Usage Notes
Do:
- Turn off the product before cleaning.
- Use a soft cloth moistened with mild detergent to clean the display housing.
- Disconnect the power plug from AC outlet if the product is not being used for a long period of time.
Don't:
- Block the slots and openings on the projector provided for ventilation.
- Use abrasive cleaners, waxes or solvents to clean the unit.
-
Use under the following conditions:
-
In extremely hot, cold or humid environments.
- In areas susceptible to excessive dust and dirt.
- Near any appliance that generates a strong magnetic field.
- Place in direct sunlight.
Precautions
Follow all warnings, precautions and maintenance as recommended in this user's guide to maximize the life of your unit.

Warning:
- Do not look into the projector's lens when the projector is on. The bright light may hurt your eyes.
• To reduce the risk of fire or electric shock, do not expose this product to rain or moisture. - Please do not open or disassemble the product as this may cause electric shock.
- When switching the projector off, please ensure the projector completes its cooling cycle before disconnecting power.
- Turn on the projector first and then the signal sources.
- Do not use lens cap when projector is in operation.
Information for Your Safety and Comfort iii
First Thing First viii
Usage Notes viii
Precautions viii
Introduction 1
Product Features 1
Package Overview 2
Projector Overview 3
Projector Outlook 3
Control Panel 4
Remote Control Layout 5
Getting Started 7
Connecting the Projector 7
Turning the Projector On/Off 9
Turning On the Projector 9
Turning Off the Projector 10
Adjusting the Projected Image 11
Adjusting the Height of the Projected Image 11
How to Get a Preferred Image Size by Adjusting Distance and Zoom 12
User Controls 14
Installation Menu 14
Onscreen Display (OSD) Menus 15
Color 16
Image 19
Setting 22
Management 27
Audio 28
3D 29
Language 30
Acer Splash Downloader 31
Introduction 31
Using the Acer Splash Downloader 31
Appendices 34
Troubleshooting 34
LED & Alarm Definition Listing 38
Ceiling Mount Installation 39
Specifications 40
Compatibility Modes 42
Regulations and safety notices 46
Introduction
Product Features
This product is a single-chip DLP ^® projector, including the following outstanding features:
- DLP ^ technology
- Enables projecting 3D content via DLP Link Technology: Blu-Ray 3D supported
- One-touch "3D" button on remote control allows quick and easy access to the 3D functions
- Acer ColorBoost technology delivers vivid, life-like images
• High brightness and contrast ratio - Versatile display modes enable optimum performance in any situation
- NTSC/PAL/SECAM compatible and HDTV (720p, 1080i, 1080p) supported
- Lower power consumption and economy (ECO) mode extends projector life
- Acer EcoProjection Technology delivers Intelligent power management approach and physical efficiency improvement
• Advanced keystone correction delivers optimum presentations - Multi-language Onscreen Display (OSD) menus
- Motorised focus projection lens
- 0.8 \~ 2X digital zoom and pan move function
- Microsoft ^ Windows ^ 2000, XP, 7, 8, 8.1, 10, Vista ^ , Macintosh OS, Chrome OS compliant
• LAN settings enable remote management of projectors via a web browser - Crestron compliant
• CEC (Consumer Electronics Control) function supported
• LumiSense supported - BluelightShield function supported
- Auto 360 degree cooling prevents the projector from overheating
- Adjustable light source power
Package Overview
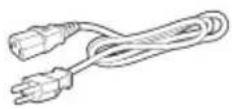
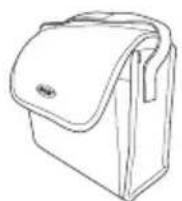
This projector comes with all the items shown below. Check to make sure you have them all. Contact your dealer immediately if any thing is missing.
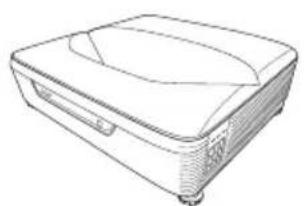
natural_image
Line drawing of a rectangular electronic device with a lid and ventilation slots (no text or symbols)Projector Power cord VGA cable


(Optional)
HDMI cable (Optional)

Security card (Optional)

User's guide (CD-ROM) (Optional)

Remote control Quick start guide

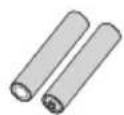
AAA Battery x 2 Carrying case
(Optional)

natural_image
Simple line drawing of a medical or laboratory device with a coiled cable, a rectangular box, and a separate cylindrical object (no text or symbols)WirelessHD dongle kit (MWIHD1) (Optional)

Note: The package content may differ by regions and models.
Projector Overview
Projector Outlook
Front/upper side

| # Description # Description | ||
| 1 Speaker grills 4 Indicator LED | ||
| 2 Remote control receiver 5 Control panel | ||
| 3 Projection lens |
Rear side

| # Description # Description | ||
| 1 LAN (RJ45 port for 10/100M Ethernet) | 8 Composite video input connector | |
| 2 HDMI connector 9 Audio input connector | (L/R) | |
| 3 USB connector (Type A) 10 Audio input connector | ConnectorAudio output connector | |
| 4 Analog RGB signal/HDTV/component video input connector | 11 | KensingtonTM lock port |
| 5 Monitor loop-through output connector | 12 | Security slot |
| 6 RS232 connector 13 Power socket | ||
| 7 S-Video input connector 14 Tilt adjusting wheel | ||
Bottom side

Control Panel

| # Function Description | |
| 1 LAMP Light source indicator LED. | |
| 2 POWER Power indicator LED | |
| 3 Keystone Adjusts image distortion caused by tilting projection. | |
| 4 Power key Refer to the "Turning the Projector On/Off" section. | |
| 5 ENTER Confirms your selection of items. | |
| 6 BACK Cancels your selection, or goes back to previous page. | |
| 7 TEMP Temperature indicator LED. | |
| 8 SOURCE Changes the active source. | |
| 9 Four directional selection keys | Selects items or makes adjustments to your selection |
| 10 MENU Launches the Onscreen Display (OSD) menu, returns to the previous step for the OSD menu operation or exits the OSD menu. | |
Remote Control Layout
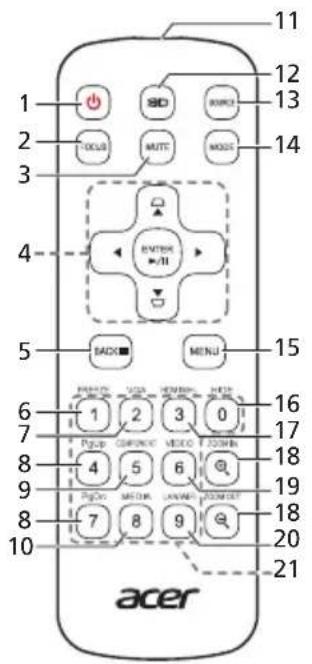

| # Function Description | |||
| 1 POWER Refer to the focus settings. | "Turning the Projector On/Off" section. | ||
| 2 FOCUS Adjusts the focus settings. | |||
| 3 MUTE Mutes or unmutes the projector's volume. | |||
| 4 | Keystone | Adjusts image distortion caused by tilting projection. | |
| Four directional selection keys | Selects items or makes adjustments to your selection. | ||
| ENTER Confirms your selection of items. | |||
| ▶// Play/Pause | |||
| 5 BACK Cancels your selection, or goes back to previous page. | |||
| ■ Stop | |||
| 6 FREEZE To pause the screen image. | |||
| 7 VGA To change source to VGA. This connection supports analog RGB, and YPbPr (480i/480p/576i/576p/720p/1080i/1080p). | |||
| 8 PgUp/PgDn For computer mode only. Use this button to select the next or previous page. This function is only available when connected to a computer via a mini USB cable. | |||
| 9 COMPONENT (No function) | |||
| 10 | MEDIA Opens MEDI | IA SETUP page. (for LAN/wireless compatible models) | |
| 11 | Infrared transmitter | Sends signals to the projector. | |
| 12 | 3D Press to open the 3D menu for adjusting 3D settings. | ||
| 13 | SOURCE Changes the active source. | ||
| 14 | MODE Chooses a display mode. | ||
| 15 | MENU Launches the Onscreen Display (OSD) menu or exits the OSD menu. | ||
| 16 | HIDE Press "HIDE" to hide screen image; press again to display the image. | ||
| 17 | HDMI/MHL To change source to HDMITM (or MHL). (for the model with HDMITM or MHL connector) | ||
| 18 | ZOOM IN/ZOOM OUT | Zooms the projector display in or out. | |
| 19 | VIDEO To change source to composite video. | ||
| 20 | LAN/WiFi To change source to LAN/WiFi. (for LAN/wireless compatible models) | ||
| 21 | Keypad 0~9 | Press "0~9" to input a password in the "Setting" > "Security" OSD. | |
Getting Started
Connecting the Projector
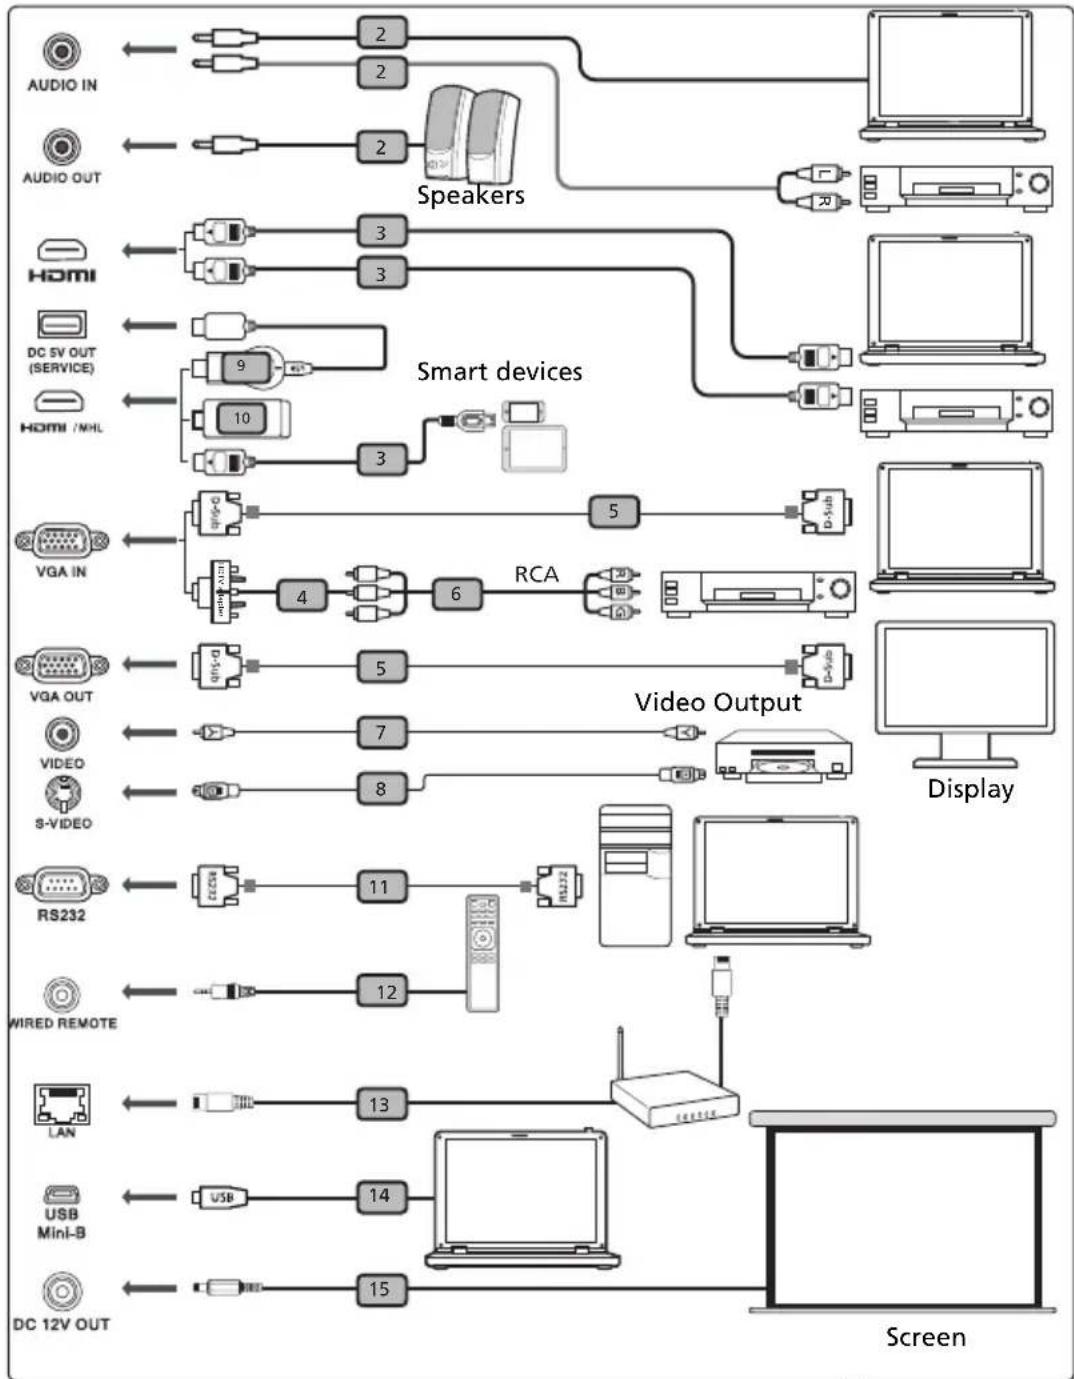
flowchart
graph TD
    A["Audio IN"] --> B["2"]
    C["Audio OUT"] --> D["2"]
    E[" Speakers"] --> F["20"]
    G[" HDMI "] --> H["3"]
    G --> I["3"]
    J[" Smart devices "] --> K["5"]
    L[" VGA IN "] --> M["4"]
    L --> N["6"]
    O[" RCA "] --> P["20"]
    Q[" Display "] --> R["20"]
    S[" Video Output "] --> T["7"]
    U[" S-VIDEO "] --> V["8"]
    W[" RS232 "] --> X["11"]
    W --> Y["12"]
    Z[" WIRED REMOTE "] --> AA["13"]
    AB[" LAN "] --> AC["14"]
    AD[" USB Mini-B "] --> AE["15"]
    AF[" DC 12V OUT "] --> AG["15"]
    AH[" Screen "] --> AI[" Laptop"]

flowchart
graph LR
    A["Power Input"] --> B["Cable"]
    B --> C["Switch"]
    C --> D["Router"]
    D --> E["Electronic Device"]
Note: Connector interface is subject to model's specifications.
| # Description # Description | ||
| 1 Power cord 9 RS232 cable | ||
| 2 Audio cable 10 WirelessHD dongle | ||
| 3 HDMI (MHL) cable 11 Wireless dongle | ||
| 4 VGA to component video/HDTV adapter 12 | Wired remote control | |
| 5 VGA cable 13 RJ45 cable | ||
| 6 3 RCA component cable 14 USB cable | ||
| 7 Composite video cable 15 12V DC cable | ||
| 8 S - V i d e o c a b | I | e |

Note: To ensure the projector works well with your computer, please make sure the timing of the display mode is compatible with the projector.
Note: Some smart devices require a converter (supplied by the smart device maker) to enable the MHL function.
Note: Compatible HDMI/MHL dongles: WirelessHD (MWIHD1), MWA3, HWA1, Chromecast™.
Turning the Projector On/Off
Turning On the Projector
1 Ensure that the power cord and signal cable are securely connected. The Power LED will light red.
2 Turn on the projector by pressing (POWER) on the control panel or remote control, and the Power indicator LED will turn blue.
3 Turn on your source (computer, notebook, video player, etc.). The projector will detect your source automatically (when it is the first time you turn on the projector or the Source Selection function is "Auto").
- If the screen displays "No Signal", please make sure the signal cables are securely connected.
- If you connect to multiple sources at the same time, use "SOURCE" on the control panel or remote control, or the direct source key on the remote control to switch between inputs.
Turning Off the Projector
1 To turn the projector off, press the power button. This message appears:
"Please press power button again to complete the shutdown process" Press the power button again.
2 The LED Power indicator will turn solid red to indicate standby mode.
3 It is now safe to unplug the power cord.

Warning indicators:
- "Projector Overheated. Lamp will automatically turn off soon."
This onscreen message indicates that the projector has overheated. The lamp will automatically turn off, the projector will automatically shut down, and the LED Temp indicator will turn solid red. Contact your local dealer or service center. - "Fan failed. Lamp will automatically turn off soon."
This onscreen message indicates that the fan has failed. The lamp will automatically turn off, the projector will automatically shut down, and the LED Temp indicator will blink. Contact your local dealer or service center.

Note: Whenever the projector automatically shuts down and the LED Temp indicator turns solid red, contact your local reseller or service center.
Adjusting the Projected Image
Adjusting the Height of the Projected Image
The projector is equipped with elevator feet for adjusting the image height.
To raise the image:
1 Use the front Tilt adjusting wheel to raise the image to the desired height and angle.
2 Use the rear Tilt adjusting wheel to fine-tune the display angle.
To lower the image:
1 Use the front Tilt adjusting wheel to lower the image to the desired height and angle.
2 Use the rear Tilt adjusting wheel to fine-tune the display angle.

Tilt adjusting wheel
How to Get a Preferred Image Size by Adjusting Distance and Zoom
The table below shows how to achieve a desired image size by adjusting either the position or the zoom ring.
To obtain an image size of 70" set the projector at a distance of 0.059 m from the screen.

| Desired Image Size Distance | (m) Top (cm) | |||
| Diagonal (inch)< A > | W (cm) x H (cm) | Max zoom<B > | Min zoom<B > | From base to top of image < C > |
| 60 129 x 81 | 0.009 0.009 99 | |||
| 70 151 x 94 | 0.059 0.059 115 | |||
| 80 172 x 108 | 0.110 0.110 131 | |||
| 90 194 x 121 | 0.160 0.160 148 | |||
| 100 215 x 135 | 0.211 0.211 164 | |||
| 110 237 x 148 | 0.262 0.262 181 | |||
| 120 258 x 162 | 0.312 0.312 197 | |||
| 130 280 x 175 | 0.363 0.363 214 | |||
| 140 302 x 188 | 0.413 0.413 230 | |||
| 150 323 x 202 | 0.464 0.464 246 | |||
| 160 345 x 215 | 0.514 0.514 263 | |||
| 170 366 x 229 | 0.565 0.565 279 | |||
| 180 388 x 2 | 42 0.615 0.615 296 | |||
| 190 409 x 2 | 56 0.666 0.666 312 | |||
| 200 431 x 2 | 69 0.717 0.717 328 | |||
| 210 452 x 2 | 83 0.767 0.767 345 | |||
| 220 474 x 2 | 96 0.818 0.818 361 | |||
| 230 495 x 3 | 10 0.868 0.868 378 | |||
| 240 517 x 3 | 23 0.919 0.919 394 | |||
| 250 538 x 3 | 37 0.969 0.969 411 | |||
| 260 560 x 3 | 50 1.020 1.020 427 | |||
| 270 582 x 3 | 63 1.070 1.070 443 | |||
| 280 603 x 3 | 77 1.121 1.121 460 | |||
| 290 625 x 3 | 90 1.172 1.172 476 | |||
| 300 646 x 4 | 104 1.222 1.222 493 | |||
Zoom Ratio: 1.0 x
User Controls
Installation Menu
The Installation menu provides an Onscreen Display (OSD) for projector installation and maintenance. Use the OSD only when the message "No signal" is displayed on the screen or when the projector searches for input signal.
1 Turn on the projector by pressing (POWER) on the control panel or remote control.
2 Press "MENU" on the control panel or remote control to launch the OSD for projector installation and maintenance.

3 The background pattern acts as a guide to adjusting the calibration and alignment settings, such as screen size and distance, focus and more.

Note: The OSD screenshot is for reference only and may differ from the actual design.
4 The Installation menu includes several options.
Use the up and down arrow keys to select an option, the left and right arrow keys to adjust selected option settings, and the right arrow key to enter a submenu for feature setting. The new settings will be saved automatically upon exiting the menu.
5 Press "MENU" anytime to exit the menu and return to the Acer welcome screen.
Onscreen Display (OSD) Menus
The projector has multilingual Onscreen Display (OSD) menus that allow you to make image adjustments and change a variety of settings.
Using the OSD menus
- To open the OSD menu, press "MENU" on the control panel or remote control.
- When the OSD is displayed, use to select an item in the main menu.
After selecting the desired main menu item, press to enter a submenu for feature setting.
• Use ▲ ▼ to select the desired item and adjust the settings by using

- Select the next item to be adjusted in the submenu and adjust as described above.
- Press "MENU" on the control panel or remote control, the screen will return to the main menu.
- To exit the OSD menu, press "MENU" on the control panel or remote control again. It will close and the projector will automatically save the new settings.


Note: Some of the following OSD settings may not be available. Please refer to the actual OSD of your projector.
Color
| BluelightShield | This function protects your eyes from over-exposure to blue light. The options are Off, Low, Medium, and High.Choose a preferred setting to reduce the level of blue light and get a comfortable viewing experience. · · · · · · · · · · · · · · · · · · · · · · · · · · · · · · · · · · · · · · · · · · · · · · · · · · · · · · · · · · · · · · · · · · · · · · · · · · · · · · · · · · · · · · · · · · · · · · · · · · · · · · · · · · · · · · · · · · · · · · · · · · · · · · · · · · · · · · · · · · · · · · · · · · · · · · · · · · · · · · · · · · · · · · · · · · · · · · · · · · · · · · · · · · · · · · · · · · · · · · · · | |
| When this function is enabled, LumiSense will be automatically set to "Off". | ||
| LumiSense | The projector can intelligently optimizes the brightness and color saturation of projected image. The feature greatly enhances dark detail visibility and color saturation.· Off: For normal mode.· Normal: For enhancing the details in the dark area.· Boost: For boosting brightness of the projected image.· Dynamic Black: automatically optimizes the display of dark movie scenes enabling them to be shown in incredible detail. · · · · · · · · · · · · · · · · · · · · · · · · · · · · · · · · · · · · · · · · · · · · · · · · · · · · · · · · · · · · · · · · · · · · · · · · · · · · · · · · · · · · · · · · · · · · · · · · · · .When this function is enabled, BluelightShield will be automatically set to "Off". · · · · · · · · · · · · · · · · · · · · · · · · · · · · · · · · · · · · · · · · · · · · · · · · · · · · · · · · · · · · · · · · · · · · · · · · · · · · · · · · · · · · · · · · · · · · · · · · · · .When this function is enabled, BluelightShield will be automatically set to "Off". · · · · · · · · · · · · · · · · · · · · · · · · · · · · · · · · · · · · · · · · · · · · · · · · · · · · · · · · · · · · · · · · · · · · · · · · · · · · · · · · · · · · · · · · · · · · · · · · · · LumiSense function is unavailable when 3D is set to "On" · · · · · · · · · · · · · · · · · · · · · · · · · · · · · · · · · · · · · · · · · · · · · · · · · · · · · · · · · · · · · · · · · · · · · · · · · · · · · · · · · · · · · · · · · · · · · · · · · · LumiSense function is unavailable when 3D is set to "On" | |
| Display Mode | There are many factory presets optimized for various types of images.· Bright: For brightness optimization.· Presentation: For meeting presentation with higher brightness.· Standard: For common environment.· Video: For playing video in a bright environment.· Education: For education environment.· DICOM SIM: For DICOM format files in simulation mode, and not for actual diagnosis.· User 1/User 2/User 3: Memorize user's settings. | |
| Color Profile | Available when User 1/User 2/User 3 is selected in the Display Mode menu. You can use one of the display modes as a starting point and customize the settings. The below OSD items can be adjusted and saved. | |
| Wall Color | Use this function to choose a proper color according to the wall. There are several choices, including White, Light Yellow, Light Blue, Pink and Dark Green. It will compensate for the color deviation due to the wall color to show the correct image tone. | |
| Brightness | Adjusts the brightness of the image. • Press to darken the image. • Press to lighten the image. | |
| Contrast | Controls the degree of difference between the lightest and darkest parts of the picture. Adjusting the contrast changes the amount of black and white in the image. • Press to decrease the contrast. • Press to increase the contrast. | |
| Saturation | Adjusts a video image from black and white to fully saturated colors. • Press to decrease the amount of color in the image. • Press to increase the amount of color in the image. | |
| Tint | Adjusts the color balance of red and green. • Press to increase the amount of green in the image. • Press to increase the amount of red in the image. | |
| Color Temperature | Adjusts the color temperature. At higher color temperatures, the screen looks colder; at lower color temperatures, the screen looks warmer. | |
| Gamma | Effects the representation of dark scenery. With greater gamma value, dark scenery will look brighter. | |
| Advanced | ·Ind. Color Management: Adjusts the red, green, blue, cyan, yellow and magenta colors.·- Ind. Hue: Changes the hue of the color selected.·- Ind. Saturation: Adjusts a video image from black and white to fully saturated color.·- Ind. Gain: Adjusts the contrast levels.·Brilliant Color: Produces an expanded on-screen color spectrum that delivers enhanced color saturation for bright, true-to-life images. This feature is "On" by default.·White Peaking: Increases the brightness of whites that are near 100%. (Video sources only)·Film Mode: Sets the image optimized to 24-frame True Film mode for more realistic cadence of film playback during motion sequences.·Noise Reduction: Adjusts the level of noise reduction that helps to eliminate unwanted noise in the picture.·Black Extension: Analyzes the current input image and calculates an offset value which is then added to the analog to digital converter black level value. This ensures optimum black level for each analog source. | |
| Rename | Available when User 1/User 2/User 3 is selected in the Display Mode menu. You can change User 1/User 2/User 3 to your preferred mode name in English letters. | |

Note: "Saturation" and "Tint" functions are not supported under computer mode.
Image
| Projection Mode | • From The factory default setting.• Rea Reverses the image so you can project from behind a translucent screen. |
| Projection Location | • Automatically adjusts projection location of image.• Desktop• Ceiling: Turns the image upside down for ceiling-mounted projection. |
| Aspect Ratio | Use this function to choose your desired aspect ratio.• Auto: Keeps the image with original width-height ratio and maximizes the image to fit native horizontal or vertical pixels.• Full (for WXGA/1080p models): The image will be displayed making full use of the horizontal and vertical pixels.• 4:3: The image will be scaled to fit the screen and displayed using a 4:3 ratio.• 16:9: The image will be scaled to fit the screen and displayed using a 16:9 ratio.• L.Box (for WXGA/1080p models): Keeps the original signal aspect ratio and zooms in by 1.333 times. |
| Lens Focus | Press to adjust the projector's focus. |
| H/V Keystone | V. KeystoneManually adjusts image distortion caused by tilting projection ( ± 5 degrees). |
H. KeystoneManually adjusts image distortion caused by tilting projection ( ± 5 degrees). | |
| 4 Corner Correction | Manually adjusts the shape and size of an image that is unevenly rectangular on all sides. Press "MODE" repeatedly to select the corner that you wish to adjust. Press four directional selection keys to adjust the image shape.     Please adjust 4-corner correction separately for each aspect ratio, and its memory is allowed to save 4 sets of settings only. Please adjust 4-corner correction separately for each aspect ratio, and its memory is allowed to save 4 sets of settings only. |
| Digital Zoom Out | Sets the default size of the projected image. You can further zooms in or out the image by pressing .Using the functions of Digital Zoom Out and Image Shift together helps you fit the projected image full screen without adjusting the existing ceiling mount settings. |
| Image Shift | Shifts the projected image by pressing  en Native Resolution is WUXGA, this functions is only available when the setting of Digital Zoom Out (Install) is less than 1.0. en Native Resolution is WUXGA, this functions is only available when the setting of Digital Zoom Out (Install) is less than 1.0. |
| Sharpness | Adjusts the sharpness of the image.Press to decrease the sharpness.Press to increase the sharpness. |
| H. Position (Horizontal Position) | Press to move the image left.Press to move the image right. |
| V. Position (Vertical Position) | Press to move the image down.Press to move the image up. |
| Frequency | Changes the projector's refresh rate to match the frequency of your computer's graphics card. If you experience a vertical flickering bar in the projected image, use this function to correct it. |
| Tracking | Synchronizes the signal timing of the display with the graphics card. If you experience an unstable or flickering image, use this function to correct it. |
Please adjust 4-corner correction separately for each aspect ratio, and its memory is allowed to save 4 sets of settings only.
| HDMI Color Range | Adjusts the color range of the HDMI image data to prevent color display error.·Auto: Automatically adjusts the color range by information from the player.·Limited Range: Processes the input image as limited color range data.·Full Range: Processes the input image as full color range data. |
| HDMI Scan Info | Adjusts the overscan ratio of the HDMI image on screen.·Auto: Automatically adjusts the overscan ratio by information from the player.·Underscan: Always no overscan on the HDMI image.·Overscan: Always keep overscan on the HDMI image. |
| HDR | ·HDR: The projector supports HDR imaging sources. It can automatically detect the dynamic range of the source, and optimize settings to reproduce contents under wide range of light conditions. If the input source is not defined with dynamic range, you can also manually select SDR for it.·EOTF: This function helps provide better image quality with options from low, middle to high. |

Note: "H. Position", "V. Position", "Frequency" and "Tracking" functions are not supported under video or HDMI mode.
Note: "HDMI Color Range" and "HDMI Scan Info" are only available when the input signal is HDMI.
Setting
| Startup Screen | Use this function to select your desired startup screen. If you change the setting, it will take effect when you exit the OSD menu.Acer: The default startup screen of your Acer projector.User: Use the picture you transfer to the projector. See "Acer Splash Downloader" for how to transfer the picture. |
| Source Selection | Manual: When switching input signals, you need to press "SOURCE" on the control panel or remote control, or the direct source key on the remote control.Auto: The projector will detect your source automatically. |
| Closed Caption | Selects a preferred closed captioning mode from CC1, CC2, CC3, CC4 (CC1 displays captions in the primary language in your area). Select "Off" to turn off the captioning feature. This function is only available when a composite video or S-Video input signal is selected and its system format is NTSC. |
| VGA OUT(Standby) | Selecting "On" enables the function. The projector can output a VGA signal when it is in standby mode and the VGA IN (or VGA IN 1) and VGA OUT sockets are correctly connected to the devices. Enabling this function increases the standby power consumption. Enabling this function increases the standby power consumption. |
| USB 5V(Standby) | Selecting "On" enables the function. The MHL port(s) and the DC 5V out port/USB A port (if available) on the projector can output 5V power when the projector is turned on or in standby mode. Only MHL port(s) will provide power output when MHL port(s) and USB A port are both plugged. Only MHL port(s) will provide power output when MHL port(s) and USB A port are both plugged. |
| HDMI CEC | Selecting "On" allows synchronized power ON/OFF operation between the projector and a CEC-compatible device connected to the HDMI/MHL port of the projector. This function is only available for the HDMI/MHL port. This function is only available for the HDMI/MHL port. |
| Low Input Lag | This function is especially suitable for gaming environment. It reduces input to output latency and helps create a seamless experience. · · · · · · · · · · · · · · · · · · · · · · · · · · · · · · · · · · · · · · · · · · · · · · · · · · · · · · · · · · · · · · · · · · · · · · · · · · · · · · · · · · · · · · · · · · · · · · · · · · · · · · · · · · · · · · · · · · · · · · · · · · · · · · · · · · · · · · · · · · · · · · · · · · · · · · · · · · · · · · · · · · · · · · · · · · · · · · · · · · · · · · · · · · · · · · · · · · · · · · · · |
| Security | This function is only available for certain input timings. After turned on, performing Auto Keystone or adjusting the following settings will deactivate this function: Aspect ratio, Keystone, H. Position, V. Position, Frequency, HDMI Scan Info, Digital Zoom. When Display Mode is Game Dark or Game Bright, this function will be automatically turned on. |
SecurityThis projector provides a useful security function for the administrator to manage the projector.Press to change the "Security" setting. If the security function is enabled, your must enter "Administrator Password" first before changing the security setting. · · · · · · · · · · · · · · · · · · · · · · · · · · · · · · · · · · · · · · · · · · · · · · · · · · · · · · · · · · · · · · · · · · · · · · · · · · · · · · · · · · · · · · · · · · · · · · · · · · · · · · · · · · · · · · · · · · · · · · · · · · · · · · · · · · · · · · · · · · · · · · · · · · · · · · · · · · · · · · · · · · · · · · · · · · · · · · · · · · · · · · · · · · · · · · · · · · · · | |
| Security | User PasswordPress to set up or change "User Password".Use the numerical keys on the remote control to set the password and press "ENTER" to confirm.To delete the digits, Press.<Enter the password again when you see "Confirm Password" displayed.The password should be 4~8 digits in length.If you select "Request password only after plugging power cord", you are requested to input the password every time the power cord is plugged. If you fail to enter the correct password within 20 minutes upon request, the projector will shut down automatically.If you select "Always request password while projector turns on", you are requested to input the password every time the projector is turned on. If you fail to enter the correct password within 20 minutes upon request, the projector will shut down automatically. |
| Administrator PasswordYou can enter "Administrator Password" when the "Enter Administrator Password" or "Enter Password" dialogue box displays.Press to change "Administrator Password".The factory default of "Administrator Password" is "1234".If you forget your administrator password, do the following to retrieve the administrator password:Enter the unique 6-digit "Universal Password" which is printed on the Security Card that came with your projector. This unique password will be accepted by the projector no matter what the administrator password is.If the Security Card is lost, please contact your local Acer service center. | |
| Lock User Startup ScreenThis function is set to "OFF" by default. If set to "ON", the startup screen is locked and cannot be changed by the "Startup Screen" and "Screen Capture" functions. | |
| LAN | LANThe default value is "Off". Choose "On" to enable the LAN connection.LAN IP/ MaskIdentify IP and Mask address.LAN ResetPress "ENTER" after choosing "Yes" to return all items on the Tools page to the default settings. |
| Reset | Press "ENTER" after choosing "Yes" to return the display parameters on all menus to the factory default settings. |

Using a web browser to control your projector
- Make sure that your PC and the projector are connected to the same local area network.
- Open the web browser on your PC and type in the LAN IP of the projector. (See the LAN IP in the Setting > LAN > LAN IP/ Mask menu.)
- The remote network operation page displays and you can control the projector. If not, perform LAN Reset in the Setting > LAN menu of the projector's OSD menu and then try again.
Note 1: An overview of the remote network operation page

Note 2 : An overview of the Tools page

Note 3: The Info page shows the projector information and status.


This projector can be controlled by using a PC (laptop) or other external device via LAN / RJ45 port and compatible with Crestron / AMX (Device - Discovery) / PJLink.
- Crestron is a registered trademark of Crestron Electronics, Inc. of the United States.
- AMX is a registered trademark of AMX LLC of the United States.
- PJLink applied for trademark and logo registration in Japan, the United States of America, and other countries by JBMIA.
The projector is supported by the specified commands of the Crestron Electronics controller and related software, for example RoomView®.
For more information, visit http://www.crestron.com/
This projector is supported by AMX (Device Discovery). For more information, visit http://www.amx.com/
This projector supports most commands of PJLink Class1 (Version 1.00). For more information, visit http://pjlink.jbmia.or.jp/english/
Management
| ECO Mode | Choose "ECO" to dim the projector lamp, which will also lower the power consumption, reduce noise, and extend the lamp life. Choose "User" allows you to adjust the light source power. Choose "Off" to return to the normal mode. |
| Light Source Power | This function is only available when "Custom" is selected in the ECO Mode menu. You can adjust the light source power to extend the light source life and decreases the fan noise. |
| High Altitude | Choose "On" to turn on the High Altitude mode. When this function is turned on, the projector fans operate at full speed continuously to cool down the projector's temperature. |
| Auto Shutdown (Minutes) | The projector will automatically shut down while there is no signal input detected after the time you set. |
| Menu Display Time (Seconds) | 5/15/30: Chooses the length of time the OSD menu will remain active after your last key press.Manual: The OSD menu remains active. The only way to launch or exit the OSD menu is by pressing "BACK". |
| Auto Power On | AC Power OnSelecting "On" enables the function. The projector will automatically turn on when power is supplied via the power cord. |
| HDMI Power OnSelecting "On" enables the function. The projector will automatically turn on when power is supplied via the power cord and the HDMI signal is supplied via the HDMI cable. | |
| VGA Power OnSelecting "On" enables the function. The projector will automatically turn on when power is supplied via the power cord and the VGA signal is supplied via the VGA cable. | |
| Control Panel Lock | Off: Allows all keys on the control panel to operate normally.Child Lock: Disables the Power key on the control panel when the projector is in standby mode to prevent it from being accidentally turned on. To turn the projector on, press and hold the Power key for 3 seconds.Full Lock: Disables all keys on the control panel. If you turn off the projector without disabling the Full Lock function, the projector will still be in locked status the next time it is turned on. To disable Full Lock function, press and hold "POWER" on the control panel for 7 seconds and the Control Panel Lock will be set to "Off". When the projector is in standby mode, press and hold "POWER" on the control panel for 7 seconds to turn the projector on and the Control Panel Lock will be set to "Off". |
| Information Displays current status of this projector. | |
Audio
| Volume | Press to decrease the volume.Press to increase the volume. |
| Mute | Choose "On" to turn mute on.Choose "Off" to turn mute off. |
| Power On/Off Volume | Select this function to adjust the notification volume when turning the projector on/off. |
3D
| 3D | Selects "On" to enable the 3D function supported by DLP 3D technology.•On: Select this item while using DLP 3D glasses, quad buffer (NVIDIA/ATI...) graphics card and HQFS format file or DVD with corresponding SW player.•Off: Turns off the 3D mode. |
| 3D Format | If the 3D content is not displayed correctly, you can select a 3D format that suits the 3D content you are viewing and obtain the best result. |
| 24P 3D Choose 96Hz or 144Hz for 24p 3D. | |
| 3D L/R Invert | If you see a discrete or overlapping image while wearing DLP 3D glasses, you may need to execute "Invert" to get best match of left/right image sequence to get the correct image (for DLP 3D). |
| 3D Warning Message | Choose "On" to display the 3D warning message.Note: 3D display is now enabled.1. Please make sure you have the correct 3D signals and glasses.2. Remember to turn off 3D if you don't want to see 3D images.3. If the 3D display isn't correct, please try to enable 3D L/R Invert.4. Display mode options will be disabled while in 3D mode. |

Note: Supported 3D signal timings:
| Signal source type USupported timing | ng |
| Video/S-Video/Component video | HQFS 3D (480i@60Hz), 576i@50Hz |
| VGA/HDMI (PC mode) 640 x 480@50Hz | 60/60/100/120Hz800 x 600@50/60/100/120Hz1024 x 768@50/60/100/120Hz1280 x 800@50/60/100/120Hz (RB)1920 x 1080@50/60/100/120Hz |
| HDMI (Video mode) HQFS 3D (480i @60Hz), 576i@50Hz,Frame Packing (1080p@23.98/24Hz,720p@50/60Hz)Side-by-Side Horizontal (1080i@50/60Hz,1080p@50/60Hz)Top-and-Bottom (720p@50/60Hz,1080p@23.97/24Hz, 1080p@50/60Hz) | |
It needs correct settings on graphics card 3D application program for correct 3D display.
Note: "3D L/R Invert" and "3D Format" are only available when "3D" is enabled.
Language
| Language | Sets a language for the OSD menus. Use to▼select your preferred language. |
Acer Splash Downloader
Introduction
Acer Splash Downloader allows you to upload your desired picture onto an Acer projector. You can select the picture as the startup screen via the projector's OSD menu.
System Requirements
| Maximum image size 6 Mbytes | |
| Maximum image resolution | 1920 x 1200Recommended: Native resolution |
| Minimum image resolution | 800 x 600 |
| Maximum color bits 24 bits | |
| Image format BMP, JPG, PNG | |
| Supported operation system | Windows 7, 8, 8.1, 10 (32 / 64 Bit) |
Using the Acer Splash Downloader
1. Entering download mode
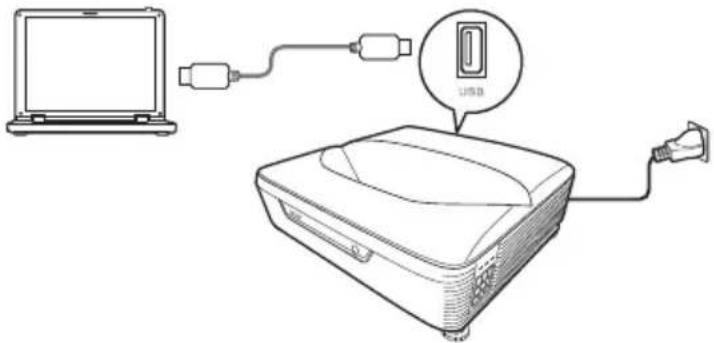
Long press the POWER and MENU buttons on the control panel simultaneously while plugging in the power cord until the LED indicator lights up red.

2. Connecting the computer to the projector
Use an USB cable to connect the computer and the projector.
3. Executing the Acer Splash Downloader tool on the computer
If the projector is not properly connecting to the computer, below message will be displayed.
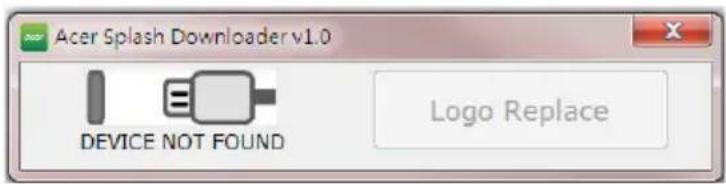
If the projector successfully connects the computer, below message will be displayed. Press "Logo Replace" to proceed.

4. Loading the image
First, select the native resolution for the projector by adjusting "PJ Native Resolution" and decide if you want the image to be displayed full screen or in its original aspect ratio.
Press "LoadImage" and choose an image from your computer.
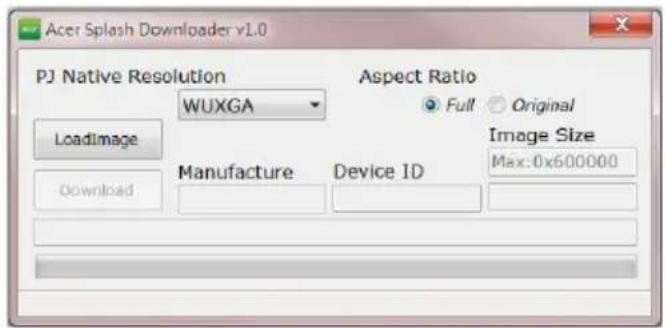
If the image is loaded successfully, the tool status will display "Load Image successfully".
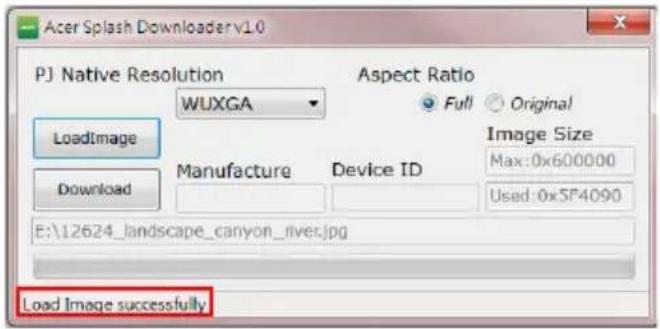
"Setting changed!! Please load image again." will be displayed in the tool status when PJ Native Resolution or aspect ratio is adjusted after the image is loaded successfully.
"Image size is over defined range" will be displayed in the tool status when the image is too large, and "Load Image fail" will be displayed when the image format is not supported.
5. Downloading the image to the projector
Press "Download" to start downloading the image to the projector.


Note: If "Unknown" is shown in the Manufacture or Device ID field, the projector is not in a status suitable for download. Go back to step 1 and try again.
After the image is downloaded successfully, the projector will automatically shut down (enter standby mode), and the Startup Screen function in the OSD menu will be set to "User".
Appendices
Troubleshooting
If you experience a problem with your Acer projector, refer to the following troubleshooting guide. If the problem persists, please contact your local reseller or service center.
Image Problems and Solutions
| # Problem Solution | |
| 1 No image appears onscreen | Make sure all the cables are correctly connected as described in the "Getting Started" section.Ensure none of the connector pins are bent or broken.Make sure the projector is switched on. |
| 2 Partial, scrolling or incorrectly displayed image (For PC) | For an incorrectly displayed image:Open "My Computer > Control Panel," and then double-click the "Display" icon.Select the "Settings" tab.Verify that your display resolution setting is lower than or equal to 1600 x 1200 or 1920 x 1080.Click the "Advanced Properties" button.If the problem still appears, change the monitor display you are using and follow the steps below:Verify that the resolution setting is lower than or equal to 1600 x 1200 or 1920 x 1080.Click the "Change" button under the "Monitor" tab.Click "Show all devices > Standard monitor types" under the SP box, and choose the resolution mode you need under the "Models" box.Verify that the resolution setting of the monitor display is lower than or equal to 1600 x 1200 or 1920 x 1080. |
| 3 Partial, scrolling or incorrectly displayed image (For notebooks) | ·For an incorrectly displayed image: ·Follow the steps for item 2 (above) to adjust the resolution of your computer. ·Press the toggle output settings. Example: [Fn]+[F4], Compaq [Fn]+[F4], Dell [Fn]+[F8], Gateway [Fn]+[F4], IBM [Fn]+[F7], HP [Fn]+[F4], NEC [Fn]+[F3], Toshiba [Fn]+[F5] ·If you experience difficulty changing resolutions or your monitor freezes, restart all equipment including the projector. |
| 4 The screen of the notebook computer is not displaying your presentation | ·If you are using a Microsoft® Windows® based notebook: Some notebook PCs may deactivate their own screens when a second display device is in use. Each has a different way to be reactivated. Refer to your computer's manual for detailed information. ·If you are using an Apple® Mac® OS based notebook: In System Preferences, open Display and select Video Mirroring "On." |
| 5 Image is unstable or flickering | ·Use "Tracking" to correct it. Refer to the "Image" section for more information. ·Change the display color setting on your computer. |
| 6 Image has vertical flickering bar | ·Use "Frequency" to make an adjustment. Refer to the "Image" section for more information. ·Check and reconfigure the display mode of your graphics card to make it compatible with the projector. |
| 7 Image is out of focus | ·Adjust the focus settings. ·Make sure the projection screen is within the required distance. (Refer to "Projection distance with clear focus" section for more information.) Refer to the "How to Get a Preferred Image Size by Adjusting Distance and Zoom" section for more information. |
| 8 Image is stretched when displaying a "widescreen" DVD title | When you play a DVD encoded in anamorphic or 16:9 aspect ratio you may need to adjust the following settings: ·If you play a 4:3 format DVD title, please change the format to 4:3 with the projector OSD. ·If the image is still stretched, you will also need to adjust the aspect ratio. Set up the display format to 16:9 (wide) aspect ratio on your DVD player. |
| 9 Image is too small or too large | Adjust the zoom lever on the top of the projector.Move the projector closer to or further from the screen.Press "MENU" on the control panel or remote control. Go to "Image" > "Aspect Ratio" and try different settings. |
| 10 Image has slanted sides | If possible, reposition the projector so that it is centered on the screen and below the bottom of the screen.Press the Keystone correction keys on the control panel or remote control until the image becomes square.Press "MENU" on the control panel or remote control to open the OSD menu. Go to "Image" > "H/V Keystone" or "Image" > "4 Corner Correction" to make adjustments. |
| 11 Image is reversed | Select "Image" > "Projection Mode", "Image" > "Projection Location" on the OSD and adjust the projection direction. |
Problems with the Projector
| # Condition Solution | |
| 1 The projector stops responding to all controls | • If possible, turn off the projector, then unplug the power cord and wait at least 30 seconds before reconnecting power.• Make sure that the control panel lock function is disabled. |
| 2 Lamp burns out or makes a popping sound | When the lamp reaches the end of its useful life, it will burn out and may make a loud popping sound. If this happens, the projector will not turn on until the lamp module has been replaced. To replace the lamp, contact your local dealer or Acer service center. |
OSD Messages
| # Condition Message Reminder | |
| 1 Message Fan Fail - the system fan is not working. | |
| Fan Fail.Laser will automatically turn off soon. | |
| Projector Overheated - the projector has exceeded its recommended operating temperature and must be allowed to cool down before it is used. | |
| Projector Overheated.Laser will automatically turn off soon. | |
LED & Alarm Definition Listing
LED Messages
| Message Power LED | LAMP LED TEMP LED | |||
| Red Blue | Red Red | |||
| Standby(Power cord plugged in) | V | - | - | |
| Power on -- V -- -- | ||||
| Lamp retry -- Quick | flashing | --- | ||
| Turning off (Cooling state) | Quick flashing | --- | ||
| Turning off (Cooling completed) | V | - | - | |
| Firmware download V -- V | V | |||
| Acer splash download V -- V | V | |||
| Error (Thermal failure) | -- V -- V | |||
| Error (Fan lock failure) | -- V | -- Quick | flashing | |
| Error (Lamp breakdown) | -- V | V | -- | |
| Error (Color wheel failure) | -- V | Quick | flashing | -- |
Ceiling Mount Installation
If you wish to use a third party ceiling mount kit, please ensure the screws used to attach a mount to the projector meet the following specifications:
- Screw type: M4 x 10L
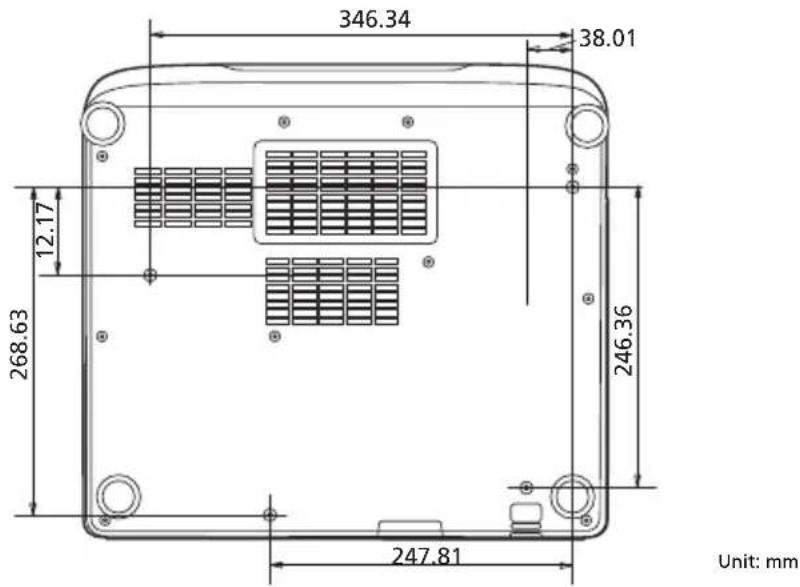

Note: Please note that damage resulting from incorrect installation will void the warranty.

Warning:
- If you buy a ceiling mount from another company, please be sure to use the correct screw size. Screw size will vary depending on the thickness of the mounting plate.
- Be sure to keep at least 10 cm gap between the ceiling and the bottom of the projector.
- Avoid installing the projector near a heat source.
Specifications
The specifications below are subject to change without notice. For final specs, please refer to Acer's marketing documentation.
| Projection system | DLP^TM |
| Computer compatibility Refer to the "Compatibility Modes" section for more information. | |
| Video compatibility NTSC/NTSC4.43/PAL (M/N)/ SECAM/ PAL60/ NTSC (480i)/ 480p/ PAL (576i)/ 576p, HDTV (720p/1080i/1080p) | |
| Displayable colors 1.07 billion colors | |
| Digital zoom 0.8 - 2 X | |
| Weight Approximate 7.7 kg (16.98 lbs.) | |
| Dimensions (W x D x H) 429 x 389 x 143 mm (16.9" x 15.3"x 5.6") 429 x 389 x 158 mm (16.9" x 15.3"x 6.2") (with tilt adjusting wheels) | |
| Power supply Universal AC input 100 - 240 V, input frequency 50/60 Hz | |
| Operating temperature 0°C to 40°C / 32°F to 104°F | |
| Standard package contents | AC power cord x 1Remote control x 1Battery x 2 (for the remote control)Quick start guide x 1 |
| Accessory (optional) | User's guide (CD-ROM) x 1VGA cable x 1HDMI cable x 1Security card x 1Carrying case x 1WirelessHD dongle kit (MWIHD1) x 1 |
UL5630/RL260/LU-U450/SL470/FL-530
Resolution Native: WUXGA (1920 x 1200)
Maximum: UXGA (1600 x 1200), 1080p (1920 x 1080),
WUXGA (1920 x 1200) (supports reduce blanking only)
Aspect ratio Auto, 4:3, 16:9, Full, L.Box
Projection lens F = 2, f = 24.85 mm,
1:1.0 Motorized Focus
Projection screen size (diagonal) 70" - 150" (1.78 m - 3.81 m)
Projection distance with clear focus 0.059 m - 0.464 m (2.32" - 18.26")
Throw ratio 0.252 (87"@0.145 m)
Horizontal scan rate 15 – 100 KHz
Vertical refresh scan rate 24 – 120 Hz
Keystone correction +/-5 Degrees (Vertical & Horizontal), Manual
Audio 10W speaker x 2
Power consumption Standard mode: 504 W @100 VAC
ECO mode: 350 W @ 100 VAC
Standby mode: < 0.5 W
| I/O connectors | UL5630/RL260/LU-U450/SL470/FL-530 |
| Power socket V | |
| USB V | |
| VGA IN V | |
| VGA OUT V | |
| RS232 | V |
| AUDIO IN | V |
| AUDIO OUT | V |
| AUDIO IN (R) | V |
| AUDIO IN (L) | V |
| HDMI 1 | V |
| HDMI 2 | V |
| S-VIDEO | V |
| VIDEO | V |
| LAN | V |
* Design and specifications are subject to change without notice.
Compatibility Modes
1 VGA Analog - PC Signal
| Mode Resolution | tion V.Frequency [Hz] | H.Frequency [KHz] | |
| VGA 640 x 480 | 80 | 60 31.47 | |
| 72 37.86 | |||
| 75 37.50 | |||
| 85 43.27 | |||
| 120 61.91 | |||
| SVGA 800 x 600 | 600 | 56 35.20 | |
| 60 37.88 | |||
| 72 48.08 | |||
| 75 46.88 | |||
| 85 53.67 | |||
| 120 77.43 | |||
| XGA 1024 x 768 | 768 | 60 48.36 | |
| 70 56.48 | |||
| 75 60.02 | |||
| 85 68.68 | |||
| 120 98.96 | |||
| SXGA | 1152 x 864 | 70 63.85 | |
| 75 67.50 | |||
| 85 77.10 | |||
| 1280 x 1024 | 60 63.98 | ||
| 72 76.97 | |||
| 75 79.98 | |||
| 85 91.15 | |||
| QuadVGA | 1280 x 960 60 60.00 | ||
| 1280 x 960 75 75.00 | |||
| SXGA+ 1400 x 1050 60 65.32 | |||
| UXGA 1600 x 1200 60 75.00 | |||
| PowerBook G4 | 640 x 480 60 31.50 | ||
| 640 x 480 66.6 (67) 35.00 | |||
| 800 x 600 60 37.88 | |||
| 1024 x 768 60 48.36 | |||
| 1024 x 768 75 60.241 | |||
| 1152 x 870 75 68.681 | |||
| WXGA | 1280 x 768 60 47.78 | ||
| 1280 x 768 75 60.29 | |||
| 1280 x 768 85 68.63 | |||
| 1280 x 720 60 45.00 | |||
| 1280 x 800 60 49.70 | |||
| 1280 x 800 - RB 120 101.6 | |||
| 1440 x 900 60 55.94 | |||
| WSXGA+ | 1680 x 1050 60 65.29 | ||
| acer_16:9 | 1366 x 768 60 47.71 | ||
| HD 1080 | 1920 x 1080-RB 60 66.60 | ||
| 1920 x 1080-EIA 60 67.50 | |||
| acer_timing | 1024 x 600 60 37.50 | ||
| WUXGA | 1920 x 1200-RB 59.95 74.04 | ||
2 HDMI - PC Signal
| Mode Resolution | V.Frequency [Hz] | H.Frequency [KHz] | |
| VGA_60 | 37.861640 x 48043.269 | 59.94 31.469 | |
| VGA_72 72.809 | |||
| VGA_75 | 75 | 37.5 | |
| VGA_85 85.008 | |||
| VGA_120 | 119.518 61.91 | ||
| SVGA_56 | 800 x 600 | 56.25 35.156 | |
| SVGA_60 | 60.317 37.879 | ||
| SVGA_72 | 72.188 48.077 | ||
| SVGA_75 | 75 | 46.875 | |
| SVGA_85 | 85.061 53.674 | ||
| SVGA_120 | 119.854 | 77.425 | |
| XGA_60 | 56.4761024 x 76860.023 | 60.004 48.363 | |
| XGA_70 70.069 | |||
| XGA_75 75.029 | |||
| XGA_120 | 119.804 | 98.958 | |
| SXGA_75 | 1152 x 86477.094 | 75 | 67.5 |
| SXGA_85 84.99 | |||
| SXGA_60 | 1280 x 1024 | 60.02 63.981 | |
| SXGA_72 | 72 | 76.97 | |
| SXGA_75 | 75.025 79.976 | ||
| SXGA_85 | 85.024 91.146 | ||
| QuadVGA_75 | 1280 x 960 | 75 | 75 |
| SXGA+_60 1400 x 1050 59.978 65.317 | |||
| UXGA_60 1600 x 1200 60 75 | |||
| Mac G4 640 x 480@60Hz 59.94 31.469 | |||
| MAC13 640 x 480@67Hz 66.667 35 | |||
| Mac G4 800 x 600@60Hz 60.317 37.879 | |||
| Mac G4 1024 x 768@60Hz 60.004 48.363 | |||
| MAC19 1024 x 768@75Hz 75.02 60.241 | |||
| MAC21 1152 x 870@75Hz 75.061 68.681 | |||
| WXGA_60 | 1280 x 768 | 59.87 47.776 | |
| WXGA_75 | 74.893 60.289 | ||
| WXGA_85 | 84.837 68.633 | ||
| WXGA_60 | 1280 x 720 | 60 45 | |
| WXGA_60 | 1280 x 800 | 59.81 49.702 | |
| WXGA_120-RB | 1280 x 800 119.909 | 101.563 | |
| WXGA+_60 1440 x 900 | 59.887 55.935 | ||
| 1680 x 1050_60 | 1680 x 1050 59.954 65.29 | ||
| acer_16:9 | 1366 x 768 | 59.79 47.712 | |
| 1920 x 1080_RB | 1920 x1080 60 66.587 | ||
| 1920 x 1080_EIA 1920 x1080 60 | 67.5 | ||
| acer_timing | 1024 x 600 | 60 | 37.5 |
| 1920 x 1200-RB | 1920 x 1200 | 59.95 74.038 | |
| 3840 x 2160_30 | 3840 x 2160 30 | 67.5 | |
| 3840 x 2160_60 | 3840 x 2160 60 | 135 |
3 HDMI - Video Signal
| Mode | Resolution | V.Frequency [Hz] | H.Frequency [KHz] |
| 480i | 720 x 480(1440 x 480) | 60 | 15.73 |
| 480p 720 x 480 | 60 | 31.47 | |
| 576i | 720 x 576(1440 x 576) | 50 | 15.63 |
| 576p 720 x 576 | 50 | 31.25 | |
| 720p | 1280 x 720 | 60 | 45.00 |
| 720p | 1280 x 720 | 50 | 37.50 |
| 1080i 1920 | x 1080 | 60 | 33.75 |
| 1080i 1920 | x 1080 | 50 | 28.13 |
| 1080p | 1920 x 1080 | 60 | 67.50 |
| 1080p | 1920 x 1080 | 50 | 56.26 |
| 1080p | 1920 x 1080 | 24 | 27.00 |
| 1080p | 1920 x 1080 | 23.98 | 26.97 |
| 1080p | 1920 x 1080 | 30 | 33.75 |
| 2160/24P 3840 × 2160 24 54 | ||
| 2160/25P 3840 × 2160 25 56.25 | ||
| 2160/30P 3840 × 2160 30 67.5 | ||
| 2160/50P 3840 × 2160 50 112.5 | ||
| 2160/60P 3840 × 2160 60 135 |
4 YPbPr Signal
| Mode | Resolution | V.Frequency [Hz] | H.Frequency [KHz] |
| 480i | 720 x 480 | 59.94 15.73 | |
| 480p | 720 x 480 | 59.94 31.47 | |
| 576i | 720 x 576 | 50.00 15.63 | |
| 576p | 720 x 576 | 50.00 31.25 | |
| 720p | 1280 x 720 | 60.00 45.00 | |
| 720p | 1280 x 720 | 50.00 37.50 | |
| 1080i | 1920 x 1080 | 60.00 33.75 | |
| 1080i | 1920 x 1080 | 50.00 28.13 | |
| 1080p | 1920 x 1080 | 60.00 67.5 | |
| 1080p | 1920 x 1080 | 50.00 56.26 | |
| 1080p | 1920 x 1080 | 24.00 27.00 | |
| 1080p | 1920 x 1080 | 23.98 26.97 |
5 Video, S-Video Signal
| Mode | V.Frequency [Hz] | H.Frequency [KHz] | fsc (MHz) |
| NTSC 15.73 60 | 3.58 | ||
| PAL | 15.63 50 | 4.43 | |
| SECAM | 15.63 50 | 4.25 or 4.41 | |
| PAL-M | 15.73 60 | 3.58 | |
| PAL-N | 15.63 50 | 3.58 | |
| PAL-60 | 15.73 60 | 4.43 | |
| NTSC4.43 | 15.73 60 | 4.43 |
Regulations and safety notices
FCC notice
This device has been tested and found to comply with the limits for a Class B digital device pursuant to Part 15 of the FCC rules. These limits are designed to provide reasonable protection against harmful interference in a residential installation. This device generates, uses, and can radiate radio frequency energy and, if not installed and used in accordance with the instructions, may cause harmful interference to radio communications.
However, there is no guarantee that interference will not occur in a particular installation. If this device does cause harmful interference to radio or television reception, which can be determined by turning the device off and on, the user is encouraged to try to correct the interference by one or more of the following measures:
- Reorient or relocate the receiving antenna.
- Increase the separation between the device and receiver.
- Connect the device into an outlet on a circuit different from that to which the receiver is connected.
- Consult the dealer or an experienced radio/television technician for help.
Notice: Shielded cables
All connections to other computing devices must be made using shielded cables to maintain compliance with FCC regulations.
Notice: Peripheral devices
Only peripherals (input/output devices, terminals, printers, etc.) certified to comply with the Class B limits may be attached to this equipment. Operation with non-certified peripherals is likely to result in interference to radio and TV reception.
Caution
Changes or modifications not expressly approved by the manufacturer could void the user's authority, which is granted by the Federal Communications Commission, to operate this device.
Operation conditions
This device complies with Part 15 of the FCC Rules. Operation is subject to the following two conditions: (1) this device may not cause harmful interference, and (2) this device must accept any interference received, including interference that may cause undesired operation.
Notice: Canadian users
This Class B digital apparatus complies with Canadian ICES-003.
Compliant with Russian/Ukraine/Belarus/Morocco regulatory certification

Radio device regulatory notice

Note: The regulatory information below is for models with wireless LAN and/or Bluetooth only.
General
This product complies with the radio frequency and safety standards of any country or region in which it has been approved for wireless use. Depending on configurations, this product may or may not contain wireless radio devices (such as wireless LAN and/or Bluetooth modules).
Canada — Low-power license-exempt radio communication devices (RSS-247)
a Common information
Operation is subject to the following two conditions:
- This device may not cause interference, and
- This device must accept any interference, including interference that may cause undesired operation of the device.
b Operation in 2.4 GHz band
To prevent radio interference to the licensed service, this device is intended to be operated indoors and installation outdoors is subject to licensing.
List of applicable countries
This device must be used in strict accordance with the regulations and constraints in the country of use. For further information, please contact a local office in the country of use. Please see http://ec.europa.eu/enterprise/rtte/implem.htm for the latest country list.
EU Declaration of Conformity
We,
Acer Incorporated
8F, 88, Sec. 1, Xintai 5th Rd., Xizhi, New Taipei City 221, Taiwan
And,
Acer Italy s.r.l
We, Acer Incorporated, hereby declare under our sole responsibility that the product described above is in conformity with the relevant Union harmonization legislations as below Directive and following harmonized standards and/or other relevant standards have been applied:
EMC Directive: 2014/30/EU
| ☒ | EN 55032:2015+AC:2016-07, Class B |
| ☒ | EN 55024:2010+A1:2015 |
| ☒ | EN 61000-3-2:2014 |
| ☒ | EN 61000-3-3:2013 |
LVD Directive: 2014/35/EU
EN 60950-1:2006/A11:2009/A1:2010/A12:2011/A2:2013
EN 62368-1:2014+A11
RoHS Directive: 2011/65/EU
EN 50581:2012
ErP Directive: 2009/125/EC
□ Regulation (EU) No. 617/2013
☐ Regulation (EU) No. 2019/1782; EN 50563:2011
Regulation (EC) No. 1275/2008; EN 50564:2011
Year to begin affixing CE marking 2020.

RU Jan/Sr. Manager
Acer Incorporated (Taipei, Taiwan)
Aug. 7, 2020
Date

Federal Communications Commission Declaration of Conformity
This device complies with Part 15 of the FCC Rules. Operation is subject to the following two conditions: (1) this device may not cause harmful interference, and (2) this device must accept any interference received, including interference that may cause undesired operation.
The following local Manufacturer /Importer is responsible for this declaration:
Product: DLP Projector
Model Number: UL5630/RL260/LU-U450/SL470/FL-
530/AWU2003
Name of Responsible Party: Acer America Corporation
Address of Responsible Party: 333 West San Carlos St.
Suite 1500
San Jose, CA 95110
U.S.A.
Contact Person: Acer Representative
Phone No.: 254-298-4000
Fax No.: 254-298-4147




- Acer DLP Projector UL5630/RL260/LU-U450/ SL470/FL-530/AWU2003 Series User's Guide
- Information for Your Safety and Comfort
- Turning the product off before cleaning
- Caution for plug as disconnecting device
- Caution for Accessibility
- Warnings!
- Using electrical power
- Product servicing
- Additional safety information
- Caution for Listening
- Disposal instructions
- Laser caution
- First Thing First
- Usage Notes
- Do:
- Don't:
- Precautions
- Warning:
- Information for Your Safety and Comfort iii
- First Thing First viii
- Introduction 1
- Getting Started 7
- User Controls 14
- Appendices 34
- Introduction
- Product Features
- Package Overview
- Projector Overview
- Projector Outlook
- Bottom side
- Control Panel
- Getting Started
- Turning the Projector On/Off
- Turning On the Projector
- Turning Off the Projector
- Warning indicators:
- Adjusting the Projected Image
- Adjusting the Height of the Projected Image
- To raise the image:
- To lower the image:
- How to Get a Preferred Image Size by Adjusting Distance and Zoom
- User Controls
- Installation Menu
- Onscreen Display (OSD) Menus
- Using the OSD menus
- Color
- Acer Splash Downloader
- Using the Acer Splash Downloader
- Entering download mode
- Connecting the computer to the projector
- Executing the Acer Splash Downloader tool on the computer
- Loading the image
- Downloading the image to the projector
- Appendices
- Troubleshooting
- OSD Messages
- LED & Alarm Definition Listing
- LED Messages
- Ceiling Mount Installation
- Specifications
- UL5630/RL260/LU-U450/SL470/FL-530
- Compatibility Modes
- Regulations and safety notices
- FCC notice
- Notice: Shielded cables
- Notice: Peripheral devices
- Caution
- Operation conditions
- Notice: Canadian users
- Radio device regulatory notice
- General
- Canada — Low-power license-exempt radio communication devices (RSS-247)
- List of applicable countries
- EU Declaration of Conformity
- Federal Communications Commission Declaration of Conformity
Brand : ACER
Model : LU-U450
Category : Projector