
SC15F60JV - Vacuum Cleaner SAMSUNG - Free user manual and instructions
Find the device manual for free SC15F60JV SAMSUNG in PDF.


| Product Type | Canister Vacuum Cleaner |
| Model | SC15F60JV |
| Brand | Samsung |
| Rated Input Power | 750 W |
| Energy Efficiency Class | B |
| Annual Energy Consumption | 34.0 kWh/year |
| Carpet Cleaning Performance Class | D |
| Hard Floor Cleaning Performance Class | B |
| Dust Re-Emission Class | A |
| Sound Power Level | 76 dBA |
| Dust Collection Type | Bagged (dust bag) |
| Dust Bag Capacity | Approximately 2.5 L |
| Power Cord Length | Approximately 8 m |
| Weight | Approximately 5.5 kg |
| Filter System | Washable micro filter, non-washable outlet filter |
| Main Accessories | Telescopic pipe, crevice tool, dusting brush, upholstery tool |
| Optional UV Brush | Yes (for mattress and bedclothes sterilization) |
| Power Control | Remote control on handle and body switch |
| Safety Features | Thermal protector, auto shut-off after 30 minutes inactivity |
| Replacement Parts | Dust bags and filters available at Samsung service centers |
Frequently Asked Questions - SC15F60JV SAMSUNG
User questions about SC15F60JV SAMSUNG
0 question about this device. Answer the ones you know or ask your own.
Ask a new question about this device
Download the instructions for your Vacuum Cleaner in PDF format for free! Find your manual SC15F60JV - SAMSUNG and take your electronic device back in hand. On this page are published all the documents necessary for the use of your device. SC15F60JV by SAMSUNG.
USER MANUAL SC15F60JV SAMSUNG
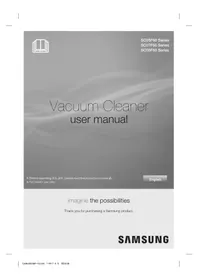
Vacuum Cleaner User Manual
* Before operating this unit, please read the instructions carefully.
* For indoor use only.
English
imagine the possibilities
Thank you for purchasing a Samsung product.
SAMSUNG
Safety Information
SAFETY INFORMATION

- Before operating the appliance, please read this manual thoroughly and retain it for your reference.

- Because these following operating instructions cover various models, the characteristics of your vacuum cleaner may differ slightly from those described in this manual.
CAUTION/WARNING SYMBOLS USED
| WARNING | Indicates that a danger of death or serious injury exists. |
| CAUTION | Indicates that a risk of personal injury or material damage exists. |
OTHER SYMBOLS USED
| Represents something you must NOT do. | |
| Represents something you must follow. | |
| Indicates that you must disconnect the power plug from the socket. |

- This vacuum cleaner is designed for household use only.
Do not use this vacuum cleaner to clean building waste and debris, toner of laser printer. Regularly keep the filters in clean conditions to prevent of collecting fine dust in them.
Dry carpet cleaners or fresheners, powders and fine dust such as flour should only be vacuumed in very small amounts.
Always clean the dust bin and filters after vacuuming them.
Do not use this vacuum cleaner with any of the filters or dust bin removed.
Do not use worn, deformed or damaged filters.
Always install the filters in the correct position as shown in this manual.
Failure to meet these requirements could cause damage to the internal parts and void your warranty. Never twist the micro filter after washing. It can cause deformation or damage to the filter.
If the filter is deformed or damaged, please replace it (it can cause dust and debris to penetrate into the motor).
Please insert the filter properly without any gap between the filter and the filter cover (it can cause dust and debris to penetrate into the motor).
IMPORTANT SAFEGUARDS
GENERAL
- Read all instructions carefully. Before switching on, make sure that the voltage of your electricity supply is the same as that indicated on the rating plate on the bottom of the cleaner.
- WARNING: Do not use the vacuum cleaner when the rug or floor is wet. Do not use it to suck up water.
- Close supervision is necessary when any appliance is used by or near children.
Do not allow the vacuum cleaner to be used as a toy.
Do not allow the vacuum cleaner to run unattended at any time.
Use the vacuum cleaner only for its intended use as described in these instructions.
- Do not use the vacuum cleaner without a dust bin.
Empty the dust bin before it is full in order to maintain the best efficiency.
- Do not use the vacuum cleaner to pick up matches, live ashes or cigarette butts. Keep the vacuum cleaner away from stoves and other heat sources.
Heat can deform and discolour the plastic parts of the unit.
- Avoid picking up hard, sharp objects with the vacuum cleaner as they may damage the cleaner parts.
Do not stand on the hose assembly.
Do not put weight on the hose.
Do not block the suction or the exhaust port.
- Switch the vacuum cleaner off on the body of the machine before unplugging from the electrical outlet.
Disconnect the plug from the electrical outlet before emptying the dust bin.
To avoid damage, please remove the plug by grasping the plug itself, not by pulling on the cord.
- This appliance can be used by children aged from 8 years and above and persons with reduced physical, sensory or mental capabilities or lack of experience and knowledge if they have been given supervision or instruction concerning use of the appliance in a safe way and understand the hazards involved. Children shall not play with the appliance.
Cleaning and user maintenance shall not be made by children without supervision.
- Children should be supervised to ensure that they do not play with the appliance.
- The plug must be removed from the socket outlet before cleaning or maintaining the appliance.
- The use of an extension cord is not recommended.
- If your vacuum cleaner is not operating correctly, switch off the power supply and consult an authorized service agent.
- If the supply cord is damaged, it must be replaced by the manufacturer or its service agent or a similarly qualified person in order to avoid a hazard.
- Don't carry the vacuum cleaner by holding the hose. Use the handle on the vacuum cleaner set.
- Unplug the cleaner when not in use. Turn off the power switch before unplugging.
- For information on Samsung's environmental commitments and product specific regulatory obligations e.g.
REACH visit: samsung.com/uk/aboutsamsung/samsungelectronics/corporate citizenship/data_corner.html
UV BRUSH
- Since the UV rays from the UV Brush damage skin and eyes, never allow the rays to make contact with skin or eyes and do not let children or the elderly use the UV Brush. It may damage your eyesight.
- If the transparent window is broken and the UV rays are exposed directly, turn the power off and contact the service center.
- Do not use the UV Brush for purposes other than the sterilization of mattresses, bedclothes, beds, cushions and so on made from material.
The company will not be held liable for any loss due to accidents from using the UV Brush for purposes other than its original purpose as listed above.
- Do not sit on the UV Brush or drop it, and avoid imparting impacts on the product.
Failing to do so may result in injury or product damage.
- Do not touch the power terminals on the back of the UV Brush with a metal pin or rod.
This may result in electric shock or fire.
- When the UV lamp is out of order, never disassemble or modify the product yourself. Please contact the manufacturer or service center for a replacement.
- Since an internal discharge occurs within the UV Brush, never use the product near an inflammable spray or substance.
- Take care not to touch the UV lamp window after using the UV Brush for an extended period of time as the surface of the window may be hot.
- The UV Brush may start slowly at a low temperature due to the inherent characteristics of UV lamps.
Please keep the UV Brush indoors.
contents
ASSEMBLING THE CLEANER
07
11 Using the UV brush (Option)
MAINTAIN TOOLS AND FILTER
12
12 Using accessory
14 Maintain floor tools
16 Dust full indicator
16 Changing the dust bag
16 Cleaning inlet filter
17 Cleaning outlet filter
17 Change the battery (remote-control type)
TROUBLESHOOTING
18
06_ contents
assembling the cleaner

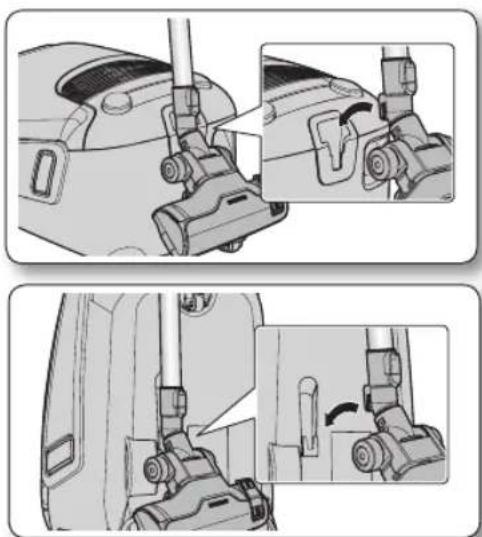
01 ASSEMBLING THE CLEANER

- For storage, park the floor nozzle.
assembling the cleaner _07
operating the cleaner
POWER CORD

CAUTION
- When removing the plug from the electrical outlet, grasp the plug, not the cord.

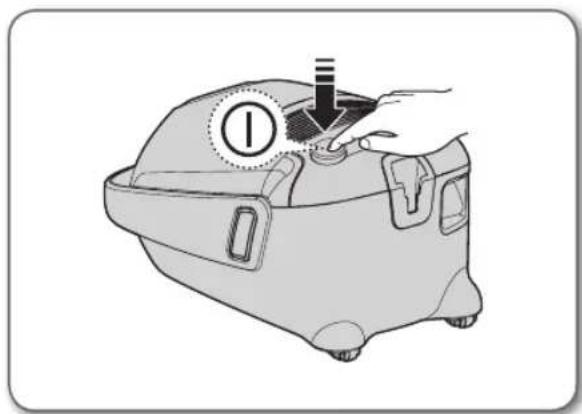
ON/OFF SWITCH
08_ operating the cleaner
POWER CONTROL
Remote-control type
HOSE (SC07F60J, SC08F60J Series)
- ON/OFF (⏻ Button)
- Press the ON/OFF button to operate the vacuum cleaner. Press again to stop the vacuum cleaner.
- Press the (+) button to operate the vacuum at high suction power. Press the (-) button to operate the vacuum at low suction power.
![graph LR A["(ON) MIN"] --> B["MID"] B --> C["MAX"]](/content/2026/05/1100431/images/2dd05a4ed7c21726cb1d31fe9df55718a781834c2987213cc46a734f7241e004.jpg)


If no button is pressed for 30 minutes while cleaning, the safety device is activated and the power is cut off. In this case, press the [Power] button on the main unit or unplug and then plug the power cord in again.
HOSE (SC07F60Y, SC08F60Y Series)
- ON/OFF (⏻ Button)
- Press the ON/OFF button to operate the vacuum cleaner. Press again to stop the vacuum cleaner.
- SUCTION (-/+) Button
- Press the [SUCTION (-/+)] button to increase or decrease the suction power. Each time you press the button, you gradually increase the suction power. After the suction power reaches its maximum, the next time you press the button, you return the suction power to its minimum.
![graph LR A["(ON) MIN"] --> B["MID"] B --> C["MAX"]](/content/2026/05/1100431/images/0d83a5864902410c01140bb97ee58ddc01fa5efe0213a52af2cedea1fa1f8a4a.jpg)

- BRUSH ON/OFF Button
- Press the [BRUSH ON/OFF] button to operate the UV Brush. Press again to stop the UV Brush.

If no button is pressed for 30 minutes while cleaning, the safety device is activated and the power is cut off. In this case, press the [Power] button on the main unit or unplug and then plug the power cord in again.
operating the cleaner _09
BODY
Press the power ON/OFF button repeatedly to start and to stop the vacuum cleaner. (OFF → ON → OFF)

If the remote handle control is not working, the cleaner can be operated using the ON/OFF button on the body of the machine.

| (1) The neon lights up blue when the power source is connected. | |
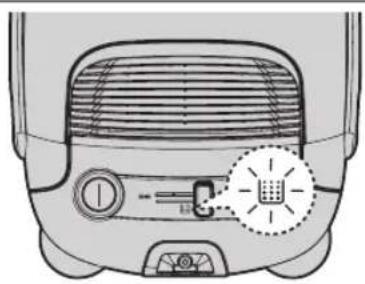
| (2) | If the filter check indicator turns red, check and eliminate possible blockages in brushes, pipe, hoses, filters and if necessary. Empty and replace dust bag. |
Body-control type (SC05F60W, SC07F60W, SC08F60W Series)
HOSE
To reduce suction for leaning draperies, small rugs, and other light fabrics, pull the tap air until the hole is open.

BODY
To control power level, just slide the power control right and left.
MIN = For delicate fabrics, e.g. net curtains.
MAX = For hard floors and heavily soiled carpets.

| (1) | If the filter check indicator turns red, check and eliminate possible blockages in brushes, pipe, hoses, filters and if necessary. Empty and replace dust bag. |
10_ operating the cleaner
USING THE UV BRUSH (OPTION)
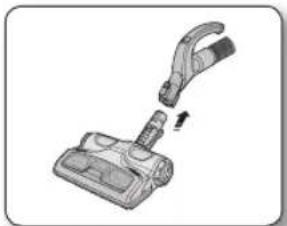
- Insert the brush into the hose handle.
- Insert the UV brush securely into the hose handle until you hear a "clicking" sound.
- Press the [BRUSH ON/OFF] button to use UV Brush.
- Press the [Suction -/+] button to start cleaning and choose the appropriate suction strength.
- Press the [BRUSH ON/OFF] button. • UV sterilization cannot be activated by itself.

- When you have finished UV cleaning, press the [button.
- Press the [button to stop the cleaner.
- For safety reasons, UV brushing only runs for 30 minutes and then stops operating. To resume the operation, press the [SUCTION (-/+)] button again.


The UV brush, which is inserted into the hose handle (not directly connected to the telescopic pipe), is dedicated for bedclothes.
maintain tools and filter
USING ACCESSORY
Pipe
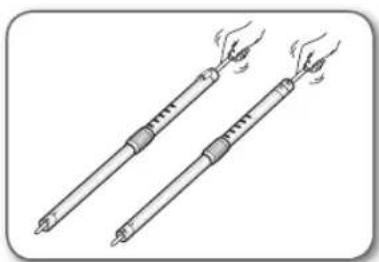
- Adjust the length of the telescopic pipe by sliding the length control button located in the center of the telescopic pipe back and forth.

- To check for blockages, separate the telescopic pipe and adjust to shorten. This allows for easier removal of waste clogging the tube.

Accessory
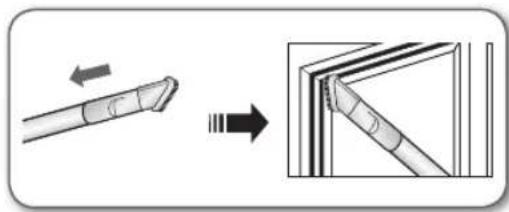
- To use the crevice tool, push the accessory on to the end of the hose handle in the opposite direction.

- Pull out the button, to use the dusting brush.

- To use the upholstery tool, push the accessory on to the end of the hose handle.

12_ maintain tools and filter
Accessory
- Push the accessory onto the end of the hose handle.

- Pull out the dusting brush to use the crevice tool.

- Push the accessory onto the end of the pipe.

- Pull out the dusting brush to use the crevice tool.

MAINTAIN FLOOR TOOLS
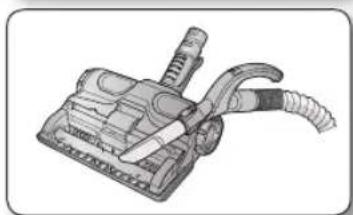
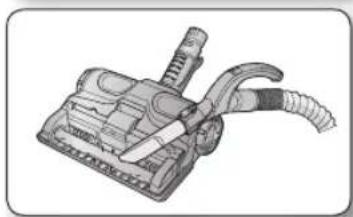
2-Step Brush

- Adjust the inlet lever according to the floor surface.
- Remove waste matter completely if the inlet is blocked.
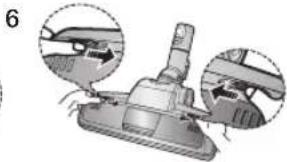
Power Pet Plus Brush (Option)

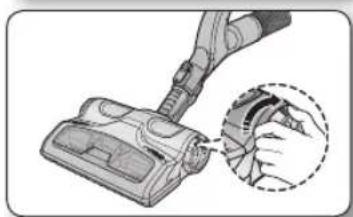
- Frequent vacuuming of hair or pet fur may cause a falling-off of the rotation due to matters tangled around.
- Push the Open button of the transparent screen cover to separate the cover.
- Remove the brushbar from the transparent screen.
- Remove waste matter such as dust and hair tangled around the brushbar using scissors.
- Remove dust inside the brush housing using a dry duster or crevice tool.
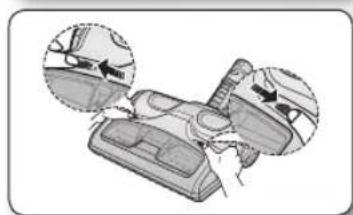
- Insert brushbar into rotating belt and assemble.
- Click the transparent screen cover back into place to reassemble.
Parquet Master Brush (Option)
• Vacuum dust in wide area at once. - Remove waste matter completely if the inlet is blocked.

14_ maintain tools and filter
To remove dust from the dust bin of the UV brush (Option)
When you notice that the dust bin is filled, use the [Dust Removal] button to empty the dust bin.
- To remove dust from the dust bin, move the [Dust Removal] button to the "Open" position.
- While the cleaner is operating (suction), use the [Dust Removal] button for this purpose.
- When done, move the [Dust Removal] button to the "Close" position.
- When the [Dust Removal] button is in the "Open" position, the suction power of the cleaner is reduced.
- Frequent vacuuming of hair or pet fur may cause a falling-off of the rotation due to matters tangled around.


Cleaning the UV brush (Cleaning the drum) (Option)
You should check your vacuum cleaner's Brush roll regularly. Strings, hair and carpet fibers can wrap around the brush and hamper its ability to clean. To prevent this you should clean the brush.
- Push the [Open Transparent Cover] button inward to remove the cover.
- Use the crevice tool to remove impurities such as dust and hair from the brush roll.
- When done, push the button outward to close the cover.


DUST FULL INDICATOR

- Frequent vacuuming of hair or pet fur may cause a falling-off of the rotation due to matters tangled around. The lamp will turn red when suction is reduced. If the light comes on, please change the bag.
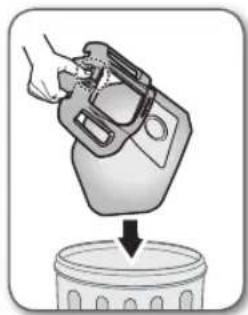
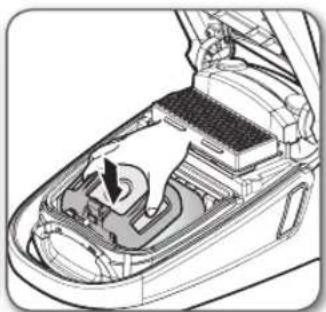
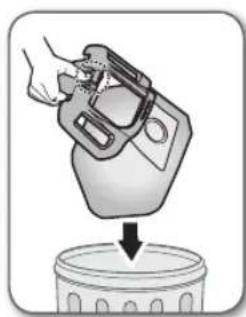
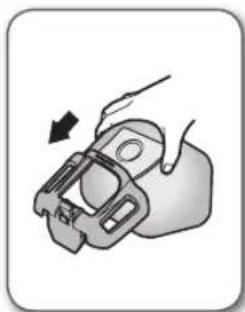
CHANGING THE DUST BAG


You can purchase dust bags in the shops where you bought this vacuum cleaner or authorized SAMSUNG service center.
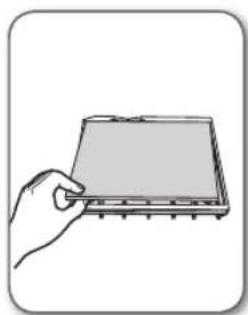
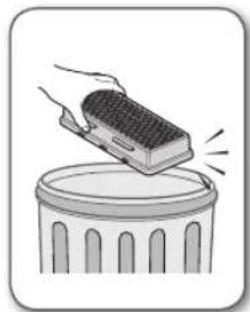
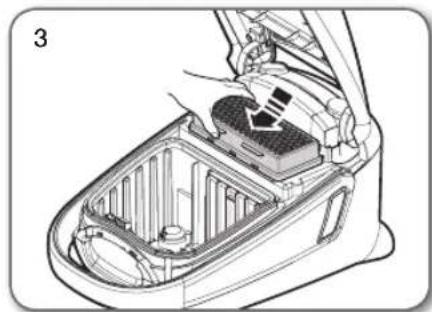
CLEANING INLET FILTER


Don't throw away the filter.
16_ maintain tools and filter
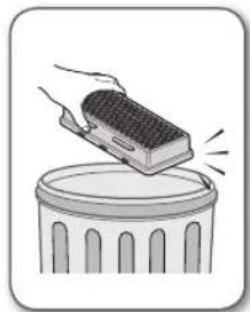
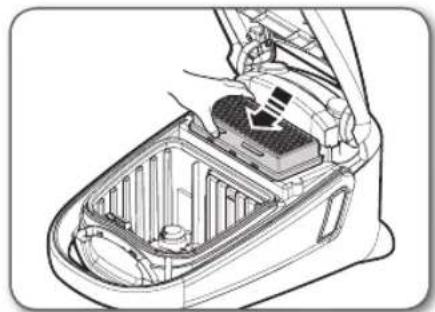
CLEANING OUTLET FILTER


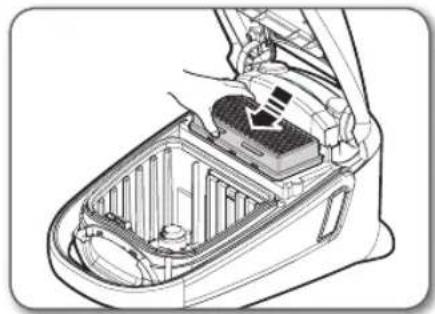
- Please replace the filter 1\~2 times a year.

- When suction is noticeably reduced continuously or vacuum cleaner abnormally overheats, please clean the outlet filter. Note. Do not wash filter. If cleaning does not resolve the problem Please replace blocked out filter.
- Replacement filters are available at your local Samsung distributor.
CHANGE THE BATTERY (REMOTE-CONTROL TYPE)

- When the vacuum cleaner does not work, replace the batteries. If the problem persists, please contact our authorized dealer.
• Use 2 batteries of size AAA.

- Never disassemble or recharge the batteries.
- Never heat up the batteries or throw them into fire.
- Do not reverse (+) and (-) poles.
- Dispose of the batteries properly.

BATTERY TYPE: AAA Size
Troubleshooting
| PROBLEM SOLUTION | |
| Motor does not start. | Check cable, plug and socket.Leave to cool. |
| Suction force is gradually decreasing. | Check for blockage and remove. |
| Cord does not rewind fully. | Pull the cord out 2-3 m and push down the cord rewind button. |
| Vacuum cleaner does not pick up dirt. | Check hose and replace if required. |
| Low or decreasing suction. | Please check filter and, if required, clean as illustrated in the instructions. if filters are out of condition change them to new ones. |
| Body overheating. | Please check filters, if required clean as illustrated in the instruction. |
| Static electricity discharge. | Please decrease power suction.This can also occur when air in the room is very dry.Please ventilate the room to air humidity become a normal. |
Thermal protector: This vacuum cleaner has a special thermostat that protects the motor in case of overheating. If the vacuum cleaner suddenly shuts off, turn off the switch and unplug the vacuum cleaner. Make sure that there is power in the socket. To avoid electric shock, please contact a qualified electrician. Check the vacuum cleaner for possible sources of overheating such as a full dust tank, a blocked hose, pipe, or clogged filter. If these conditions are found, fix them and wait at least 30 minutes before attempting to use the vacuum cleaner. After the 30 minute period, plug the vacuum cleaner back in and turn on the switch.
If the vacuum cleaner still does not run, contact a service engineer.
This vacuum cleaner is compliant with the following regulations:
- RTTE Directive (1999/5/EC)
- Electromagnetic Compatibility Directive: 2004/108/EEC
- Low Voltage Directive: 2006/95/EC
The official Declaration of Conformity may be found at http://www.samsung.com, go to Support
Please search Product Support and enter the model name.
18_troubleshooting
Product fiche
[English]
According to Commission Regulation (EU) No 665/2013 and No 666/2013
| A Supplier Samsung Electronics., Co. Ltd | |||||||
| B Model | SC07F60WU | SC07F60JV SC07F60YX SC08F60WU SC08F60JV SC08F60YX SC05F60WV | |||||
| C Energy Efficiency Class | A B A | + | |||||
| D Annual Energy Consumption (kWh/yr) | 28.0 34.0 22.0 | ||||||
| E Carpet Cleaning Performance Class | C D C | ||||||
| F Hardfloor Cleaning Performance Class | A B A | ||||||
| G Dust Re-Emission Class | A A A | ||||||
| H Sound Power Level (dBA) | 74 76 74 | ||||||
| I Rated Input Power (W) | 700 750 500 | ||||||
| J Type | General purpose vacuum cleaner | ||||||
1) Indicative annual energy consumption (kWh per year), based on 50 cleaning tasks. Actual annual energy consumption will depend on how the appliance is used.
2) Measurements for power consumption and performance are based on methods in EN 60312-1 and EN 60704.
SAMSUNG
Vacuum cleaner
Assembling the vacuum cleaner _07
Operating the vacuum cleaner
POWER CORD

- When unplugging from the wall outlet, grasp the plug, not the cord.

ON/OFF SWITCH
08_Operating the vacuum cleaner
Handle control This vacuum cleaner is operated via radio frequency signals.

If you do not press any button within 30 minutes during cleaning, the safety device will activate and cut off the power. In that case, press the [Power] button on the main unit or unplug and replug the power cord.
HOSE (SC07F60Y, SC08F60Y series)
- ON/OFF button [💡]
- Press the ON/OFF button to turn the vacuum cleaner on. Press it again to turn it off.
- SUCTION (-/+) button
- Press the [SUCTION (-/+)] button to increase or decrease the suction power. Each time you press the button, the suction power increases gradually. After the suction power reaches its maximum, the next time you press the button, the suction power returns to minimum.
![graph LR A["(UKLJ.) MIN."] --> B["SREDNJE"] B --> C["MAKS."]](/content/2026/05/1100431/images/f6f2da37104e367229f4aa7ce363acf605ca13d382417f36df5ae3f55a42a626.jpg)

Handle control This vacuum cleaner is operated via radio frequency signals.
- BRUSH ON/OFF button
- Press the [BRUSH ON/OFF] button to use the UV brush. Press it again to stop the UV brush.

If you do not press any button within 30 minutes during cleaning, the protective device will activate and cut off the power. In that case, press the [Power] button on the main unit or unplug and replug the power cord.
MAIN BODY
Press the ON/OFF button to turn the vacuum cleaner on or off. (OFF → ON → OFF)

MAIN BODY
Move the power control switch to the right or left to adjust the suction power.
MIN = For delicate fabrics such as curtains.
MAX = For floors and heavily soiled carpets.

| (1) | Ako indikator statusa filtera počne da svetli crveno, proverite i po potrebi uklonite zapušenja u četkama, cevi, crevima i filterima. Ispraznite i zamenite vreću za prašinu. |
10. Handling the vacuum cleaner
USING THE UV BRUSH (OPTIONAL)
- Insert the brush into the hose handle.
- Insert the UV brush firmly into the hose handle until you hear a "click".
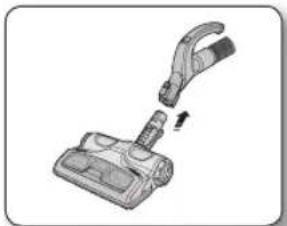
- Press the [BRUSH ON/OFF] button to use the UV brush.
- Press the [Suction -/+] button to start vacuuming and select the appropriate suction power.
- Press the [BRUSH ON/OFF] button.
- UV sterilization cannot be activated by itself.
- When you have finished UV cleaning, press the [∅] button.
- Press [Master] to stop the vacuum cleaner.
- For safety reasons, the UV brush operates for only 30 minutes and then stops. To continue, press the [SUCTION (-/+)] button again.

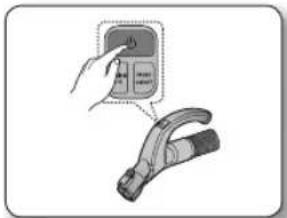

The UV brush, which is inserted into the hose handle (and not directly connected to the telescopic tube), is intended for bedding.
Additional accessories
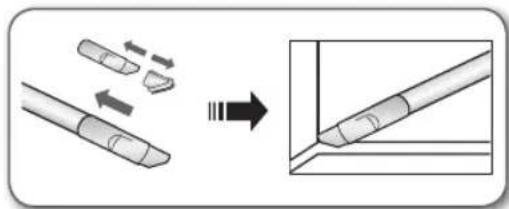
- If you want to use the crevice tool, attach it to the end of the hose handle so that it faces the opposite direction.

- Pull out the button to use the dusting brush.

- If you want to use the upholstery cleaning tool, attach it to the end of the hose handle.

- Pull out the dusting brush to use the crevice tool.

• Push the accessory into the end of the tube.

- Pull out the dusting brush to use the crevice tool.
FLOOR CLEANING TOOLS
2-step brush

- Adjust the handle on the suction part according to the type of surface.
- Completely remove dirt if the suction part is blocked.
Professional pet hair brush (optional)

- Frequent vacuuming of hair or pet fur may cause a reduction in rotation speed due to tangled material.
- Press the release button on the transparent cover to detach it.
- Remove the brush tape from the transparent cover.
- Using scissors, remove dirt such as dust and hair tangled around the brush tape.
- Remove dust from the brush housing using a dry dusting tool or a tool for hard-to-reach areas.
- Place the brush tape onto the rotating belt and assemble it.
- Put the transparent cover back in place.
Professional parquet brush (optional)
- One-pass dust pickup over a wide area.
- Completely remove dirt if the suction part is blocked.


- Frequent vacuuming of hair or pet fur may cause the rotation speed to decrease due to tangled material.
Cleaning the UV brush (Drum cleaning) (Optional)
You should regularly check the vacuum cleaner brush. Threads, hair, and carpet fibers can wrap around the brush and reduce its ability to clean carpets effectively. To prevent this, clean the brush.
- Press the [Open Transparent Cover] button inward to remove the cover.
- Use the crevice tool to remove dirt around the brush, such as dust and hair.
- When you are finished, pull the button to close the cover.


Cleaning tools and filter _15
DUST BAG FULL INDICATOR


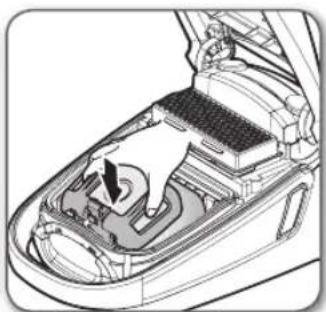

Dust bags can be purchased at stores where this vacuum cleaner is sold or at an authorized SAMSUNG service center.
REPLACING THE EXHAUST FILTER


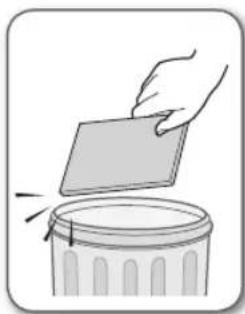

Do not throw away the filter.


- Replace the filter 1~2 times a year.

- If the suction power is continuously noticeably reduced or the vacuum cleaner heats up abnormally, clean the exhaust filter. Note: Do not wash the filter. If cleaning does not solve the problem, replace the clogged filter.
BATTERY TYPE: Size AAA
Troubleshooting
| PROBLEM REŠENJE | |
| Motor se ne uključuje. | Proverite kabl, utikač i utičnicu.Ostavite uređaj da se ohladi. |
| Snaga usisavanja se postepeno smanjuje. | Proverite da li postoji zapušenje i uklonite ga. |
| Kabl se ne uvlači u potpunosti. | Izvucite kabl 2-3 m, pa pritisnite dugme za uvlačenje kabla. |
| Usisivač ne usisava prljavštinu. | Proverite crevo i zamenite ga po potrebi. |
| Mala ili opadajuća snaga usisavanja. | Proverite filter i po potrebi ga očistite u skladu sa uputstvima. a u slučaju da je dotrajao zamenite ga. |
| Kućište se pregreva. | Proverite filtere i po potrebi ih očistite u skladu sa uputstvima. |
| Pražnjenje statičkog elektriciteta. | Smanjite snagu usisavanja.Ovo može da se dogodi i kada je vazduh u prostoriji veoma suv.Provetrite prostoriju da bi vlažnost vazduha postala normalna. |
Thermal protector: This vacuum cleaner has a special thermostat that protects the motor in case of overheating. If the vacuum cleaner suddenly turns off, turn off the switch and unplug the power cord from the outlet. Check if the outlet has power. To avoid electric shock, contact a qualified electrician. Check the vacuum cleaner for possible sources of overheating such as a full dust tank, blocked hose, pipe, or clogged filter. If these conditions are found, fix them and wait at least 30 minutes before using the vacuum cleaner. After 30 minutes, plug the power cord back into the outlet and turn on the switch. If the vacuum cleaner still does not work, contact a service technician.
Assembling the vacuum cleaner _07
Operating the vacuum cleaner
Power cord

- When unplugging from the power outlet, hold the plug, not the cable.

ON/OFF SWITCH
08_operating the vacuum cleaner
POWER CONTROL
Control on the handle
The vacuum cleaner is operated using radio frequency signals.

Control on the handle
The vacuum cleaner is operated using radio frequency signals.
- BRUSH ON/OFF BUTTON
HOUSING
To adjust the power level, simply turn the power control knob to the right or left.
| (1) | Ako indikator provjere filtra počne svijetliti crveno, provjerite i po potrebi uklonite moguća začepljenja u četkama, cijevi, crijevima, filtrima. Ispraznite i zamijenite vrećicu za prašinu. |
10_operating the vacuum cleaner
USING THE UV BRUSH (OPTION)
- When you have finished UV cleaning, press the button [
- Press the button [ ♦to turn on the vacuum cleaner.
- For safety reasons, UV cleaning runs for only 30 minutes and then stops. To continue working, press the [SUCTION (-/+)] button again.


- To check for blockages, disconnect the telescopic tube and reduce its length. This makes it easier to remove accumulated debris from the tube.
Accessory
- To use the dusting brush, pull out the button.

- To use the upholstery cleaning nozzle, push the accessory onto the end of the hose handle.

12_ maintenance of accessories and filter
Accessory
• Push the accessory onto the end of the hose handle.

• Push the accessory onto the end of the tube.

MAINTENANCE OF THE FLOOR NOZZLE
2-position brush

- Adjust the suction opening lever according to the floor surface.
- If the suction opening is clogged, remove accumulated debris.
Additional pet hair brush (optional)

- Frequent vacuuming of pet hair may cause the rotation to slow down due to tangled material.
14_ maintenance of accessories and filter
Removing dust from the UV brush dust container (Option)
- When finished, move the [Dust Removal] button to the "Close" position.
- When the [Dust Removal] button is in the "Open" position, suction power is reduced.

- Frequent vacuuming of pet hair may cause slower rotation due to tangled material.


maintenance of accessories and filter _15
DUST BAG FULL INDICATOR


Remote control type Control on the device
- Frequent vacuuming of pet hair may cause slower rotation due to tangled material. When suction power decreases, the indicator lights up red. When the indicator turns on, replace the bag.
CHANGING THE DUST BAG


Dust bags can be purchased at stores where you bought this vacuum cleaner or at an authorized SAMSUNG service center.
CLEANING THE INLET FILTER


Do not discard the filter.
16_ maintenance of accessories and filter
CLEANING THE OUTLET FILTER



BATTERY TYPE: AAA size
troubleshooting
| PROBLEM RJEŠENJE | |
| Motor se ne pokreće. | Provjerite kabel, utikač i utičnicu.Ostavite uređaj da se ohladi. |
| Usisna snaga postepeno se smanjuje. | Provjerite postoji li začepljenje i uklonite ga. |
| Kabel se ne može namotati do kraja. | Izvucite 2-3 metra kabela i pritisnite gumb za namotavanje kabela. |
| Usisivač ne skuplja prljavštinu. | Provjerite crijevo i prema potrebi ga zamijenite. |
| Usisavanje je slabo ili postaje slabije. | Provjerite filtar i prema potrebi ga očistite u skladu s ilustracijama u uputama. Ako filtri više nisu funkcionalni, zamijenite ih novima. |
| Pregrijavanje kućišta. | Provjerite filtre i prema potrebi ih očistite u skladu s ilustracijama u uputama. |
| Pražnjenje statičkog elektriciteta. | Smanjite usisnu snagu.To se može događati i kada je zrak u prostoriji vrlo suh.Prozračite prostoriju kako bi se povećala vlažnost zraka na uobičajenu razinu. |
Overheating protection: The vacuum cleaner contains a special thermostat that protects the motor in case of overheating. If the vacuum cleaner suddenly turns off, turn off the switch and unplug the vacuum cleaner from the power supply. Check if the outlet is providing power. To avoid electric shock, contact a qualified electrician. Check possible sources of overheating in the vacuum cleaner, such as whether the dust container is full, whether the hose or tube is blocked, and whether the filter is clogged. If you have found any of the mentioned sources of overheating, remove it and wait at least 30 minutes before using the vacuum cleaner again. After 30 minutes, plug the vacuum cleaner into the power supply and turn it on. If you still cannot start the vacuum cleaner, contact a service engineer.
WARNING
BODY

Accessories








BODY

Accessories
FLOOR CARE TOOLS
2-step brush


DUST FULL INDICATOR


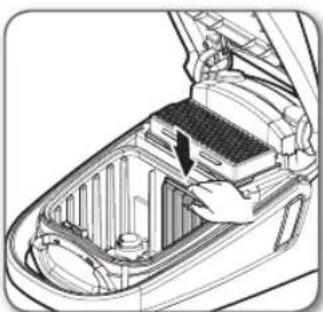
Do not discard the filter.



ON/OFF BUTTON

BODY

Accessories
MAINTENANCE OF FLOOR ACCESSORIES
2-step brush

DUST FILL INDICATOR

CHANGING THE DUST BAG




BATTERY TYPE: AAA size
troubleshooting
WARNING
HOUSING

Accessories





CAUTION
BODY

Accessory




WARNING!
DEVICE HOUSING

MAINTENANCE OF FLOOR CARE ACCESSORIES
Two-position brush

DUST LEVEL INDICATOR


OTHER SYMBOLS USED
WARNING
08_ operating the vacuum cleaner
HOSE (SC07F60J, SC08F60J series)
Control on the handle
Control on the handle
BODY

Accessories
MAINTENANCE OF FLOOR NOZZLES
Two-position brush


DUST BAG FULL INDICATOR




Do not discard the filter.


01 ASSEMBLING THE VACUUM CLEANER

- If you want to put the device away, insert the floor nozzle into the holder.

Assembling the vacuum cleaner
Operating the vacuum cleaner
POWER CORD

CAUTION
- When unplugging the plug from the electrical outlet, do not pull on the cord, but grasp the plug directly.

SWITCH

![graph LR A["(ZAP.) MIN"] --> B["STRED"] B --> C["MAX"]](/content/2026/05/1100431/images/702ddfb2f517c5ed5c86d6a4844a83ea529a9a1daf4da3d82bfa5cad0bbae3b3.jpg)

BODY

Accessories
- Press the accessory onto the end of the tube.
FLOOR MAINTENANCE TOOLS
2-step brush





BATTERY TYPE: Size AAA
Troubleshooting
(ON) MIN (MIN.) → MID (MED.) → MAX (MAX.)


(ON) MIN (MIN.) → MID (MED.) → MAX (MAX.)


HOUSING

Accessories
MAINTENANCE OF FLOOR CLEANING TOOLS



assembling the vacuum cleaner _07
using the vacuum cleaner
POWER CORD

CAUTION
- When unplugging from the electrical outlet, grasp the plug, not the cord.

ON/OFF SWITCH

HOUSING
To adjust the power, move the power button left and right.
- To use the UV brush, press the [BRUSH ON/OFF] button.
- To start cleaning and select the appropriate suction power, press the [Suction -/+] button.
- Press the [BRUSH ON/OFF] button. • UV sterilization does not turn on automatically.


Accessories
- To use the dusting brush, pull out the button.

- To use the crevice nozzle, pull out the dusting brush.

• Insert the accessory into the end of the hose.

- To use the crevice nozzle, pull out the dusting brush.

MAINTENANCE OF FLOOR CLEANING ATTACHMENTS
Two-stage brush


FULL BAG INDICATOR


Do not discard the filter.


• Replace the filter once or twice a year.

BATTERY TYPE: AAA size
Troubleshooting
- VACUUM CLEANER USER MANUAL
- SAFETY INFORMATION
- CAUTION/WARNING SYMBOLS USED
- OTHER SYMBOLS USED
- IMPORTANT SAFEGUARDS
- GENERAL
- UV BRUSH
- CONTENTS
- ASSEMBLING THE CLEANER
- MAINTAIN TOOLS AND FILTER
- TROUBLESHOOTING
- OPERATING THE CLEANER
- POWER CORD
- ON/OFF SWITCH
- POWER CONTROL
- REMOTE-CONTROL TYPE
- HOSE (SC07F60J, SC08F60J SERIES)
- HOSE (SC07F60Y, SC08F60Y SERIES)
- BODY
- BODY-CONTROL TYPE (SC05F60W, SC07F60W, SC08F60W SERIES)
- HOSE
- USING THE UV BRUSH (OPTION)
- USING ACCESSORY
- PIPE
- ACCESSORY
- MAINTAIN FLOOR TOOLS
- STEP BRUSH
- POWER PET PLUS BRUSH (OPTION)
- PARQUET MASTER BRUSH (OPTION)
- TO REMOVE DUST FROM THE DUST BIN OF THE UV BRUSH (OPTION)
- CLEANING THE UV BRUSH (CLEANING THE DRUM) (OPTION)
- DUST FULL INDICATOR
- CHANGING THE DUST BAG
- CLEANING INLET FILTER
- CLEANING OUTLET FILTER
- CHANGE THE BATTERY (REMOTE-CONTROL TYPE)
- PRODUCT FICHE
- [ENGLISH]
- SAMSUNG
- VACUUM CLEANER
- OPERATING THE VACUUM CLEANER
- MAIN BODY
- USING THE UV BRUSH (OPTIONAL)
- ADDITIONAL ACCESSORIES
- FLOOR CLEANING TOOLS
- PROFESSIONAL PET HAIR BRUSH (OPTIONAL)
- PROFESSIONAL PARQUET BRUSH (OPTIONAL)
- CLEANING THE UV BRUSH (DRUM CLEANING) (OPTIONAL)
- DUST BAG FULL INDICATOR
- REPLACING THE EXHAUST FILTER
- HOUSING
- MAINTENANCE OF THE FLOOR NOZZLE
- POSITION BRUSH
- ADDITIONAL PET HAIR BRUSH (OPTIONAL)
- REMOVING DUST FROM THE UV BRUSH DUST CONTAINER (OPTION)
- CLEANING THE INLET FILTER
- CLEANING THE OUTLET FILTER
- ACCESSORIES
- FLOOR CARE TOOLS
- ON/OFF BUTTON
- MAINTENANCE OF FLOOR ACCESSORIES
- DUST FILL INDICATOR
- DEVICE HOUSING
- MAINTENANCE OF FLOOR CARE ACCESSORIES
- TWO-POSITION BRUSH
- DUST LEVEL INDICATOR
- MAINTENANCE OF FLOOR NOZZLES
- SWITCH
- FLOOR MAINTENANCE TOOLS
- MAINTENANCE OF FLOOR CLEANING TOOLS
- USING THE VACUUM CLEANER
- MAINTENANCE OF FLOOR CLEANING ATTACHMENTS
- TWO-STAGE BRUSH
- FULL BAG INDICATOR
Brand : SAMSUNG
Model : SC15F60JV
Category : Vacuum Cleaner