Reactiv - Uncategorized Newline - Free user manual and instructions
Find the device manual for free Reactiv Newline in PDF.


| Product Type | Interactive Flat Panel Display |
| Brand | Newline |
| Model | Reactiv |
| Display Size | 65 inches (typical) |
| Resolution | 4K UHD (3840 x 2160) |
| Touch Technology | Infrared or Capacitive (20-point touch) |
| Brightness | 350 cd/m² (typical) |
| Contrast Ratio | 4000:1 |
| Viewing Angle | 178° both horizontal and vertical |
| Operating System | Android (varies by model) |
| Built-in Speaker | 2×10W stereo speakers |
| Connectivity Inputs | HDMI, VGA, USB, RJ45, Audio In/Out |
| Dimensions (without stand) | 1488×897×86 mm (approx.) |
| Weight | Approx. 35 kg |
| Power Supply | AC 100-240V, 50/60 Hz |
| Power Consumption | Typical 150W, standby <0.5W |
| Mounting | VESA 600×400 mm |
| Accessories Included | Remote control, power cable, HDMI cable, user manual |
| Maintenance | Clean with soft dry cloth; avoid solvents |
| Safety Features | Overheat protection, anti-glare coating |
| Repairability | Spare parts available through authorized service centers |
Frequently Asked Questions - Reactiv Newline
User questions about Reactiv Newline
0 question about this device. Answer the ones you know or ask your own.
Ask a new question about this device
Download the instructions for your Uncategorized in PDF format for free! Find your manual Reactiv - Newline and take your electronic device back in hand. On this page are published all the documents necessary for the use of your device. Reactiv by Newline.
USER MANUAL Reactiv Newline
newline

REACTIV SUITE
1.0 Introduction
Reactiv SUITE IFP is an application framework that is installed on a Microsoft Windows 10 PC. This comprehensive guide will allow IT and Admin personnel to configure and deploy Reactiv on corporate PC and associated networks.
Reactiv SUITE IFP is a stand-alone compiled application (EXE) that requires the following:
• Windows 10 operating system
- 1GB HD space
- 16MB RAM
• Strong GPU (Nvidia Quadro P620 or equivalent) highly recommended)
- Touch screen with automatic pen \ eraser detection
Reactiv SUITE does not depend on any servers or external applications. As such it can be installed using our one click installer that can be downloaded from our website. In addition, the software works with your existing network architecture, mapped drives, local drives, user authentication methodology and policies just like any other application on the computer.
2.0 Network Configuration
To ensure that all the features of Reactiv SUITE work without issue, be sure to review and ensure that these ports are open on your network.
2.1 Keyboard\File Drop Service:
Reactiv SUITE integrates a web server that allows users on premises to connect with the IFP for remote control and file drop. Local users that are on the same network, can connect from any device using any standard web browser, to the IFP and drop documents and send keyboard commands. The following ports are required for this service to operate correctly.
| Port # | TCP or UDP | Protocol Name |
| 80 | TCP | Hypertext Transfer Protocol (HTTP) |
2.2 Airplay:
Airplay allows users to mirror their Apple mobile, tablet and laptop devices onto the IFP. Any Apple device that supports screen mirroring is supported natively without the need to install any additional applications. The following ports are required for this service to operate correctly.
| Port # | TCP or UDP | Protocol Name |
| 5353 | UDP | Multicast DNS (MDNS) |
| 7000 | TCP | Server Port |
| 29053 | TCP | Event Port |
| 7100 - ... | TCP | Data Port |
| 2001 - ... | UDP | Timing Port |
| 61875 | UDP | Audio Data Port |
2.3 Miracast:
Miracast allows users to mirror their Windows 10 devices onto the IFP. Any Windows 10 laptop or tablet can be mirrored onto the IFP without the need to install any additional applications. The following ports are required for this service to operate correctly.
| 7250 | TCP | Server Port |
| 7236 | TCP | Control Port |
| 51566 - ... | UDP | |
| 5353 | UDP | mDNS Port |
2.4 Chromecast:
Chromecast allows users to mirror their Android and Chromebook devices onto the IFP. Most Android mobile and laptops, in addition to Google Chromebooks, can be mirrored onto the IFP without the need to install any additional applications. The following ports are required for this service to operate correctly.
| Port # | TCP or UDP | Protocol Name |
| 443 | TCP | Secure Sockets Layer (SSL or HTTPS) |
| 1900 | UDP | Simple Service Discovery Protocol (SSDP) |
| 5353 | UDP | Multicast DNS (mDNS) |
| 8009 | TCP | Server Port |
| 56086 - ... | UDP | Data Port |
3.0 System Settings
Reactiv SUITE allows Administrators to configure and lock down settings that control user experience and data access. Some of these features are only available in the IFP version of the product.
3.1 Admin Login (IFP version)
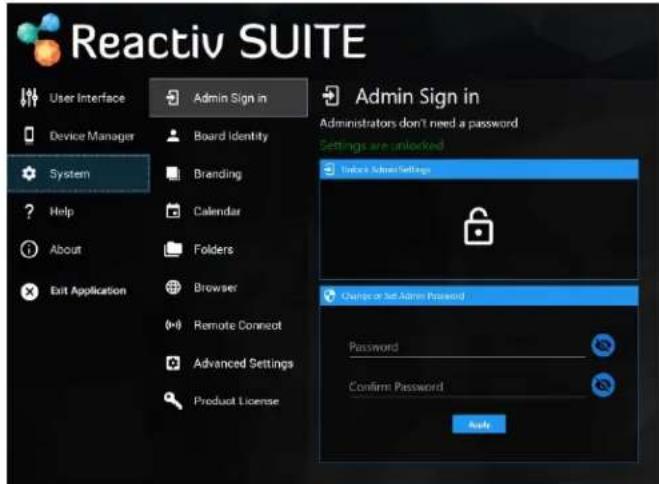
For security purposes, administrator password can be used to lock the system settings. This restricts normal users from changing pre-established settings.
- Settings > System > Admin Sign In
- Type and confirm password. Click "Apply"
- The next time the Setting menu is opened, it will be locked for changes until the correct password is entered
3.2 Board Identity
The Board Identity is used by Reactiv SUITE to identify the board. This identity is used to generate Airplay, Miracast, and Chromecast servers. In addition, this identity will allow the board to access online calendars and manage resources in the future.
- Settings > System > Board Identity
- Set Company Name and Meeting Room Name for the IFP
TIP: Name your IFP in a manner that will help you easily identify and locate your device. For example, set the company name and meeting room name where it will be located.

3.3 Brand Identity (IFP version)
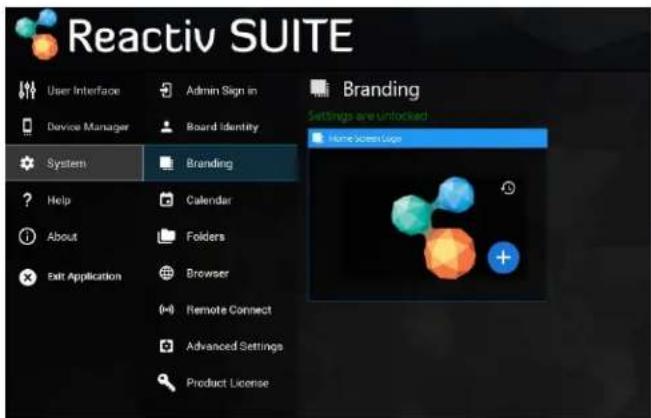
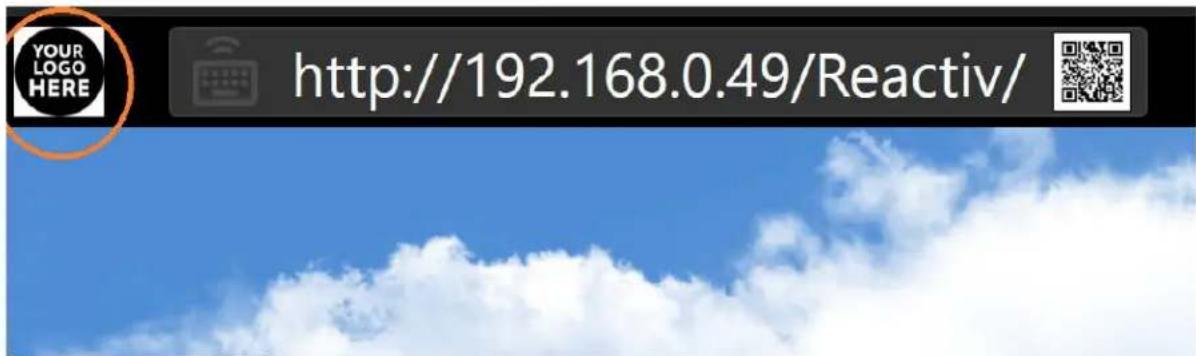
Brand Identity can be used to customize the Home Screen and Setting Screen logo to match your corporate branding.
Rev 1.9.0
August 2021
Reactiv Configuration Guide for IT
- Settings > System > Brand Identity
- Select the logo of your choice
TIP: Select a square logo with simple colours for optimal effect.
3.4 Calendar Integration (IFP version)
If you assign a dedicated calendar account to Reactiv SUITE, anyone in the organization cansimply invite the IFP to a meeting and join using a single click.
Only O365 calendars are currently supported.
- Settings > System > Calendar
- Login to a dedicated O365 calendar account
- Use the dropdown to select a specific calendar or resource
- Enable\Disable the type of meeting that can be joined

3.5 Folder Settings (IFP version)
Reactiv SUITE allows IT to configure where your users can stored and accessed data from. It offers two different options. Public and Private folders.
Public folders and public workspaces are data that is visible to any user using Reactiv SUITE, even if they did not login to Active Directory. These are unauthenticated data folders. This menu will
Rev 1.9.0
August 2021
Reactiv Configuration Guide for IT
allow Administrators to lock down what folders are visible to the end users. It is not always ideal to allow the users to save corporate data onto local IFP folders, allow USB keys or use folders such as Desktop or Windows system folders. As such an Administrator can define specific drives or even very specific root folders that will are visible to the end users.
Private folders are restricted to users, unless they login as a user. This allows the IFP to be deployed in a public environment, like a boardroom, and restrict network access only to authenticated individuals.
3.5.1 Public Folders
This menu allows Administrators to curate and restrict what root drives are visible to the end user. Any drive that is mapped in Windows (visible in File Explorer) can be controlled through this menu. Simply enable or disable the drive to restrict end user's access.
Content can be shared on LOCAL DRIVES when:
- Users are working locally and do not need to share content across multiple IFPs
- Users are working with generic content that is used regularly (generic company, sales, and product presentations)
- Users are working in an environment where network connectivity is not guaranteed (on the road, mobile IFP devices that are being moved)

NETWORK DRIVES should be used when:
- Users need to be able to access their private content that is stored on the network
- Users want to move and work from any IFP in the organization. They want to pick up a meeting in any room without restrictions
USB DRIVES can be used when:
- Users are in a public environment and data can be shared using USB drives. Schools are a great example where a large number of students can interface with an IFP in a classroom and individual presentations can be given by simply using a USB drive
TIP: In general, it is not recommended that root level access be given to all drives. Drives, such as the local C:\, should be restricted such that users don't navigate operating system folders, programfile folders and other restricted locations. Administrators should restrict and guide users to where content should be stored. In the case of some network drives, such as home directory H:\, root level access can be given. This will allow users to navigate freely without restrictions when appropriate.
In addition, the Administrator can also create custom shortcuts and force users to use specific folders on specific drives using the Local Folders shortcuts.
- Add Shortcut
- Click on File Explorer Button, OR manually enter the directory path
Rev 1.9.0
August 2021
Reactiv Configuration Guide for IT
• UNC network paths can also be directly typed into the path field
• An alias can be given to each directory path
- Click Save Button
TIP: Folder shortcuts are ideal for guiding end users directly to content and project locations. For example, local directories on the IFP can be used for generic non-confidential presentations. In this case, a specific folder C:\ReactivPresentations could be created as a shortcut that forces users to only use this folder for locally hosted content. Similarly, various network folders can be setup for "Design Presentations" and "Customer Projects" which are accessible from any IFP and allow users the freedom to move from room to room.
3.5.2 Private Folders
Reactiv SUITE allows Administrators to configure user authentication using existing Active Directory implementation, such that any individual in the organization can login, navigate the network, and access their private data using their login privileges.
Enable Network Access
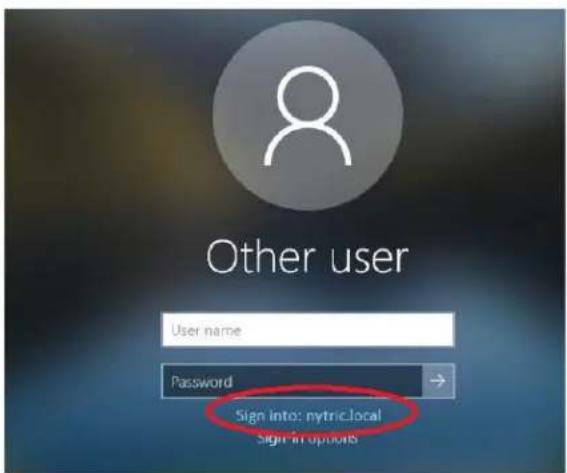
This menu allows Administrators to configure access and create policies to manage this feature. The first part of the menu allows this feature to be enabled or disabled. If the feature is disabled, the Network Sign-In icon will disappear on the home screen of Reactiv SUITE. In addition to enabling this feature in the menu, Administrators must ensure that two other things are done.
First, the computer must be joined to the domain. In addition, Windows must be signed in using a valid domain user account. If these two steps are not taken Reactiv
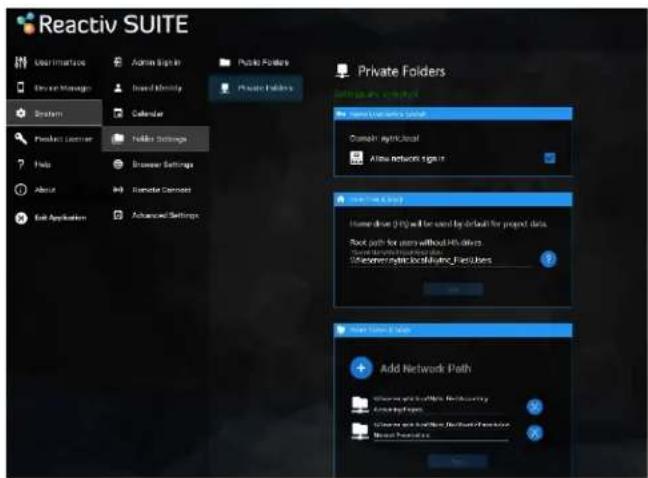
SUITE will not be able to authenticate users against your domain policies.

Rev 1.9.0
August 2021
Reactiv Configuration Guide for IT
TIP: In order to ensure network security, login to Windows using a very basic, generic Active Directory account that has minimal rights on the network. This will allow Reactiv SUITE to be deployed into a public conference room environment without compromising security and allows Reactiv SUITE to validate other users as they login to the application.
When a domain user authenticates themselves in Reactiv SUITE and creates workspaces, the data related to these workspaces is stored in their default HOME DIRECTORY (H:). If your organization does not offer a default home directory for every user, a secondary network folder can also be used.
The ‘Home Drive’ section of this menu allows a root path to be defined. A standard UNC network path can be defined here for any user that requires it.
It should be noted that only data related to workspaces, such as path names, user configuration data, is stored here. Sensitive data, documents or files are never stored as part of a workspace.

Custom Network Directories
Instead of navigating the entire network in a given organization, it is ideal if users could quickly access commonly used folders and drives to create workspaces. This menu allows the Administrator to create custom shortcuts and force users to use specific folders on specific drives. Simply type the UNC network path that points to the folder on the network. Reactiv SUITE will check these network paths against the read\write privileges of a given user that logs in and automatically restrict access.
3.6 Browser Settings & Launcher Shortcuts
This menu can configure the home page for the Reactiv embedded browser and configure the links that are displayed on the home screen.
- Settings > System > Browser Settings
- Multiple web shortcuts can be added by clicking the Add Shortcut button
- Icons can also be defined for these various shortcuts
- Custom search engine query can also be configured. Change the preference of the default search by configuring this text field

Rev 1.9.0
August 2021
Reactiv Configuration Guide for IT
3.7 Remote Connect
Remote Connect features allow colleagues and attendees to interact with the IFP using their personal devices. In room users, that are on the same network, can drop files and send text to the IFP using these remote services. In addition, laptops and mobile devices can also be paired to the IFP to mirror their screens.
3.7.1 Remote Connect Services (IFP version)
Enable/disable remote text input and file upload. This feature allows users to enter text and share files with IFP through the URL that is located on the top bar.

3.7.2 Airplay
Enable/disable wireless display sharing by users through Airplay. This functionality allows any Apple device in the room to cast its screen directly into Reactiv SUITE.

3.7.3 Miracast
Enable/disable wireless display sharing by users through Miracast. This functionality allows any device that supports Miracast (Windows 10 and specific Android devices) to cast its screen directly into Reactiv SUITE.

Rev 1.9.0
August 2021
Reactiv Configuration Guide for IT
3.7.4 Chromecast
Enable/disable wireless display sharing by users through Chromecast. This functionality allows any device that supports Chromecast (Chromebook and specific Android devices) to cast its screen directly into Reactiv SUITE.

3.8 Advanced Settings
3.8.1 Kiosk Mode
Enable Kiosk Mode to lock down the system such that users are prevented from interacting with the operating system outside of the Reactiv SUITE's UI. In public environments, it is ideal to lock down the PC such that users don't have access to Windows.
- Settings > System > Advanced Settings > Kiosk Mode
- Check to enter Kiosk Mode

FEATURES:
- "Exit Application" button will be deactivated.
- "Fullscreen Mode" toggle will be deactivated.
- "Auto Boot" – whenever the device enters Sleep Mode through Motion Sensor or is rebooted due to power cut, it will automatically restart and run Reactiv SUITE on Kiosk Mode.
Rev 1.9.0
August 2021
Reactiv Configuration Guide for IT
3.9 Product License
This menu allows you to check on the status of the license, expiry date and also deactivate the license if it is to be moved to a different PC.
- Settings > System > Product License
- Type in the license key from your records and click 'Deactivate'
- This license key can then be activated on a different PC

Rev 1.9.0
August 2021
Reactiv Configuration Guide for IT
4.0 Device Manager
4.1 Display Settings
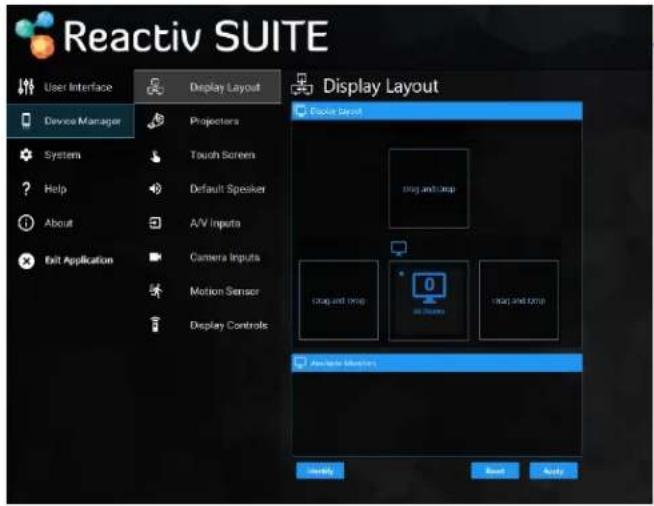
Reactiv projector and secondary screen integration will allow you to easily extend or mirror your display to any available monitor or projector with the touch of a button.
- Settings > Device Manager > Display Settings
- Drag any monitor you'd like from the available Monitor section and drop it into the Display Settings section to determine the Main and Secondary Monitor
- Set up to three screens to cast and extend Reactiv SUITE content
4.2 Projectors
Control and manage projectors that are connected to your local network and supports the PJLink Protocol:
- Settings > Device Manager > Projectors
- "Discover" to find projectors that support PJLink Protocol
- Select projector for connection

Rev 1.9.0
August 2021
Reactiv Configuration Guide for IT
4.3 Default Speaker
Reactiv SUITE allows the user to configure which speaker will be used by default. If a specific speaker is selected, Reactiv will monitor and overwrite any Windows selection changes. This is ideal when various devices are being connected and disconnected and Windows is changing the default speaker without the user being informed.
- Settings > Device Manager > Default Speaker
- Drag and drop the speaker from the 'Devices' list to select
- If no device is selected, the Default Windows speaker will be selected

4.4 A/V Inputs
Reactiv SUITE supports most common video capture devices that stream video from external sources. Devices such as: HDMI input capture devices, Document Cameras, Microscopes and many other video devices can be selected, grouped and configured in this menu.
- Settings > Device Manager > A/V Inputs
- Drag Video and Audio Inputs from the available devices list and drop them into the Group section to bind them together and enable them for use.
• Each of the Video Inputs can also be labelled to identify them to the end user.

4.5 Camera Inputs
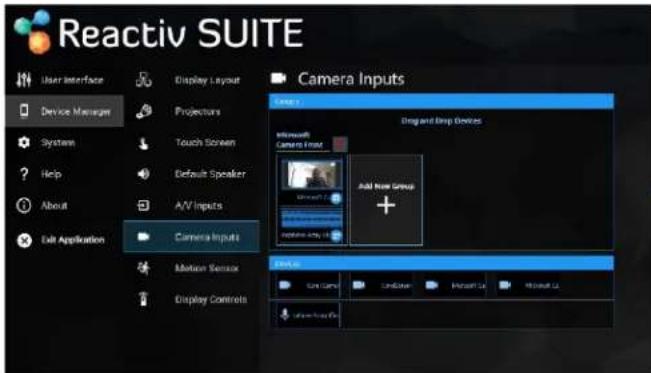
Reactiv SUITE supports most standard web and conference cameras. These cameras can be used as Picture-In-Picture (PIP) sources in a workspace and as conference call sources as well. This menu allows the user to select, group and configure these devices.
Rev 1.9.0
August 2021
Reactiv Configuration Guide for IT
- Settings > Device Manager > Camera Inputs
- Drag Video and Audio Inputs from the available devices list and drop them into the Group section to bind them together and enable them for use.
• Each of the Video Inputs can also be labelled to identify them to the end user.
Rev 1.9.0
August 2021
Reactiv Configuration Guide for IT

- Introduction
- Network Configuration
- Keyboard\File Drop Service:
- Airplay:
- Miracast:
- Chromecast:
- System Settings
- Admin Login (IFP version)
- Board Identity
- Brand Identity (IFP version)
- Calendar Integration (IFP version)
- Folder Settings (IFP version)
- Public Folders
- Private Folders
- Enable Network Access
- Custom Network Directories
- Browser Settings & Launcher Shortcuts
- Remote Connect
- Remote Connect Services (IFP version)
- Airplay
- Miracast
- Chromecast
- Advanced Settings
- Kiosk Mode
- FEATURES:
- Product License
- Device Manager
- Display Settings
- Projectors
- Default Speaker
- A/V Inputs
- Camera Inputs
Brand : Newline
Model : Reactiv
Category : Uncategorized