S2TOTM11 - Telephone Sandstrøm - Free user manual and instructions
Find the device manual for free S2TOTM11 Sandstrøm in PDF.


| Brand | Sandstrøm |
| Model | S2TOTM11 |
| Product Type | Cordless Digital Phone |
| Frequency Band | 1.88 to 1.9 GHz |
| Maximum Range (Outdoor) | 300 meters |
| Maximum Range (Indoor) | 50 meters |
| Battery Type | 3.7V 500mAh Li-Polymer Rechargeable |
| Standby Time | 100 hours |
| Talk Time | 10 hours |
| Charging Time | 15 hours |
| Phonebook Memory | 50 entries |
| Redial Memory | 10 last numbers |
| Answering Machine Recording Time | 30 minutes total; 3 minutes per message |
| Speakerphone | Yes (handsfree operation) |
| Caller ID | Yes (name and number) |
| Call Waiting | Yes (with recall) |
| Intercom | Yes (between handsets) |
| Call Transfer | Yes (between handsets) |
| Alarm Clock | Yes (with snooze) |
| Keypad Lock | Yes |
| Outgoing Message (OGM) Customization | Yes (record up to 30 seconds) |
| Remote Message Retrieval | Yes (via touch-tone phone, requires PIN) |
| Number of Handsets Supported | Up to 5 |
| Display | LCD with icons (contrast adjustable) |
| Power Supply (Base) | Input AC 100-240V 50/60Hz; Output 7.5V 300mA |
| Power Supply (Charging Cradle) | Input AC 100-240V 50/60Hz; Output 7.5V 300mA |
| Cleaning | Wipe with soft cloth; do not use solvents or abrasives |
| Safety | Do not use near water; do not disassemble; use only specified batteries |
Frequently Asked Questions - S2TOTM11 Sandstrøm
User questions about S2TOTM11 Sandstrøm
0 question about this device. Answer the ones you know or ask your own.
Ask a new question about this device
Download the instructions for your Telephone in PDF format for free! Find your manual S2TOTM11 - Sandstrøm and take your electronic device back in hand. On this page are published all the documents necessary for the use of your device. S2TOTM11 by Sandstrøm.
USER MANUAL S2TOTM11 Sandstrøm
Cordless Digital Phones
S1TOTM11
S2TOTM11

natural_image
Interior scene with a white office desk featuring framed items, a globe, and a desk lamp; next to an open book with handwritten notes (no legible text)
natural_image
Two black mobile phone models on stands, displaying control panels and buttons (no visible text or symbols)for S2TOTM11 only

bar
| Category | Value | |---|---| | Category 1 | 100 | | Category 2 | 100 | | Category 3 | 100 | | Category 4 | 100 | | Category 5 | 100 | | Category 6 | 100 | | Category 7 | 100 | | Category 8 | 100 | | Category 9 | 100 | | Category 10 | 100 | | Category 11 | 100 | | Category 12 | 100 | | Category 13 | 100 | | Category 14 | 100 | | Category 15 | 100 | | Category 16 | 100 | | Category 17 | 100 | | Category 18 | 100 | | Category 19 | 100 | | Category 20 | 100 | | Category 21 | 100 | | Category 22 | 100 | | Category 23 | 100 | | Category 24 | 100 | | Category 25 | 100 | | Category 26 | 100 | | Category 27 | 100 | | Category 28 | 100 | | Category 29 | 100 | | Category 30 | 100 | | Category 31 | 100 | | Category 32 | 100 | | Category 33 | 100 | | Category 34 | 100 | | Category 35 | 100 | | Category 36 | 100 | | Category 37 | 100 | | Category 38 | 100 | | Category 39 | 100 | | Category 40 | 100 | | Category 41 | 100 | | Category 42 | 100 | | Category 43 | 100 | | Category 44 | 100 | | Category 45 | 100 | | Category 46 | 100 | | Category 47 | 100 | | Category 48 | 100 | | Category 49 | 100 | | Category 50 | 100 | | Category 51 | 100 | | Category 52 | 100 | | Category 53 | 100 | | Category 54 | 100 | | Category 55 | 100 | | Category 56 | 100 | | Category 57 | 100 | | Category 58 | 100 | | Category 59 | 100 | | Category 60 | 100 | | Category 61 | 100 | | Category 62 | 100 | | Category 63 | 100 | | Category 64 | 100 | | Category 65 | 100 | | Category 66 | 100 | | Category 67 | 100 | | Category 68 | 100 | | Category 69 | 100 | | Category 70 | 100 | | Category 71 | 100 | | Category 72 | 100 | | Category 73 | 100 | | Category 74 | 100 | | Category 75 | 100 | | Category 76 | 100 | | Category 77 | 100 | | Category 78 | 100 | | Category 79 | 100 | | Category 80 | 100 | | Category 81 | 100 | | Category 82 | 100 | | Category 83 | 100 | | Category 84 | 100 | | Category 85 | 100 | | Category 86 | 100 | | Category 87 | 100 | | Category 88 | 100 | | Category 89 | 100 | | Category 90 | 100 | | Category 91 | 100 | | Category 92 | 100 | | Category 93 | 100 | | Category 94 | 100 | | Category 95 | 100 | | Category 96 | 100 | | Category 97 | 100 | | Category 98 | 100 | | Category 99 | 100 | | Total (Total) |Contents
Unpacking 6
Installing Your Phone 8
Connecting the Base Unit 8
Installing and charging the Batteries....8
Handling the Batteries 9
Getting to Know Your Phone 10
Handset Overview....10
Base Unit Overview....12
Display Icons and Symbols 14
Menu Structure....15
Operations 16
Registering the Handset 16
Intercom Function....16
Call Transfer....17
Keypad Lock....17
To Unlock Keypad....17
Place a Call....17
Place a Call with Speakerphone 17
Answer a Call....18
Answer a Call with Speakerphone 18
Dial One of 10 Redial Numbers ....18
Last Number Redial....19
Pause Function ....19
Recall Function....19
Low Battery Warning ....19
Paging Function....19
Receiving A New Call....20
Viewing The Caller Id List ....20
Call Waiting 21
Message Waiting 21
Delete the Message 21
Placing a Call from the Caller List 21
Saving the Name and Number from the Caller List into Phone Book .....22
Selective Deleting in the Caller List ....22
Deleting All Records in the Caller List....22
Phonebook Setting 23
Saving in the Phonebook 23
Viewing the Phonebook 23
Editing Name and Number in the Phonebook ....24
Placing Calls from the Phonebook ....24
Deleting a Stored Number 25
Deleting All the Stored Number 25
Phonebook Status....25
Base Setting 26
Deregister the Handset Setting 26
Dial Mode Setting....26
Flash Time Setting ......26
Modify PIN Setting 27
BS Default Setting....27
Handset Setting 28
Alarm Setting 28
Alarm Off....28
Ring Set 29
Tone Set....29
Language Setting ....30
HS Label Setting....30
Auto Answer Setting....30
Date & Time Setting 31
Contrast Setting....31
Select Base Setting....31
Handset Default Setting 32
Telephone Answering Machine (TAM) Setting 33
Message Setting....33
OGM Setting 33
TAM Setting....33
TAM On/Off 34
Set OGM Setting....34
Set Ring Setting....35
Time Saver....35
TAM Voice Setting....35
Remote Code Setting 36
TAM Default Setting....36
OGM Setting....36
Telephone Answering Machine (TAM) Basic Information 37
Selecting a Factory Out-Going Message (OGM) 37
Customizing an OGM 37
Reset to the Factory OGM 38
Record a Memo....38
Incoming Call Message (ICM) Operation 38
Call Intercept....39
Record a Conversation ....39
New Message Indication ....39
Message Playback....39
Delete Messages....40
Set Remote Code for Remote Message Retrieval ....40
Answering Machine Remote Operation While Away 41
Text and Digit Entry Table 42
Hints and Tips...... 43
ALWAYS check first that: 43
Everyday use....43
Intercom and transfer....45
Batteries 45
Specifications 46
Safety First 47
Thank you for purchasing your new Logik Cordless Digital Phones.
We recommend that you spend some time to read this instruction manual in order to fully understand how to install and operate it.
Read all the safety instructions carefully before use and keep this instruction manual for future reference.
Unpacking
Remove all packaging from the unit. Retain the packaging. If you dispose of it please do so according to local regulations.
The following items are included:
for S1TOTM11

Handset x 1
PN: S1TOTMHS

natural_image
Simple line drawing of a mobile phone with a rectangular body and a circular base (no text or symbols)Base Unit x 1 PN: S1TOTMBS

natural_image
Simple line drawing of a plug with a cord and power outlet (no text or symbols)Mains Adapter x 1 PN: S1TOTMMA
natural_image
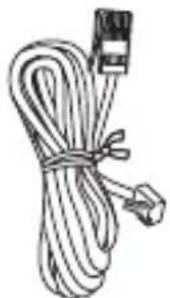
Illustration of a bundled cable with a connector (no text or symbols)Telephone Linecord x 1 PN: S1TOTMTL

Instruction manual x 1 PN: S1_2TOTM-002

Handset x 2 PN: S1TOTMHS

natural_image
Simple line drawing of a mobile phone with a button and base (no text or symbols)Base Unit x 1 PN: S1TOTMBS

natural_image
Simple line drawing of a vertical rectangular object mounted on a circular base (no text or symbols)Charging Cradle x 1 PN: S2TOTMCC
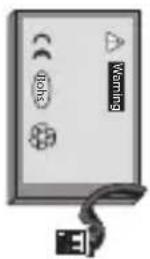
Battery x 2
PN: S2TOTMBA

natural_image
Simple line drawing of a plug with a coiled cable and a small terminal outlet (no text or symbols)Mains Adapter x 2 PN: S1TOTMMA

natural_image
Line drawing of a bundled cable with connectors (no text or symbols)Telephone Linecord x 2 PN: S1TOTMTL
Instruction manual x 1 PN: S1_2TOTM-002

If items are missing or damaged, please contact Partmaster (UK only). Tel: 0844 800 3456 for assistance.
Installing Your Phone
Connecting the Base Unit
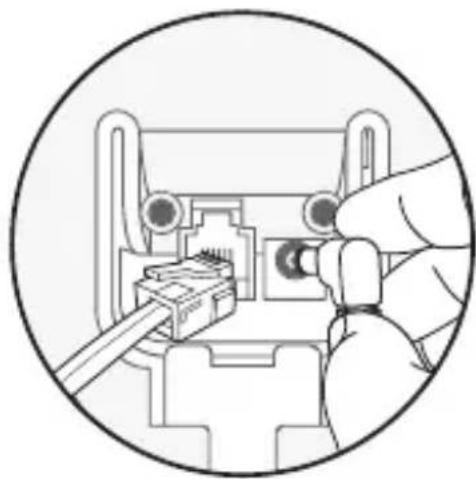
- Plug the mains adapter & telephone line cable into the base unit.
natural_image
Illustration of a hand inserting a component into an electronic device (no text or symbols visible)- Plug the mains adapter & telephone line cord into the wall socket.

natural_image
Line drawing of a hand holding a small object, enclosed in a circle (no text or symbols)
natural_image
Line drawing of a hand holding an electrical plug, enclosed in a circle (no text or symbols)- Always use the cables provided in the box.
Installing and charging the Batteries
-
Slide open the battery compartment cover.
-
Plug the battery wire into the white socket in the lower right corner of the remote control's battery compartment, then slot in the battery. Afterwards, slide on the battery compartment's lid.
-
Slide the battery compartment cover back on.
-
Put the handset on the base unit to charge. Charge the handset for 14 hours the first time you charge it. A beep indicates that the handset is properly placed on the base unit.


• Use only the mains adapter provided for the base unit.
• Use only rechargeable Li-Polymer batteries.

- The display will show the time and the handset number, e.g. 2, to show it is registered to the base unit.
- Your phone is now set up to make and receive calls.
Handling the Batteries
- Improper or incorrect use of batteries may cause corrosion or battery leakage, which could cause personal injury or damage to property.
• Install the battery correctly by following the instruction manual on page 7.
• Use only the types of the batteries which are indicated in this manual.
- Do not install new batteries with used ones and do not mix different types of batteries.
- Do not dispose of the used batteries as domestic waste. Dispose of them in accordance with local regulations.
Getting to Know Your Phone
Handset Overview
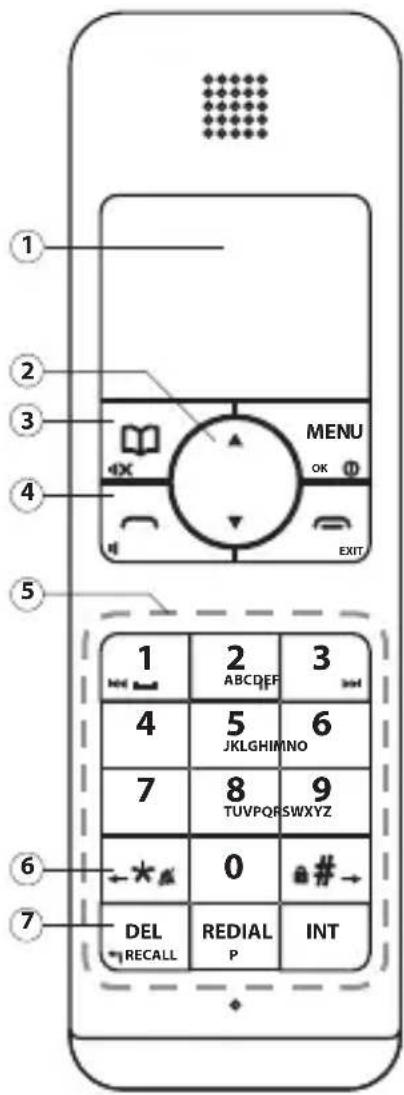
1. LCD Display
Show call information, phone status, prompts and phonebook items
2. (Up) Button
- Reviews the caller list from idle mode scrolling up through lists and menu options.
• Increases the earpiece volume during a call.
(Down) Button
- The handset can save the last 10 dial numbers. Review the redial list from idle mode. Scrolls down through lists and menu options.
• Decreases the earpiece volume during a call.
3. (Phonebook) / (Mate) Button
- Access the phonebook. Allows you to change the format of displayed number.
- In talk mode, this button allows you to temporarily disable the handset microphone. The LCD displayed "CALL MUTED".
4. /Button
• To switch the speakerphone On/Off.
• To make or answer a call.
5. TELEPHONE KEYPAD
6. /\* (Move Left) / Button
• Temporarily change the dialing mode from Pulse to Tone when dialing in the Pulse mode.
- Move left on the large LCD display.
7. DEL (Delete) / (Return) / RECALL Button
• To access custom calling features such as call waiting or 3-way calling provided by you local phone company.
- Delete item.
• Return to the previous menu.
8. MENU / OK / Button
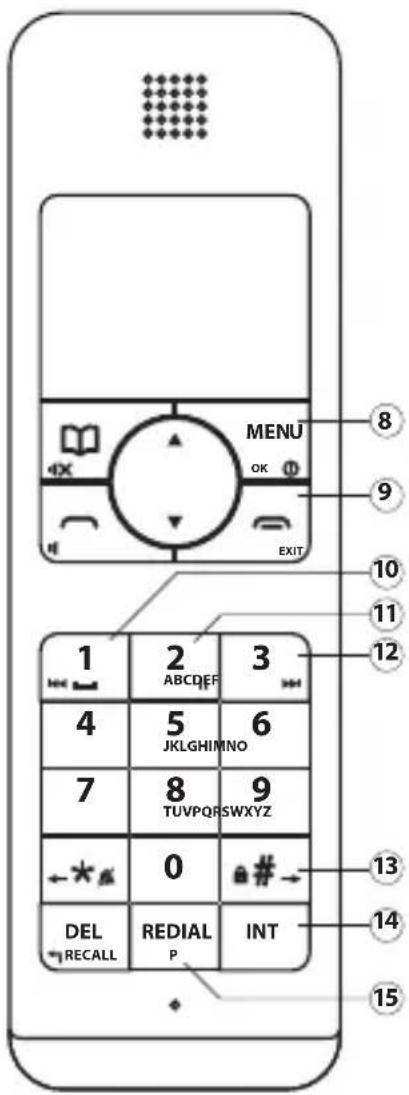
- Confirm a selection during menu operation.
• Access the program menu. - Switch On/Off the handset.
9. /EXIT Button
- End a call.
-
Exit all modes of operation and return the handset and base unit to the idle mode.
-
(Repeat) Button
- (Pause) Button
- (Skip) Button
-
(Keylock) / (Move Right) Button
-
Lock and unlock the keypad at standby mode.
• Activate 3-way conference. -
Move right on the large LCD display.
-
INT (Intercom) Button
- REDIAL / P (Pause) Button
• Redial the last number you dialed.
• Insert pause while dialing.
Base Unit Overview
for S2TOTM11 only
Base Unit
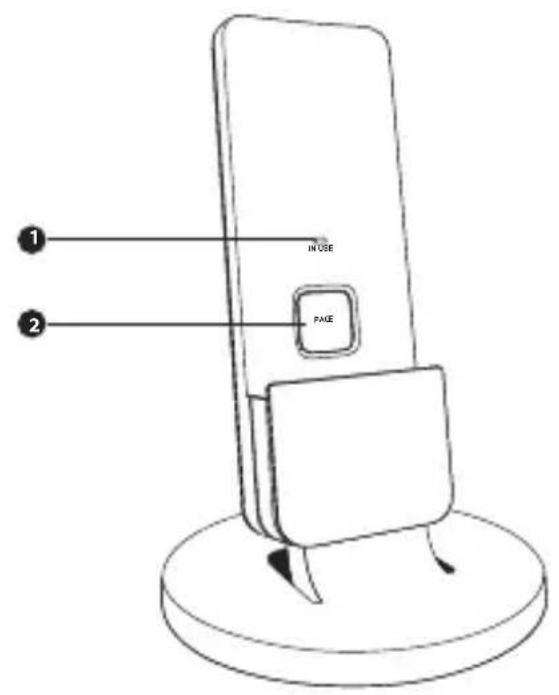

- IN USE LED Indicator
- PAGE Button
- Mains Socket
- Telephone Line Socket
Base Unit

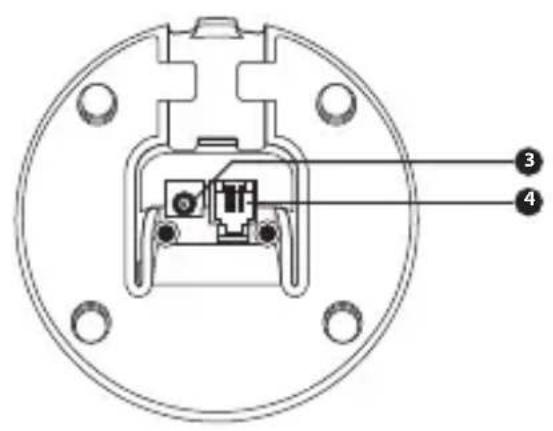
Charging Cradle

natural_image
Simple line drawing of a chair with a rectangular seat and two legs, mounted on a circular base (no text or symbols)
natural_image
Technical diagram of a mechanical component with mounting holes and internal structure (no text or symbols)- IN USE LED Indicator
- PAGE Button
- Mains Socket
- Telephone Line Socket
Display Icons and Symbols
 | Call | Indicates that an external call is connected or held. Icon blinks when receiving an incoming call. |
 | Alarm Displays when the alarm clock is activated. | |
 | Battery Charge Level | Indicates battery is fully charged. |
 | Battery Charge Level | Indicates battery is fully discharged. |
 | Message Indicates you have a new voice mail message. | |
 | Phonebook Display when the phonebook is accessed. | |
 | Signal Level | Indicates that the handset is registered and within range of the base station. Icon blinks when the handset is out of range or is searching for a base unit. |
Menu Structure
In idle mode, press the MENU button to access the call log menu. Refer to the following for the menu structure.
Menu Map
Press the ▲ or ▼ buttons to scroll through the menu items.
| CALL LOG | PHONEBOOK | BS SETTING | HS SETTING | REGISTER | TAM |
| RECEIVED | LIST | DEREGIS HS | ALARM | BASE 1 | MESSAGE |
| DIALED | ADD ITEM | DIAL MODE | RING SET | BASE 2 | OGM |
| MODIFY ITEM | FLASH TIME | TONE SET | BASE 3 | TAM SETTING | |
| DEL ITEM | MODIFY PIN | LANGUAGE | BASE 4 | ||
| DELETE ALL | BS DEFAULT | HS LABEL | |||
| PB STATUS | AUTO ANS | ||||
| DATE&TIME | |||||
| CONTRAST | |||||
| SELECT BS | |||||
| HS DEFAULT |
Operations
Registering the Handset

Maximum of 5 handsets can be linked to the same base unit; Maximum of 4 bases per handset.
You can purchase additional handsets (5 handsets can be registered) for use with many of this telephone's features. Make sure the battery is connected and the base is powered on before starting the operation.
-
Press and hold the PAGE button on the base unit until the base IN USE LED Indicator flash.
-
Press the OK button.
-
Press the ▲ or ▼ buttons to select "REGISTER".
-
Press the OK button.
-
Press the ▲ or ▼ buttons to select desired base number. Press the OK button to confirm. The LCD display will show "SEARCHING NUMBER".
-
When the handset has been successfully registered, the Pin code screen will be displayed, pin number should be entered. The factory preset pin number is "0000". Press the OK button to confirm. The tone will be sounded and the base assigns a number to the Handset.

When you want to add a new extension handset, you must register the new handset on the base unit.
Intercom Function
-
In idle mode, press the INT button on the handset, and then enter the handset number that you want to call. The internal called handset will ring.
-
To answer the intercom call, press the ☐ button on the called party handset.
-
To end intercom mode, press the button.

After the intercom call is established between two handsets, the third handset can still make or answer a call to the external line.
Call Transfer
You can transfer an external call from on handset to another handset.
- During an external call, press the INT button and the corresponding handset number that you want to transfer.
- The external call is put on hold and the internal called handset rings.
- After the internal called handset has answered, press the button to hang up your handset to complete the call transfer.

If the internal called handset does not answer the internal call with 30 sec, the handset will return to the external call again.
Keypad Lock
- Press the MENU button.
- Press the 🔒 button to lock keypad.
To Unlock Keypad
- Press the MENU button.
- Press the 🔒 button to unlock keypad.
Place a Call
- Pick up the handset and press the button.
- Listen for a dial tone.
- Dial the telephone number. The phone numbers appear on the LCD display as you enter the number. The base IN USE LED indicator will light up steadily.
- When finished with your call, press 📄 the button.
Place a Call with Speakerphone
- Press the button twice for speaker mode.
- Listen for a dial tone.
- Dial the telephone number. The phone numbers appear on the LCD display as you enter the number. The base IN USE LED indicator will light up steadily.
- When finished with your call, press the 📄 button.
Answer a Call
- When the phone rings, the LCD display will show "CALL", press the button on the handset.
- Start your conversation.
- To end your conversation, press the 📄 button.
Answer a Call with Speakerphone
- When the phone rings, the LCD display will show "CALL", press the button twice on the handset for speaker mode.
- Start your conversation.
- To end your conversation, press the 📄 button.
If the handset is on the base:
- When the phone rings, the LCD display will show "CALL", simply pick up the handset from the base cradle if the unit is set to auto-answer ON mode. If the unit is set to auto-answer OFF mode, and then press the button on the handset. The base unit IN USE LED Indicator will flash.
- Start your conversation.
- To end your conversation, press the 📄 button, the base IN USE LED Indicator will turn off.
Dial One of 10 Redial Numbers
- Press the button to enter the dialed calls list.
- Press the ▲ or ▼ buttons to scroll through to the previously called numbers.
- Press the button. The selected number will be dialed automatically.
Last Number Redial
When the handset is off the base unit and in idle mode:
- Press the 📄 button on the handset and listen for a dial tone.
- Press the REDIAL button. This will automatically redial the last telephone number that you called (up to 32 digits).
- When finished with your call, press the button or place the handset on the base unit.
Pause Function
In some cases, such as PABX or long distance service, a pause may be needed in the dialing sequence. Pressing the handset REDIAL button inserts the programmed time interval between dialed numbers.
Recall Function
Used to access custom calling features such as Call Waiting or Three-Way Calling provided by your local phone company. Recall can also be used to restore a dial tone to make a new call.
Low Battery Warning
- When the handset battery voltage level is low, the "BATTERY LOW" icon will show.
• Return the handset on the base cradle to charge.

If the battery is low during a call, a warning beep will be emitted every 90 seconds to alert the user.
Paging Function
If you have misplaced the handset or need to alert a person near the handset, press the PAGE button on the base unit. Each presses will activate the handset to beep for 60 seconds while the LCD display shows "PAGING..." and the base IN USE LED Indicator will start to blink. Press again to stop.

Even if the handset is in RING OFF mode, the base unit can page the handset.
Receiving A New Call
- When you receive a new call, the call information is stored in the CALLER ID List. The "NEW NUMBER" segment of the LCD display shows the number of calls not yet reviewed.
- When you receive a call, the system displays the caller information sent by the telephone company, called a Call Record. The Call Record consists of the following information:
a. The caller's telephone number
b. The caller's name (if available)
c. The date and time of the call

- If there are no call records, the LCD display shows "EMPTY" by pressing the ▲ button.
Viewing The Caller Id List
- In idle mode, press the button to enter the Caller ID list. If there is a new call(s), the new call(s) will be displayed first.

-
Press the ▲ or ▼ buttons to scroll to the next call. Press the button will go through the calls from the last call received to the first. Press the ▲ button will allow you to view the calls from the first call received to the last.
-
Press the → button to finish.

If no active buttons are pressed for 20 seconds, the LCD display will automatically return to idle mode.
Call Waiting
When you subscribe to Call Waiting service from your local telephone Company, this telephone will display the name and number of the second caller while you are having a conversation.
- If a second call comes in while you are having a conversation, you will hear a notification tone from the handset and volume is momentarily muted. The LCD Display will automatically show the name and number of the second caller.
- Press the RECALL button to answer the second caller.
- When you are finished, press the RECALL button to continue your conversation with the first caller.
Message Waiting
When the Caller ID receives the Message Waiting signal from your local phone company, the ☐ on on the LCD display panel will be flashed. The icon will turn off after you have reviewed your messages. Message Waiting is an optional, extra service provided by your local phone company.
Delete the Message
- In standby mode, press and hold the DEL button. The LCD display will show "DEL MESSAGE?".
- Press the OK Button to delete message icon.
Placing a Call from the Caller List
- Press the button to enter the Caller ID list.
- Press the ▲ or ▼ buttons to select the call record you wish to call back. Press the button to dial out.
- To end your conversation, press the 📄 button.
Saving the Name and Number from the Caller List into Phone Book
- Press the MENU button to enter the program menu.
- Press the ▲ or ▼ buttons to select "CALL LOG". And then press the OK button to confirm.
- Press the ▲ or ▼ buttons to select "RECEIVED". And then press the OK button to confirm.
- Press the ▲ or ▼ buttons to scroll the call record you wish to store. And then press the OK button to confirm.
- Press the ▲ or ▼ buttons to select "ADD TO PB". And then press the OK button three times to confirm.
- Press the ▲ or ▼ buttons to select the Melody 1-10. And then press the OK button to confirm.
- Press the EXIT button to return to Idle Mode.
Selective Deleting in the Caller List
- Press the MENU button to enter the program menu.
- Press the ▲ or ▼ buttons to select "CALL LOG". And then press the OK button to confirm.
- Press the ▲ or ▼ buttons to select "RECEIVED". And then press the OK button to confirm.
- Press the ▲ or ▼ buttons to scroll the call record you wish to delete. And then press the OK button to confirm.
- Press the ▲ or ▼ buttons to select "DELETE". And then press the OK button to confirm.
- "CONFIRM?" will be displayed. And then press the OK button to confirm.
- Press the EXIT button to return to Idle Mode.
Deleting All Records in the Caller List
- Press the MENU button to enter the program menu.
- Press the ▲ or ▼ buttons to select "CALL LOG". And then press the OK button to confirm.
- Press the ▲ or ▼ buttons to select "RECEIVED". And then press the OK button to confirm.
- Press the ▲ or ▼ buttons to select "DELETE ALL". And then press the OK button to confirm.
- "CONFIRM?" will be displayed. And then press the OK button to confirm.
- Press the EXIT button to return to Idle Mode.
Phonebook Setting
Saving in the Phonebook
- Press the MENU button to enter the program menu.
- Press the ▲ or ▼ buttons to select "PHONE BOOK". And then press the OK button to confirm.
- Press the ▲ or ▼ buttons to select "ADD ITEM". And then press the OK button to confirm. "NAME?" will be displayed.
- Use the TELEPHONE KEYPAD buttons to enter the name; (see the "Text and Digit Entry Table" section) you can store up to 12 characters. And then press the OK button to confirm. "NUMBER?" will be displayed.
- Enter the telephone number using the TELEPHONE KEYPAD buttons. You can store up to 20 digits. And then press the OK button to confirm.
- The melody name is displayed, the ringer tone will also be sounded. The default name to be displayed is "Melody 1". The user can move through the melody options using the or button. And then press the OK button to confirm.

If there are no memory locations left in the phonebook, the unit will display "PB FULL". To continue with memory programming, you must delete or edit existing speed dial numbers. If no active buttons are pressed for 20 seconds, the LCD Display will automatically return to idle mode.
Viewing the Phonebook
This phonebook lets you scroll through the list to find the person you need for one touch dialing. You can store up to 50 names and telephone numbers in the Memory.
- Press the 📋 button to enter the phonebook.
- Press the ▲ or ▼ buttons to find the one you need.

To exit the phonebook at anytime, Press the button.
Editing Name and Number in the Phonebook
- Press the MENU button to enter the program menu.
- Press the ▲ or ▼ buttons to select "PHONE BOOK". And then press the OK button to confirm.
- Press the ▲ or ▼ buttons to select "MODIFY ITEM". And then press the OK button to confirm.
- Press the ▲ or ▼ buttons to select desired change. And then press the OK button to confirm.
- Press the TELEPHONE KEYPAD buttons to edit the name. Press the DEL button erase the previous letter. Use the TELEPHONE KEYPAD buttons to add.
- Press the OK button to edit the number.
- Press the TELEPHONE KEYPAD buttons to edit the number you want to change. To erase, press the DEL button to remove previous number. To add, use the TELEPHONE KEYPAD buttons.
- Press the OK button. The melody name is displayed, the ringer tone will also be sounded. The default name to be displayed is the "Melody 1". The user can move through the melody options using the or button. And then press the OK button to confirm.

When no active buttons are pressed for 20 seconds, the LCD display will automatically return to idle mode.
Placing Calls from the Phonebook
- Press the button to enter the phonebook.
- Press the ▲ or ▼ buttons to find the contact you want to call.
- Press the button to dial out the telephone number.
- Start your conversation.
- To end your conversation, press the 📄 button.

Be sure to check that the line is not in use by another extension.
Deleting a Stored Number
- Press the MENU button to enter the program menu.
- Press the ▲ or ▼ buttons to select "PHONE BOOK". And then press the OK button to confirm.
- Press the ▲ or ▼ buttons to select "DEL ITEM". And then press the OK button to confirm.
- Press the ▲ or ▼ buttons to select desired deletion. And then press the OK button to confirm.
- "CONFIRM?" will be displayed. And then press the OK button to confirm.
- Press the EXIT button to return to Idle Mode.
Deleting All the Stored Number
- Press the MENU button to enter the program menu.
- Press the ▲ or ▼ buttons to select "PHONE BOOK". And then press the OK button to confirm.
- Press the ▲ or ▼ buttons to select "DELETE ALL". And then press the OK button to confirm.
- "CONFIRM?" will be displayed. And then press the OK button to confirm.
- Press the EXIT button to return to Idle Mode.
Phonebook Status
This function allows the user to see how many entries in the phone book are occupied. On entering the function, the user will see the number of entries.
- Press the MENU button to enter the program menu.
- Press the ▲ or ▼ buttons to select "PHONE BOOK". And then press the OK button to confirm.
- Press the ▲ or ▼ buttons to select "PB STATUS". And then press the OK button to see how many entries.
- Press the EXIT button to return to Idle Mode.
Base Setting
Deregister the Handset Setting
This function allows the user to delete a handset registration from the base.
- Press the MENU button to enter the program menu.
- Press the ▲ or ▼ buttons to select "BS SETTING". And then press the OK button to confirm.
- Press the ▲ or ▼ buttons to select "DEREGIS HS". And then press the OK button to confirm.
- Enter the PIN number "0000". And then press the OK button to confirm.
- Press the ▲ or ▼ buttons to select HS number. And then press the OK button to confirm.
- Press the EXIT button to return to idle mode.
Dial Mode Setting
The user can select to change the mode in which the base will dial.
- Press the MENU button to enter the program menu.
- Press the ▲ or ▼ buttons to select "BS SETTING". And then press the OK button to confirm.
- Press the ▲ or ▼ buttons to select "DIAL MODE". And then press the OK button to confirm.
- Press the ▲ or ▼ buttons to select TONE or PULSE. And then press the OK button to confirm.
- Press the EXIT button to return to idle mode.
Flash Time Setting
The user can select to change the Flash Time.
- Press the MENU button to enter the program menu.
- Press the ▲ or ▼ buttons to select "BS SETTING". And then press the OK button to confirm.
- Press the ▲ or ▼ buttons to select "FLASH TIME". And then press the OK button to confirm.
- Press the ▲ or ▼ buttons to select 100MS, 250MS, 300MS or 600MS. And then press the OK button to confirm.
- Press the EXIT button to return to idle mode.
Modify PIN Setting
This function allows the user to change the pin number of the currently active Base.
- Press the MENU button to enter the program menu.
- Press the ▲ or ▼ buttons to select "BS SETTING". And then press the OK button to confirm.
- Press the ▲ or ▼ buttons to select "MODIFY PIN". And then press the OK button to confirm.
- Enter the PIN NUMBER (The factory default is "0000"). And then press the OK button to confirm.
- "NEW PIN" will be displayed, enter the new pin number. And then press the OK button to confirm.
- "RE-ENTER" will be displayed, enter the new pin number again. And then press the OK button to confirm.
- Press the EXIT button to return to Idle mode.

The PIN number is very important. If you lost the PIN number, you can't restore to the factory default setting.
BS Default Setting
This function allows the user to restore the Base setting to the factory default.
- Press the MENU button to enter the program menu.
- Press the ▲ or ▼ buttons to select "BS SETTING". And then press the OK button to confirm.
- Press the ▲ or ▼ buttons to select "BS DEFAULT". And then press the OK button to confirm.
- Enter the modified PIN NUMBER. And then press the OK button to confirm.
Handset Setting
Alarm Setting
The alarm feature can alert you at a set time. When the alarm is alerting, your handset ring for 30 seconds. To stop the alarm, simply press any key on the handset.
- Press the MENU button to enter the program menu.
- Press the ▲ or ▼ buttons to select "HS SETTING". And then press the OK button to confirm.
- Press the ▲ or ▼ buttons to select " ALARM". And then press the OK button to confirm.
- Press the ▲ or ▼ buttons to select ALARM ON.
- Press the OK button to set ALARM TIME.
- Press the telephone keypad button to enter the hour and minute, press the ▲ or ▼ buttons to select PM or AM. And then press the OK button to confirm.
- Press the ▲ or ▼ buttons to select SNOOZE ON or SNOOZE OFF. And then press the OK button to confirm.
- Press the EXIT button to return to idle mode.

If setting the "SNOOZE ON" temporarily halts the alarm from sounding when the alarm rings.
Alarm Off
- Press the MENU button to enter the program menu.
- Press the ▲ or ▼ buttons to select "HS SETTING". And then press the OK button to confirm.
- Press the ▲ or ▼ buttons to select "ALARM". And then press the OK button to confirm.
- Press the ▲ or ▼ buttons to select "ALARM OFF". And then press the OK button to confirm.
- Press the EXIT button to return to idle mode.
Ring Set
The user is able to change the settings for the Handset ringing on Internal Calls. The user is able to adjust the internal ring volume from the range of volume levels available. The user is able to change the settings for the Handset ringing on External Calls. The user is able to adjust the external ring volume from the range of volume levels available.
- Press the MENU button to enter the program menu.
- Press the ▲ or ▼ buttons to select "HS SETTING". And then press the OK button to select.
- Press the ▲ or ▼ buttons to select "RING SET". And then press the OK button to select.
- Press the ▲ or ▼ buttons to select "INT RING" or "EXT RING". And then press the OK button to select.
- Press the ▲ or ▼ buttons to select "MELODY" or "VOLUME". And then press the OK button to select.
- Press the ▲ or ▼ buttons to select "MELODY 1-10". Press the ▲ or ▼ buttons to select Volume OFF, 1, 2 or 3. And then press the OK button to confirm.
- Press the EXIT button to return to idle mode.
Tone Set
A beep will sound when a key is pressed on the handset. A beep will sound then the battery is low. A beep will sound then the Handset is out of range of the Base.
- Press the MENU button to enter the program menu.
- Press the ▲ or ▼ buttons to select "HS SETTING". And then press the OK button to select.
- Press the ▲ or ▼ buttons to select "TONE SET". And then press the OK button to select.
- Press the ▲ or ▼ buttons to select KEY TONE, BAT LOW. And then press the OK button to select.
- Press the ▲ or ▼ buttons to select ON or OFF. And then press the OK button to confirm.
- Press the EXIT button to return to idle mode.
Language Setting
This telephone offers ENGLISH, FRENCH, SPANISH languages for your convenience.
- Press the MENU button to enter the program menu.
- Press the ▲ or ▼ buttons to select "HS SETTING". And then press the OK button to select.
- Press the ▲ or ▼ buttons to select "LANGUAGE". And then press the OK button to select.
- Press the ▲ or ▼ buttons to select desired language. And then press the OK button to confirm.
- Press the EXIT button to return to idle mode.
HS Label Setting
- Press the MENU button to enter the program menu.
- Press the ▲ or ▼ buttons to select "HS SETTING". And then press the OK button to select.
- Press the ▲ or ▼ buttons to select "HS LABEL". And then press the OK button to select.
- Use the TELEPHONE KEYPAD buttons to enter the name. The handset name is limited to 12 characters. And then press the OK button to confirm.
- Press the EXIT button to return to idle mode.
Auto Answer Setting
- Press the MENU button to enter the program menu.
- Press the ▲ or ▼ buttons to select "HS SETTING". And then press the OK button to select.
- Press the ▲ or ▼ buttons to select "AUTO ANS". And then press the OK button to select.
- Press the ▲ or ▼ buttons to select ON or OFF. And then press the OK button to confirm.
- Press the EXIT button to return to idle mode.
Date & Time Setting
- Press the MENU button to enter the program menu.
- Press the ▲ or ▼ buttons to select "HS SETTING". And then press the OK button to select.
- Press the ▲ or ▼ buttons to select "DATE&TIME". And then press the OK button to select.
- Press the ▲ or ▼ buttons to select "DATE FORMAT", "SET DATE", "TIME FORMAT" or "SET TIME". And then press the OK button to confirm.
DATE FORMAT SETTING
Press the ▲ or Buttons to select "DD-MM" or "MM-DD". SET DATE - Use the telephone keypad to enter the date.
TIME FORMAT SETTING
Press the ▲ or buttons to select 12-HOUR or 24-HOUR. SET TIME - Use the telephone keypad to enter the time.
- Press the OK button to confirm.
- Press the EXIT button to return to idle mode.
Contrast Setting
- Press the MENU button to enter the program menu.
- Press the ▲ or ▼ buttons to select "HS SETTING". And then press the OK button to select.
- Press the ▲ or ▼ buttons to select "CONTRAST". And then press the OK button to select.
- Press the ▲ or ▼ buttons to select level 1, 2, 3. And then press the OK button to confirm.
- Press the EXIT button to return to idle mode.
Select Base Setting
This function allows the user to select a base from those already registered to the handset.
- Press the MENU button to enter the program menu.
- Press the ▲ or ▼ buttons to select "HS SETTING". And then press the OK button to select.
- Press the ▲ or ▼ buttons to select "SELECT BS". And then press the OK button to select.
- Press the ▲ or ▼ buttons to select "BASE 1, 2, 3, 4 or AUTO". And then press the OK button to confirm.
Handset Default Setting
This function allows the user to restore the Handset settings to the factory default.
- Press the MENU button to enter the program menu.
- Press the ▲ or ▼ buttons to select "HS SETTING". And then press the OK button to select.
- Press the ▲ or ▼ buttons to select "HS DEFAULT". And then press the OK button to select.
- "PIN?" will be displayed. Enter the PIN NUMBER. And then press the OK button to confirm.
- "PB CLR? Y/N" will be displayed. Press the ▲ or ▼ buttons to select "YES" to clear all previous phonebook setting. And then press the OK button to confirm.
Telephone Answering Machine (TAM) Setting
Message Setting
- Press the MENU button to enter the program menu.
- Press the ▲ or ▼ buttons to select "TAM". And then press the OK button to select.
- Press the ▲ or ▼ buttons to select "MESSAGE". And then press the OK button to select.
- Press the ▲ or ▼ buttons to select "NEW MSG", "SAVED MSG", "MEMO", or "DELETE ALL". And then press the OK button to confirm.
- Press the EXIT button to return to idle mode.
OGM Setting
- Press the MENU button to enter the program menu.
- Press the ▲ or ▼ buttons to select "OGM". And then press the OK button to select.
- Press the ▲ or ▼ buttons to select "OGM 1" or "OGM 2". And then press the OK button to select.
- Press the ▲ or ▼ buttons to select "PLAY", "RECORD" or "DEFAULT". And then press the OK button to confirm.
- Press the EXIT button to return to idle mode.
TAM Setting
- Press the MENU button to enter the program menu.
- Press the ▲ or ▼ buttons to select "TAM SETTING". And then press the OK button to select.
- Press the ▲ or ▼ buttons to select "TAM ON/OFF", "SET OGM", "SET RING", "TAM VOICE", "REMOTE CODE", or "TAM DEFAULT". And then press the OK button to confirm.
- Press the EXIT button to return to idle mode.
TAM On/Off
- Press the MENU button to enter the program menu.
- Press the ▲ or ▼ buttons to select "TAM". And then press the OK button to select.
- Press the ▲ or ▼ buttons to select "TAM SETTING". And then press the OK button to select.
- Press the ▲ or ▼ buttons to select "TAM ON/OFF". And then press the OK button to select.
- "ON" will be displayed. Press the OK button to confirm.
- Press the EXIT button to return to idle mode.
Set OGM Setting
- Press the MENU button to enter the program menu.
- Press the ▲ or ▼ buttons to select "TAM". And then press the OK button to select.
- Press the ▲ or ▼ buttons to select "TAM SETTING". And then press the OK button to select.
- Press the ▲ or ▼ buttons to select "SET OGM" And then press the OK button to select.
- "OGM 1" will be displayed. Press the ▲ or ▼ buttons to select "OGM 1" or "OGM 2". And then press the OK button to confirm.
- Press the EXIT button to return to idle mode.
Set Ring Setting
- Press the MENU button to enter the program menu.
- Press the ▲ or ▼ buttons to select "TAM". And then press the OK button to select.
- Press the ▲ or ▼ buttons to select "TAM SETTING". And then press the OK button to select.
- Press the ▲ or ▼ buttons to select "SET RING". And then press the OK button to select.
- "4 RINGS" will be displayed. Press the ▲ or ▼ buttons to select "2 RINGS", "3 RINGS", "4 RINGS", "5 RINGS", "6 RINGS" or "TIME SAVER". And then press the OK button to confirm.
- Press the EXIT button to return to idle mode.
Time Saver
When "TIME SAVER" is selected:
- If the unit has new messages, calls will be answered after 2 rings.
- If the unit has no new message, calls will be answered after 5 rings.

This feature allows a user to remotely check for new messages check for new messages without incurring any toll charge. The user can call in and listen for the number of rings before the machine answers. If the machine does not answer at 2 or 3 rings, then there is no new message. The user should hand up immediately to avoid any toll charge
TAM Voice Setting
- Press the MENU button to enter the program menu.
- Press the ▲ or ▼ buttons to select "TAM". And then press the OK button to select.
- Press the ▲ or ▼ buttons to select "TAM SETTING". And then press the OK button to select.
- Press the ▲ or ▼ buttons to select "TAM VOICE". And then press the OK button to select.
- "ENGLISH" will be displayed. Press the ▲ or ▼ buttons to select desired language. And then press the OK button to confirm.
- Press the EXIT button to return to idle mode.
Remote Code Setting
- Press the MENU button to enter the program menu.
- Press the ▲ or ▼ buttons to select "TAM". And then press the OK button to select.
- Press the ▲ or ▼ buttons to select "TAM SETTING". And then press the OK button to select.
- Press the ▲ or ▼ buttons to select "REMOTE CODE". And then press the OK button to select.
- "0000" will be displayed. Enter the PIN NUMBER (The factory default is "0000"). Press the OK button to confirm.
- Press the EXIT button to return to Idle mode.

The PIN number is very important. If you lost the PIN number, you can't restore to the factory default setting.
TAM Default Setting
- Press the MENU button to enter the program menu.
- Press the ▲ or ▼ buttons to select "TAM". And then press the OK button to select.
- Press the ▲ or ▼ buttons to select "TAM SETTING". And then press the OK button to select.
- Press the ▲ or ▼ buttons to select "TAM DEFAULT". And then press the OK button to select.
- "PIN?" will be displayed. Enter the PIN NUMBER. And then press the OK button to confirm.
OGM Setting
- Press the MENU button to enter the program menu.
- Press the ▲ or ▼ buttons to select "TAM". And then press the OK button to select.
- Press the ▲ or ▼ buttons to select "OGM". And then press the OK button to select.
- "OGM 1" will be displayed. Press the ▲ or ▼ buttons to select "OGM 1" or "OGM 2". And then press the OK button to confirm.
- "PLAY" will be displayed. Press the ▲ or ▼ buttons to select "PLAY", "RECORD" or "DEFAULT". And then press the OK button to confirm.
- Press the EXIT button to return to idle mode.
Telephone Answering Machine (TAM) Basic Information
There are approximately 30 minutes of total recording time. The maximum length of each message or memo is limited to 3 minutes. The answering machine is ready to use with the following default settings:
- English is the default voice prompt.
- Greeting message(OGM 1): "Your call can not be answered at the moment. Please leave a message after the tone."
- Answers all incoming calls on the 4th ring.
- No time stamping on new messages unless you have subscribed to phone company CID service or you have set the date/ time function.
- Remote Code(password) for remote message retrieval is "0000".
Selecting a Factory Out-Going Message (OGM)
Two factory OGMs are provided for greeting. The user can select either OGM 1 or OGM 2 as greeting message. (Factory default is OGM 1.)
OGM 1: "Your call can not be answered at the moment. Please leave a message after the tone".
OGM 2: "Your call can not be answered at the moment. Please call again later".
Customizing an OGM
Either factory provided OGM may be customized by the user.
- Press the MENU button to enter the program menu.
- Press the ▲ or ▼ buttons to select "OGM". And then press the OK button to confirm.
- Press the ▲ or ▼ buttons to select "RECORD".
- Press the OK button to recording the new OGM.
- When finish, press the OK button to stop recording (up to a 30 seconds of OGM may be recorded).
- The machine automatically re-plays your customized OGM: "Your new announcement is ......"
Reset to the Factory OGM
The user can delete any customized OGM and reset back to the factory OGM.
- Press the MENU button to select the OGM to listen to current OGM.
- While the current OGM is being played, press the DEL button to delete the customized OGM. This automatically resets to the original factory default OGM.

Factory default OGMs are resided in a non-volatile memory and can not be deleted
- The machine automatically re-plays the factory OGM: "Outgoing message 1(or 2) ......"
Record a Memo
The purpose of this function is to let the user record a reminder voice memo for someone to review later. This memo is treated as a recorded new message.
- Press the MENU button to enter the program menu.
- Press the ▲ or ▼ buttons to select "TAM". And then press the OK button to select.
- Press the ▲ or ▼ buttons to select "MESSAGE". And then press the OK button to select.
- "NEW MSG" will be displayed. Press the ▲ or ▼ buttons to select "MEMO". Press the OK button to start memo recording. The machine announces "Please speak after the tone". During the memo recording, press the OK button or EXIT button to end.
- You have a maximum of 3 minutes for recording. If no button is pressed, it will automatically finish recording at 3 minutes.
Incoming Call Message (ICM) Operation
-
During "Answer on" mode, incoming calls will be received by the answering machine. It plays the OGM followed by a beep tone, and the performs the recording.
-
The ICM recording will stop if any of the following events occur, i.e., 15 seconds of silence, busy tone, the 3 minute record time is used up, another extension handset is picked up, or press the button to answer the call.
-
If the 30 minute recording memory is full, an incoming call will be picked up by the machine, it will play back the OGM followed with "Sorry, memory is full" and then hangs up the line.
Call Intercept
You may intercept a call in the middle of recording by pressing the button on the handset any time.
Record a Conversation
Two-way conversation may be recorded from the handset.

Most state laws require the user to inform other party before recording.
To record a conversation while talking on a handset, press and hold the N° 6 button at the TELEPHONE KEYPAD for about 3 seconds to start recording. Press the button to stop and end call.
New Message Indication
- If there are new messages, the new message LED will be flashing. For example: A display of "1 NEW MSG" means there are 1 new messages.
- If there are both new and saved messages, the flashing digital display only shows the number of new messages.
- A non-flashing digital display indicates there are only saved messages and no new message.
Message Playback
- Press the MENU button to enter the program menu.
- Press the ▲ or ▼ buttons to select "TAM". And then press the OK button to select.
- Press the ▲ or ▼ buttons to select "MESSAGE". And then press the OK button to select.
- Press the ▲ or ▼ buttons to select "NEW MSG", "SAVED MSG". And then press the OK button to confirm.
- Press the button once, it will re-play the current message.
- Press the 11 button once, it will pause playing current message.
- Press the ➞ button once, it will jump to the next message.
Delete Messages
- During message playback, press the DEL button once to delete message. The machine will then play the next message.
- If you want to delete all the message, press the MENU button and enter the Sub-Menu option to select the "DELETE ALL" to delete all saved messages, the machine will announce "ALL message deleted".
Set Remote Code for Remote Message Retrieval
A remote code (password) is required to do remote message retrieval while away. The factory default remote code is "0000".
- Press the MENU button to enter the menu mode.
- Press the ▲ or ▼ buttons to select "TAM". And then press the OK button to select.
- "Message" will be displayed. Press the ▲ or ▼ buttons to select "TAM SETTING". Press the OK button to select.
- "TAM ON/OFF" will be displayed, press the ▲ or ▼ buttons to select "REMOTE CODE". And then press the OK button to select.
- The default code is "0000". You can change it to any 4-digit code. Then press the OK button to confirm and save.
Answering Machine Remote Operation While Away
Remote Message Retrieval:
This handset allows the user to retrieval messages while away. The remote code (default is "0000") must be entered at the end of the greeting message when you call in.
- Call your house/business where you have this handset. At the end of the greeting message, enter the 4 digit remote code using the phone keypad.

If you have forgotten to turn on the answering machine before you left, the machine will answer at the 20th ring so you can still do remote message retrieval.
-
Once you entered the correct remote code, and if there are new messages, the handset plays the following voice prompt: "You have XX new messages" and then starts playing back all new messages.
-
Or, if there is no new message, the handset plays the following voice prompt: "You have no new messages. To listen to main menu, press 1".
-
When you press 1, the following voice prompts will be announced: "To play new messages, press 2", "To play all messages, press 3", "To delete messages, press 4",

Pressing "4" in the middle of a message playback only deletes that message. However, pressing "4" at the end of all message playback deletes all saved messages but not new messages.
"To set answer on or off, press 5", "To record a new outgoing message, press 6", "To listen to the main menu again, press 1". To change the remote code, the user must press "9" and then follow voice prompts to enter the new code. For security reason, the initial voice prompt (to change remote code) is purposely not announced.
- If no pressing within eight seconds, the remote operation will be cancelled and disconnected.
Text and Digit Entry Table
The following tables show you where each letter and punctuation character can be found. Respective character table will be used when corresponding menu language is selected. This will be helpful when storing a name in the contacts and renaming your handset.
In editing mode, a cursor is displayed to indicate the current text entry position. It is positioned at the right of the last character entered.
Writing Tips:
- Once a character is selected, the cursor will move to the next position after a short pause.
- You can move the cursor within the text by the ▲ or ▼ buttons to amend the text entry.
- Press the DEL button to delete the last character.
English Character Set
| Button | Alphanumeric Editing(For contacts name editing and renaming handset) | Number Editing(For phone number editing, date/time editing) | |||||||||
| Button Press | 1st 2nd 3rd 4th 5th 6th 7th 8th 9th 10th | ||||||||||
| 1 space | < >* | 1 | |||||||||
| 2 A B C 2 | 2 | ||||||||||
| 3 D E F 3 | 3 | ||||||||||
| 4 G | H I | 4 4 | |||||||||
| 5 | J K L | 5 5 | |||||||||
| 6 | M | N | O 6 6 | ||||||||
| 7 P Q R S | 7 | 7 | |||||||||
| 8 | T U V | 8 8 | |||||||||
| 9 | W | X Y Z | 9 | 9 | |||||||
| 0 0 | ? & / | , | 0 | ||||||||
| * | * | ||||||||||
| # | #, or P (Pause) if press and hold | ||||||||||
Hints and Tips
ALWAYS check first that:
- You have followed all the steps listed in the user manual to install and set up your telephone.
• All connectors are firmly inserted in their sockets.
• Mains power to the base unit is switched on at the socket. - The handset's batteries are correctly and securely installed and are not run down.
Everyday use
I cannot make or answer calls
- If the handset's display is blank, it may have been switched off. Press and hold the Ⓞ button to switch it back on.
- Check that the base unit's mains power adapter is plugged in and power is switched on.
- The base unit needs mains power for normal operation of the phone. Not just for charging the batteries.
• Make sure you are using the telephone line cable supplied with your phone. Other telephone line cables might not work. Move the handset closer to the base unit. - Check the battery level symbol on the display. If it is low, replace the handset on the base unit or charging cradle to recharge the batteries.
- Switch off the power at the mains socket, wait for a short time and then switch back on. This may solve the problem.
I cannot make a call
- If the handset display shows KEYS LOCKED, press and hold the 🔒 button to unlock it before you make a call.
- Only one handset (or the base unit) can be connected to the outside line at a time. If another handset is already using the line, you need to wait until it has finished its call.
When I press on the keys, nothing happens
Make sure the batteries are fitted in your handset. If the Battery Level symbol on the display shows 'low', put your handset back on the base unit or charging cradle to charge.
When I key in a number, it appears on the display, but I cannot make an outside call
Try a different position for the base unit – somewhere higher if possible, or further from other electrical equipment.
The phone does not ring
- Check that the base unit's mains power adapter is plugged in and power is switched on.
- The base unit needs mains power for normal operation of the phone – not just for charging the batteries.
- Make sure you are using the telephone line cable that was supplied with your telephone.
My call was cut off when I went out of range. Now I can't use my handset
Move the handset closer to the base unit before you try again to make a call.
There is interference and noise on the line
- Move the handset closer to the base unit, or to a different position.
- Try moving the base unit so that it's not near other electrical equipment, such as a television or a computer.
- You'll get the best sound if you place the base unit as high as possible. For example, in a two-floor building, the first-floor landing is an ideal place.
I hear 'beeps' from my handset while I'm on a call
- You may be going out of range of the base unit. Move closer or your call may be cut off.
- Check the Battery Level symbol on the display. If it's low, recharge the batteries.
The Caller Display feature isn't working
- You need to subscribe to the Caller Display feature from your network service provider. You should find contact details on your phone bill.
- The caller may have withheld their number by dialing 141. Or they may be calling from a network that does not transmit the caller's number (e.g. if they are making international calls.)
When I try to make a call, I hear busy tone
If you're using a multi-handset system, check whether another handset is already on a call.
The volume in the earpiece is low when I'm on a call
- Make sure you're holding the earpiece correctly over your ear.
- Adjust the volume by pressing the ▲ or ▼ buttons.
Intercom and transfer
I can't transfer a call
• Make sure the other handset is in range of the base unit.
• Make sure you are dialing the correct number for the other handset.
Batteries
The handset's battery cells are running low within an hour or two
- Before you first use the handset, you should have left it on the base unit or charger pod for 15 hours to charge the batteries fully.
• You may need to replace the batteries. - Check the connection between the base unit and the mains power socket.
- "I try to recharge the batteries but I still get a warning that they are low" You need to replace the batteries.
- Dispose of used batteries safely – never burn them, or put them where they could get punctured.
- Do not use non-rechargeable batteries in your handset – they may explode, causing damage.
If the fault persists...
- Disconnect all other instruments connected to the same line and try to make a call.
- Disconnect the base unit from the telephone line and plug a different phone into the master telephone socket. Try making a call. If this works, the line is OK.
- If the call does not work, and you are using a two-way socket adapter, remove it and plug a telephone directly into the socket.
• If the call now works, the adapter may be faulty. - If you cannot make a call, the fault may be on the exchange line. Contact the service provider.
Specifications
| Frequency range 1.88 to 1.9 GHz (bandwidth = 20 MHz) | |
| Channel bandwidth 1.728 MHz | |
| Operating range Up to 300m outdoors; up to 50m indoors | |
| Operating time Standby: 100 hoursTalking: 10 hoursBattery charge time: 15 hours | |
| Temperature range Operating | 0°C to 40°CStorage -20°C to 60°C |
| Electrical power HANDSET – 3.7V 500mAh Li-Polymer rechargeable batteriesBASE UNIT – input AC 100-240V ~50-60Hz output7.5V 300mACHARGING CRADLE – AV 100-240V ~50-60Hz output 7.5V 300mA | |
| Port specification The power port (connect to the mains power supply) is a SELV port with respect to EN41003.The phone port (connected to the telephone line) is a TNV port with respect to EN41003. | |
PBX compatibility:
Timed break recall (flash): adjustable to 100ms (default), 250ms or 600ms
Pause length: 3 seconds
Dialling type: Tone (DTMF, dual tone multi-frequency) or Pulse (loop disconnect).
Network connection: This equipment is intended to be used in the UK only.
Operation on other countries' PSTN termination points cannot be guaranteed.
Safety First
For your continued safety and to reduce the risk of injury or electric shock, please follow all the safety precautions listed below.
- Read all instructions carefully before using the telephone and keep them for future reference.
- Retain the manual. If you pass the telephone onto a third party, make sure to include this manual.
- Follow all warnings and instructions marked on the telephone.
- Do not use the product near water for example near a bathtub, kitchen sink, etc.
- Place the product securely on a stable surface. Serious damage and/or injury may result if the product falls.
- Do not cover slots and openings on the telephone. They are provided for ventilation and protection against overheating. Never place the telephone near radiators, or in place where proper ventilation is not provided.
- Do not place objects on the telephone cable. Install the phone where no one can step or trip on the telephone cable.
- To reduce the risk of injury or electric shock, do not disassemble the telephone. Incorrect reassembly can cause electric shock when the product is subsequently used.
- During thunderstorms, avoid using telephones except cordless types. There may be a remote risk of an electric shock from lightning.
- Do not use the telephone to report a gas leak, when in the vicinity of the leak.
- Young children should be supervised to ensure that they do not play with the telephone.
- The telephone is not intended for use by persons (including children) with reduced sensory or mental capabilities, or lack of experience and knowledge unless they have been given supervision or instructions concerning the use of the phone by a person responsible of their safety.
- Battery - To reduce the disk of re or injury to persons, read and follow these instructions.
- Use only the battery(ies) specified. Do not dispose the battery(ies) in a fire. They may explode. Check with local council office for special disposal instructions not open or mutilate the battery(ies).
- Released electrolyte is corrosive and may cause burns or injury to the eyes or skin. The electrolyte may be toxic if swallowed.
• Exercise care when handling the battery(ies). Do not allow conductive materials such as rings, bracelets or keys to touch the battery(ies).
- Otherwise a short circuit may cause the battery(ies) and/or the conductive material to overheat and cause burns.
- Environment - Place the unit in a room where the temperature is between 0°C and 40°C. Allow 5cm clearance around the unit for proper ventilation.
- Avoid excessive smoke, dust, mechanical vibration, shock, or direct sunlight.
- Cleaning - Wipe the unit with a soft cloth. Do not use benzine, thinner, or any abrasive cleaners.
- If there is no sound - Disconnect the unit from the telephone line and connect a known working phone. If the known phone does not operate or have sound, then it could be the phone line issues. Please contact your telephone company for assistance.
- Moving your phone - Carefully pack your unit, preferably in the original packaging.
- Disposal - Old units still have some residual value. An environmentally friendly method of disposal will ensure that valuable raw materials can be recovered and used again. Up to date information concerning options of disposing of your old unit and packaging from the new one can be obtained from your local council office.
| If you require a replacement for any of the items listed below, please quote their corresponding part numbers: | |
| Replacement Part Part Number | |
| for S1TOTM11 and S2TOTM11 | |
| Handset S1TOTMHS | |
| Base Unit S1TOTMBS | |
| Mains Adapter S1TOTMMA | |
| Battery S1TOTMBA | |
| Telephone Linecord S1TOTMTL | |
| only for S2TOTM11 | |
| Handset S1TOTMHS | |
| Charging Cradle S2TOTMCC | |
DSG International Sourcing declares that the unit comply with the essential requirements and other relevant provisions of Directive 1999/5/EC.

Visit Partmaster.co.uk today for the easiest way to buy electrical spares and accessories. With over 1 million spares and accessories available we can deliver
direct to your door the very next day. Visit www.partmaster.co.uk or call 0844 800 3456 (UK customers only) Calls charged at National Rate.

natural_image
Symbol of a trash bin crossed with a diagonal line, no text or numbers presentThis symbol on the product or in the instructions means that your electrical and electronic equipment should be disposed at the end of its life separately from your household waste. There are separate collection systems for recycling in the EU.
For more information, please contact the local authority or your retailer where you purchased the product.
DSG Retail Ltd. • Maylands Avenue • Hemel Hempstead
Herts • HP2 7TG • England

bar
| Category | Value | |---|---| | Category 1 | 100 | | Category 2 | 100 | | Category 3 | 100 | | Category 4 | 100 | | Category 5 | 100 | | Category 6 | 100 | | Category 7 | 100 | | Category 8 | 100 | | Category 9 | 100 | | Category 10 | 100 | | Category 11 | 100 | | Category 12 | 100 | | Category 13 | 100 | | Category 14 | 100 | | Category 15 | 100 | | Category 16 | 100 | | Category 17 | 100 | | Category 18 | 100 | | Category 19 | 100 | | Category 20 | 100 | | Category 21 | 100 | | Category 22 | 100 | | Category 23 | 100 | | Category 24 | 100 | | Category 25 | 100 | | Category 26 | 100 | | Category 27 | 100 | | Category 28 | 100 | | Category 29 | 100 | | Category 30 | 100 | | Category 31 | 100 | | Category 32 | 100 | | Category 33 | 100 | | Category 34 | 100 | | Category 35 | 100 | | Category 36 | 100 | | Category 37 | 100 | | Category 38 | 100 | | Category 39 | 100 | | Category 40 | 100 | | Category 41 | 100 | | Category 42 | 100 | | Category 43 | 100 | | Category 44 | 100 | | Category 45 | 100 | | Category 46 | 100 | | Category 47 | 100 | | Category 48 | 100 | | Category 49 | 100 | | Category 50 | 100 | | Category 51 | 100 | | Category 52 | 100 | | Category 53 | 100 | | Category 54 | 100 | | Category 55 | 100 | | Category 56 | 100 | | Category 57 | 100 | | Category 58 | 100 | | Category 59 | 100 | | Category 60 | 100 | | Category 61 | 100 | | Category 62 | 100 | | Category 63 | 100 | | Category 64 | 100 | | Category 65 | 100 | | Category 66 | 100 | | Category 67 | 100 | | Category 68 | 100 | | Category 69 | 100 | | Category 70 | 100 | | Category 71 | 100 | | Category 72 | 100 | | Category 73 | 100 | | Category 74 | 100 | | Category 75 | 100 | | Category 76 | 100 | | Category 77 | 100 | | Category 78 | 100 | | Category 79 | 100 | | Category 80 | 100 | | Category 81 | 100 | | Category 82 | 100 | | Category 83 | 100 | | Category 84 | 100 | | Category 85 | 100 | | Category 86 | 100 | | Category 87 | 100 | | Category 88 | 100 | | Category 89 | 100 | | Category 90 | 100 | | Category 91 | 100 | | Category 92 | 100 | | Category 93 | 100 | | Category 94 | 100 | | Category 95 | 100 | | Category 96 | 100 | | Category 97 | 100 | | Category 98 | 100 | | Category 99 | 100 | | Total (Total) |
bar
| Category | Value | |---|---| | Category 1 | 100 | | Category 2 | 100 | | Category 3 | 100 | | Category 4 | 100 | | Category 5 | 100 | | Category 6 | 100 | | Category 7 | 100 | | Category 8 | 100 | | Category 9 | 100 | | Category 10 | 100 | | Category 11 | 100 | | Category 12 | 100 | | Category 13 | 100 | | Category 14 | 100 | | Category 15 | 100 | | Category 16 | 100 | | Category 17 | 100 | | Category 18 | 100 | | Category 19 | 100 | | Category 20 | 100 | | Category 21 | 100 | | Category 22 | 100 | | Category 23 | 100 | | Category 24 | 100 | | Category 25 | 100 | | Category 26 | 100 | | Category 27 | 100 | | Category 28 | 100 | | Category 29 | 100 | | Category 30 | 100 | | Category 31 | 100 | | Category 32 | 100 | | Category 33 | 100 | | Category 34 | 100 | | Category 35 | 100 | | Category 36 | 100 | | Category 37 | 100 | | Category 38 | 100 | | Category 39 | 100 | | Category 40 | 100 | | Category 41 | 100 | | Category 42 | 100 | | Category 43 | 100 | | Category 44 | 100 | | Category 45 | 100 | | Category 46 | 100 | | Category 47 | 100 | | Category 48 | 100 | | Category 49 | 100 | | Category 50 | 100 | | Category 51 | 100 | | Category 52 | 100 | | Category 53 | 100 | | Category 54 | 100 | | Category 55 | 100 | | Category 56 | 100 | | Category 57 | 100 | | Category 58 | 100 | | Category 59 | 100 | | Category 60 | 100 | | Category 61 | 100 | | Category 62 | 100 | | Category 63 | 100 | | Category 64 | 100 | | Category 65 | 100 | | Category 66 | 100 | | Category 67 | 100 | | Category 68 | 100 | | Category 69 | 100 | | Category 70 | 100 | | Category 71 | 100 | | Category 72 | 100 | | Category 73 | 100 | | Category 74 | 100 | | Category 75 | 100 | | Category 76 | 100 | | Category 77 | 100 | | Category 78 | 100 | | Category 79 | 100 | | Category 80 | 100 | | Category 81 | 100 | | Category 82 | 100 | | Category 83 | 100 | | Category 84 | 100 | | Category 85 | 100 | | Category 86 | 100 | | Category 87 | 100 | | Category 88 | 100 | | Category 89 | 100 | | Category 90 | 100 | | Category 91 | 100 | | Category 92 | 100 | | Category 93 | 100 | | Category 94 | 100 | | Category 95 | 100 | | Category 96 | 100 | | Category 97 | 100 | | Category 98 | 100 | | Category 99 | 100 | | Total (Total) |- Contents
- Unpacking 6
- Installing Your Phone 8
- Getting to Know Your Phone 10
- Operations 16
- Phonebook Setting 23
- Base Setting 26
- Handset Setting 28
- Telephone Answering Machine (TAM) Setting 33
- Telephone Answering Machine (TAM) Basic Information 37
- Text and Digit Entry Table 42
- Hints and Tips...... 43
- Specifications 46
- Safety First 47
- Unpacking
- Installing Your Phone
- Connecting the Base Unit
- Installing and charging the Batteries
- Handling the Batteries
- Getting to Know Your Phone
- Handset Overview
- LCD Display
- (Up) Button
- (Down) Button
- (Phonebook) / (Mate) Button
- /Button
- TELEPHONE KEYPAD
- /\* (Move Left) / Button
- DEL (Delete) / (Return) / RECALL Button
- MENU / OK / Button
- /EXIT Button
- (Keylock) / (Move Right) Button
- Base Unit Overview
- Display Icons and Symbols
- Menu Structure
- Menu Map
- Operations
- Registering the Handset
- Intercom Function
- Call Transfer
- Keypad Lock
- To Unlock Keypad
- Place a Call
- Place a Call with Speakerphone
- Answer a Call
- Answer a Call with Speakerphone
- If the handset is on the base:
- Dial One of 10 Redial Numbers
- Last Number Redial
- Pause Function
- Recall Function
- Low Battery Warning
- Paging Function
- Receiving A New Call
- Viewing The Caller Id List
- Call Waiting
- Message Waiting
- Delete the Message
- Placing a Call from the Caller List
- Saving the Name and Number from the Caller List into Phone Book
- Selective Deleting in the Caller List
- Deleting All Records in the Caller List
- Phonebook Setting
- Saving in the Phonebook
- Viewing the Phonebook
- Editing Name and Number in the Phonebook
- Placing Calls from the Phonebook
- Deleting a Stored Number
- Deleting All the Stored Number
- Phonebook Status
- Base Setting
- Deregister the Handset Setting
- Dial Mode Setting
- Flash Time Setting
- Modify PIN Setting
- BS Default Setting
- Handset Setting
- Alarm Setting
- Alarm Off
- Ring Set
- Tone Set
- Language Setting
- HS Label Setting
- Auto Answer Setting
- Date & Time Setting
- DATE FORMAT SETTING
- TIME FORMAT SETTING
- Contrast Setting
- Select Base Setting
- Handset Default Setting
- Telephone Answering Machine (TAM) Setting
- Message Setting
- OGM Setting
- TAM Setting
- TAM On/Off
- Set OGM Setting
- Set Ring Setting
- Time Saver
- TAM Voice Setting
- Remote Code Setting
- TAM Default Setting
- Telephone Answering Machine (TAM) Basic Information
- Selecting a Factory Out-Going Message (OGM)
- Customizing an OGM
- Reset to the Factory OGM
- Record a Memo
- Incoming Call Message (ICM) Operation
- Call Intercept
- Record a Conversation
- New Message Indication
- Message Playback
- Delete Messages
- Set Remote Code for Remote Message Retrieval
- Answering Machine Remote Operation While Away
- Remote Message Retrieval:
- Text and Digit Entry Table
- Hints and Tips
- ALWAYS check first that:
- Everyday use
- I cannot make or answer calls
- I cannot make a call
- When I press on the keys, nothing happens
- When I key in a number, it appears on the display, but I cannot make an outside call
- The phone does not ring
- My call was cut off when I went out of range. Now I can't use my handset
- There is interference and noise on the line
- I hear 'beeps' from my handset while I'm on a call
- The Caller Display feature isn't working
- When I try to make a call, I hear busy tone
- The volume in the earpiece is low when I'm on a call
- Intercom and transfer
- I can't transfer a call
- Batteries
- The handset's battery cells are running low within an hour or two
- If the fault persists...
- Specifications
- Safety First
Brand : Sandstrøm
Model : S2TOTM11
Category : Telephone