
F2WV9S8P2E - Washing machine LG - Free user manual and instructions
Find the device manual for free F2WV9S8P2E LG in PDF.


| Product Type | Front-Load Washing Machine |
| Model Number | F2WV9S8P2E |
| Brand | LG |
| Capacity | 8 kg |
| Dimensions (W x D x H) | 600 x 550 x 850 mm |
| Net Weight | 70 kg |
| Power Supply | 220-240 V, 50 Hz, 10 A |
| Energy Consumption | 0.80 kWh per cycle (Eco 40-60) |
| Water Consumption | 45 L per cycle (Eco 40-60) |
| Spin Speed | Up to 1400 rpm |
| Motor Type | Inverter Direct Drive |
| Key Functions | AI DD, Steam, TurboWash 360°, Allergy Care, Rapid 14 |
| Control Type | Touch + Dial |
| Display | Digital LED |
| Door Opening | Side opening (left to right) |
| Water Supply | Cold and hot water (optional) |
| Noise Level (Wash/Spin) | 54 dB / 72 dB |
| Safety Features | Child Lock, Door Lock, Overheating Protection, Leakage Protection |
| Maintenance | Clean drain filter monthly; clean detergent drawer regularly; run tub clean cycle |
| Spare Parts Available | Drum, motor, pump, door seal, control board, inlet valve |
| Reparability Index | 8.0/10 |
| Warranty | 2 years parts and labor |
| Included Accessories | Installation guide, user manual, inlet hose, drain hose |
Frequently Asked Questions - F2WV9S8P2E LG
User questions about F2WV9S8P2E LG
0 question about this device. Answer the ones you know or ask your own.
Ask a new question about this device
Download the instructions for your Washing machine in PDF format for free! Find your manual F2WV9S8P2E - LG and take your electronic device back in hand. On this page are published all the documents necessary for the use of your device. F2WV9S8P2E by LG.
USER MANUAL F2WV9S8P2E LG


SAFETY INSTRUCTIONS
READ ALL INSTRUCTIONS BEFORE USE


SAFETY INSTRUCTIONS
5
- Do not modify the plug provided with the device. If your outlet does not match the plug, call a qualified electrician to install an appropriate outlet.
- This device is equipped with a power cord that has an equipment grounding conductor (grounding pin) and a grounding plug. The plug must be connected to a suitable power outlet that is properly installed and grounded in accordance with all local codes and regulations.
- Improper connection of the equipment grounding conductor can result in a risk of electric shock. Check with a qualified electrician or service personnel if you are in doubt as to whether the device is properly grounded.
- The device must not be installed behind a lockable door, sliding door, or a door with hinges on the opposite side of the device in such a way that the full opening of the device door is restricted.
Operation
- Do not touch the control panel with sharp objects to operate the washing machine.
- Do not attempt to separate the panels or disassemble the washing machine.
- Do not repair or replace any part of the device. All repairs and servicing must be performed by qualified service personnel, unless specifically recommended in this user manual. Use only approved factory parts.
- Do not push the door too hard when the device door is open.
- Do not put live animals in the product. The animal may suffocate.
- Do not wash carpets, mats, shoes, pet blankets, stuffed toys, or any other items other than clothing and sheets in this machine.
- Keep flammable materials such as fibers, paper, rags, chemicals, and the like away from the space below and around the appliance.
- Do not leave the appliance door open. Children could hang on the door or crawl into the appliance, which could cause damage or injury.
- Do not insert, wash, or dry items that have been cleaned, washed, soaked, or stained with flammable or explosive substances (such as


6 SAFETY INSTRUCTIONS
wax, oil, paint, gasoline, degreasers, dry cleaning solvents, kerosene, stain removers, turpentine, vegetable oil, cooking oil, acetone, alcohol, etc.). Improper use may cause fire or explosion.
- Do not use or store flammable or combustible substances (ether, benzene, alcohol, chemicals, LPG, flammable spray, gasoline, thinner, petroleum, insecticide, air freshener, cosmetics, etc.) near the appliance.

Maintenance


8 SAFETY INSTRUCTIONS
- The most energy-efficient programs are generally those that run at lower temperatures and for longer durations.
- Noise and residual moisture content are affected by the spin speed: the higher the spin speed in the spin phase, the higher the noise and the lower the residual moisture content.
- Loading the laundry evenly up to the weight specified by the manufacturer for the corresponding programs will contribute to energy and water savings.
- When washing smaller loads, the automatic load detection system will reduce water and energy consumption.
- Use the quick program for small loads of lightly soiled laundry.
- Detergents for washing in cold water are effective at low temperatures (around 20 °C). Using a temperature setting of 20 °C will use less energy than settings of 30 °C or higher.
Detergent
- The detergent should be selected according to the type, color, and degree of soiling of the fabric, as well as the washing temperature. It is necessary to follow the usage instructions provided by the detergent manufacturer. Use only detergents suitable for front-loading washing machines.
- For smaller loads, use less detergent.
- Partial load: 1/2 of the normal amount.


Disposal of the old appliance

- This symbol of a crossed-out wheeled bin indicates that waste electrical and electronic products (WEEE) must be disposed of separately from municipal waste.
- End-of-life electrical products may contain hazardous substances, so proper disposal of your old appliances will help prevent potential negative consequences for the environment and human health. Your old appliance may contain parts that can be reused to repair other products and other valuable materials that can be recycled, thus conserving limited resources.
- Depending on the level of interference/damage and the age of the item, old products can be repaired for a longer working life, which will prevent waste. Products that are not suitable for reuse can be recycled to recover valuable resources and help reduce the global consumption of new raw materials.
- You can take the appliance to the store where you purchased the product, or you can contact the waste disposal office at your local authorities to find out more information about the nearest authorized WEEE collection center. For the latest information from your country, visit the website www.lg.com/global/recycling




10 INSTALLATION
INSTALLATION
1 Control panel ② Detergent dispenser drawer 3 Drum 4 Door 5 Cover lid 6 Drain plug 7 Drain pump filter 8 Leveling feet
Rear view


Accessories
*1 Included accessories vary depending on the purchased model.
1
2
3
4
5
6
| 1 | Dovodno crijevo za hladnu vodu | 4 | Podloge protiv klizanja*1 |
| 2 | Ključ | 5 | Kutni držač za pričvršćivanje odvodnog crijeva |
| 3 | Poklopci za pokrivanje otvora matičnih vijaka za prijevoz | 6 | Spojnica*1 |
CROATIAN
Technical data
| Model F2WV9S8P2E | |
| Napajanje 220 – 240 V~, 50 Hz | |
| Težina proizvoda 60 kg |
Dimensions (mm)


| W 600 | D 475 D" 1015 | ||||
| H | 8 | 5 | 0 | D | ' 5 |
12 INSTALLATION
- To prevent vibration, we recommend placing rubber plugs at least 15 mm thick under each leg of the appliance, secured with screws to at least two floor joists.
- If possible, place the washing machine in a corner of the room where the floor is most stable.
- Install rubber rings to reduce vibration.
CAUTION
- Check that the drum holder 1* is removed together with the base and make sure it is not stuck to the bottom of the appliance.
- If you need to lower the appliance to remove the cardboard base ②, always protect the side of the appliance and carefully lay it on its side. Do not lower the appliance onto its front or back.
Removing the transport bolt assemblies
To prevent dangerous vibrations and damage to the appliance, remove the transport bolts and clamps.


14 INSTALLATION
2 Remove the bolt assemblies while gently moving the appliance up and down and left and right.
3 Install the hole covers.
- Locate the hole covers ② included in the accessory kit or attached to the rear.

NOTE
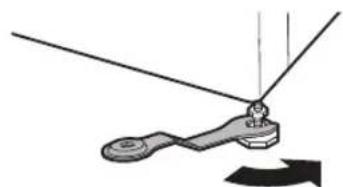
3 Secure the adjustable feet with the lock nuts ② by turning them counterclockwise toward the bottom of the appliance.

4 Check that all nuts on the bottom of the washer are properly tightened.
NOTE
- Proper installation and leveling of the washer will ensure long, regular, and reliable operation.
- The appliance must be 100% horizontal and stand firmly on a hard and flat floor.
- It must not "rock" over the edges under load.
- Make sure the feet of the washer do not get wet. Otherwise, vibrations or noise may occur.
- Use a dry cloth to remove and clean foreign objects and moisture. If moisture remains, the anti-slip pads may slip.
2 Adjust the level after placing the appliance in the installation area.
3 Attach the adhesive side of the anti-slip pads to the floor.
- The most effective way to install the anti-slip pads is to place them under the front legs of the washing machine. If it is not possible to place the pads under the front legs, attach them under the rear legs.

4 Place the washing machine on the anti-slip pads.
- Do not attach the adhesive side of the anti-slip pads to the legs of the washing machine.
NOTE
- Additional anti-slip pads can be obtained from the LG Electronics service center.
Using the anti-slip pads


16 INSTALLATION
NOTE
- Do not overtighten the water supply hose or use mechanical devices to secure it to the inlet valves.
- No additional backflow protection is required for connection to the water supply.
NOTE
- For models with only one water inlet valve, do not connect the hose to hot water. Connect it only to cold water.
NOTE
- If water leaks from the hose after connection, repeat the procedure. Use a standard type of faucet for the water supply. If the faucet is square or too large, remove the guide before inserting the faucet into the adapter.
- Make sure the hose is not bent or trapped.


- Properly securing the drain hose will protect the floor from damage caused by water leakage.


18 OPERATION
OPERATION
Operation overview
3 Close the door.
CAUTION
4 Add cleaning products or detergent and softener.
- Add the correct amount of detergent to the detergent dispenser. If desired, add bleach or fabric softener to the appropriate parts of the dispenser.

- Then select the wash temperature and spin speed. Pay attention to the garment care labels.

7 Start the cycle.


20 OPERATION
Control panel


22 OPERATION


Preparing laundry for washing
- Wash delicate items (nylons, underwear) in a laundry net.
- Close zippers, hooks, and ties to ensure these items do not get caught on other clothing.
- Before washing, brush off dirt and stains with a small amount of diluted detergent to help lift the dirt.




Adding detergents and softeners
Dosing detergent
- Detergent should be used according to the detergent manufacturer's instructions and selected according to
the fabric type, color, level of soiling, and washing temperature. Use only detergents suitable for front-loading washing machines.
- If too much foam appears, reduce the amount of detergent.
- If too much detergent is used, excessive foam may form, leading to poor washing results or causing heavy strain on the motor.
- If you want to use liquid detergent, follow the guidelines provided by the detergent manufacturer.
- You can pour liquid detergent directly into the main detergent drawer if you start the wash cycle immediately.
- Do not use liquid detergent if you have activated the Delay End function or selected the Pre Wash option, as the liquid will be dispensed immediately and may harden in the drawer or drum.
① Main wash detergent compartment 2 Pre-wash detergent compartment 3 Liquid fabric softener compartment
3 Before starting the cycle, carefully close the detergent dispenser drawer.
- Closing the drawer roughly or forcefully may cause detergent to overflow into another compartment or to be released into the drum earlier than programmed.
- Be careful not to pinch your hand while closing the drawer.


- It is normal for a small amount of water to remain in the dispenser compartments at the end of the cycle.
Fabric softener compartment


26 WASH
Program table
Wash program
| Cotton (Pamuk) | 40 °C (Cold (Hladno) do 95 °C) | Maksimalno punjenje: nazivno | |
| Opis | Pere normalno zaprljanu odjeću kombiniranjem različitih kretnji bubnja.Pritiskom tipkPokretanje/Zaustavljanjebez odabira programa uzrokovat će trenutno pokretanje programa Cotton (Pamuk) uz zadane postavke. | ||
| Eco 40-60 (Eko 40-60) | 40 °C (40 °C do 60 °C) | Maksimalno punjenje: nazivno | |
| Opis | Pranje normalno zaprljane pamučne odjeće koja ima oznaku za pranje na temperaturama 40 °C ili 60 °C. | ||
| TurboWash 39 | 40 °C (Cold (Hladno) do 60 °C) | Maksimalno punjenje 4 kg | |
| Opis Uporabom | 4 mlaznice za vodu tijekom pranja i ispiranja ova perilica može oprati polovicu punjenja lagano zaprljane odjeće za približno 39 minuta. | ||
| Mixed Fabric (Mješovita tkanina) | 40 °C (Cold (Hladno) do 60 °C) | Maksimalno punjenje 4 kg | |
| Opis Istodobno | pranje miješanih tkanina. Upotrebljavajte za različite vrste tkanina osim posebnih odjevnih predmeta (svila/ osjetljivo rublje, sportska odjeća, tamna odjeća, vuna, posteljina/zastori). | ||
| Easy Care (Sintetika) | 40 °C (Cold (Hladno) do 60 °C) | Maksimalno punjenje 4 kg | |
| Opis | Pranje odjeću koja se nakon pranja ne mora glačati.• Upotrebljavajte za rublje od poliamida, akrila, poliestera. | ||
| Silent Wash (Tiho pranje) | 40 °C (Cold (Hladno) do 60 °C) | Maksimalno punjenje 4 kg | |
| Opis | Pranje odjeće uz manje buke i vibracija nego drugi programi pranja.Koristite za lagano zaprljano bijelo pamučno (donje) rublje. | ||
| Allergy Care (Antialergijski program) | 60 °C Maksimalno punjenje 4 kg | ||
| Opis | Pomaže u smanjenju količini tvari koje uzrokuju alergijske reakcije. • Upotrebljavajte za pamuk, donje rublje, jastučnice, plahte, odjeću za bebe. | ||


| Delicates (Osjetljivo rublje) | 20 °C (Cold (Hladno) do 40 °C) | Maksimalno punjenje 1,5 kg | |
| Opis | Pere donje rublje i prozirnu i čipkastu odjeću koja se može prati u perilici rublja. | ||


28 WASH
Additional options
*1 This option is automatically enabled in the program and cannot be cancelled.
NOTE
- For each wash program in the table below, the options Rinse+ (Extra Rinse), Delay End (Time Delay), and Add Item (Add Garments Later) can be selected.
- The Intensive option can be selected for each wash program in the table below, except for the TurboWash 39 and Speed 14 (Quick Program 14) programs.
| Program | Steam (Vodena para) | Wrinkle Care (Njega za manje nabora) | TurboWash | Pre Wash (Pretpranje) |
| Cotton (Pamuk) | ● | ● | ● | ● |
| Eco 40-60 (Eko 40-60) | ● | ● | ● | ● |
| TurboWash 39 | ● | ● | ●*1 | ● |
| Mixed Fabric (Mješovita tkanina) | ● | ● | ● | ● |
| Easy Care (Sintetika) | ● | ● | ● | ● |
| Silent Wash (Tiho pranje) | ● | ● | ● | |
| Allergy Care (Antialergijski program) | ●*1 | |||
| Delicates (Osjetljivo rublje) | ● | |||
| Hand/Wool (Ručno pranje/ vuna) | ||||
| Sportswear (Sportska odjeća) | ● | |||
| Speed 14 (Brzi pogram 14) | ●*1 | |||
| Duvet (Posteljina) | ● |
Possibility to select the maximum spin speed
| Program | Brzina centrifuge | |
| Zadano Dostupno | ||
| Cotton (Pamuk) | 1200 okretaja u minuti Sve | |
| Eco 40-60 (Eko 40-60) | 1200 okretaja u minuti Sve | |
| TurboWash 39 | 1200 okretaja u minuti 400 do 1200 opm | |
| Mixed Fabric (Mješovita tkanina) | 1000 okretaja u minuti Sve | |
| Easy Care (Sintetika) | 1200 okretaja u minuti Sve | |
| Silent Wash (Tiho pranje) | 800 okretaja u minuti Do 1000 okretaja u minuti | |
| Allergy Care (Antialergijski program) | 1200 okretaja u minuti Sve | |
| Delicates (Osjetljivo rublje) | 800 okretaja u minuti Do 800 okretaja u minuti | |
| Hand/Wool (Ručno pranje/vuna) | 800 okretaja u minuti Do 800 okretaja u minuti | |
| Sportswear (Sportska odjeća) | 800 okretaja u minuti Do 800 okretaja u minuti | |
| Speed 14 (Brzi pogram 14) | 400 okretaja u minuti Sve | |
| Duvet (Posteljina) | 1000 okretaja u minuti Do 1000 okretaja u minuti | |
NOTE


32 WASHING
Steam
Adding this option helps achieve better cleaning results.
Wrinkle Care
2 Select a wash program. 3 If desired, press the Delay End button. 4 Press the Start/Pause button.
NOTE


34 SMART FUNCTIONS
SMART FUNCTIONS
LG ThinQ Application
The LG ThinQ application allows you to communicate with the appliance using a smartphone.
LG ThinQ Application Features
Communicate with the washing machine using a smartphone and take advantage of convenient smart features.
Remote Start
3 Connect your smartphone to the wireless router.

- To check the Wi-Fi connection, check whether the icon on the control panel is lit.
- The device supports only 2.4 GHz Wi-Fi networks. To check the network frequency, contact your internet service provider or refer to the wireless router manual.
- LG ThinQ is not responsible for any network connection problems or any errors, malfunctions, or failures caused by the network connection.
- If the device has trouble connecting to the Wi-Fi network, it may be too far from the router. Get a Wi-Fi repeater (range extender) to improve the Wi-Fi signal strength.
- The Wi-Fi connection may not be established or may be interrupted due to the home network environment.
- The network connection may not work properly, depending on the internet service provider.
- The surrounding wireless environment may cause the wireless network to operate slowly.
- The device cannot be registered due to a wireless signal transmission problem. Turn off the device and wait about a minute before trying again.
- If the firewall is enabled on the wireless router, disable the firewall or add an exception.
- The wireless network name (SSID) should contain a combination of Latin letters and numbers. (Do not use special characters.)
- The smartphone user interface (UI) may vary depending on the mobile operating system (OS) and manufacturer.
- If the router's security protocol is set to WEP, you may not be able to set up the network. Change to other security protocols
(WPA2 is recommended) and register the product again.


Press and hold the Remote Start button for 3 seconds to enable this remote control function. 4 Start the cycle from the LG ThinQ app on your smartphone.
NOTE
- When this function is enabled, the cycle can only be started from the LG ThinQ app on your smartphone. If the cycle is not started, the appliance will wait to start the cycle until the remote control is turned off from the app or this function is disabled.
- If the door is open, you cannot start the cycle remotely.

38 MAINTENANCE
MAINTENANCE
⚠ WARNING
⚠ WARNING
Cleaning the drain pump filter and performing emergency water drain
40 MAINTENANCE
3 First, remove the drain plug from the drain hose ①, and then drain the water. Then slowly unscrew the drain pump filter ② to drain the remaining water, and then remove any dirt or objects from the filter.



44 TROUBLESHOOTING
Smart Diagnosis ....41
MAINTENANCE



12 INSTALLATION
Accessories


NOTE


16 INSTALLATION
NOTE
NOTE



18 INSTALLATION
NOTE




bg_main.book.book Page 19 Friday, January 8, 2021 4:37 PM
INSTALLATION


20 OPERATION
OPERATION
3 Close the door.
WARNING


22 OPERATION
Control panel




OPERATION

OPERATION
NOTE


Program table
Washing program

OPERATION
NOTE


OPERATION


NOTE


NOTE


MAINTENANCE
MAINTENANCE
WARNING


MAINTENANCE


TROUBLESHOOTING
TROUBLESHOOTING

TROUBLESHOOTING


48 TROUBLESHOOTING


TROUBLESHOOTING


50 TROUBLESHOOTING


52 TROUBLESHOOTING
Odor


Note
USER MANUAL
WASHING MACHINE

Smart Diagnosis ....36
MAINTENANCE

SAFETY INSTRUCTIONS
READ ALL INSTRUCTIONS BEFORE USING THE APPLIANCE


SAFETY INSTRUCTIONS
5


6 SAFETY INSTRUCTIONS


Maintenance


10 INSTALLATION
INSTALLATION

Accessories

CAUTION
• You can purchase rubber feet from the LG service center (part no. 4620ER4002B).
Ventilation
CAUTION

CAUTION
4 Check that all locking nuts under the appliance are properly tightened.
CAUTION
4 Place the appliance on the anti-slip pads.


16 INSTALLATION
WARNING
WARNING




18 USE
USE
Overview of use
Using the appliance
3 Close the door.
CAUTION
4 Add detergent and fabric softener.
5 Press the Power button to switch on the appliance.



USE


20 USE
Control panel


22 USE



24 USE
1 Main wash compartment 2 Pre-wash compartment 3 Liquid fabric softener compartment


Fabric softener compartment


26 USE
Program table
Washing program


Standard programs
| Programm | kg | h:mm | kWh | °C | liitrit | p/min | % |
| Cotton (Puuvill) 20 °C | 8,5 1:38 | 0,106 23 42 | 4 1150 58,5 | ||||
| Cotton (Puuvill) 60 °C | 8,5 | 2:38 | 0,850 38 | 41,2 1150 58,5 | |||
| Mixed Fabric (Segakangapesu) | 4 1:21 | 0,658 42 49 | 6 1000 62,9 | ||||
| Speed 14 (Kiirpesu 14) | 2 0:14 | 0,047 | 23 26,6 40 | 0 101,0 | |||
| Cotton (Puuvill) 40 °C + Intensive (Intensiiv) | 8,5 2:57 | 0,235 25 52 | 5 1150 58,5 | ||||
| Eco 40-60 (Öko 40-60) (Täis)*1 | 8,5 3:43 | 0,860 37 70 | 0 1170 53,0 | ||||
| Eco 40-60 (Öko 40-60) (Pool)*1 | 4,25 | 2:51 0,380 | 28 | 49,0 1170 52,0 | |||
| Eco 40-60 (Öko 40-60) (Veerand)*1 | 2 2:30 | 0,188 25 28 | 0 1170 53,0 |


32 USE
CAUTION


CAUTION
Child Lock


34 SMART FUNCTIONS
SMART FUNCTIONS
LG ThinQ app



CAUTION


36 SMART FUNCTIONS
WARNING


38 MAINTENANCE
MAINTENANCE
DANGER


40 MAINTENANCE
MAINTENANCE
41
42 TROUBLESHOOTING
TROUBLESHOOTING



46 TROUBLESHOOTING


Operation


48 TROUBLESHOOTING
Odor
TROUBLESHOOTING


1 Control panel
1 Power plug


12 INSTALLATION
Accessories


NOTE
NOTE


18 INSTALLATION
NOTE

INSTALLATION
RUSSIAN


20 OPERATION
OPERATION
3 Close the door.
⚠️ WARNING!
7 Starting the wash cycle.


22 OPERATION
Control panel


26 OPERATION


28 OPERATION


Program table
Wash program


30 OPERATION


32 OPERATION
| Программа | Steam(Паровой) | Wrinkle Care(Без складок) | TurboWash | Pre Wash(Предв. стирка) |
| Allergy Care(Гипоаллергенная) | *1 | |||
| Delicates(Деликатная) | ||||
| Hand/Wool(Шерсть) | ||||
| Sportswear(Спортивная) | ||||
| Speed 14(Быстро 14) | *1 | |||
| Duvet (Пуховые вещи) |

34 OPERATION


NOTE








LG
Life's Good
- SAFETY INSTRUCTIONS
- READ ALL INSTRUCTIONS BEFORE USE
- OPERATION
- MAINTENANCE
- DETERGENT
- DISPOSAL OF THE OLD APPLIANCE
- INSTALLATION
- ACCESSORIES
- TECHNICAL DATA
- CAUTION
- REMOVING THE TRANSPORT BOLT ASSEMBLIES
- NOTE
- USING THE ANTI-SLIP PADS
- OPERATION OVERVIEW
- START THE CYCLE
- CONTROL PANEL
- PREPARING LAUNDRY FOR WASHING
- ADDING DETERGENTS AND SOFTENERS
- DOSING DETERGENT
- FABRIC SOFTENER COMPARTMENT
- WASH
- PROGRAM TABLE
- WASH PROGRAM
- ADDITIONAL OPTIONS
- WASHING
- STEAM
- WRINKLE CARE
- SMART FUNCTIONS
- LG THINQ APPLICATION
- LG THINQ APPLICATION FEATURES
- REMOTE START
- ⚠ WARNING
- CLEANING THE DRAIN PUMP FILTER AND PERFORMING EMERGENCY WATER DRAIN
- TROUBLESHOOTING
- WARNING
- WASHING PROGRAM
- USER MANUAL
- WASHING MACHINE
- READ ALL INSTRUCTIONS BEFORE USING THE APPLIANCE
- VENTILATION
- USE
- OVERVIEW OF USE
- USING THE APPLIANCE
- CHILD LOCK
- LG THINQ APP
- DANGER
- ⚠️ WARNING
- STARTING THE WASH CYCLE
Brand : LG
Model : F2WV9S8P2E
Category : Washing machine