
F4DV910H2EA - Washing machine LG - Free user manual and instructions
Find the device manual for free F4DV910H2EA LG in PDF.


| Product Type | Front-load Washing Machine |
| Brand | LG |
| Model | F4DV910H2EA |
| Capacity | 9 kg |
| Spin Speed | 1400 rpm |
| Dimensions (W x H x D) | 600 x 850 x 550 mm |
| Weight | 70 kg |
| Power Supply | 220-240 V, 50 Hz, 2000 W |
| Energy Class | A+++ |
| Noise Level (Wash/Spin) | 74 dB / 72 dB |
| Motor Type | Inverter Direct Drive |
| Key Technologies | AI Direct Drive, TurboWash 360, Steam, 6 Motion |
| Smart Features | LG ThinQ (Wi-Fi), Smart Diagnosis |
| Safety Features | Child Lock, Anti-Flood Protection, Unbalanced Load Detection |
| Maintenance | Clean Filter, Drain Pump Filter, Drum Clean (Tub Clean) |
| Spare Parts | Door Seal, Drain Pump, Inverter Motor, Drum Bearings |
| Repairability Index | 8.2 / 10 |
Frequently Asked Questions - F4DV910H2EA LG
User questions about F4DV910H2EA LG
0 question about this device. Answer the ones you know or ask your own.
Ask a new question about this device
Download the instructions for your Washing machine in PDF format for free! Find your manual F4DV910H2EA - LG and take your electronic device back in hand. On this page are published all the documents necessary for the use of your device. F4DV910H2EA by LG.
USER MANUAL F4DV910H2EA LG


SAFETY INSTRUCTIONS
READ ALL INSTRUCTIONS BEFORE USE


- Fabric softeners or similar products should be used in accordance with the instructions on the fabric softener.
- Remove all items from pockets such as lighters and matches.
- The appliance must not be used if industrial chemicals have been used for cleaning.
Installation
- Never attempt to operate the appliance if it is damaged, malfunctioning, partially disassembled, or if it has missing or broken parts, including a damaged cord or plug.
- The appliance should be carried by two or more people holding it securely.
- Do not place the appliance in a damp or dusty location. Do not place the appliance outdoors or in any area subject to weather conditions such as sunlight, wind, or rain, or temperatures below freezing.
- Make sure the power plug is fully inserted into the outlet.
- Do not connect the appliance to multiple outlets, power strips, or extension cords.
- Do not modify the plug provided with the appliance. If your outlet does not match the plug, call a qualified electrician to install an appropriate outlet.
- This appliance is equipped with a power cord that has an equipment grounding conductor and a grounding plug. The plug must be connected to an appropriate outlet that is properly installed and grounded in accordance with all local codes and ordinances.
- Improper connection of the equipment grounding conductor can result in a risk of electric shock. Check with a qualified electrician or service personnel if you are in doubt as to whether the appliance is properly grounded.
- The appliance must not be installed behind a lockable door, sliding door, or a door with a hinge on the opposite side of the appliance, so that the full opening of the appliance door is restricted.


6 SAFETY INSTRUCTIONS
Operation
- Do not touch the control panel with sharp objects to operate the washing machine.
- Do not attempt to separate the panels or disassemble the washing machine.


SAFETY INSTRUCTIONS
7


8 SAFETY INSTRUCTIONS
If you install the appliance in a location, contact the LG Electronics customer information center.
Disposal


SAFETY INSTRUCTIONS
9
- Detergents for washing clothes in cold water are effective at low temperatures (around 20 °C). Using a temperature setting of 20 °C will use less energy than settings of 30 °C or higher.
Detergent
- Detergent should be chosen according to the type, color, soiling of the fabric, and washing temperature. Follow the usage instructions provided by the detergent manufacturer. Use only detergents suitable for front-loading washing machines.
- For a smaller load, use less detergent.
- Partial load: 1/2 of the normal amount.


10 SAFETY INSTRUCTIONS
Disposal of your old appliance

- This crossed-out wheeled bin symbol indicates that waste electrical and electronic products (WEEE) must be disposed of separately from municipal waste.
- End-of-life electrical products may contain hazardous substances, so correct disposal of your old appliance will help prevent potential negative consequences for the environment and human health. Your old appliance may contain parts that can be reused to repair other products and other valuable materials that can be recycled to conserve limited resources.
- Depending on the level of interference/damage and the age of the item, old products can be repaired for a longer working life, which will prevent avoidable waste. Products that are not suitable for reuse can be recycled to recover valuable resources and help reduce global consumption of new raw materials.
- You can take the appliance to the store where you purchased the product, or you can contact the waste disposal office at your local authorities to find out more information about the nearest authorized WEEE collection center. For the latest information from your country, visit www.lg.com/global/recycling
INSTALLATION
① Control panel ② Detergent dispenser drawer ③ Drum ④ Door ⑤ Cover lid ⑥ Drain plug ⑦ Drain pump filter ⑧ Leveling feet
Rear view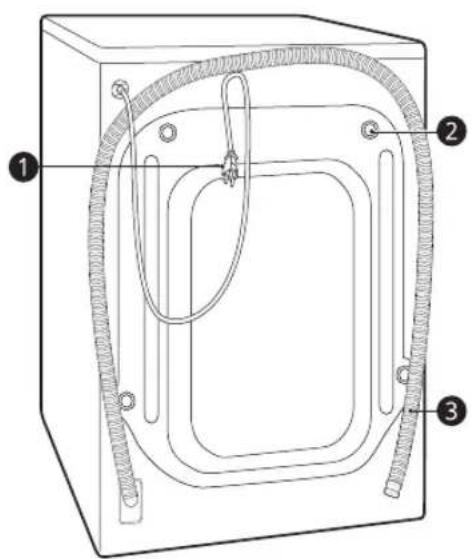

12 INSTALLATION
Technical specifications
| Model F4DV910H2EA | |
| Napajanje 220 – 240 V~, 50 Hz | |
| Težina proizvoda 73 kg |
Dimensions (mm)


| W 600 | D 565 D" 1100 | ||||
| H | 8 | 5 | 0 | D | ' 6 |


Accessories
*1 Included accessories vary depending on the purchased model.
 Dovodno crijevo za hladnu vodu Podloge protiv klizanja*1 Dovodno crijevo za hladnu vodu Podloge protiv klizanja*1 |  |
 Ključ Ključ |  Kutni držač za pričvršćivanje odvodnog crijeva Kutni držač za pričvršćivanje odvodnog crijeva |
 Poklopci za pokrivanje otvora matičnih vijaka za prijevoz Traka vezice*1 Poklopci za pokrivanje otvora matičnih vijaka za prijevoz Traka vezice*1 | 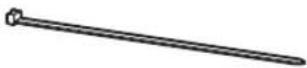 |


14 INSTALLATION
- To prevent vibration, we recommend placing rubber plugs at least 15 mm thick ① under each leg of the appliance, secured with screws to at least two floor joists.
- If possible, place the washing machine in a corner of the room where the floor is most stable.
- Install the rubber rings to reduce vibration.



CAUTION
- Check that the drum holder 1* is removed along with the base and make sure it is not stuck to the bottom of the appliance.
- If you need to lower the appliance to remove the cardboard base ②, always protect the side of the appliance and carefully lay it on its side. Do not lower the appliance onto its front or back.
Removing the transit bolt assemblies
To prevent dangerous vibrations and damage to the appliance, remove the transit bolts and clamps.
2 Remove the bolt assemblies while gently moving them up and down and left and right.
3 Install the hole covers.
- Find the hole covers ② included in the accessory kit or attached to the back.

NOTE

3 Secure the adjustable feet with the lock nuts ② by turning them counterclockwise toward the bottom of the appliance.

4 Check that all the nuts on the bottom of the washing machine are securely tightened.
NOTE
- Proper installation and leveling of the washing machine will ensure long, regular, and reliable operation.
- The appliance must be 100% horizontal and stand firmly on a hard, flat floor.
- It must not "rock" over the edges under load.
- Make sure the washing machine's feet do not get wet. Otherwise, vibrations or noise may occur.
- Use a dry cloth to remove and clean foreign objects and moisture. If moisture remains, the anti-slip pads may slip.
2 Adjust the level after placing the appliance in the installation area.
3 Attach the adhesive side① of the anti-slip pad to the floor.
- The most effective way to install the anti-slip pads is to insert them under the front feet of the washing machine. If installing the pads under the front feet is not possible, attach them under the rear feet.

4 Place the washing machine on the anti-slip pads.
- Do not attach the adhesive side ① of the anti-slip pads to the washing machine's feet.
NOTE
- Additional anti-slip pads can be obtained from the LG Electronics service center.
Use of anti-slip pads


18 INSTALLATION
NOTE
- Do not overtighten the water supply hose or use mechanical devices to secure it to the inlet valves.
- No additional backflow protection is required for connection to the water supply.
NOTE
- For models with only one water inlet valve, do not connect the hose to hot water. Connect it only to cold water.
NOTE
- If water leaks from the hose after connection, repeat the procedure. Use a standard type of faucet for the water supply. If the faucet is square or too large, remove the guide before inserting the faucet into the adapter.
- Make sure the hose is not bent or trapped.
INSTALLATION
- Properly securing the drain hose will protect the floor from damage caused by water leakage.




20 OPERATION
OPERATION
Operation overview
3 Close the door.
CAUTION
4 Add cleaning products or detergent and fabric softener.
- Add the correct amount of detergent to the detergent dispenser. If desired, add fabric softener to the appropriate compartments of the dispenser.

- Then select the wash temperature and spin speed. Pay attention to the care labels on the clothing.

7 Start the cycle.


22 OPERATION
Control panel


Preparing laundry for washing
- Wash delicate items (nylons, underwear) in a mesh laundry bag.
- Close zippers, hooks, and ties to ensure these items do not get caught on other clothing.
- Before washing, brush off dirt and stains with a small amount of diluted detergent to help lift the dirt.


26 OPERATION
Adding detergents and fabric softeners
Detergent dosing
- Detergent should be used in accordance with the manufacturer's instructions and selected based on the fabric type, color, level of soiling, and washing temperature. Use only detergents suitable for washing machines.
- If too much suds appears, reduce the amount of detergent.
- If too much detergent is used, excessive suds may form, leading to poor washing results or causing heavy strain on the motor.
- If you want to use liquid detergent, follow the guidelines provided by the detergent manufacturer.
- You can pour liquid detergent directly into the main detergent drawer if you start the wash cycle immediately.
- If you select the Pre Wash option after adding detergent directly into the drum, the detergent may be rinsed away, reducing the washing effectiveness. For better results, use the Pre Wash option with the ezDispense function. The manual dispenser cannot be used to release pre-wash detergent.
① Liquid detergent compartment ② Fabric softener or liquid detergent compartment


3 Pour detergent and fabric softener into their respective compartments up to the MAX line.
- The ezDispense drawer has two compartments. Pour liquid detergent into the compartment on the right, and liquid fabric softener into the compartment on the left. If detergent is added to compartment ②, you cannot use fabric softener.
- Do not put liquid bleach, powder bleach, powder detergents, gel detergents, or tablet detergents into the ezDispense compartments.
- Remove any detergent residue from the outside of the ezDispense drawer before inserting it.
- Do not try to fill the compartments too quickly. Add detergent and fabric softener slowly to prevent overflow.


28 OPERATION
① Dispenser 1 button ② Dispenser 2 button
2 Open the detergent dispenser drawer.

③ Manual detergent compartment for main wash
4 Before starting the cycle, carefully close the detergent dispenser drawer.
OPERATION 29
Adding water softener
A water softener, such as an anti-scale agent, can be used to reduce the amount of detergent in areas with high water hardness.
- First add the detergent, then the water softener. Dose according to the amount specified on the packaging.


30 OPERATION
Program table
Wash program


| Delicates (Osjetljivo rublje) | 20 °C (Cold (Hladno) do 40 °C) | Maksimalno punjenje 3 kg | |
| Opis | Pere donje rublje i prozirnu i čipkastu odjeću koja se može prati u perilici rublja. | ||


32 OPERATION
Additional options
*1 This option is automatically enabled in the program and cannot be cancelled.
NOTE


| Program | kg | h:mm | kWh | °C | Litara | okretaja pominuti | % |
| Eco 40-60 (Eko 40-60) + 52*2(Puna)*3 | 7 8:20 | 4,870 32 120,0 1360 - | |||||
| Eco 40-60 (Eko 40-60) + 52*2(Polovina)*3 | 3,5 4:55 | 2,460 28 70,0 1360 - |
*1 In the same cycle, it can wash normally soiled cotton laundry intended for washing at temperatures of 40 °C or 60 °C, and this program is used for assessing compliance with EU Ecolabel regulations (EU 2019/2023). *2 Possibility of normal eco drying *3 In the same cycle, it can wash normally soiled cotton laundry intended for washing at temperatures of 40 °C or 60 °C and dry it so that the laundry can be immediately stored in the wardrobe, and this program is used for assessing compliance with EU Ecolabel regulations (EU 2019/2023).
NOTE
36 OPERATION
Drying program


38 OPERATION
- Iron (☐) - for drying laundry that remains damp for easier ironing
- Low temperature (6) - for delicate fabrics • Normal Eco ( 📋) - for heavier fabrics
4 Press the Start/Pause button.
NOTE


40 OPERATION
NOTE


NOTE


42 OPERATION
NOTE
- Use the manufacturer's recommendations on the detergent or softener packaging when setting the ezDispense amounts for a standard 4-6 kg load.
- Most cycles automatically use the default amounts you have set, and they are shown with normal LED light on the Dispenser 1 and Dispenser 2 buttons.
- Delicates (Gentle) and Tub Clean cycles exclude the ezDispense function by default.

2 Simultaneously press and hold the Dispenser 1 and Dispenser 2 buttons for 3 seconds. 3 Press the Dispenser 2 button to light up the liquid detergent indicator ③. 4 To save the changes, simultaneously press and hold the Dispenser 1 and Dispenser 2 buttons for 3 seconds.
NOTE



44 OPERATION
2 To deactivate this function, simultaneously press and hold the Delay End and Add Item buttons for 3 seconds.
Beep On/Off The device plays a melody when starting and stopping.
- To deactivate/activate this function, simultaneously press and hold the Steam and TurboWash buttons for 3 seconds.



SMART FUNCTIONS
LG ThinQ Application
The LG ThinQ application allows communication with the device via a smartphone.
LG ThinQ Application Features
Communicate with the washing machine via your smartphone using convenient smart features.
Remote Start


46 SMART FUNCTIONS
3 Connect your smartphone to the wireless router.

NOTE
- To check the wireless Wi-Fi connection, check if the 📋 icon lights up on the control panel.
- The device only supports 2.4 GHz Wi-Fi networks. To check the network frequency, contact your internet service provider or refer to the wireless router manual.
- LG ThinQ is not responsible for any network connection problems or any errors, malfunctions, or failures caused by the network connection.
- If the device has trouble connecting to the Wi-Fi network, it may be too far from the router. Get a Wi-Fi repeater (range extender) to improve the Wi-Fi signal strength.
- The Wi-Fi connection may not be established or may be interrupted due to the home network environment.
- The network connection may not work properly, depending on the internet service provider.
- The surrounding wireless environment may cause the wireless network to operate slowly.
- The device cannot be registered due to problems with wireless signal transmission. Turn off the device and wait about a minute before trying again.
- If the firewall is enabled on the wireless router, disable the firewall or add an exception.
- The wireless network name (SSID) should contain a combination of Latin letters and numbers. (Do not use special characters).
- The smartphone user interface (UI) may vary depending on the mobile operating system (OS) and manufacturer.
- If the router's security protocol is set to WEP, you may not be able to set up the network. Change to other security protocols (WPA2 is recommended) and register the product again.

2 Press the Power button. 3 Press and hold the Remote Start button for 3 seconds to enable this remote control function. 4 Start a cycle from the LG ThinQ app on your smartphone.
NOTE
- When this function is enabled, you can start a cycle only from the LG ThinQ application on your smartphone. If the cycle is not started, the appliance will wait to start the cycle until it is remotely turned off from the application or this function is disabled.
- If the door is open, you cannot start a cycle remotely.

MAINTENANCE
⚠ WARNING
⚠ WARNING
Cleaning the drain pump filter and performing emergency water drain
3 First, remove the drain plug from the drain hose ①, and then drain the water. Then slowly unscrew the drain pump filter ② to drain the remaining water, and then remove any dirt or objects from the filter.

4 Open the covers.

5 Clean the inserts with warm water.
- Rinse the drawer with warm water to dissolve any detergent residue or fabric softener buildup.
- Use a soft cloth or brush to remove any residue.

52 MAINTENANCE
6 If detergent or fabric softener has hardened inside the ezDispense compartments, remove the covers on the drawer.

10 Reinsert the detergent dispenser drawer.

7 Clean the inside of the compartments with warm water.
- Use a soft cloth or brush to clean and remove any residue.
- Do not use soap to clean the drawer and its inserts.



TROUBLESHOOTING


ezDispense error messages
| Simptomi Mogući | uzrok i rješenje |
| E d 1ezDispense POGREŠKA 1 | Količina tekućeg deterdženta u odjeljku za deterdžent nije se smanjila. Nakon stavljanja deterdženta u odjeljak za deterdžent, ostavljen je dulje vrijeme te se deterdžent stvrdnuo.Očistite temeljito odjeljak za deterdžent, napunite ga tekućim deterdžentom, umetnite ga u ladicu i pokrenite postupak pranja. Ako se neprestano prikazuje E d 1, pozovite servis. |
| E d2ezDispense POGREŠKA 2 | Količina tekućeg deterdženta u odjeljku za deterdžent nije se smanjila.Pozovite servis. |
| E d3ezDispense POGREŠKA 3 | Količina omekšivača u odjeljku za omekšivač ili tekući deterdžent nije se smanjila.Nakon stavljanja omekšivača u odjeljak za omekšivač ili tekući deterdžent, ostavljen je dulje vrijeme te se omekšivač stvrdnuo.Očistite temeljito odjeljak za omekšivač ili tekući deterdžent, napunite ga tekućim omekšivačem, umetnite ga u ladicu i pokrenite postupak pranja. Ako se neprestano prikazuje E d3, pozovite servis. |
| E d4ezDispense POGREŠKA 4 | Količina tekućeg omekšivača u odjeljku za tekući omekšivač ili tekući deterdžent nije se smanjila.Pozovite servis. |
| E d5ezDispense POGREŠKA 5 | Količina tekućeg deterdženta ili omekšivača u odjeljku za tekući omekšivač ili tekući deterdžent nije se smanjila.Pozovite servis. |
| ☐ PnPOGREŠKA OTVARANJA ezDispense | Perilica je radila bez u potpunosti zatvorene ladice.Ladica je otvorena tijekom postupka pranja.Potpuno zatvorite ladicu. Ako se neprestano prikazuje ☐ Pn, pozovite servis. |
Sounds you may hear


56 TROUBLESHOOTING


Drying
| Simptomi Mogući | uzrok i rješenje |
| Problem sa sušenjem Provjerite slavinu dovoda vode. | Nemojte prepuniti perilicu. Provjerite odvodi li se ispravno voda iz perilice rublje za izdvajanje prikladne količine vode iz punjenja. Kada je veličina punjenja rublja premala za ispravno kotrljanje. Dodajte nekoliko ručnika.Isključite slavinu dovoda vode. |
| Vrijeme sušenja predugo je. | Temperatura okoline preniska je.Pobrinite se da je temperatura u dopuštenom rasponu. |
| Učinkovitost sušenja je slaba ili loša. | Dovod vode nije ispravan. Voda se upotrebljava za automatsko čišćenje filtra za vlakna na bubnju tijekom sušenja.Pobrinite se da je slavina za dovod vode otvorena. |
| Voda se ne ispušta ispravno.Pobrinite se da odvodni filtar nije začepljen. | |
| Uređaj je preopterećen.Provjerite kapacitet punjenja za odabrani program. Ako je potrebno, dodajte program vremena sušenja. | |
| Brzina centrifuge premala je.Odaberite najveću dopuštenu brzinu centrifuge za program pranja. | |
| Iz stražnje strane uređaja izlazi toplizrak. | Uređaj zagrijava zrak radi sušenja odjeće.Topli zrak suši odjeću i izlazi iz stražnje strane uređaja. |



62 TROUBLESHOOTING
Wi-Fi connection
| Simptomi Mogući | uzrok i rješenje |
| Vaš kućanski aparat i pametni telefon nisu spojeni na Wi-Fi mrežu. | Lozinka za Wi-Fi mrežu na koju se pokušavate spojiti nije ispravna.Pronadite Wi-Fi mrežu na koju je spojen Vaš pametni telefon i uklonite je, a zatim registrirajte svoju perilicu u aplikaciji LG ThinQ. |
| Mobilni podaci za Vaš pametni telefon su uključeni.Isključite funkciju Mobile data na svojem pametnom telefonu i registrirajte perilicu rublja putem Wi-Fi mreže. | |
| Naziv bežične mreže (SSID) je pogrešno postavljen.Naziv bežične mreže (SSID) treba sadržavati kombinaciju latiničnih slova i brojeva. (Nemojte upotrebljavati posebne znakove). | |
| Frekvencija usmjerivača nije 2,4 GHz.Podržana je samo frekvencija usmjerivača od 2,4 GHz. Postavite bežični usmjerivač na 2,4 GHz i povežite perilicu rublja s bežičnim usmjerivačem. Obratite se svom davatelju pristupa internetu ili proizvođaču usmjerivača kako biste provjerili frekvenciju usmjerivača. | |
| Udaljenost između uređaja i bežičnog usmjerivača je prevelika.Ako je udaljenost između uređaja i bežičnog usmjerivača prevelika, signal može biti preslab i veza se možda neće uspješno konfigurirati. Premjestite usmjerivač tako da je bliže uređaju. |
Customer care and service
Contact the LG Electronics customer information center.
- You will find authorized LG Electronics service centers on our website www.lg.com, and follow the instructions provided there.
- It is not recommended to repair the appliance yourself, as this may cause further damage and void the warranty.
- Spare parts listed in Regulation 2019/2023 are available for at least 10 years.




12 INSTALLATION
INSTALLATION


INSTALLATION 13


Specifications
| Модел F4DV910H2EA | |
| Електрозахранване | 220 - 240 V~, 50 Hz |
| Тегло на продукта | 73 кг |
Dimensions (mm)


| W 600 | D 565 D" 1100 | ||||
| H | 8 | 5 | 0 | D | ' 6 |



14 INSTALLATION
Accessories

BULGARIAN
NOTE


18 INSTALLATION
NOTE
NOTE




20 INSTALLATION
NOTE
INSTALLATION
21



22 OPERATION
OPERATION
3 Close the door.
WARNING
24 OPERATION
Control panel


26 OPERATION


28 OPERATION


30 OPERATION
WARNING

32 OPERATION
Table of programs
Washing program

34 OPERATION
NOTE


36 OPERATION

38 OPERATION
NOTE


40 OPERATION
NOTE


42 OPERATION

44 OPERATION
1 Press the Power button. 2 Select a washing program. 3 Press the Delay End button as needed. 4 Press the Start/Pause button.
NOTE

46 OPERATION
NOTE
NOTE




52 SUPPORT
SUPPORT
WARNING


54 SUPPORT


bg_main.book.book Page 56 Wednesday, May 26, 2021 1:54 PM
56 SUPPORT


TROUBLESHOOTING


60 TROUBLESHOOTING


62 TROUBLESHOOTING


64 TROUBLESHOOTING
Odor


TROUBLESHOOTING


Note
USER MANUAL
WASHING MACHINE-DRYER

Smart Diagnosis ....47
MAINTENANCE


SAFETY INSTRUCTIONS
READ ALL INSTRUCTIONS BEFORE USING THE APPLIANCE

SAFETY INSTRUCTIONS
5


6 SAFETY INSTRUCTIONS
Usage


SAFETY INSTRUCTIONS
7


8 SAFETY INSTRUCTIONS
Handling


Detergent
10 SAFETY INSTRUCTIONS


et_main.book.book Page 12 Wednesday, May 26, 2021 2:01 PM
12 INSTALLATION
Technical specifications
| Mudel F4DV910H2EA | |
| Vooluühendus 220-240 V~, 50 Hz | |
| Toote kaal 73 kg |
Dimensions (mm)


| W 600 | D 565 D" 1100 | ||||
| H | 8 | 5 | 0 | D | ' 6 |



Accessories


14 INSTALLATION
CAUTION

CAUTION
4 Check that all locking nuts under the appliance are properly tightened.
CAUTION
4 Place the appliance on the anti-slip pads.


18 INSTALLATION
CAUTION


20 USE
USAGE
Usage overview
Using the appliance
3 Close the door.
CAUTION
4 Adding detergent and fabric softener.
5 Press the Power button to turn on the appliance.


22 USAGE
Control panel



26 USAGE


28 USAGE
3 Place the washing products into the respective manual dispenser drawers.


USAGE
29


30 USE
Program table
Washing program


32 USE
ATTENTION


| Programm | Steam (Aur) | Wrinkle Care (Kortsudev astane hooldus) | TurboWash | Dry (Kuivatus) | EcoHybrid | Pre Wash (Eelpesu) |
| Dry Only (Ainult kuivatus) | *1 | |||||
| Wash+Dry (Pesu + kuivatus) | *1 |
Normal programs
| Programm | kg | h:mm | kWh | °C | liitrit | p/min | % |
| Cotton (Puuvill) 20 °C | 10,5 2:59 | 0,299 25 7 | 6,0 1350 50 | 0 | |||
| Cotton (Puuvill) 60 °C | 10,5 3:59 | 1,567 49 7 | 3,0 1350 50 | 0 | |||
| Eco 40-60 (Öko 40-60) (Täis)*1 | 10,5 4:00 | 0,839 36 7 | 0,0 1360 42 | 0 | |||
| Eco 40-60 (Öko 40-60) (Pool)*1 | 5,25 3:00 | 0,570 31 5 | 3,0 1360 41 | 1 | |||
| Eco 40-60 (Öko 40-60) (Veerand)*1 | 2,5 2:25 | 0,310 26 4 | 3,0 1360 45 | 2 | |||
| Mixed Fabric (Segakangapesu) | 4 1:21 | 0,603 35 54 | 0 1000 67,0 | ||||
| Speed 14 (Kiirpesu 14) | 2 0:14 | 0,051 21 41 | 0 400 106,0 | ||||
| Eco 40-60 (Öko 40-60) + 52*2(Täis)*3 | 7 8:20 | 4,870 32 12 | 0,0 1360 - | ||||
| Eco 40-60 (Öko 40-60) + 52*2(Pool)*3 | 3,5 4:55 | 2,460 28 7 | 0,0 1360 - |

36 USE
Drying program

38 USE


40 USE
ATTENTION

ATTENTION


42 USE
ATTENTION


ATTENTION
Child Lock


44 USE



SMART FUNCTIONS
LG ThinQ app


46 SMART FUNCTIONS


48 SMART FUNCTIONS





52 MAINTENANCE
4 Open the lids.
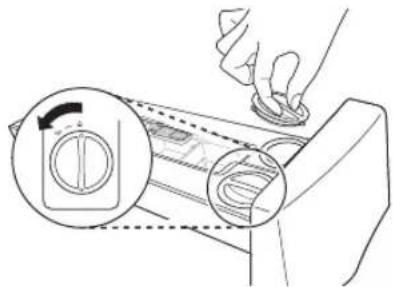
8 Close the ezDispense chamber lids firmly.




TROUBLESHOOTING


54 TROUBLESHOOTING


60 TROUBLESHOOTING
Odor


62 TROUBLESHOOTING
WiFi









12 INSTALLATION
INSTALLATION


14 INSTALLATION
Accessories


RUSSIAN
| Index 3a3op (MM) | |
| A | 100 |
| B | 5 |
| C | 20 |
CAUTION!
NOTE
NOTE


20 INSTALLATION
NOTE




22 OPERATION
OPERATION
3 Close the door.
⚠️ WARNING!
7 Starting the wash cycle.

24 OPERATION
Control panel


26 OPERATION


28 OPERATION


30 OPERATION


32 OPERATION

34 OPERATION


36 OPERATION
38 OPERATION
| Программа | кг | ч:мин | кВт·ч | °C | л | об/мин | % |
| Eco 40-60 (Эко 40-60) (полная)*1 | 10,5 4:00 | 0,839 36 7 | 0,0 1360 42,0 | ||||
| Eco 40-60 (Эко 40-60) (половина)*1 | 5,25 3:00 | 0,570 31 5 | 3,0 1360 41,1 | ||||
| Eco 40-60 (Эко 40-60) (четверть)*1 | 2,5 2:25 | 0,310 26 4 | 0 1360 45,2 | ||||
| Mixed Fabric (Смешанная) | 4 1:21 | 0,603 35 54 | 0 1000 67,0 | ||||
| Speed 14 (Быстро 14) | 2 0:14 | 0,051 21 41 | 0 400 106,0 | ||||
| Eco 40-60 (Эко 40-60) + ‰*2 (полная)*3 | 7 8:20 | 4,870 32 120,0 | 1360 - | ||||
| Eco 40-60 (Эко 40-60) + ‰*2 (половина)*3 | 3,5 4:55 | 2,460 28 70,0 | 1360 - |


40 OPERATION
Drying program


42 OPERATION


44 OPERATION
NOTE
NOTE


48 OPERATION
NOTE


NOTE



4 Open the covers.

RUSSIAN




LG
Life's Good
- SAFETY INSTRUCTIONS
- READ ALL INSTRUCTIONS BEFORE USE
- INSTALLATION
- OPERATION
- DISPOSAL
- DETERGENT
- DISPOSAL OF YOUR OLD APPLIANCE
- TECHNICAL SPECIFICATIONS
- DIMENSIONS (MM)
- ACCESSORIES
- CAUTION
- REMOVING THE TRANSIT BOLT ASSEMBLIES
- NOTE
- USE OF ANTI-SLIP PADS
- OPERATION OVERVIEW
- START THE CYCLE
- CONTROL PANEL
- PREPARING LAUNDRY FOR WASHING
- ADDING DETERGENTS AND FABRIC SOFTENERS
- DETERGENT DOSING
- ADDING WATER SOFTENER
- PROGRAM TABLE
- WASH PROGRAM
- ADDITIONAL OPTIONS
- DRYING PROGRAM
- PRESS THE START/PAUSE BUTTON
- SMART FUNCTIONS
- LG THINQ APPLICATION
- LG THINQ APPLICATION FEATURES
- REMOTE START
- MAINTENANCE
- ⚠ WARNING
- CLEANING THE DRAIN PUMP FILTER AND PERFORMING EMERGENCY WATER DRAIN
- TROUBLESHOOTING
- CUSTOMER CARE AND SERVICE
- WARNING
- TABLE OF PROGRAMS
- WASHING PROGRAM
- SUPPORT
- USER MANUAL
- WASHING MACHINE-DRYER
- READ ALL INSTRUCTIONS BEFORE USING THE APPLIANCE
- USAGE
- HANDLING
- USE
- USAGE OVERVIEW
- USING THE APPLIANCE
- ATTENTION
- CHILD LOCK
- LG THINQ APP
- OPEN THE LIDS
- CLOSE THE EZDISPENSE CHAMBER LIDS FIRMLY
- ⚠️ WARNING
- STARTING THE WASH CYCLE
Brand : LG
Model : F4DV910H2EA
Category : Washing machine