
DCB-P773Z - Receiver SAMSUNG - Free user manual and instructions
Find the device manual for free DCB-P773Z SAMSUNG in PDF.


| Product Type | Digital Cable Receiver (Set-Top Box) |
| Brand | Samsung |
| Model | DCB-P773Z |
| Dimensions (W x D x H) | 381 x 267 x 60 mm |
| Net Weight | 3.2 kg |
| Power Supply | AC 230V~, 50/60 Hz |
| Power Consumption | Max 30W (Standby: 18W) |
| Tuner | VHF/UHF 50–870 MHz, DVB-C |
| Demodulation | 16/32/64/128/256 QAM |
| Flash Memory | 8 MB |
| SDRAM | 64 MB |
| Built-in HDD | 80 GB |
| Video Decoding | MPEG-2 MP@ML, 4:3 and 16:9 aspect ratio |
| Audio Decoding | MPEG-1 Layer I & II, Dolby Digital, SRS TruSurround XT |
| Connectivity | 2x SCART, RCA Audio/Video, Optical Digital Audio, USB 2.0 Host, RF Loopthrough |
| Smartcard Slot | 1x Conax (embedded) |
| PVR Functions | Time Shift, Instant Recording, Timer Recording, A-B Repeat |
| Electronic Programme Guide | Full Guide and Mini Guide with category filtering |
| Teletext & Subtitles | VBI and OSD teletext, multi-language subtitles |
| Media Playback | MP3 audio, JPEG photo |
| Cleaning Instructions | Disconnect from mains; use a cloth lightly dampened with water; no solvents |
| Safety Precautions | Do not open; avoid liquids, overloading, and blocked ventilation; use only recommended attachments |
| Repairability | Do not attempt self-repair; contact qualified service agent |
Frequently Asked Questions - DCB-P773Z SAMSUNG
User questions about DCB-P773Z SAMSUNG
0 question about this device. Answer the ones you know or ask your own.
Ask a new question about this device
Download the instructions for your Receiver in PDF format for free! Find your manual DCB-P773Z - SAMSUNG and take your electronic device back in hand. On this page are published all the documents necessary for the use of your device. DCB-P773Z by SAMSUNG.
USER MANUAL DCB-P773Z SAMSUNG
Instructions for use ....GB
Instructions for use ....GB
natural_image
Simple U-shaped line drawing with no text, numbers, or symbolsDCB-P853Z/DCB-P773Z
Käyttöohjeet
FIN
TURVALLISUUSOHJEET
5. Kanavaluettelo
7. Teksti-TV

10. Pikatallennus
natural_image
Close-up of a textured surface with horizontal lines and a circular emblem (no readable text or symbols)natural_image
Exterior view of a classical-style building with domes and columns, partially obscured by a small inset image showing a stylized face (no visible text or symbols)1.1. Koko opas
1.2. Pienoisopas
2.5. Kanavaluettelo

Flash: 8 Mt SDRAM: 64 Mt
SISÄÄNRAKENNETTU HDD 160 Gt (DCB-P853Z) 80 Gt (DCB-P773Z)
PÄÄSY ULKOINEN HDD USB 2.0 (ISÄNTÄ)
TOISTETTAVAT TIEDOSTOMUODOT
natural_image
Simple U-shaped line drawing with no text, numbers, or symbolsDCB-P853Z/DCB-P773Z
Instructions for use
GB
SAFETY INSTRUCTIONS
This STB has been manufactured to satisfy international safety standards.
Please read the following recommended safety precautions carefully.
MAINS SUPPLY: AC 230V\~, 50/60Hz
OVERLOADING: Do not overload wall outlets, extension cords or adapters as this can result in fire or electric shock.
LIQUIDS: Keep liquids away from the STB.
CLEANING: Before cleaning, disconnect the STB from the wall socket. Use a cloth lightly dampened with water(no solvents) to clean the exterior.
VENTILATION: Do not block the STB ventilation holes. Ensure that free airflow is maintained around the STB. Never store the STB where it is exposed to direct sunlight or near heating equipment e.g. a radiator. Never stack other electronic equipment on top of the STB. Place the STB at least 10cm from the wall.
ATTACHMENTS: Do not use any attachment that is not recommended by the manufacturer; it may cause a hazard or damage the equipment.
CONNECTION OF CABLE, TV, AND STB
Connect all components before plugging any power cords into the wall outlet. Always turn off the STB, TV and other components before you connect or disconnect any cables. To disconnect this STB, from the mains, the plug must be pulled out from the mains socket, therefore the mains plug shall be readily operable.
SERVICING: Do not attempt to service this product yourself. Any attempt to do so will make the warranty invalid. Refer all servicing to a qualified service agent.
LIGHTNING: If the STB is installed in an area subject to intense lightning activity, protection devices for the STB mains connector and modem telephone line are essential. The individual manufacturer's instruction for safeguarding other equipment, such as TV set, Hi-Fi, etc., connected to the STB must also be followed during lightning storms.
GROUNDING: Signal cable MUST BE EARTHED. The grounding system must comply with SABS 061.
Note : Dispose the used batteries at designated place for environment protection.
WARNING!
-
Follow these directions in order not to damage the power cord or plug.
-
Do not modify or process the power cord or plug arbitrarily.
- Do not bend or twist the power cord too much.
- Make sure to disconnect the power cord with holding the plug.
-
Separate heat appliances from the power cord as distantly as possible in order to prevent the cover from being melted.
-
Failure to follow one of them may cause electric shock or fire.
-
Do not open the main body.
- Do not insert metals or inflammable objects inside the product.
- Do not touch the power plug with a wet hand.
- Disconnect the power cord in case of lightning.
- Do not cover the receiver's ventilation openings with items such as newspapers, clothes etc.
- Do not place the receiver on top of household appliances that emit heat.
-
Do not expose the receiver to rain or moisture.
-
Do not use the product when it is out of order. If you continue to use the product with a defect, it can cause a serious damage to the product. Make sure to contact your local product distributor when the product is out of order.
- Do not turn the power off suddenly while the hard disk drive is running. The company shall not be liable for any corruption of data on the hard disk drive caused by the carelessness or misuse of users.

Correct Disposal of This Product (Waste Electrical & Electronic Equipment)
(Applicable in the European Union and other European countries with separate collection systems)

This marking shown on the product or its literature, indicates that it should not be disposed with other household wastes at the end of its working life. To prevent possible harm to the environment or human health from uncontrolled waste disposal, please separate this from other types of wastes and recycle it responsibly to promote the sustainable reuse of material resources.
Household users should contact either the retailer where they purchased this product, or their local government office, for details of where and how they can take this item for environmentally safe recycling.
Business users should contact their supplier and check the terms and conditions of the purchase contract. This product should not be mixed with other commercial wastes for disposal.
CONTENTS
Safety Instructions 2
General Features ....5
Connecting Your "STB"....6
Description 8
Front Panel 8
Rear Panel....9
Remote Control....10
Setting Up TV Operations with the Remote Control.... 12
Initial Installation....13
Basic Functions ....14
Operating The Receiver 24
Main Menu....24
1. Guide 24
1.1.Full Guide....25
1.2. Mini Guide....25
1.3. Using the colour buttons....25
2. Channel 26
2.1. Favorite Channel 26
2.2. Auto Scanning....28
2.3. Manual Scanning....28
2.4. Linear Scanning....28
2.5. Channel List....29
2.6. Parental Guide....31
3. Library 32
3.1. Video 32
3.2. Music....35
3.3. Photo....37
3.4. Radio....39
4. Timer Recording....40
4.1. Scheduled Recordings 40
4.2. EPG Setting 42
4.3. Manual Setting....42
5. Setup....43
5.1.PVR 43
5.2. Preferences....44
5.3. Language 46
5.4. System 48
5.5. Conax....49
Available TV Manufacturer Numbers....51
Troubleshooting....59
Technical Specifications....60
GENERAL FEATURES
1. USER SECTION
400 PROGRAMMABLE CHANNELS
ADVANCED ELECTRONIC PROGRAMME GUIDE
MULTI LANGUAGE SUPPORTED FOR OSD
SUBTITLE & TELETEXT SUPPORTED WITH MULTI LANGUAGES
FULL FUNCTION INFRARED REMOTE CONTROL
▶ AUTO SCAN FACILITY
▶ CHANNEL ORGANISING (PROGRAMMABLE)
- LOW POWER CONSUMPTION
▶ AUTO UPDATED EPG
PVR(PERSONAL VIDEO RECORDER) FUNCTION
2. TUNER SECTION
VHF, UHF BAND 50\~870 MHz
MAX 7 Msps SYMBOL RATE
16\~256 QAM MODULATION FORMAT
RF LOOP-THROUGH OUTPUT(MALE) FOR ANALOG RECEIVER
3. VIDEO SECTION
DVB-C COMPLIANT
MPEG-2 VIDEO(MP@ML)
COMPATIBLE FOR BOTH SCPC/MCPC
▶ SUPPORTS ASPECT RATIO 4:3(NORMAL) AND 16:9(WIDE SCREEN)
1\~15 Mb/s DATA RATE
2 SCART
COMPOSITE VIDEO OUTPUT
4. AUDIO SECTION
MPEG 1 AUDIO LAYER I & II
STEREO AUDIO MODE
32, 44.1, AND 48kHz SAMPLING FREQUENCIES
VOLUME CONTROL AND MUTE FUNCTION THROUGH REMOTE CONTROL
▶ OPTICAL DIGITAL AUDIO OUTPUT
CONNECTING YOUR "STB"
1. LOCATION OF THE RECEIVER
Your receiver should be placed under proper ventilation. Don't put in completely enclosed cabinet that will restrict the flow of air, resulting in overheating.
The location should be safeguarded from direct sunlight, excess moisture, rough handling or household pets. Avoid stacking other electronic components on the top of the receiver. The location should be safely accessible by the cable from your antenna system.
2. CONNECTING THE RECEIVER WITH CABLE SYSTEM
After installing your cable system, connect the coaxial cable to "ANT IN" terminal marked at the rear of the STB.
All cable connectors should be finger tightened; do not use any kind of wrench while tightening connectors. The cable should be 75 ohm impedance coaxial cable.
3. CONNECTING THE RECEIVER TO TV
To connect the receiver with your television, you can use the following methods; Via SCART cable, RF cable or RCA cable. Connect the RF cable to the terminal marked "RF OUT" on the rear panel of STB and its other end to the TV RF input socket. In here, "RF OUT" means the loop through.
In the case of connecting your TV through SCART cable, connect the SCART connector marked AV1 (TV) to the respective SCART port on the TV.
4. CONNECTING YOUR VCR OR DVD PLAYER
To connect a VCR or DVD player, the STB has been provided with SCART at the rear marked "AV2 (EXT)." Using a SCART connector, the VCR or DVD player can be connected to the receiver.
5. CONNECTING EXTERNAL AUDIO / HI-FI SYSTEM
To connect any external Audio Hi-Fi system, the receiver has been provided with two RCA connectors at the back of the receiver, marked with AUDIO L and R respectively to connect the left and right Audio.
6. CONNECTING DIGITAL AUDIO SYSTEM
Connect a fiber optic cable between OPTICAL on the receiver and OPTICAL on the Digital Audio System.
7. INSERTING SMARTCARDS FOR CONAX SERVICES
In order to view a scrambled service, you need to have a valid Smartcard. This STB has embedded the Conax to view Conax programmes.
Note : Insert the Smartcard with the gold coloured chip facing downwards.
Connecting Figure
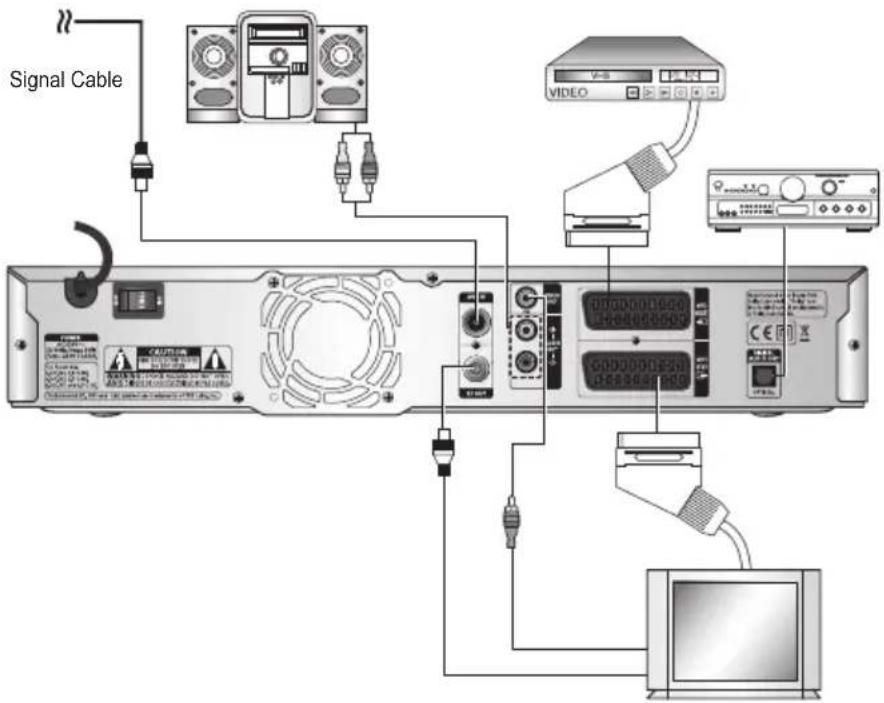
If degraded picture quality is observed while viewing copy-protected VOD (Video-on-Demand) movies, connect the set-top box directly to the TV set. Do not connect through a VCR.
Manufactured under license from Dolby Laboratories. "Dolby" and the double-D symbol are trademarks of Dolby Laboratories.
TruSurround XT, SRS and ● Symbol are trademarks of SRS Labs, Inc. TruSurround XT technology is incorporated under license from SRS labs, Inc.

DESCRIPTION
Front Panel
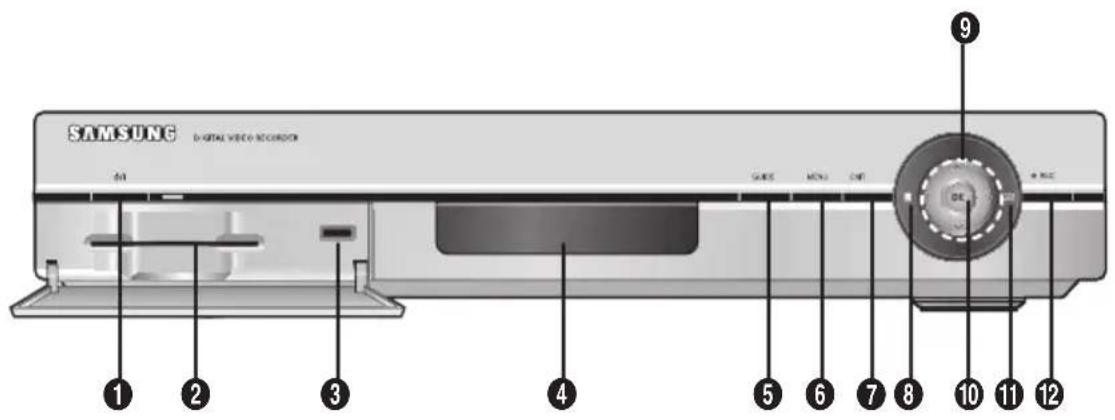
- ⬆(POWER) Turns the receiver on and off (standby).
- Smart Card Slot 1 slot for Conax smartcard.
Note: Smart Cards are only distributed by service providers and special distributors, not by SAMSUNG.
- USB Port Connects an external USB storage device such as USB-HDD or thumb-drive.
- Display Displays the playing status.
- GUIDE Displays TV/Radio EPG (Electronic Programme Guide).
- MENU Opens up or exits the menu.
- EXIT Exits the current menu.
- Infrared Sensor Receives IR commands from the remote control.
- ∧/∨ ∨ Moves the highlight bar for selecting options on the menu.
- OK Enters and confirms any data to the receiver in the menu.
- REC Indicator Lights when the receiver is recording.
- REC Records for Live TV and Radio programmes.
Rear Panel

Fan
The fan always revolves when the power is on.
Ensure a minimum of 10cm clear space on all sides of the fan when installing the product.
- AC MAINS This is to plug in the AC mains power cord. The input AC voltage range is 230V\~, 50/60Hz supply.
- POWER SWITCH This is used to turn AC mains power on and off.
- ANT IN Connects to a terrestrial aerial (or antenna).
- RF OUT Connects to your TV aerial.
- VIDEO OUT Connects to a video input of your TV using a RCA video cable.
- AUDIO OUT Connects to audio inputs of your TV using RCA audio cables.
- AV2(EXT) Connects to your VCR, DVD player or other equipment using a SCART cable.
- AV1(TV) Connects to your TV using a SCART cable.
- DIGITAL AUDIO OUT(OPTICAL) Connects to an optical input of your digital amplifier using an optical cable.
Remote Control

-
TV Switches the TV mode.
-
STB Switches the STB mode.
-
TV/RADIO Toggles between the TV channel and Radio channel.
-
INPUT SEL. Selects input signal in external input mode.
-
STANDBY/ON Turns the receiver on and off (standby).
-
PIP Used for PIP(Picture in Picture) function.
-
TV STANDBY/ON Turns the TV on and off (standby).
-
NUMERIC(0\~9) Enters numeric values and selects the channel directly by entering its number. Also used for inputting text.
-
FAV.CH Displays the favorite channel list.
-
BOOKMARK Used for bookmark function.
-
REC Records for Live Broadcasting.
-
T.REC Used for configuring the timer recording.
-
SKIP(◀◀/▶▶I) Buttons Used for skipping backwards or forwards. (every 30 seconds)
-
SEARCH(◀◀/▶▶) Buttons Used for searching backwards or forwards.
-
LIVE(■) Button Used for stopping play in HDD mode or returning to Live Broadcasting when the Time Shift is active.
-
TIME SHIFT▶II) Used for starting and pausing play in HDD mode or starting the Time Shift.
-
VOL+/- Increases or decreases the volume.
-
CH^/\~Selects channels (programmes).
-
☐(MUTE) Toggles between normal and muted audio.
-
MENU(1) Opens up or exits the menu.
-
RETURN(●) Returns to the previous menu.
-
DIRECTION Buttons Moves the highlight bar for selecting options on the menu.
-
OK Enters data or confirms the selection on the menu.
-
REPEAT Repeats selected section (A–B).
-
GUIDE Displays TV/Radio EPG (Electronic Programme Guide).
-
INFO(i) Displays the channel information and programme information. If pressed again, it displays the Info menu, which includes information about signal information, time details, audio/video track, Add to FAV list, PIP On/Off, and recording status.
-
EXIT(∅) Exits the current menu.
-
RED(LIBRARY) Displays the recorded list. This button functions the same as the RED button on the menu.
-
GREEN(ALT) Selects the audio and video track list for the current service. This button functions the same as the GREEN button on the menu. Press it once and audio track list appears. Press it twice and video track list appears. The audio and video track services are not provided for every channel and depend on the conditions the operator is in.
-
YELLOW(TEXT) Selects the Teletext or Subtitle mode. This button functions the same as the YELLOW button on the menu.
-
BLUE(PRE.CH) Moves the previous channel. This button functions the same as the BLUE button on the menu.
Setting Up TV Operations with the Remote Control
Enter the manufacturer number into the remote control to control the TV with the remote control (see "Available TV Manufacturer Numbers" on pages 51\~58).
- Turn the TV on.
- Point the remote control towards the TV.
- Enter the TV manufacturer number by using the NUMERIC(0\~9) buttons while pressing the TV button. E.g. For a Samsung TV, press 0, 0 and 1 in this order by using the NUMERIC(0\~9) buttons while pressing the TV button.
- When the TV is turned off or on, the configuration is finished.
TV functions that you can control with the remote control
| Button Function | |
| TV STANDBY/ON Press to turn the TV on or off. | |
| INPUT SEL. Press to select an external input source for the TV. | |
| VOL+/- Press to adjust the TV volume / Exclusive to the TV | |
| CH^/Press to select a TV channel. | |
| (MUTE) Press to mute the TV sound. | |
| NUMERIC(0~9) Press to enter the number | |
Note : 1. There is a model that can only be turned on by pressing the NUMERIC buttons "0" on the remote control.
-
TV models of other manufacturer that can be controlled with the remote control are limited, and some functions may not work.
-
If you replace the remote control batteries or enter a new manufacturer number, the previously configured TV manufacturer number is deleted.
-
When a connected device is an integrated TV model (VCR, DVDP), take care when using the remote control because it may operate both of them simultaneously.
-
If the configuration number does not work, try another number.
INITIAL INSTALLATION
Setting Language
- Use the ◀/▶ buttons to select a desired menu language.

Executing Auto Channel Scanning
- After select option, use the▲/▼ buttons to select Confirm, then press the OK button. Auto channel scan will be started.
- After auto channel scan completes, press the OK button to save the TV and Radio channels.

BASIC FUNCTIONS
1. Display Screen
Before you can view the television programme, you must perform the installation. Therefore you will see only menu images at first.
After the television channels have been programmed, you will see the following picture (banner) each time you change channels:
- Press the INFO(i) button in Live mode.
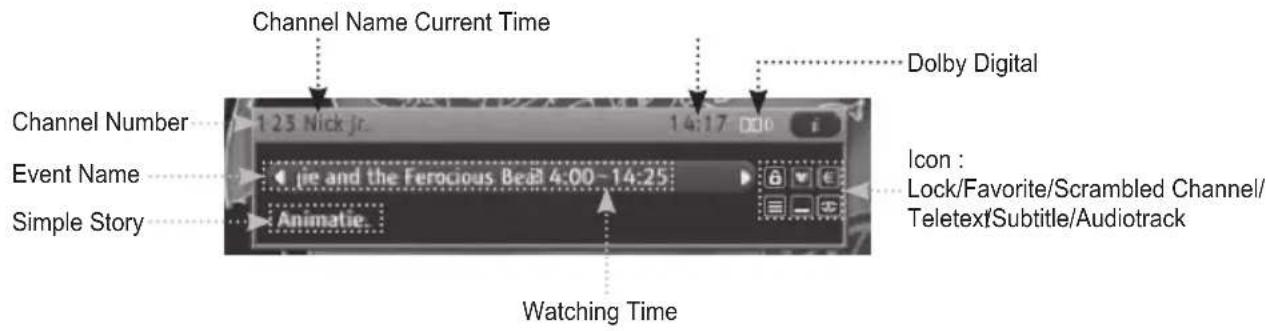
- Select the channel by pressing the NUMERIC(0\~9) buttons or CH^/buttons and select the TV/RADIO button to move to TV or Radio channel. You will also see this picture each time you change channels.
When you press the TV/RADIO button on the remote control, TV and Radio programmes are toggled.
Detailed programme information
- Press the INFO(i) button twice while you are viewing a programme. First you will see the channel information. If pressed again, detailed information on the current programme is displayed as shown in the picture.
- [◀/▶ buttons]: displays information of the previous or next programmes.
- [▲/▼ buttons]: scrolls the current information.
Note : This service depends on the service provider.

2. Volume Control
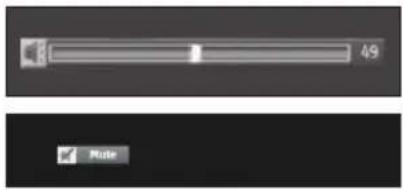
To control the volume level :
- Press the VOL +/- buttons to adjust the volume level.
- Press the (MUTE) button to turn to silence mode.
- Press the (MUTE) button again or VOL +/- buttons in order to cancel the mute function.
3. Select audio track
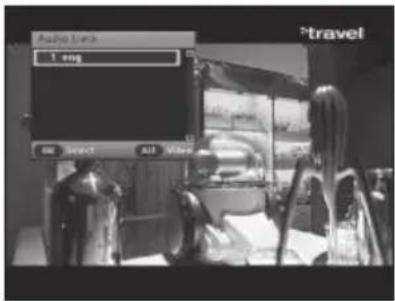
- Press the GREEN(ALT) button to see the audio track list.
- Use the ▲/▼ buttons to select an audio language, press the OK button.
Note: 1. Although the channel you are trying to record contains many audio tracks, you can listen to the limited number of audio tracks after the recording is complete.(minimum 1 / maximum 3 audio tracks)
- If the channel does not contain the subtitle and teletext: Maximum three audio tracks are available for recording.
- If the channel contains either the subtitle or teletext: Maximum two audio tracks are available for recording.
-
If the channel contains both the subtitle and teletext: One audio track is only available for recording.
-
For the channels that contains many audio tracks, use the GREEN(ALT) button to select audio tracks while recording. Then you can listen to the selected audio tracks after the recording is complete.
4. Select video track
- Press the GREEN(ALT) button twice to see the video track list.
- Use the ▲/▼ buttons to select a video, press the OK button.

5. Channel List
- Press the OK button while you are watching a programme.
- Press the TV/RADIO button to select a TV or Radio channel.
You can select any of TV, Radio, and All channel lists.
- Press the ▲/▼ buttons to select a desired channel, then press the OK button. To move to the previous or next page on the channel list, use the ◀/▶ buttons.
- [RED(LIBRARY) button]: Sorts by alphabetic order or default setting.
- [GREEN(ALT) button]: Locks the channel after entering your PIN code.
- [YELLOW(TEXT) button]: Adds to the favorite list.
- [BLUE(PRE.CH) button]: Renames the channel.

6. Favorite List
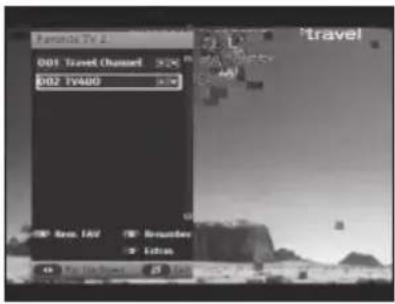
- Press the FAV.CH button while you are viewing a programme.
- Press the TV/RADIO button to select a TV or Radio channel.
You can select any of TV, Radio, and All channel lists.
- Press the ▲/▼ buttons to select a desired channel, then press the OK button. To move to the previous or next page on the channel list, use the◀/▶ buttons.
- [RED(LIBRARY) button]: Removes the favorite channel.
- [GREEN(ALT) button]: Renumbers the channel. The channel number is changed using the◀/▶ buttons or NUMERIC buttons.
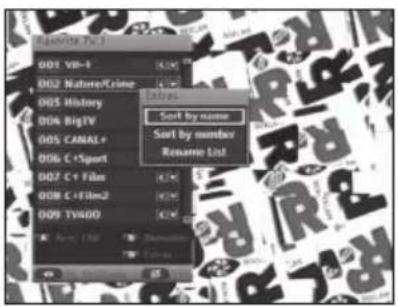
- [BLUE(PRE.CH) button]: Used when performing extra functions (such as Sort by name, Sort by number, or Rename List).
Sort by name: Sorts by alphabetic order.
Sort by number: Sorts by channel order.
Rename List: Renames the channel.
7. Teletext
When the current broadcasting programme provides teletext, press the YELLOW(TEXT) button to see the current teletext language list. The first press displays the VBI (vertical blanking interval) teletext and the second press displays the OSD teletext.
To change the teletext language:
- Press the YELLOW(TEXT) button to see the teletext language list.
- Use the ▲/▼ buttons to select a teletext language you want.
- Press the OK button and then the selected teletext language is displayed.


To use the coloured-button for teletext:
- [RED(LIBRARY) button]: Goes back to the previous page. (It can be different depending on the service provider.)
- [GREEN(ALT) button]: Goes to the next page. (It can be different depending on the service provider.)
- [▲/▼ buttons]: Moves to the previous/next page.

Note : When the YELLOW(TEXT) button is pressed, no action follows but the Teletext banner disappears after about four seconds.
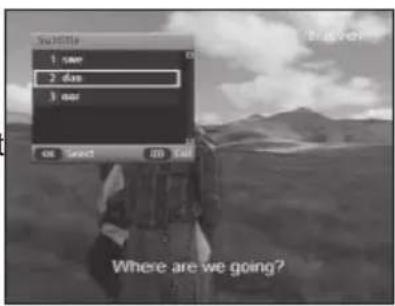
8. Subtitle
When the current broadcasting programme provides subtitle, press the YELLOW(TEXT) button three times to see the current subtitle language list.
To change the subtitle language:
- Press the YELLOW(TEXT) button three times to see the subtitle language list.
- Use the ▲/▼ buttons to select the subtitle language you want.
- Press the OK button and then the selected subtitle language is displayed.
9. Programme Information (EPG—Electronic Programme Guide)
The electronic programme guide shows you programme information for the selected channel.
Note : 1. This service depends on the service provider.
- After the receiver recognises the GMT-time from the signal which takes few seconds, it can display correct EPG information.
- Press the GUIDE button while you are viewing a programme.
Programme Information is displayed on the screen on the time basis.
- [▲/▼ buttons]: Selects channels.
- [◀/▶buttons]: Used to display the program information by 30 minutes per block.
- [OK button]: You can select a current live channel, and also can schedule the future coming programmes for recording.
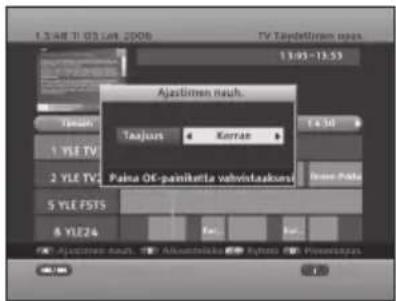
- [RED(LIBRARY) button]: Used for adding or cancelling timer recording. For timer recording, you can select any of Once, Daily, Weekly, and Workday (Monday to Friday).
- [GREEN(ALT) button]: Used for changing the time scale to 15 minutes, 30 minutes, or 1 hour.
- [YELLOW(TEXT) button]: Displays programmes by categories. (All, Movie/Drama, News/Affairs, Show/Game Show, Sports, Children's/Youth Programmes, Music/Ballet/Dance, Arts/Culture, Social/Political Issues/Economics, Education/Science, Leisure hobbies, Others)
- [BLUE(PRE.CH) button]: Toggles between Full Guide and Mini Guide.
- [SKIP(1◄◄) button]: Moves back to the previous day.
- [SKIP(▶▶I) button]: Moves to the next day.
- [INFO(i)button]: Displays the programme information.

10. Instant Recording
Directly records while enjoying Live TV or Radio programme. The recorded file will be automatically saved to Video and Radio folders in the Library menu. This is not for permanent recording, so if you plug out the set without stopping the record, no file is saved. You can also record two separate channels at the same time.

11. Time Shift
Time Shift function enables replay of previous scenes while playing a programme. The system automatically records the active live programme on the built-in HDD. First press the PLAY/PAUSE▶II) button during play and the current live programme will be paused. After a while, press the PLAY/PAUSE▶II) button and the programme resumes. The Time status bar appears to show you the current operating status. Use the playback-related buttons to play contents saved in the HDD.
- [TIMESHIFT(▶II)]: Used to start the Time Shift. To resume the stilled screen, press it again.
- [LIVE(■)]: Returns to the live channel.
- [SKIP(◀◀/▶▶▶I)]: Skips backwards or forwards.
- [FAST SEARCH(◄◄/►►)]: Fast-searches backwards or forwards.
- [SLOW SEARCH(◄◄/►►)]: Slow-searches backwards or forwards while the screen is paused.

To record one channel:
- Change to the channel you want to record, then press the REC button to start recording.
- To stop the recording, press the STO(■) or REC button. The recording option menu will appear. Press the STO(■) button again.

To record two channels:
- Change to the channel you want to record, then press the REC button to start recording.
- Change to another channel you want to record, then press the REC button to start recording. The red color indicates the channel that is currently displayed.
-
To stop the recording,
-
Press the STOR(■) button. The recording option menu will appear.
-
Select the channel to stop the recording using the◀/▶ buttons after moving the cursor by the▲ button, and press the STOP(■) button.
-
To stop the second recording also, press the STQ☐) button and press it again when the option menu opens.
natural_image
Close-up of a textured surface with horizontal lines and a circular emblem (no readable text or symbols)Note: When recording two channels, you can watch only one of those.
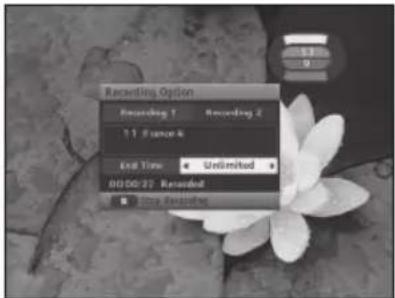
To use the Recording Option menu:
- Press the REC button during recording. The Recording Option menu will appear.
- [◀/▶ buttons]: To change the recording end time such as Unlimited, 30, 60, 90, and 120 minutes.
- To exit the menu, press the EXIT button.
12. A-B Repeat Function
Repeatedly plays a selected section (A–B).
- Press the REPEAT button during playback.
- Press the OK button at the scene you want to start repeating.
- Press the OK button again at the scene you want to end repeating.
The specified A–B section will be played repeatedly.
- To deactivate the repeat function, press the REPEAT button again while the A–B section is playing, then the function will be deactivated.

13. Bookmark Function
You can bookmark specific scenes of the recorded file for easier search.
To add a bookmark:
- Press the BOOKMARK button during playback.
- Press the RED(LIBRARY) button when a desired scene appears. The number "1" is displayed at the top on the screen and the scene is memorised.
- Press the RED(LIBRARY) button again when the next desired scene appears. To get the scene quickly, use the SEARCH(◄◄/►►) buttons. The number "2" is displayed and the scene is memorised.
- Bookmarks can be added by repeating the steps above. You can bookmark up to 10 scenes.

To find a preset bookmark:
- Press the ◀▶ buttons to search the bookmark that you want. The selected bookmark number changes.
- After selection, press the OK button to play from that point.
To delete a bookmark:
- Press the ◀/▶ buttons to select the bookmark that you want to delete. The selected bookmark number changes.
- After selection, press the BLUE(PRE.CH) button to delete from the preset bookmarks. The final bookmark number decreases by 1 with no change to locations.
To move to the bookmark starting point:
- Press the JUMP button to get to the starting point of the current bookmark.
14. Info Menu
To see the Info menu about the programme on a live channel or the recorded play on HDD, press the INFO(i) button.
14.1. On live programme
With in the live programme, do the following:
- Press the INFO(i) button 3 times. The first press opens the channel information while the second press opens the programme information.
- The Info menu box displays the following items for your own taste.
- [Audio Track]: Use the▲/▼ buttons to select an audio language, then press the OK button. When the Dolby Digital is available and it has priority, you can select it also.
- [Video Track]: Use the▲/▼ buttons to select a video track number, then press the OK button.
- [PIP]: After setting it to "On," you can watch two channels with main and sub pictures by pressing the PIP button. When you are watching 2 programmes at a time, use the RED(LIBRARY) button for swapping between main and sub pictures. The channel on the sub picture is changed upward by the YELLOW(TEXT) button, while it is changed downward by the BLUE(PRE.CH) button. To remove the sub picture, press the PIP button or change the setting to "Off."
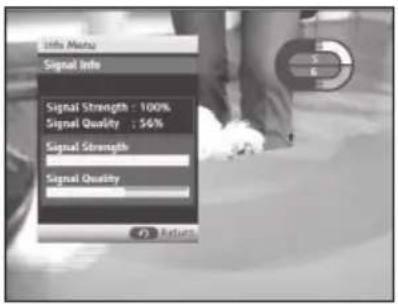
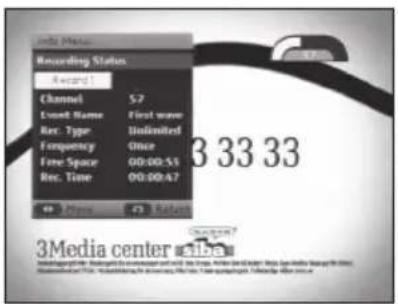
- [Signal Info]: Displays the signal strength and quality. - [Recording Status]: If any recording is going on, it displays the recording information. For more details, see the following sections.
Note : When the PIP is active but a locked channel is in the small picture, it is displayed black-empty.


natural_image
Black-and-white photo of a landscape with a small inset showing a sunset over water, no visible text or symbols.14.2. While a recorded file is played
With in a recorded file playing, do the following:
- Press the INFO(i) button. It displays the following items for your own taste.
- [Time]: Displays the current time.
- [Playing Time]: Displays the played period of time.
- [Remain Time]: Displays the remaining time to the end.
- [Audio Track]: Use the▲/▼ buttons to select an audio language, then press the OK button. When the Dolby Digital is available and it has priority, you can select it also.
- [PIP]: After setting it to "On," you can watch a live programme on the sub picture as mentioned above.
- [Recording Status]: If any recording is going on, it displays the recording information as mentioned above.
14.3. Signal Info
You can check the signal strength and quality of the current channel.

14.4. Recording Status
You can check the recording status such as channel number, event name, record type, frequency, free space, and record proceeding time. When there are 2 recordings available, use the ◀/▶ buttons to see the recording status between recording 1 and recording 2.
After installing your aerial system and STB with appropriate connectors.
- Plug in the AC main power and switch on the receiver.
- Press the MENU button to bring up the main menu.
The following on screen display will appear:
You will see the main menu on the TV screen as shown below.
- Moves into the desired sub menu using the ▲/▼/◄/► buttons.
- Press the OK button to confirm your selection.
1. Guide
In this menu, you can get information about programmes on various channels.
Note : 1. This service depends on the service provider.
-
After the receiver recognises the GMT-time from the received signal that takes few seconds, it can display correct programme information.
-
Use the ▲/▼ buttons to select Guide in the main menu, then press the OK or▶ button.
- Use the ▲/▼ buttons to select Full Guide or Mini Guide, then press the OK or▶ button.
The programme information may include: current time, channel name, name of the current and next programme, the start and total time of the current and next programme.

1.1. Full Guide
The function gives you information for the full channels. This service depends on the service provider.
When you select a channel using the▲/▼ buttons, it will display various information such as current time and date, channel name, programme name, schedule of programmes, and programme status (Recording, Favorite Channel, Parental Guide, Pay TV, etc.).

- Use the ▲/▼/◄/► buttons to select a desired channel, then press the OK button. You can also schedule the future coming programmes for recording. To schedule the programme for recording, press the RED(LIBRARY) button.
- Press the INFO(i) button, then you can get more information selected programme.
1.2. Mini Guide
Mini Guide menu is similar to Full Guide menu. Use ◀/▶ buttons to get previous or next programme information.
- Use the ▲/▼ buttons to select Mini Guide in the Guide menu, then press the OK or▶ button.
- Press ◀/▶ buttons to select previous or next programme.
You can use OK and INFO(i) buttons as in Full Guide menu.
![25 TV/MONDE [0:36] 27 Travel Ch... [0:1] 28 MTV Timer Rec. Categories Full Guide Pre-News/About Day Information](/content/2026/05/1092526/images/29caac2d77e2f2559e06ab78060fe3d1471cf15c2a3eb9b0fc02b81872748ed1.jpg)
Note: 1. It can reach as far as the time displaying the EPG information.
2. If you select a locked channel, you can input the password only when the Mini Guide menu is gone.
1.3. Using the colour buttons
- When you press the RED(LIBRARY) button, the timer recording can be assigned with a desired recording frequency. For recording frequency, you can select any of Once, Daily, Weekly, and Workday (Monday to Friday).
- When you press the GREEN(ALT) button, you can change the time scale to 15 minutes, 30 minutes, or 1 hour.
- When you press the YELLOW(TEXT) button, the programmes are displayed by categories like sports, news, movie, and such.
- Full Guide and Mini Guide are toggled by the BLUE(PRE.CH) button.

2. Channel
Channel menu have six sub menus: Favorite Channel, Auto Scanning, Manual Scanning, Linear Scanning, Channel List, and Parental Guide.
These options enable you to change channel settings. You can set the various settings you want.
- Use the ▲/▼ buttons to select Channel in the main menu, then press the▶ button.
- Use the ▲/▼ buttons to select a sub menus, then press the OK or ▶ button.

2.1. Favorite Channel
You can select TV or Radio channel from the favorite list. The screen displays five different favorite groups.
Select a favorite group you want.
- Press the TV/RADIO button to toggle the TV and Radio favorite list.
- Use the ▲/▼/◄/► buttons to select a desired channel.
- You can edit the favorite channel list using Rem. FAV, Renumber, and Extras.
- To exit, press the EXIT button.

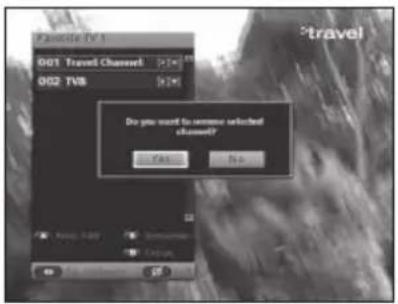
2.1.1 Remove Favorite channel
You can remove channels on the favorite list.
- Use the ▲/▼ buttons to select the channel you want to remove.
- Press the RED(LIBRARY) button.
- Use the ◀/▶ buttons to select Yes, then press the OK button.
The selected channel is removed.
2.1.2. Renumber
You can change the channel number of the selected one on the list.
- Use the ▲/▼ buttons to select the channel you want to renumber, then press the GREEN(ALT) button.
- Use the ◀/▶ buttons or NUMERIC buttons to change the channel number, then press the OK button.

2.1.3. Extras
You can perform extra functions in the favorite list. (See page 16)
2.2. Auto Scanning
This menu automatically downloads available channels with the predefined network ID.
- Select Yes and press the OK button to start scanning.
- After scanning completes, press the OK button to save.
- To exit without saving, press the MEN(☐) or EXIT( ) ☑ button.

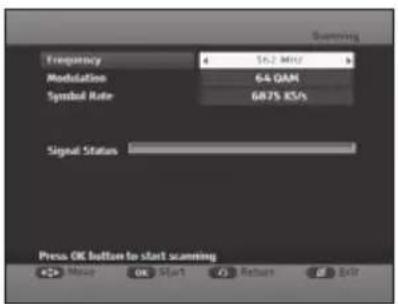
2.3. Manual Scanning
This menu enables to download the channels manually.
- If you want to change the items below, use the▲/▼ buttons to select them, then press the◄/► buttons to change the value.
- [Frequency]: Selects the channel frequency.
- [Modulation]: Selects the modulation scheme.
- [Symbol Rate]: Selects the rate of state changes on the communication circuit.
-
[Signal Status]: Displays the signal strength.
-
Press the OK button to start scanning.
- After scanning completes, press the OK button to save.
- To exit without save, press the MENU(☐) or EXIT( ) button.
2.4. Linear Scanning
This menu is used when the auto scanning fails. It enables to download the channels with no network ID.
- Select Yes and press the OK button to start scanning.
- After scanning completes, press the OK button to save.
- To exit without saving, press the MEN(☐) or EXIT( ) ☑ button.

2.5. Channel List
You can select TV or Radio channel from the channel list.
- Press the TV/RADIO button to toggle the TV and Radio channel list.
- Use the ▲/▼/◄/► buttons to select a desired channel list and press the OK button.
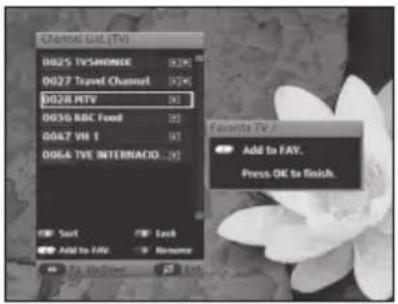
- You can edit the channel list using Sort, Lock, Add to FAV., and Rename.
- To exit, press the EXIT button.

ICONS of the Channel List
: Locked channel.
: Favorite channel.
€ : Scrambled channel.
2.5.1. Sort
You can sort channels on the channel list.
- Press the RED(LIBRARY) button to sort channels.
- Use the ▲/▼ buttons to select a desired sorting method from Alphabetic and Default.
- When you press the OK button, channel list is sorted by your desired sorting method.

2.5.2. Lock
You can block the current channel.
- Press the GREEN(ALT) button to lock the channel. Then the menu requesting the PIN code appears.
- Enter the PIN code using the NUMERIC buttons.

2.5.3. Add to FAV.
You can add the current channel to the favorite list.
- Use the ▲/▼ buttons to select the channel you want to add to the favorite list, then press the YELLOW(TEXT) button.
2.5.4. Rename
You can rename the current channel.
- Press the BLUE(PRE.CH) button to rename the channel.
- [▲/▼/◄/► buttons]: Moves the cursor.
- [OK button]: Enters characters.
- [RED(LIBRARY) button]: Toggles between upper case and lower case.
- [BLUE(PRE.CH) button]: Toggles between special characters and alphabets.
- After changing completes, use the ▲/▼/◄/► buttons to select SAVE, then press the OK button.
- Up to 30 characters are allowed as a channel name.
- To exit without saving, press the MEN(☐ or EXIT( ) ☑ button.

2.6. Parental Guide
This function prevents children or unauthorized persons from watching programme. Also you can change your PIN (Personal Identification Number) code.
- Enter your own PIN code. (The factory preset PIN code: 0000)
- Use the ▲/▼ buttons to select a sub menu, then press the OK or ▶ button.

2.6.1. Program Grade
You can change the programme grade.
- Use the ▲/▼ buttons to select a programme grade, then press the OK or▶ button.
- [Off]: Parental lock is inactive.
- [4...17]: You can block for each age from 4 to 17.
- [All]: Locks for all users.

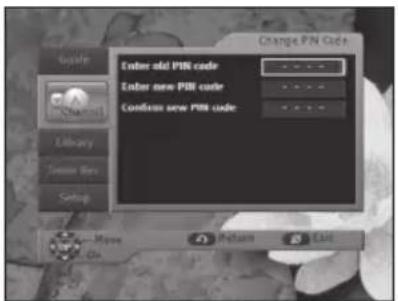
2.6.2. Change PIN Code
You can change the PIN code.
- Use the NUMERIC(0\~9) buttons to enter the old PIN code and new PIN code.
- To confirm it enter the new PIN code again.
Please remember the PIN code should be a 4-digit numerical value.
The factory preset PIN code: 0000
Note: If you forgot the PIN code, contact the Service Provider. Once you change your password, you must keep it in mind.
3. Library
You can play and edit TV channel recordings, Radio channel recordings, video files, photo files, and music files in the Library menu.
You can also enjoy JPG and MP3 files stored in your external USB storage device.
- Use the ▲▼ buttons to select Library in the main menu, then press the ▶ button.
- Use the ▲/▼ buttons to select a sub menu, then press the OK or ▶ button.

3.1. Video
You can play and edit TV channel recordings.

- Use the ▲/▼/◄/► buttons to select a recorded file or video file, then press the OK button.
- [PLAY/PAUSE(▶II) button]: Plays or pauses the current file.
- [STOP(■) button]: Stops playback and exits to the file list.
-
[SKIP(I ◀◀◀▶▶I) buttons]: Each press performs a 30-second commercial skip. It enables you to evade from watching commercials.
-
To enter a folder, use the ▲/▼/◄/► buttons to select a folder, then press the OK button.
- To change to a higher level folder, use the ▲/▼/◄/► buttons to select the □.. icon, then press the OK button. After selecting a folder, you can edit by options such as Rename, Delete, and New Folder after pressing the GREEN(ALT) button.
Note : According to the size recorded on HDD, the booting time may vary.
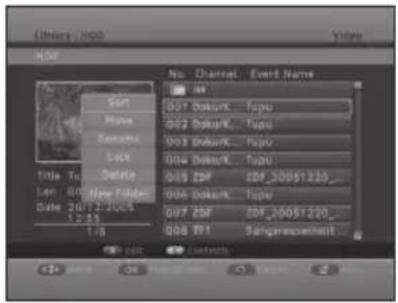
- After selecting a file, you can use the following buttons:
- [YELLOW(TEXT) button]: You can list the files by the selected media such as Video, Music, Photo, and Radio using the ▲/▼ and OK buttons.
- [GREEN(ALT) button]: You can edit files using Sort, Move, Rename, Lock, Delete, and New Folder. Use the ▲/▼ buttons to select a sub menu, then press the OK button.
3.1.1. Sort
You can sort video files in the file list.
- Use the ▲/▼ buttons to select a desired sorting type such as length, channel, event name, and date.
- When you press the OK button, file list is sorted by your desired sorting type.

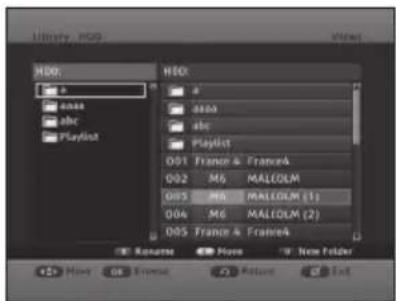
3.1.2. Move
Files can be moved between different HDD folders. If Move is selected, it lists the video files.
- To move to the file list, press the button.
- Use the ▲/▼ buttons to select each file to move, then press the OK button.
- To move the selected files to the destination folder, use the ◀/▶ button to set the destination. After a folder is selected, press the YELLOW(TEXT) button. The selected files are moved to the destination folder.
Note: You can select multiple files using ▲/▼ and OK buttons.
3.1.3. Rename
You can change the name of file or folder. (See page 30)
3.1.4. Lock/Unlock
You can lock or unlock files in the list.
- Enter your own PIN code. (The factory preset PIN code: 0000)
If a file is locked, you can see icon. In order to see the locked file, you must enter the PIN code.
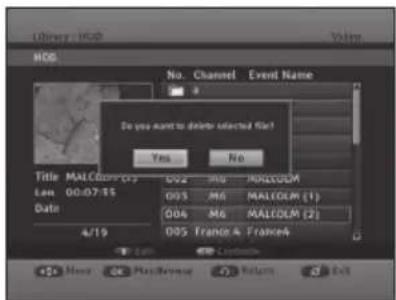
3.1.5. Delete
You can delete files from the file list.
- Use the ◀/▶ buttons to select Yes, then press the OK button.
3.1.6. New folder
A new folder can be created on the current directory.
- Enter the name of new folder as in page 30.
- Select Save using the▲/▼/◄/► buttons, then press the OK button.

3.2. Music
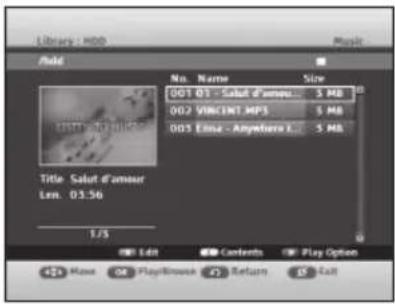
You can play and edit music files with the extension *.mp3.
- Use the ▲/▼/◄/► buttons to select a music file, then press the OK button.
- [PLAY/PAUSE▶II) button]: Plays or pauses the current file.
- [STOP(■) button]: Stops playback and exit to the file list.
- [SKIP(I◄◄/►►) buttons]: Moves to the previous or next music title.
- For entering a folder, first use the ▲/▼/◄/► buttons to select a folder, then press the OK button.
- To change to a higher level folder, use the ▲/▼/◄/► buttons to select the □... then press the OK button.
- [RED(LIBRARY) button]: Selects the storage device between the built-in HDD and the external USB storage device. If the external USB storage device is not connected, this button is deactivated.
Note: When using external USB HDD, its file system must be FAT32.
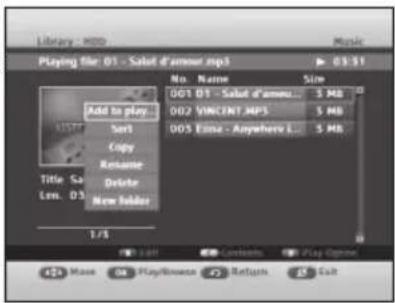
- [GREEN(ALT) button]: Edits files by Add to Playlist, Sort, Copy, Rename, Delete, and New folder. Use the ▲/▼ button to select a sub menu, then press the OK button.
- [YELLOW(TEXT) button]: Selects the contents such as Video, Music, Photo, and Radio. Use the ▲/▼ button to select a content, then press the OK button.
- [BLUE(PRE.CH) button]: Selects the play option such as Repeat and Random. Repeat repeatedly plays the selected file or the files in the selected folder. Random repeatedly plays the files in the selected folder.
3.2.1. Add to Playlist
You can add the selected file to the Playlist folder. If the Playlist folder does not exist, the folder is created on the root directory automatically.
- To remove the file from the Playlist folder, select a file to remove using the ▲/▼ buttons, then press the GREEN(ALT) button and select Delete
3.2.2. Sort
You can sort music files in the file list.
- Use the ▲/▼ to select a desired sorting type such as file name and size.
- When you press the OK button, the file list is sorted by your desired sorting type.
3.2.3. Copy
Files can be copied from an external USB storage device to your receiver and vice versa. You can also copy files between folders on the hard disk drive.
- After selecting a file for copy, press the GREEN(ALT) button. The selected file is highlighted.
- Select Copy using the▲/▼ buttons, then press the OK button.
- Select a target folder in the HDD or USB device and press the YELLOW(TEXT) button. To change to the external USB device, press the RED(LIBRARY) button, which can toggle between HDD and USB device.
3.2.4. Rename
You can change the name of file or folder. (See page 30)
3.2.5. Delete
You can delete files from the file list.
- Use the ◀/▶ buttons to select Yes, then press the OK button.
3.2.6. New folder
A new folder can be created on the current directory. (See page 34)
3.3. Photo
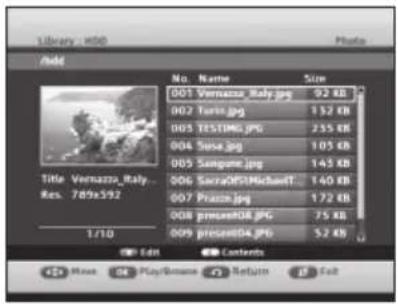
You can play and edit photo files with the extension *.jpg.
- Use the ▲/▼/◄/► buttons to select a photo file, then press the OK button.
- [PLAY/PAUSE▶II) button]: Plays or pauses the slide show.
- [STOP(■) button]: Stops playback and exit to the file list.
- [◀/▶ buttons]: Changes to the previous or next image.
- [SEARCH(◄◄/►►) buttons]: Changes the slide show in fast speed.
- For entering a folder, first use the ▲/▼/◄► buttons to select the folder, then press the OK button.
- To change to a higher level folder, use the ▲/▼/◄/► buttons to select the □... , then press the OK button.
- [RED(LIBRARY) button]: Selects the storage device between the built-in HDD and the external USB storage device. If the external USB storage device is not connected, this button is deactivated.
Note : When using external USB HDD, its file system must be FAT32.
- [GREEN(ALT) button]: Edits files by Add to Playlist, Sort, Copy, Rename, Delete and New folder. Use the ▲/▼ buttons to select a sub menu, then press the OK button. The listed functions are the same as in Music. (See page 35 and 36)
- [YELLOW(TEXT) button]: Selects the contents such as Video, Music, Photo, and Radio. Use the▲/▼ buttons to select a content, then press the OK button.
3.3.1. Slide Show
You can play photo files by slide show mode.

3.3.2. Slide Option
You can set the slide show speed and background music to on or off.
- Use the ◀/▶ buttons to select a desired option among Normal, Slow, Fast, On, and Off, then press the OK button to check.
- Use the ▶ button to select OK, then press the OK button.
- If you set the Music On, music files stored in the receiver are played in sequential order, while slide show is running. The music files should have been stored in the folder for slide show.
3.3.3. Sort
You can sort photo files in the file list.
- Use the ▲/▼ buttons to select a desired sorting type such as file name and size.
- When you press the OK button, file list is sorted by your desired sorting type.
3.3.4. Copy
Files can be copied between your receiver and an external USB storage device. Refer to the method as in video files moving. Only the difference is the target files are not removed from the source folder by Copy.
3.3.5. Rename
You can change the name of file or folder. (See page 30)
3.3.6. Delete
You can delete files from the file list.
- Use the ◀/▶ buttons to select Yes, then press the OK button.
3.3.7. New Folder
A new folder can be created on the current directory. (See page 34)

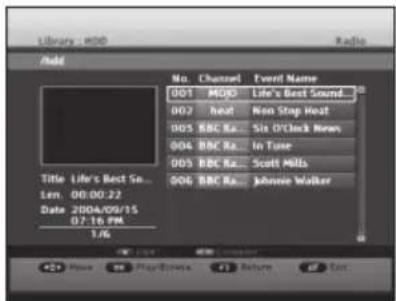
3.4. Radio
You can play and edit Radio channel recordings.
- Use the ▲/▼/◄/► buttons to select a Radio channel recording, then press the OK button.
- For entering a folder, first use the ▲/▼/◄/► buttons to select a folder, then press the OK button.
- To change to a higher level folder, use the ▲/▼/◄/► buttons to select the □... , then press the OK button.
- [GREEN(ALT) button]: Edits files such as Add to Playlist, Sort, Copy, Rename, Delete, and New folder. Use the ▲/▼ button to select a sub menu, then press the OK button. Edit functions of Radio are the same as the ones in music. (See page 35 and 36)
- [YELLOW(TEXT) button]: Selects the contents such as Video, Music, Photo, and Radio. Use the ▲/▼ button to select a content, then press the OK button.
4. Timer Recording
You can schedule timer recordings for the TV and Radio channels.
- Use the ▲/▼ buttons to select Timer Rec. on the main menu, then press the▶ button.
- Use the ▲/▼ buttons to select a sub menu, then press the OK or ▶ button.
4.1. Scheduled Recordings
You can add, edit or delete the timer recording in the reserved list.
- [Title]: Title name of the timer recordings.
- [Date]: Date of the timer recordings.
- [Start]: Starting time of the timer recording.
- [Freq.]: Frequency of the timer recording such as Once, Daily, Weekly, and Work Day.


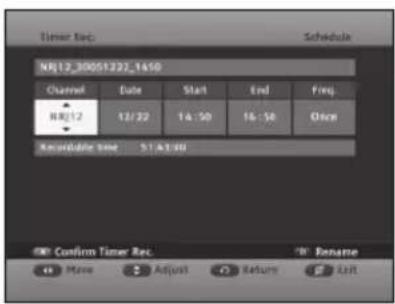
4.1.1. Add
You can add the timer recording to the reserved list.
- Press the RED(LIBRARY) button to add the timer recording to the scheduled list.
-
Use the ▲/▼/◄/► buttons to set the channel, date, start time, end time, and frequency, then press the RED(LIBRARY) button to confirm.
-
[▲/▼ buttons]: Adjusts the values.
- [◀/▶ buttons]: Moves through the items.
- [NUMERIC(0\~9) buttons]: Enters a number.
- [BLUE(PRE.CH) button]: Changes the recording name. The default name is created based on the channel, date, and start time of the recording(See page 30)
- To confirm the timer recording, press the RED(LIBRARY) button.
4.1.2. Edit
You can edit the timer recordings in the reserved list.
- Use the ▲/▼ buttons to select a timer recording you want to edit, then press the GREEN(ALT) button.
- Use the ▲/▼/◄/► buttons to edit the items of the timer recording, then press the RED(LIBRARY) button to confirm.
Note : You cannot modify the file that is in progress for recording.
4.1.3. Delete
You can delete a timer recording from the reserved list.
- Use the ▲/▼ buttons to select a timer recording you want to delete, then press the BLUE(PRE.CH) button.
- Use the ◀/▶ buttons to select Yes, then press the OK button.
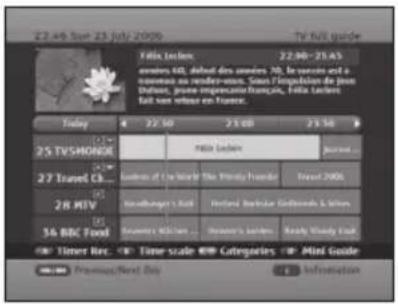
4.2. EPG Setting
You can record the channels using EPG.
- Use the following buttons to select a channel you want to record, then press the RED(LIBRARY) button.
- [▲/▼ buttons]: Selects channels.
- [◀/▶ buttons]: Selects times.
- [SKIP(▶▶I) button]: Moves to the next day.
- Use the ▲/▼/◄/► buttons to select the start time and the duration, then press the OK button to confirm.
- The channel will be added to the reserved list automatically.
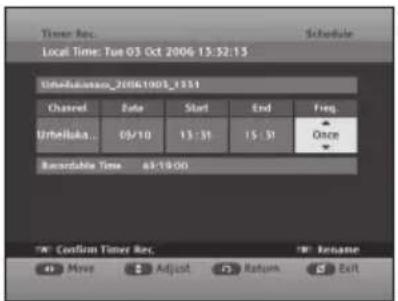
4.3. Manual Setting
You can set the channels using EPG.
- Use the ▲/▼/◄/► buttons to set the channel, date, start time, end time, and frequency, then press the RED(LIBRARY) button to confirm.
- [▲/▼ buttons]: Adjusts the values.
- [◀/▶ buttons]: Moves the items.
- [NUMERIC(0\~9) buttons]: Enters number.
- [BLUE(PRE.CH) button]: Changes the recording name.
The default name is created based on the channel, date, and start time of the recording(See page 30)
5. Setup
You can set the setup items such as PVR, Preferences, Language, System, and Conax.
- Use the ▲/▼ buttons to select Setup in the main menu, then press the▶ button.
- Use the ▲/▼ buttons to select a sub menu, then press the OK or ▶ button.
5.1. PVR
You can set the Time Shift Buffer and executing Disc Manager.
The setting of Time Shift Buffer enables replay of previous scenes of live TV programme for up to 240 minutes before.
5.1.1. Time Shift Buffer
You can set the time length for the Time Shift function.
- Use the ▲/▼ buttons to select Time Shift Buffer, then press the OK or▶ button.
- Use the ▲/▼ buttons to desired time(such as 30, 60, 90, 120, and 240 minutes), then press the OK button.
5.1.2. Disc Manager
You can check the capacity information of the disc, and you can format the disc. All data stored in the disc will be deleted after formatting.
To format the disc:
- Press the ◀/▶ buttons to select a storage device between HDD and USB. If the external USB storage device is not connected, this button is deactivated.
- You cannot format the USB memory but can see information only.
- Use the ▲/▼ buttons to select Format, then press the OK button.
- Use the ◀▶buttons to select OK, then press the OK button to confirm.
- Enter your own PIN code to start format. (The factory preset PIN code: 0000)
• After the formatting completes, press the OK button.
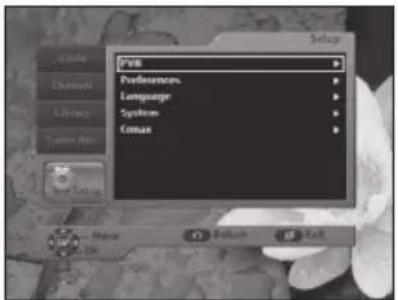
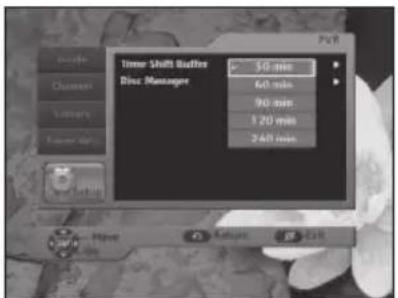
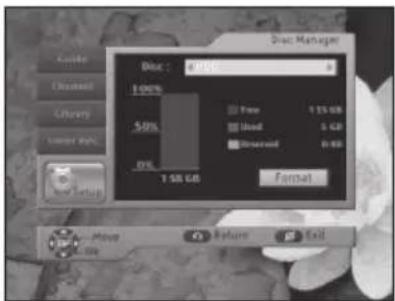
5.2. Preferences
You can set the preferences menu.
- Use the ▲/▼ buttons to select a sub menu, then press the OK or ▶ button.
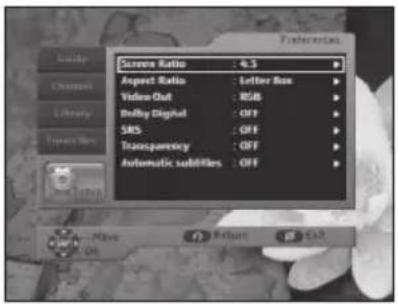
5.2.1. Screen Ratio
You can set the screen ratio.
- Use the ▲/▼ buttons to select a desired screen ratio (such as 4:3 and 16:9), then press the OK button.

5.2.2. Aspect Ratio
You can set the aspect ratio of your TV.
- Use the ▲/▼ buttons to select the desired aspect ratio (such as Letter Box, Pan & Scan, Mixed, and Full), then press the OK button.
- [Letter Box]: Select this when you want to see a 16:9-ratio image on the 4:3-ratio TV monitor. It shrinks the 16:9-ratio image with no screen distortion so the top and bottom of the screen are black-empty.
- [Pan & Scan]: Select this when you want to see a 4:3-ratio image on the 16:9-ratio TV monitor. It shows the 4:3-ratio image with no screen distortion so extreme left and right sides are cut off.
- [Mixed]: Select this when you want to see a mixture image of Letter Box and Pan & Scan. So the top, bottom, extreme left, and extreme right are cut off.
- [Full]: Select this when you want to see an image with converted to full screen regardless of the aspect ratio of sources.

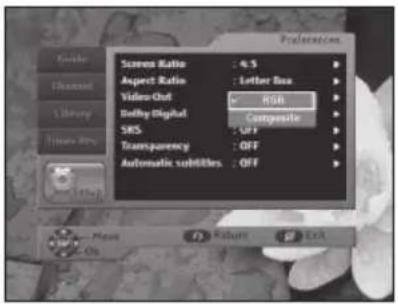
5.2.3. Video Out
You can set the video output signal format.
- Use the ▲/▼ buttons to select the desired video output signal format (such as RGB and Composite), then press the OK button.
- RGB: Selects for SCART cable.
- [Composite]: Selects for RCA cable.
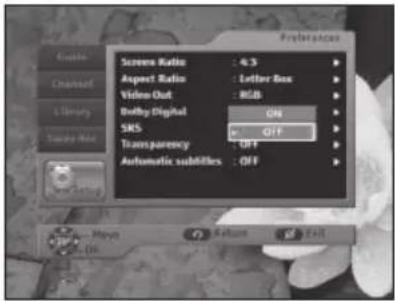
5.2.4. Dolby Digital
You can set the Automatic Dolby digital audio to on or off.
- Use the ▲/▼ buttons to select ON or OFF, then press the OK button.
5.2.5. SRS
You can set the Sound Retrieval System to on or off.
- Use the ▲/▼ buttons to select ON or OFF, then press the OK button.

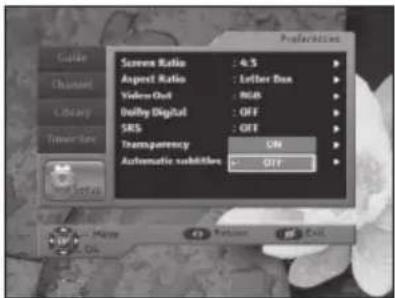
5.2.6. Transparency
You can set the OSD transparency to on or off.
- Use the ▲/▼ buttons to select ON or OFF, then press the OK button.
5.2.7. Automatic Subtitles
You can set the automatic subtitle display to on or off. To show effect sounds such as "knock knock" for hearing-impaired people, select Hear. Impair.
- Use the ▲▼ buttons to select any of ON, OFF, and Hear. Impair., then press the OK button.

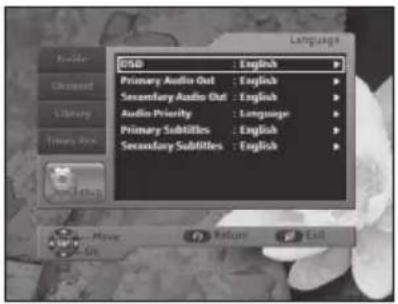
5.3. Language
You can set languages for OSD, Primary Audio Out, Secondary Audio Out, Audio Priority, Primary Subtitles, and Secondary Subtitles.
5.3.1. OSD
You can set the OSD language.
- Use the ▲/▼ buttons to select a desired language, then press the OK button.
5.3.2. Primary Audio Out
You can set the primary audio language. If multiple languages are available, this primary language is set to the audio language.
- Use the ▲/▼ buttons to select a desired language, then press the OK button.
5.3.3. Secondary Audio Out
You can set the secondary audio language. If the primary language is not available, this secondary language is set to the audio language.
- Use the ▲/▼ buttons to select a desired language, then press the OK button.
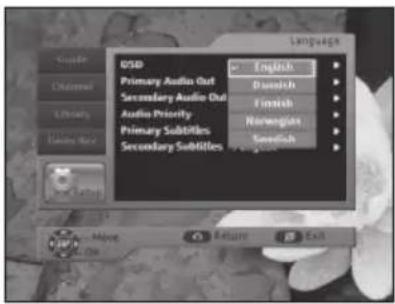

5.3.4. Audio Priority
You can select any of audio language and Dolby Digital. If the audio language has priority, you can hear the audio language without Dolby Digital sound.
- Use the ▲/▼ buttons to select any of audio language and Dolby Digital, then press the OK button.
5.3.5. Primary Subtitle
You can set the primary subtitle language. If multiple languages are available, this primary language is set to the subtitle language.
- Use the ▲/▼ buttons to select a desired language, then press the OK button.
5.3.6. Secondary Subtitle
You can set the secondary subtitle language. If the primary language is not available, this secondary language is set to the subtitle language.
- Use the ▲/▼ buttons to select a desired language, then press the OK button.


5.4. System
You can set the system menu.
- Use the ▲/▼ buttons to select a sub menu, then press the OK or ▶ button.
5.4.1. Product Information
You can display the product information such as Brand Name, Product Name, Firmware Version, Software Version, Last SW Update, and HDD Size.
To upgrade software:
- Press the OK button on the Product Information menu, then the SW Upgrade menu will appear.
- To scan particular channel, use the◀/▶ buttons to select a mode between Auto and Manual.
- In the manual mode, you can select the channel and PID value using the▲/▼/◄/► buttons.
- To start the software upgrade, press the OK button.
Caution: When the receiver is transferring, you must keep a thing intact until transfer is ended.
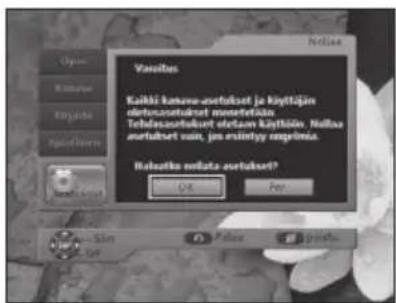
5.4.2. Reset
You can restore the factory preset values in case the user has encountered some problems after changing any new values for channel data and others, which may be in error.
- Use the ◀/▶ buttons to select OK, then press the OK button.
- Enter your own PIN code to start reset. (The factory preset PIN code: 0000)


5.5. Conax
You can see the smartcard-related information and change the PIN code using this menu.
Product Ordering
It loads the product catalog data.
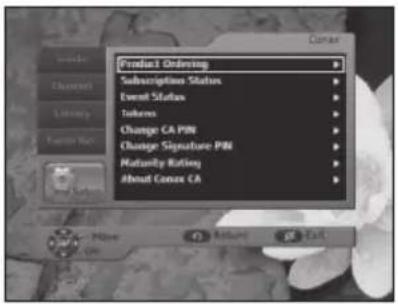
Subscription Status
It shows you the subscription status of your smartcard. The status displays the valid terms.

Event Status
It shows you the events that are available to your smartcard.

Tokens
It shows you the tokens that are available to your smartcard.
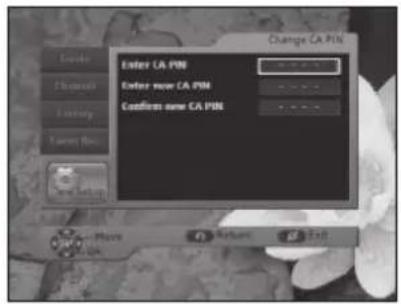
Change CA PIN
If needed, you can change the current CA PIN code. You have to enter the new PIN code again to confirm.
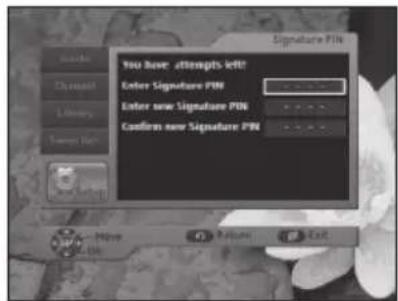
Change Signature PIN
You can also change the current PIN code for signature.
Maturity Rating
You can select the maturity rating. The available maturity ratings are general audience, parental guidance, over 18, and erotic. To watch the restricted programme, you have to enter the smartcard PIN code.
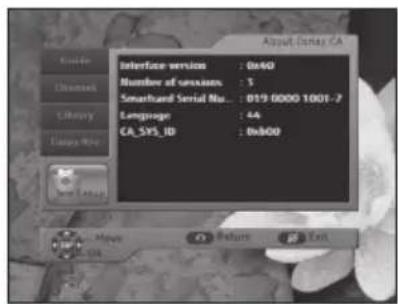
About Conax CA
It shows you the smartcard-related information.

AVAILABLE TV MANUFACTURER NUMBERS
- TV button + 3-Digit User Code
- TV Operating buttons: TV STANDBY/ONNUMERIC(0\~9), CH^/∨, VOL+/-, INPUT SEL.,
(MUTE)
TV
Maker (BRAND) NAME CODE NUMBER (3DIGIT) LIST
| SAMSUNG 001 002 003 004 005 006 007 008 009 | |
| 010 050 066 076 102 195 217 365 379 | |
| 421 | |
| A.R. SYSTEMS 049 152 | |
| ACCENT 049 152 | |
| ACEC 112 | |
| ACURA 195 | |
| ADMIRAL 065 076 163 171 190 307 324 369 466 | |
| 481 | |
| ADYSON 379 | |
| AGASHI 076 379 | |
| AGEF 324 | |
| AIKO 049 076 102 141 152 172 195 225 379 | |
| AIWA 377 459 | |
| AKAI 049 050 055 066 076 102 107 123 139 | |
| 141 150 152 172 182 195 209 225 379 | |
| 428 433 437 471 475 | |
| AKIBA | 049 123 152 380 378 |
| AKITO | 049 106 152 |
| AKURA | 049 076 123 195 378 426 470 |
| ALARON 042 379 | |
| ALBA | 018 049 050 107 123 134 163 168 195 |
| 225 232 379 413 421 457 | |
| ALBIRAL 371 | |
| ALCYON 407 | |
| ALLORGAN | 050 094 236 379 |
| ALLSTAR | 049 152 |
| AMPLIVISION | 113 379 421 425 |
| AMSTRAD | 012 049 076 123 131 152 172 195 225 |
| 426 476 | |
| ANAM | 049 152 195 |
| ANAM NATIONAL | 049 152 |
| ANGLO | 076 195 |
| ANITECH 049 076 152 195 407 | |
| ANSONIC | 045 049 107 112 152 195 210 226 391 |
| 413 421 | |
| ARC EN CIEL | 074 182 186 424 453 463 |
| ARCAM | 379 424 |
| ARISTONA | 049 050 065 079 112 152 160 |
| ARTHUR MARTIN | 107 127 136 139 153 307 425 |
| ASA | 020 065 078 080 091 146 171 197 307 |
| 324 375 408 449 | |
| ASBERG | 049 152 407 |
| ASORA | 195 |
| ASTRA | 195 |
| ASUKA | 050 076 123 378 379 |
Maker (BRAND) NAME CODE NUMBER (3DIGIT) LIST
| ATLANTIC | 049 050 071 113 152 236 379 |
| ATORI | 195 |
| AUCHAN | 107 425 |
| AUDIOSONIC | 049 074 076 152 182 195 213 379 421 |
| AUDIOTON | 050 076 379 421 |
| AUSIND | 090 407 |
| AUTOVOX | 050 071 078 079 080 083 090 156 236 324 379 407 413 449 468 470 |
| AWA | 018 049 131 152 195 226 320 379 426 433 |
| AYOMI | 411 |
| BAIRD | 074 102 182 209 218 379 409 |
| BANG & OLUFSEN | 324 483 |
| BARCO | 107 371 480 |
| BASIC LINE | 049 107 123 195 226 378 |
| BASTIDE | 379 |
| BAUR 049 107 150 152 172 247 249 357 414 454 470 475 | |
| BEKO | 152 241 421 433 460 |
| BEON | 049 152 163 |
| BEST | 213 421 |
| BESTAR | 049 152 226 421 |
| BINATONE | 379 |
| BLACK STAR | 413 |
| BLACKTRON | 378 |
| BLACKWAY | 378 |
| BLAUPUNKT | 057 060 113 247 249 345 451 454 481 |
| BLUE SKY | 049 123 152 195 217 232 378 380 457 |
| BLUE STAR | 378 |
| BONDSTEC | 413 |
| BOOTS | 050 106 379 |
| BPL | 049 152 378 |
| BRANDT 014 074 182 186 218 424 436 452 462 | |
| BRANDT ELECTRONIC | 074 453 463 |
| BRANDT ELECTRONIQUE | 074 182 186 453 |
| BRINKMANN | 049 152 163 |
| BRIONVEGA | 049 065 083 152 167 172 324 356 476 |
| BRITANNIA | 379 |
| BROTHER | 076 |
| BRUNS | 065 324 |
| BSR | 094 107 110 139 168 |
| BTC | 123 |
| BUSH | 018 049 076 094 106 107 123 134 139 142 172 193 195 209 217 225 226 232 307 378 379 457 458 470 480 |
| BUSH(UK) | 107 168 |
Maker (BRAND) NAME CODE NUMBER (3DIGIT) LIST
| CAPSONIC 049 076 152 380 |
| CARREFOUR 018 177 |
| CASCADE 049 064 152 195 |
| CASIO 049 152 |
| CATHAY 049 152 |
| CCE 049 152 379 |
| CENTURION 049 152 |
| CENTURY 065 163 324 411 413 481 |
| CGE 011 090 093 094 107 139 142 163 168 |
| 346 348 369 407 413 421 480 |
| CIHAN 217 |
| CIMLINE 123 134 195 |
| CITY 195 |
| CLARIVOX 049 125 163 |
| CLATRONIC 045 049 076 113 123 152 195 225 379 |
| 407 413 421 |
| CMS HIGHTEC | 379 |
| COMTEL | 125 217 |
| CONCORDE | 195 |
| CONDOR | 045 049 050 113 152 163 195 210 378 379 413 421 467 |
| CONTEC | 018 131 195 320 379 |
| CONTINENTAL EDISON | 014 074 182 186 232 424 453 462 463 |
| COSMEL | 195 213 |
| CROSLEY 065 090 093 094 104 107 139 324 346 | |
| 348 407 413 469 481 | |
| CROWN | 049 152 163 170 195 209 232 407 421 |
| 470 | |
| CRYSTAL | 477 |
| CS ELECTRONICS | 123 379 413 |
| CTC | 413 |
| CTC CLATRONIC | 045 |
| CURTIS MATHES | 126 190 |
| CYBERTRON | 123 |
| DAENYK | 042 |
| DAEWOO | 049 123 152 193 195 226 379 456 464 |
| DAINICHI | 123 379 |
| DANSAI | 049 076 141 152 195 379 |
| DANSETTE | 426 |
| DANTAX | 421 |
| DATSURA | 209 |
| DAWA | 049 152 |
| DAYTON | 049 152 195 226 |
| DE GRAAF | 107 139 209 307 479 |
| DECCA | 049 102 106 120 217 |
| DECCA(UK) | 046 049 050 102 106 131 152 379 |
| DEITRON 049 152 | |
| DENKO | 076 |
| DENON | 126 |
| DERWENT | 105 |
| DESMET | 049 113 152 |
| DIGATRON | 049 |
Maker (BRAND) NAME CODE NUMBER (3DIGIT) LIST
| DIGILINE | 049 152 |
| DIXI | 049 152 195 379 413 |
| DORIC | 104 105 |
| DREAN | 049 152 |
| DTS 195 | |
| DUAL | 049 050 107 139 152 156 168 182 243 379 414 417 424 468 470 |
| DUAL TEC | 040 050 168 195 379 |
| DUMONT | 045 065 080 102 139 146 324 375 379 449 469 |
| DUMONT-FINLUX | 020 045 078 091 104 |
| DUX | 049 112 152 |
| DYNATRON | 049 152 |
| ELBE | 049 107 123 152 172 210 243 369 391 411 421 435 |
| ELBIT | 217 |
| ELCIT | 045 046 062 065 104 107 150 168 324 413 |
| ELECTA | 076 378 |
| ELECTRO TECH | 195 |
| ELEKTA | 076 378 |
| ELG 049 152 | |
| ELIN | 020 049 107 139 152 172 195 379 470 479 |
| ELITE | 049 123 152 467 |
| ELMAN | 045 168 |
| ELTA | 195 076 379 |
| EMERSON | 012 042 049 065 113 152 225 324 378 413 475 481 |
| ERRES | 049 112 152 |
| ESC | 049 152 |
| ETRON | 049 107 139 152 195 |
| EURO-FEEL 076 | |
| EUROMAN | 049 076 152 379 421 |
| EUROPA 049 152 | |
| EUROPHON | 045 046 049 050 068 107 120 152 168 379 413 |
| EXPERT | 071 107 236 425 |
| EXQUISIT | 049 152 413 |
| FAMILY LIFE | 049 152 |
| FENNER | 152 195 226 |
| FERGUSON 049 050 074 | 076 080 082 102 103 182 218 247 409 411 436 452 472 |
| FIDELITY | 049 050 076 107 152 225 307 379 475 |
| FILSAI | 050 379 |
| FINLANDIA | 033 139 172 197 209 307 375 470 474 |
| FINLUX | 020 042 045 049 078 080 090 091 102 104 107 139 146 152 163 197 210 324 375 379 407 408 428 429 437 449 469 |
| FIRST LINE | 045 049 094 102 107 134 139 152 191 195 209 210 226 379 411 413 457 470 |
Maker (BRAND) NAME CODE NUMBER (3DIGIT) LIST
| FISHER 018 041 050 065 069 102 104 107 139 | |
| 156 172 209 320 324 379 408 414 421 470 | |
| FLINT 049 102 123 152 380 | |
| FNR 045 | |
| FORMENTI 049 090 107 113 139 307 324 379 407 467 469 480 481 | |
| FORMENTI-PHOENIX 050 104 113 307 | |
| FORTRESS 190 324 | |
| FRABA 049 152 421 | |
| FRIAC 045 049 152 195 | |
| FRONTECH 066 076 139 195 307 379 413 466 470 477 | |
| FUJITSU 042 045 071 102 107 195 236 379 | |
| FUJITSU GENERAL 195 379 | |
| FUNAI 042 076 094 | |
| GALAXI 045 049 152 | |
| GALAXIS 045 049 152 163 421 | |
| GBC 104 107 139 168 195 226 480 | |
| GE | 074 182 218 378 |
| GEANT CASINO | 107 425 |
| GEC 049 102 104 107 120 152 171 172 307 379 470 | |
| GEC(UK) | 046 050 102 107 150 162 |
| GELOSO | 062 104 107 139 168 171 195 226 307 413 469 481 |
| GENERAL | 064 074 182 |
| GENERAL TECHNIC | 195 |
| GENEXXA | 049 123 152 307 426 466 |
| GOLDHAND | 379 |
| GOLDLINE | 213 |
| GOLDSTAR(LG) | 049 050 055 107 139 152 168 172 182 195 219 379 413 414 421 460 |
| GOODMANS | 018 042 049 076 102 134 139 141 152 182 193 195 218 225 226 232 379 428 450 456 464 |
| GORENJE | 421 |
| GPM | 123 |
| GRADIENTE | 049 152 170 177 |
| GRAETZ | 049 090 104 136 139 152 153 162 171 172 198 225 307 466 469 475 |
| GRANADA | 013 018 033 041 049 102 104 105 112 120 152 171 172 198 209 218 238 241 307 379 407 425 470 471 472 474 |
| GRANADA(UK) | 046 050 090 107 139 162 307 |
| GRANDIN | 049 107 113 123 152 195 378 380 425 435 |
| GRONIC 045 379 | |
| GRUNDIG | 049 080 090 152 232 247 249 407 454 455 |
| HALIFAX 076 379 | |
| HAMPTON | 379 |
Maker (BRAND) NAME CODE NUMBER (3DIGIT) LIST
| HANIMEX | 094 |
| HANSEATIC | 018 049 050 094 104 107 113 152 172 195 241 324 378 379 391 421 455 467 470 475 |
| HANTAREX | 045 046 049 152 195 |
| HANTOR | 049 152 |
| HARLEY DAVIDSON 042 | |
| HARWOOD 049 152 195 426 | |
| HAUPPAUGE | 049 152 |
| HAVERMY | 190 |
| HCM | 049 076 123 152 163 195 378 379 426 |
| HEMA | 195 379 |
| HEMMERMANN | 150 470 |
| HIFIVOX | 074 182 186 424 453 463 |
| HIGASHI | 050 |
| HIGHLINE | 049 076 152 |
| HIKONA | 123 |
| HINARI | 012 018 042 049 066 094 107 123 134 139 195 209 232 307 |
| HISAWA | 123 378 380 425 |
| HIT | 324 |
| HITACHI | 018 020 033 049 050 074 086 099 102 104 107 110 126 127 139 150 152 162 168 171 182 186 218 238 307 379 466 469 470 472 479 |
| HITACHI FUJIAN | 013 |
| HITSU 123 195 380 | |
| HORNYPHON | 049 112 152 |
| HOSHAI 123 380 | |
| HUANYU | 193 226 379 |
| HYGASHI | 379 |
| HYPER | 050 168 195 379 413 |
| HYPERSONIC | 172 |
| HYPSON | 049 076 152 217 378 379 380 425 |
| IBERIA | 049 152 |
| ICE | 049 076 123 152 195 225 379 |
| ICES | 123 379 |
| IMPERIAL | 011 049 090 093 094 107 142 152 163 168 307 346 348 369 407 413 421 470 480 |
| INDIANA | 049 152 |
| INGELEN | 090 104 136 139 153 162 171 198 232 435 466 |
| INGERSOLL | 195 |
| INNO HIT | 046 049 050 066 102 123 152 195 217 379 407 413 |
| INNOVATION | 049 152 |
| INTERACTIVE | 210 |
| INTERBUY | 076 195 413 |
| INTERFUNK | 049 065 067 074 090 104 107 112 139 150 152 153 172 182 307 324 413 421 453 463 466 475 |
Maker (BRAND) NAME CODE NUMBER (3DIGIT) LIST
| INTERNAL 049 152 | |
| INTERVISION 045 049 055 076 107 123 152 225 232378 379 380 413 421 | |
| IR 346 | |
| IRRADIO 049 066 090 123 152 195 407 413 | |
| ISUKAI 049 123 152 378 | |
| ITC 379 480 | |
| ITS 049 076 123 152 225 378 379 | |
| ITT 042 090 107 134 139 150 157 162 171172 193 197 198 209 307 375 428 466469 470 471 475 479 | |
| ITT-NOKIA 042 090 104 107 134 136 139 150 153162 171 172 193 197 198 209 307 375470 428 433 435 437 | |
| ITV 076 049 152 413 | |
| JEAN 018 | |
| JEC 141 | |
| JET POINT 365 | |
| JVC | 018 103 123 170 182 225 409 433 439465 |
| KAISUI 049 050 123 152 195 378 379 380 | |
| KAMOSONIC | 050 |
| KAMP | 379 |
| KAPSCH | 071 107 172 236 466 |
| KARCHER 020 045 049 050 068 076 107 152 195217 378 421 435 | |
| KATHREIN | 455 |
| KAWASHO 379 | |
| KB ARISTOCRAT | 107 |
| KENDO | 045 049 055 134 152 172 210 413 421435 476 |
| KENNEDY | 071 079 104 107 139 236 369 480 |
| KINGSLEY | 379 |
| KLARMAX | 371 |
| KNEISSEL | 049 152 210 243 369 391 411 421 435 |
| KOLSTER | 045 049 152 470 |
| KONKA | 049 123 152 225 |
| KONTAKT | 232 |
| KORPEL | 049 152 |
| KORTING 065 094 113 324 421 | |
| KOSMOS | 049 152 |
| KOTRON | 076 426 |
| KOYODA | 195 |
| KRAKING | 411 |
| KRIESLER | 050 065 079 112 152 160 |
| KTV | 050 379 |
| KURO | 445 |
| KYOSHU | 076 163 426 |
| KYOTO | 107 |
| LECSON | 049 152 |
| LEMAIR | 210 |
| LENCO | 049 107 152 195 226 |
Maker (BRAND) NAME CODE NUMBER (3DIGIT) LIST
| LENOIR | 050 195 |
| LESA | 413 |
| LEYCO | 049 076 094 102 152 |
| LIESENK & TTER | 049 112 152 345 |
| LIFE | 440 441 443 444 |
| LIFETEC | 049 076 123 152 195 226 440 441 443 444 |
| LLOYD S | 195 |
| LOEWE | 035 049 089 120 152 324 391 421 |
| LOEWE OPTA | 035 046 049 065 120 144 152 213 324 |
| LOGIK | 131 225 |
| LOGIX | 195 |
| LUMA | 071 107 110 152 171 172 195 210 226 236 307 |
| LUMATRON | 049 076 107 152 172 236 379 |
| LUX MAY | 049 152 195 |
| LUXOR | 042 050 090 107 127 139 150 172 197 209 307 375 428 429 470 472 473 475 |
| LYCO | 076 |
| MAAZ | 371 |
| MADISON | 049 152 |
| MAGNADYNE | 045 046 062 065 104 107 120 139 150 168 324 413 469 |
| MAGNAFON | 045 046 050 068 090 120 379 407 481 |
| MAGNAVOX | 018 042 049 152 |
| MAGNUM | 440 441 443 444 |
| MANDOR | 076 |
| MANESTH 076 094 113 134 141 152 379 467 | |
| MANHATTAN 049 195 | |
| MARANTZ | 049 152 455 |
| MARELLI | 324 |
| MARK | 049 152 195 226 379 |
| MASUDA | 123 195 225 |
| MATSUI | 012 018 041 049 050 094 100 102 106 107 131 134 141 150 152 171 195 209 218 225 232 247 307 379 380 470 |
| MAXIMAL | 139 |
| MAXWELL 371 | |
| MEDIATOR | 049 112 152 |
| MEDION | 049 152 195 217 457 |
| MEGAS | 435 |
| MEGATRON | 126 |
| MELECTRONIC | 020 049 074 152 182 193 195 197 210 226 375 379 408 413 428 429 466 470 |
| MELVOX | 425 |
| MEMOREX | 099 195 217 |
| MEMPHIS | 102 125 195 213 |
| MERCURY | 049 152 195 |
| METZ | 049 065 067 070 092 247 324 412 420 454 481 |
| MICROMAXX | 049 152 195 |
| MICROSTAR | 440 441 443 444 |
Maker (BRAND) NAME CODE NUMBER (3DIGIT) LIST
| MINERVA 080 090 232 247 249 407 454 |
| MINOKA 049 152 426 470 |
| MITSUBISHI 013 018 049 065 105 131 152 157 190247 324 454 |
| MIVAR 046 050 058 072 081 090 120 379 391407 414 421 434 |
MONACO 195
| MORGAN S 049 152 |
| MOTION 407 |
| MOTOROLA 190 |
| MTC 152 379 421 470 |
| MTEC 106 |
| MULTISTANDARD 045 |
| MULTITEC 049 152 195 |
| MULTITECH 045 046 049 050 120 152 195 379 407 |
| 413 421 470 |
MURPHY 102 104 105 107 171 307 379
| MURPHY(UK) | 162 |
| MUSIKLAND | 123 |
| MYRYAD | 455 |
| NAD | 172 209 475 |
| NAIKO | 049 152 |
| NAKIMURA | 049 152 226 |
| NAONIS | 040 071 079 110 171 |
| NAT 085 151 | |
| NATIONAL | 033 085 104 |
| NEC | 018 049 113 131 152 177 195 226 379 380 |
| NECKERMANN | 011 049 050 065 107 139 152 163 210 247 249 307 324 357 379 413 421 455 470 481 |
NEDIATOR 152
| NEI | 049 125 152 225 477 |
| NESCO | 042 413 |
| NETSAT | 049 152 |
| NETWORK | 213 |
| NEUFUNK | 049 152 195 435 |
| NEW TECH | 049 050 152 182 195 379 |
| NEW WORLD | 123 |
| NICAMAGIC | 379 |
| NIKKAI | 018 049 076 102 123 125 139 141 152 195 213 379 066 |
| NOBLEX | 049 076 152 |
| NOBLIKO | 045 050 080 090 379 407 |
| NOGAMATIC 074 182 186 424 453 463 | |
| NOKIA | 090 104 107 134 136 139 150 153 157 162 171 172 193 197 198 209 226 307 375 428 429 433 437 465 470 475 478 479 |
| NORDMENDE | 049 074 083 150 152 182 186 218 247 |
| 307 424 453 463 469 481 | |
| NOVATRONIC | 020 049 152 226 |
Maker (BRAND) NAME CODE NUMBER (3DIGIT) LIST
| OCEANIC 086 094 104 107 108 109 139 172 209 | |
| 425 466 469 475 | |
| OCEANIC(F) | 150 |
| ODEON | 076 |
| OKANO 049 076 102 152 421 | |
| OMEGA | 076 |
| ONCEAS 050 | |
| ONWA | 123 225 |
| OPERA | 049 152 |
| OPTIMUS 099 | |
| OPTONICA | 190 |
| ORBIT | 049 152 |
| ORION | 012 042 045 049 076 094 113 131 134 139 150 152 191 195 216 366 367 426 467 |
| ORLINE | 049 123 152 |
| ORMENTI-PHOENIX | 104 |
| ORMOND | 195 |
| OSAKA | 066 |
| OSAKI | 049 066 076 102 106 123 152 226 379 426 |
| OSIO | 049 152 |
| OSO | 123 |
| OSUME | 018 102 123 |
| OTAKE | 450 |
| OTTO VERSAND | 018 049 050 074 094 104 107 113 134 139 152 172 190 218 247 249 357 362 379 413 414 454 455 467 469 470 480 481 |
| P.T ACTRON | 217 |
| PAEL | 050 379 |
| PALLADIUM | 049 107 152 163 210 247 324 357 379 413 421 470 |
| PALSONIC | 049 055 076 152 379 426 |
| PANAMA | 049 076 152 195 379 413 |
| PANASONIC | 016 049 099 104 107 139 151 152 172 396 420 466 469 481 |
| PANAVISION 049 152 210 | |
| PATHE CINEMA | 107 113 379 391 411 425 467 470 48481 |
| PATHE CINEMA(F) | 050 168 |
| PATHE MARCONI | 014 074 182 186 424 453 462 463 |
| PAUSA | 195 |
| PAUZA | 195 |
| PERDIO | 049 102 107 113 152 467 |
| PERFEKT | 049 152 |
| PERSHIN | 425 |
| PHILCO 011 016 049 065 090 093 094 104 107 126 142 152 163 168 324 346 348 369 407 413 421 480 481 | |
| PHILEX | 471 |
| PHILHARMONIC | 379 |
Maker (BRAND) NAME CODE NUMBER (3DIGIT) LIST
| PHILIPS 014 049 050 065 079 089 112 152 160 | |
| 182 193 216 217 220 226 247 249 324 427 455 482 | |
| PHOENIX 049 050 102 104 107 113 152 324 379 | |
| 421 | |
| PHONOLA 049 050 065 079 112 152 160 324 379 | |
| PILOT 049 152 | |
| PIONEER 049 074 152 172 182 209 218 307 421 | |
| 427 466 | |
| PLANTRON 049 076 152 195 | |
| PLAYSONIC 379 | |
| POLICOM 074 | |
| POPPY 195 | |
| PORTLAND 226 | |
| POWERPOINT 232 | |
| PRANDONI-PRINCE 046 090 120 171 172 307 407 413 | |
| PRECISION 379 | |
| PREMIER | 142 |
| PRIMA | 076 195 307 |
| PRINCE | 046 171 |
| PRINZ | 102 470 |
| PROFEX | 107 139 195 407 475 |
| PROFI-TRONIC | 045 049 152 |
| PROLINE | 049 102 112 191 366 436 |
| PROSONIC | 049 085 151 152 195 225 226 379 421 |
| PROTECH | 045 049 076 125 139 152 163 195 379 413 457 470 477 480 |
| PROVISION | 049 152 |
| PYE | 050 065 079 112 152 160 226 324 |
| PYMI | 049 112 152 195 226 324 |
| QUADRA VISION | 425 |
| QUASAR 045 046 068 099 413 | |
| QUELLE | 018 020 049 050 074 076 078 080 090 091 094 113 131 139 146 150 152 153 172 195 247 249 320 345 346 348 357 379 408 413 449 451 454 470 475 480 481 |
| QUESTA | 018 |
| RADIALVA | 049 074 107 123 152 |
| RADIOLA | 014 049 050 065 079 112 152 160 |
| RADIOMARELLI | 045 046 062 065 104 105 150 152 168 324 413 |
| RADIONETTE | 020 150 |
| RADIOSHACK | 049 152 |
| RADIOTONE | 049 076 152 163 195 421 426 |
| RANK ARENA | 018 |
| RCA | 190 218 436 |
| RECOR | 049 152 |
| RECTILIGNE | 049 152 |
| REDIFFUSION | 018 059 104 105 139 171 172 307 471 475 |
| REDIFFUSION(UK) | 150 162 |
Maker (BRAND) NAME CODE NUMBER (3DIGIT) LIST
| REDSTAR | 049 152 |
| REFLEX | 049 152 |
| REOC | 460 |
| REVOX | 049 152 421 |
| REX | 040 071 079 107 110 152 171 210 236 243 307 413 466 |
| RFT | 076 102 241 324 391 421 |
| RHAPSODY | 379 |
| R-LINE | 049 152 |
| ROADSTAR 049 076 123 | 152 163 195 |
| ROBOTRON | 065 324 |
| RODEX 049 152 | |
| ROWA | 458 |
| ROWSONIC | 050 |
| ROYAL LUX 421 426 | |
| RTF | 065 |
| SABA | 046 065 074 077 107 120 139 172 182 186 218 307 324 424 436 452 453 463 466 469 481 |
| SACCS 411 | |
| SAGEM | 378 380 435 |
| SAISHO | 012 050 076 107 131 134 195 307 379 477 |
| SALORA | 033 107 127 136 139 150 153 171 172 198 209 307 466 470 472 474 475 479 |
| SAMBERS | 045 046 068 090 120 407 481 |
| SANDRA | 379 |
| SANELA | 411 |
| SANSUI | 049 152 225 |
| SANTON | 195 |
| SANYO | 018 020 041 049 050 065 102 107 131 152 195 198 209 320 379 391 408 421 481 |
| SAVE | 049 152 |
| SBR | 049 112 152 |
| SCHAUB LORENZ | 090 104 136 139 153 162 171 198 307 433 469 470 475 |
| SCHNEIDER | 014 040 049 050 065 069 079 104 107 112 123 139 152 156 160 168 172 182 195 225 243 307 379 382 413 414 417 457 468 470 |
| SCOTT | 042 |
| SEARS | 042 |
| SEG | 018 045 049 050 076 107 152 172 195 232 379 413 407 457 480 |
| SEI | 012 045 049 094 107 139 152 236 324 357 469 470 481 |
| SEI SINUDYNE | 446 |
| SELECO | 040 071 079 107 110 152 171 172 210 236 243 307 369 466 476 |
| SENCORA | 195 |
| SENTRA | 123 139 141 195 |
Maker (BRAND) NAME CODE NUMBER (3DIGIT) LIST
| SERINO 380 435 |
| SHARP 018 094 170 190 320 362 |
| SHORAI 042 094 |
| SIAM 049 152 |
| SIAREM 045 046 065 104 107 120 139 324 469 |
| 481 |
| SIEMENS 018 049 066 113 152 247 249 307 320 |
| 345 451 454 469 481 |
| SIERA 050 065 079 112 152 160 |
| SIERRA 049 112 152 |
| SIESTA 421 |
| SILVA 049 152 379 |
| SILVER 018 042 049 076 152 172 |
| SINGER 045 049 065 104 152 195 324 369 413 |
| 425 |
| SINUDYNE 012 045 065 094 104 107 134 139 150 |
| 152 172 210 216 236 324 357 366 367 |
| 469 470 481 |
| SKANTIC 307 472 473 | |
| SKY 049 152 | |
| SKYWORTH 448 | |
| SOGERA | 113 |
| SOLAVOX | 066 102 107 139 172 307 466 471 |
| SONAWA | 123 |
| SONITRON | 209 379 421 |
| SONNECLAIR | 049 152 |
| SONOKO | 049 050 076 152 195 378 379 |
| SONOLOR | 107 139 172 209 357 425 466 |
| SONTEC | 049 094 152 421 |
| SONY | 018 045 131 211 346 357 358 370 |
| SOUND & VISION | 045 123 226 |
| SOUND WAVE | 049 113 163 |
| SOUNDESIGN | 042 |
| SPECTRA 195 | |
| SSANGYONG | 195 |
| STANDARD 049 050 113 123 152 195 226 379 | |
| STARLIGHT | 049 076 107 152 195 |
| STENWAY | 123 378 |
| STERN | 040 071 079 107 110 152 171 236 243 307 466 |
| STRATO | 049 076 152 195 |
| SUNKAI | 049 094 123 134 152 191 232 367 380 |
| SUNSTAR | 049 152 195 225 |
| SUNWOOD | 049 152 195 |
| SUPERLA | 379 |
| SUPERTECH | 049 123 152 195 379 |
| SUPRA | 195 226 |
| SUSUMU 123 218 | |
| SUTRON 195 | |
| SWISSLINE 413 | |
| SYDNEY | 379 |
| SYSLINE 044 | |
Maker (BRAND) NAME CODE NUMBER (3DIGIT) LIST
| SYTONG | 379 |
| TACTUS 106 | |
| TANDBERG | 065 074 078 172 182 210 213 420 449 |
| TANDY | 050 102 123 190 307 379 413 466 |
| TASHIKO 018 050 107 177 379 470 474 | |
| TATUNG | 049 050 102 106 120 131 152 217 379 |
| TCM | 440 441 443 444 |
| TEAC 049 076 152 163 195 217 378 380 426 | |
| 457 458 470 | |
| TEC | 040 050 064 168 195 213 218 243 379 |
| 413 480 | |
| TECH LINE | 049 152 195 |
| TECHICA | 123 |
| TECHNEMA | 113 467 |
| TECHNICS | 099 |
| TECHNOL ACE | 042 |
| TEDELEX | 379 |
| TEIRON | 195 |
| TEKNIKA 042 | |
| TELEAVIA | 014 074 182 186 218 424 453 462 463 |
| TELECOR | 049 107 123 152 379 |
| TELEFUNKEN | 049 064 074 082 152 182 186 187 218 |
| 230 346 348 424 436 452 453 463 | |
| TELEFUSION | 049 152 |
| TELEGAZI | 049 076 107 123 152 |
| TELEMEISTER | 049 113 152 467 |
| TELESONIC | 049 152 |
| TELESTAR | 049 152 |
| TELETECH | 049 152 195 213 413 |
| TELETON | 018 067 071 107 236 379 470 |
| TELEVIDEON | 050 104 107 113 379 |
| TELEVISO | 425 |
| TEMCO | 094 |
| TEMPEST | 049 152 195 |
| TENNESSEE | 049 152 |
| TENSAI | 020 050 055 094 113 123 152 195 225 |
| 226 379 413 450 467 | |
| TESMET | 439 |
| TETUNG | 046 |
| TEVION | 049 152 195 |
| TEXET 050 123 195 226 379 | |
| THOMSON 014 024 049 064 074 134 152 182 186 | |
| 218 230 424 436 453 462 463 470 | |
| THORN 049 102 103 106 141 152 218 226 346 | |
| 348 408 409 411 454 464 470 475 | |
| THORN-FERGUSON | 074 076 080 082 103 218 357 358 375 |
| TOKAI | 049 102 107 152 195 213 226 379 |
| TOKYO 141 379 | |
| TOMASHI | 123 378 |
| TOSHIBA | 018 045 128 141 369 379 |
| TOWADA | 045 379 470 480 |
| TOYODA | 195 |
Maker (BRAND) NAME CODE NUMBER (3DIGIT) LIST
| TRAKTON 076 | |
| TRANS CONTINENS 046 049 152 171 307 379 | |
| TRANSONIC 049 152 380 458 | |
| TRANSTEC 379 | |
| TRIDENT 379 | |
| TRISTAR 123 | |
| TRIUMPH 012 046 049 128 152 197 375 | |
| UHER 049 069 071 080 090 113 152 163 226236 307 407 414 421 467 | |
| ULTRA 409 | |
| ULTRAVOX 045 049 050 065 104 107 139 152 226324 379 413 471 | |
| UNIC LINE 049 152 | |
| UNITED 049 152 | |
| UNIVERSUM 011 012 018 020 049 074 076 094 107131 152 163 172 195 197 210 213 247320 345 346 357 375 379 407 408 413421 428 429 437 454 470 480 | |
| UNIVOX | 049 107 152 213 324 411 |
| UTAX | 050 |
| VEGAVOX | 163 |
| VESTEL | 049 107 125 152 379 |
| VEXA | 152 195 |
| VICTOR | 170 |
| VIDEO SYSTEM | 049 152 |
| VIDEOLOGIQUE | 123 379 |
| VIDEOSAT | 413 447 |
| VIDEOSYSTEM | 049 152 |
| VIDEOTECHNIC | 113 226 379 |
| VIDEOTON | 107 472 |
| VIDIKRON 045 | |
| VIDTECH | 018 |
| VIPER | 213 |
| VISIOLA | 379 |
| VISION | 049 113 152 467 |
| VISOREX | 442 |
| VISTAR | 172 236 |
| VOLTEC | 074 |
| VORTEC 152 | |
| VOXSON | 049 065 090 152 163 171 307 324 407466 |
| WALTHAM | 049 152 163 182 307 379 472 |
| WATSON | 049 107 113 123 152 195 247 467 |
| WATT RADIO | 045 050 068 104 107 139 150 379 47480 |
| WEGA | 018 049 139 152 324 |
| WEGA COLOR | 065 088 |
| WEGAVOX | 195 |
| WELTBLICK | 113 152 |
| WESTINGHOUSE | 094 152 |
| WESTON | 168 |
| WHARFEDALE | 049 152 |
Maker (BRAND) NAME CODE NUMBER (3DIGIT) LIST
| WHITE | 045 |
| WHITE WESTINGHOUSE | 049 050 113 152 213 379 467 |
| WINCO | 426 |
| WINDSTAR | 378 |
| XRYPTON | 049 152 |
| YAMISHI | 049 123 152 378 379 380 |
| YOKAN | 049 152 |
| YOKO | 049 050 076 123 152 195 379 413 421 477 |
| YORX | 123 |
| ZANUSSI | 040 071 079 110 152 171 236 307 379 |
| ZOPPAS | 040 071 079 110 171 307 |
TROUBLESHOOTING
| Problems Possible causes Solutions | ||
| No display on the front panel; No power supply | Power cord is not plugged in correctly | Plug in the power cord correctly |
| No pictures on the screen R | Receiver in Standby mode; SCART is not tightly connected to video output on TV; Incorrect channel or video output is selected | Set your receiver to “On”; Check and correct the connection; Check and correct channel and video output |
| No sound Audio cord is connected incorrectly; Volume level = 0; The MUTE) button is pressed | Check and correct the connection; Increase the volume on your TV; Press the MUTE) button | |
| Remote control does not operate | TV mode is now selected; It is pointed wrong way; Batteries are discharged or wrongly inserted | Press the STB button; Point the remote control toward the receiver; Replace batteries or insert correctly |
| Poor picture Signal strength is too weak Check the signal strength in the Info Menu; Correct alignment of your antenna | ||
| On-screen error message “No signal” | Antenna cable is not connected or not tightly connected; Incorrect connection of the antenna | Check and correct the connection; Check the signal strength on the Info Menu |
| On-Screen error messages: “No card inserted.” | Smartcard:- not plugged in correctly;- not plugged in. | (depending on models)Check the Smartcard.“Insert the Smartcard.” |
| On-screen error message “No access” | Access to the channel is not allowed | Check that you have subscribed to the channel; If your STB was off for a long period, turn it on, select the channel, and wait for authorization for up to 60 minutes |
DISPOSAL
The device, packaging material (e.g. Styrofoam) and the batteries must never be disposed of with household refuse.
Please obtain appropriate information about the regulations in your community, and dispose of all refuse in accordance with regulations at the separate locations provided.
TECHNICAL SPECIFICATIONS
Power Supply
Type: SMPS
Input voltage: AC 230V\~, 50/60 Hz
Fuse rating: 250V/T1.6AH
Power consumption: Max. 30W
Stand by: 18W
Tuner & Demodulator
Input frequency: VHF, UHF BAND (50\~870 MHz)
Demodulation: QAM DVB-C
Symbol rate: MAX 7 Msps
Constellation: 16, 32, 64, 128, 256 QAM
Cable out: Loopout for analog receiver
RF Input
Input connector: IEC, Female
Frequency range: 50 \~ 860 MHz
Input signal level: -78 \~ -20 dBm
Loop through: 50\~860 MHz
-78\~-20 dBm
50\~860 MHz, IED, Male
Video Decoder
System decoding:
MPEG 2 ISO/IEC 13818
(Transport Stream)
Profile and level: MPEG 2 MP@ML (4:2:2)
Data rate:
1\~15 Mbps
Video formats:
4:3 (normal) and 16:9 (wide screen)
Picture resolution:
720(H) x 576(V) x 50 fields/sec
Audio Decoder
System decoding:
MPEG 1 ISO/IEC 11172\~3 layer I & II
Audio mode: Stereo Audio Mode
Sampling frequency: 32, 44.1, 48kHz
Note : The specification of the STB may be changed without notice in advance.
BASE-BAND AUDIO/VIDEO OUTPUT
A/V Output
SCART(TV) : VIDEO(CVBS/RGB), AUDIO L/R SCART(VCR) : VIDEO(CVBS), AUDIO L/R RCA JACK : VIDEO(CVBS), AUDIO L/R DIGITAL AUDIO OUTPUT: OPTICAL
MEMORY
Flash: 8MB SDRAM: 64MB
BUILT-IN HDD 160GB (DCB-P853Z) 80GB (DCB-P773Z)
ACCESS EXTERNAL HDD USB2.0 (HOST)
PLAYABLE CONTENTS FILE FORMAT
Music: MP3 Photo: JPG
PHISICAL SPECIFICATION
Size (W x D x H): 381 x 267 x 60 mm Weight (Net): 3.2 Kg
Note : Actual formatted capacity may be less than what is marked on box and manual. (1GB=1billion byte)

natural_image
Simple U-shaped line drawing with no text, numbers, or symbolsDCB-P853Z/DCB-P773Z
Bruksanvisning
SWE
SÄKERHETSINSTRUKTIONER
Startinstallation....13
Basfunktioner....14
ANSLUTNING AV DIN "STB"
1. MOTTAGARENS PLACERING
5. Kanallista
7. Text-TV

8. Undertext
natural_image
Close-up of a textured surface with horizontal lines and a circular emblem (no visible text or symbols)12. Upprepningsfunktion A-B
natural_image
Black-and-white photo of a flower with visible petals and leaves, no text or symbols present.

2.1.2. Omnumrera
2.5. Kanallista
3.4. Radio


Konstellation: 16, 32, 64, 128, 256 QAM
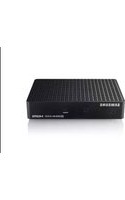


- DCB-P853Z/DCB-P773Z
- Käyttöohjeet
- TURVALLISUUSOHJEET
- Kanavaluettelo
- Teksti-TV
- Pikatallennus
- Koko opas
- Pienoisopas
- Kanavaluettelo
- TOISTETTAVAT TIEDOSTOMUODOT
- Instructions for use
- SAFETY INSTRUCTIONS
- CONNECTION OF CABLE, TV, AND STB
- WARNING!
- Correct Disposal of This Product (Waste Electrical & Electronic Equipment)
- CONTENTS
- Safety Instructions 2
- General Features ....5
- Connecting Your "STB"....6
- Description 8
- Initial Installation....13
- Basic Functions ....14
- Operating The Receiver 24
- Main Menu....24
- Guide 24
- Channel 26
- Library 32
- Timer Recording....40
- Setup....43
- Available TV Manufacturer Numbers....51
- Troubleshooting....59
- Technical Specifications....60
- GENERAL FEATURES
- USER SECTION
- TUNER SECTION
- VIDEO SECTION
- AUDIO SECTION
- CONNECTING YOUR "STB"
- LOCATION OF THE RECEIVER
- CONNECTING THE RECEIVER WITH CABLE SYSTEM
- CONNECTING THE RECEIVER TO TV
- CONNECTING YOUR VCR OR DVD PLAYER
- CONNECTING EXTERNAL AUDIO / HI-FI SYSTEM
- CONNECTING DIGITAL AUDIO SYSTEM
- INSERTING SMARTCARDS FOR CONAX SERVICES
- Connecting Figure
- DESCRIPTION
- Front Panel
- Rear Panel
- Remote Control
- Setting Up TV Operations with the Remote Control
- INITIAL INSTALLATION
- Setting Language
- Executing Auto Channel Scanning
- BASIC FUNCTIONS
- Display Screen
- Detailed programme information
- Volume Control
- Select audio track
- Select video track
- Channel List
- Favorite List
- Teletext
- To change the teletext language:
- To use the coloured-button for teletext:
- Subtitle
- To change the subtitle language:
- Programme Information (EPG—Electronic Programme Guide)
- Instant Recording
- Time Shift
- To record one channel:
- To record two channels:
- To use the Recording Option menu:
- A-B Repeat Function
- Bookmark Function
- To add a bookmark:
- To find a preset bookmark:
- To delete a bookmark:
- To move to the bookmark starting point:
- Info Menu
- On live programme
- While a recorded file is played
- Signal Info
- Recording Status
- The following on screen display will appear:
- Guide
- Full Guide
- Mini Guide
- Using the colour buttons
- Channel
- Favorite Channel
- Remove Favorite channel
- Renumber
- Extras
- Auto Scanning
- Manual Scanning
- Linear Scanning
- Channel List
- ICONS of the Channel List
- Sort
- Lock
- Add to FAV.
- Rename
- Parental Guide
- Program Grade
- Change PIN Code
- Library
- Video
- Sort
- Move
- Rename
- Lock/Unlock
- Delete
- New folder
- Music
- Add to Playlist
- Sort
- Copy
- Rename
- Delete
- New folder
- Photo
- Slide Show
- Slide Option
- Sort
- Copy
- Rename
- Delete
- New Folder
- Radio
- Timer Recording
- Scheduled Recordings
- Add
- Edit
- Delete
- EPG Setting
- Manual Setting
- Setup
- PVR
- Time Shift Buffer
- Disc Manager
- To format the disc:
- Preferences
- Screen Ratio
- Aspect Ratio
- Video Out
- Dolby Digital
- SRS
- Transparency
- Automatic Subtitles
- Language
- OSD
- Primary Audio Out
- Secondary Audio Out
- Audio Priority
- Primary Subtitle
- Secondary Subtitle
- System
- Product Information
- To upgrade software:
- Reset
- Conax
- Product Ordering
- Subscription Status
- Event Status
- Tokens
- Change CA PIN
- Change Signature PIN
- Maturity Rating
- About Conax CA
- AVAILABLE TV MANUFACTURER NUMBERS
- TROUBLESHOOTING
- DISPOSAL
- TECHNICAL SPECIFICATIONS
- Power Supply
- Tuner & Demodulator
- RF Input
- Video Decoder
- Audio Decoder
- BASE-BAND AUDIO/VIDEO OUTPUT
- A/V Output
- MEMORY
- PLAYABLE CONTENTS FILE FORMAT
- PHISICAL SPECIFICATION
- Bruksanvisning
- SÄKERHETSINSTRUKTIONER
- Startinstallation....13
- Basfunktioner....14
- ANSLUTNING AV DIN "STB"
- MOTTAGARENS PLACERING
- Kanallista
- Text-TV
- Undertext
- Upprepningsfunktion A-B
- Omnumrera
- Kanallista
Brand : SAMSUNG
Model : DCB-P773Z
Category : Receiver