MM436 - Heating Manta - Free user manual and instructions
Find the device manual for free MM436 Manta in PDF.


| Product Type | Convection Heater |
| Model | MM436 |
| Brand | Manta |
| Power | 2000W |
| Heat Settings | 3 (750W / 1250W / 2000W) |
| Voltage | 220-240V |
| Frequency | 50/60Hz |
| Protection Class | II |
| Overheating Protection | Yes (automatic cutout) |
| Indicator Light | Yes |
| Thermostat | Yes (smoothly rotation control) |
| Mounting Options | Free standing on feet or wall mounted |
| Included Accessories | Feet with screws, wall mounting brackets |
| Safety Features | Automatic cutout, do not cover |
| Usage Restrictions | Indoor use only, not for drying clothes, keep away from children |
| Cleaning Instructions | Wipe with soft cloth, vacuum dust from grills |
| Wall Mounting Minimum Height | 40 cm from floor |
| Customer Service | +48 22 332 34 63, serwis@manta.com.pl |
| Approvals | CE, RoHS, GS |
| Color | White |
| Heat Control | Two switches and thermostat dial |
| Safety Warning | Do not use near flammable or heat-sensitive items |
Frequently Asked Questions - MM436 Manta
User questions about MM436 Manta
0 question about this device. Answer the ones you know or ask your own.
Ask a new question about this device
Download the instructions for your Heating in PDF format for free! Find your manual MM436 - Manta and take your electronic device back in hand. On this page are published all the documents necessary for the use of your device. MM436 by Manta.
USER MANUAL MM436 Manta
natural_image
Exterior view of a white electric heater with black ventilation grilles and control buttons (no visible text or symbols)Instrukcja obsługi
User's Manual
MM436
Spis treści
UWAGI DOTYCZACE BEZPIECZEŃSTWA 3
MONTAZ 4
UŻYTKOWANIE 4
CZYSZCZENIE 5
SPECYFIKACJA 6
GENERAL SAFETY 8
ASSEMBLY 8
TO USE 9
CLEANING AND MAINTENANCE. 9
SPECIFICATION....10
natural_image
Abstract black-and-white circular logo with interlocking curved shapes (no text or symbols)MANTA
RoHS
① C E

INFOLINIA SERWISOWA
tel: +48 22 332 34 63
- Do not cover, restrict air inlet/out or use to dry clothes.
- Do not use without feet attached.
- Only use in the upright position on a flat level surface.
- The surface of this fan heater is not closely supervise any children and pets in using.
- Do not use fan heater near flammable or heat sensitive items.
- Do not position in point of or under power sockets, shelving or other obstructions to air flow.
- This appliance is not intended for use by persons (including children) with reduced physical, sensory or mental capabilities, or lack of experience and knowledge, unless they have been given supervision or instruction concerning use of the appliance by a person responsible for their safety. Children should be supervised to ensure that they do not play with the appliance.
Electrical Safety
- For indoor use only.
- Switch off and unplug when not in use
- Do not full the heater along the cord or use if damaged
- Do not use heater in humid or wet environments
- If the supply cord is damaged. It must be replaced by an electrician or similarly qualified person to avoid hazard.
Assembly
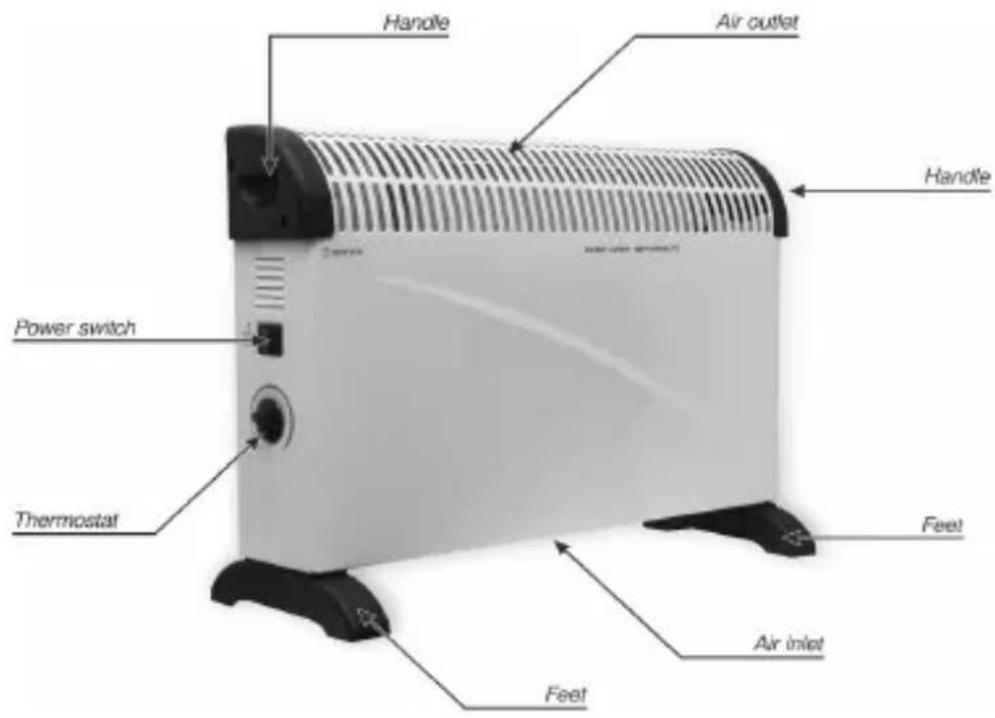
Carefully turn the radiator on it's side to fit the feet Position each feet as shown in the picture below, and secure using the self tapping screws provided. Two screws are required for each feet and this unit must not be used without the feel firmly attached
To Use
Turn the heater to the "off" position before plugging in. The operating temperature is selected by a combination of the heater switches and thermostat. The hottest setting will be when the heaters switches are both on and the thermostat isturned to "maximum". To determine the correct working temperature for your conditions, turn the heater to "high" and the thermostat to "maximum" when the room has reached the required temperatu re turn the thermostat slowly to the left until the temperature is off. The temperature will now be kept constant. If you want to lower the operating temperature select the one of the heater switch only and repeat the above procedure. The heater is fitted with an automatic cutout in the event that it overheats. If is this activates, turn the heater to the off position and unplug. Allow the heater to cool and remove anything restricting the airflow before using the heater again. If the automatic cut out operates repeatedly contact a quantified electrician for advice.
Notes
For maximum benefit, closing windows and door when the heater is open Do not cover the ventilation holes as this will cause overheating and will activate the cut out.
CCCllleeeaaannniinnnggg aaannnddd mmma To maximum the efficiency of the heater cleans regularly. Switch power switches to OFF position, unplug and allow the heater to cool. Wipe surfaces with a soft cloth. Do not use detergent or abrasives as this with scratch the surface. Ensure the intake grills free front dust, as this will reduce the airflow. Light accumulated dust can be removed with soft cloth or vacuum cleaner. Allow surface to fully dry before using the heater again.
Maximum the Life of Your Heater
Avoid knocking or scratching the heater. Do not in dusty environment. When not in use cover heater and store in clean, cool and dry area.
NOTE!
Product design and Technical parameters may be change without notice. This mainly concerns parameters technical, software and user manual present. Users Manual is a general orientation on service product.
Manufacturer and distributor do not assume any responsibility as compensation for any inaccuracies errors in the descriptions appearing in this user manual.
IIINNNSSSTTTAAALLLLLLAAATTTIIOOONNN WWWAAALLLLLL HHHEEEAAATTTEEI
NNNOOOTTTEEE!!!
• The heater should be mounted at a distance of at least 40 cm from the floor.
• The distance of the radiator from the wall appoint four brackets included.
- Feet heater should not be installed.
• The heater should not be hung on the walls made of wood or covered with wood paneling.
- Measure the distance between the two slots on the back of the device (see Figure A)
- Drill two second horizontally at the same distance in the wall and insert dowels into the holes.
- Place the brackets standing indicated in the picture B and tighten them in this position by means of screws.
- Before installing the unit on the brackets, screw the brackets into two other devices described in the picture C.
- Attach the device to the wall. To do this, hold the heater in such a way that the slots hit the brackets, and then add half of the heater to the brackets so that the device supports settled in the grooves.
- As soon as the device is set correctly, mark a dot on the wall in the hole of each bracket on the device, then remove the device from the upper brackets. Drill a hole in the wall on each selected early in the bottom of the dot and insert the dowel in each hole. Attach the unit back on the wall, insert the bolts through the brackets underneath the unit and tighten them.

| Name MM436 Convection Heater 2000W | |
| 3 heat settings (750W/1250W/2000W) | |
| Indicator light + | |
| Overheating protection + | |
| Smoothly rotation control + | |
| Free standing or wall mounted + | |
| Rated Voltage 220V-240V | |
| Rated Frequency 50Hz/60Hz | |
| Protection class II | (ZTA48) |
| GS approval | (CATX) |

INFORMATION ON THE CORRECT PROCEEDINGS IN THE CASE OF DISPOSING OF ELECTRONIC AND ELECTRIC DEVICE
The crossed dust bin symbol placed on our products indicates that the redundant electric or electronic products should not be disposed together with household waste.
Appropriate action in the event of having to dispose of equipment or components, or recycle them involves bringing the machine to a collection point where it will be accepted free of charge. In some countries you may dispose of the product when purchasing a new device.
The correct disposal of this product makes it possible to preserve the earth's natural resources for longer and prevents the degradation of the environment. Information about collection points is issued by local authorities. Incorrect disposal of waste is subject to penalties provided for in the law of the relevant area.

natural_image
Abstract black-and-white circular logo with interlocking curved shapes (no text or symbols)MANTA

CE

CUSTOMER SERVICE
tel: +48 22 332 34 63 or e-mail: serwis@manta.com.pl
FROM MONDAY TO FRIDAY, IN HOURS: 9.00-17.00
The manufacturer reserves the right to introduce changes
- MM436
- Spis treści
- MANTA
- INFOLINIA SERWISOWA
- Electrical Safety
- Assembly
- To Use
- Notes
- Maximum the Life of Your Heater
- NOTE!
- IIINNNSSSTTTAAALLLLLLAAATTTIIOOONNN WWWAAALLLLLL HHHEEEAAATTTEEI
- NNNOOOTTTEEE!!!
- INFORMATION ON THE CORRECT PROCEEDINGS IN THE CASE OF DISPOSING OF ELECTRONIC AND ELECTRIC DEVICE
- CE
- CUSTOMER SERVICE
Brand : Manta
Model : MM436
Category : Heating