
Bolla PD3106 - Ignition Kuzco - Free user manual and instructions
Find the device manual for free Bolla PD3106 Kuzco in PDF.


| Product Type | Single lamp LED pendant |
| Brand | Kuzco |
| Model | Bolla PD3106 |
| Category | Lighting |
| Power Source | Hardwired (120V AC) |
| LED Module | Pre-wired, integrated (do not touch) |
| Dimmer Compatibility | ELV (Electronic Low Voltage) dimmer required |
| Maximum Cable Length | 72 inches (adjustable via push release) |
| Installation | Mounting plate, junction box, wire nuts (white to white, black to black, ground to ground) |
| Glass Cover | Domed glass, screw clockwise to secure |
| Safety Precautions | Turn off power at fuse box; hire qualified licensed electrician; wear gloves |
| Technical Support | 1-877-452-6858 |
| Material | Metal and glass |
Frequently Asked Questions - Bolla PD3106 Kuzco
User questions about Bolla PD3106 Kuzco
0 question about this device. Answer the ones you know or ask your own.
Ask a new question about this device
Download the instructions for your Ignition in PDF format for free! Find your manual Bolla PD3106 - Kuzco and take your electronic device back in hand. On this page are published all the documents necessary for the use of your device. Bolla PD3106 by Kuzco.
USER MANUAL Bolla PD3106 Kuzco
Single lamp LED pendant.
Please Note:
- All Kuzco LED fixtures come with pre-wired LED module(s).
- Unless instructed to do so, please do not touch any part of the LED module(s) as any unnecessary contact with the module could cause permanent damage.
-
For dimming, an ELV (Electronic Low Voltage) dimmer is required.
-
Remove the fixture from its original packaging and remove the fixture mounting plate from within the hardware package.
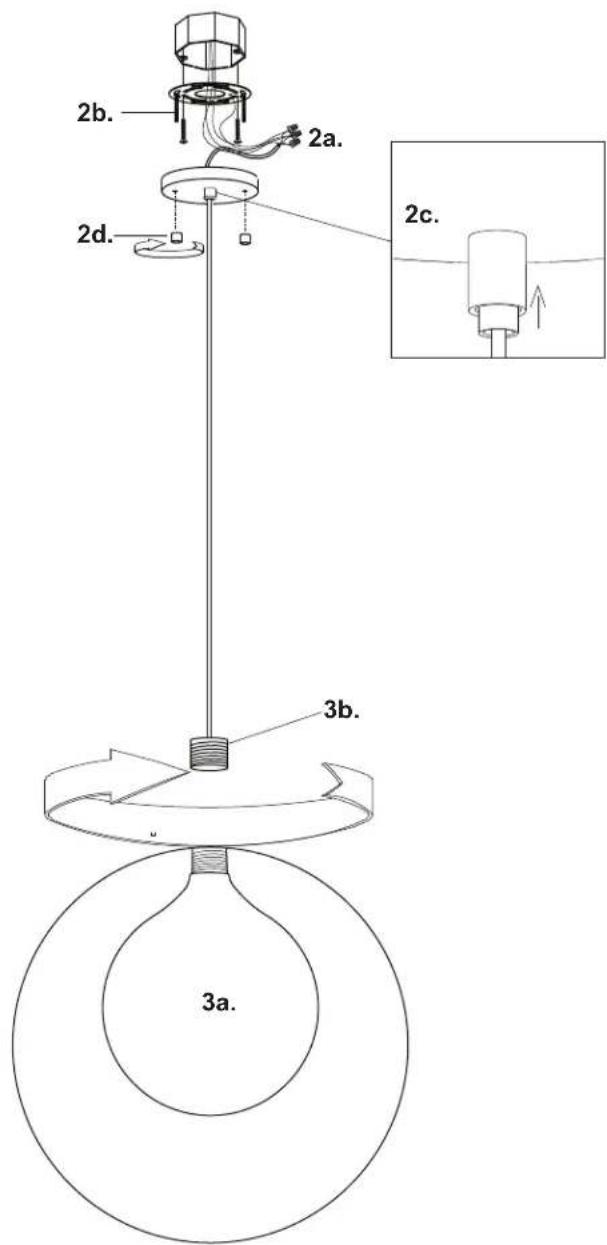
- Attach the fixture to the mounting plate, which is attached to the electrical junction box on the ceiling. First attach all wiring (2a) with the provided marrets (white to white "N", black to black "L", ground to ground "G"). Push the screws (2b) through the holes in the back of the fixture so they are poking through into the center of the fixture. If desired, adjust the cables using the push release (2c) and pull down the cable to a maximum of 72 inches. Once this is complete you can screw on the decorative nuts (2d) until the fixture is secured to the ceiling.
- With the fixture connected to the junction box and mounting plate, next step is to install the glass cover (3a) onto the fixture. With one hand, push the domed glass (3a) up against the fixture (3b) and thread clockwise until domed glass is secure. Caution, do not use exsive force when tightening.
- You have now completed the installation of your fixture, enjoy.
START FROM HERE
- Make sure power is completely off at the fuse box.
- Have your fixture installed by a qualified licensed electrician
- Prepare everything in clear area.
- Wear gloves at all times during this installation.
- Read instructions carefully before you start assembly.
- Keep this instruction sheet for future reference.
Technical Support: 1-877-452-6858

Brand : Kuzco
Model : Bolla PD3106
Category : Ignition