
OMX-07HMHM0001 - HDMI switch Ocean Matrix - Free user manual and instructions
Find the device manual for free OMX-07HMHM0001 Ocean Matrix in PDF.


| Product Type | 4x4 HDMI Matrix Switcher with Downscaling |
| Dimensions (LxWxH) | 8.5 x 5.1 x 1.3 in |
| Weight | 1.03 lbs |
| Power Supply | 12V/2A DC (included) |
| Max Resolution | 4K@60Hz YUV 4:4:4 |
| Bandwidth | 18 Gbps |
| HDMI Inputs | 4 x HDMI 2.0 |
| HDMI Outputs | 4 x HDMI 2.0/1.4 |
| Audio Outputs | 4 x SPDIF Coaxial, 4 x Analog Audio (Phoenix plugs) |
| HDR Support | HDR10, HLG, Dolby Vision |
| Audio Formats | PCM 2.0, Dolby TrueHD, DTS-HD Master Audio, LPCM 7.1 |
| Control Methods | Front panel, IR remote, RS232, TCP/IP, Web GUI, Presets |
| HDCP Compliance | HDCP 1.4 and 2.2 |
| EDID Management | Built-in EDID learning and user EDID |
| Operating Temperature | 32°F to 104°F |
| Included Accessories | 12V/2A power supply, remote control, IR extender cable, 5 Phoenix plugs |
| Safety Precautions | Use only supplied PSU; do not expose to moisture; do not block vents |
| Maintenance | Clean with dry cloth; avoid liquid ingress |
| Warranty | 1 Year |
Frequently Asked Questions - OMX-07HMHM0001 Ocean Matrix
User questions about OMX-07HMHM0001 Ocean Matrix
0 question about this device. Answer the ones you know or ask your own.
Ask a new question about this device
Download the instructions for your HDMI switch in PDF format for free! Find your manual OMX-07HMHM0001 - Ocean Matrix and take your electronic device back in hand. On this page are published all the documents necessary for the use of your device. OMX-07HMHM0001 by Ocean Matrix.
USER MANUAL OMX-07HMHM0001 Ocean Matrix
4K HDR 4x4 HDMI Matrix Switcher with
Downscaling - 18Gbps
OPERATION MANUAL


natural_image
Ocean wave pattern with dark blue and white sea (no text or symbols)Description:
The Ocean Matrix OMX-07HMHM0001 allows up to four HDMI source device connections to independently distribute any source to up to four connected HDMI displays. This HDMI 2.0 unit supports up to 4K@60Hz with flexible switching options for ease of use, as well as digital and analog audio extraction. The OMX-07HMHM0001 also supports mixed 4K & 1080p display outputs and features built-in downscaling for simultaneously displaying 4K content to a 4K monitor and 1080p content to a 1080p monitor.
Features:
- 4 x HDMI 2.0 Inputs
• 4 x HDMI 2.0/1.4 Outputs
• 4 x SPDIF Coaxial Audio outputs
• 4 x Analog Audio outputs
• Supports 4K@60Hz YUV 4:4:4
• Audio Sampling Rates up to 192kHz
• Supports HDR10, HLG, and Dolby Vision
• Supports IR, RS232 control, TCP/IP control, web GUI control, or Push Button control
• PCM2.0, Dolby True HD, DTS-HD Master Audio, and LPCM 7.1 Supported
• Supports Analog and SPDIF Audio Extraction
• 18Gbps Bandwidth
• HDCP 1.4 and 2.2 Compliant
• Built-in EDID Management and Learning
Specifications:
- Operating Temperature: 32 F to 104 F
• Max Resolution: 4K@60hz YUV 4:4:4 - Ethernet Port (IP Control): RJ45 Female
• IR Ext Port: 1 x 3.5mm Stereo Jack
• Bandwidth: 18 Gbps
• Dimensions (LxWxH): 8.5 x 5.1 x 1.3in
• Weight: 1.03lbs
• Power Consumption: 14W (Max)
Product Includes:
• 1 x 12V/2A DC Power Supply
- 1 x Remote Control
- 1 x IR Ext RX Cable
- 5 x Phoenix Plugs for RS232 Cable Termination & L/R Audio Termination
Operation Controls and Functions:

- LCD Screen / IR Receiver Window
- Output 1-4: Press to choose an output, press again to cancel. Press and hold to choose all outputs, press and hold again to cancel all.
- Input 1-4: Press to choose one input, workable only if output is already chosen, press and hold to choose one input for all outputs.
- PRESET: PRESS TO ACCESS PRESETS.
- UP Button
- LOCK: Press and hold to lock, repeat to unlock. When locked, all other buttons are not accessible.
- MENU: Press to access main menu interface or return to the previous menu.
- DOWN Button
- ENTER: Press to confirm
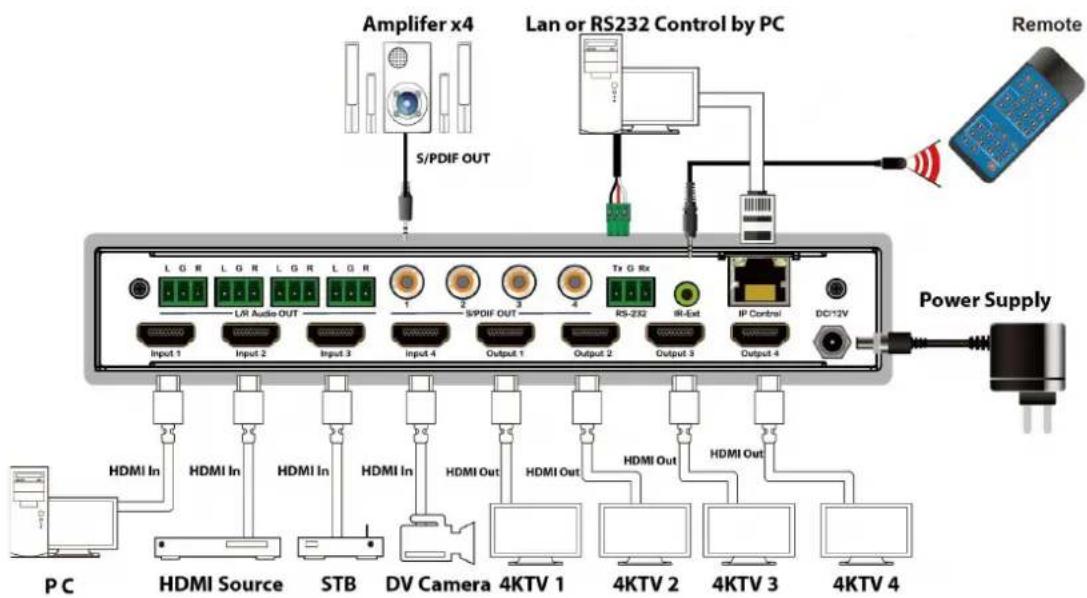

- Analog Audio Out
- S/PDIF Audio Out
- RS232 Control
- IR-Ext
- Ethernet Port
- DC12V/2A Input
- HDMI Output
- HDMI Input
Connecting and Operating:
- Connect source devices to input ports of the matrix
- Connect HDMI output ports to a TV or other HDMI devices
- Optional: Connect RS232 cable from PC RS232 port
- Optional: Connect an ethernet cable from the TCP/IP port on the matrix to a local network
- Connect 12V power supply to DC power socket
- Power on the matrix, HDMI sources and displays
Remote Control Description:

- Power On / Standby
- M: Turn off the HDMI output audio
- W: Lock remote control
- Outputs 1-4
- All: Selects all outputs
- X: Turn off output channel
- PTP: Mirror all inputs and outputs
a. Ex. Input 1 to output 1, input 2 to output 2 etc.. - Inputs 1-4
- For switching inputs left and right
- For switching inputs left and right, up and down
Note:
- Power on / Standy: press for standby mode, LCD screen will show "System Shutdown", HDMI output 5V will disconnect and TV without image. Press again to wake device, HDMI output will return to normal.
• Video Switch: output + input (ex. output 1 + input 2, switches output 1 to input 1) - Turn off HDMI Output Audio: output + M (ex. output 1 + M, turn off output 1 audio)
- Lock Remote Control: press W to lock, press again to unlock
- Turn off Output Channel: output + x (ex. output 1 + X, output 1 turns screen black, output + X again, to return normal)
- Switching Input Left and Right: output + < or >; (ex. All + <, TV image will change according to the switching input and skip automatically if there is no input signal.
Panel Control Description:
Video Switch Operation:
Signal switching options includes 4 switching channels, which can be randomly configured as input/output according to requirements to form a 1x4 to 4x4 matrix. It can switch any input signal to 1 channel output or all channel outputs.
Operation format: "Output channel" + "input channel", or press and hold "input channel"

For example:
To switch output 1 to input 4:
Press output 1 + input 4 to complete switch
Note: Press output + input to switch; then press input button again to switch input (no need to repeatedly press output)
Video Control:
There are 2 sub-menus in video interface: 1: Switching 2: On/Off
| Menu> | ||
| 1/6 | 0/2 | |
| Video > | Switching > | |
| Audio > | On/Off > | |
| EDID > | ||
| Preset > | ||
| Setup > |
Video Switching:
Operation:
- Select "Video" in the main menu, press "ENTER" button
- Press "up and down" button to choose "Switching"
- Press "Enter" to enter the next sub-menu
- Press the "up and down" button to select "Output 1 - 4" ("All" means all output, "Switching")
- Press "Enter" to enter the next sub-menu
- Press the "up and down" button to select input
- Press "Enter" button to complete video switching

| Menu> Video> Switching> | |
| 1/5 | 0/4 |
| Output1 > | Input1 @ |
| Output2 > | Input2 |
| Output3 > | Input3 |
| Output4 > | Input4 |
| All > | |
Output Switch Control:
Video output is open by default but you can open/close any output port, or open/close all output ports:
- In the main menu, select "Video" and press "Enter" button
- Press "up and down" button to select "On/Off"
- Press "Enter" button to enter the next sub-menu
- Press "up and down" button to select "output 1-4"
- Press "Enter" to enter the next sub-menu
- Select Output-HDMI 1-4, press "Enter" button to enter the next sub-menu
- Press the "up and down" button to select "Off" or "On"
- Press "Enter" button to confirm that the output port is open/closed
| Menu> Video> | ||
| 2/2 | 0/5 | |
| Switching > | Output1 > | |
| On/Off > | Output2 > | |
| Output3 > | ||
| Output4 > | ||
| All > |
| Menu> Video> On/Off> | |
| 1/5 | 0/2 |
| Output1 > | Off |
| Output2 > | On @ |
| Output3 > | |
| Output4 > | |
| All > | |
Audio Control Interface:
There are 2 sub-menus in audio control interface: Line out & De-Embed (both are default open)

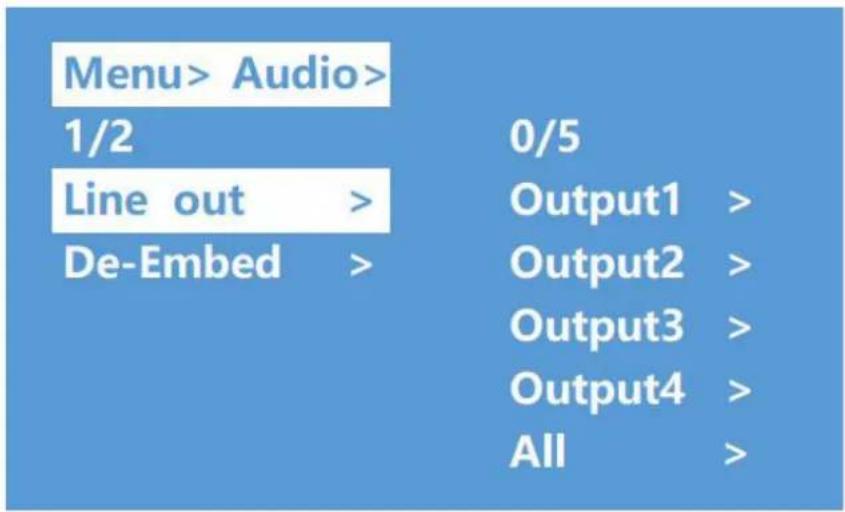
Switch Output Audio:
"Line out" means switch HDMI output audio, you are able to mute the TV from any one HDMI output channel
Operation:
- Select "Audio" in main menu and press "Enter" button
- Press "up and down" button to select "Line out", press "Enter" button, you are then able to select output 1-4 and all by pressing the "up and down" button. Press "Enter" button to choose "on" and "off"
- Ex. to mute an HDMI connected to output1, press "Audio", "Enter", "Line Out", "Output1-HDMI1", "Off", "Enter"
Audio Extraction Control:
"De-Embed" to set the output audio for both analog and SPDIF audio, can select or mute any one audio channel
Operation:
- Select "Audio" in the main menu and press "Enter" button
- Press the "up and down" button to select "De-Embed", press "Enter" button, you are then able to select output 1-4 or all via pressing "up and down". Press the "Enter" button to choose "on" and "off"
- Ex. to turn off audio extraction on HDMI output1 press "Audio", "Enter", "De-Embed", "Output1", "Off", you will then return to the upper menu after "Enter"
| Menu> Audio> | |
| 2/2 | 0/5 |
| Line out > | Output1 > |
| De-Embed > | Output2 > |
| Output3 > | |
| Output4 > | |
| All > | |
EDID Setting Interface:
EDID management: User EDID, build-in EDID, Copy EDID mode
The default EDID is "Default1"
| Default1 | 4K60444-LPCM:2.0,HDR:HLG | Default2 | 4K60 420-LPCM: 2.0, HDR:None |
| Default3 | 4K30444-LPCM:2.0,HDR:None | Default4 | 1080P60 444-LPCM: 2.0, HDR:None |
| Menu> | |||
| 3/6 | 0/5 | ||
| Video | > | Input1 | > |
| Audio | > | Input2 | > |
| EDID | > | Input3 | > |
| Preset | > | Input4 | > |
| Setup | > | All | > |
Ex. Switch default1 to output1:
Operation:
- Select "EDID" in the main menu and press the "Enter" button
- Press the "up and down" button to select "Input1"
- Press the "Enter" button to enter the next sub-menu
- Press the "up and down" button to select "Default1", press "Enter" to complete setting
- Behind the selected EDID, it will show the max support resolution, audio format and audio channel
| Menu> EDID> | ||
| 1/5 | 0/17 | |
| Input1 | > | Default1 @ |
| Input2 | > | Default2 |
| Input3 | > | Default3 |
| Input4 | > | Default4 |
| All | > | User1 |

Preset Application:
The Preset interface can save the current video, audio, EDID, system settings, etc..., supports 8 different presets, can preset through the web, command, panel button, and recall
Preset control interface has three sub-menus:
Call Scene
Save Scene
Clear Scene
Operation:
- Select "Preset" in the main menu and press "Enter" to enter the preset interface; you are able to call, save and clear preset
- Save preset: select "Save" and any presets 1-8, then "Enter"
- Call preset: Call, and any presets 1-8, then "Enter"
- Clear preset: Clear, and any presets 1-8, then "Enter" (the saved preset will return to the default)
| Menu> | |||
| 4/6 | 0/3 | ||
| Video | > | Call | > |
| Audio | > | Save | > |
| EDID | > | Clear | > |
| Preset | > | ||
| Setup | > | ||
| Menu > Preset > | ||
| 1/3 | 0/8 | |
| Call | > | Preset1 @ |
| Save | > | Preset2 |
| Clear | > | Preset3 |
| Preset4 | ||
| Preset5 | ||
Setup Interface
Setup interface can set serial port baud rate, DHCP switch, device reboot and factory reset.
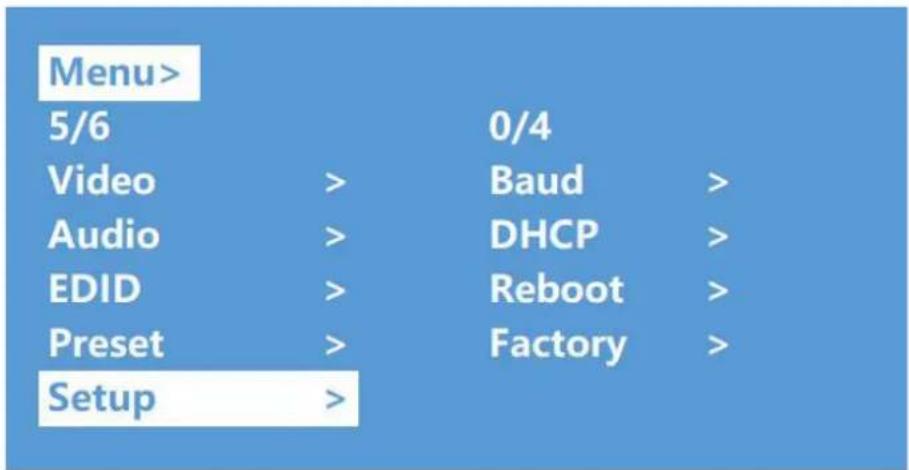
Baud Rate Setting:
Baud Rate Setting
4 options for baud rate setting: 9600, 19200, 57600, 115200. The default serial port is 115200
The below example is setting baud rate to 9600
Operation :
- Select "Setup" in the main menu and press the "Enter" button
- Press the "up and down" button to select the "Baud"
- Press the "Enter" button to enter the next sub-menu
- Press the "up and down" button to select "9600"
- press "Enter" to complete setting
| Menu> Setup> | ||
| 1/4 | 0/4 | |
| Baud > | 115200 @ | |
| DHCP > | 57600 | |
| Reboot > | 19200 | |
| Factory > | 9600 | |
DHCP Switch:
DHCP On: dynamic IP address; DHCP Off: static IP address (default is DHCP off) DHCP on operation:
- Select "Setup" in main menu and press the "Enter" button
- Press the "up and down" button to select "DHCP" setting
- Press "Enter" to enter the next sub-menu
- Press the "up and down" button to select "On"
- Press "Enter" to open DHCP to allocate an IP address automatically

Reboot:
Reboot device, default is "NO".
Operation :
- Select "Setup" in the main menu and press the "Enter" button
- Press the "up and down" button to select "Reboot"
- Press "Enter" to enter the next sub-menu
- Press the "up and down" button to select "Yes"
- Press "Enter" to complete rebooting the device

Factory Reset:
There are two factory settings:
- Factory Common: factory reset for video switch, EDID, audio and settings (IP address can't be factory reset when under "common")
- Factory All: factory set for video switch, EDID, audio, settings, presets and device name
a. Ex factory all operation:
i. Select "Setup" in the main menu and press the "Enter" button
ii. Press the the "up and down" button to select "Factory"
iii. Press "Enter" to enter the next sub-menu
iv. Press the "up and down" button to select "ALL" and press the "Enter" button
v. Press the "up and down" button to select "Yes" and press thr "Enter" button
| Menu> Setup> | |
| 4/4 | 0/2 |
| Baud > | Common > |
| DHCP > | All > |
| Reboot > | |
| Factory > | |


Query Information Interface:
System interface : query company name, device name and version information
IP interface : query device IP address, MAC address and DHCP status
Operation :
- Select "INFO" in main menu and press "Enter" button
- Press the "up and down" button to select "System" or "IP", bottom color will turn white when selected
- Press "Enter" to enter the next sub-menu, then you are able to query device information
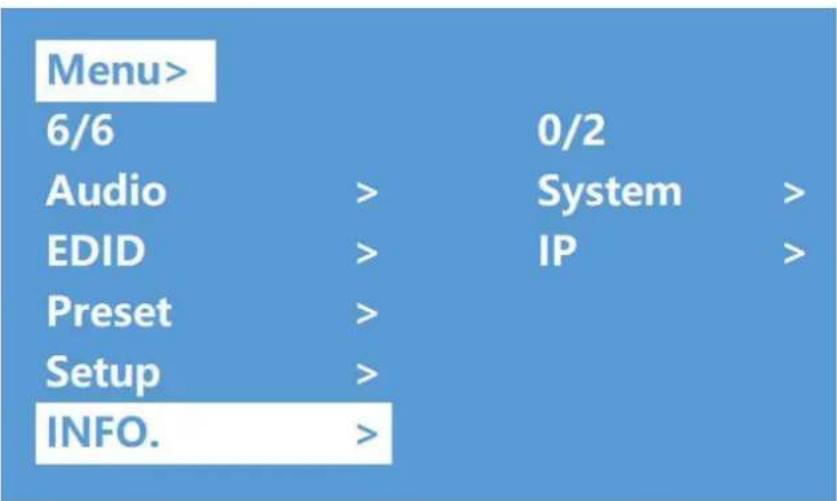

| Menu>INFO. > | ||
| 2/2 | ||
| System | DHCP | Off |
| IP | IP | 192.168.1.168 |
| MASK | 252.255.255.0 | |
| WG | 192.168.1.1 | |
| MAC | 0008-DC40-7454 | |
- RS232 Control
9.1 Open CommUart Assistant.
9.2 Comport setting:

Choose correct COM port that connect to PC in parameter configuration area
| Baud Rate: | 115200 bps(Default) |
| Parity: | None |
| Data Bit: | 8bit |
| Stop Bit: | 1bit |
9.3 Enter Port Command in Send options.

9.4.Command List
1).All commands start with “#”
2).“ _” the underline cannot omit.
3) Command head, Parameter and target need to add one "SPACE".
The following table is only an example.Please refer to the list of instructions.
| Type | Format | Value | Regulation |
| Command head | #cmd | without | |
| Explain | Can be used to search command,after receiving command, the system will feedback all open command format fields | ||
| Example1 | #cmd | ||
| Search all open command | |||
Web Control:

flowchart
graph TD
    A["Internet"] --> B["Router"]
    B --> C["Desktop Computer"]
    B --> D["Internet Icon"]
Change IP Address of PC:
Before configuring the device through the website, it is necessary to configure the IP address of the computer configured with the device (mainly to ensure that the computer and the device are set in the same network segment).
1). Open the network control center and set the computer's IP address
2). Choose to use Static IP, with the IP address set to 196.168.1.x (x ranges from 0 to 254, but cannot be consistent with the device's IP address),
3). Subnet mask set to 255.255.255.0
4). Gateway set to 192.168.1.1

Log in by Browser:
Default IP address for log-in: 192.168.1.168
Type in user name and password (default user name: admin; default password: 123456)
Note: it is suggested to use newer versions of Google, firefox, etc.. for better compatibility.

Video interface:
- Output: 01 >> 02, 01 means input, 02 means output, all means all output
Operation steps:
Click 01 >> 01 or All, then click input 01\~04
Ex: Switching input 1 to output 4; Click "04 >> 04" first, then click "01"
-
Input: 01\~04 means HDMI input 1\~4
-
OFF: Close output channel, click "OFF" to close output channel; Click "ON" to close this function. The default is "OFF"
-
Store : preset1\~preset8. Recall: call the preset; Save: save the preset
Operation steps:
1) Call preset: preset1 + Recall, call preset1
2) Save preset: preset2 + Recall, save preset2
Modify Port Name:
- Click to choose the input or output port, rename in input box, then click save & exit
- Click to choose preset, rename in input box, then click save & exit
Note: Rename limit: 1-15 characters

flowchart
graph TD
    A["Video"] --> B["Audio"]
    B --> C["EDID"]
    C --> D["Network"]
    D --> E["System"]
    F["Output"] --> G["01>>01 OFF"]
    F --> H["02>>02 OFF"]
    F --> I["03>>03 OFF"]
    F --> J["04>>04 OFF"]
    F --> K["All"]
    L["Input"] --> M["01 02"]
    L --> N["03 04"]
    O["Store"] --> P["Preset 1 Preset 2 Preset 3 Preset 4 Save"]
    O --> Q["Preset 5 Preset 6 Preset 7 Preset 8 Recall"]
    R["Modify Port Name"] --> S["Rename"]

Audio Interface:
- Click output1-4 HDMI : Turn off HDMI output audio ;
Operation:
- Ex: Turn off audio on the unit connected to HDMI output1 (TV)
-
Click output1 HDMI, color will change on the TV, will only display video (no audio)
• Re-click to turn on audio -
Click output1-4 De-Embed : turn off audio extraction function, also turn off SPDIF and a nalog audio at the same time.
Operation :
• Ex: Turn off HDMI output1 audio extraction
- Click output1 De-Embed, color will change and audio for analog and SPDIF out will turn off
• Re-click to turn on audio

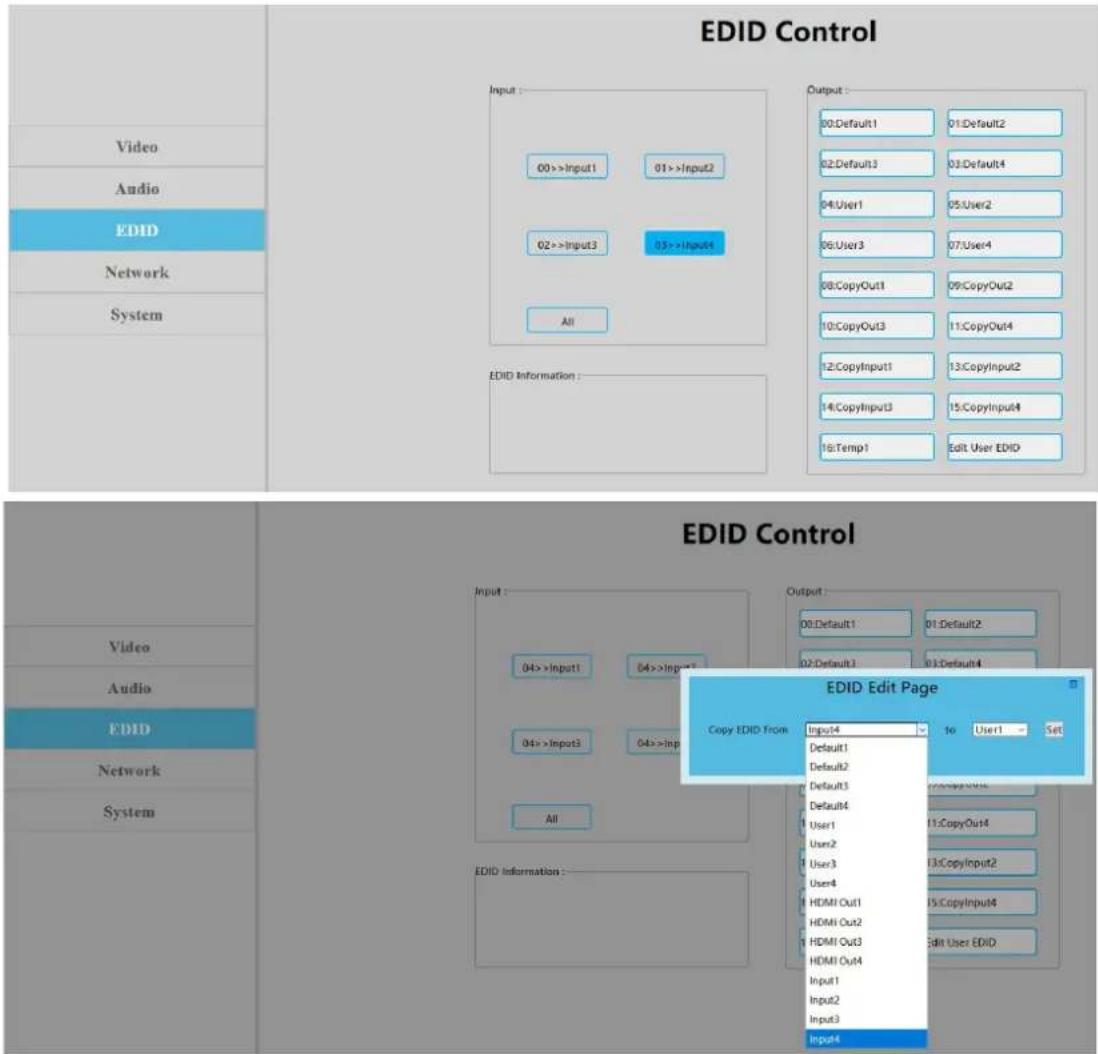
EDID Interface:
- Input: 00>> Input1, 00\~16: EDID number, Input1\~4: HDMI input1\~4
- Output: 00\~03: Default EDID, 04\~07: User EDID, 08\~11: Copy EDID, 12\~15: Input EDID, 16:
Temp EDID, refer to below for more details:
| 00 | 4K60 444-LPCM: 2.0, HDR:HLG | 01 | 4K60 420-LPCM: 2.0, HDR:None |
| 02 | 4K30 444-LPCM: 2.0, HDR:None | 03 | 1080P60 444-LPCM: 2.0, HDR:None |
| 04 | User1 | 05 | User2 |
| 06 | User3 | 07 | User3 |
| 08 | Copy HDMI out1 | 09 | Copy HDMI out2 |
| 10 | Copy HDMI out3 | 11 | Copy HDMI out4 |
| 12 | Copy input1 | 13 | Copy input2 |
| 14 | Copy input3 | 15 | Copy input4 |
| 16 | Default is empty, need save EDID to device to take effect,don't support power-off memory | ||
- EDID information: show EDID here: click "00>> Input1" or 00: "Default1", will show resolution, audio, audio channel, HDR and serial number
- Edit user EDID: Click "Edit User EDID", choose default, user, copy, input EDID on "EDID Edit Page" to save User 1-4, support power-off memory
Operation:
- HDMI input1 use second default EDID; click "00>>Input1", then click "01: Default2"
- Save copy HDMI out1 to User1: choose "default1" in "EDID Edit Page", then choose "User1" and click "Set" to finish
Network Interface:
MAC address can not be modified, for display only.
Static IP: Click DHCP switch (DHCP Off), you can modify IP address, then click "Apply" button, it will then countdown. If device IP address is the same as client IP, it will re-login into the web interface. If unable to refresh automatically, then resubmit form manually
Dynamic IP: Click DHCP switch (DHCP On), IP address is assigned by router and will turn to grey, can not be modified, but can display current IP address information.
IP address / Net Mask address / Gate Way address can only be modified when DHCP is Off
Default IP Address: 192.168.1.168

System Setting Interface:
- System Setting:
Reboot: Click to reboot device
Factory Common: Click to reset device for partial function
Factory All: Click to reset device totally
"Reboot" will not clear user parameter; "Factory Common" will not clear Network and Preset parameter; "Factory all" will reset to default totally
- Change Password: Change user name and password, then click "Apply".
Note: The user name and password, only supports 6\~15 characters

PRODUCT SERVICE
Damage requiring service:
- The unit should be serviced by qualified service personnel if:
• (a) The DC power supply cord or AC adaptor has been damaged
• (b) Objects or liquids have gotten into the unit
• (c) The unit has been exposed to rain
(d) The unit does not operate normally or exhibits a marked change in performance; The unit has been dropped or the cabinet is damaged.
• (2) Servicing Personnel: Do not attempt to service the unit beyond that described in these operating instructions. Refer all other servicing to authorized servicing personnel.
• (3) Replacement parts: When parts need replacing ensure the servicer uses parts specified by the manufacturer. Unauthorized substitutes may result in fire, electric shock, or other hazards.
• (4) Safety check: After repairs or service, ask the servicer to perform safety checks to confirm that the unit is in proper working condition.
SAFETY PRECAUTIONS
Please read all instructions before attempting to unpack, install or operate this equipment and before connecting the power supply.
Please keep the following in mind as you unpack and install the unit:
- Always follow basic safety precautions to reduce the risk of fire, electrical shock and injury to persons.
- To prevent fire or shock hazard, do not expose the unit to rain, moisture or install this product near water.
- Never spill liquid of any kind on or into this product.
- Never push an object of any kind into this product through any openings or empty slots in the unit, as you may damage parts inside the unit.
- Do not attach the power supply cabling to building surfaces.
- Use only the supplied power supply unit (PSU). Do not use the PSU if it is damaged.
- Do not allow anything to rest on the power cabling or allow any weight to be placed upon it or any person walk on it.
- To protect the unit from overheating, do not block any vents or openings in the unit housing that provide ventilation and allow for sufficient space for air to circulate around the unit
WARRANTY
1 Year

- Description:
- Features:
- Specifications:
- Product Includes:
- Operation Controls and Functions:
- Connecting and Operating:
- Remote Control Description:
- Note:
- Panel Control Description:
- Video Switch Operation:
- For example:
- Video Control:
- Video Switching:
- Operation:
- Output Switch Control:
- Audio Control Interface:
- Switch Output Audio:
- Audio Extraction Control:
- EDID Setting Interface:
- Preset Application:
- Setup Interface
- Baud Rate Setting:
- Baud Rate Setting
- Operation :
- DHCP Switch:
- Reboot:
- Factory Reset:
- Query Information Interface:
- Web Control:
- Change IP Address of PC:
- Log in by Browser:
- Video interface:
- Operation steps:
- Modify Port Name:
- Audio Interface:
- EDID Interface:
- Network Interface:
- System Setting Interface:
- PRODUCT SERVICE
- Damage requiring service:
- SAFETY PRECAUTIONS
- WARRANTY
Brand : Ocean Matrix
Model : OMX-07HMHM0001
Category : HDMI switch