
BGDC-21-2000 - Polisher BISSELL - Free user manual and instructions
Find the device manual for free BGDC-21-2000 BISSELL in PDF.


| Product Type | High-Speed Floor Burnisher/Polisher |
| Brand | BISSELL BigGreen Commercial |
| Model | BGDC-21-2000 |
| Motor Power | 1.5 HP (DC motor) |
| Operating Speed | 2000 RPM |
| Pad Size | 21 inches (diameter) |
| Voltage | 115 V (nominal), 60 Hz AC |
| Current Rating | 10.8 amps |
| Power Cord | 50 ft (15 m), 14/3 gauge, grounded |
| Chassis Material | All metal |
| Handle | Fully adjustable with locking lever |
| Pad Driver | Flexible, high-speed with hook-and-loop surface |
| Safety Features | Dual trigger controls, safety interlock switch, grounded plug |
| Grounding | 3-prong grounded plug; do not use extension cord |
| Warranty (Parts/Labor) | 1 year |
| Warranty (Motor/Gearbox) | 5 years |
| Intended Use | Indoor floor burnishing and polishing |
| Transport Wheels | 4-inch rear wheels for easy transport |
| Front Wheel Assembly | Adjustable for controlling pad pressure (2000 RPM models) |
| Motor Ventilation | Air-cooled; keep vents clean |
Frequently Asked Questions - BGDC-21-2000 BISSELL
User questions about BGDC-21-2000 BISSELL
0 question about this device. Answer the ones you know or ask your own.
Ask a new question about this device
Download the instructions for your Polisher in PDF format for free! Find your manual BGDC-21-2000 - BISSELL and take your electronic device back in hand. On this page are published all the documents necessary for the use of your device. BGDC-21-2000 by BISSELL.
USER MANUAL BGDC-21-2000 BISSELL
New Equipment Warranty
Limited Warranty
The manufacturer gives you the following limited warranty for this product if it was originally purchased for use, not resale, from BISSELL BigGreen Commercial or a BISSELL BigGreen Commercial-Authorized Retail Dealer.
The manufacturer will repair or replace, free of charge, to the original purchaser, any part which is found to be defective in material or workmanship within one (1) year of the date of purchase; five (5) years on the motor and gear box.
Drive belts, brushes, and other parts subject to normal wear are not covered by this limited warranty. This limited warranty does not apply to any part subjected to accident, abuse, or alteration, misuse, damage caused by fire or act of God, the use of voltages other than indicated on the serial number plate of this product or service of this product by other than a trained service technician.
The manufacturer does not authorize any person or representative to assume or grant any other warranty obligation with the sale of this product.
The manufacturer's limited warranty is valid only if you retain proof of purchase from BISSELL BigGreen Commercial or a BISSELL BigGreen Commercial-Authorized Retail Dealer for this product. If you purchase this product from any other source, your purchase is "AS IS," which means the manufacturer grants you no warranty, and that you, not the manufacturer, assume the entire risk of the quality and performance of this product, including the entire cost of any necessary servicing or repairs of any defects.
The manufacturer's liability for damages to you for any costs whatsoever arising out of this statement of limited warranty shall be limited to the amount paid for this product at the time of original purchase, and the manufacturer shall not be liable for any direct, indirect, consequential or incidental damages arising out of the use or inability to use this product.
Some states do not allow the exclusion or limitation of incidental or consequential damages, so the above limitation or exclusion may not apply to you.
ALL EXPRESS AND IMPLIED WARRANTIES FOR THIS PRODUCT, INCLUDING IMPLIED WARRANTIES OF MERCHANTABILITY AND FITNESS FOR A PARTICULAR PURPOSE, ARE LIMITED IN DURATION TO THE WARRANTY PERIOD, AND NO WARRANTIES, WHETHER EXPRESS OR IMPLIED, WILL APPLY AFTER THIS PERIOD.
Some states do not allow limitations on the duration of implied warranties, so the above limitation may not apply to you.
This warranty gives you specific legal rights, and you may also have other rights which vary from state to state.

BigGreen Commercial™
BISSELL BigGreen Commercial
100 Armstrong Road | Suite 101 | Plymouth, MA 02360
Phone: 800-242-1378 | Fax: 877-672-4566
www.bissellcommercial.com
Make a copy of this card for future reference.
2013 © BISSELL BigGreen Commercial. All rights reserved.
FMU-2000 HIGH-SPEED BURNISHER
SAFETY, OPERATION AND MAINTENANCE MANUAL WITH PARTS LIST
Please read before use!
HIGH-SPEED BURNISHER
1.5 HP | 2000 RPM | 20" Apron


natural_image
Exterior view of a mechanical cleaning or cleaning press machine (no visible text or symbols)2000 RPM
Fully Adjustable
Balanced Design
All Metal Chassis
Quiet Motor
Safe & Easy to Use

BigGreen Commercial™
IMPORTANT INFORMATION AND SAFETY INSTRUCTIONS
Register your Machine – Return your Warranty Registration Card! Serial No: ____
2013 © BISSELL BigGreen Commercial. All rights reserved.
Bissell®
BigGreen Commercial™
Dear Valued Customer,
Congratulations on the purchase of your BISSELL BigGreen Commercial FMU-2000 IIHigh-Speed Burnisher! The world of floor care is becoming more high-tech and competitive and we strive to provide you with the most innovative products. Our Burnisher is yet another example of this, bringing a new dimension to floor care and maintenance with its cutting-edge features, quality and value.
Please review this manual paying careful attention to the Safety Instructions section. Keep in mind that any unnecessary damage, neglect or abuse of this machine will void your warranty. You can be confident that simple maintenance will ensure that your Burnisher provides quality performance for many years to come.
If warranty questions arise, please consult your manual or contact your distributor. Should you have any questions regarding maintenance, replacing parts or ordering parts, please call an authorized distributor.
Before you begin using your Burnisher, thoroughly review the Owner's Manual.
Again, congratulations on the purchase of your BISSELL BigGreen Commercial FMU-2000 High-Speed Burnisher!
Questions or Comments?
Bissell®
BigGreen Commercial™
BISSELL BigGreen Commercial
100 Armstrong Road | Suite 101 | Plymouth, MA 02360
Phone: 800-242-1378 | Fax: 877-672-4566
www.bissellcommercial.com
(2) BISSELL BigGreen Commercial FMU-2000 Burnisher
Bissell®
BigGreen Commercial
Warranty Registration
Please take a moment to register your machine. Fill out the information below and mail back to BISSELL BigGreen Commercial immediately.
The warranty starts on the purchase date by the original purchaser, subject to proof of purchase. Please immediately register your machine by returning this Machine Registration Card at the time of purchase. If proof of purchase cannot be identified, the warranty start date is ninety (90) days after the inventory stocking date at the distributor's warehouse.
Machine Model ____ Purchase Date ____
Motor Type ____ Serial No. ____
Place of Purchase
Shipped To
Your Name ____ Phone ____
E-mail ____ Fax ____
Address Line 1
Address Line 2
City ____ State ____ Zip ____
Comments:
Mail to:
BISSELL BigGreen Commercial
100 Armstrong Road | Suite 101 | Plymouth, MA 02360
See reverse side for warranty information. Make a copy of this card for future reference.
2013 © BISSELL BigGreen Commercial. All rights reserved.
©2013 BISSELL BigGreen Commercial. All rights reserved. All word marks, logos, product configurations and registered trademarks are owned and used under the authority of BISSELL BigGreen Commercial.
FMU - 2000 HIGH-SPEED BURNISHER
By BISSELL BigGreen Commercial
Please fill out the following information for your records:
Model No:
Serial No: ____
Distributor Name:
Distributor Phone No: ____
Date of Purchase: ____
Bissell®
BigGreen Commercial™
BISSELL BigGreen Commercial
100 Armstrong Road | Suite 101 | Plymouth, MA 02360
Phone: 800-242-1378 | Fax: 877-672-4566
www.bissellcommercial.com
New Equipment Warranty
5-year warranty on motor and chassis. 1-year warranty on service labor.
Limited Warranty
The manufacturer gives you the following limited warranty for this product if it was originally purchased for use, not resale, from BISSELL. BigGreen Commercial or a BISSELL. BigGreen Commercial-Authorized Retail Dealer.
The manufacturer will repair or replace, free of charge, to the original purchaser, any part which is found to be defective in material or workmanship within one (1) year of the date of purchase; five (5) years on the motor and gear box.
Drive belts, brushes, and other parts subject to normal wear are not covered by this limited warranty. This limited warranty does not apply to any part subjected to accident, abuse, or alteration, misuse, damage caused by fire or act of God, the use of voltages other than indicated on the serial number plate of this product or service of this product by other than a trained service technician.
The manufacturer does not authorize any person or representative to assume or grant any other warranty obligation with the sale of this product.
The manufacturer's limited warranty is valid only if you retain proof of purchase from BISSELL BigGreen Commercial or a BISSELL BigGreen Commercial-Authorized Retail Dealer for this product. If you purchase this product from any other source, your purchase is "AS IS," which means the manufacturer grants you no warranty, and that you, not the manufacturer, assume the entire risk of the quality and performance of this product, including the entire cost of any necessary servicing or repairs of any defects.
The manufacturer's liability for damages to you for any costs whatsoever arising out of this statement of limited warranty shall be limited to the amount paid for this product at the time of original purchase, and the manufacturer shall not be liable for any direct, indirect, consequential or incidental damages arising out of the use or inability to use this product.
Some states do not allow the exclusion or limitation of incidental or consequential damages, so the above limitation or exclusion may not apply to you.
ALL EXPRESS AND IMPLIED WARRANTIES FOR THIS PRODUCT, INCLUDING IMPLIED WARRANTIES OF MERCHANTABILITY AND FITNESS FOR A PARTICULAR PURPOSE, ARE
LIMITED IN DURATION TO THE WARRANTY PERIOD, AND NO WARRANTIES, WHETHER
EXPRESS OR IMPLIED, WILL APPLY AFTER THIS PERIOD.
Some states do not allow limitations on the duration of implied warranties, so the above limitation may not apply to you.
This warranty gives you specific legal rights, and you may also have other rights which vary from state to state.
©2013 BISSELL BigGreen Commercial. All rights reserved.
All word marks, logos, product configurations and
registered trademarks are owned and used under
the authority of BISSELL BigGreen Commercial.
1.0 Safe Operating Conditions
READ THIS MANUAL BEFORE USING BURNISHER. KNOW THE PROPER OPERATION, CORRECT APPLICATIONS AND THE LIMITATIONS OF THIS EQUIPMENT BEFORE USE.
Reduce the Risk of Fire, Electric Shock or Injury:
- This burnisher is designed for indoor use only. Do not use outdoors. Do not expose to rain.
- Do not wash the motor with flowing water. If the motor gets wet, seek authorized service.
- Keep the vents on this air-cooled motor free from debris. Do not operate with the motor covered or with vents blocked. Do not use this machine as a floor sander.
- Never operate this machine near flammable dusts, liquids or vapors. Never use flammable solvents as a cleaning agent. Engine sparks and operating heat can cause fire.
- Never handle electrical equipment with wet hands. Never operate this machine with bare feet.
- Unplug the machine when not in use and when servicing the equipment. To unplug, grasp the plug not the cord.
- Do not operate a burnisher with damaged handle controls, cord or plug. If the equipment is not performing properly, seek repair from a qualified service supplier.
- This machine is constructed with electrical grounding at the plug. Operate only when connected to a properly grounded outlet. See section 1.2 for grounding details.
- Prevent electrical cord abuse. Do not close a door upon the cord, drive equipment over it, or run the Burnisher over it. Do not expose the cord to hot surfaces. Do not lift, pull or carry this burnisher by the cord.
- Never operate the machine over sharp objects that can be thrown out and harm the operator and damage the floor. Sweep hard floors before scrubbing or buffing. Vacuum clean carpets before shampooing or bonnet cleaning.
• Train your staff in proper use of this machine.




8.0 Machine Parts List
| Drawing No. | Description | Part No. | Qty. | |
| 46 | Drip Cap Mount Screw | B-151 | 6 | |
| 47 | 66 Fr. Drip Cap Cover | M-242 | 2 | |
| 48 | 66 Fr. Drip Cap Cover Bumper - Green M-239-G | 2 | ||
| 49 | UHS Motor Screen | SCR-01 | 1 | |
| 50 | UHS Motor Screen Bumper - Green M-238-G | 1 | ||
| 51 | Cork Drip Cap Gasket | M-248 | ||
| 52 | 1.5 IIP, DC Motor | MOTOR-DC-IMP | 1 | |
| 53 | Washer | B-28 | ||
| 54 | Motor Mount Bolt for UHS Motor | B-143 | ||
| 55 | Bearing Block Assembly Mount Bolt | B-144 | 4 | |
| 56 | Bearing Block Assembly | BBA-1 | ||
| 57 | Bearing Block Gasket | B-145 | ||
| 58A | 19" Base Casting | A-131 | ||
| 58B | 20" Base Casting | A-132 | ||
| 59 | Motor Mount Lock Nut | B-150 | ||
| 60 | Bumper - Green | BUMPER STOCK | ||
| 61 | Ground Wire Screw | B-68 | ||
| 62 | 20" Floppy Disk Driver | DC-20 | ||
| 63 | Big Mouth Retainer | PR7-ABL | ||
| 64 | Screw | B-95 | ||
| 65 | Bolt | B-149 | ||
| 66 | Pulley Driver | PD-1 | ||
| 67 | Bumper Screw | B-68 | ||
| 68 | Bumper Strap | BUMPER STRAP | ||
| 69 | Drive Belt DC-2000 | DB-1 | ||
| 70 | Allen Head Set Screw For PD | B-148 | ||
| 71 | Pulley To Fit Motor 2000 RPM DC | PM-1 | ||
| 72 | Cotter Pin Wheel Axel | B-142 | ||
| 73 | Spring Washer | B-51 | ||
| 74 | Wheel Axel | B-16 | ||
| 75 | 6" Operating Wheel | M-250 | ||
| 76 | Transport Wheel Axel Bolt | B-26 | ||
| 77 | 4" Transport Wheel M-209 | 2 | ||
| 78 | Lock Nut | B-77 | ||
| 79 | Front Wheel Assembly | FCA-1 | ||
| (2000 RPM Models Only) | ||||
7.0 Machine Schematic Drawing 2.0 Grounding Instructions

(12) BISSELL BigGreen Commercial FMU-2000 Burnisher
DANGER: IMPROPER GROUNDING METHOD CAN RESULT IN A RISK OF ELECTRIC SHOCK.
Electrical equipment must be grounded. If it should malfunction or breakdown, grounding provides a path of least resistance for electrical current and reduces the risk of electric shock. The vacuum is equipped with a cord containing a grounding conductor and grounding plug. The plug must be inserted into an appropriate outlet that is properly installed and grounded in accordance with all local codes and ordinances.
If repair or replacement of the cord or plug is necessary, DO NOT connect the grounded wire to a flat bed terminal. The green insulated wire, with or without yellow stripes, is the grounding wire.
The BISSELL. BigGreen Commercial High-Speed Burnisher operates on a 10.8 amp nominal 115V, 60 Hz, A.C. power circuit (motors may be custom wired at the factory 220V, 50 Hz international operation). The, amp, hertz and voltage ratings are listed on the motor spec label found on each Burnisher. Using voltages above or below those indicated on the spec label will damage the motor. Always check your local voltage requirements.
This Burnisher is for use on a normal 120 volt circuit. It has a grounded plug that fits the outlet illustrated in Figure A. If a properly grounded outlet is not available, a temporary adapter, such as the adapter illustrated in Figure B and C, may be used to connect the plug into a 2-pole outlet, as shown in Figure C.
The temporary adapter should be used only until a properly grounded outlet, Figure A, can be installed by a qualified electrician. The green color rigid ear lug or grounding means extending from the adapter must be connected to a permanent ground, such as a properly grounded outlet box cover. Whenever the adapter is used, it must be held in place by its grounding means and a metal screw, as shown in Figure C.

WARNING:
Improper connection of the equipment grounding conductor can result in a risk of electric shock. Check with a qualified electrician or service person if you are in doubt as to whether the outlet is properly grounded. DO NOT modify the plug provided with the equipment. If it will not fit into the outlet, have a proper outlet installed by a qualified electrician.
The BISSELL BigGreen Commercial High-Speed Burnisher is built with a 50 foot (15 M) safety cord which plugs directly into an approved outlet. Use of extension cords is NOT RECOMMENDED. NOTE: In Canada, the use of a temporary adapter is not permitted by the Canadian Electrical Code. This adaptor may not be used in Canada.
BISSELL BigGreen Commercial FMU-2000 Burnisher (5)
2.0 Mount the Handle
This burnisher is shipped from the factory with the handle unattached. You will need two 7/16" wrenches to complete the assembly.
Remove the handle and mounting hardware from its carton. Bolts, nuts, washers and the locking lever assembly are in the plastic bag attached to the handle.
1. Mount the handle to the chassis:
Align the handle with the yoke (1) over the mount (2) on the burnisher chassis. The power cord will be facing away fro the motor. Place a flat washer (4) on a 3" bolt (3), then place the bolt through the holes in the yoke and the mount. Place another washer on the bolt and secure with the locking nut (5). Tip the handle back and out of your way for the next step.

2. Mount he support braces on the handle:
Tip the handle up. The handle mounting collar (7) is designed to slide freely up and down the handle tube, allowing the handle to be adjusted for the comfortable operation of all users. Line up the mounting collar with the upper holes in the two straight handle braces (6).
- Place the curved spacer (12) with a square hole onto the locking lever shaft (11). The curve must face the lever.
- From behind the machine, insert the shaft through the right handle brace (6), the mounting collar (7) and the left handle brace.
• Place a spacer (9) on the shaft. - Place the split washer (13) on the shaft.
• Place the locking wing nut (14) on the shaft. - Adjust the wing nut for tightness. When correctly installed, the collar slides easily when the cam-engineered locking lever is "up," but is firmly fixed when the lever is "down."

6.0 Handle Parts List
| Drawing No. | Description | Part No. | Qty. | ||
| 1 | Switch Box Back Cover | A-104 | 1 | ||
| 2 | Handle Tube Screw | B-23 | 2 | ||
| 3 | Switch Box Closing Screws | B-21 | 4 | ||
| 4 | Strain Relief Clip | M-213 | 1 | ||
| 5 | Switch Plate Screw | B-68 | 2 | ||
| 6 | Black Hand Grip with Green Band | M-218-G | 2 | ||
| 8 | Handle Tube Insert | M-247 | 1 | ||
| 9 | Handle Tube Assembly | M-206 | 1 | ||
| 10 | Cable Hook Screw | B-2 | 2 | ||
| 11 | Cable Hook | A-164 | 1 | ||
| 12 | Sliding Collar | A-111 | 1 | ||
| 13 | Flat Washer | B-37 | 1 | ||
| 14 | Split Washer | B-39 | 1 | ||
| 15 | Cam Lock Wing Nut | B-25 | 1 | ||
| 16 | Straight Brace | M-233 | 2 | ||
| 17 | Stop Nut | B-10 | 2 | ||
| 18 | Washer | B-28 | 2 | ||
| 19 | Cap Screw | B-9 | 2 | ||
| 20 | Yoke Tube Mount Bolt | B-18A | 2 | ||
| 21 | Tube Mounting Nut | B-19 | 2 | ||
| 22 | Yoke | A-1001 | 1 | ||
| 24 | Yoke Bolt | B-14 | 1 | ||
| 25 | Handle Tube Cable | G-16 | 1 | ||
| 26 | Black Rubber Cable Connector | M-249 | 1 | ||
| 27 | Cable Grommet | B-63 | 1 | ||
| 28 | Rectangular Hole Cam Washer | B-67 | 1 | ||
| 29A | Cam Assembly | C-100 | 1 | ||
| 29B | Complete Cam Assembly Kit | CCA | 1 | ||
| (Includes 1 each of Drawing Items#13, 14, 15, 28, 29) | |||||
| 30 | 50-Foot, 14/3-Gauge - Yellow | G-14-50-Y | 1 | ||
| 31 | Insulated Flag Wire Connector | G-48 | 2 | ||
| 32 | On/Off Switch and Plate Assembly | G-30-AB | 1 | ||
| 33 | Switch Mounting Plate | G-30-B | 1 | ||
| 34 | Ground Wire Screw | B-1 | 2 | ||
| 35 | Int. Tooth Lock Washer | B-35 | 1 | ||
| 36 | Flat Hex Nut | B-33 | 1 | ||
| 37 | Trigger Return Spring | G-30-C-T057 | 1 | ||
| 38 | Label - Switchbox | 1 | |||
| 39 | Switchbox Front | A-103 | 1 | ||
| 40 | Wire Nut | G-47 | 1 | ||
| 41 | Triggers | A-105 | 2 | ||
| 42 | 16" Crossbar | M-211-A | 1 | ||
| 43 | Trigger Pins | B-70 | 2 | ||
| 44 | Cross Bar Screw | B-22 | 2 | ||
| 45 | Safety Interlock Assembly | SIA-1R | 1 | ||
5.0 Handle Schematic Drawing
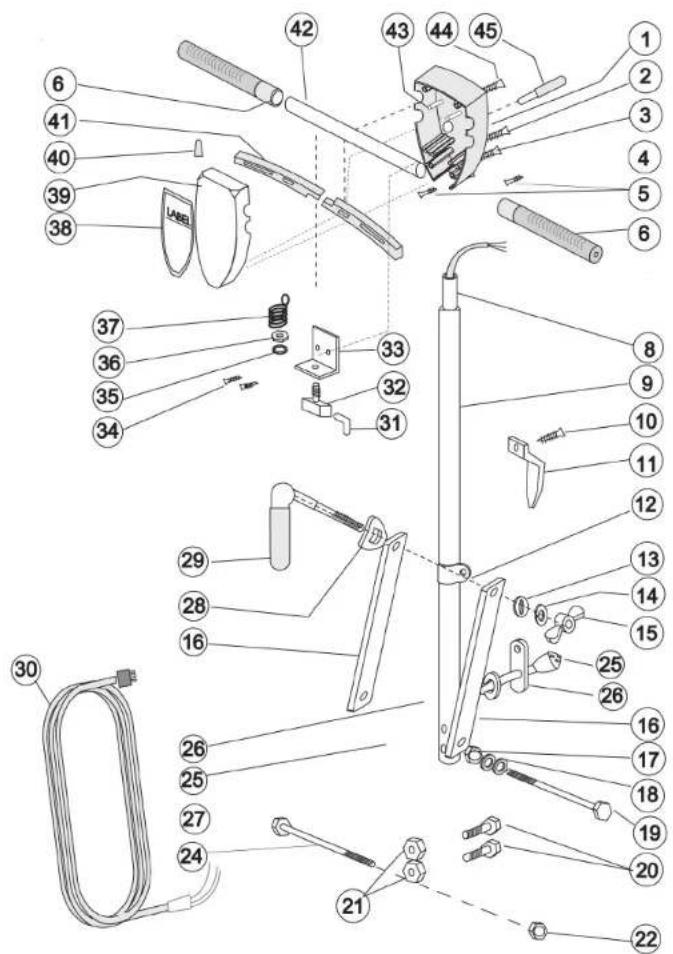
2.1 Attach the Power Cord
The triple-wire grounded power cord has been factory-installed into the handle tube. A flexible rubber cable connector (11) is used to secure the plug-in connections. The burnisher ships with this connector mounted on the cord coming out of the handle (10).
Stretch the connector and slip the male connector (9) (coming out of the motor housing) through the connector hole and then into the female connector. Now, plug the end of the 50-foot cord into a grounded power outlet. Squeeze the triggers on the handle and cheek for power to the motor.

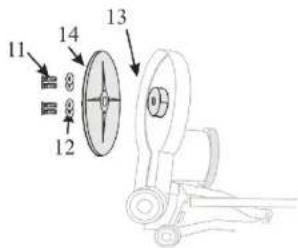
2.2 Inspect the Pad Driver
A flexible, high-speed pad driver has been bolted onto the burnishing machine and dynamically balanced. This driver is the connection between the burnisher and a disposable pad that burnishes the hard floor finish. If this molded plastic part ever becomes damaged or if the molded hooks are worn and cannot hold the pad, replace promptly.
Unplug the burnishing machine. Lock the handle in the "up" position and tip the machine back fully. Remove the 4 mounting screws (11) and washers (12) from the drive hub (13).
Place the new pad driver (14) onto the main drive pulley. Insert the mounting screws (11) through the washers (12) into the bolt hole. Tighten securely.
2.3 Install the Pad
The face (bottom) of the pad driver (14) is covered with small "hooks" that grab onto the pad (16). Every time you mount a new pad onto the pad driver, follow these steps:
- Unplug the burnishing machine. Lock the handle in the "up" position and tip the machine back fully.
- Pad Sizes: 20" diameter pad on the 20" and 21" machines. Mount a pad (16) over the male shoulder (15) on the pad driver. Make sure that the pad is centered on the driver.
- Insert the locking ring (17) through the center hole in the pad and into the shoulder. Tighten until the locking ring lies below the face of the pad. If the ring is not fully locked, it will scratch the floor.

NEVER operate the burnisher without a pad.
NEVER operate the burnisher with a damaged pad of without a locking ring to hold the pad in place.
2.4 Adjust the Front Wheel Assembly on 2000 RPM Model
The 2000 RPM model is designed with a front wheel assembly that controls the down pressure that the pad applies to the floor. Raise the apron height to reduce the down pressure. Lower the apron height as the pad wears. The warranty on a 2000 RPM machine will be voided if the machine is operated without this wheel assembly in place and operating correctly.

3.0 Operating Tips
• For indoor use only. Sweep abrasive soils before burnishing.
- While the pad driver is spinning, keep the burnisher moving to avoid "donut" burns on the floor.
To Start Operation:
- Unlock the handle by raising the locking lever.
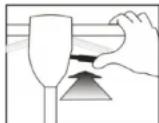
• Lower the handle to a comfortable position, typically waist high. - Relock the handle by pushing the lever down. NEVER OPERATE THE MACHINE WITH THE HANDLE UNLOCKED.
• This burnisher has a high torque motor. - Hold the machine firmly with both hands when starting up.
- Push the red safety interlock switch forward to unlock the dual triggers.
- Squeeze both triggers to power the motor. Once power is on, either trigger will keep power to the motor. To stop, release both triggers.
3.1 To Store your Machine
- Lock the handle in the "up" position. Tilt the machine back onto the transport wheels. Never store the machine with the pad on the ground.
• Wind the cord around the handles and the bottom cord hook. - Wash pads and hang to dry.
- Inspect and maintain equipment on a regular schedule for best results.
- Check and clean pads after each operation. Remove soil and chemical buildup. Replace worn or damaged pads.
- Check the triggers and switches for proper operation.
- Use air pressure or vacuum to remove dust and debris from the motor vents.
• Report problems and repair promptly.
(8) BISSELL BigGreen Commercial FMU-2000 Burnisher



natural_image
Line drawing of a mechanical tool with multiple blades and a base (no text or symbols)3.2 Transport
To transport this burnisher from the janitor's closet to the work area:
- Lock the handle in the "up" position. Wind the cord around the handles and the bottom cord hook.
- Tip the machine back onto the transport wheels. Push or pull the machine by the handle, not by the cord or any other part of the machine. Travel carefully.

natural_image
Line drawing of a mechanical tool with gears and a base (no text or symbols)4.0 Troubleshooting
Never operate this burnisher when the equipment is not performing as expected or when any parts are visibly damaged. The cause and solution for some basic problems are described below. When repair is needed, take the equipment to an authorized repair service center.
4.1 Burnisher will not Run
• Circuit breakers are tripped in the building. Check and reset.
• Equipment is unplugged. Check plug wall and at machine base. Plug in.
- Power cord failure. Test with a working power cord. Lock the handle up and tip the motor back. Unplug the cord at the motor and plug the motor into your working power cord.
- IMPORTANT! THIS IS JUST FOR TESTING. When you do this, you have removed the safety handle controls from the circuit and you are sending power directly to the motor. If the motor now spins, the problem is in the cord of the handle assembly. Seek authorized repair service.
- If the motor still does not spin, the problem is either in the male connection at the motor base or in the motor. Seek authorized repair service.
• Motor sparks or smokes. Seek authorized repair service.
4.2 Electrical Shock to Operator
• Equipment wiring failure or electrical short in the machine. Seek authorized service.
- Poor grounding or no grounding. Test the outlet with a ground fault interrupter. Retain certified electrician to inspect and repair grounding. NEVER clip off the ground plug on your cord.
- Repeated circuit breaking. High amp draw and circuit breaking can be an electrical or mechanical problem. Seek authorized repair service.
4.3 High Vibration
- Pads are not centered on the pad driver. Tip machine back and re-center the pad.
- Uneven wear or warp to pad or brushes. Replace.
• Machine chassis is damaged by dropping. Replace.

- New Equipment Warranty
- Limited Warranty
- FMU-2000 HIGH-SPEED BURNISHER
- SAFETY, OPERATION AND MAINTENANCE MANUAL WITH PARTS LIST
- HIGH-SPEED BURNISHER
- BigGreen Commercial™
- IMPORTANT INFORMATION AND SAFETY INSTRUCTIONS
- Bissell®
- Dear Valued Customer,
- Questions or Comments?
- Warranty Registration
- See reverse side for warranty information. Make a copy of this card for future reference.
- FMU - 2000 HIGH-SPEED BURNISHER
- Please fill out the following information for your records:
- Safe Operating Conditions
- Reduce the Risk of Fire, Electric Shock or Injury:
- Machine Parts List
- Machine Schematic Drawing 2.0 Grounding Instructions
- WARNING:
- Mount the Handle
- Mount the handle to the chassis:
- Mount he support braces on the handle:
- Handle Parts List
- Attach the Power Cord
- Inspect the Pad Driver
- Install the Pad
- Adjust the Front Wheel Assembly on 2000 RPM Model
- Operating Tips
- To Start Operation:
- To Store your Machine
- Transport
- Troubleshooting
- Burnisher will not Run
- Electrical Shock to Operator
- High Vibration
Brand : BISSELL
Model : BGDC-21-2000
Category : Polisher