GO Beating - Mp3 player Zipy - Free user manual and instructions
Find the device manual for free GO Beating Zipy in PDF.


| Product Type | Portable MP3 Player |
| Brand | Zipy |
| Model | GO Beating |
| Dimensions | Approx. 90 x 40 x 10 mm |
| Weight | Approx. 35 g |
| Power Source | Built-in rechargeable lithium-ion battery |
| Battery Capacity | 300 mAh |
| Charging Time | Approx. 2 hours |
| Playback Time | Up to 15 hours |
| Memory Capacity | 8 GB internal storage |
| Supported Audio Formats | MP3, WMA, WAV, FLAC |
| Display | 1.5-inch monochrome LCD |
| Audio Output | 3.5 mm headphone jack |
| Radio | FM tuner with presets |
| Recording | Voice recording via built-in microphone |
| Playback Functions | Play, pause, skip, repeat, shuffle |
| Equalizer | Multiple presets (Normal, Rock, Pop, Jazz, Classic) |
| Connectivity | USB 2.0 for charging and data transfer |
| Languages | English, Spanish, Portuguese, French, German, Italian, Dutch, Russian, Chinese, Japanese, Korean |
| Maintenance | Clean with a soft dry cloth; avoid moisture |
| Safety | Keep away from water, heat sources, and small children |
| Spare Parts | Available from authorized service centers |
| Repairability | Battery replacement possible by qualified technician |
| General Information | User manual downloadable in multiple languages; 25 pages |
Frequently Asked Questions - GO Beating Zipy
User questions about GO Beating Zipy
0 question about this device. Answer the ones you know or ask your own.
Ask a new question about this device
Download the instructions for your Mp3 player in PDF format for free! Find your manual GO Beating - Zipy and take your electronic device back in hand. On this page are published all the documents necessary for the use of your device. GO Beating by Zipy.
USER MANUAL GO Beating Zipy
English Spanish Portuguese
The go! team
music fitness health emotion sport swimming adventure
go! with you
www.gowithyou-Zipy.com

go! Beating
www.gowithyou-Zipy.com
Congratulations on purchasing the go! Beating Before using this device, please read carefully all the instructions in this manual and keep it for future reference.
IMPORTANT
THIS PRODUCT IS FOR SPORT PURPOSES ONLY AND IS NOT MEANT TO REPLACE ANY MEDICAL ADVICE.
WARNING:
The signals used by this monitor may interfere with a pacemaker or other implanted devices.
Consult the manufacturer of the implant device and your physician before using this monitor.
IMPORTANT SAFETY INFORMATION
Please read all safety information prior to using the Well Being Player. Failure to do so may result in unnecessary injury.
Safety Precaution
- Please read all the information in this manual or any other literature included in the box before using the device. Please keep this manual for future reference.
- Do not make judgments yourself regarding the measurement results or selftreat yourself. Contact your physician or healthcare provider before beginning a weight reduction or exercise program.
- Consult your physician before using this device when pregnant.
- Operate the device only as intended. Do not use for any other purpose.
- Do not place heavy objects on the device and keep the device away from humid, dusty and smoky environments.
- Do not use water, chemicals or detergent to clean the device. Clean the surface with a soft cloth.
- Do not use excessive force on the buttons.
- Keep out of extreme heat or cold. The device is only operable between 0C and 40C.
-
To avoid damage, make sure you do not drop, smash, bend or crash the device.
-
Keep the device away from strong magnetic fields.
- Do not disassemble or modify the device yourself.
- Use only go! Beating parts and accessories.
Parts and accessories not approved for use with the device may damage the unit.
- When you upload or download files using a USB cable, do not disconnect the
USB cable during data transfer or turn the device off.
- Data can be damaged because of physical impact, lightning and power failure.
Wearing your Device
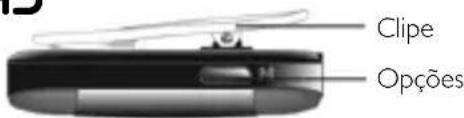
In order for the device to measure your workout information illustrated in the diagram. You may use the clip at the back of device to attach it to your clothing and close to your body.

natural_image
Line drawing of a running human figure (no text or symbols)KEYS FUNCTIONS

USINGTHEKEYS
Key
-
Switchbetweenfour modesonyourdevice:Music,Workout,HeartBeat and Settingmode.
-
Gobacktotheprevioussscreen.
M Key
-
Scroll throughdistance,steps,speed,andclockscreenintheWorkoutmode.
-
See the option menu in the Workoutmode/Heartbeatmode.
+ or - Key
- Volume up or down.
2.Browseupordown list.
- Increase or decrease value in Time & Date settings.
Key
- Playorpausemusic.
2.Startstepcounting,startheartbeatmeasurement.
3.Enter/Confirmselectedmodesandoptions.
Note
If no operation is chosen within 15 seconds of being in a particular mode, the screen will return to the music mode if the step counter is not started; or return to the pedometer mode if the step counter is started.
PowerOn

PowerOff

Note:
Your device will automatically turn offitis not used within your preset time period (defaultisthreeminutes).
Profile Editing
If this is the first time you have turned your device on, a screen will appear prompting you to edit your profile by inputting your personal data.
Input your own personal / health information into this profile for personalized activity reports.
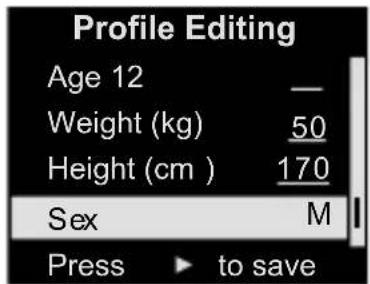
AgeDefaultsettingis 25 (Rangefrom1 \~ 99) WeightDefaultsettingis 75 (Rangefrom5 \~ 300kg) Height Defaultsetting is 180 ( Range from30 \~ 300cm) Sex Default setting is M
KeyLock


NAVIGATINGTHROUGHTHEMODES
Press the ☐ key to start scrolling through different mode selections: Music mode → Workout mode → Heart Beat mode → Setting → Music mode. Press the ▶ key to select the desired mode.
MUSIC MODE
Listening to Music
Once within the Music mode, you may select the music play sequence, repeat option and equalizer effect.
Press the ▶ key to select the option, and press the + or - key to select a song.
Press the ▶ key to play or pause the selected song.
Press the 🔑 key to go back to the Music mode screen. Music will not stop until you pause the current playing song under music playback screen.
WORKOUT MODE
Start the Counter
Press the ▶II key to start.
Note:
No steps will be counted until you have jogged or walked for at least six steps.
Counter Screens
Press the M key to scroll through four different counter screens in sequence (Distance -> Steps -> Speed -> Clock) to view the different counters.

flowchart
graph TD
    A["Distance screen"] --> B["Step screen"]
    B --> C["Speed screen"]
    C --> D["Clock screen"]
    D --> E["Stop"]

    subgraph A
        F["Balance: Lock Title Battery status"] --> G["Balance by run: R 0.00km W 0.00km"]
        G --> H["Balance by walk: Cal 0000"]
        H --> I["Balance by walk: Calories burnTime counter"]
        I --> J["Balance by walk: Stop Split"]
    end

    subgraph B
        K["Steps: R 0 W 0 00 00 00 Cal 00 00 Split Stop"]
    end

    subgraph C
        L["Speed: Max 0.00 km/hour Avg 0.00 km/hour Split Stop"]
    end

    subgraph D
        M["Clock: Lock Day Battery status AM/PM 12:35 27 2007-12-22 Split Stop"]
    end
Stopwatch
At the counter screen, press the (Split) key to log down the current elapsed time counter. The logged time can only be seen at the bottom right hand corner of the Distance or Steps screen (marked by an “s”)
Stop the Counter and Save Information
-
Press the ▶ key to stop the counting.
-
Press the ▶ key to save the workout information. The saved information can be downloaded via the USB to the PC Software supplied, for further analysis.
Or press the ◀ key to go back to the main menu without saving the information.
Review the Saved Information
You may review your workout information saved in device.
- At the workout mode screen, press the M key to enter the options menu.
- Press the + or - key select the "View Record" or "Weekly Summary" option.
- Press the ▶ key to review the saved workout information.
Select Work out Program
At the workout mode screen, press the M key to enter the options menu. Select "Mode Select" option and press the ▶II key.
You can set the heart beat measurement ON & OFF while the pedometer and stopwatch remains active.
| Program | Descriptions | |
| 1 | Basic (Default) Optimum for self-training with time and distance monitoring. | |
| 2 | Advanced | Multi-counter for fitness and health training with static heart beat measured after training. |
HEARTBEATMODE
Note:
Consult your physician or healthcare provider to help you determine your maximum heart beat rate, resting heart beat rate, and target heart beat rate, required exercise frequency and appropriate duration.
Taking your Heart Beat Rate
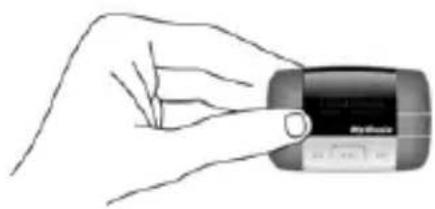
- The device has a built-in heart beat sensor, just place your thumb gently on the lens of the sensor to get your heart beat rate measured.
Sensor

natural_image
Hand holding a black handheld device with a white label, no visible text or symbols on the device itself.-
Pressthe key to start the sensor. Do not mover your thumb during measurement.
-
Whentheheartbeatmeasurementhascompleted,theheart iconwillstop blinking.
-
Press the ▶ key to save the heart beat measurement.
Or press the ◀ key to go back to the main menu without saving the measurement.
Note:
Repeat from step 1 of “Taking your Heart Beat Rate” if the error massage “Improper placement of thumb. Reapply thumb gently” shows up. The error massage shows up when:
- Pressed on the sensor too hard.
- Not covering the lens entirely with your thumb.
- Moved your thumb away from the sensor during the measurement process.
Minimum System Requirement
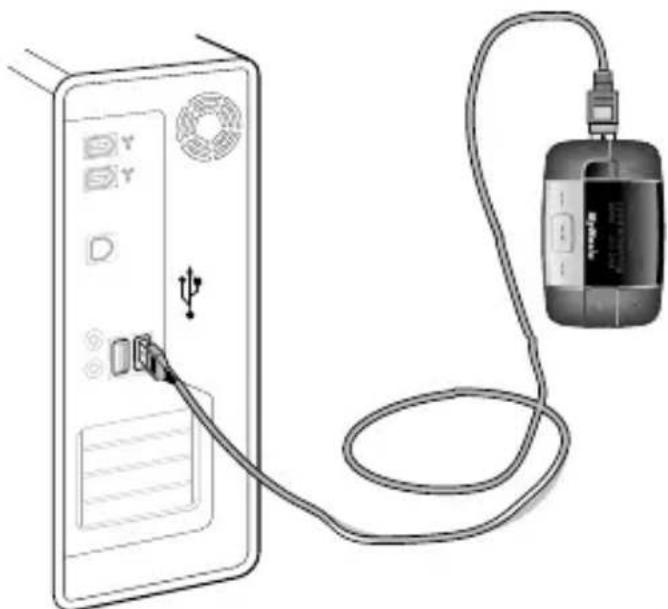
You can connect the device to PC via the provided USB2.0 cable for Charging and File Transfer purposes. Your PC system must meet the following minimum requirement:
- Only supports Windows 2000/ Windows XP/ Windows Vista. Other systems are not supported.
- CD-ROM drive
- USB 1.1 port or above (USB 2.0 is recommended)
Charging go! Beating
go! Beating device comes with a re-chargeable battery. It will be charged automatically once connected to a PC via the supplied USB cable.
Note:
- Charge the device for at least 4 hours before using it for the first time.
- If the device is connected to PC via a USB hub, the USB hub must be self-powered in order to charge
- File transferring during charging may prolong the charging time.
natural_image
Diagram showing a computer monitor connected to a cable via a USB cable (no text or symbols present)Technical Support:
natural_image
Line drawing of a running human figure in motion (no text or symbols)BOTONES DE CONTROL
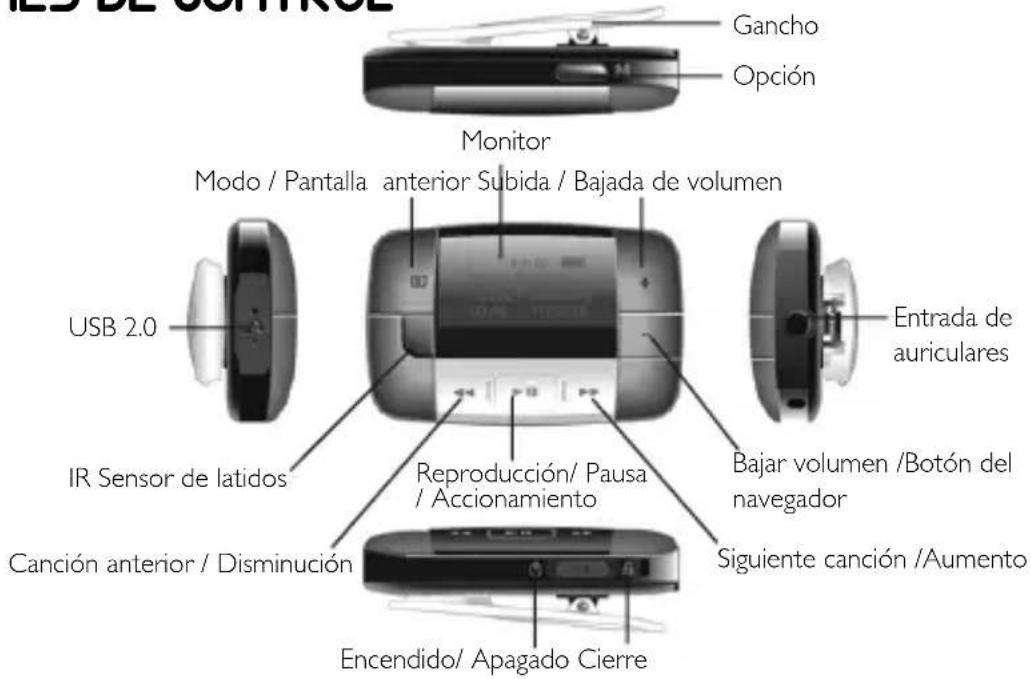
Soporte técnico:
natural_image
Line drawing of a running human figure wearing a belt (no text or symbols)FUNÇÕES DAS TECLAS
natural_image
Diagram showing a device connected to a computer via cable, with no visible text or symbols on the device itself.Suporte Técnico
- The go! team
- IMPORTANT
- WARNING:
- IMPORTANT SAFETY INFORMATION
- Safety Precaution
- Wearing your Device
- KEYS FUNCTIONS
- USINGTHEKEYS
- Key
- M Key
- + or - Key
- Note
- PowerOn
- PowerOff
- Note:
- Profile Editing
- KeyLock
- NAVIGATINGTHROUGHTHEMODES
- MUSIC MODE
- Listening to Music
- WORKOUT MODE
- Start the Counter
- Counter Screens
- Stopwatch
- Stop the Counter and Save Information
- Review the Saved Information
- Select Work out Program
- HEARTBEATMODE
- Taking your Heart Beat Rate
- Minimum System Requirement
- Charging go! Beating
- Technical Support:
- BOTONES DE CONTROL
- Soporte técnico:
- FUNÇÕES DAS TECLAS
- Suporte Técnico
Brand : Zipy
Model : GO Beating
Category : Mp3 player