
29115 - Telephone GE - Free user manual and instructions
Find the device manual for free 29115 GE in PDF.


| Product Type | DECT Cordless Phone |
| Brand | GE |
| Model | 29115 |
| Dimensions (Handset) | 170 x 50 x 30 mm |
| Weight (Handset) | 120 g |
| Power Supply Base | AC 100-240V, 50/60Hz |
| Power Supply Handset | 2 x NiMH AAA rechargeable batteries |
| Display | Backlit LCD |
| Caller ID | Yes |
| Answering Machine | Yes, with digital recording |
| Ringer Options | Adjustable volume and melody selection |
| Speed Dial | Yes, up to 10 entries |
| Speakerphone | Yes, full duplex |
| Range | Up to 300 m outdoor, 50 m indoor |
| Number of Handsets Supported | Up to 5 (expandable) |
| Standby Time | Up to 100 hours |
| Talk Time | Up to 10 hours |
| Additional Features | Intercom, conference call, call block |
| Maintenance & Cleaning | Wipe with dry cloth; do not use liquids |
| Safety | Use only supplied power adapter; keep away from water and moisture |
Frequently Asked Questions - 29115 GE
User questions about 29115 GE
0 question about this device. Answer the ones you know or ask your own.
Ask a new question about this device
Download the instructions for your Telephone in PDF format for free! Find your manual 29115 - GE and take your electronic device back in hand. On this page are published all the documents necessary for the use of your device. 29115 by GE.
USER MANUAL 29115 GE
Model 29115 Series DECT 6.0 Cordless Handset Speakerphone System User's Guide

natural_image
Stylized circular logo with a white 'g' symbol inside, no text or numbers present.
Your new GE telephone system is EXPANDABLE up to a total of 4 handsets (by purchase of optional Model 29110 handset with charge cradle)
Equipment Approval Information
Your telephone equipment is approved for connection to the Public Switched Telephone Network and is in compliance with parts 15 and 68, FCC Rules and Regulations and the Technical Requirements for Telephone Terminal Equipment published by ACTA.
1 Notification to the Local Telephone Company
On the bottom of this equipment is a label indicating, among other information, the US number and Ringer Equivalence Number (REN) for the equipment. You must, upon request, provide this information to your telephone company.
The REN is useful in determining the number of devices you may connect to your telephone line and still have all of these devices ring when your telephone number is called. In most (but not all) areas, the sum of the RENs of all devices connected to one line should not exceed 5. To be certain of the number of devices you may connect to your line as determined by the REN, you should contact your local telephone company.
A plug and jack used to connect this equipment to the premises wiring and telephone network must comply with the applicable FCC Part 68 rules and requirements adopted by the ACTA. A compliant telephone cord and modular plug is provided with this product. It is designed to be connected to a compatible modular jack that is also compliant. See installation instructions for details.
Notes
- This equipment may not be used on coin service provided by the telephone company.
- Party lines are subject to state tariffs, and therefore, you may not be able to use your own telephone equipment if you are on a party line. Check with your local telephone company.
- Notice must be given to the telephone company upon permanent disconnection of your telephone from your line.
- If your home has specially wired alarm equipment connected to the telephone line, ensure the installation of this product does not disable your alarm equipment. If you have questions about what will disable alarm equipment, consult your telephone company or a qualified installer.
US Number is located on the cabinet bottom.
REN Number is located on the cabinet bottom.
2 Rights of the Telephone Company
Should your equipment cause trouble on your line which may harm the telephone network, the telephone company shall, where practicable, notify you that temporary discontinuance of service may be required. Where prior notice is not practicable and the circumstances warrant such action, the telephone company may temporarily discontinue service immediately. In case of such temporary discontinuance, the telephone company must: (1) promptly notify you of such temporary discontinuance; (2) afford you the opportunity to correct the situation; and (3) inform you of your right to bring a complaint to the Commission pursuant to procedures set forth in Subpart E of Part 68, FCC Rules and Regulations.
The telephone company may make changes in its communications facilities, equipment, operations or procedures where such action is required in the operation of its business and not inconsistent with FCC Rules and Regulations. If these changes are expected to affect the use or performance of your telephone equipment, the telephone company must give you adequate notice, in writing, to allow you to maintain uninterrupted service.
Interference Information
This device complies with Part 15 of the FCC Rules. Operation is subject to the following two conditions: (1) This device may not cause harmful interference; and (2) This device must accept any interference received, including interference that may cause undesired operation.
This equipment has been tested and found to comply with the limits for a Class B digital device, pursuant to Part 15 of the FCC Rules. These limits are designed to provide reasonable protection against harmful interference in a residential installation.
This equipment generates, uses, and can radiate radio frequency energy and, if not installed and used in accordance with the instructions, may cause harmful interference to radio communications. However, there is no guarantee that interference will not occur in a particular installation.
Privacy of Communications may not be ensured when using this product.
If this equipment does cause harmful interference to radio or television reception, which can be determined by turning the equipment off and on, the user is encouraged to try to correct the interference by one or more of the following measures:
- Reorient or relocate the receiving antenna (that is, the antenna for radio or television that is “receiving” the interference).
- Reorient or relocate and increase the separation between the telecommunications equipment and receiving antenna.
- Connect the telecommunications equipment into an outlet on a circuit different from that to which the receiving antenna is connected.
If these measures do not eliminate the interference, please consult your dealer or an experienced radio/television technician for additional suggestions. Also, the Federal Communications Commission has prepared a helpful booklet, "How To Identify and Resolve Radio/TV Interference Problems." This booklet is available from the U.S. Government Printing Office, Washington, D.C. 20402. Please specify stock number 004-000-00345-4 when ordering copies.
Notice: The changes or modifications not expressly approved by the party responsible for compliance could void the user's authority to operate the equipment.
Hearing Aid Compatibility (HAC)
This telephone system meets FCC standards for Hearing Aid Compatibility.
Licensing
Licensed under US Patent 6,427,009.
FCC RF Radiation Exposure Statement
This equipment complies with FCC RF radiation exposure limits set forth for an uncontrolled environment. This equipment should be installed and operated with a minimum distance of 20 centimeters between the radiator and your body. This transmitter must not be co-located or operated in conjunction with any other antenna or transmitter.
For body worn operation, this phone has been tested and meets the FCC RF exposure guidelines when used with the belt clip supplied with this product. Use of other accessories may not ensure compliance with FCC RF exposure guidelines.
Information for DECT Product

This telephone is compliant with the DECT 6.0 standard which operates in the 1.92GHz to 1.93GHz frequency range.
WARNING: TO PREVENT FIRE OR ELECTRICAL SHOCK HAZARD, DO NOT EXPOSE THIS PRODUCT TO RAIN OR MOISTURE.

THE LIGHTNING FLASH AND ARROW HEAD WITHIN THE TRIANGLE IS A WARNING SIGN ALERTING YOU OF "DANGEROUS VOLTAGE" INSIDE THE PRODUCT.
CAUTION:
RISK OF ELECTRIC SHOCK DO NOT OPEN
CAUTION: TO REDUCE THE RISK OF ELECTRIC SHOCK, DO NOT REMOVE COVER (OR BACK). NO USER SERVICEABLE PARTS INSIDE REFER SERVICING TO QUALIFIED SERVICE PERSONNEL.

THE EXCLAMATION POINT WITHIN THE TRIANGLE IS A WARNING SIGN ALERTING YOU OF IMPORTANT INSTRUCTIONS ACCOMPANYING THE PRODUCT.
SEE MARKING ON BOTTOM / BACK OF PRODUCT
Table of Contents
EQUIPMENT APPROVAL INFORMATION 2
INTERFERENCE INFORMATION...... 4
HEARING AID COMPATIBILITY (HAC) 5
LICENSING 6
FCC RF RADIATION EXPOSURE STATEMENT 6
INFORMATION FOR DECT PRODUCT 6
INTRODUCTION 12
BEFORE YOU BEGIN 12
PARTS CHECKLIST....12
TELEPHONE JACK REQUIREMENTS....13
INSTALLATION 13
DIGITAL SECURITY SYSTEM 13
IMPORTANT INSTALLATION GUIDELINES 15
HANDSET LAYOUT 16
BASE LAYOUT 17
INSTALLING THE PHONE.... 18
INSTALLING THE HANDSET BATTERY....18
BASE BACKUP BATTERY INSTALLATION 19
BASE STATION....20
WALL MOUNTING....21
ANSWERING SYSTEM SETUP 22
SETTING THE VOICE PROMPT LANGUAGE 22
VOICE TIME/DAY STAMP AND REAL TIME CLOCK....23
SPEAKER VOLUME 23
VOICE INSTRUCTION 24
RECORDING THE OUTGOING ANNOUNCEMENT 24
REVIEWING AND CHOOSING THE ANNOUNCEMENT 25
PROGRAMMING THE TELEPHONE 25
STANDBY SCREEN 25
PROGRAMMING FUNCTIONS 25
ROOM MONITOR....26
HANDSET SETUP 27
SET LANGUAGE....28
HANDSET NAME 28
RINGER TONE....29
RINGER VOLUME....30
VIP MELODY 31
STORING VIP MELODY 31
CHANGING A STORED VIP MELODY RECORD 33
REVIEWING AND DELETING STORED VIP MELODY RECORD.33
KEY TONE 34
AUDIO PREDIAL 34
VIBRATE RINGER....35
MESSAGE ALERT (FOR ANSWERING SYSTEM) 35
RINGS TO ANSWER (FOR ANSWERING SYSTEM)......36
SECURITY CODE (FOR ANSWERING SYSTEM) 37
AREA CODE 38
TONE/PULSE 38
REGISTRATION 39
DE-REGISTRATION....40
GLOBAL DE-REGISTRATION 41
DEFAULT SETTING 42
Do Not Disturb....47
FLASH/CALL WAITING....47
LAST NUMBER REDIAL....48
EXIT 48
PAGE 49
HANDSET TO HANDSET PAGING 49
PAGING ALL HANDSETS FROM A HANDSET 49
PAGING FROM THE BASE/GROUP PAGE 50
MUTE 50
RECEIVER VOLUME CONTROL 51
VOLUME AMPLIFY 51
TONE CONTROL 51
RECEIVING AN INCOMING CALL DURING AN INTERCOM CALL 53
USING INTERCOM WITH EXTERNAL TELEPHONE CALLS......54
TWO-WAY CALLING....54
THREE-WAY CALLING 55
TRANSFERRING EXTERNAL CALLS TO OTHER HANDSETS......56
CALLER ID (CID) 57
CALL WAITING CALLER ID 58
RECEIVING CID RECORDS 58
STORING CID RECORDS (IN CID MEMORY)....59
REVIEWING CID RECORDS....59
DIALING A CID NUMBER 60
STORING CID RECORDS IN INTERNAL MEMORY....61
To REPLACE A STORED CID RECORD....62
DELETING A CID RECORD....62
DELETING ALL CID RECORDS....63
MEMORY 63
STORING A NAME AND NUMBER IN MEMORY 63
STORING THE LAST NUMBER DIALED 65
INSERTING A PAUSE IN THE DIALING SEQUENCE (OF A STORED NUMBER) 66
REVIEWING RECORDS STORED IN MEMORY......66
CHANGING RECORDS STORED IN MEMORY 66
DELETING RECORDS STORED IN MEMORY 66
DIALING A NUMBER FROM MEMORY 67
CHAIN DIALING FROM MEMORY 68
MESSAGE COUNTER INDICATOR....69
LEAVING A MESSAGE/MEMO....70
SCREENING CALLS FROM THE BASE....71
MESSAGE PLAYBACK....71
MEMORY FULL 72
ERASING MESSAGES 72
REMOTE ACCESS....73
Cordless Handset....73
SCREENING CALLS FROM THE HANDSET....74
ACCESSING THE ANSWERING SYSTEM FROM ANOTHER LOCATION....74
MEMORY FULL 75
BELT CLIP AND OPTIONAL HEADSET 76
CONNECTING THE BELT CLIP 76
CONNECTING AN OPTIONAL HEADSET TO THE HANDSET ...... 76
CHANGING THE BATTERY 77
BATTERY SAFETY PRECAUTIONS 78
DISPLAY MESSAGES....79
ANSWERING SYSTEM DISPLAY MESSAGES 82
TROUBLESHOOTING GUIDE......83
TELEPHONE SOLUTIONS 83
CALLER ID SOLUTIONS 85
BATTERY SOLUTIONS 86
ANSWERING SYSTEM SOLUTIONS 86
CAUSES OF POOR RECEPTION....87
GENERAL PRODUCT CARE 88
WARRANTY ASSISTANCE 89
LIMITED WARRANTY....90
ACCESSORY INFORMATION 93
INDEX 94
Introduction

CAUTION: When using telephone equipment, there are basic safety instructions that should always be followed. Refer to the IMPORTANT SAFETY INSTRUCTIONS provided with this product and save them for future reference.
IMPORTANT: Because cordless phones operate on electricity, you should have at least one phone in your home that isn't cordless, in case the power in your home goes out.
Before You Begin
Parts Checklist (for model 29115)
Make sure your package includes the items shown here.
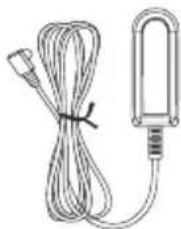
natural_image
Line drawing of a cable with a plug and a U-shaped connector attached (no text or symbols)AC power adaptor

Handset battery
pack

Base


Battery
compartment cover

Belt clip

Wall mount
bracket

Telephone line
cord
Telephone Jack Requirements
To use this phone, you need an RJ11C type modular telephone jack, which might look like the one pictured here, installed in your home. If you don't have a modular jack, call your local phone company to find out how to get one installed.
Installation
Wall plate
Modular telephone line jack

Digital Security System
Your cordless phone uses a digital security system to protect against false ringing, unauthorized access, and charges to your phone line.
INSTALLATION NOTE: Some cordless telephones operate at frequencies that may cause or receive interference with nearby TVs, microwave ovens, and VCRs. To minimize or prevent such interference, the base of the cordless telephone should not be placed near or on top of a TV, microwave ovens, or VCR. If such interference continues, move the cordless telephone farther away from these appliances.
Certain other communications devices may also use the 1.9 GHz frequency for communication, and, if not properly set, these devices may interfere with each other and/or your new telephone. If you are concerned with interference, please refer to the owner's manual for these devices on how to properly set channels to avoid interference. Typical devices that may use the 1.9 GHz frequency for communication include wireless audio/video senders, wireless computer networks, multi-handset cordless telephone systems, and some long-range cordless telephone systems.
Important Installation Guidelines
- Avoid sources of noise and heat, such as motors, fluorescent lighting, microwave ovens, heating appliances and direct sunlight.
- Avoid areas of excessive dust, moisture and low temperature.
- Avoid other cordless telephones or personal computers.
- Never install telephone wiring during a lightning storm.
- Never install telephone jacks in wet locations unless the jack is specifically designed for wet locations.
- Never touch non-insulated telephone wires or terminals, unless the telephone line has been disconnected at the network interface.
- Use caution when installing or modifying telephone lines.
Handset Layout

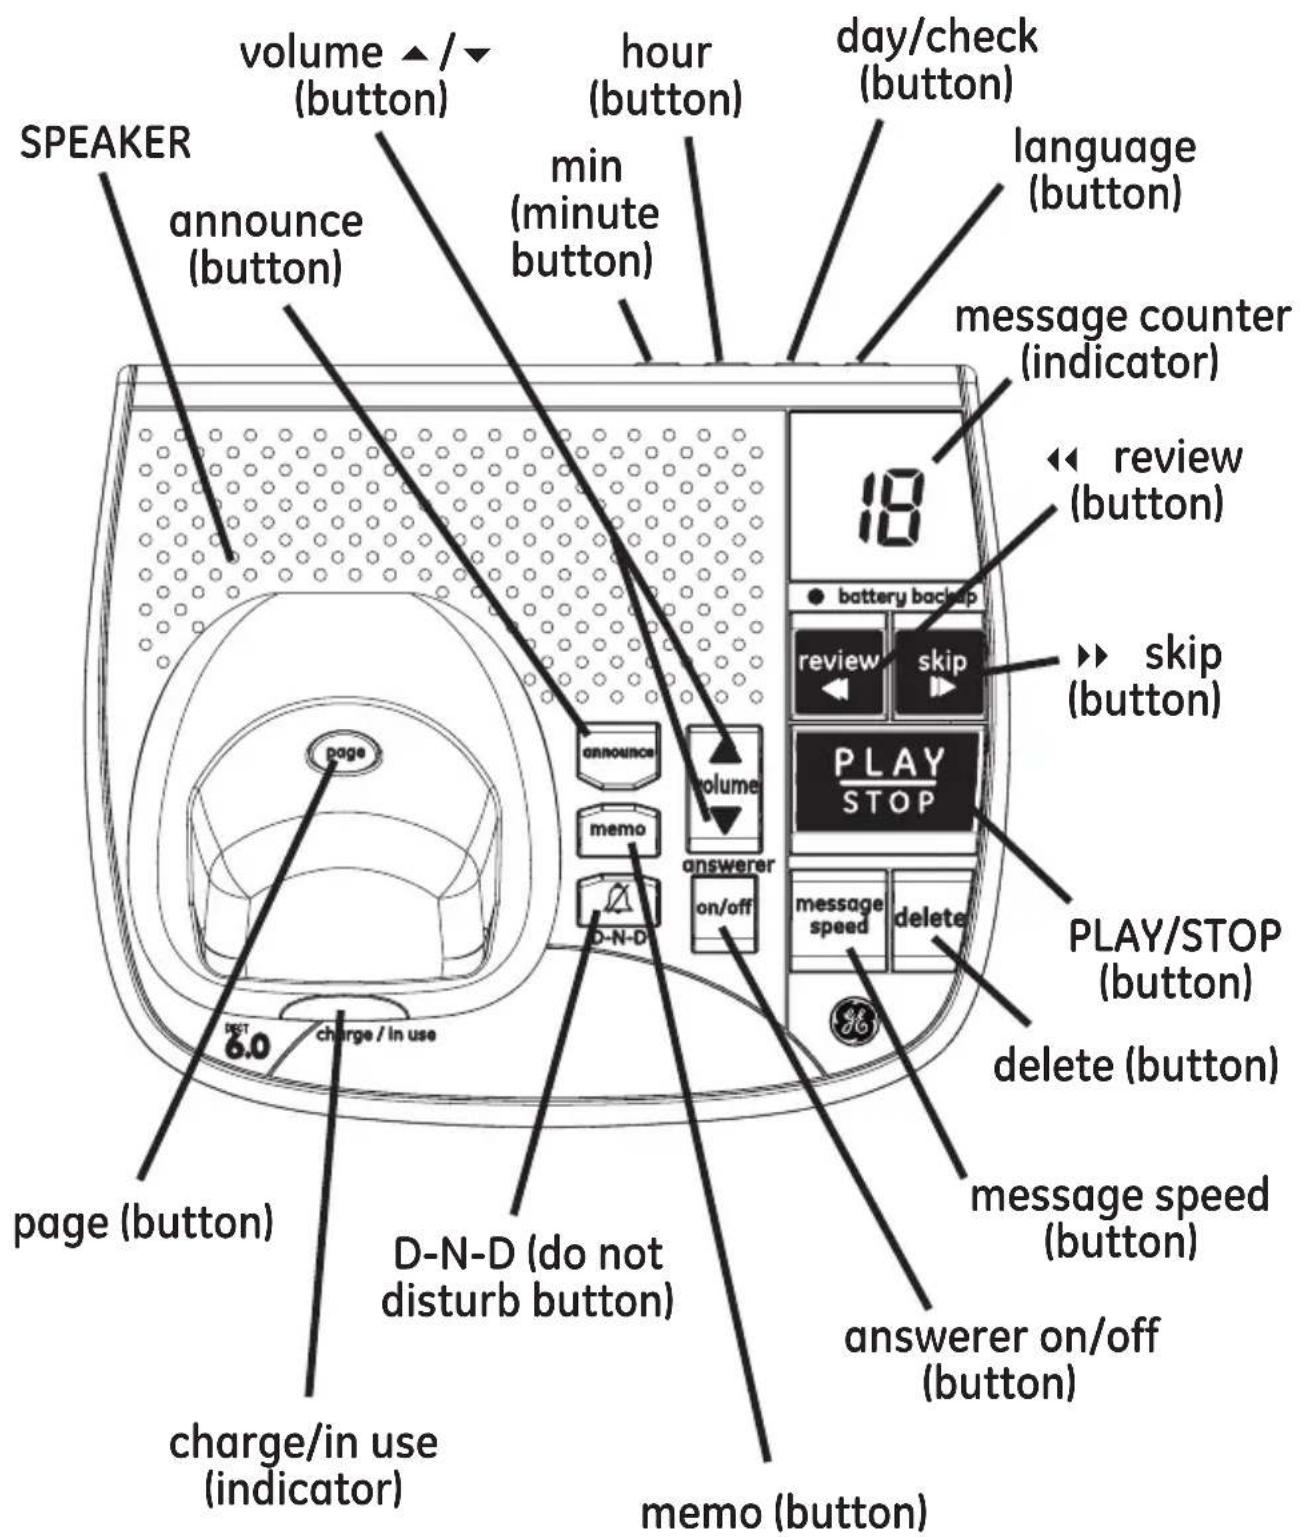
Base Layout
Installing the Handset Battery
NOTE: You must connect the handset battery before use.

CAUTION: To reduce the risk of fire or personal injury, use only the Thomson Inc. approved model 5-2721 Nickel-metal Hydride battery (Ni-MH), which is compatible with this unit.
- Locate battery and battery door which are packaged together inside a plastic bag and are separate from the handset.
- Locate the battery compartment on the back of the handset.
- Plug the battery pack cord into the jack inside the compartment.
NOTE: To ensure proper battery installation, the connector is keyed and can be inserted only one way.

- Insert the battery pack.
- Close the battery compartment by pushing the door up until it snaps into place.
Base Backup Battery Installation

CAUTION: Disconnect the phone cord from the wall outlet before installing or replacing the batteries.
In case of a power outage, the phone uses four AAA alkaline batteries for backup power for incoming voice amplification, answering machine and other functions.
- Unplug the power adaptor and the telephone line before installing batteries.
- Carefully turn over the phone, and release latch on battery compartment and remove cover.
- Insert four AAA-size alkaline batteries as shown on the diagram in the battery compartment.
- Snap the battery compartment door back into place.
- Re-attach the power adaptor and the telephone line cord to the unit.

natural_image
Technical line drawing of an electronic device casing with internal components and mounting holes (no text or symbols)NOTE: Remove the batteries if storing the batteries for over 30 days to prevent damage in the event of leaking batteries.
Base Station
- Choose an area near an electrical outlet and a telephone wall jack (RJ11C), and place your cordless telephone on a level surface, such as a desktop or tabletop, or you may mount it on the wall.
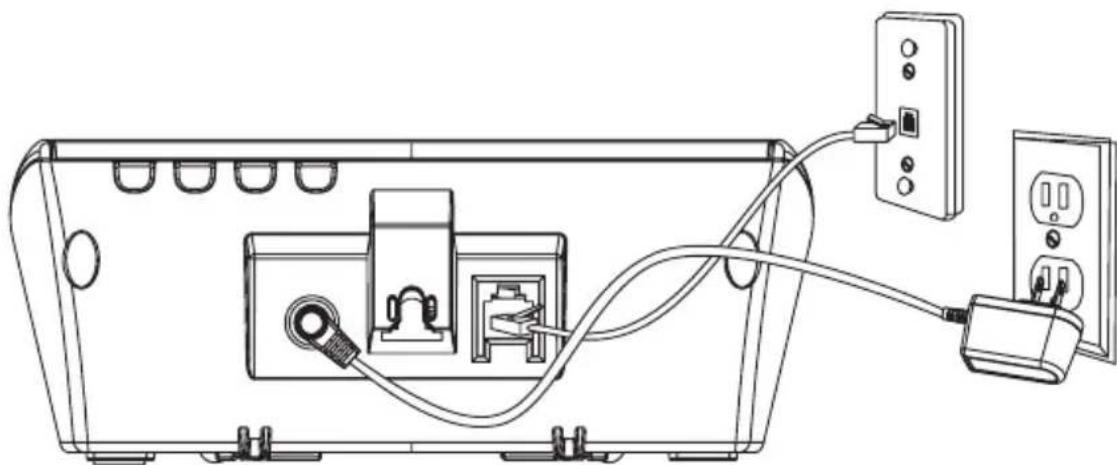
natural_image
Line drawing of a device rear panel with cable and socket, showing connections to a wall-mounted power outlet (no text or symbols)- Plug one end of the telephone line cord into the TEL LINE jack on the back of the base and the other end into a modular jack.
- Plug the AC power converter into the electrical outlet and the DC connector into the jack on the back of the base.
- Place the handset in the base cradle. The charge/in use indicator turns on, verifying the battery is charging.
- Allow the phone to charge for 16 hours prior to first use. If you don't properly charge the phone, battery performance is compromised.

CAUTION: To reduce risk of personal injury, fire, or damage use only the 5-2760 power adaptor listed in the user's guide. This power adaptor is intended to be correctly orientated in a vertical or floor mount position.
Wall Mounting
- Turn the base over.
- Attach the wall mounting pedestal by first inserting the tabs on the open edge of the pedestal into the slots on the lower portion of the bottom of the base. Then push down and snap the pedestal into place.
- Slip the mounting holes (on the back of the base) over the wall plate posts, and slide the unit down into place. (Wall plate not included.)
NOTE: If desired, gather the extra telephone line and power adaptor cord and store inside the wall mounting bracket.
Answering System Setup
This section shows you how to set up your answering system to receive incoming calls. Before you begin the set up process, you must turn on the answering system.
- Press the answerer on/off button to turn the answering system on and off.
The MESSAGES indicator lights when the answering system is on. The indicator blinks when you have new messages.
NOTE: The answering system displays “- -” when it is off.
Setting the Voice Prompt Language
The default voice prompt language is English.
To change the answering system's voice prompt language,
- Press the language button on top of base to change to the FRENCH voice prompt. The unit announces “OPTION FRANCAISE” and Fr shows in the message counter.
- Press the language button again to change to the SPANISH voice prompt. The unit announces “SELECCION ESPANOL” and SP shows in the message counter.
NOTE: To change to English, press the language button again. En shows in the message counter.
NOTE: In remote access mode, the system follows the selected language. The voice prompt language cannot be switched remotely.
Voice Time/Day Stamp and Real Time Clock
- Make sure the answering system is ON.
- Press and hold the day/check button to set the day of the week.
- Press and hold the hour button to set the hour (a.m. or p.m.). Example: 12AM, 1AM, or 12PM, 1PM.
- Press and release the min button to advance the clock in one minute intervals. Press and hold to increase by 5-minute increments.
- After the time is set, the real time clock will be displayed on the handset within 1 minute.
NOTE: You must set the day manually. You may choose to set the time manually as well, although the time is automatically transmitted by your local phone company as part of Caller ID service. If you subscribe to Caller ID service, the current time is set automatically when you receive your first CID record.
Speaker Volume
Use the volume (▲ or ▼) buttons to adjust speaker volume on the base to a comfortable level. L1 is the minimum speaker volume and L8 is the maximum.
Voice Instruction
If you need additional assistance, press the review button in standby mode and follow the voice instructions.
Recording the Outgoing Announcement
For best results when recording, you should be about nine inches from the microphone, and eliminate as much background noise as possible.
You may record an outgoing announcement in the answerer or choose the default for your current outgoing announcement.
- Make sure the answering system is ON.
- Press and hold the announce button until the speaker announces "RECORD ANNOUNCEMENT AFTER TONE".
- Begin speaking after you hear the beep.
- Release the button when you finish your announcement.
NOTE: If you choose not to record an outgoing announcement, a default announcement plays instead. To return to the default announcement after you have recorded your own outgoing announcement, press the announce button and release it when you hear the beep. Or, press the delete button while the announcement is reviewing.
Sample Outgoing Announcement
Hi, this is (use your name here), I can't answer the phone right now, so please leave your name, number and a brief message after the tone, and I'll get back to you. Thanks.
NOTE: The maximum recording time for the outgoing announcement is 2 minutes.
Reviewing and Choosing the Announcement
Press and release the announce button to review and select this one as your outgoing announcement.
NOTE: Press the PLAY/STOP button at any time to stop playing the announcement.
Programming the Telephone
Standby Screen
The handset displays the handset number and user name.
12:30AM
USER NAME
HANDSET X
Programming Functions
The system uses a menu structure to give you access to all of the built-in features. You may program the following items in main menu: Room Monitor and Handset Setup.
Room Monitor (applicable only with additional handsets)
- Make sure your phone is OFF (not in TALK mode).
- Press the program/mute button to go to the main menu.
- Press caller ID-volume (▼ or ▲) button to scroll to ROOM MONITOR.
- Press program/mute button to enter ROOM MONITOR menu, ROOM MONITOR EXTENSION? shows in the display.
ROOM MONITOR EXTENSION?
- Use the touch tone pad to enter the handset number to be monitored.
NOTE: When this phone system is expanded (up to 4 handsets by purchase of optional Model 29110 handset with recharge cradle), handsets are named HANDSET 1, HANDSET 2, HANDSET 3 and HANDSET 4 respectively.
- The receiving handset will turn on the microphone and the originating handset will turn on the speakerphone to monitor sound from the receiving handset.
NOTE: For room monitoring mode to work, the originating handset must NOT be on the cradle.
NOTE: While in room monitoring mode, the handsets will emit an alert tone approximately every 5 seconds if there is an incoming call. You may press the SPEAKER button to quit room monitor and answer the call.
NOTE: While in room monitoring mode, the originating handset can be switched to monitor by handset earpiece by pressing the TALK/CALL BACK button once. Switch back to speakerphone by pressing the SPEAKER button once.
NOTE: Press the *tone/exit button on the handset to exit room monitor mode.
Handset Setup
- Make sure your phone is OFF (not in TALK mode).
- Press the program/mute button to go to the main menu.
- Press caller ID-volume (▼ or ▲) button to scroll to HANDSET SETUP.
- Press program/mute button to confirm and you may program the following items: Set Language, Handset Name, Ringer Tone, Ringer Volume, Message Alert, Ring To Answer, Security Code, VIP Melody, Key Tone, Audio Predial, Vibrate Ringer, Area Code, Tone/Pulse, Registration, Deregistration and Default Setting.
NOTE: During programming, you may press the *tone/exit button at any time to exit the sub-menu and return to the menu.
Set Language
From the Handset Setup Menu:
- Press the caller ID-volume (▼ or ▲) button to scroll to the SET LANGUAGE sub-menu.
- Press program/mute button to enter the menu. SET LANGUAGE 1ENG 2FRA 3ESP shows in the display.
- Use the touch tone pad on the handset to select 1ENG, 2FRA, 3ESP, or use the caller ID-volume (▼ or ▲) button to scroll to the desired language. English is the default setting.
- Press the program/mute button to save your selection. You will hear a confirmation tone and the selected language shows in the display.
Handset Name
From the Handset Setup Menu:
- Press the caller ID-volume (▼ or ▲) button to scroll to the HANDSET NAME sub-menu.
-
Press program/mute button to enter the menu. HANDSET NAME shows in the display.
-
Use the touch-tone pad to enter a name (up to 15 characters). More than one letter is stored in each of the number keys. For example, to enter Bill Smith, press the 2 key twice for the letter B. Press the 4 key 3 times for the letter I. Press the 5 key 3 times for the letter L. Press the 5 key 3 times for the second letter L, and press the 1 key to insert a space between the first and last name. Press the 7 key 4 times for the letter S; press the 6 key once for the letter M; press the 4 key 3 times for the letter I; press the 8 key for the letter T; press the 4 key twice for the letter H.
NOTE: If you make a mistake, use the delete button to backspace and delete one character at a time.
- Press the program/mute button to save your name. You will hear a confirmation tone and the handset name shows in the display.
Ringer Tone
You may choose from ten different ringer tones and ten different melodies.
From the Handset Setup Menu:
- Press the caller ID-volume (▼ or ▲) button to scroll to the RINGER TONE sub-menu.
-
Press program/mute button to enter the menu. SET RINGER TONE 01 shows in the display. 01 is default setting.
-
Use the caller ID-volume (▼ or ▲) button to scroll to the desired setting (1 through 20). You will hear a sample of the ringer tone/melody you select.
-
Press the program/mute button to save your selection. You will hear a confirmation tone and the selected ringer tone shows in the display.
NOTE: You must have the Ringer Volume set to ON for ring tone to signal an incoming call.
Ringer Volume
From the Handset Setup Menu:
-
Press the caller ID-volume (▼ or ▲) button to scroll to the RINGER VOLUME sub-menu.
-
Press program/mute button to enter the menu. SET RINGER 1HI 2LOW 3OFF shows in the display.
-
Use the touch tone pad on the handset to select 1, 2 or 3, or use the caller ID-volume (▼ or ▲) button to scroll to your selection. HI is the default setting.
-
Press the program/mute button to save your selection. You will hear a confirmation tone and the new volume setting shows in the display.
NOTE: If you turn the ringer OFF, the ringer off icon shows in the display.
VIP Melody
This features allows you to assign a specific melody to someone you want to get your attention when the person calls. When a VIP melody is assigned and that person calls, the unit rings the normal ring for the first ring and then follows with VIP melody ring. You may choose from ten different polyphonic melodies and may store up to 10 VIP records.
NOTE: This feature ONLY works when the following conditions are met.
- You have subscribed to Caller ID.
- You have your Caller ID record previously transferred to the memory. (Refer to Storing CID Records in Internal Memory). NO USER MEMORY will show in the display to remind the user to do CID record transfer first.
Storing VIP Melody
From the Handset Setup Menu:
- Press the caller ID-volume (▼ or ▲) button to scroll to VIP MELODY sub-menu.
- Press program/mute button to select VIP melody feature and then display VIP 1 record.
-
If VIP1 does NOT contain any specific number/records, it will display EMPTY.
-
Press caller ID-volume (▼ or ▲) button to select the specific VIP melody memory location (10 VIP locations) that does not contain any record.
- Press program/mute button to display SELECT MEMORY.
NOTE: If the memory location does not contain any CID memory records and you are trying to mark a specific record as VIP MELODY, then SELECT MEMORY will not be displayed. Instead, NO USER MEMORY will display in prompt to alert the user. - Press caller ID-volume (▼ or ▲) button to view the records from memory to be selected as VIP.
- Press program/mute button to confirm and then display VIP MELODY 01 to wait for the melody tone selection.
- Press caller ID-volume (▼ or ▲) button to select from melody 01 to melody 10 (a testing tone is generated while making melody selection)
- Press program/mute button to confirm.
NOTE: If the desired number/record was previously stored in any one of the ten VIP melody records, DUPLICATE NUMBER shows in the display.
Changing a Stored VIP Melody Record
Use the Storing VIP Melody procedure to change the number of a selected record and replace the old phone number with new phone number.
When REPLACE VIP# ? shows in the display, you must press program/mute button on the handset to confirm replacement.
Reviewing And Deleting Stored VIP Melody Record
From the Handset Setup Menu:
- Press the program/mute button to enter to VIP MELODY menu.
- Use the caller ID-volume (▼ or ▲) button to scroll to the desired VIP Melody Record.
- If you want to delete the information, press the delete button on the handset while the entry displays. The display shows DELETE VIP# ?.
- Press delete again to confirm. You will hear a confirmation tone and VIP# DELETED shows in the display.
Key Tone
From the Handset Setup Menu:
- Press the caller ID-volume (▼ or ▲) button to scroll to the KEY TONE sub-menu.
- Press program/mute button to enter the menu. SET KEY TONE 1ON 2 OFF shows in the display.
- Use the touch tone pad on the handset to select 1 or 2, or use the caller ID-volume (▼ or ▲) button to scroll to your selection. 1ON is the default setting.
- Press the program/mute button to confirm and the key tone setting shows in the display.
Audio Predial
The handset will announce the numbers as you press 0-9 on the keypad while in pre-dialing mode.
From the Handset Setup Menu:
- Press the caller ID-volume (▼ or ▲) button to scroll to the AUDIO PREDIAL sub-menu.
- Press program/mute button to enter the menu. AUDIO PREDIAL 1ON 2 OFF shows in the display.
- Use the touch tone pad on the handset to select 1 or 2, or use the caller ID-volume (▼ or ▲) button to scroll to your selection. 20FF is the default setting.
- Press the program/mute button to confirm your selection.
NOTE: If both AUDIO PREDIAL and KEY TONE are set to on, AUDIO PREDIAL will take the priority in dialing mode.
Vibrate Ringer
This feature lets you to turn the vibrate ringer on or off.
From the Handset Setup Menu:
- Press the caller-ID volume (▼ or ▲) button to scroll to the VIBRATE RINGER sub-menu.
- Press program/mute button to enter the menu. VIBRATE RINGER 1ON 2OFF shows in the display.
- Use the touch tone pad on the handset to select 1 or 2, or use the caller-ID volume (▼ or ▲) button to scroll to your selection, 20FF is the default setting.
- Press the program/mute button to confirm your selection.
NOTE: If the Vibrate Ringer is set to ON, the handset will implement vibrate ringer while receiving an incoming call.
Message Alert (for answering system)
This feature sets your answering system to give an alert tone every 10 seconds when there are new messages.
From the Handset Setup Menu:
-
Press the caller ID-volume ( ▲ or ▼ ) button to scroll to the MESSAGE ALERT sub-menu.
-
Press mute/program button to enter the menu. NEW MSG ALERT 1ON 2OFF shows in the display.
- Use the touch-tone pad to enter the selection, or use the caller ID-volume ( ▲ or ▼ ) button to scroll to the 1ON or 2OFF. The default setting is 2OFF.
- Press the mute/program button to confirm. You will hear a confirmation tone and the new setting shows in the display.
Rings to Answer (for answering system)
This feature lets you select the number of times you want the phone to ring before the answering system answers a call.
From the Handset Setup Menu:
- Press the caller ID-volume ( ▲ or ▼ ) button to scroll to the RING TO ANSWER sub-menu.
- Press mute/program button to enter the menu. RING TO ANSWER 3 4 5 6 TS shows in the display.
- Use the caller ID-volume ( ▲ or ▼ ) button to scroll to the your selection. The default setting is 5.
- Press the mute/program button to confirm. You will hear a confirmation tone and the new setting shows in the display.
NOTE: If you select Toll Saver (TS) the unit answers after the 3rd ring if there are NEW messages, OR the unit answers after the 5th ring if there are NO new messages. This allows user to access their answerer from another location and then hang up after 4 rings to save long distance charges.
Security Code (for answering system)
You can access the answering system from a tone dialing telephone in another (remote) location. The security code is required for remote access, and it prevents unauthorized access to your answering system.
From the Handset Setup Menu:
- Press the caller ID-volume ( ▲ or ▼ ) button to scroll to the SECURITY CODE sub-menu.
- Press mute/program button to enter the menu. SECURITY CODE 123 shows in the display.
- Use the touch-tone pad to enter your new -digit security code. The default setting is 123.
- Press the mute/program button to confirm. You will hear a confirmation tone and the new security code shows in the display.
NOTE: If you make a mistake, use the delete button to delete the security code and begin again.
Area Code
From the Handset Setup Menu:
- Press the caller ID-volume (▼ or ▲) button to scroll to the AREA CODE sub-menu.
- Press program/mute button to enter the menu. SET AREA CODE --- shows in the display.
- Use the touch-tone pad to enter your 3-digit area code.
- Press the program/mute button to confirm. You will hear a confirmation tone and the new area code shows in the display.
NOTE: To restore the default setting to - - -, press and release delete when SET AREA CODE shows in the display.
Tone/Pulse
From the Handset Setup Menu:
- Press the caller ID-volume ( ▲ or ▼ ) button to scroll to the TONE PULSE sub-menu.
- Press program/mute button to enter the menu. TONE/PULSE ▶ 1TONE 2PULSE shows in the display. The default setting is "1 TONE".
- Use the touch-tone pad or caller ID-volume ( ▲ or ▼ ) to enter 1 TONE or 2 PULSE.
- Press the program/mute button to confirm. You will hear a confirmation tone and your selection shows in the display.
Registration
Your packaged handset(s) are pre-registered and ready to use. It is not recommended that a handset be registered again unless absolutely necessary.
From the Handset Setup Menu:
- Press the caller ID-volume (▼ or ▲) button to scroll to the REGISTRATION sub-menu.
- Press the program/mute button to enter the menu. REGISTRATION 1YES ▶ 2NO --- shows in the display The default setting is 2NO.
- Use the touch-tone pad to select 1 for YES or 2 for NO. Or use the caller ID-volume (▼ or ▲) button to scroll to 1YES or 2NO.
- If you select 1YES, press the program/mute button. HOLD BASE PAGE FOR 5 SECONDS, THEN PRESS HANDSET PROGRAM shows in the display. (Your handset should be held near the base during registration process.)
- Press and hold the page button on the base unit, the charge/in use indicator flashes. Press the handset program/mute button. REGISTERING shows in the display. HANDSET X REGISTERED shows in the handset display, where X is the handset number. You may now rename your handset. (Refer to Step 3 & 4 of Handset Name Section)
NOTE: IF you are re-registering the handset through the handset menu; to rename your handset you must go to the Handset Name Section and start from the beginning step.
De-Registration
De-registration cancels registration. During the de-registration process, keep the handset near the base.
From the Handset Setup Menu:
-
Press the caller ID-volume (▼ or ▲) button to scroll to the DEREGISTRATION sub-menu.
-
Press the program/mute button to enter the menu. DEREGISTRATION 1YES ▶ 2NO --- shows in the display The default setting is "2NO".
-
Use the touch-tone pad to select 1 for YES or 2 for NO. Or use the caller ID-volume (▼ or ▲) button to scroll to 1YES or 2NO.
WARNING: It is not recommended that a handset be de-registered unless absolutely necessary because once a handset is de-registered, that handset's telephone features cannot be used until the handset is re-registered.
-
Select NO, if you do not want to de-register.
-
If you select 1YES, press the program/mute button and MOVE NEAR TO BASE displays for 2 seconds, then CONFIRM? 1YES 2NO appears in the display.
- Press the touch-tone pad to select 1YES or 2NO, or use the caller ID-volume (▼ or ▲) button to scroll to 1YES or 2NO.
- If you select YES, press the program/mute button to confirm. DE-REGISTER... shows in the display. You will hear a confirmation tone. Then HANDSET X DEREGISTERED shows in the display to confirm the handset is deregistered.
NOTE: When you complete the de-registration process, HANDSET NEEDS REGISTRATION shows in the display. To use the handset, you MUST re-register the handset using the Registration process.
Global De-registration
If one or more handsets becomes lost, you should de-register all handsets to ensure proper system operation.
WARNING: It is not recommended that a handset be de-registered unless absolutely necessary because once a handset is de-registered, that handset's telephone features cannot be used until the handset is re-registered.
- Disconnect power from the base by pulling the plug out of the back of the unit.
- Press and hold the page button and while holding the page button reconnect the power.
- Continue to hold the page button until the charge/in use light flashes rapidly.
- Release the page button.
- Press and release the page button on the base once. All handsets are de-registered and HANDSET NEEDS REGISTRATION shows in the display.
Default Setting
As you become familiar with this system, you may prefer to use the system's original settings. Follow the steps below to return to the factory default settings.
From the Handset Setup Menu:
- Press the caller ID-volume (▼ or ▲) button to scroll to the DEFAULT SETTING sub-menu.
- Press the program/mute button to enter the menu. DEFAULT SETTING 1YES 2NO shows in the display. The default setting is 2NO.
- Use the touch-tone pad to select 1YES or 2NO, or use the caller ID-volume (▼ or ▲) button to move the cursor to 1YES or 2NO.
NOTE: If you choose YES all the settings in the programmable menu are returned to factory default setting.
- Press the program/mute button to save your selection. You will hear a confirmation tone.
Telephone Operation
Visual Indicators
Base
The indicator on the base will flash to alert you to an incoming call, during paging, or if you have a message waiting from your service provider. The indicator will remain lit when a handset is in the base charging or when the line is in use.
Handset
The TALK/CALL BACK and SPEAKER indicator buttons flash when you receive a call and remain lit during a call. The keypad and CID will also light when a call is received.
VMWI / Visual Ringer Indicator on Handset IMPORTANT: In order to use this unit's Voice Mail Waiting Indicator (VMWI) feature, you must subscribe to this service from your phone company.
The VMWI indicator on the top of the handset flashes when you receive a new message from your service provider. Also, it serves as a Visual Ringer function. It will flash when there is an incoming call.
Speakerphone Operation.
NOTE: If you are using the speakerphone, remain close to handset so the party you are speaking to can hear you.
If you are using the handset and want to switch to the speakerphone, press the SPEAKER button, press SPEAKER again to end conversation.
If you are using the speakerphone and want to switch to the handset, press the TALK/CALL BACK button, press TALK/CALL BACK again to end conversation.
Making a Call
- Press the TALK/CALL BACK or SPEAKER button. Dial the desired number.
- OR -
Dial the number first, then press the TALK/CALL BACK or SPEAKER button.
- OR -
Press the caller ID-volume (▼ or ▲) button to select the desired record, then press the TALK/CALL BACK or SPEAKER button.
- When finished, press the TALK/CALL BACK or SPEAKER button to hang up.
NOTE: You may enter up to 32 pre-dial digits.
NOTE: If you want to delete the pre-dial number you entered, press the delete button until all of the digits are erased.
Answering Calls
- When the phone rings or vibrates (depends on the phone setting), press the SPEAKER button on the handset.
- OR -
Pick up the handset and press the TALK/CALL BACK button.
- When finished, press SPEAKER or TALK/CALL BACK to hang up.
NOTE: Adjust the handset volume by pressing the caller ID-volume (▼ or ▲) button during a call.
Call Timer
After you press the TALK/CALL BACK button on the handset, the built-in call timer shows on the display and counts the length of time of the call in minutes and seconds.
Auto Standby
If you place the handset in the cradle while the handset is off the hook (during a call), the call is automatically disconnected.
Ringer HI/LO/OFF (Shortcut)
There are two ways to set the ringer to HI/LO/OFF. One is the traditional way as described in the Programming Functions; Handset Setup; Ringer Volume menus. The other one is this short cut to ringer menu.
- Make sure the phone is OFF (not in TALK mode).
- Press the #pause/ringer button to display SET RINGER 1HI 2LOW 3OFF.
- Use the touch tone pad on the handset to select 1, 2 or 3, or use the caller ID-volume (▼ or ▲) button to scroll to your selection. HI is the default setting.
- Press #pause/ringer button again to save and display the new selection for a few seconds.
Do Not Disturb
This feature allows you to turn off the base ringer and handset ringers for all handsets registered with the base unit. The answerer speaker will be silenced when the unit is receiving incoming messages.
Press the do not disturb button on the base. Handset will display DO NOT DISTURB.
NOTE: If DO NOT DISTURB is activated during an incoming ring, it will only be effective from the next incoming call.
Flash/Call Waiting
If you subscribe to the combined Call Waiting Caller ID service from your local telephone company, you will receive Caller ID information (if available) on Call Waiting calls. During a phone call, you will hear a beep to indicate another call is waiting on the line and Caller ID information for the waiting call shows on the handset display.
- To connect to the waiting call, press the flash button on the handset, and your original call is put on hold.
- To switch between the two calls, press the flash button.
TIP: Do not press the TALK/CALL BACK button on the handset to activate a custom calling service, such as call waiting, or call will disconnect.
Last Number Redial
You may redial a number up to 32 digits long. To quickly redial the last number you dialed:
-
Press the TALK/CALL BACK button.
-
Press the redial button.
-OR-
- Press the redial button first, then use the caller ID-volume (▼ or ▲) button to select the desired redial number.
- Press the caller ID-volume ( ▲ ) to review the oldest call and scroll toward the most recent calls (higher numbers).
- Press the caller ID-volume (▼) to review the newest call and scroll to older calls (lower numbers).
NOTE: You may choose from three last dialed numbers.
- Press the TALK/CALL BACK button. The number dials automatically.
If you get a busy signal and want to keep dialing the number, press the redial button to quickly redial the number.
Exit
Press the *tone/exit button to exit a menu function and return to the standby screen.
Page
The page feature helps you locate a misplaced handset. To send and receive pages, all handsets must be registered. If your handset is not registered, follow the instructions in the Registration section of this manual.
Handset to Handset Paging (applicable only with additional handsets)
- Make sure the phone is OFF (not in TALK mode).
- Press and release the int button on a handset. PAGING EXTENSION? shows in the display.
- Use the touch-tone pad to enter the handset number you want to page.
- To cancel the page, press the *tone/exit, int, or TALK/CALL BACK button on the originating handset, or press the *tone/exit button on the receiving handset.
Paging All Handsets from a Handset
(applicable only with additional handsets)
- Make sure the originating phone is OFF (not in TALK mode).
- Press and release the int button on a handset. PAGING EXTENSION? shows in the display.
-
Use the touch-tone pad to enter the handset number you want to page. (1= to page Handset 1, 2=to page handset 2, etc., and 5=to page all handsets)
-
To cancel the page, press the *tone/exit, int, or TALK/CALL BACK button on the originating handset, or press the *tone/exit button on the receiving handset.
Paging from the Base/Group Page
Use the base-only to page all registered handsets at the same time.
- Press the page button on the base. All handsets beep for two minutes, and PAGING FROM BASE shows on each handset's display.
- To cancel the page, press the page button on the base, or press the TALK/CALL BACK button or the *tone/exit button on each handset.
Mute
To have a private, off-line conversation, use the MUTE feature. The party on the telephone line cannot hear you, but you can hear them.
- Press the program/mute button. The handset display shows MUTE ON.
- Press the program/mute button to cancel and return to your phone conversation.
Receiver Volume Control
When the handset is ON (in TALK mode) you may adjust the receiver volume by pressing the caller ID-volume (▼ or ▲) button. There are four volume levels to choose from. When the maximum or minimum volume level is reached, the phone beeps twice. VOL 1 is minimum and VOL 4 is maximum.
Volume Amplify
During a conversation, you may increase the volume by pressing the amplify button on the side of the handset, AMPLIFY will show in display. The volume will return to its original setting when you hang up the phone or if you press the amplify button again during conversation.
NOTE: The Volume Amplify feature can be turned on at any Volume Level setting during conversation. Also, the volume level can still be adjusted after the Volume Amplify Feature is enabled by using the caller ID-volume (▼ or ▲) button.
Tone Control
During a conversation, you may adjust the frequency levels for your specific hearing loss needs by repeatedly pressing the tone control button on the side of the handset. Select from Tone 1, Tone 2 or Tone 3 Selected tone is displayed and then screen returns to standby.
Intercom Operation
(applicable only with additional handsets)
The intercom feature allows you to have a conversation with another registered handset without tying up the telephone line, allowing you to still receive incoming calls.
Making an Intercom Call
- Make sure the handset is OFF (not in TALK mode).
- Press the int button on the handset.
- Use the touch-tone pad to select the handset you want to page.
NOTE: To cancel page, press the int button again or the *tone/exit button on the sending handset.
- Wait for the person at the receiving handset to press the int button.
NOTE: If the receiving handset does not answer within two minutes, the intercom call is automatically canceled. The originating handset displays NO ANSWER.
- When finished, press the *tone/exit button or int button on either handset to deactivate the intercom.
NOTE: The system is expandable up to 4 handsets (by purchase of optional Model 29110 handset with recharge cradle). When 4 handsets are registered, the system can handle 2 separate intercom operations at once, for example, 1st handset intercoms with 2nd handset while 3rd handset intercoms with 4th handset.
Receiving an Intercom Call
When you receive an intercom call, your handset beeps. To answer the call press the int button or TALK/CALL BACK button.
Advanced Intercom Features
Receiving an Incoming Call During an Intercom Call
If you receive a telephone call during an intercom call, the intercom call is immediately terminated and both handsets ring. Either handset user may press the TALK/CALL BACK button to answer the call.
Using Intercom with External Telephone Calls
During a telephone call, you may use the intercom/paging function to page another handset and have an off line, private (two-way) intercom conversation. You may also have a three-way conversation between the external caller and the handsets, or you may transfer the external telephone call to another handset.
NOTE: Before you intercom/page another handset, you must decide whether you want to create a two-way or a three-way conversation.
Two-Way Calling
- During an external call, press the int button, and use the touch-tone pad to enter the handset number you want to call.
NOTE: The receiving handset presses the int button to answer the intercom call. Both intercom users may speak privately. The external caller will not hear the intercom conversation.
- When finished, press the *tone/exit button or int button to end the intercom call, return to the talk mode, and resume your original telephone conversation.
Three-Way Calling
-
During an external call, press the int button. LINE ON HOLD EXTENSION? shows in the display.
-
Use the touch-tone pad to select Handset #. You will hear a paging tone and PAGING shows in the originating handset's display.
NOTE: PAGING FROM... shows in the display on the receiving handset, and the receiving handset presses the int or TALK/CALL BACK button to answer the intercom.
- When the receiving handset connects, press the conf/format button on the originating handset to conference with the receiving handset and the external caller. CONFERENCE shows in the display on the originating and receiving handsets.
NOTE: A handset can enter conference mode directly by pressing TALK/CALL BACK on the second handset during a call.
Transferring External Calls to Other Handsets
During an external call, you may transfer the external call to another handset.
- Press the int button on the originating handset to put an external call on hold, and then page the receiving handset.
- Use the touch-tone pad on the handset to select Handset #. You will hear a paging tone. PAGING shows on the originating handset's display, and PAGING FROM... shows on the receiving handset's display.
- When the receiving handset connects, press the TALK/CALL BACK button on the originating handset to transfer the call. -OR-
- Press the TALK/CALL BACK button on the originating handset to transfer the call. If the receiving handset does not answer within 30 seconds, the originating handset rings back and displays CALLBACK. If the originating handset does not answer within 30 seconds, the call is automatically dropped.
IMPORTANT: In order to use this unit's Caller ID features, you must subscribe to either the standard Name/Number Caller ID Service or Call Waiting Caller ID Service. To know who is calling while you are on the phone, you must subscribe to Call Waiting Caller ID Service.
This unit receives and displays information transmitted by your local phone company. This information can include the phone number, date, and time; or the name, phone number, date, and time.

Call Waiting Caller ID
Provided you subscribe to Call Waiting Caller ID service from your phone company; if you receive an incoming call and you are using the GE multi handset system, a beep indicates the presence of a Call Waiting call on the line. The Call Waiting Caller ID information will be displayed and stored in the history of all handsets in the system.
- When you hear the call waiting beep in the handset receiver, press the flash button to put the current call on hold and answer the incoming call. Press FLASH again to return to the original call.
Receiving CID Records
When you receive a call, the Caller ID information is transmitted between the first and second ring. The Caller ID information appears on the display while the phone rings, giving you a chance to monitor the information and decide whether or not to answer the call.
Storing CID Records (In CID Memory)
If you are not at home or cannot answer, your telephone's Caller ID memory stores the data for the 40 most recent calls you received so you can see who called while you were unavailable. When the 41st call is received, the oldest Caller ID record (1st call) is automatically deleted.
You may review the stored information at any time. Calls received since your last review show as NEW in the display. Calls that have not been previously reviewed but were received from the same number more than once show as REPT in the display.
Reviewing CID Records
As calls are received and stored, the display is updated to let you know how many calls have been received. To scroll CID records:
- Make sure the phone is OFF (not in TALK mode).
- Press the caller ID-volume (▼) button to review the newest CID record.
- Press the caller ID-volume ( ▲ ) button to review the oldest CID record first.
Dialing a CID Number
- Make sure the phone is OFF (not in TALK mode).
- Use the caller ID-volume (▼ or ▲) button to display the desired record.
- Press the TALK/CALL BACK or SPEAKER button. The number dials automatically.
NOTE: Depending on (a) how the incoming caller's phone number is formatted when it is received, and (b) whether or not you previously pre-programmed your local area code into the set up menu, you may need to adjust the format of the incoming caller's stored phone number before making the call, press the conf/format button to adjust the number, and try again.
Available formats include:
Number of digits Explanation Example
Eleven digits long distance code "1" 1-317-888-8888
+3-digit area code
+7-digit telephone number.
Ten digits 3-digit area code + 317-888-8888
7-digit telephone number.
Seven digits 7-digit telephone number. 888-8888
Storing CID Records in Internal Memory
You may also store CID information in the phone's internal memory.
NOTE: It is important that you format CID records correctly BEFORE storing in internal memory as you cannot reformat CID records stored in memory.
- Make sure the phone is OFF (not in TALK mode).
- Use the caller ID-volume (▼ or ▲) button to scroll to the desired CID record.
- Press the memory button to display SELECT MEMORY 01-50.
- Use the touch-tone pad to enter a memory location to store the number in that memory location. You will hear a confirmation tone.
NOTE: If the memory location is occupied, REPLACE MEMO? is displayed, and you must confirm replacement by pressing the memory button.
NOTE: Press the *tone/exit button once to keep the previous setting (making no changes) and return to the menu.
NOTE: If the selected CID record contains any information that is non-numeric, the unit will not allow this record to transfer to the internal user memory. The handset will display UNABLE TO STORE.
To Replace a Stored CID Record
- Repeat steps 1 through 3 in Storing CID Records in Internal Memory. After you enter the memory location, REPLACE MEMO? shows in the display.
- Press the memory button again, and the new CID record replaces the old memory in that location. You will hear a confirmation tone.
Deleting a CID Record
- Make sure the phone is OFF (not in TALK mode).
- Use the caller ID-volume (▼ or ▲) button to display the CID record you want to delete.
- Press the delete button. The display shows DELETE CALL ID?
- Press the delete button to erase the record showing in the display. The display shows DELETED.
NOTE: Press the *tone/exit button to return to the standby mode without deleting any CID records.
Deleting All CID Records
- Make sure the phone is OFF (not in TALK mode).
- Use the caller ID-volume (▼ or ▲) button to display any Caller ID record.
- Press and hold the delete button until DELETE ALL? shows in the display.
- Press delete button to erase all of the current CID records. The display shows DELETED followed by NO CALLS.
NOTE: Press the *tone/exit button to return to the standby mode without deleting any CID records.
Memory
Each handset can store up to fifty 20-digit numbers with up to 15-character names in memory for quick dialing. This memory feature is in addition to the CID memory log, which stores up to 40 CID records in each handset.
Storing a Name and Number in Memory
- Make sure the phone is OFF (not in TALK mode).
- Press the memory button to display SELECT MEMORY 01-50.
- Press the desired memory location button (01 through 50) or use the caller ID-volume (▼ or ▲) button to scroll to desired the memory location.
NOTE: If the memory location is occupied, the memory location number and stored name and telephone number shows in the display. If the memory location is empty, EMPTY shows in the display.
-
Press the memory button. The display shows ENTER NAME.
-
Use the touch-tone pad to enter a name (up to 15 characters). More than one letter is stored in each of the number keys. For example, to enter Bill Smith, press the 2 key twice for the letter B. Press the 4 key 3 times for the letter I. Press the 5 key 3 times for the letter L. Press the 5 key 3 times for the second letter L, and press the 1 key to insert a space between the first and last name. Press the 7 key 4 times for the letter S; press the 6 key once for the letter M; press the 4 key 3 times for the letter I; press the 8 key for the letter T; press the 4 key twice for the letter H.
NOTE: If you make a mistake press the delete button to backspace and erase the wrong character(s) or number(s).
- Press the memory button to confirm and save the record. The display shows ENTER TEL NUMBR.
- Use the touch-tone pad to enter the telephone number (up to 20 digits, including pauses (press #pause/ringer button), and press the memory button again to save the record. The unit beeps to confirm.
NOTE: The system treats PAUSES as delays or spaces in the dialing sequence.
- To enter another name and number in a different memory location, return to step 2 and repeat the process.
Storing the Last Number Dialed
You may transfer all three redial numbers into internal user memory.
- Make sure the phone in OFF (not in TALK mode).
- Press redial button to display the most recent redial number.
- Use the caller ID-volume (▼ or ▲) button to scroll to desired redial number.
- Press memory button to display SELECT MEMORY 01 - 50.
- Use touch-tone pad to enter two digit desired memory location (01 through 50). Display will show ENTER NAME.
- Follow step 5 in the "Storing a Name and Number in Memory" section to enter name.
NOTE: If the memory location is occupied, REPLACE MEMO? is displayed, and you must confirm replacement by pressing the memory button.
-
Press memory button to save.
-
To enter another name and number in a different memory location, return to step 2 and repeat the process.
NOTE: If the redial number has more than 20 digits, it cannot be stored in memory.
Inserting a Pause in the Dialing Sequence (of a Stored Number)
Press the #pause/ringer button on the handset's touch-tone pad to insert a delay in dialing sequence when a pause is needed to wait for a dial tone (for example, after you dial 9 for an outside line, or to wait for a computer access tone.) Each pause counts as one digit in the dialing sequence.
Reviewing Records Stored in Memory
- Make sure the phone is OFF (not in TALK mode).
- Press the memory button to display SELECT MEMORY 01-50.
- Press the caller ID-volume (▼ or ▲) buttons to scroll the records, or use the handset's touch-tone pad to enter the memory location number.
Changing Records Stored in Memory
Follow the procedure for Storing Names and Numbers in Memory, except replace a stored telephone number with a new one.
Deleting Records Stored in Memory
- Make sure the phone is OFF (not in TALK mode).
-
Press the memory button to display SELECT MEMORY 01-50.
-
Press the caller ID-volume (▼ or ▲) button to scroll to the record you want to delete or use the touch-tone pad to enter the desired memory location.
-
Press the delete button to mark the record for deletion. The display shows DELETE?
-
Press the delete button to delete the record. DELETED shows in the display.
NOTE: If you don't want to change or delete a record, simply press the *tone/exit button, or wait for one minute to exit the review mode automatically.
Dialing a Number from Memory
-
Make sure the phone is ON (in TALK mode) by pressing the TALK/CALL BACK or SPEAKER button.
-
Press the memory button to display MEMO # - - .
-
Use the touch tone pad to enter the memory location number. The number dials automatically.
-OR-
-
Make sure the phone is OFF (not in TALK mode).
-
Press the memory button to display SELECT MEMORY 01-50.
-
Press the memory location for the phone number you want to dial, or use the caller ID-volume (▼ or ▲) button to scroll to the number you want to dial.
-
Press the TALK/CALL BACK or SPEAKER button. The number dials automatically.
Chain Dialing from Memory
Use this feature to make calls from records stored in memory which require a sequence of numbers, such as a calling card number used for a frequently called long distance number. The following example shows how you can store each part of the dialing sequence and use chain dialing to make a call through a long distance service:
The Number For Memory Location
Long Distance Access Number 7
Authorization Code 8
Frequently called long distance number 9
- Make sure the phone is ON (in TALK mode) by pressing the TALK/CALL BACK or SPEAKER button.
- Press the memory button, and then press 07.
- When you hear the access tone, press the memory button, and then press 08.
- At the next access tone, press the memory button and then 09.
This section discusses the buttons and features on the answering system.
Message Counter Indicator
The message counter gives you a numeric display of how many messages you have. The new message indicator flashes to indicate you have new messages. See below for the details.
a) Message counter has a number displayed without flashing - No new messages. Shows total number of old messages.
b) Message counter has a flashing number displayed - There are new messages. Shows total number of old and new messages.
c) Message counter has bars ( - - ) - Answerer is off.
d) Message counter has an "F" flashing on the display - Memory is full.
e) Message counter has a "CL" flashing on the display - Clock is not set since power up or after power failure.
f) Message counter has six horizontal bars flashing on the display - MEMO recording.
g) Message counter has a "An" flashing on the display - Answering incoming calls and recording an incoming call.
h) Message counter has "LA" - The answering system is being accessed remotely.
i) Message counter has "En" on the display - English is selected as the current voice prompt during language selection.
j) Message counter has "Fr" on the display - French is selected as the current voice prompt during language selection.
k) Message counter has "SP" on the display - Spanish is selected as the current voice prompt during language selection.
NOTE: While the messages are playing, the message counter will display the messages in the order they were received.
NOTE: The maximum recording time for each message is 3 minutes and the total recording time of this unit is 12 minutes.
Leaving a Message/Memo
Use the memo feature to leave a message.
- Press and hold the memo button.
- Begin speaking after you hear "RECORD MESSAGE" and start tone.
- Release the memo button when you are finished recording the memo.
NOTE: Maximum recording time for memo is 3 minutes.
Screening Calls from the Base
- When the answering system answers the call, listen while the caller leaves a message (to determine who is calling).
- To speak to the caller, pick up the handset, and press the TALK/CALL BACK or SPEAKER button.
The answering system automatically stops recording when you activate the handset or pick up an extension phone.
TIP: Make sure the volume on the base is set loud enough to hear your incoming calls.
Message Playback
The message counter lets you know when you have message(s) or new message(s). To play the messages, press the PLAY/STOP button.
While a message is playing, you may do the following:
- Press the PLAY/STOP button to stop the message playback.
- Press and release the message speed button to listen to the message playback at half of its normal speed. Press again to cancel and return to standard playback mode.
- Press and release the review button to restart the current message.
-
Press and release the review button twice to go to the previous message.
-
Press and release the skip button to go to the next message.
- Press the delete button to erase the current message.
Memory Full
When the answering system memory is full, the system answers after 10 rings. You should erase some messages so the answering system may record new messages.
Erasing Messages
You may erase messages in the following three ways:
To erase a message while it is playing
- Press and release PLAY/STOP button.
- Press the review and skip buttons to select and play the message you want to erase.
- Press the delete button, the current message is erased, and the next message plays.
To erase all previously played Messages in a mailbox
- Make sure the phone is OFF (not in talk mode)
- Press and hold the delete button until "ALL OLD MESSAGES ERASED" is announced.
To erase a message from the handset :
- Press the flash/answerer button on the handset
- Press the play/stop (key 2) on the handset.
- Press the erase (key 0) on the handset to erase a message during playback.
NOTE: Erased messages cannot be restored.
Remote Access
You may access the answering system with the cordless handset or from any tone-dial compatible telephone.
Cordless Handset
Use the corresponding handset keys just like you would use the base buttons (see “Answering System Setup”). The button functions are located on the handset above each number key. For example, to play messages:
- Press the flash/answerer button. The display shows ANSWERER REMOTE ACCESS.
- Press the play/stop button to play the message.
- When you are finished listening to your messages, press the flash/answerer button again.
Screening Calls from the Handset
Use the handset to screen calls even when you can't hear the answering system.
When the answering system picks up:
- Press the flash/answerer button to access the answering system. CALL SCREENING shows on the display.
- Listen as the caller leaves a message.
- Press the TALK/CALL BACK or SPEAKER buttons to speak to the person or press the flash/answerer button to stop screening the call.
Accessing the Answering System from Another Location
You can access your answering system from any touch-tone phone by entering your 3-digit security code during the playing of outgoing announcement or after you hear the outgoing announcement.
- Dial the telephone number to which the answering system is connected.
- While the outgoing announcement is playing, enter the security code "123"
-OR-
After the announcement has played and you hear a tone, enter security code "123"
- Follow the voice menu to use the answering system's remote functions.
The remote feature lets you perform the following functions:
To Press this button
Review message 1
Play back messages 2
Stop message playback 2
Erase message 0 (during message playback)
Skip message 3
Turn off/on answerer 4
Review voice menu options 7
Memory Full
When answering system memory is full, the system answers after 10 rings, beeps and waits for you to enter the 3-digit security code. If you don't enter the security code within 8 seconds, the phone hangs up.
You should erase some messages so the answering system can record new messages.
NOTE: The unit also answers after the 10th ring if it is turned off. To access the answering system, enter your 3-digit security code.
Belt Clip and Optional Headset
Connecting the Belt Clip
- To attach the belt clip, insert the sides of the belt clip into the slots on each side of the handset.
- Snap the ends of the belt clip into place.
Connecting an Optional Headset to the Handset
Each handset can be used with an optional headset hands free operation.
- Connect the headset to the headset jack on the side of the handset. The handset receiver and microphone are disabled when the headset is connected.
- Adjust the headset to rest comfortably on top of your head and over your ear. Move the microphone to approximately two to three inches from your mouth.
- Press the TALK/CALL BACK button to answer a call or make calls using the headset.
- To return to normal operation, unplug the headset from the jack.
Changing the Battery

CAUTION: To reduce the risk of fire or personal injury, use only the Thomson Inc. approved model 5-2721 Nickel-metal Hydride battery (Ni-MH), which is compatible with this unit.
- Make sure the telephone is OFF (not in TALK mode) before you replace the battery.
- Remove the battery compartment door.
- Disconnect the battery plug from the jack inside the battery compartment and remove the battery pack from the handset.
- Insert the new battery pack and connect the cord to the jack inside the battery compartment.
- Put the battery compartment door back on.
- Place handset in the base or handset charge cradle to charge. Allow the handset battery to properly charge (for 16 hours) prior to first use or when you install a new battery pack. If you do not properly charge the phone, battery performance will be compromised.
Battery Safety Precautions
- Do not burn, disassemble, mutilate, or puncture. Like other batteries of this type, toxic materials could be released which can cause injury.
- To reduce the risk of fire or personal injury, use only the Nickel-metal Hydride battery listed in the User's Guide.
- Keep batteries out of the reach of children.
- Remove batteries if storing over 30 days.
NOTE: The RBRC seal on the battery used in your Thomson Inc. product indicates that we are participating in a program to collect and recycle the rechargeable battery (or batteries).
For more information go to the RBRC web site at www.rbrc.org or call 1-800-8-BATTERY or contact a local recycling center.
Display Messages
The following messages shows the status of the phone, provides Caller ID information, or helps you set up and use your phone.
BLOCKED NUMBER Indicates the person is calling from a number which is blocked from transmission.
CHARGING... Indicates the handset needs to charge for a period of time before it can resume normal function.
DELETE ALL? Prompt asking if you want to erase all CID records.
DELETE CALL ID? Prompt asking if you want to erase the CID record showing on the display.
DELETE? Prompt asking if you want to erase one of the 50 records stored in the phone's memory.
DUPLICATE NUMBER Under VIP melody feature, if the desired number/record was selected in any one of TEN VIP melody records before, DUPLICATE NUMBER shows in the display.
END OF LIST Indicates that there is no additional information in CID memory.
ENTER NAME Prompt telling you to enter a name in one of the 50 memory locations.
ENTER TEL NUMBR Prompt telling you to enter a telephone number in one of the 50 memory locations.
NEW Indicates call or calls which have not been reviewed.
HANDSET NAME Prompt telling you to enter the user name for the registered handset.
HANDSET NEEDS Indicates you must register a non-REGISTRATION registered handset prior to use.
INCOMPLETE DATA Caller information is interrupted during transmission or the phone line is excessively noisy. Indicates no CID information was received, you are not subscribed to CID service, or CID service is not working.
LINE IN USE Displays on handset while the line is in use.
LONG DISTANCE Indicates CID record is from a long distance call.
LOW BATTERY Indicates the battery needs to be charged.
NEW VOICE MAIL Indicates voice mail has not been retrieved from service provider.
NEW CALL XX XX represents the number of new CID records not reviewed.
NO CALLS Indicates there are no CID records in memory.
NO USER MEMORY Indicates the memory location contains no user memories and the user is trying to mark a specific user record for VIP MELODY.
OUT OF RANGE May indicate handset is too far away from the base or that the power has been interrupted. Move closer and check connections.
PAGING or Someone pressed the page button PAGING FROM on the base or int button on the handset.
REPT Indicates a repeat call message. Indicates a new call from the same number was received more than once.
SEARCHING Indicates handset is searching for the base.
SPKR Indicates the handset is in speakerphone mode.
UNKNOWN CALLER/ Indicates incoming call is from an NAME/NUMBER area not serviced by CID or the CID information was not sent.
Handset Sound Signals
Signal Meaning
A long warbling tone Signals an incoming call (with ringer on)
Three short beeps Page signal (several times)
One beep every 7 seconds Low battery warning
Answering System Display Messages
The following messages show the status of the answering system or help you set up and use the system.
0-59 Indicates the total number of messages.
CL (blinking) The voice time/day stamp needs to be set.
-- Answering system is turned off.
An (blinking) The system is answering a call.
F (blinking) Answering system memory is full.
Six bars (blinking) The system is recording a memo or an announcement.
LA (Line Access) External line remote answering system.
Telephone Solutions
No dial tone
- Check or repeat installation steps: Make sure the base power cord is connected to a working electrical outlet.
Make sure the telephone line cord is connected to the base and the wall jack.
- Connect another phone to the same jack. If it doesn't work, the problem might be your wiring or local service.
- The handset may be out of range of the base. Move closer to the base.
- Make sure the battery is properly charged (for 16 hours).
- Make sure the battery pack (in the handset) is properly installed.
- The handset should beep when you press the TALK/CALL BACK button, and the charge indicator on the base should be lit when the handset rests in the cradle. If not, the battery may need to be charged.
- Place handset in charge cradle for at least 20 seconds to reset the unit.
Handset does not ring
- Make sure the handset ringer software switch is set to on.
- The handset may be out of range of the base. Move closer to the base.
- You may have too many extension phones on your line. Try unplugging some extensions.
- Check for a dial tone.
You experience static, noise, or fading in and out
- The handset may be out of range of the base. Move closer to base.
- Make sure base is not plugged into an electrical outlet with another household appliance. If necessary, relocate the base.
- Charge the battery (for 16 hours).
Unit beeps
- Clean the charging contacts on the cordless handset and base charge cradle with a soft cloth or an eraser.
- See solutions for "No dial tone" on previous page.
- Replace the battery.
Memory dialing doesn't work
- Did you program the memory location keys correctly?
• Did you follow proper dialing sequence?
Unit locks up and no communication between the base and cordless handset
- Unplug the power adaptor from the electrical outlet and the back of the base. Remove the handset battery. Wait for 30 seconds and plug the power adaptor back into the base and electrical outlet. Reconnect the battery and charge for 16 hours.
Caller ID Solutions
No Display
- Charge the battery (for 16 hours). Or replace the battery.
- Make sure the unit is connected to a non-switched electrical outlet. Disconnect the power adaptor from the base and reconnect it.
Caller ID Error Message
- The unit displays this message if it detects anything other than valid Caller ID information during the silent period after the first ring. This message indicates the presence of noise on the line.
No Caller ID
- You must be subscribed to the standard Name/Number Caller ID service from your local telephone company to receive CID information.
Battery Solutions
If you experience any of the following problems, even after recharging the battery, you may need to replace the battery pack:
- Short talk time
- Poor sound quality
- Limited range
- Charge indicator fails to turn on
Answering System Solutions
Can't hear messages, beep, etc.
- Adjust speaker volume.
Time/Day setting stuck at 12 a.m Mon.
- Set the time clock.
Answers on 10th ring
- Make sure answering system is turned on.
- Answering system memory may be full. Erase some messages.
Incoming messages are incomplete
- An extension phone may have been lifted as a message is received.
- Answering system memory is full. Erase some messages.
- You may have accidentally pressed the play/stop button during playback and stopped the message.
Won't respond to remote commands
- You must use a tone-dial phone. This phone does not support pulse (rotary) dialing.
- Make sure to enter the correct security code.
- Did unit hang up? If you take no action for a period of time, it automatically hangs up.
Causes of Poor Reception
- Aluminum siding.
- Foil backing on insulation.
- Heating ducts and other metal construction that can shield radio signals.
- You're too close to appliances such as microwaves, stoves, computers, etc.
- Atmospheric conditions, such as strong storms.
- Base is installed in the basement or lower floor of the house.
- Base is plugged into AC outlet with other electronic devices.
- Baby monitor is using the same frequency.
- Handset battery is low.
- You're out of range of the base.
General Product Care
To keep your unit working and looking good, follow these guidelines:
- Avoid dropping the handset, as well as other rough treatment to the phone.
- Clean the phone with a soft cloth.
- Never use strong cleaning agents, paint thinner, abrasive powder, alcohol, or other chemical products to clean the unit. Doing so will damage the finish.
- Retain the original packaging in case you need to ship the phone at a later date.
- Periodically clean the charge contacts on the handset and base with a clean pencil eraser.
Warranty Assistance
If trouble is experienced with this equipment, for warranty information, please contact customer service at
1-800-448-0329. If the equipment is causing harm to the telephone network, the telephone company may require that you disconnect the equipment until the problem is resolved.
Any unauthorized repairs, changes or modifications not expressly approved by Thomson Inc. could void the user's authority to operate this product. For instructions on how to obtain a replacement unit, refer to the warranty included in this guide or call customer service at 1-800-448-0329.
Or refer inquiries to:
Thomson Inc.
Manager, Consumer Relations
P O Box 1976
Indianapolis, IN 46206
Attach your sales receipt to this booklet for future reference or jot down the date this product was purchased or received as a gift. This information will be valuable if service should be required during the warranty period.
Purchase Date ____
Name of Store ____
What your warranty covers:
- Defects in materials or workmanship.
For how long after your purchase:
- Two year, from date of purchase. (The warranty period for rental units begins with the first rental or 45 days from date of shipment to the rental firm, whichever comes first.)
What we will do:
- Provide you with a new or, at our option, a refurbished unit. The exchange unit is under warranty for the remainder of the original product's warranty period.
How you get service:
- Properly pack your unit. Include any cables, etc., which were originally provided with the product. We recommend using the original carton and packing materials. - "Proof of purchase in the form of a bill of sale or receipted invoice which is evidence that the product is within the warranty period, must be presented to obtain warranty service." For rental firms, proof of first rental is also required. Also print your name and address and a description of the defect. Send via standard UPS or its equivalent to:
Thomson Inc.
11721 B Alameda Ave.
- Insure your shipment for loss or damage. Thomson Inc. accepts no liability in case of damage or loss.
- A new or refurbished unit will be shipped to you freight prepaid.
What your warranty does not cover:
- Customer instruction. (Your Owner's Manual provides information regarding operating instructions and user controls. Any additional information, should be obtained from your dealer.)
• Installation and setup service adjustments. - Batteries.
- Damage from misuse or neglect.
- Products which have been modified or incorporated into other products.
- Products purchased or serviced outside the USA.
- Acts of nature, such as but not limited to lightning damage.
Product Registration:
- Please complete and mail the Product Registration Card packed with your unit. It will make it easier to contact you should it ever be necessary. The return of the card is not required for warranty coverage.
Limitation of Warranty:
- THE WARRANTY STATED ABOVE IS THE ONLY WARRANTY APPLICABLE TO THIS PRODUCT. ALL OTHER WARRANTIES, EXPRESS OR IMPLIED (INCLUDING ALL IMPLIED WARRANTIES OF MERCHANTABILITY OR FITNESS FOR A PARTICULAR PURPOSE) ARE HEREBY DISCLAIMED. NO VERBAL OR WRITTEN INFORMATION GIVEN BY THOMSON INC., ITS AGENTS, OR EMPLOYEES SHALL CREATE A GUARANTY OR IN ANY WAY INCREASE THE SCOPE OF THIS WARRANTY.
- REPAIR OR REPLACEMENT AS PROVIDED UNDER THIS WARRANTY IS THE EXCLUSIVE REMEDY OF THE CONSUMER. THOMSON INC. SHALL NOT BE LIABLE FOR INCIDENTAL OR CONSEQUENTIAL DAMAGES RESULTING FROM THE USE OF THIS PRODUCT OR ARISING OUT OF ANY BREACH OF ANY EXPRESS OR IMPLIED WARRANTY ON THIS PRODUCT. THIS DISCLAIMER OF WARRANTIES AND LIMITED WARRANTY ARE GOVERNED BY THE LAWS OF THE STATE OF INDIANA. EXCEPT TO THE EXTENT PROHIBITED BY APPLICABLE LAW, ANY IMPLIED WARRANTY OF MERCHANTABILITY OR FITNESS FOR A PARTICULAR PURPOSE ON THIS PRODUCT IS LIMITED TO THE APPLICABLE WARRANTY PERIOD SET FORTH ABOVE.
How state law relates to this warranty:
- Some states do not allow the exclusion nor limitation of incidental or consequential damages, or limitations on how long an implied warranty lasts so the above limitations or exclusions may not apply to you.
- This warranty gives you specific legal rights, and you also may have other rights that vary from state to state.
If you purchased your product outside the USA:
- This warranty does not apply. Contact your dealer for warranty information.
Accessory Information
| DESCRIPTION MODEL NO. | |
| Handset Replacement Battery 5-2721 | |
| AC Power converter 5-2760 | |
| Belt Clip 5-2815 | |
| Charge Cradle 5-2816 | |
To place order, have your Visa, MasterCard, or Discover Card ready and call toll-free 1-800-338-0376.
A shipping and handling fee will be charged upon ordering. We are required by law to collect appropriate sales tax for each individual state, country, and locality to which the merchandise is being sent. Items are subject to availability.
Index
A
Accessing the Answering System from Another Location 74
Accessory Information 93
Advanced Intercom Features 53
Answering Calls 45
Answering System Display Messages 82
Answering System Operation 69
Answering System Setup 22
Answering System Solutions 86
Area Code 38
Audio Predial 34
Auto Standby 46
B
Base 43
Base Backup Battery Installation 19
Base Layout 17
Base Station 20
Battery Safety Precautions 78
Battery Solutions 86
Before You Begin 12
Belt Clip and Optional Headset 76
C
Call Timer 46
Call Waiting Caller ID 58
Caller ID (CID) 57
Caller ID Solutions 85
Causes of Poor Reception 87
Chain Dialing from Memory 68
Changing a Stored VIP Melody Record 33
Changing Records Stored in Memory 66
Changing the Battery 77
Connecting an Optional Headset to the Handset 76
Connecting the Belt Clip 76
Cordless Handset 73
D
Default Setting 42
Deleting a CID Record 62
Deleting All CID Records 63
Index
Deleting Records Stored in Memory 66
De-Registration 40
Dialing a CID Number 60
Dialing a Number from Memory 67
Digital Security System 13
Display Messages 79
Do Not Disturb 47
E
Equipment Approval Information 2
Erasing Messages 72
Exit 48
F
FCC RF Radiation Exposure Statement 6
Flash/Call Waiting 47
G
General Product Care 88
Global De-registration 41
H
Handset 43
Handset Layout 16
Handset Name 28
Handset Setup 27
Handset to Handset Paging 49
Hearing Aid Compatibility (HAC) 5
|
Important Installation Guidelines 15
Information for DECT Product 6
Inserting a Pause in the Dialing Sequence 66
Installation 13
Installing the Handset Battery 18
Installing the Phone 18
Intercom Operation 52
Interference Information 4
Introduction 12
K
Key Tone 34
Index
L
Last Number Redial 48
Leaving a Message/Memo 70
Licensing 6
Limited Warranty 90
M
Making a Call 44
Making an Intercom Call 52
Memory 63
Memory Full 72, 75
Message Alert 35
Message Counter Indicator 69
Message Playback 71
Mute 50
P
Page 49
Paging All Handsets from a Handset 49
Paging from the Base/Group Page 50
Parts Checklist 12
Programming Functions 25
Programming the Telephone 25
R
Receiver Volume Control 51
Receiving an Incoming Call During an Intercom Call 53
Receiving an Intercom Call 53
Receiving CID Records 58
Recording the Outgoing Announcement 24
Registration 39
Remote Access 73
Reviewing and Choosing the Announcement 25
Reviewing And Deleting Stored VIP Melody Record 33
Reviewing CID Records 59
Reviewing Records Stored in Memory 66
Ringer HI/LO/OFF 46
Ringer Tone 29
Ringer Volume 30
Rings to Answer 36
Room Monitor 26
Index
S
Screening Calls from the Base 71
Screening Calls from the Handset 74
Security Code 37
Set Language 28
Setting the Voice Prompt Language 22
Speaker Volume 23
Speakerphone Operation 44
Standby Screen 25
Storing a Name and Number in Memory 63
Storing CID Records 59
Storing CID Records in Internal Memory 61
Storing the Last Number Dialed 65
Storing VIP Melody 31
T
Telephone Jack Requirements 13
Telephone Operation 43
Telephone Solutions 83
Three-Way Calling 55
To Replace a Stored CID Record 62
Tone Control 51
Tone/Pulse 38
Transferring External Calls to Other Handsets 56
Troubleshooting Guide 83
Two-Way Calling 54
U
Using Intercom with External Telephone Calls 54
V
Vibrate Ringer 35
VIP Melody 31
Visual Indicators 43
VMWI / Visual Ringer Indicator on Handset 44
Voice Instruction 24
Voice Time/Day Stamp and Real Time Clock 23
Volume Amplify 51
W
Wall Mounting 21
Warranty Assistance 89
Visit the GE website at: www.GE.com/phones
THOMSON
images & beyond
Thomson Inc.
101 West 103rd Street
Indianapolis, IN 46290-1102
© 2007 Thomson Inc.
Trademark(s) ® Registered
Marca(s) Registrada(s)
Model 29115
00021384 (Rev. 0 Dom E/S)
07-42
Printed in China
natural_image
Circular logo with stylized white 'g' symbol inside a black ring (no text or symbols)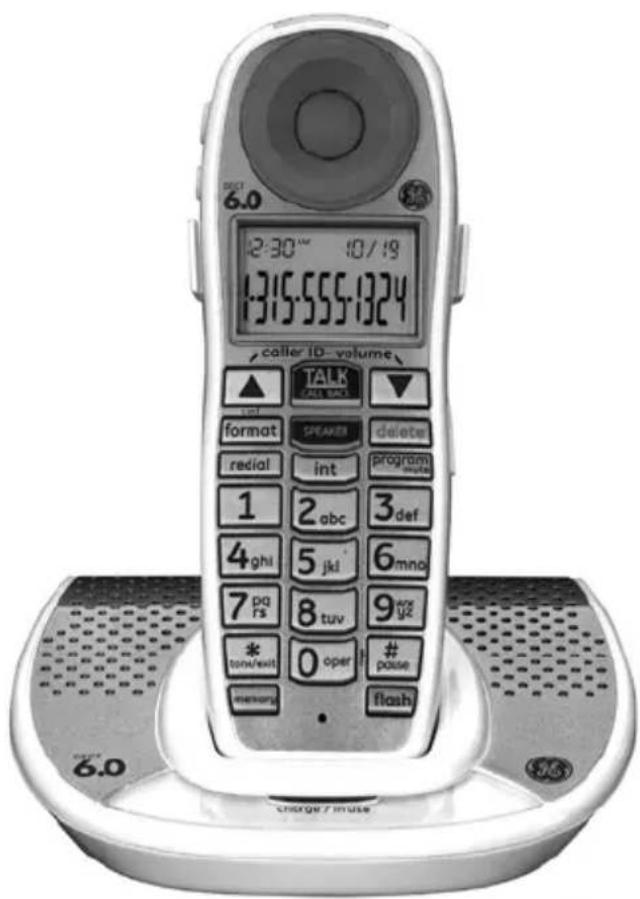
natural_image
Technical line drawing of an electronic device interior showing internal components and housing (no text or symbols)natural_image
Line drawing of an electronic device showing internal components connected to a wall-mounted power outlet (no text or symbols)101 West 103rd Street
Indianapolis, IN 46290-1102
© 2007 Thomson Inc.
Trademark(s) ® Registered
Marca(s) Registrada(s)
Modelo 29115
00021384 (Rev. 0 DOM E/S)
07-42
Impreso en China
- Model 29115 Series DECT 6.0 Cordless Handset Speakerphone System User's Guide
- Equipment Approval Information
- Notification to the Local Telephone Company
- Notes
- Rights of the Telephone Company
- Interference Information
- Hearing Aid Compatibility (HAC)
- Licensing
- FCC RF Radiation Exposure Statement
- Information for DECT Product
- CAUTION:
- Table of Contents
- PROGRAMMING THE TELEPHONE 25
- CALLER ID (CID) 57
- MEMORY 63
- REMOTE ACCESS....73
- BELT CLIP AND OPTIONAL HEADSET 76
- CHANGING THE BATTERY 77
- ANSWERING SYSTEM DISPLAY MESSAGES 82
- TROUBLESHOOTING GUIDE......83
- ANSWERING SYSTEM SOLUTIONS 86
- Introduction
- Before You Begin
- Parts Checklist (for model 29115)
- Telephone Jack Requirements
- Installation
- Digital Security System
- Important Installation Guidelines
- Handset Layout
- Installing the Handset Battery
- Base Backup Battery Installation
- CAUTION: Disconnect the phone cord from the wall outlet before installing or replacing the batteries.
- NOTE: Remove the batteries if storing the batteries for over 30 days to prevent damage in the event of leaking batteries.
- Base Station
- Wall Mounting
- Answering System Setup
- Setting the Voice Prompt Language
- Voice Time/Day Stamp and Real Time Clock
- Speaker Volume
- Voice Instruction
- Recording the Outgoing Announcement
- Sample Outgoing Announcement
- Reviewing and Choosing the Announcement
- Programming the Telephone
- Standby Screen
- Programming Functions
- Room Monitor (applicable only with additional handsets)
- Handset Setup
- Set Language
- From the Handset Setup Menu:
- Handset Name
- NOTE: If you make a mistake, use the delete button to backspace and delete one character at a time.
- Ringer Tone
- Ringer Volume
- VIP Melody
- Storing VIP Melody
- Changing a Stored VIP Melody Record
- Reviewing And Deleting Stored VIP Melody Record
- Key Tone
- Audio Predial
- Vibrate Ringer
- Message Alert (for answering system)
- Rings to Answer (for answering system)
- Security Code (for answering system)
- Area Code
- Tone/Pulse
- Registration
- De-Registration
- Global De-registration
- Default Setting
- Telephone Operation
- Visual Indicators
- Base
- Handset
- VMWI / Visual Ringer Indicator on Handset IMPORTANT: In order to use this unit's Voice Mail Waiting Indicator (VMWI) feature, you must subscribe to this service from your phone company.
- Speakerphone Operation.
- Making a Call
- Answering Calls
- Call Timer
- Auto Standby
- Ringer HI/LO/OFF (Shortcut)
- Do Not Disturb
- Flash/Call Waiting
- Last Number Redial
- NOTE: You may choose from three last dialed numbers.
- Exit
- Page
- Handset to Handset Paging (applicable only with additional handsets)
- Paging All Handsets from a Handset
- Paging from the Base/Group Page
- Mute
- Receiver Volume Control
- Volume Amplify
- Tone Control
- Intercom Operation
- Making an Intercom Call
- Receiving an Intercom Call
- Advanced Intercom Features
- Receiving an Incoming Call During an Intercom Call
- Using Intercom with External Telephone Calls
- Two-Way Calling
- Three-Way Calling
- Transferring External Calls to Other Handsets
- Call Waiting Caller ID
- Receiving CID Records
- Storing CID Records (In CID Memory)
- Reviewing CID Records
- Dialing a CID Number
- Storing CID Records in Internal Memory
- To Replace a Stored CID Record
- Deleting a CID Record
- Deleting All CID Records
- Memory
- Storing a Name and Number in Memory
- NOTE: The system treats PAUSES as delays or spaces in the dialing sequence.
- Storing the Last Number Dialed
- NOTE: If the memory location is occupied, REPLACE MEMO? is displayed, and you must confirm replacement by pressing the memory button.
- Inserting a Pause in the Dialing Sequence (of a Stored Number)
- Reviewing Records Stored in Memory
- Changing Records Stored in Memory
- Deleting Records Stored in Memory
- Dialing a Number from Memory
- Chain Dialing from Memory
- The Number For Memory Location
- Message Counter Indicator
- Leaving a Message/Memo
- Screening Calls from the Base
- TIP: Make sure the volume on the base is set loud enough to hear your incoming calls.
- Message Playback
- Memory Full
- Erasing Messages
- To erase a message while it is playing
- To erase all previously played Messages in a mailbox
- To erase a message from the handset :
- NOTE: Erased messages cannot be restored.
- Remote Access
- Cordless Handset
- Screening Calls from the Handset
- When the answering system picks up:
- Accessing the Answering System from Another Location
- To Press this button
- Belt Clip and Optional Headset
- Connecting the Belt Clip
- Connecting an Optional Headset to the Handset
- Changing the Battery
- Battery Safety Precautions
- Display Messages
- Handset Sound Signals
- Signal Meaning
- Answering System Display Messages
- Telephone Solutions
- No dial tone
- Handset does not ring
- Unit beeps
- Caller ID Solutions
- No Display
- Caller ID Error Message
- No Caller ID
- Battery Solutions
- Answering System Solutions
- Causes of Poor Reception
- General Product Care
- Warranty Assistance
- What your warranty covers:
- For how long after your purchase:
- What we will do:
- How you get service:
- What your warranty does not cover:
- Product Registration:
- Limitation of Warranty:
- How state law relates to this warranty:
- If you purchased your product outside the USA:
- To place order, have your Visa, MasterCard, or Discover Card ready and call toll-free 1-800-338-0376.
- Index
- A
- B
- C
- D
- E
- F
- G
- H
- |
- K
- L
- M
- P
- R
- S
- T
- U
- V
- W
- THOMSON
Brand : GE
Model : 29115
Category : Telephone