
500 SX - Webcam MANHATTAN - Free user manual and instructions
Find the device manual for free 500 SX MANHATTAN in PDF.


| Product Type | Webcam |
| Brand | Manhattan |
| Model | 500 SX |
| Dimensions | 3.5 x 1.5 x 1.2 inches (9 x 3.8 x 3 cm) |
| Weight | 2.8 oz (80 g) |
| Power Source | USB-powered (5V, 500mA) |
| Image Sensor | CMOS, 0.3 MP (640x480) |
| Maximum Resolution | 640 x 480 pixels (VGA) |
| Frame Rate | 30 fps at 640x480 |
| Lens | Fixed focus, f/2.0 |
| Field of View | 60 degrees |
| Built-in Microphone | Yes, monaural |
| Interface | USB 2.0 (compatible with USB 1.1) |
| Cable Length | 5.9 ft (1.8 m) |
| Mounting | Clip-on design for monitors, tripod ready (1/4 inch thread) |
| Compatibility | Windows 7/8/10, macOS, Chrome OS |
| Software Included | Drivers for Windows only (built-in for other OS) |
| Color | Black |
| Materials | Plastic with rubberized base |
| Cleaning | Wipe lens with soft, dry cloth. Do not use liquids. |
| Safety | Do not expose to water or extreme temperatures. |
| Warranty | 1-year limited |
Frequently Asked Questions - 500 SX MANHATTAN
User questions about 500 SX MANHATTAN
0 question about this device. Answer the ones you know or ask your own.
Ask a new question about this device
Download the instructions for your Webcam in PDF format for free! Find your manual 500 SX - MANHATTAN and take your electronic device back in hand. On this page are published all the documents necessary for the use of your device. 500 SX by MANHATTAN.
USER MANUAL 500 SX MANHATTAN
natural_image
Black Manhattan webcam with mesh grille and base mount (no visible text or symbols on device body)MANHATTAN™
MAN-460491-UM-0910-03
INTRODUCTION
Thank you for purchasing the MANHATTAN ^® Web Cam 500 SX, Model 460491.
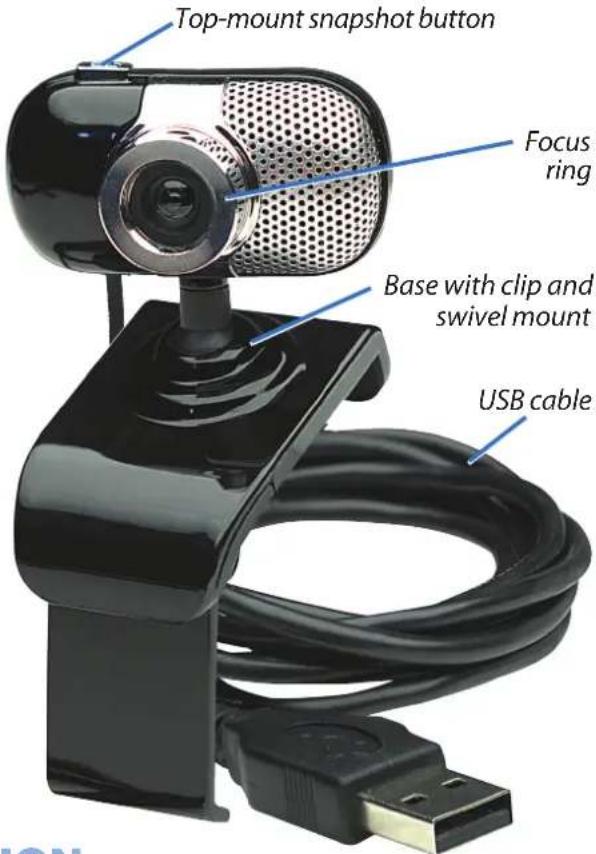
With simple, operation and easy-to-use software, the Pro Cam's 5.0-megapixel (software interpolated) CMOS lens captures crisp and clear images and smooth, steady video to share with family and friends. Automatic color balance, exposure and brightness controls combine with focus and tracking functions for professional results. Its versatile base with universal clip and swivel mount easily installs with most flat-panel displays and notebook or netbook computers.
The compact size, attractive finish and Plug and Play installation make it a good accessory for desktop and notebook PCs, and by following the instructions in this user manual — or the simpler setup procedure in the printed quick install guide included with the product — you’ll soon be enjoying these popular features:
- Enhance online communications, instant messaging, blogs and more – easily capture and share photos and video
• Automatic tracking keeps subjects sharp and in-frame without adjusting camera position - Self-adjusting color, exposure and brightness levels maximize clarity in varying light conditions
- Personalize conversations and images with special 18 video and 6 frame effects
• High-performance megapixel sensor with powerful 4x digital zoom function - Versatile base with clip and swivel mount ideal for flat-panel displays, notebook and netbook computers
- Plug and Play installation – Windows compatible
- Lifetime Warranty (For a complete list of country-specific warranties, go to www.manhattan-products.com/warranty.)
Package Contents
- Web Cam 500 SX
- Software CD
- Quick install guide
System Requirements
- IBM PC-compatible computer or notebook with USB port
- Pentium 200 or higher CPU
- Windows XP/Vista/7
• 20 MB of HDD space - CD-ROM drive
• VGA display card for DirectX
HARDWARE
- With your computer on, plug the camera into a USB port on the PC/notebook/netbook.
- Use the universal clip on the camera base to position the camera as desired.
NOTE: You may prefer to wait until you are adjusting the focus ring during the software installation so you can view the camera image. (See the procedures below in Software Installation.)
- Press the snapshot button to capture and file still images. (Refer to the Capture section in Software Installation.)
SOFTWARE INSTALLATION
- With the camera connected to your computer through a USB port, insert the included software CD in the CD-ROM drive. The installation procedure will launch and run automatically, displaying a series of screens and easy-to-follow procedural prompts.
- Follow the on-screen instructions presented by the InstallShield Wizard. NOTE: The steps and screen images represent Windows XP and may vary slightly from those for Windows Vista and 7. Refer to your operating system user manual as needed.
- When you're finished with the InstallShield Wizard, go to Start on your desktop, then Programs. Select "Webcam/Webcam VideoCap" to display the initial menu screen and active camera image (below).

The Menu bar is at the top of the image screen. To the lower left of the image is information about what camera is being used and the frame rate per second. The feature items on the menu bar — File, Device, Options, Capture and Preview — give you access to the various settings that let you configure your camera for optimal enjoyment.
File
- Set Capture File Folder When this option is selected, a window will open so you can select a location for saving captured video. This only needs to be done once: The VideoCap software program will continue to write to the same folder each time a video is saved.
- Set Snapshot File Folder When this option is selected, a window will open so you can select a location for
saving captured snapshots to. This only needs to be done once: The VideoCap software program will continue to write to the same folder each time a snapshot is saved.
- File Index Reset
This resets the location of the video and snapshot save locations. - Exit
This exits and shuts down the application
Device
This will display a list of available video input devices and audio input devices. When you make your selections, a check mark will appear next to each active device.
Options
- Preview
If this option is selected, the video seen by the camera is displayed in the main screen of the CamApp. If there is no check mark next to Preview, the image on the main screen will not be updated. If video is captured, it will show what is being captured in the main window, even if Preview is not checked.
• Video Capture Filter
When this option is selected, the Properties box will open. These options are used to edit the appearance and behavior of the video. Different versions of the software may provide various tabs and selections, but the options are the same. The various tabs will contain options to adjust the appearance of the images (such as color, brightness and hue), image orientation, special effects, framing, face tracking and PTZ features. NOTE: Depending on the camera model, not all features may be active.
- Video Capture Pin This option allows for the configuration of the video stream properties. Unlike Filter, this has options such as frame rate, compression and output size settings.
- Audio Capture Filter This allows the configuration of audio input properties. If no audio is selected in Devices, the options will not be available. Properties of the line-in audio and the master input can be edited for treble, base and volume.
Capture
This menu presents a list of various capture options. Still frame resolutions can be selected, and the active resolution will be displayed with a check mark. There are
options for audio recording, frame rate, video format and maximum length (in time) of video capture. It is where you can configure the settings for taking snapshots, starting video capture and stopping video capture.
Preview
This menu option will provide different resolutions for the Preview screen. The window will resize itself automatically when a new resolution is selected.
Help
This option provides the version information of the software.
SPECIFICATIONS
Standards and Certifications
- USB 2.0
• CE
• RoHS
• WEEE
Lens
- CMOS Vimicro DSP color sensor; 300k pixels (software enhanced; interpolated to 5.0 M pixels)
- Lens: F2.2 1/9-inch lens with focus ring
• Image focus: 50 mm to infinity
Image
• Maximum resolution up to 2560 x 1920
- Format: AVI, BMP
• Color depth: 24-bit true color
General
• Automatic color equalizing, exposure and brightness balance adjustments
- Top-mount snapshot button
• Viewing angle: 55° horizontal
• Built-in compression ratio (BMP)
Physical
- Base with clip and swivel mount; cable, 1.4 m (4.75 ft.)
- Dimensions: 5.4 × 4.75 × 5 cm (2.125 x 1.875 x 2 in.)
- Weight: 57 g (2 oz.)
System Requirements
- IBM PC-compatible computer or notebook with USB port
- Pentium 200 or higher CPU
- Windows XP/Vista/7
• 20 MB of HDD space - CD-ROM drive
• VGA display card for DirectX
WASTE ELECTRICAL & ELECTRONIC EQUIPMENT
Disposal of Electric and Electronic Equipment
(applicable in the European Union and other European countries with separate collection systems)
ENGLISH
This symbol on the product or its packaging indicates that this product shall not be treated as household waste. Instead, it should be taken to an applicable collection point for the recycling of electrical and electronic equipment. By ensuring this product is disposed of correctly, you will help prevent potential negative consequences to the environment and human health, which could otherwise be caused by inappropriate waste handling of this product. If your equipment contains easily removable batteries or accumulators, dispose of these separately according to your local requirements. The recycling of materials will help to conserve natural resources. For more detailed information about recycling of this product, contact your local city office, your household waste disposal service or the shop where you purchased this product. In countries outside of the EU: If you wish to discard this product, contact your local authorities and ask for the correct manner of disposal.
DEUTSCH
ENGLISH: For warranty information, go to www.manhattan-products.com/warranty.
This equipment has been tested and found to comply with the limits for a Class B digital device, pursuant to Part 15 of Federal Communications Commission (FCC) Rules. These limits are designed to provide reasonable protection against harmful interference in a residential installation. This equipment generates, uses and can radiate radio frequency energy, and if not installed and used in accordance with the instructions may cause harmful interference to radio communications. However, there is no guarantee that interference will not occur in a particular installation. If this equipment does cause harmful interference to radio or television reception, which can be determined by turning the equipment off and on, the user is encouraged to try to correct the interference by one or more of the following measures:
- Reorient or relocate the receiving antenna.
- Increase the separation between the equipment and the receiver.
- Connect the equipment to an outlet on a circuit different from the receiver.
- Consult the dealer or an experienced radio/TV technician for help.
CE / R&TTE
ENGLISH
This device complies with the requirements of the R&TTE Directive 1999/5/EC.
DEUTSCH
MANHATTAN® offers a complete line of PC Components,
Peripherals, Cables and Accessories. Ask your local computer dealer for more information or visit www.manhattan-products.com.
All products mentioned are trademarks or registered trademarks of their respective owners.

Brand : MANHATTAN
Model : 500 SX
Category : Webcam