
AX-LOC2.2-LD - Hi-Fi System Axxess - Free user manual and instructions
Find the device manual for free AX-LOC2.2-LD Axxess in PDF.


| Product Type | Premium Active LOC with Line Driver 2 IN - 2 OUT |
| Channels | 2 Input / 2 Output with Line Driver |
| Max Input Level | 40V / 400W @20kΩ |
| Operating Voltage | 9V - 16V DC |
| Max Output Voltage | 9.5V RMS @13.8V |
| Input Impedance (Speaker Level) | Selectable: 20Ω, 60Ω, 20kΩ |
| Input Impedance (RCA Level) | 7kΩ |
| Gain Adjustment Range | -28dB to +1dB |
| Signal-to-Noise Ratio | >110dB @6.4V output |
| Total Harmonic Distortion + Noise | <0.01% |
| Frequency Response | 20Hz - 20kHz |
| Clip Indicator | Yes |
| Ground Isolation Settings | GND / ISO / 200Ω |
| Trigger Selection | REM (DC Offset, Audio Sense, Remote In) |
| Turn-On Trigger (DC) | 3V - 7V |
| Remote Control Compatibility | Optional AX-RM1 (sold separately) |
Frequently Asked Questions - AX-LOC2.2-LD Axxess
User questions about AX-LOC2.2-LD Axxess
0 question about this device. Answer the ones you know or ask your own.
Ask a new question about this device
Download the instructions for your Hi-Fi System in PDF format for free! Find your manual AX-LOC2.2-LD - Axxess and take your electronic device back in hand. On this page are published all the documents necessary for the use of your device. AX-LOC2.2-LD by Axxess.
USER MANUAL AX-LOC2.2-LD Axxess
Premium Active LOC with Line Driver 2 IN - 2 OUT with Line Driver, Max Input 40v
Universal Premium LOC with Line Driver
The Axxess AX-LOC2.2-LD is an LOC and line driver all-in-one package. This unit allows you to add aftermarket amplifiers to your factory system easily. High level inputs mean you can tap right into your factory speaker wire for signal, and the built-in signal sensing turns the unit on without the need to find a factory accessory lead. In applications where a low level RCA output needs amplified the built in line driver is exactly what you need to achieve the output you are looking for. It also provides you with a remote turn on output to your amplifier.
COMPONENTS
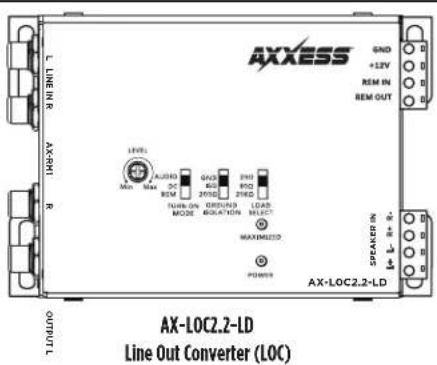
TABLE OF CONTENTS
Quick Start Guide
Things to Know 2
Connections 2
Gain setup
Basic setup....3
Advanced Setup....3
Feature Breakdowns 4
Quick Reference 5
Diagram....6
Specifications....7
TOOLS RECOMMENDED
• Digital Multi-meter
- Test Tones
QUICK START GUIDE
THINGS TO KNOW
- This is an active LOC and MUST have constant 12 volt and a good ground to operate properly. Having a poor ground can induce noise into your system, use the same gauge wire as the 12 volt line.
- Determine a suitable mounting location. Make sure you can access all controls and connections.
- When ready to mount your LOC check under your selected mounting location to make sure it is clear of any wiring harnesses, fuel or brake lines or anything else that may affect the vehicle safety.
CONNECTIONS
- Connect your 12 volt and ground wires to the terminals. 14-16 gauge wire is recommended.
- By default the LOCs Turn On Mode is set to DC Offset. Other turn on options are available and described in the Turn On Signal Feature Breakdown portion of this manual.
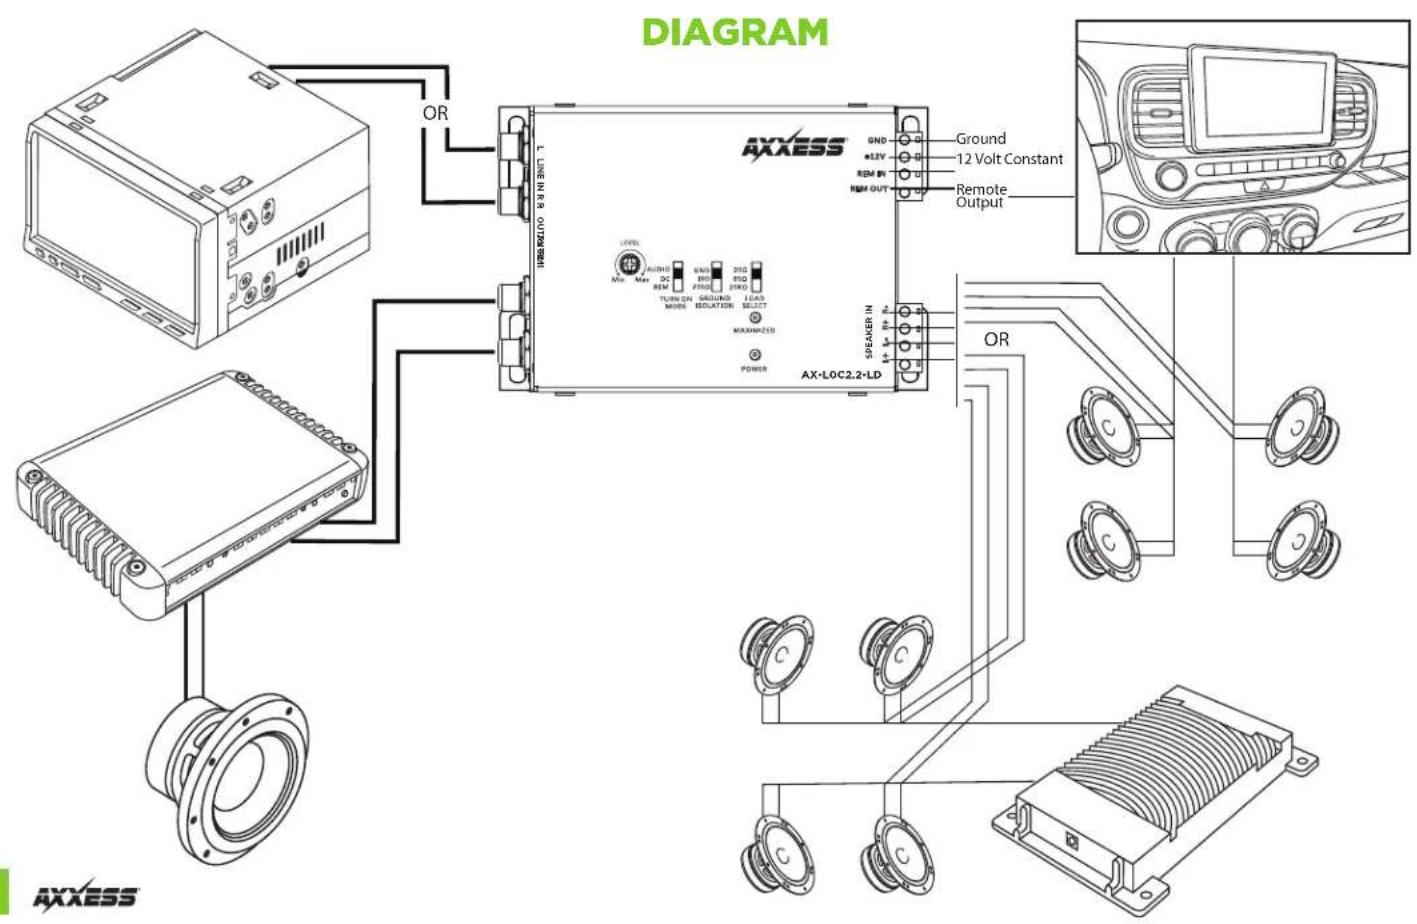
- Connecting your Speaker Input can happen in a few different places based on your factory system.
a. If your vehicle doesn't have an OE amplifier your best option is to use the speaker wires located behind the radio. Your LOC only requires two inputs, we recommend a left and right full range signal.
b. If your vehicle has an OE amplifier your best option is to use the speaker wires on the output side of your factory amplifier, look for a full range signal. - If you have an RCA output from an aftermarket radio or a low level output from factory equipment you can use the LINE IN RCA to feed signal into the LOC, taking advantage of the built in LINE DRIVER.
- Connect your RCAs. Red RCA's are for the right channel. Black, Gray, or White are for the left channels. An explanation of the RCAs Main Output and Bass Output are described in the Feature Breakdown portion of this manual.
- If the customer would like to control the Bass Level remotely the AX-RM1 can be purchased separately and plugs directly into the side of the LOC.
GAIN SETUP
Setting gains is very important, if done incorrectly you can damage your speakers. It is recommended that all settings be adjusted by a professional. Axxess LOCs have a maximum output of 9.5v RMS. On average aftermarket amplifiers have a maximum input voltage range of 3-6 volts.
When adjusting the gains it is important to understand the input sensitivity of your aftermarket equipment and adjust the Output Levels of the LOC to match. If the Output Levels of the LOC are increased beyond the input capabilities of the amplifier it will cause the input stage of the aftermarket amplifier to clip, creating distortion. The fix would be to lower the output levels of the LOC until the distortion is removed.
Basic Setup - No Tools Required
- Before turning your system on, set all levels and gains to minimum. This includes the LOC and all aftermarket amplifiers.
- On your radio make sure all audio adjustments i.e. Bass, Treble, Balance and Fade are all Centered and Flat. Turn Loudness off and any preset EQ to Flat.
- While playing a Pink noise track or a song with dynamic sound, increase radio's volume to 3/4 of the way up.
- Adjust the output levels of the LOC slowly until the clipping indicator activates, then reduce the levels so the indicator light doesn't come on.
- Do not adjust the amplifier's gain.
Advanced Setup - Tools Required: Digital Multi-meter, Test Tones
- During this setup process the RCAs between the LOC and aftermarket amplifier need to be disconnected. They will be reconnected in Step 11.
- Set all levels to Minimum on the LOC
- On your radio make sure all audio adjustments Bass, Treble, Balance, and Fade are centered and flat. Turn Loudness off and any preset EQ to Flat.
- Open the manual for the aftermarket amplifier and look for Line Input Maximum Sensitivity on the specifications page. This measurement will be in volts. (i.e. 3vrms 6vrms)
- If setting gains for a full range system, play a 1 kHz tone through your radio into the LOC. If setting levels for a subwoofer, play a 100 Hz tone from the factory radio into the LOC.
- Turn the radio all the way up, you should not hear the tone playing.
- Using a Digital Multi-meter set to Volts AC, touch the black lead to the OUTPUT RCA shield and insert the Red lead to the center of the RCA OUTPUT. You will see a voltage reading show on the Multi-meter's screen.
- Adjust the OUTPUT LEVEL of the LOC until the voltage shown on the screen matches the Line Input Maximum Sensitivity of the aftermarket amplifier. If the Maximized light comes on before the level is reached, reduce OUTPUT LEVEL until the light is off.
- Repeat Steps 7 and 8 for the rear output.
- Turn the radio's volume down
- Connect the RCAs from aftermarket amplifier to the LOC.
- Adjust the gain on your amplifier(s) to Minimum.
- Refer to the amplifier's manual if additional adjustments are required.
FEATURE BREAKDOWNS
Turn On Signal
Audio Sense – When selected the LOC will power up when an audio signal is present regardless of source. If the radio is muted and the LOC doesn't see an audio signal it will turn off.
DC Signal Sense (Default) – Detects when the OE radio or OE amplifier turns on. The AX-LOC2.2LD detects the DC voltage across the speaker leads and will provide 12 volts to the REM OUT.
REM IN – This is the standard way to turn of aftermarket equipment by using a dedicated amp turn on signal or a true ignition signal. When the REM IN is powered it will output through the REM Out.
Ground Isolation Settings – Different types of ground noise can easily enter into your audio system. The Ground Isolation Switch on the LOC will help eliminate some of the most common ground noises with the simple flip of a switch.
GND - The ground for the LOC is tied to the ground shield of the audio signal.
ISO – The ground of the LOC and ground shield of the RCA are separated.
200 Ohm - LOC ground and ground shield of RCAs are connected to each other by a 200 ohm resistor, balancing yet isolating the ground circuit.
Load Select Settings – Factory radios and amplifiers can sometimes stop passing audio when they do not see the original speaker's impedance. This is a common issue found in many Chrysler vehicles. The load selector switch will offer two Ohm Load settings that will make the factory equipment think the original speakers are still connected and start passing audio. In some Chrysler vehicles you will need to let the vehicle go the sleep (turn ignition off for 2 minutes) after each load selection.
20 Ohm - Commonly used in vehicles that do not have a factory amplifier. Mainly late model Chrysler vehicles, which includes RAM, JEEP, DODGE, and some FIATS
60 Ohm - Commonly used in vehicles with a factory amplifier. Mainly late model Chrysler vehicles, which includes RAM, JEEP, DODGE, and some FIATS
20k Ohm - Default setting and used for all other applications.
If none of these Ohm load settings restore the factory audio or if you have distortion, Axxess offers additional load resistors that plug directly into the speaker level input terminal(s) of each LOC. AX-LR39 is the only value not built into the Axxess LOCs.
QUICK REFERENCE: AX-LOC2.2-LD

SPECIFICATIONS
SPECIFICATIONS
Channels
2 IN - 2 OUT w/Line Driver
Max Input Level (20kOhm) 40V / 400W @20K Ohm
Operating Voltage 9V - 16V
Trigger Selection REM
Turn On Trigger (DC) 3V - 7V
Output Max@13.8V 9.5V RMS
Input Impedance Selection (Speaker Level) 20 / 60 / 20k Ohm
Input Impedance (RCA Level) 7kOhm
Ground Selection GND / ISO / 2000hm
Gain Adjustment - 28dB to +1dB
Input Sensitivity N/A
Signal to Noise >110dB @6.4V Output
THD+N (Total Harmonic Distortion) <0.01%
Frequency Response 20Hz - 20kHz
Low Pass Filter N/A
Clip Indicator YES
Bass Boost N/A
Remote Control
Optional AX-RM1
Remote Control w/Voltmeter
N/A
Having difficulties? We're here to help.
Contact our Tech Support line at:
385-257-1187
Or via email at:
techsupport@metra-autosound.com
Tech Support Hours (Eastern Standard Time)
Monday - Friday: 9:00 AM - 7:00 PM
Saturday: 10:00 AM - 5:00 PM
Sunday: 10:00 AM - 4:00 PM

KNOWLEDGE IS POWER
Enhance your Installation and fabrication skills by travelling in the most recognized and respected
enrolling in the most recognized and resp mobile electronics school in our industry.
Log onto www.installerinstitute.edu or call
386-672-5771 for more information and take steps toward a better tomorrow.

Metra recommends MECP
certified technicians
- Premium Active LOC with Line Driver 2 IN - 2 OUT with Line Driver, Max Input 40v
- Universal Premium LOC with Line Driver
- COMPONENTS
- TABLE OF CONTENTS
- TOOLS RECOMMENDED
- QUICK START GUIDE
- THINGS TO KNOW
- CONNECTIONS
- GAIN SETUP
- Basic Setup - No Tools Required
- Advanced Setup - Tools Required: Digital Multi-meter, Test Tones
- FEATURE BREAKDOWNS
- Turn On Signal
- QUICK REFERENCE: AX-LOC2.2-LD
- SPECIFICATIONS
Brand : Axxess
Model : AX-LOC2.2-LD
Category : Hi-Fi System