
OF9FT - Frying Pan PROLINE - Free user manual and instructions
Find the device manual for free OF9FT PROLINE in PDF.


| Product Type | Oil-filled radiator |
| Brand | Proline |
| Model | OF9FT |
| Power Consumption | 1830W - 2200W |
| Voltage | 220-240V ~ 50/60Hz |
| Heating Settings | 3 settings: Low (I), Medium (II), High (III) |
| Thermostat | Adjustable, maintains set room temperature |
| Timer | Mechanical, 24-hour clock with 15-minute increments |
| Tip-over Protection | Automatic shut-off when tipped over |
| Overheat Protection | Yes, do not cover the heater |
| Oil Type | Special oil, sealed unit |
| Assembly Required | Yes, includes wheel mounting plates and wing nuts |
| Cord Storage | Built-in cord wrap at side |
| Cleaning Method | Wipe with damp cloth, do not immerse |
| Safety Warnings | Keep away from flammable materials; not for bathroom immediate vicinity; children supervision required |
| Dimensions (Approx.) | 65 x 45 x 25 cm |
| Weight (Approx.) | 12 kg |
| Color | Black and silver |
| Number of Fins (Est.) | 9 |
Frequently Asked Questions - OF9FT PROLINE
User questions about OF9FT PROLINE
0 question about this device. Answer the ones you know or ask your own.
Ask a new question about this device
Download the instructions for your Frying Pan in PDF format for free! Find your manual OF9FT - PROLINE and take your electronic device back in hand. On this page are published all the documents necessary for the use of your device. OF9FT by PROLINE.
USER MANUAL OF9FT PROLINE
natural_image
Black and silver electric heater with ventilation grilles and control knobs (no visible text or symbols)Catalogue
Language of introduction
Page
English
EG1 - EG7
French
FR1 - FR 9
Dutch
NL1 - NL 7
Espa
ES1 - ES 7
WARNINGS
This appliance is intended for domestic household use only and should not be used for any other purpose or in any other application, such as for non-domestic use or in a commercial environment.
If the supply cord is damaged, it must be replaced by the manufacturer, its service agent or similarly qualified persons in order to avoid a hazard.
For the details concerning the method of cleaning, please see section “Cleaning and Maintenance” on pages 6&7.
Children of less than 3 years should be kept away unless continuous supervised.
Children aged from 3 years and less than 8 years shall only switch on/off the appliance provided that it has been placed or installed in its intended normal operating position and they have been given supervision or instruction concerning use of the appliance in a safe way and understand the hazards involved. Children aged from 3 years and less than 8 years shall not plug in, regulate and
clean the appliance or perform user maintenance.
CAUTION — Some parts of this product can become very hot and cause burns. Particular attention has to be given where children and vulnerable people are present.

WARNING: In order to avoid overheating, do not cover the heater.
The heater must not be located immediately below a socket-outlet.
Do not use this heater in the immediate surroundings of a bath, a shower or a swimming pool.
The main plug must remain easily accessible.
This appliance can be used by children aged from 8 years and above and persons with reduced physical, sensory or mental
capabilities or lack of experience and knowledge if they have been given
supervision or instruction concerning use of the appliance in a safe way and understand the hazards involved.
Children shall not play with the appliance.
Cleaning and user maintenance shall not be made by children without supervision.
Do not use this heater with a programmer, timer, separate remote-control system or any other device that switches the heater on automatically, since a fire risk exists if the heater is covered or positioned incorrectly.
The heater must not be installed closed to curtains and other combustible materials.
This heater is filled with a precise quantity of special oil. Repairs requiring opening of the oil container are only to be made by the manufacturer or his service agent who should be contacted if there is an oil leak.
When scrapping the heater, follow the regulations concerning the disposal of oil.
ASSEMBLY THE WHEELS
-
Turn the radiator upside down.
-
Fit the wheel mounting plates to the bottom of the radiator.
- Make sure that the U-bolts are inserted into the holes of the wheel mounting plates.
-
Attach the wheel mounting plates to the radiator by tightening the wing nuts supplied.
-
Turn the radiator back to its upright position and allow the oil to settle for a few minutes before use.
IMPORTANT SAFETY INSTRUCTIONS
- Switch off and disconnect the appliance from the mains socket when the appliance is not in use and before cleaning.
• Always use and store the radiator in the upright position. - Do not use the radiator in rooms where flammable liquids or gases are used or stored.
- Ensure that the radiator is not positioned close to curtains or furniture during use as this could create a fire hazard.
PARTS
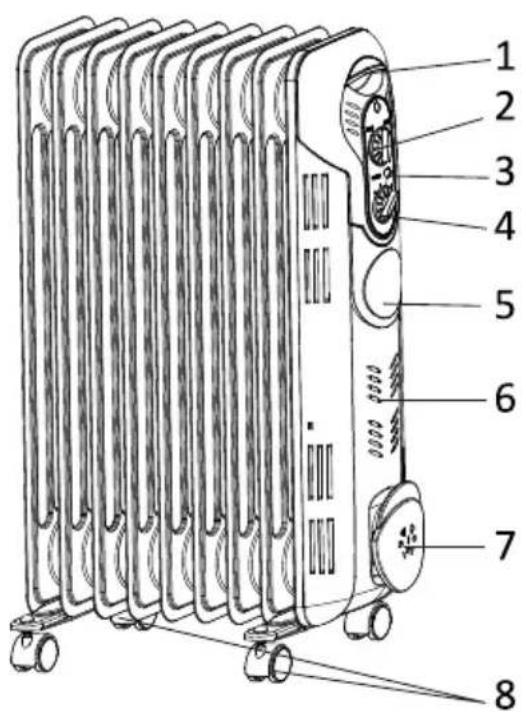
- Handle
- Thermostat knob
- Power indicator light
- Power selector
- Mechanical timer
- Vents
- Cord storage
- Wheel assemblies (2)
OPERATION
WARNING: The radiator carries a warning 'DO NOT COVER' to alert the user to the risk of overheating that exists if the heater is accidentally covered.

- Place the radiator on a stable flat surface.
- Plug in the radiator.
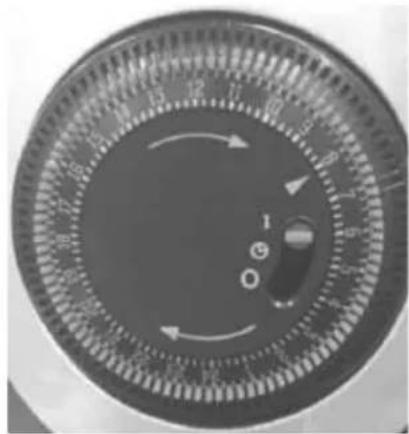
- To operate the radiator without the timer, slide the switch to the I position.
natural_image
Close-up of a circular mechanical dial with numbered segments and directional arrows (no readable text or symbols)-
Turn the thermostat knob clockwise to the MAX position.
-
Switch on the radiator by setting the power selector to the desired heating setting.
I – Low heat
II - Medium heat

III – High heat
- When the desired room temperature has been reached, slowly turn the thermostat knob anticlockwise until the indicator light goes out.
- The thermostat will maintain a room temperature determined by the setting selected.
- To turn off the radiator completely, set the power selector to the O position and turn the thermostat knob to the MIN position. Unplug the heater from the mains socket.
Using the timer
-
Slide the switch to the position.
-
Set the clock time by turning the timer dial clockwise (indicated by the arrow) until the correct clock time coincides with the pointer
▶ marked on the timer dial.
- The timer uses 24-hour clock. If it is 16:00 for example, time shown for 4 pm is '16'.

- Set the periods of time during which you want to the heater to operate by pushing the red teeth outwards.
• Each tooth corresponds to a period of 15 minutes.
- The radiator will function automatically each day at the time set. Important: the radiator must always be plugged into the mains socket.
- To modify the timer, return the teeth to the initial position and set the new operating periods.
- To cancel the timer, slide the timer switch to the O position.
NOTE: The radiator features a tip-over switch. If the radiator tips over, it will automatically switch off. Once placed back into the upright position, the heater will automatically switch on again.
CLEANING AND MAINTENANCE
Make sure that the heater is switched off and unplugged from the mains socket and has cooled to room temperature before cleaning.
Clean the outer surface of the heater with a slightly damp cloth. Dry thoroughly.
Never immerse it in water.
Do not use any abrasive or chemical cleaning agents.
To store the radiator, keep it in a dry area. Coil the power cord around the cord storage at the side of the radiator.
SPECIFICATIONS
Ratings: 220V-240V\~ 50/60Hz
1830W-2200W
We apologise for any inconvenience caused by minor inconsistencies in these instructions, which may occur as a result of product improvement and development.
Darty Holdings SNC © 14 route d'Aulnay 93140 Bondy, France
07 / 05 / 2015
AVERTISSEMENTS
natural_image
Close-up of a circular mechanical dial with directional arrows indicating rotation and adjustment (no text or symbols visible)natural_image
Close-up of a circular mechanical dial with measurement markings and a central knob (no readable text or symbols)natural_image
Close-up of a circular mechanical dial with directional arrows and a small knob (no text or symbols visible)natural_image
Close-up of a circular dial with 'O' and 'I' labels, no additional text or symbols visible.natural_image
Close-up of a circular dial with measurement markings and directional arrows, no readable text or symbols beyond basic design elements.natural_image
Close-up of a circular mechanical dial with measurement markings and a rotary knob (no readable text or symbols)natural_image
Close-up of a circular mechanical dial with directional arrows and measurement markings (no readable text or symbols)
Brand : PROLINE
Model : OF9FT
Category : Frying Pan