
Episcope A4 - Episcopes Reflecta - Free user manual and instructions
Find the device manual for free Episcope A4 Reflecta in PDF.


| Product Type | Opaque Projector (Episcope) |
| Brand | Reflecta |
| Model | Episcope A4 |
| Maximum Document Size | A4 (210 x 297 mm) |
| Illumination Type | LED or halogen (built-in) |
| Lens System | Fixed focus with manual adjustment |
| Output Resolution | Standard definition (composite video) |
| Video Output | RCA composite (yellow) |
| Power Supply | AC 100-240V, 50/60 Hz |
| Power Consumption | Approx. 30 W |
| Dimensions (L x W x H) | Approx. 30 x 20 x 15 cm |
| Weight | Approx. 2.0 kg |
| Color | Black / White |
| Operating Temperature | 10°C to 35°C |
| Storage Temperature | -20°C to 60°C |
| Included Accessories | Power cord, user manual |
| Maintenance | Clean lens with soft, lint-free cloth |
| Safety Warning | Do not look directly into light source |
| Repairability | Consumer device; professional repair recommended |
Frequently Asked Questions - Episcope A4 Reflecta
User questions about Episcope A4 Reflecta
0 question about this device. Answer the ones you know or ask your own.
Ask a new question about this device
Download the instructions for your Episcopes in PDF format for free! Find your manual Episcope A4 - Reflecta and take your electronic device back in hand. On this page are published all the documents necessary for the use of your device. Episcope A4 by Reflecta.
USER MANUAL Episcope A4 Reflecta
natural_image
White portable projector with a circular lens and ventilation grilles (no visible text or symbols)GB Operating instructions
Index
Important safeguards 3
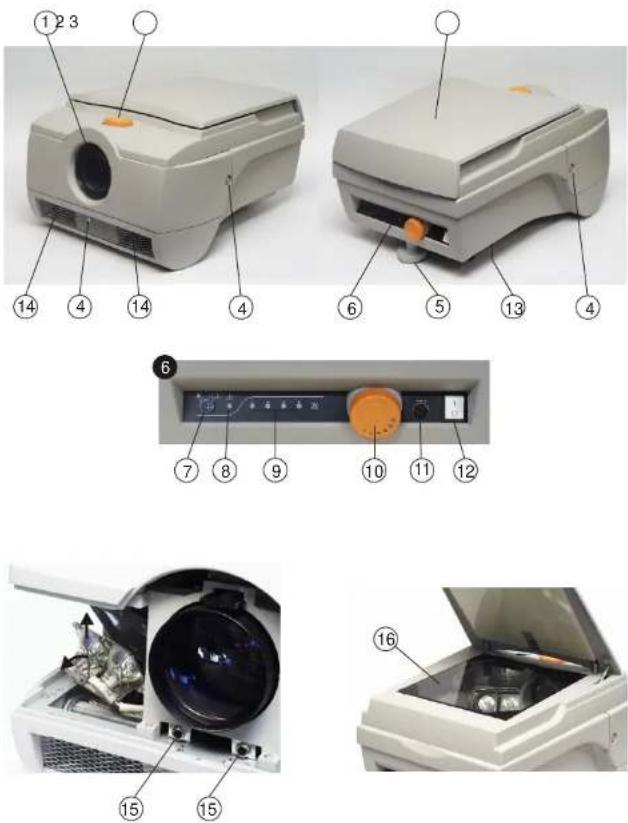
Legend 4
Packaging content 4
Main parts of the projector....4
Preparing the projection 4
Use and operation of the projector.... 5
Operating instructions 5
Focusing 5
Replacement of a burnt-out lamp 5
Protection from overheating 6
After cooling 6
Replacement of a blown fuse 6
Cleaning of projector 6
Technical data 6
Publication ID: 041 136 517
Revision A
All rights reserve
Replacement of the auxiliary lamp
The auxiliary lamp should be replaced by a specialist only.
Protection from overheating
When the equipment overheats the lamps turn off automatically. Check if the air-intake opening (13) and the air-outlet opening (14) are not obstructed!
After the device has cooled down the lamps turn on automatically.
After cooling
Following prolonged use the cooling system can continue to operate after the projector has been switched off. The thermostatic controlled fans will stop to operate after some time.
Replacement of a blown fuse
When the device is connected to the mains and switched on and neither the ventilator, nor any of the lamps come on then the fuse has blown. WARNING: Before the replacement of the fuse you must disconnect the plug from the wall-socket!
Turn the fuse holder for a quarter of a turn and pull out the blown fuse together with its holder. Replace the fuse with a new one of the same rating (10A 250V slow).
Should it happen that the just replaced fuse blows again after the device has been switched on, take the projector to be serviced.
Cleaning of the projector
WARNING: Before cleaning disconnect the plug from the wall-socket!
For cleaning use distilled water or a mild detergent solution. Use a clean and soft cloth that will not leave any scratches. Clean the projection glass (16) and the objective lens (1) in the same way.
Technical Data
Working area:
285×285 mm
3-lens-objective:
2.8/1-330mm
Halogen reflector lamps:
ENX 82V / 360W (4x)
Auxiliary lamp:
15W / 230V, socket E14, matt
0 max 27 mm, Lmax 58 mm,
(i.e.: Osram T26/57 FR15)
Enlargement:
3.5x to 9.5x
Projection distance:
1.5m-3.5m
Size of projected image:
1.0 m - 2.7 m
Mains voltage:
dependant on the model
220V / 50-60 Hz
230V / 50-60 Hz (EU)
240V / 50-60 Hz (UK)
Power consumption:
1500W
Dimensions of the projector:
590×480×330 mm
Weight:
19.5 kg
Use and operation of the projector
The projector is a device used to show opaque objects, separate pieces of paper as well as books, maps and thick three-dimensional objects.
We recommend reducing the light before projection.
The projector can be used in different ways:
Lifting the cover, the projection lamps go out and the less bright auxiliary lamp lights up, allowing the projecting area to remain visible in the darkened room.
The cover of the projector can be also removed. Consequently thick 3-D objects put on the projection glass can be projected.
The cover of the projector can also be removed when larger surfaces, such as maps are projected.
Examples of projection:
From a piece of paper to a 3-cm-book: Picture A Lift the cover of the projector and place the object to be projected on the projection glass. Close the cover and switch on the projector if switched off. Check the sharpness.
3-D object: Picture B
Switch off the projector. Remove the cover. Place the object on the projection glass and cover it with the blackout cloth dust cover provided. Operate the override switch by means of a coin and switch on the projector. Check the sharpness.
To replace the object with another one switch off the projector or rotate the override switch.
Map or piece of paper of larger format:
Picture C
Procede as in the case of projecting a 3-D object. However we recommend to use a special cover instead of the provided cover. The special cover can be purchased from your dealer.
Tip: if the described way of projection is not used frequently, the original cover can be turned upside down instead of having to use the special cover.
Operation instructions
The projection glass heats up quite intensely when in use! We recommend not to touch it during the projection phase.
The projected objects are healed to the same extent. Consequently we recommend not to touch project objects sensitive to temperatures in excess of 80°C.
Paper objects can buckle during a longer projecting time as a consequence of the loss of moisture.
Focusing
Adjust the picture at the bottom edge by means of the focus knob (2). Then turn the Tilt and sharpness correction knob (10) to sharpen the picture at the top edge. At the end operate the focus knob (2) again to correct the sharpness of the picture as a whole.
Replacement of a burnt-out lamp
WARNING: The interior of the projector is very hot! Before the replacement of a lamp the projector must be left to cool down! Check on the control panel which lamp has burnt out. Switch off the projector and unplug it from the mains. When the projector has cooled down remove the door by unscrewing the two side screws as well as the metal-screw (under the objective lens). Unscrew the screws (4) using a coin. Remove the door by pulling in the direction of the projected picture. There is a diagram near the lamps to indicate the location of each of the lamps. Now replace the burnt-out lamp. To assist replacement there is a handle on the neck of the lamp.
IMPORTANT: Reset the device by pressing the automatic fuses (15). Replace the door and fasten the screws. The projector is now ready for use again.

natural_image
Close-up of a white printer with paper spout, no visible text or symbols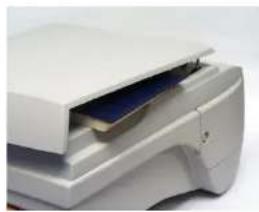
natural_image
Close-up of a white printer with a paper lid open, showing internal components (no visible text or symbols)
natural_image
Diagram of a mechanical setup with an inclined plane and labeled component (no text or symbols present)B
A

natural_image
Close-up of a mechanical component with textured surfaces and a circular opening (no visible text or symbols)C

natural_image
White rectangular electronic device with a circular vent and ventilation slots (no visible text or symbols)
natural_image
White industrial machine with orange button and white top (no visible text or symbols)
natural_image
White rectangular object with a curved top and label pointing to the corner (no text or symbols on the object itself)IMPORTANT SAFEGUARDS
When using your equipment, basic safety precautions should always be followed, including the following :
-
Read and understand all instructions before using. Pay particular attention to areas where this symbol ☑ is shown.
-
Close supervision is necessary when any appliance is used by or near children. Do not leave appliance unattended while in use.
☑ 3. Care must be taken as burns can occur from touching hot parts.
- Do not operate appliance with a damaged cord or if the appliance has been dropped or damaged - until it has been examined by a qualified serviceman.
☑ 5. Position the cord so that it will not be tripped over, pulled, or contact hot surfaces.
-
If any extension cord is necessary, a cord with a current rating at least equal to that of the appliance should be used. Cords rated for less amperage than the appliance may overheat.
-
Always unplug appliance from electrical outlet before opening the cover for cleaning, servicing, lamp changing and when not in use. Never yenk cord to pull plug from outlet. Grasp plug and pull to disconnect.
☑ 8. Let appliance cool completely before putting away or when replacing lamp.
-
To reduce the risk of electric shock, do not immerse this appliance in water or other liquids.
-
To reduce the risk of electric shock, do not disassemble this appliance, but take it to a qualified technician when service or repair work is required. Incorrect reassembling can cause electric shock when the appliance is used subsequently.
-
The use of an accessory attachment not recommended by the manufacturer may cause a risk of fire, electric shock, or injury to persons.
-
Connect this appliance to a grounded outlet.
-
Disconnect this unit from its source of supply before replacing the projection lamp.
☑ 14. This unit is equipped with optical lenses and should not be exposed to direct sunlight.
-
Keep ventilation openings free of any obstructions.
-
This unit is connected by a special cable that, if it is damaged, has to be replaced by the same type of cable. This cable can be ordered from your local dealer and has to be installed by a professional.
SAVE THESE INSTRUCTIONS
The information contained in this manual will help you operate and maintain your overhead projector.
UK ONLY
Important!
The wires in this mains lead are coloured in accordance with the following code:
- green/yellow: earth
- blue:
neutral
- brown
live
Legend
- Objective lens
- Focus knob
- Cover
- Doorscrew (3x)
- Levelling-adjustment foot
- Control panel
- Override switch
- Override warning light
- Indication lights of burnt-out lamp
- Tilt and sharpness correction
- Main fuse
- On/off switch
- Air-intake opening (at the bottom)
- Air-outlet opening
- Automatic fuse
- Projection glass
- Blackout cloth/dust cover (option)
Packaging content
- Projector
- User's Manual
- Blackout cloth/dust cover (option)
Main parts of the projector
Objective lens (1):
The objective lens enables the user to project an image onto the projection screen.
Focus knob (2):
used to focus the picture for various distances between the projector and the projection screen.
Tilt and sharpness correction (10):
used to sharpen out of focus images that appear with an oblique projection onto the projection area.
Cover (3)
used to cover the projecting area.
Levelling-adjustment foot (5):
used to adjust the projector to the required projection angle.
On/off switch (12):
to switch the projector on and off.
Indication lights of burnt-out lamps (9):
The projector is equipped with four indication lights to show the condition of the four projection lamps.
The auxiliary lamp does not have any indication to show its condition.
Override switch (7):
The override switch enables the user to switch on the projection lamps after the removal of the cover. The built-in switch can be operated by means of a coin.
Warning: As soon as the override switch is turned on, the projection lamps are on. Thus the cover loses its disconnecting function of the projection lamps.
As soon as the override switch is on the control light turns on and remains so for the entire duration that the override switch is on.
Blackout cloth/dust cover:
used to cover the projecting area when projecting thicker objects or when the cover has been removed.
Preparing the projection
Put the projector on an even and stable surface to obtain an optimal projection of your picture.
√ Make sure the air-intake opening (13) and the air-outlet opening (14) remain unobstructed at all times!
√ Warning: Never touch the objective lens with bare hands.
☑ Make sure the wall-socket is grounded correctly.
☑ Attention: Check if the mains voltage corresponds with the one required (cf. label with the technical data).
Plug in the projector.
- Index
- Replacement of the auxiliary lamp
- Protection from overheating
- After cooling
- Replacement of a blown fuse
- Cleaning of the projector
- Technical Data
- Use and operation of the projector
- The projector can be used in different ways:
- Examples of projection:
- 3-D object: Picture B
- Map or piece of paper of larger format:
- Operation instructions
- Focusing
- Replacement of a burnt-out lamp
- IMPORTANT SAFEGUARDS
- SAVE THESE INSTRUCTIONS
- UK ONLY
- Important!
- Legend
- Packaging content
- Main parts of the projector
- Objective lens (1):
- Focus knob (2):
- Tilt and sharpness correction (10):
- Cover (3)
- Levelling-adjustment foot (5):
- On/off switch (12):
- Indication lights of burnt-out lamps (9):
- Override switch (7):
- Blackout cloth/dust cover:
- Preparing the projection
Brand : Reflecta
Model : Episcope A4
Category : Episcopes