
Corridor 8172 - Wardrobe BDI - Free user manual and instructions
Find the device manual for free Corridor 8172 BDI in PDF.


| Product Type | Media Cabinet / AV Tower |
| Brand | BDI |
| Model | Corridor 8172 |
| Material | Wood veneer cabinet, tempered glass top, steel legs |
| Dimensions (W x D x H) | 32 x 16 x 55 inches |
| Adjustable Shelves | 2 large, 1 small |
| LP Record Storage | Includes 3 LP storage bars |
| Glass Top | Tempered glass, included |
| Door Swing | Reversible (left or right hinge) |
| Leveling Legs | Built-in levelers, adjustable with hex wrench |
| Assembly Required | Yes, with included hex wrenches and Phillips screwdriver |
| Maintenance | Glass: glass cleaner; Steel & wood: moist cloth |
| Designer | Matthew Weatherly |
| Country of Origin | China |
| Patent | Protected by US and international patents |
Frequently Asked Questions - Corridor 8172 BDI
User questions about Corridor 8172 BDI
0 question about this device. Answer the ones you know or ask your own.
Ask a new question about this device
Download the instructions for your Wardrobe in PDF format for free! Find your manual Corridor 8172 - BDI and take your electronic device back in hand. On this page are published all the documents necessary for the use of your device. Corridor 8172 by BDI.
USER MANUAL Corridor 8172 BDI
Product Registration
Registering your new BDI product allows us to send you important product updates, service information and helpful hints related to your BDI products. Register today, and you will be entered to win free a BINK table from BDI: www.bdiusa.com/register
Placement and Maintenance
Corridor® Media furniture is designed for indoor use on level floors. Clean glass with glass cleaner, and steel parts and wood veneer with a moist cloth.
Your Corridor® Media furniture is engineered for easy assembly. Carefully follow this procedure to prevent any damage. Do not use power tools for assembly of this product.
Step 1
Unpack and identify the parts listed below. The assembly workspace should be a non-marring surface such as carpet. For missing hardware pieces, please contact BDI Customer Service at customerservice@bdiusa.com. For all other concerns, please contact your BDI retailer.
For your convenience, wheel assembly is pre-installed. Wheels can be removed if desired.
Removal of wheels (optional):
Detach Wheel Assembly from Metal Leg E,F by removing the Leveler and Screw.

natural_image
Technical line drawing of a mechanical bracket with mounting holes and a circular label (E,F) at the base, no readable text or symbols beyond the label.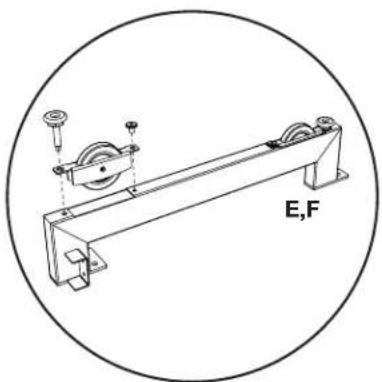
natural_image
Technical line drawing of a mechanical lever system with pulleys and a circular label (E,F) at the base, no readable text or symbols beyond label.Reinstall Leveler to Metal Leg E,F.
Designed by Matthew Weatherly. These distinctive product configurations are protected by US and international patents, trade dress, and/or copyright laws. Corridor & BDI are trademarks of Becker Designed, Inc. All rights reserved. ©2016, BDI Made in China. 05.11.2016 V5
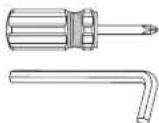


A Phillips Screwdriver x 1
B1 Hex Wrench x 1
B2 Hex Wrench x 1
B3 Hex Wrench x 1
C Cabinet x 1
D 1/4-20 x 10 mm Machine Screw x 12
M 1/4-20 x 63 mm Machine Screw x 1
E Left Leg x 1
F Right Leg x 1
L Stretcher x 1
G Glass Top x 1
H Rubber Bumpers x 4
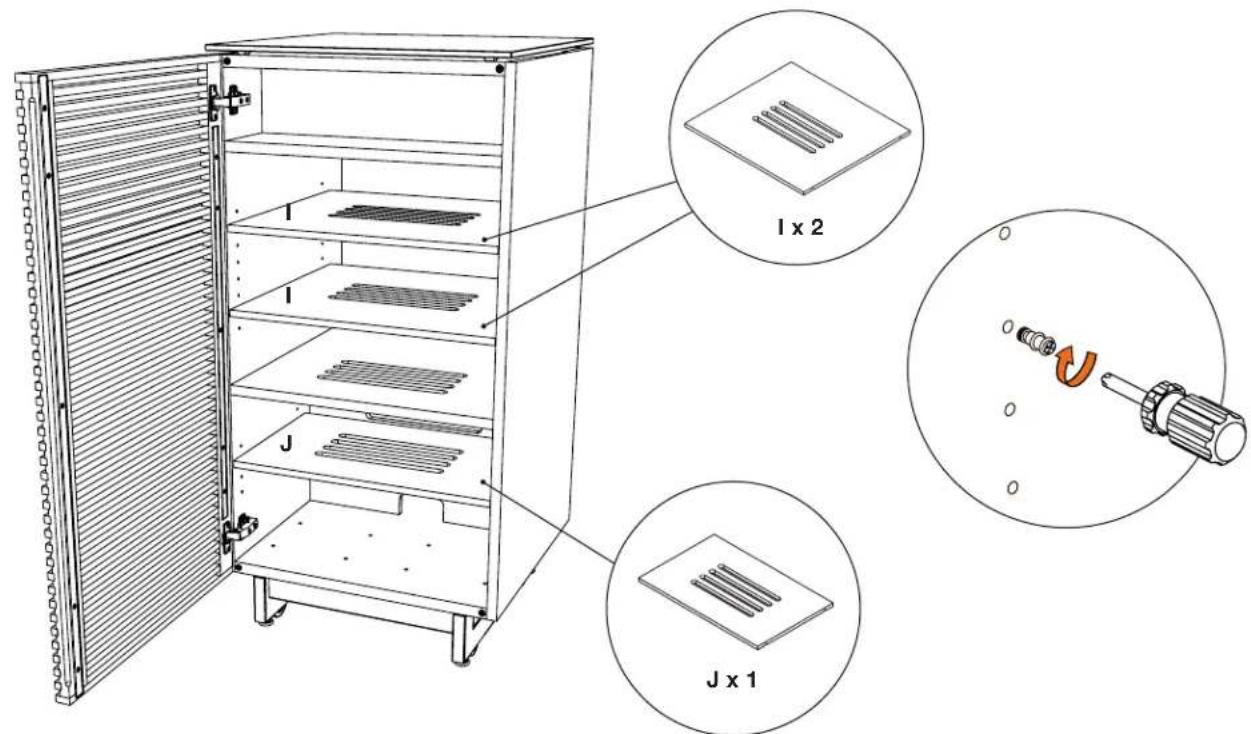
I Large Adjustable Shelf x 2
J Small Adjustable Shelf x 1
K Back Panel x 1
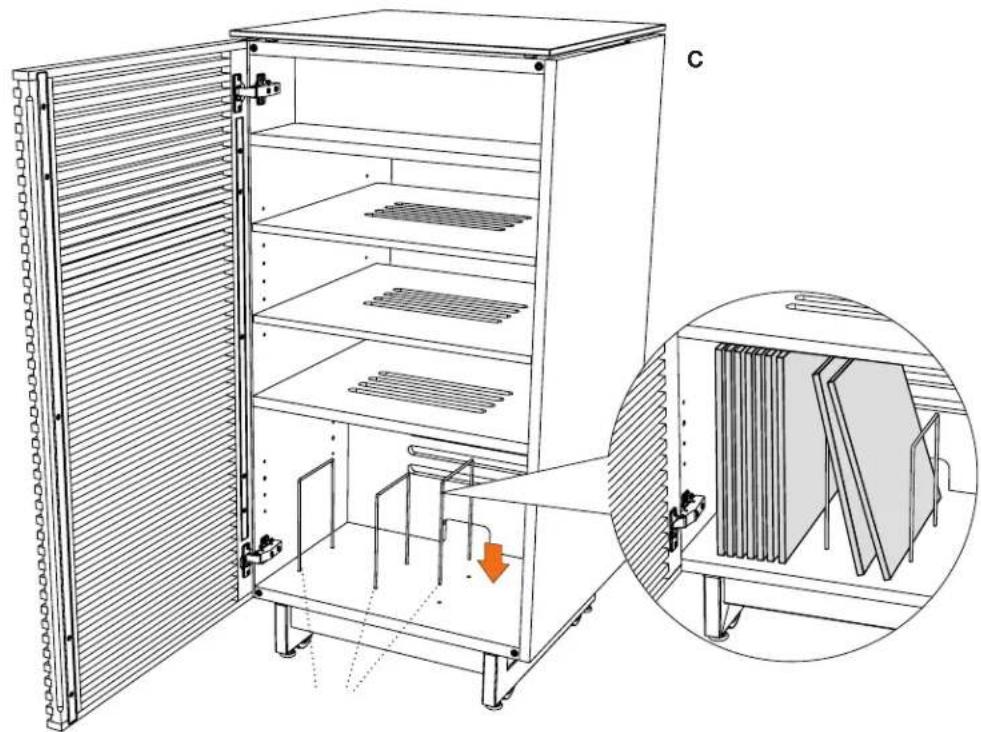
L LP Storage Bars x 3
Step 2 - Build Base Assembly
Slide tab of Metal Legs E,F into ends of Stretcher L. Connect by using Screw D and Hex Wrench B1. Fully tighten all screws.

Step 3 - Position cabinet on its back. Prop up the bottom edge with a book. Using Screw D, attach Leg Assembly to Cabinet C with Hex Wrench B1. Do not overtighten. *Note: Each of the metal legs has levelers that can be adjusted using the Hex Wrench B2.

Step 4 - Install Glass
Position the cabinet upright and remove paper backing from Rubber Bumpers H and place near corners of the top of the cabinet (within 1" of the edge). Place Glass Top G on top of Cabinet C centered left to right and front to back.

Step 5 - Install Back Panel
Install Back Panel K to the backside of the cabinet by inserting top edge in upper channel then tipping bottom edge forward and into lower channel.
NOTE: Velcro straps are included for your convenience to facilitate wire management.

Adjustable Shelves
If desired, lift Adjustable Shelf I away, loosen & remove related Shelf Support Pins, reinstall the Shelf Support Pins at desired height, then reinstall Adjustable Shelf.
LP Record Storage
This cabinet is designed to store LP Records by placing LP Storage Bars L into designated holes in bottom of Cabinet C. LP Storage Bars L can be stored by placing them in designated holes in back of Cabinet C when not in use (see below)
natural_image
Technical line drawing of a cabinet with open door and internal storage compartments, showing internal structure and mounting bracket (no text or symbols)
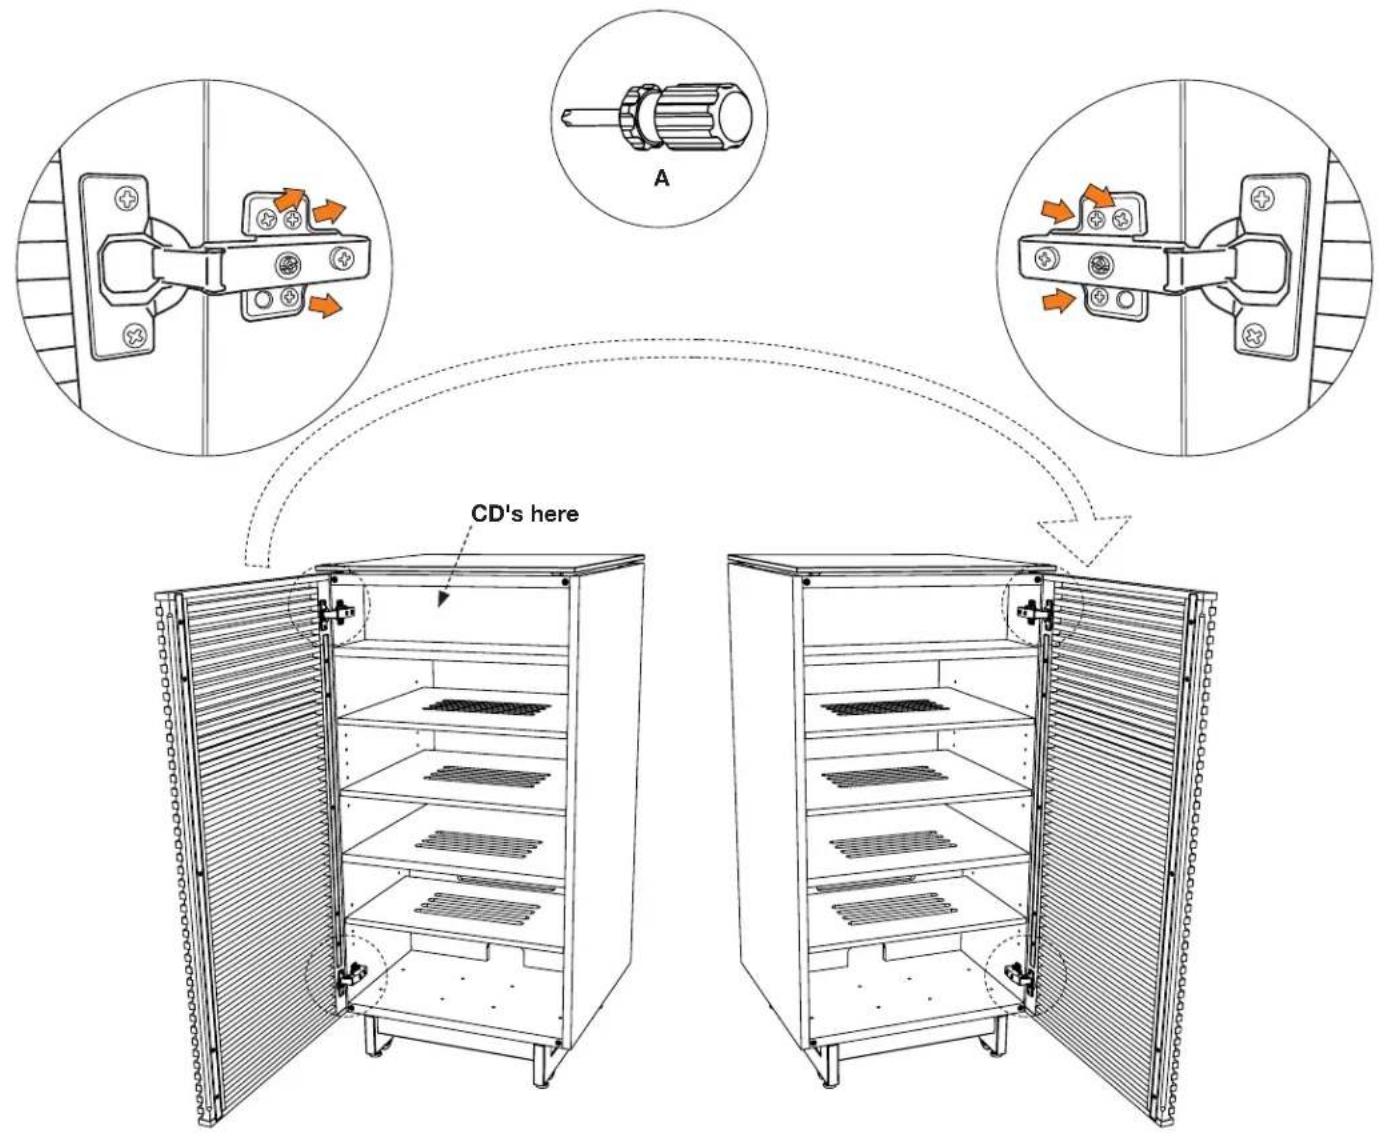
Reverse Door-Swing if desired
The door on the Corridor AV Tower can either hinge left or right. To change sides, remove the screws using a Phillips Screwdriver (A) that secure the hinge plates to the cabinet. Rotate the door 180° (up side down) and reattach the door with the same screws going into the threaded inserts on the other side of the cabinet as illustrated.
Fine tuning your new BDI Corridor Home Theater Furniture
These steps are to be followed after you have unpacked and completed the simple assembly instructions for your Corridor AV cabinet. Due to jostling in freight or perhaps an uneven floor, the doors on your Corridor cabinet may not appear to be in perfect alignment. Making a few minor adjustments can rectify this situation. Be aware that depending on your situation, patience and a bit of trial and error are required. The high-quality European hinge hardware is infinitely adjustable, but changing one element can cause the need for further adjustments. Through a little adjustment, you can modify the orientation of the cabinet doors to make sure that they are sitting perfectly on your Corridor unit.
STEP 1 - Level your Corridor unit
Levelers are integrated into each leg assembly and are accessed at the bottom of each cabinet leg using Hex Wrench B2. If your floor is uneven, you may extend one or more levelers to attain a level, stable cabinet placement. Turning the leveler clockwise will extend the leveler; turning it counter-clockwise will retract it.

natural_image
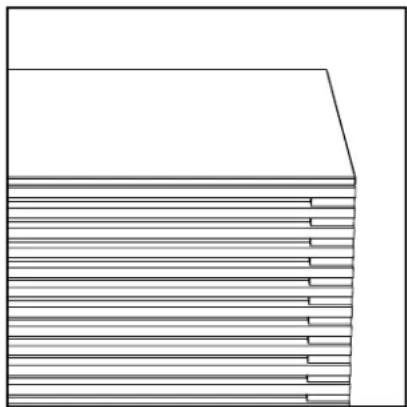
Stacked rectangular panels with horizontal lines, no text or symbols visibleINCORRECT! Door is out of alignment with the rest of the unit.
natural_image
Pure architectural line drawing of a building facade with horizontal floor lines (no text or symbols)CORRECT! Door is sitting squarely and evenly spaced on tops and sides.
STEP 2 - Adjust Door Hinges 2.1.1.2.
The doors on your cabinet should be evenly spaced and the doors should open and close freely without rubbing against the door frame.
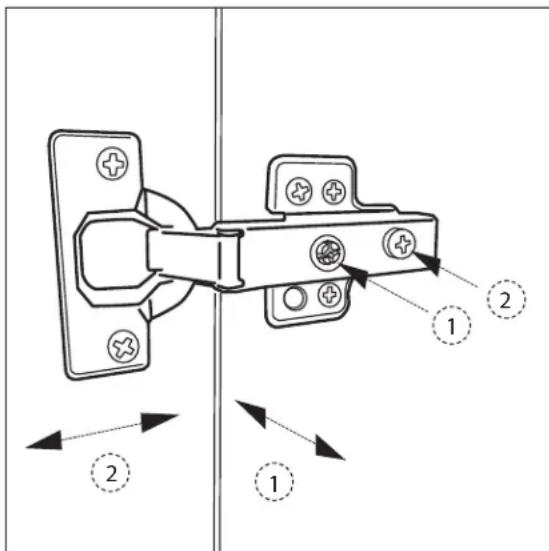
If the cabinet's doors appear out of alignment, this condition can be corrected with minor adjustment to the European hinges on each door.
Because these hinges are infinitely adjustable, adjusting one hinge element can sometimes cause the need for adjustments to other elements. But with a few adjustments, you can modify the orientation of the cabinet doors to make sure that they hang perfectly within your cabinet.
Use the Phillips Screwdriver A supplied to adjust Corridor's door hinges:
- By adjusting Screw 1, the door will move LEFT or RIGHT within the frame. Make minor adjustments at both top and bottom hinges for best results.
- By adjusting Screw 2 the entire door will move IN or OUT, opening or closing the gap between the door frame and cabinet. (This screw rarely needs
adjustment.)
Door adjustments
If your door is not straight, the door can be straightened by adjusting the depth of the set screw found in the middle of the 2 metal bars on the back of the door.

natural_image
Diagram showing a circular component on the left and a right-side view of a rectangular frame with wheels on the right, no text or symbols present.Turning the set screws clockwise will push the middle of the door outward.
Turning the set screws counterclockwise will push the middle of the door inward.

natural_image
Simple line drawing of a door with a handle and circular arrow indicating rotation (no text or symbols)
natural_image
Technical line drawing of a laboratory apparatus with open doors and internal compartments (no text or symbols)
- Product Registration
- Placement and Maintenance
- Step 1
- Step 2 - Build Base Assembly
- Step 4 - Install Glass
- Step 5 - Install Back Panel
- Adjustable Shelves
- LP Record Storage
- Reverse Door-Swing if desired
- Fine tuning your new BDI Corridor Home Theater Furniture
- STEP 1 - Level your Corridor unit
- STEP 2 - Adjust Door Hinges 2.1.1.2.
- Door adjustments
Brand : BDI
Model : Corridor 8172
Category : Wardrobe