
AVS-HDB-WPTX - AV extender Black Box - Free user manual and instructions
Find the device manual for free AVS-HDB-WPTX Black Box in PDF.


| Product Type | Video Extender – 4K HDMI, VGA, RS-232, Wallplate Transmitter with Audio |
| Dimensions (H x W x D) | 4.1 x 3.5 x 1.7 in (10.4 x 8.9 x 4.4 cm) |
| Weight | 0.63 lb (0.29 kg) |
| Power Supply | 12 VDC via terminal block or PoC (Power over Cable) from compatible receiver |
| Inputs | 1 x HDMI (Type A), 1 x VGA (DB-15), 1 x 3.5 mm stereo audio (for VGA) |
| Output | 1 x HDBaseT (RJ-45) with PoC support |
| Control Ports | 2 x RS-232 (3-pin terminal blocks: front and rear) |
| Video Resolutions Supported | VGA: up to 1920x1200; HDMI: up to 4K x 2K, 1080p 3D |
| Bandwidth | 10.2 Gbps |
| HDMI Compliance | HDMI 1.4, HDCP compliant |
| Transmission Distance (PoC) | 1080p up to 60 m (197 ft); 4K up to 40 m (131 ft) |
| Operating Temperature | -14 to 104 °F (-10 to 40 °C) |
| Operating Humidity | 10–90% |
| Enclosure Type | Decora-style wallplate for double-gang wall box (aluminum chassis) |
| Included Accessories | Faceplate, screws, terminal blocks (2-pin, 3-pin, 4-pin), user manual |
| Mounting | In-wall (standard double-gang box) |
| Key Features | Auto-switching between HDMI/VGA; built-in scaler; bi-directional RS-232; firmware upgrade via USB; PoC receiver powered |
| Maintenance | Clean with dry cloth; do not use liquids; ensure ventilation; do not open casing |
| Safety | Class A device for commercial use; ground properly; use specified power; avoid moisture |
| Spare Parts / Repairability | No user-serviceable parts; contact Black Box Technical Support for repairs |
Frequently Asked Questions - AVS-HDB-WPTX Black Box
User questions about AVS-HDB-WPTX Black Box
0 question about this device. Answer the ones you know or ask your own.
Ask a new question about this device
Download the instructions for your AV extender in PDF format for free! Find your manual AVS-HDB-WPTX - Black Box and take your electronic device back in hand. On this page are published all the documents necessary for the use of your device. AVS-HDB-WPTX by Black Box.
USER MANUAL AVS-HDB-WPTX Black Box
Video Extender - 4K HDMI, VGA, RS-232, Wallplate Transmitter with Audio
User Manual
Provides a wallplate interface for HDMI/VGA input sources.
Trademarks Used in this Manual
Black Box and the Double Diamond logo are registered trademarks of BB Technologies, Inc.
Any other trademarks mentioned in this manual are acknowledged to be the property of the trademark owners.
FEDERAL COMMUNICATIONS COMMISSION AND INDUSTRY CANADA RADIO FREQUENCY INTERFERENCE STATEMENTS
This equipment generates, uses, and can radiate radio-frequency energy, and if not installed and used properly, that is, in strict accordance with the manufacturer's instructions, may cause interference to radio communication. It has been tested and found to comply with the limits for a Class A computing device in accordance with the specifications in Subpart B of Part 15 of FCC rules, which are designed to provide reasonable protection against such interference when the equipment is operated in a commercial environment. Operation of this equipment in a residential area is likely to cause interference, in which case the user at his own expense will be required to take whatever measures may be necessary to correct the interference.
Changes or modifications not expressly approved by the party responsible for compliance could void the user's authority to operate the equipment.
This digital apparatus does not exceed the Class A limits for radio noise emission from digital apparatus set out in the Radio Interference Regulation of Industry Canada.
For reliable operation of the equipment and personnel safety, follow the guidelines below for installation, use, and maintenance of the device.
- The system must be grounded properly. Do not use two-blade plugs and ensure the alternating power supply ranges from 100 to 240 VAC and 50 to 60 Hz.
- Do not put the control panel in an environment that is not within the its temperature tolerance.
- Because the switch's power generates heat when running, be sure the working environment is properly ventilated to avoid damage caused by equipment overheating.
- Turn off the general power switch in humid weather or when the control panel will be left unused for long time.
- Before operating, be sure that the alternating current wire is pulled out of the power supply.
- NEVER open the casing of the equipment, DO NOT repair it on your own. This might be harmful to persons or the equipment.
- DO NOT splash any liquids on or around the equipment.
Table of Contents
- Specifications 8
- Overview....9
2.1 Introduction....9
2.2 Features 9
2.3 What's Included....10
2.4 Hardware Description 10
2.4.1 Front Panel....10
2.4.2 Side Panel 12
2.4.3 Back Panel 12
- System Connection 14
3.1 Usage Precautions....14
3.2 Connection Procedure 14
3.3 Powering On the Unit....15
3.4 PoC Solution....15
3.5 Application 16
- Operation....17
4.1 Front-Panel Buttons 17
4.2 RS-232 Communications Command....19
-
Troubleshooting and Maintenance 23
-
Specifications
| Video | |
| Input (1) HDMI, (1) VGA | |
| Input Connector (1) 19-pin Type A HDMI F, (1) 15-pin VGA | |
| Output (1) HDBaseT | |
| Output Connector (1) RJ-45 | |
| Transmission Mode HDBaseT | |
| Audio | |
| Input (1) synchronous VGA audio | |
| Input Connector (1) 3.5-mm stereo jack | |
| Frequency Response 20 Hz-20 kHz | |
| Impedance >10 ohms, ASNR, >85 dB @ 20 Hz-20 kHz | |
| Control Ports | |
| Control Ports (1) 3-pin RS-232 socket on front panel,(1) 3-pin RS-232 socket on rear panel (shares the grounding pole with 12 V output) | |
| General | |
| Resolution VGA: 800 x 600, 1024 x 768, 1280 x 800,1280 x 1024,1440 x 900,1600 x 1200,1920 x 1080, 1920 x 1200;HDMI: 4Kx2K, 1080p 3D, 1080P(HD)/1080i/720P/576P/576i/480P/480i | |
| Transmission Distance 1080P < or = 60 m (PoC)4K x 2K < or = 40 m (PoC) | |
| Bandwidth 10.2 Gbps | |
| HDMI Standard | Support HDMI1.4 and HDCP |
| Hardware | |
| Chassis Style | Decora-style wall-gang |
| Dimensions | 4.1"H x 3.5"W x 1.7"D (10.4 x 8.9 x 4.4 cm) |
| Weight | 0.63 lb. (0.29 kg) |
| Environmental | |
| Operating Temperature | -14 to 104°F (-10 to +40°C) |
| Operating Humidity | 10–90% |
2. Overview
2.1 Introduction
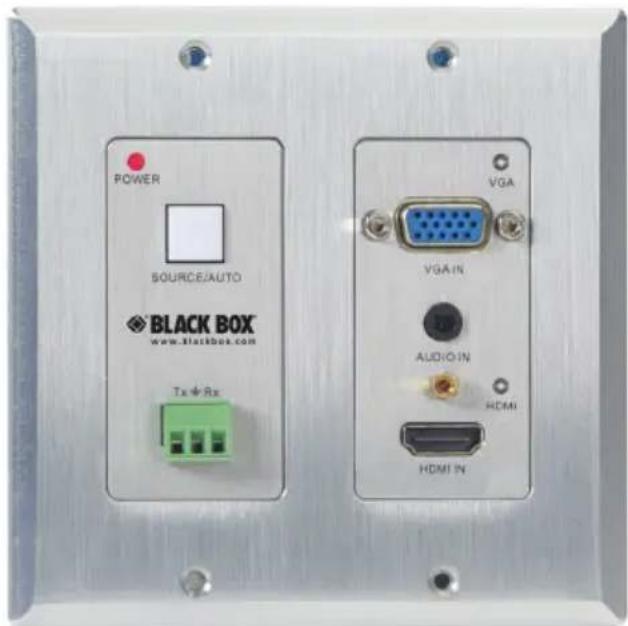
The Video Extender —4K HDMI, VGA, RS-232, Wallplate Transmitter with Audio (AVS-HDB-WPTX) is a Decora style transmitter that installs in a double-gang wall box to provide a convenient interface for HDMI/VGA input sources. It has (1) HDMI IN, (1) VGA IN and (1) HDBaseT OUT with PoC connector. It supports VGA as a full HD scale. HDMI 1.4 with 4k and 3D input signals support auto-switching and manual-switching. The HDBaseT output supports 60-m UHD video transmission with PoC, and enables bi-directional RS-232 communication between the AVS-HDB-WPTX and the remote device. Using PoC, AVS-HDB-WPTX can be powered via a far-end PoC receiver.
2.2 Features
- Selectable HDMI/VGA with audio input
• Supports VGA output resolution up to 1920x1200
• High bandwidth: 10.2 Gbps
• Built-in scaler, scales HDMI/VGA signals to match the native resolution of the display.
• Transmits HDMI signals up to 4K - Compliant with HDMI 1.4, support 1080p 3D
- HDCP compliance, equipped with HDCP auto-tracking solution
- Provides auto-switching capability
- Supports multiple control methods including front-panel buttons, and RS-232. The extender supports bi-directional RS-232 passthrough control.
• Supports firmware upgrading via USB. - Powered by a 12-VDC power output or PoC connection up to 60m .
• Made of aluminum, so it cools faster.
Chapter 2: Overview
2.3 What's Included
Your package should include the following items. If anything is missing or damaged, contact Black Box Technical Support at 724-746-5500 or info@blackbox.com.
• (1) Video Extender —4K HDMI, VGA, RS-232, Wallplate Transmitter with Audio (AVS-HDB-WPTX)
• (4) Screws (for AVS-HDB-WPTX)
• (3) Pluggable Terminal Blocks ([1] 2-pin block, [1] 3-pin block, and [1] 4-pin block)
• (1) Faceplate
• (4) Screws (for the faceplate)
- This printed user manual
2.4 Hardware Description
2.4.1 Front Panel
78
1
2
4
5
3
6
9
Figure 2-1. Front panel.
Table 2-1. Components.
| Number Name Description | ||
| 1 Power LED Lights red when power is on. | ||
| 2 | SOURCE/AUTO button | Used as video source selection button (with backlight off): Press to select one source, press again to select next source, switching circularly between HDMI and VGA. The indicator of the selected input source will light green.Used as switching mode selection button (with backlight on): Press and hold for 3 seconds or more to enter Auto-switching mode. The LED lights green when the unit is in auto-switching mode. Press and hold the button for 3 seconds or longer to enter in Manual-switching mode. |
| 3 RS-232 Serial port, 3-pin pluggable terminal block | This connects to the control terminal to control the AVS-HDB-WPTX, and supports bi-directional RS-232 control (send control signal from local or transmitter, send receive control signal from far-end devices). | |
| 4 VGA IN LED Connects to VGA source device. | ||
| 5 | AUDIO IN | Connect with the audio output socket of VGA source device, deliver synchronous audio source with VGA signal source when choosing VGA as source signal. |
| 6 HDMI IN Connect to HDMI source device. | ||
| 7 LINK and HDCP LED | LINK: Twisted Pair Link status indicator, lights green when successfully connected.HDCP: HDCP compliance indicator, lights green when the source signals is HDCP; blinks when it is not HDCP; and turns off when there is no source signal. | |
| 8 RESET button Press this button to reboot the AVS-HDB-WPTX. | ||
| 9 | USB | Used for firmware update. Plug a flash disk or other storage device with update file (MERGE.bin), and send command 50698% to update the firmware. |
2.4.2 Side Panel

natural_image
Front view of a device chassis with labeled ports and an internal socket (no text or symbols beyond labels)Figure 2-2. Side panel.
- HDBaseT OUT: RJ-45 port, connect to a receiver via a CAT5e/6 cable to deliver Audio/Video signals, supports PoC.
NOTE: AVS-HDB-WPTX supports unidirectional PoC. It can be powered the by far-end receiver but it can't power the far-end receiver.
2.4.3 Back Panel

Figure 2-3. Back panel.
Table 2-2. Back panel components.
| Number Name Description | ||
| 1 | Power In | Power in port, 2-pin pluggable terminal block, connects to 12-VDC power adapter. |
| 2 | Power out | Power out port, connects to AVS-CTRL8 to power it with a 12-VDC power output. |
| 3 RS-232 serial port Connects to a far-end receiver, supports bi-directional RS-232 control leads (sends the control signal from local devices or receives the control signal sent from far-end devices. | ||
3. System Connection
3.1 Usage Precautions
- Install the system in a clean environment that has a proper temperature and humidity.
- Make sure that all the power switches, plugs, sockets, and power cords are insulated and safe.
- Connect all devices before powering on.

flowchart
graph TD
    A["AVS-HDB-RX"] --> B["Projector"]
    B --> C["PC"]
    C --> D["Blu-ray™"]
    D --> E["PC"]
    E --> F["Blu-ray™"]
    F --> G["Projector"]
    style A fill:#f9f,stroke:#333
    style B fill:#ccf,stroke:#333
    style C fill:#cfc,stroke:#333
    style D fill:#fcc,stroke:#333
    style E fill:#cff,stroke:#333
    style F fill:#ffc,stroke:#333
    style G fill:#fcc,stroke:#333
Figure 3-1. Connections.
3.2 Connection Procedure
Step 1: Connect an HDMI source device (e.g. Blu-ray DVD) to the HDMI input port of the AVS-HDB-WPTX with HDMI cable. Connect a VGA source device (e.g. PC) to the VGA input port of the AVS-HDB-WPTX with VGA cable.
Step 2: Connect a AVS-HDB-RX to the HDBaseT port on the rear panel with twisted pair.
Step 3: Connect a HDMI display to the HDMI OUT port of AVS-HDB-RX.
Step 4: Connect a control terminal to the RS-232 port on the front panel of the AVS-HDB-RX.
Step 5: Connect a control device (e.g. PC) to the RS-232 port of the AVS-HDB-WPTX or the AVS-HDB-RX (bi-directional RS-232 control, either is available).
Step 6: Connect the 24-VDC power adapter to the power port of the AVS-HDB-RX. AVS-HDB-WPTX can get power from AVS-HDB-RX via PoC.
NOTE: AVS-HDB-WPTX supports unidirectional PoC, i.e., AVS-HDB-WPTX can get power from far-end PoC devices with PoC function, but it can't power far-end PoC devices when the power supply is connected to the AVS-HDB-WPTX.
3.3 Powering On the Unit
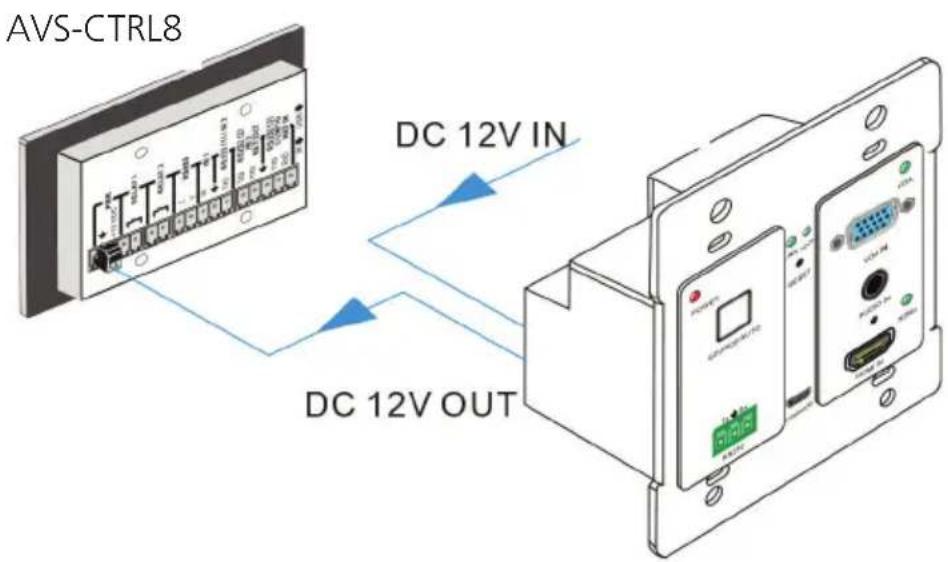
AVS-HDB-WPTX has a 12-V power output port on the rear panel. Connect the 12-VDC power output port of the AVS-HDB-WPTX to the power port of the AVS-CTRL8 (refer to the following figure). AVS-HDB-WPTX can power the AVS-CTRL8.
flowchart
graph TD
    A["AVS-CTRL8"] -->|DC 12V IN| B["Device 1"]
    A -->|DC 12V OUT| C["Device 2"]
Figure 3-2. Power connections.
3.4 PoC Solution
AVS-HDB-WPTX has a HDBaseT OUTPUT port on the rear panel, which can extend HDMI/ VGA signals up to 60 m. It also supports PoC, which allows several terminals to share the same power supply and eliminates the need for an extra power supply at the remote nodes.
Connect a 24-VDC power adapter to the power port of AVS-HDB-RX. AVS-HDB-WPTX can be powered synchronously via PoC.
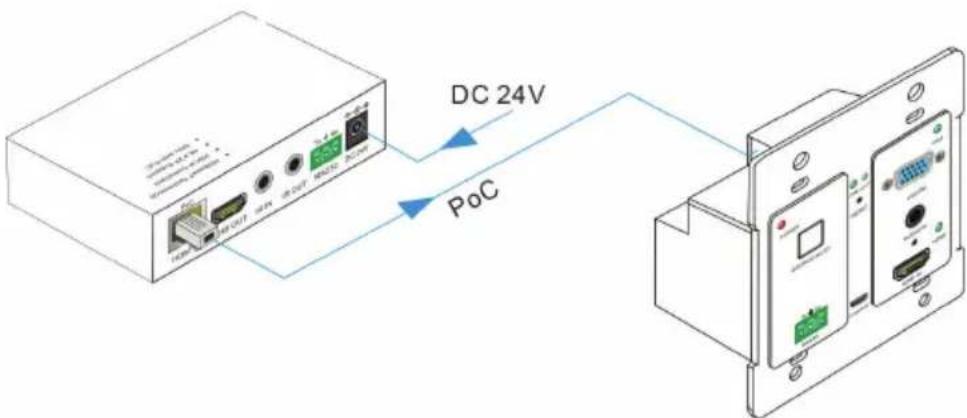
Figure 3-3. PoC connections.
3.5 Application
Use the AVS-HDB-WPTX for computer monitoring, conference rooms, large-screen displays, television, education applications and more.
4. Operation
4.1 Front-Panel Buttons
AVS-HDB-WPTX has a channel switching button on the front panel, through which users can switch input source signals.
It supports both manual switching and auto switching. (The default setting is Auto switching.) Press and hold the switching button for 3 seconds or send command "50770%" and "50771%" to switch between the two modes.
Switching modes:
- Auto switching mode: In this mode, the indicator will light green, and AVS-HDB-WPTX will recognize the last connected source device as the input source automatically.
- Disconnect the present source device, and it will deliver the other source signal (if there is an input signal on the other source).
- Manual switching mode: In this mode, the indicator will remain off. Press the switching button to select the input source, it will switch circularly between HDMI and VGA. Or switch it by sending RS-232 commands. The indicator of the selected input source will light green.
4.2 RS-232 Control
RS-232 can be transmitted bi-directionally between AVS-HDB-WPTX and AVS-HDB-RX, so it can control a third-party RS-232 device locally or control an AVS-HDB-WPTX from remotely. To control a third-party RS-232 device, set the baud rate of this device to 2400, 4800, 9600, 19200, 38400, 57600, or 115200.
Accessing through Serial
- Using the client, select "serial" and enter "115200" for the speed (baud rate).

Figure 4-1. PuTTY configuration screen using serial.
- No username or password is required. Just press enter.
Set the COM number, baud rate, data bit, stop bit, and parity bit correctly so you can send commands in the Command Sending Area of the screen.
NOTE: To control the AVS-HDB-WPTX via an RS-232 port, configure the communication protocol parameters as: Baud rate: 9600; Data bit: 8; Stop bit: 1; Parity bit: none.
4.2 RS-232 Communication Commands
Table 4-1. RS-232 commands.
| Switch Commands | ||
| Command Function Feedback Example | ||
| 50701% Switch to HDMI input Switch to HDMI | ||
| 50704% Switch to VGA input Switch to VGA | ||
| 50705% Change the horizontal polarity to the opposite. | Hpolarity:0/1 | |
| 50706% Change the vertical polarity to the opposite. | Vpolarity:0/1 | |
| 50707% Check the present resolution and polarity. 1920 x | 1080Hpolarity:1Vpolarity:0 | |
| 50770% Enable auto-switching Auto Switching | ||
| 50771% Disable auto-switching | Manual Switching | |
| Resolution Commands | ||
| Command Function Feedback Example | ||
| 50619% Change the resolution to 1360 x 768 HD | Resolution: 1360 x 768 | |
| 50626% Change the resolution to 1024 x 768 XGA | Resolution: 1024 x 768 | |
| 50627% Change the resolution to 1280 x 720 720P | Resolution: 1280 x 720 | |
| 50628% Change the resolution to 1280 x 800WXGA | Resolution: 1280 x 800 | |
| 50629% Change the resolution to 1920 x 10801080P | Resolution: 1920 x 1080 | |
| 50620% Change the resolution to 1920 x 1200WUXGA | Resolution: 1920 x 1200 | |
| 50621% Change the resolution to 1600 x 1200UXGA | Resolution: 1600 x 1200 | |
| Setup Commands | ||
| Command | Function Feedback Example | |
| 502xx% Set | the brightness to xx. XX ranges from 00 to 99. | Brightness: xx |
| 503xx% Set | the contrast to xx. XX ranges from 00 to 99 | Contrast: xx |
| 504xx% Set | the saturation to xx. XX ranges from 00 to 99. | Saturation: xx |
| 505xx% Set | the sharpness to xx. XX ranges from 00 to 99. | Sharpness: xx |
| 50606% Auto-adjust the input parameter. VGA Input Auto | ||
| 50607% | Adjust the color temperature. | Color Temperature: xx (xx can be medium, warm, user, or cool) |
| 50608% Set | the aspect ratio. Aspect Ratio: xx (xx can be 16:9, 4:3, or auto.) | |
| 50614% Set | the picture mode. Picture Mode: xx (xx can be dynamic, standard, mild, or user.) | |
| 50699% Check the system version. Version Vx.x.x | ||
| 50779% | Switch to RS-232 mode 1, enable scaler to control far-end devices. | RS-232 Mode 1: RS-232 Control Scaler and Remote |
| 50780% | Switch to RS-232 mode 2, enable far-end devices to control scaler. | RS-232 Mode 2: RS-232 and Remote Control Scaler |
| 50790% | Set the HDCP status of the HDMI output socket to Active. | HDCP Active |
| 50791% | Set the HDCP status of HDMI output socket to On. | HDCP On |
| 50792% Set | the HDCP status of HDMI output socket to Off. | HDCP Off |
| 50698% | Software update. | — |
| Setup Commands (continued) | ||
| Command Function Feedback Example | ||
| 50617% Reset to factory default. — | ||
| Inquire Commands | ||
| Command Function Feedback Example | ||
| 50632% Check the output resolution . Resolution: xx | ||
| 50633% Check the picture mode. Picture Mode: xx | ||
| 50793% Check HDCP status. HDCP Off | HDCP On HDCP Active | |
| 50635% | Check the image aspect ratio. | Aspect Ratio: xx |
| 50636% | Check the brightness. | Brightness: xx |
| 50637% | Check the contrast. | Contrast: xx |
| 50638% | Check the saturation. | Saturation: xx |
| 50639% | Check sharpness. | Sharpness: xx |
| 50640% | Check the color temperature. | Color Temperature: xx |
| Adjustment Commands | ||
| 50678% | Enable screen output adjusting. | Enter Output Position Adjust |
| 50679% | Disable screen output adjusting. | Exit Output Position Adjust |
| 50670% | Move the image to left. | Output Position Adjust X xx |
| 50671% | Move the image to right. | Output Position Adjust X xx |
| 50672% Move the image up. Output Position Adjust Y xx | ||
| 50673% Move the image down. Output Position Adjust Y xx | ||
| 50674% | Stretch left from left side (increase image width). | Output Width Adjust xx |
| 50675% Pull right from left side (decrease image width). | Output Width Adjust xx | |
| 50676% | Stretch upwards from bottom side (decrease image height). | Output Height Adjust xx |
| 50677% Stretch downwards from bottom side. | Output Height Adjust xx (increase image height) | |
| EDID Commands | ||
| Command | Function Feedback Example | |
| 50772% EDID | passthrough EDID: bypass mode | |
| 50773% Set | EDID passthrough EDID:1080P&PCM 2ch | |
| 50774% Set | EDID data to 1080P Dolby 5.1 EDID:1080P&5.1ch | |
| 50775% | Set EDID data to 1080P3D Dolby 5.1 | EDID:1080P3d&5.1ch |
| 50776% Set | EDID data to 1080i PCM 2.0ch EDID:1080i&PCM 2ch | |
| 50777% | Set EDID data to 4K*2K PCM 2.0ch | EDID:4K&PCM 2ch |
| 50778% | Check EDID data | EDID:1080P&PCM 2chEDID:1080P&5.1chEDID:1080P3d&5.1chEDID:4K&PCM 2ch |
| 50799% Program EDID file, send EDID data within 10s | Waiting for edid within 10 secs! | |
NOTES:
- EDID commands are for HDMI sources only.
5. Troubleshooting
Problems/Causes/Solutions
Table 5-1. Problems/Causes/Solutions.
| Problems Causes Solutions | ||
| Losing color or no video signal output in HDMI display. | The cables may not be connected correctly or may be broken.The connecting cable's quality is bad. Failed or loose connection. | Check whether the cables are connected correctly and are in working condition.Try another high-quality cable.Make sure the connec-tion is good. |
| No HDMI signal output in AVS-HDB-4TX while local HDMI input is in normal work-ing state. | ||
| Output image has snowflake pattern. | ||
| POWER indicator doesn't work or does not respond to any operation. | Power cord connection failed. | Make sure the power cord connection is good. |
| Cannot control the device by control device (e.g. a PC) through RS-232 port. | Wrong RS-232 communi-cation parameters. | Make sure the RS-232 communication param-eters are correct. |
| Static becomes stronger when connecting the video connectors. | Bad grounding. Check the grounding and make sure it is connected well. | |
| Cannot control the device through RS-232 port or front-panel buttons. | The unit might be broken. | Contact Black Box Technical Support at 724-746-5500 or info@blackbox.com. |
If your problem persists after you follow the above troubleshooting steps, contact Black Box Technical Support at 724-746-5500 or info@blackbox.com.
Black Box Tech Support: FREE! Live. 24/7.
Tech support the way it should be.

natural_image
Black-and-white portrait of a smiling man wearing a headset, no visible text or symbolsGreat tech support is just 60 seconds away at 724-746-5500 or blackbox.com.

BLACK BOX®
About Black Box
Black Box provides an extensive range of networking and infrastructure products. You'll find everything from cabinets and racks and power and surge protection products to media converters and Ethernet switches all supported by free, live 24/7 Tech support available in 60 seconds or less.
© Copyright 2015. Black Box Corporation. All rights reserved. Black Box ^® and the Double Diamond logo are registered trademarks of BB Technologies, Inc. Any third-party trademarks appearing in this manual are acknowledged to be the property of their respective owners.
AVS-HDB-WPTX, version 1
- User Manual
- FEDERAL COMMUNICATIONS COMMISSION AND INDUSTRY CANADA RADIO FREQUENCY INTERFERENCE STATEMENTS
- Table of Contents
- Overview
- Introduction
- Features
- Chapter 2: Overview
- What's Included
- Hardware Description
- Front Panel
- Back Panel
- System Connection
- Usage Precautions
- Connection Procedure
- Powering On the Unit
- PoC Solution
- Application
- Operation
- Front-Panel Buttons
- RS-232 Control
- Accessing through Serial
- RS-232 Communication Commands
- NOTES:
- Troubleshooting
- Problems/Causes/Solutions
- Black Box Tech Support: FREE! Live. 24/7.
- BLACK BOX®
- About Black Box
Brand : Black Box
Model : AVS-HDB-WPTX
Category : AV extender