AXAMP-CH3 - Car audio interface Axxess - Free user manual and instructions
Find the device manual for free AXAMP-CH3 Axxess in PDF.


| Product Type | Audio Amplifier |
| Model | AXAMP-CH3 |
| Brand | AXESS |
| Amplifier Class | Class D |
| Number of Channels | 2 (Stereo) |
| Power Output (RMS) | 50W per channel (4 Ohms) |
| Total Harmonic Distortion (THD) | <0.1% |
| Frequency Response | 20 Hz - 20 kHz ±1 dB |
| Input Impedance | 10 kOhms |
| Input Sensitivity | 1V RMS |
| Signal-to-Noise Ratio | >90 dB |
| Power Supply | AC 100-240V, 50/60Hz |
| Dimensions (W x D x H) | 280 x 200 x 60 mm |
| Weight | 1.5 kg |
| Cooling | Passive (heatsink) |
| Front Panel Controls | Volume knob, Power switch, Input selector |
| Rear Panel Inputs | 2x RCA, 1x 3.5mm AUX |
| Rear Panel Outputs | 2x Speaker terminals (binding posts) |
| Protection Features | Short circuit, overheat, overcurrent |
| Compliance | CE, RoHS |
| Accessories Included | Power cord, User manual |
| Cleaning Instructions | Wipe with dry cloth. Do not use solvents. |
| Safety Warnings | Do not expose to water. Unplug before cleaning. |
| Repairability | No user-serviceable parts. Contact authorized service. |
Frequently Asked Questions - AXAMP-CH3 Axxess
User questions about AXAMP-CH3 Axxess
0 question about this device. Answer the ones you know or ask your own.
Ask a new question about this device
Download the instructions for your Car audio interface in PDF format for free! Find your manual AXAMP-CH3 - Axxess and take your electronic device back in hand. On this page are published all the documents necessary for the use of your device. AXAMP-CH3 by Axxess.
USER MANUAL AXAMP-CH3 Axxess
natural_image
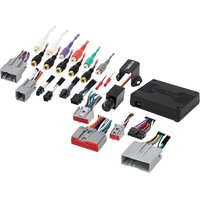
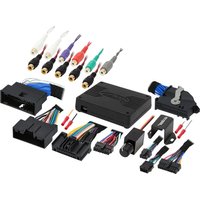
Collection of electronic components including a black rectangular device, connectors, and various colored wires (no visible text or symbols)INTERFACE COMPONENTS
- AXAMP-CH3 Amplifier Integration interface
- AXAMP-CH3 interface harness
- AXAMP-CH3 vehicle T-harness
- Bass knob
APPLICATIONS
Visit AxxessInterfaces.com for current application list
Amplifier Integration Interface
Fits Chrysler Select Models 2011-2020
INTERFACE FEATURES
- Designed for amplified and non-amplified models
- Provides 6 channels of 5-volt RMS audio
• Non-fading full range output (Channels 5 & 6) - Includes plug-n-play harnessing
- Simple behind the radio installation
- Dual colored LED Display
- Input Power handling 50 Watts per channel
- Amp turn-on trigger (DC) 250mA
• 2 channel S/PDIF out (Fronts)
www.MetraOnline.com
MetraOnline.com may be used to assist with dash assembly instructions. Simply enter your Year, Make, Model vehicle into the vehicle fit guide and look for the Dash Kit Installation Instructions.

TABLE OF CONTENTS
Installation & Installation Options....2
Adding Amp/Amps to a Factory System......3
Troubleshooting: LED Feedback ....4
TOOLS & INSTALLATION ACCESSORIES REQUIRED
- Crimping tool and connectors, or solder gun, solder, and heat shrink
- Tape
- Wire cutter
- Zip-ties
- Multimeter
ATTENTION: With the key out of the ignition, disconnect the negative battery terminal before installing this product. Ensure that all installation connections, especially the air bag indicator lights, are plugged in before reconnecting the battery or cycling the ignition to test this product. NOTE: Refer also to the instructions included with the aftermarket accessory before installing this device.
INSTALLATION OPTIONS INSTALLATION
Adding a subwoofer to a factory system:
This feature offers the ability to add a subwoofer to a factory system, whether amplified or non-amplified (Refer to Page 3)
Adding a full-range amp and subwoofer to a factory system:
This feature offers the ability to add a full-range amp and sub to a factory system, whether amplified* or non-amplified. (Refer to Page 3)
* For amplified models the amp must be bypassed/unplugged. Use either Axxess AXABH-CH2 or AXABH-CH4 (sold separately) to bypass the amp for best results.
Note: The interface provides a 12-volt 1-amp output to turn on aftermarket amp(s). If installing multiple amps, an SPDT automotive relay will be required if the amp turn-on current of all amps combined exceeds 1-amp. Use Metra part number E-123 (sold separately) for best results.
- Disassemble the dash, unplug all connectors, and then remove the factory radio.*
- Install the AXAMP-CH3 vehicle T-harness to the vehicle and make all necessary connections, but leave the amp turn-on wire disconnected.
- Plug the AXAMP-CH3 vehicle T-harness to the AXAMP-CH3 interface.
- Plug the AXAMP-CH3 interface harness to the AXAMP-CH3 interface.
- Connect the amp turn-on wire.
- Adjust your aftermarket amplifier to a desired listening level.
ADDING AMPLIFIER/AMPLIFIERS TO A FACTORY SYSTEM

REV. 12/17/24 INSTAXAMP-CH3

AXAMP-CH3
INSTALLATION INSTRUCTIONS
TROUBLESHOOTING
Final LED Feedback
At the end of programming the LED will turn Solid Green which indicates programming was successful. If the LED didn't turn Solid Green, reference the list below to understand which programming section the problem may stem from.
Blink Rate Condition/Status
| Solid Green | All Good | |
| Solid Red | Missing Can Frames | |
| Blink Red | Clipping Output | |
| Green/Red | Missing Adv. (Comm Frames) |
Scan QR Code

Further troubleshooting steps and
information can be located at:
axxessinterfaces.com/product/AXAMP-CH3
Having difficulties? We're here to help.

act our Tech Support line at:
257-1187

mail at:
techsupport@metra-autosound.com
Tech Support Hours (Eastern Standard Time)
Monday - Friday: 9:00 AM - 7:00 PM
Saturday: 10:00 AM - 5:00 PM
Sunday: 10:00 AM - 4:00 PM


Metra recommends MECP certified technicians



- INTERFACE COMPONENTS
- APPLICATIONS
- Amplifier Integration Interface
- Fits Chrysler Select Models 2011-2020
- INTERFACE FEATURES
- TABLE OF CONTENTS
- TOOLS & INSTALLATION ACCESSORIES REQUIRED
- INSTALLATION OPTIONS INSTALLATION
- Adding a subwoofer to a factory system:
- Adding a full-range amp and subwoofer to a factory system:
- AXAMP-CH3
- INSTALLATION INSTRUCTIONS
- TROUBLESHOOTING
- Final LED Feedback
- Tech Support Hours (Eastern Standard Time)
Brand : Axxess
Model : AXAMP-CH3
Category : Car audio interface