
SBID-6265S-PW - Interactive whiteboard SMART Technologies - Free user manual and instructions
Find the device manual for free SBID-6265S-PW SMART Technologies in PDF.


| Product Type | Interactive Whiteboard |
| Brand | SMART Technologies |
| Model | SBID-6265S-PW |
| Screen Size | 65 inches (diagonal) |
| Dimensions (W x H x D) | Approximately 1490 x 900 x 100 mm |
| Weight | Approximately 50 kg |
| Power Supply | 100-240V AC, 50/60 Hz |
| Power Consumption | Approximately 200 W (typical) |
| Touch Technology | Infrared or capacitive touch (multi-touch supported) |
| Resolution | 1920 x 1080 (Full HD) |
| Connectivity | HDMI, USB, VGA, Audio, Ethernet, Wi-Fi (optional) |
| Included Accessories | Stylus (pen), mounting bracket, power cable, USB cable |
| Compatible Software | SMART Notebook, SMART Ink, other third-party apps |
| Maintenance | Clean with a soft, dry cloth; do not use abrasive cleaners |
| Safety | Handle with care; use professional mounting; keep away from liquids |
| Spare Parts & Repairability | Contact SMART Technologies support; do not attempt self-repair |
| Operating Temperature | 0°C to 40°C (32°F to 104°F) |
| Storage Temperature | -20°C to 60°C (-4°F to 140°F) |
| Certification | CE, FCC, RoHS |
Frequently Asked Questions - SBID-6265S-PW SMART Technologies
User questions about SBID-6265S-PW SMART Technologies
0 question about this device. Answer the ones you know or ask your own.
Ask a new question about this device
Download the instructions for your Interactive whiteboard in PDF format for free! Find your manual SBID-6265S-PW - SMART Technologies and take your electronic device back in hand. On this page are published all the documents necessary for the use of your device. SBID-6265S-PW by SMART Technologies.
USER MANUAL SBID-6265S-PW SMART Technologies
natural_image
Line drawing of a blank rectangular electronic device with ports and buttons, no text or symbols present.SMART Board®
6000S and 6000S Pro series
interactive displays
USER GUIDE
SBID-6265S | SBID-6275S | SBID-6286S | SBID-6265S-PW | SBID-6275S-PW | SBID-6286S-PW
SBID-6065S | SBID-6075S | SBID-6086S | SBID-6065S-PW | SBID-6075S-PW | SBID-6086S-PW
Learn more
This guide and other resources for SMART Board 6000S and 6000S Pro series interactive displays are available in the Support section of the SMART website (smarttech.com/support). Scan this QR code to view these resources on your mobile device.
Licenses
The terms HDMI and HDMI High-Definition Multimedia Interface, and the HDMI logo are trademarks or registered trademarks of HDMI Licensing LLC in the United States and other countries.
The Bluetooth word mark is owned by the Bluetooth SIG, Inc. and any use of such marks by SMART Technologies ULC is under license.
Trademark notice
SMART Board, SMART Notebook, SMART TeamWorks, SMART Meeting Pro, Pen ID, HyPr Touch, Object Awareness, Silktouch, Tool Explorer, smarttech, the SMART logo and all SMART taglines are trademarks or registered trademarks of SMART Technologies ULC in the U.S. and/or other countries. The Bluetooth word mark is owned by the Bluetooth SIG, Inc. and any use of such marks by SMART Technologies ULC is under license. The Adopted Trademarks HDMI, HDMI High-Definition Multimedia Interface, and the HDMI Logo are trademarks or registered trademarks of HDMI Licensing Administrator, Inc. in the United States and other countries. All other third-party product and company names may be trademarks of their respective owners.
Copyright notice
© 2021 SMART Technologies ULC. All rights reserved. No part of this publication may be reproduced, transmitted, transcribed, stored in a retrieval system or translated into any language in any form by any means without the prior written consent of SMART Technologies ULC. Information in this manual is subject to change without notice and does not represent a commitment on the part of SMART.
This product and/or use thereof is covered by one or more of the following U.S. patents:
www.smarttech.com/patents
January 15, 2021
Important information
NOTE
Refer to the SMART Board 6000S and 6000S Pro series interactive displays installation and maintenance guide (smarttech.com/kb/171414) for important information about installing and maintaining the display.

WARNING
- Do not open or disassemble the display. You risk electrical shock from the high voltage inside the Opening the casing also voids the warranty.
- Do not stand (or allow children to stand) on a touch the surface of the display.
- To reduce the risk of fire or electric shock, do the display to rain or moisture.
- Do not insert objects inside the cabinet ventilation because they could touch dangerous voltage point cause electric shock, fire or product damage which not be covered by the warranty.
- Do not place heavy objects on the power cable. to the cable could cause shock, fire, or product which may not be covered by the warranty.
- If the glass is broken, do not touch the liquid prevent injury, handle glass fragments with care disposing of them.
-
Disconnect the display's power cable from the wall and seek assistance from qualified service personne any of the following occur:
-
The power cable or plug is damaged
- Liquid is spilled into the display
- Objects fall into the display
- The display is dropped
Structural damage, such as cracking, occurs - The display behaves unexpectedly when you follow operating instructions
ENERGY STAR®

ENERGY STAR is the government-backed symbol for energy efficiency, providing simple, credible, and unbiased information that consumers and businesses rely on to make well-informed decisions. ENERGY STAR-certified products are
the simple choice for energy efficiency, making it easy for consumers and businesses to make purchases that save them money and protect the environment. The U.S. EPA ensures that each product that earns the label is independently certified to casing deliver the quality, performance, and savings that users have come to expect.
Chair to As shipped, your display delivers ENERGY STAR performance and savings. However, changing some settings may increase not expose energy consumption beyond the limits required for ENERGY STAR certification. For example, increased brightness and
chicast will increase power consumption.
\$please consider the environment when you choose non-ENERGY STARTY settings.
Damage Federal Communication Commission damage interference statement
FCC
Supplier's Declaration of Conformity
47 CFR § 2.1077 Compliance Information
Responsible Party - U.S. Contact Information
SMART Technologies Inc.
2401 4th Ave, 3rd Floor
Seattle, WA 98121
compliance@smarttech.com
This device complies with Part 15 of the FCC Rules. Operation is subject to the following two conditions:
- This device may not cause harmful interference, and
- this device must accept any interference received, including interference that may cause undesired operation.
NOTE
This equipment has been tested and found to comply limits for a Class A digital device, pursuant to part Rules. These limits are designed to provide reasonable
protection against harmful interference when the equipment is Users should also be advised that high-power radars are operated in a commercial environment. This equipment allocated as primary users (i.e., priority users) of the bands generates, uses, and can radiate radio frequency energy 5250-5350 MHz and 5650-5850 MHz and that these radars if not installed and used in accordance with the instruction could cause interference and/or damage to LE-LAN devices.
manual, may cause harmful interference to radio
communications. Operation of this equipment in a residential
area is likely to cause harmful interference in which user will be required to correct the interference at expense.
(iii) the maximum antenna gain permitted for devices in the band 5725-5825 MHz shall comply with the e.i.r.p. limits
specified for point-to-point and non point-to-point operation as appropriate.
Radiation exposure statement
Case the This equipment complies with ISED radiation exposure limits set its own forth for an uncontrolled environment. This equipment should be installed and operated with minimum distance of 20~cm between the antenna of this device and all nearby persons. This transmitter must not be co-located or operated in conjunction with any other antenna or transmitter.

CAUTION
Any changes or modifications not expressly approved I party responsible for compliance could void the user's to operate this equipment.
Restriction
Operations in the 5.15-5.25GHz band are restricted to usage only.
IEEE 802.11b or 802.11g operation of this product in the firmware limited to channels 1 through 13.
Radiation exposure statement
This equipment complies with FCC radiation exposure line forth for an uncontrolled environment. This equipment shall be installed and operated with minimum distance of 20 cm the antenna of this device and all nearby persons. The must not be co-located or operated in conjunction with antenna or transmitter.
Innovation, Science and Economic Development Canada statement
This device complies with RSS-210 of the Innovation, S Economic Development Canada Rules. Operation is subject following two conditions:
- This device may not cause harmful interference, and
- this device must accept any interference received, interference that may cause undesired operation.

CAUTION
(i) the device for operation in the band 5150-5250 M for indoor use to reduce the potential for harmful int to co-channel mobile satellite systems;
(ii) the maximum antenna gain permitted for devices in the bands 5250-5350 MHz and 5470-5725 MHz shall comply with the e.i.r.p. limit; and
EU Declaration of Conformity
Hereby, SMART Technologies ULC declares that the equipment type Interactive Display IDS665-1, IDS675-1, IDS686-1 and the OPS AM50, PCM8, are in compliance with Directive 2014/53/EU.
The full text of the EU declaration of conformity is available at the following Internet address: smarttech.com/compliance
Microsoft® statement regarding Windows® 10 operating system
Windows 10 is automatically updated, which is always enabled. ISP fees may apply. Additional requirements may apply over time for updates.

WARNING
Operation of this equipment in a residential environment could cause radio interference.
The frequency band and the maximum transmitted power in EU are listed below:
| Transmitting Band (MHz) | Maximum Transmit Power dBuV/m @ 10m |
13.56 -9
| Transmitting | Band | (MHz) | Maximum dBm | Transmit | Power |
| 2402–2483.5 | 20 | ||||
| 5150–5350 | 22 | ||||
| 5470–5725 | 22 |
Restrictions in: AT/BE/BG/CZ/DK/EE/FR/DE/IS/IE/IT/EL/ES/CY/LV/LI/LT/LU/HU/MT NL/NO/PL/PT/RO/SI/SK/TR/FI/SE/CH/UK/HR - 5150MHz- 5350MHZ is for indoor use only. Regulatory models: OPS AM50, PCM8
| Transmitting | Band | (MHz) | Maximum dBm | Transmit | Power |
| 2402–2483.5 | 20 | ||||
| 5150–5350 | 22 | ||||
| 5470–5725 | 22 | ||||
| 5745–5875 | 13 |
Contents
Important information...3
Chapter 1: Welcome...8
About this guide 8
About the display 9
Identifying your specific model 14.
Accessories 15
More information 17
Chapter 2: Using basic features...18
Waking up the display and putting it back to sleep 18
Using the Home button...19....
Using the convenience panel 20
Using the remote control 21
Using touch 23
Using the pens and erasers.... 25
Adjusting the volume 27
Freezing or hiding the screen 28
Using additional tools and manipulatives 29
Chapter 3: Using the iQ...apps
Using the Apps Library 34
Using the SMART Sensors app 35
Using the Files Library 35
Using kapp Whiteboard 35
Using SMART Notebook Player 36
Using Browser 36
Using Screen Share 36
Using Input 37
Using screenshots 37
Installing third-party apps 37
Cleaning up the display 37
Chapter 4: Connecting computers and other devices.
Installing and using SMART software 39
Connecting room computers and guest laptops 41
Connecting a SMART OPS PC module 44
Contents
Connecting USB drives, peripherals, and other devices 45
Chapter 5: Troubleshooting...47.
The display isn't turning on 48
The display is turning on when it shouldn't 48.
The screen is blank or there's a problem with the image...on...the...screen...49...
There's no sound or there's a problem with the sound 50
Touch isn't working as expected 51
The pens and erasers aren't working as expected 51.
iQ apps aren't working as expected 52
SMART software on connected computers isn't working as...expected..52....
The SMART OPS PC module isn't working as expected.
Contacting your reseller for additional support......
53
53
Chapter 1
About this guide 8
About the display 9
Touch 10
Writing, drawing and erasing 10
Support for additional pens and tools 10
iQ experience 11
Display 11
Audio 11
Network connectivity 11
Room computers and guest laptops 12
Accessory slot 12
Convenience panel 12
Proximity sensor 13
Ambient light sensor 13
Remote control and IR sensor 13
Temperature and humidity sensors.... 14
Mounting hardware 14
Accessory mounting points 14
Identifying your specific model 14
Accessories 15
Pen accessory kit 15
Tool Explorer-enabled objects and manipulatives 15
SMART OPS PC module 16
SBA-100 projection audio system 16
Stands 16
USB extenders 17
More information 17
This chapter introduces the SMART Board® 6000S and 6000S Pro series interactive displays.
About this guide
This guide explains how to use a SMART Board 6000S or 6000S Pro series interactive display.
Chapter 1
Welcome
This guide is for people who use SMART Board interactive displays. Documentation and resources f those who install and maintain displays is also available (see More information on page 17).
About the display
The SMART Board 6000S or 6000S Pro series interactive display with iQ is the hub of your cla meeting room.
The display includes an extensive set of features and components:

Touch
You can do everything on the display that you can do at your computer—open and close applica meet with others, create new documents or edit existing ones, visit websites, play and manipulate and so on—by touching the display's surface.
You can use an array of gestures within applications, including panning, scaling, rotating and zoomir out.
The display's advanced HyPr Touch™ (Hybrid Precision Touch) with InGlass™ touch technology provides a natural, intuitive writing and touch experience with high accuracy and low latency. In addition, its S ultra-smooth finish allows you to use the display for hours without finger burn.
For more information, see Using touch on page 23.
Writing, drawing and erasing

natural_image
Three electronic devices: two gray rectangular blocks and one red-and-black pen, arranged on a white background (no text or symbols visible)The display comes with a black pen and a red pen that you can use to write or draw on the screen.
The display also includes two erasers, which you can use to erase digital ink.
With Object Awareness, the display responds automatically to the tool or object you're using, whether it's a pen, finger, eraser, or palm. The display's Pen ID and Simultaneous Tool Differentiation technologies allow multiple people to write
independently and simultaneously, using different colored ink.
For more information, see Using the pens and erasers on page 25.
Support for additional pens and tools
The SMART Board 6000S features the Tool Explorer™ platform, which enables you to use other SM authorized pens and tools in addition to those supplied with the display. No additional configuration required — just pick up any Tool Explorer-enabled object such as a pen, object, or manipulative a using it. For more information about using Tool Explorer-enabled object on the display, see Using additional tools and manipulatives on page 29.
For more information about available tool kits, see smarttech.com/accessories.
iQ experience
If enabled, the iQ embedded computer provides one-touch access to collaborative tools, such as a whiteboard, wireless screen sharing, and a web browser. There's no need for wires, cables, or main software and firmware updates.
NOTE
Some features, such as Browser and Screen Share, require a properly configured network connectio

natural_image
Front view of a blank computer monitor with control buttons and a small icon below (no text or symbols on the screen)Press the Home button on the display (pictured) or the remote control to
open the Home screen. From the Home screen, you can open the iQ a switch inputs, and adjust settings.
For more information about the Home button and the Home screen, see Using the Home button on page 19.
For more information about the iQ apps, see Chapter 3: Using the iQ a
on page 34.
Display
The 4K ultra-high-definition LED display provides optimal image clarity and wide viewing angles.
The size of the display varies by model:
Models Size (diagonal)
SBID-6265S, SBID-6265S-PW, SBID-6065S, SBID-6065S-PW 65"
SBID-6275S, SBID-6275S-PW, SBID-6075S, SBID-6075S-PW 75"
SBID-6286S, SBID-6286S-PW, SBID-6086S, SBID-6086S-PW 86"
Audio
The display includes two 20 W integrated speakers, which are designed to provide sound at the room.
Network connectivity
The display requires a network connection for downloading software and firmware updates, and a n of the iQ apps require a network connection as well.
Chapter 1
Welcome
You can connect to a network using Wi-Fi or an Ethernet cable:
• The Wi-Fi module supports both 2.4 and 5 GHz bands.
- The two RJ45 jacks allow you to connect the display and an external device, such as a computer, to a Gigabit Ethernet network.
Room computers and guest laptops
You can connect room computers and guest laptops to the display and view and interact with the
The display comes with SMART software that you can install on connected computers to take full advantage of the display's features while using the connected computers.
For more information, see Connecting room computers and guest laptops on page 41.
Accessory slot
You can install an OPS-compatible device, such as a SMART OPS PC module, in the accessory sl PCM8 series of SMART OPS PC modules provides a complete Windows 10 Pro installation.
For more information about the SMART PCM8 series OPS PC, see SMART OPS PC module on pa
NOTE
Unlike with previous SMART Board interactive displays, the SMART Board 6000S and 6000S Pro interactive displays don't require an AM30, AM40, or AM50 appliance in the accessory slot. The i experience is embedded on these interactive displays (see iQ experience on the previous page). For this reason, SMART doesn't recommend installing AM30, AM40, or AM50 appliances in these displays' accessory slots.
Convenience panel
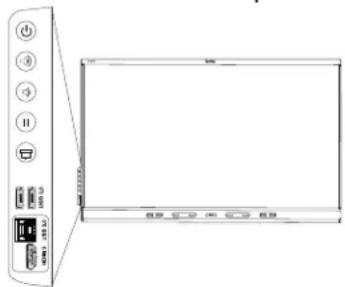
The convenience panel provides buttons for turning the display on and of controlling the volume, freezing and unfreezing the screen, and showing and hiding a screen shade. It also includes connectors for USB peripheral and a computer or other input source.
For more information about the convenience panel, see Using the convenience panel on page 20.
Proximity sensor

The proximity sensor is located in the top-left corner of the display's frame.
The proximity sensor can detect people up to 16' (5 m) away when the display Standby mode.
When the proximity sensor detects people in the room, the display turns on or enters ready mode, depending on how its configured.
If the room is empty for a specified period, the display returns to Standby mode.
For more information, see Waking up the display and putting it back to sleep on page 18.
Ambient light sensor

The ambient light sensor is located in the top left corner of the display's frame.
The ambient light sensor detects the room's brightness and adjusts the brightness of screen accordingly.
You can enable, disable, and adjust this feature. Refer to the SMART Board 6000S 6000S Pro series interactive displays installation and maintenance guide
(smarttech.com/kb/171414) for more information.
Remote control and IR sensor

You can use the remote control to turn the display on and off, adjust display and so on.
The display's IR sensor is located in the top-left corner of the display's frame.
For more information about the remote control, see Using the remote control on page 21.
Temperature and humidity sensors

The display features integrated temperature and humidity sensors that enable real-time measurement and recording of the environmental conditions surrounding the display.
This data is easily accessible using the temperature and humidity app in the display. App library.
NOTE
Temperature and humidity sensors are available only when iQ is enabled.
For more information, see Using the SMART Sensors app on page 35.
Mounting hardware
The display comes with a WM-SBID-200 wall mount, which your organization can use to mount the on a wall.
You can also mount the display on a wall or mobile stand (see Accessories on the next page).
Accessory mounting points
The display features M4 mounting points located at the top, bottom, left, and right for SMART api accessories.
Identifying your specific model
SMART offers a variety of models of the SMART Board 6000S and 6000S Pro series interactive dis
| Model | Frame | style | Screen | size | (approximate) | iQ embedded computing | SMART Notebook® Player | ||
| SBID-6265S | White | 65" | Yes | Yes | |||||
| SBID-6275S | White | 75" | Yes | Yes | |||||
| SBID-6286S | White | 86" | Yes | Yes | |||||
| SBID-6265S-PW | White | 65" | Yes | No | |||||
| SBID-6275S-PW | White | 75" | Yes | No | |||||
| SBID-6286S-PW | White | 86" | Yes | No | |||||
| SBID-6065S | White | 65" | No | No | |||||
| Model | Frame | style | Screen size | (approximate) | iQ embedded computing | SMART Notebook® Player |
| SBID-6075S | White | 75" | No No | |||
| SBID-6086S | White | 86" | No No | |||
| SBID-6065S-PW | White | 65" | No No | |||
| SBID-6075S-PW | White | 75" | No No | |||
| SBID-6086S-PW | White | 86" | No No |
Refer to the specifications for detailed technical information for these models, including product dimensions and weights (see More information on page 17).
Accessories
Accessories for the display include:
- Pen accessory kit
- Tool Explorer-enabled objects and manipulatives
• SMART OPS PC module
• SBA-100 projection audio system - Stands
- USB extenders
NOTE
For more information about these and other accessories, see smarttech.com/accessories.
Pen accessory kit
The pen accessory kit includes blue, green, purple, and orange pens and a holder that you can mount on the side of the display.
Tool Explorer-enabled objects and manipulatives
The display's Tool Explorer platform enables you to use a range of different pens, objects, and manipulatives that are automatically recognized the moment they contact the display's screen.
NOTE
Support for the different pens, objects, and manipulatives varies depending on the model of display. Using additional tools and manipulatives on page 29.
SMART OPS PC module
SMART Open Pluggable Specification (OPS) PC modules provide a hassle-free Windows® 10 Pro installation based on eighth generation Intel® Core™ processors and are designed specifically to work with a SMART display. Available in two standard configurations, all OPS PC modules in the PCM8 series are WHQL certified and fully licensed with Windows 10 Pro. Install the OPS PC module in a display's OPS slot to provide a complete 4K UHD Windows 10 installation at your fingertips, without the need for an external PC or additional cables.
Install familiar Windows applications, such as SMART Notebook®, SMART TeamWorks™, and SMART Meeting Pro® software, and access the internet directly through your display's network connection Upgrades and service for the OPS PC module are easy to perform without removing the display mounting.
NOTE
Refer to an application's specifications for information about its computer requirements.
SBA-100 projection audio system

For education models only
The SBA-100 projection audio system consists of two 14 W speakers designed for wall-mounted displays. You can control volume using the display's convenience panel or the volume controls on a connected computer.
Stands
If you want to move the display from place to place, you can install it on a SMART mobile station installing the display on a wall that cannot support the display's full weight, you can install the cSMART floor stand.
Chapter 1
Welcome
USB extenders
As noted in the display's specifications, there is a maximum length for USB cable connections between display and computer.
When using USB 2.0, the cable should be no longer than 16' (5 m).
When using USB 3.0, the cable should be no longer than 9' (3 m).
Use one of the following USB extenders if you need a longer USB connection:
Extender Specifications
USB-XT smarttech.com/kb/119318
CAT5-XT-1100 smarttech.com/kb/170202
NOTE
For more information about extending USB connections, see USB cable extenders.
More information
SMART provides a variety of other documents for this display in the Support section of the SMART (smarttech.com/support). Scan the QR code on the cover of this guide to view links to SMART Board 6000S and 6000S Pro series interactive display documents and other support resources.
Chapter 2
Waking up the display and putting it back to sleep 18
Using the Home button 19
Using the convenience panel 20
Using the remote control 21
Using touch 23
Using the pens and erasers 25
Writing and drawing in digital ink 25
Using the SMART Ink dynamic (floating)...toolbar.... 26
Changing a pen's default color, thickness, and other properties 26
Erasing digital ink 26
Adjusting the volume 27
Freezing or hiding the screen.... 28
Freezing the screen 28
Showing and hiding the screen shade 28
Using additional tools and manipulatives 29
Using the magic pen 29
Using the highlighter pen 31
Using Tool Explorer cubes 31
Using Tool Explorer stamps 33
Waking up the display and putting it back to sleep
The display's proximity sensor can detect people up to 16' (5 m) away when the display is in S (a full sleep state). Depending on the display's configuration, it turns on or enters Ready mode (a sleep state) when the sensor detects people.
If the display is in Ready mode, you can turn it on in a number of ways:
- Press the Power button on the convenience panel.
- Tap the Home button below the screen.
NOTE
The Home button is illuminated when the display is in Ready mode.
- Press the Home button on the remote control.
- Pick up a pen or the eraser.
If the display is on, it will return to Ready mode when one of the following occurs:
- The sensor detects no motion in the room for 60 minutes.
- You press the Power button on the convenience panel.
The display enters Standby mode 60 minutes after entering Ready mode when the sensor doesn't anyone in the room.
For information about turning off the display, see the SMART Board 6000S and 6000S Pro series interactive displays installation and maintenance guide (smarttech.com/kb/171414).
Using the Home button
You can use the Home screen to open and use iQ apps, view the input of connected computer. You can also change the background and personalize other features of the Home screen. To learn about the Home screen, see Understanding the Home screen.
The Input screen shows thumbnails of connected computers and allows you to switch among inputs
You can return to the Home screen or the Input screen at any time by following the instructions
To show the Home screen or the Input screen
Tap the Home button below the screen.
OR
Press the Home button on the remote control.
Using the convenience panel
The convenience panel contains buttons for turning the display on and off, controlling the volume, and unfreezing the screen, and showing and hiding a screen shade. It also includes connectors for peripherals and a computer or other input source.
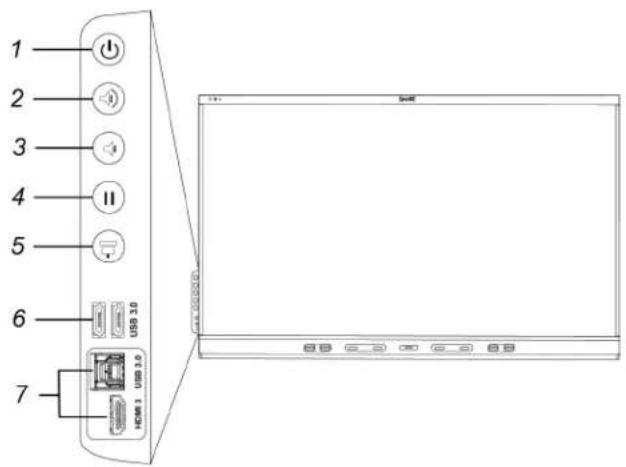
No. Name Procedure
| 1 Power | Press to enter or exit Standby mode (see Waking up the display a putting it back to sleep on page 18).Press and hold for five seconds to turn off the display.Press and hold for 10 seconds to reset the display. | |
| 2 | Volume increase | Press to increase the volume (see Adjusting the volume on page 27). |
| 3 | Volume decrease | Press to decrease the volume (see Adjusting the volume on page 27). |
| 4 | Freeze | Press to freeze and unfreeze the screen (see page 28). |
| 5 | Screen shade | Press to hide screen contents behind a screen shade (see Showing and hiding the screen shade on page 28). |
| 6 USB | Type A connector (×2) | Connect USB drives and other devices that you want to use with t iQ experience or a connected computer (see Connecting USB drives, peripherals, and other devices on page 45). |
| 7 | HDMI 3 input connectors | Connect a computer or other input source to use with the display (see page 41). |
The Power button's color indicates the display's status:
Power button Display status
Off Not receiving power
Amber Standby mode
White Normal operating mode
Using the remote control
The display comes with one of two infrared remote control models. These models are similar, except has a button screen sharing button.
Use the infrared remote control to turn the display on or off, change the input source, change the access the display's iQ apps, and more. You can also use the remote control to open the on-sc and change the display's settings.
IMPORTANT
- Do not subject the remote control to strong shock.
- Keep the remote control away from liquids. If it gets wet, wipe it dry immediately.
- Do not expose the remote control to heat or steam.
- Do not open any part of the remote control other than the battery compartment.
The image and table below list the remote control's functions.
Chapter 2
Using basic features
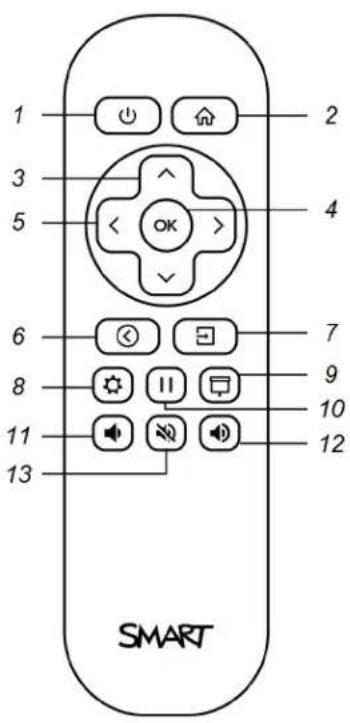

No. Name Procedure
| 1 | Power | Press to enter or exit Standby mode (see Waking up the display a putting it back to sleep on page 18).Press and hold for four seconds to turn off the display.Press and hold for 10 seconds to reset the display. |
| 2 | Home Open the Home screen or the Input screen (see Using the Home button on page 19). | |
| 3 | Up and down buttons | Select a menu option in the settings. |
| 4 | OK Select menu option in the settings. | |
| 5 | Left and right buttons | Change the value of the selected setting. |
| 6 | Back Go one step back in the navigation history. | |
| 7 | Input | Switch input sources (see Viewing a connected computer's input on page 42). |
| 8 | Settings Open iQ Settings. | |
| 9 | Screen shade | Hide screen contents behind a screen shade (see Showing and hiding the screen shade on page 28). |
| 10 | Freeze frame | Freeze and unfreeze the screen (see page 28). |
| 11 | Volume increase | Increase the volume (seeAdjusting the volume on page 27). |
| 12 | Volume decrease | Decrease the volume (seeAdjusting the volume on page 27). |
| 13 | Volume mute | Mute the volume (seeAdjusting the volume on page 27). |
| 14 | Share screen | Open the Screen Share app (seeSharing your device's screen to the display). |
| NOTEThis button is not available on all remote control models. | ||
Using touch
You can do everything on the display that you can do at your computer—open and close applica meet with others, create new documents or edit existing ones, visit websites, play and manipulate and so on—by touching the display's surface.
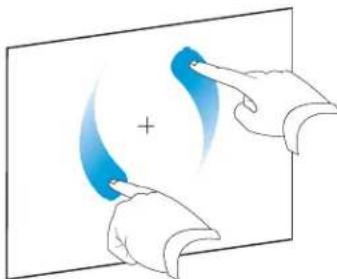
You can use a variety of gestures within applications, including panning, scaling, rotating, and zoom and out.
The display's support for up to 20 simultaneous interaction points enables you and others to interact objects on the screen at the same time.
NOTE
Not all gestures work in all applications. Refer to an application's documentation to learn which get it supports.
Pan (one finger) Pan (two fingers) / scroll

natural_image
Illustration of a hand pointing at a four-petal flower with blue gradient petals (no text or symbols)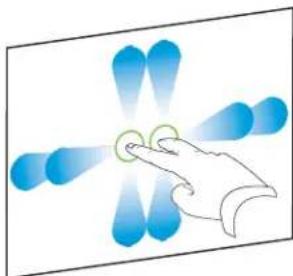
natural_image
Hand interacting with a blue flower-shaped icon (no text or symbols)Pinch to zoom in / scale (enlarge) Pinch to zoom out / scale (reduce)

natural_image
Illustration of two hands pointing at a screen with three green circles and blue triangular highlights (no text or symbols)
natural_image
Illustration of two hands interacting with a touchscreen display (no text or symbols)Rotate Flick
natural_image
Illustration of two hands pointing at a curved interface with a plus sign, no text or symbols present
natural_image
Simple line drawing of a hand holding a circular object with green motion arrows (no text or symbols)Chapter 2
Using basic features
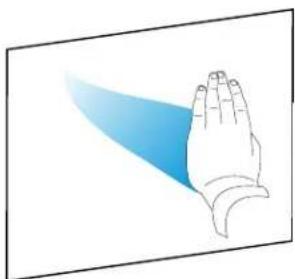
Erase with palm Erase with fist
natural_image
Line drawing of a human hand with a blue highlight on the palm (no text or symbols)
natural_image
Illustration of a blue ribbon with a white hand, no text or symbols presentUsing the pens and erasers
The display comes with a black pen, a red pen, and two erasers. You can use the pens to w digital ink on the display, and you can use the erasers—or your palm or fist—to erase digital ink
The display has magnetic holders for the pens and erasers at the bottom of the display's frame. pens and erasers to their holders when you're done with them.

CAUTION
When you return a pen to the magnetic holder, make sure it's centered in its holder to keep and being damaged.
Writing and drawing in digital ink
Several people can write or draw on the screen at the same time. Each pen writes and draws color. The Pen ID ^TM feature lets you assign different colors, thicknesses, and other properties to each

IMPORTANT
Use only pens designed for SMART Board 6000S and 6000S Pro series interactive displays (see smarttech.com/kb/171230).
To write or draw in digital ink
- Pick up one of the display's pens.
- Write or draw in digital ink on the screen.
TIP
- To learn how to change a pen's default behavior, see Changing a pen's default color, thickness, and other properties below.
- Before writing or drawing over a video, an animation, or other moving images, freeze the screen (see Freezing the screen on page 28).
Using the SMART Ink dynamic (floating) toolbar
If you pick up a pen while viewing a connected computer's input, the SMART Ink® dynamic (floating) toolbar for SMART Ink appears on the screen. use this toolbar to temporarily change the pen's color, thickness, or properties, you can also access SMART Ink's tools, such as screen spotlight, screen shade, and so on.
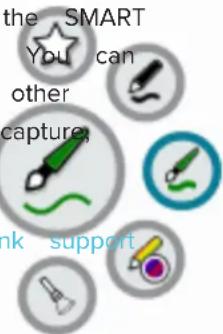
To learn more about SMART Ink and its toolbar, visit the SMART page. Here are a few quick links to get you started:
- Turning SMART Ink on or off
- Opening the dynamic (floating) toolbar
- Closing (hiding) the toolbar
• Using SMART Ink presentation tools
Changing a pen's default color, thickness, and other properties
While you're viewing a connected computer's input, you can use the SMART Ink dynamic (floating) to change a pen's color, thickness, and other properties.
To change the pen's default color, thickness, and other properties, see Changing pen, eraser, and button settings.
Erasing digital ink

CAUTION
When you return an eraser to a magnetic holder, make sure it's centered in its holder to keep falling and being damaged.
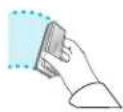
You can erase digital ink from the screen using an eraser or your palm or fist:
Chapter 2
Using basic features
Move a pen's eraser over digital ink to erase.

OR
Move the eraser over digital ink to erase.
OR
Move your palm or fist over digital ink to erase.

Adjusting the volume
Use the buttons on the convenience panel or the remote control to increase, decrease, or mute it display's volume.
NOTE
See There's no sound or there's a problem with the sound on page 50 if you encounter issues with the display's sound.
To turn the volume up or down
Press the Volume Up or Volume Down button on the convenience panel or the remote control.
NOTES
- Press and hold the Volume Down button to rapidly decrease the volume.
- When you press the Volume Up or Volume Down button on the convenience panel or the remote control, you can use the on-screen slider to adjust the volume.
To mute the volume
Press the remote control's mute button.
TIP
You can also mute the volume by pressing and holding the Volume Down 📋 button on the convenience panel or the remote control, until the screen slider reaches its lowest position.
Freezing or hiding the screen
You can temporarily freeze or hide the contents on the screen using the display's freeze and scr features.
Freezing the screen
You can temporarily freeze the screen by pressing the Freeze11 button on the convenience panel or
remote control. This is particularly useful when you want to pause a video, an animation, or other images.
NOTE
Freezing the screen does not pause applications that are running on the connected computer. It is freezes the display of those applications.
TIP
You can write or draw over the screen while it is frozen (see Writing and drawing in digital ink on
page 25). If the iQ experience is enabled, you can then save the screenshot of your writing or the Files Library (see Using the iQ experience Files Library).
To unfreeze the screen, press the Freeze button again.
Showing and hiding the screen shade
You can temporarily hide the contents of the screen behind a virtual screen shade by pressing the Screen
Shade button on the convenience panel or remote control.
To remove the screen shade and reveal the screen contents, press the Screen Shade button again.
Using additional tools and manipulatives
The SMART Board 6000S or 6000S Pro series interactive display's Tool Explorer platform enables y use a range of different pens, objects, and manipulatives that are automatically recognized the mom they contact the display's screen. The entire screen can recognize a Tool Explorer-enabled object automatically, so there's no need to select a tool type before you use a tool or manipulative.
NOTES
- The tools work best when they're separated by at least 4 or 5 inches (10–15 cm). If the pens, stamps, or cubes are too close to each other, you might experience an error or unexpected behavior. Performance may vary with different tools and different sizes of display.
- Support for the different pens, objects, and manipulatives varies depending on the model of display, as described in the following descriptions of each tool.
TIP
For information about cleaning the Tool Explorer platform-enabled pens, objects, and manipulatives, se cleaning-and-maintaining.htm.

For education
The Tool Explorer platform lets teachers and students manipulate real -world objects that are autom recognized by the display, combining the learning benefits of manipulatives with the flexibility and scalability of digital materials. Kinesthetic and tactile learners can get the hands-on activity and fine experiences they need to explore, learn and retain.
By creating tool sets for different subjects, learning needs, and abilities, teachers can also quickly | multiple pathways through lessons.
Using the magic pen
Use the magic pen to write or draw digital ink that fades after a few seconds. You can write any input or content as the magic pen isn't limited to a specific application.
You can also use the magic pen to open a spotlight or magnification window to focus attention area of the screen.
NOTE
The magic pen is supported on SMART Board 6000S and 6000S Pro displays with iQ system soft 3.6 or later.
To use the magic pen to write or draw ink that fades
-
Pick up the magic pen.
-
Use the "nib" end of the pen to write in magic ink.

natural_image
Blue ink brush with a wavy line drawing (no text or symbols)To use the magic pen to spotlight or magnify screen content
-
Pick up the magic pen.
-
Use the gesture end of the pen to draw a circle or rectangle around the portion of the set to spotlight or magnify.

After the spotlight appears, you can:
- Press and hold within the spotlight and drag to move it.
- Press and hold the spotlight's edge and drag toward or away from the center to make a spotlight larger or smaller.
Tap the magnifier icon to double the size of the spotlighted screen area.
When you're done with the spotlight, tap Close.
Using the highlighter pen
Use the highlighter pen to emphasize text in supported applications, such as the iQ whiteboard, SI Notebook Player, and SMART Notebook desktop.
NOTE
The highlighter is supported on SMART Board 6000S displays with iQ system software 3.6 or later.
To use the highlighter pen
- Pick up the highlighter pen.
- Use the pen to highlight text or an object.

The pen is reversible: you can use one end to highlight in yellow and the other end to high green.
Using Tool Explorer cubes
On an iQ enabled display, you can use the Tool Explorer-enabled cubes to add content to a wh lesson you start or open in the Player app.
The cubes feature a different shape, number, image, and more, on each of their six faces. When cube's face on the display's screen, the image is inserted as an object. You can then move, res and delete the object.
NOTE
The cubes are supported on SMART Board 6000S displays with iQ system software 3.6 SP3 or la
To insert an object using a Tool Explore cube
- Pick up a cube.
- Tap the cube face that features the image you want on the display's screen.
The image is inserted as an object.
TIP
The inserted object can be made smaller by tapping a portion or corner of a cube's face (screen.

natural_image
Two 3D cube icons with red and green symbols, one with a blue circular arrow above it, the other with a red circle below (no text or labels)To move, resize, and rotate an object
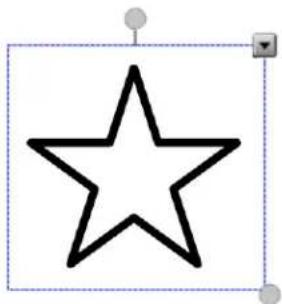
- Tap the object you want to manipulate.
A selection rectangle appears around the object.
natural_image
Simple black outline of a five-pointed star inside a dashed square frame (no text or symbols)-
To manipulate the object, you can:
-
drag the object to a new position on the screen.
- drag the object's resize handle (bottom right circle) to make the object larger or smaller.
- drag the object's rotation handle (top circle) in the direction you want to rotate the object
- delete an object by pressing the object's menu arrow, and then tapping Delete.
To delete an object
- Tap the object.
A selection rectangle appears around the object.
- Press the object's menu arrow, and then select Delete.
Chapter 2
Using basic features
Using Tool Explorer stamps
Tool Explorer stamps feature a single shape, number, image, and more, that is inserted as an obj you tap the stamp's face on the display's screen. You can move, resize, rotate, delete the object. are ideal for younger children and early learners.
TIP
You can store the stamps in place of the erasers at the bottom of the display's frame. Two cu each magnetic holder.
NOTE
The stamps are supported on SMART Board 6000S displays with iQ system software 3.6 SP3 or I
To insert an object using a Tool Explorer stamp
-
Pick up a stamp.
-
Tap the stamp's face on the screen.
The image on the stamp is inserted as an object.
TIP
The inserted object can be made smaller by tapping a portion or corner of the stamp's face screen.

natural_image
Illustration of a hexagonal box with red hearts, next to a pair of red hearts above it (no text or symbols)To move, resize, rotate, or delete an object
See To move, resize, and rotate an object on the previous page and To delete an object on the previous page.
Chapter 3
The display comes with the following iQ apps:
• SMART Notebook Player
- Browser
- Input
- Screen Share
- kapp Whiteboard
You can use these apps along with the Files Library and Apps Library to deliver lessons in a c coordinate meetings and other collaborative activities.
NOTE
Some apps, such as Screen Share, require a properly configured network connection. If you're experiencing issues with these apps, contact your IT administrator to make sure the network and have been properly configured.
Using the Apps Library
The Apps Library contains the Browser, SMART Notebook Player, and kapp Whiteboard apps. You can add apps from the web and SMART's app store or install third-party apps.
NOTE
SMART Notebook Player is available on education models only.
To open the Apps Library
From the Home screen, tap Apps Library.
To learn how to use the other features of Apps Library, see Adding and managing apps in the experience.
Using the SMART Sensors app
The SMART Sensors app shows the ambient temperature and humidity in the classroom or meeting
To show the temperature and humidity
- From the Home screen, tap Apps Library
- Tap SMART Sensors.
Using the Files Library
The Files Library contains kapp Whiteboard sessions, whiteboards, SMART Notebook files that have been shared with the display, PDFs, and screenshots. If a USB drive is connected to the display, the USB drive are also available in the Files Library. Although these files can be viewed on the display, not saved on the display.
NOTE
SMART Notebook Player is available on education models only.
To open Files Library
From the Home screen, tap Files Library.
To learn how to use the other features of Files Library, see Using the iQ experience Files Library.
Using kapp Whiteboard

For Pro models only
Use the kapp Whiteboard to write and erase notes on the display just as you do on a tradition board. You can also save your notes for later and share them using the SMART kapp® app. The Whiteboard app is the default whiteboard for enterprise models.
To learn how to use the display's pens and eraser to write, draw, and erase in kapp Whiteboard, see Using the pens and erasers on page 25.
To learn how to use the other features of kapp Whiteboard, see Using the kapp Whiteboard.
Using SMART Notebook Player

For education models only
Use SMART Notebook Player to open, view, and interact with SMART Notebook software files. Notebook Player makes it easy to present SMART Notebook files and play SMART lab™ activities on the displ SMART Notebook Player is also the default whiteboard for education models.
You can install the Notebook Player app on your iOS and Android devices to view and control. Notebook files from the device.
To learn more about SMART Notebook Player, see Using the Player app to deliver lessons.
Using Browser
You can use Browser to view web sites on the display.
To learn more about Browser, see Browsing the internet on your display.
Using Screen Share
You can share the screens from computers and mobile devices on the display wirelessly using Scr Share.
Screen Share supports:
- Chromebook™ laptops, using the Chrome™ browser
- Windows computers, using MiracasChrome browser, or AirParrot
• Mac computers and iOS devices, using AirPlay - Android™ devices, using Cast Screen
You can also download the SMART Screen Share app for Chromebooks, Windows computers, Mac computers, iOS devices, and Android devices.
To learn how to use the other features of Screen Share, see Sharing your device's screen to the display.
Using Input
You can use the connectors the display to connect a room computer, guest laptops, and other in sources.
To learn how to connect computers to the display and view their video output, see Viewing a connected computer's screen.
Using screenshots
When using the Browser or Screen Share apps, you can write or draw on a screenshot and save Files Library.
To learn more about screenshots, see Writing and drawing over content and saving as screenshots in the iQ experience.
Installing third-party apps
You can install third-party apps from the Google Play Store using SMART Remote Management.
To learn more about installing third-party apps, see Adding and managing apps in the iQ experience.
Cleaning up the display
After you've finished using the display, tap Clean Up the next user.

on the Home screen to clean up the display for
• For education models:
- Saves the whiteboard to the Files Library
- Saves the SMART Notebook file to the Files Library
-
Erases the whiteboard
-
For enterprise models, saves the kapp Whiteboard to the Files Library (if saving to the Library is enabled in Settings)
- Resets Browser (clears the browser history, cache, cookies and closes all open tabs, and opens a new tab)
- Removes all tiles under Recent
- Closes all applications, including third-party apps.
Chapter 3
Using the iQ apps
To learn more, see About the iQ experience and navigating the Home screen.
devices
| Installing and using SMART software 39 | |
| Downloading and installing SMART software 40 | |
| Using SMART software 41 | |
| Connecting room computers and guest laptops 41 | |
| Viewing a connected computer's input | 42 |
| Setting a connected computer's resolution and refresh rate | 43 |
| Using recommended cables | 43 |
| Connecting USB drives, peripherals, and other devices | 44 |
| Troubleshooting connected computers | 44 |
| Connecting a SMART OPS PC module | 44 |
| Viewing the OPS PC module input | 45 |
| Connecting external displays | 45 |
| Connecting USB drives, peripherals, and other devices | 45 |

WARNING
Ensure that any cables that cross the floor to the display are properly bundled and marked to a hazard.
Installing and using SMART software
The display comes with the following software, which you can install on connected computers:
| Software | Description | Notes |
| SMART Learning Suite | A suite of desktop and online software. combines lesson delivery, activities, assessments, and collaborative workspaces. Includes SMART Notebook software and SMART Learning Suite Online. | Education models only. SMART Notebook basic version also available. |
| Software Description | Notes | |
| SMART TeamWorks room edition | Software that simplifies meetings and facilitates deeper, more natural interaction with on-site and remote participants. | Pro models only. |
| SMART Meeting Pro | Software that enables you to capture ideas in a virtually unlimited interactive workspace. | Models only. |
| SMART Product Drivers | Software that enables the computer to include input from the display. | with SMART Learning Suite, SMART TeamWorks, and SMART Meeting Pro software |
| SMART Ink Software | that enables you to write and draw in digital ink over applications, files, folders, websites, and any other open window. | Included with SMART Learning Suite, SMART TeamWorks, and SMART Meeting Pro software |
| SMART Remote Management | Cloud-based mobile device management N/A software for remotely maintaining, supporting, controlling, and securing the display and your other devices. |
TIP
You can purchase additional licenses or subscriptions to SMART software to install on other compu
Contact your authorized SMART reseller (smarttech.com/where) for information about purchasing SMART software.
Downloading and installing SMART software
You can download SMART software from smarttech.com/downloads and install it following the instructions in Installing and maintaining SMART Notebook, Downloading and installing SMART TeamWorks, or Installing and maintaining SMART Meeting Pro.
Chapter 4
Connecting computers and other devices
Using SMART software
For information about using SMART software, see the following pages in the Support section of the website:
• SMART Notebook
• SMART Learning Suite Online
• SMART Learning Suite
• SMART TeamWorks
• SMART Meeting Pro
• SMART Product Drivers
- SMART Ink
• SMART Remote Management
Connecting room computers and guest laptops
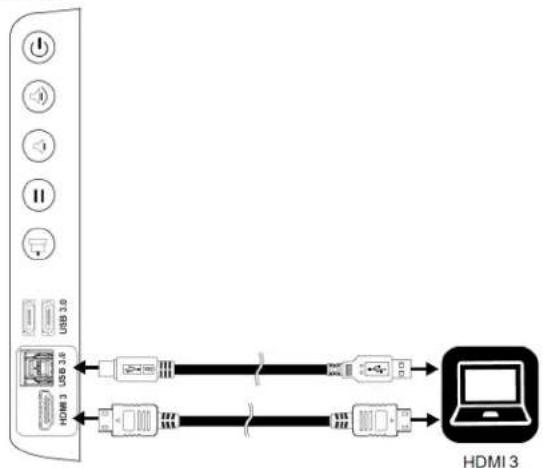
You can connect room computers and guest laptops to the display to view and interact with then
Connector panel Convenience panel

flowchart
graph TD
    A["Internal Media"] --> B["Internet"]
    B --> C["Ethernet"]
    C --> D["HDMI 1"]
    C --> E["HDMI 2"]
    B --> F["Internet"]
    F --> G["Ethernet"]
    G --> H["HDMI 1"]
    G --> I["HDMI 2"]
    J["VGA"] --> K["Computer"]
    K --> L["Device"]
    L --> M["Switch"]
    M --> N["Switch"]
    N --> O["Switch"]
    O --> P["Switch"]
    P --> Q["Switch"]
    Q --> R["Switch"]
    R --> S["Switch"]
    S --> T["Switch"]
    T --> U["Switch"]
    U --> V["Switch"]
    V --> W["Switch"]
    W --> X["Switch"]
    X --> Y["Switch"]
    Y --> Z["Switch"]
NOTES
- Install SMART software on computers you connect to the display (see Installing and using SMART software on page 39).
- Your organization's installers might have connected cables to the display and run the cables behind a wall or under the floor to a desk or table where you can place your computer.
Viewing a connected computer's input
Use the Input app to view a connected computer's input on the display.
To view a connected computer's input
- Connect the computer to the display.
- Do one of the following:
If iQ is enabled If iQ is disabled
Tap the Home button below the screen, Tap the Home button below the screen. and then tap Input. OR OR Press the Home button or the Input button Press the Input button on the remote control.
- On the Home menu, tap the source icon to open the All Source menu
On the remote control, press the source button to open the All Source menu.
The display shows thumbnails of the devices that are connected to the display:
- A gray thumbnail indicates no device is connected to an input.
- A blue thumbnail indicates a device is connected to an input but is in Sleep mode.
- A thumbnail showing a preview screen indicates an active device is connected to an input.
TIP
If iQ is disabled and you want a computer's input to appear whenever you wake up the di the star in the upper-left corner of the computer's thumbnail.
- Tap the computer's thumbnail.
Setting a connected computer's resolution and refresh rate
This table presents the recommend resolutions and refresh rates for the display's inputs:
| Input source | Resolution | Refresh rate |
| HDMI | 1 | 3840 × 2160 | 60 Hz |
| HDMI | 2 | 3840 × 2160 | 60 Hz |
| HDMI | 3 | 3840 × 2160 | 60 Hz |
| VGA | 1920 × 1080 | 60 Hz |
If possible, set connected computers to these resolutions and refresh rates. See the computers' open system documentation for instructions.
Using recommended cables
SMART recommends the following varieties of cable:
| Cable type | Maximum length | Recommendation |
| HDMI | 23' (7 1 m) | Use only certified HDMI cables that have been tested to support the performance standard you require. |
| VGA | 23' (7 m) | Use VGA cables with all pins in their connectors fully populated and wired. |
| Stereo 3.5 mm | 20' (6 m) | [N/A] |
| USB 2.0 | 16' (5 m) | Use a USB extender if the distance between the computer and the display is greater than 16' (5 m). For more information, see USB extenders on page 17. USB 2.0 cables support Hi-Speed (480 Mbps), whether connected to a USB 2.0 or USB 3.0 receptacle. For SuperSpeed (5 Gbps), connect a USB 3.0 cable to a USB 3.0 receptacle. |
| USB 3.0 | 9' (3 m) | SMART supports only installations that use directly connected video and USB cables, AC-powered extenders, or USB extenders purchased from SMART. You might be able to use higher-grade cables that are longer than specified. If you have problems with such a cable or an extender of any type, test the connection with a shorter cable before contacting SMART Support. |
Using cables that exceed these maximum lengths may produce unexpected results, degraded picture quality or degraded USB connectivity.
Connecting USB drives, peripherals, and other devices
You can use USB drives, peripherals, and other devices with a computer connected to the display display's USB plugs.
For more information, see Connecting USB drives, peripherals, and other devices on the next page.
Troubleshooting connected computers
For troubleshooting information for connected computers, see Chapter 5: Troubleshooting on page 47.
Connecting a SMART OPS PC module
If your organization has purchased a SMART OPS PC module, you or your organization's installers can install the OPS PC module in the display's accessory slot following the OPS PC module's installation instructions
(smarttech.com/kb/171544). You can then view the OPS PC module's input on the display.
For more information about the PCM8 series of SMART OPS PC SMART OPS PC module on page 16.


CAUTION
Do not install the OPS PC module or remove it from the accessory slot while the display is tu Ensure the power switch on the back of the display beside the AC power inlet is in the OFF
TIP
You can install the SMART software that is included with the display on the OPS PC. For more on installing software, see Installing and using SMART software on page 39.
Viewing the OPS PC module input
To view the OPS PC module input
- Do one of the following:
| If iQ is enabled If iQ is disabled | |
| Tap the Home button below the screen, Tap the Home button below the screen. and then tap Input . OR OR Press the Home button or the Input button on the remote control. | |
| Press the Input button on the remote control. | |
On the Home menu, tap the source icon to open the All Source menu
On the remote control, press the source button to open the All Source menu.
A screen appears, showing thumbnails of the inputs connected to the display, including the OP's module.
TIP
If iQ is disabled and you want the OPS PC module's input to appear whenever you wake i display, tap the star in the upper-left corner of the OPS PC module's thumbnail.
- Tap the OPS PC module input.
Connecting external displays
You can connect an external display to duplicate or extend the OPS PC module's desktop.
For more information, see the SMART Board 6000S and 6000S Pro series interactive displays installation and maintenance guide (smarttech.com/kb/171414).
Connecting USB drives, peripherals, and other devices
The display includes two USB 3.0 Type-A plugs on the convenience panel and one USB 3.0 Type-on the connector panel. You can connect USB drives, peripherals (such as keyboards), and other of these connectors and use the devices with the iQ experience, connected computers, and devices in the accessory slot (such as the SMART OPS PC).
Chapter 4
Connecting computers and other devices

NOTE
If a SMART OPS PC module is installed in the accessory slot, you can connect USB drives, peripherals, and other devices to the USB 2.0
Type-A, USB 3.0 Type-B, and USB Type-C receptacles on the OPS
PC module to access those devices from the OPS PC module input.

Chapter 5
The display isn't turning on 48
The display is turning on when it shouldn't 48
The screen is blank or there's a problem with the image on the screen 49
There's no sound or there's a problem with...the...sound...50.
Touch isn't working as expected 51
The pens and erasers aren't working as expected 51
iQ apps aren't working as expected 52
SMART software on connected computers isn't working as...expected.... 52
The SMART OPS PC module isn't working as expected 53
Contacting your reseller for additional support 53
This chapter explains how to resolve a variety of common issues with the display and optional SM PC module. If your specific issue isn't described here or the solutions to the symptoms don't work the SMART knowledge base for additional troubleshooting information.
https://community.smarttech.com/s/topic/OTOU0000000kAJ0OAM/interactive-displays?language=en_US&tabset-7ccc8=2
The display isn't turning on
Symptom Troubleshooting steps
The power light isn't lit.
• Make sure the power cable is securely fastened to the power outlet and the display.
NOTE
If the power cable is connected to a power bar, make sure the power bar is set fastened to the power outlet and turned on.
• Make sure the switch beside the AC power inlet is in the ON (I) position.
• Make sure the power outlet is working by testing it with a different device.
• Make sure the power cable is working by testing it with a different device.
The power light is lit, but the screenness is the Power button on the convenience panel or the remote control. blank. • Make sure the proximity sensors aren't blocked.
- Make sure the proximity sensors aren't blocked.
- Restart the display.
• Determine if the problem is with the video.
See The screen is blank or there's a problem with the image on the screen on the next page.
The display is turning on when it shouldn't
Symptom Troubleshooting steps
The display turns on or enters mode when it shouldn't.
Readcheck for and, if possible, move the display away from the following:
- Direct sunlight
- Bright lights
- Forced air ducts
- Plasma displays
- Infrared audio systems and other infrared sources
- Polished floors, glass walls, or other reflective surfaces
- Be aware that the proximity sensors' range is 16' (5 m).
The screen is blank or there's a problem with t image on the screen
Symptom Troubleshooting steps
The screen is blank.
- Make sure the screen is working by tapping the Home button — below the screen or pressing the Home button on the remote control to open the Home screen.
- Make sure any connected computers are on and not in Sleep mode.
- Restart the display and any connected computers.
- Replace the video cables connecting any computers to the display to determine if the issue is with the cables.
A computer is connected to the display, but only a connection message appears on the screen.
• Make sure the computer is connected to the currently selected input.
- If the currently selected input is a computer, make sure the computer is not in Sleep mode.
The image on the screen is distorted OR
Tap the Home button — below the screen or press the Home button 📤 on the remote control to open the Home screen. If it appears correctly, the issue is with the
There are lines, snow or, other noise on the screen.
visualvideo input.
OR
- Switch to a different input and then back to the first input.
The image if flickering or flashing.
• Make sure any connected computers are on and not in Sleep mode.
OR
- Restart the display and any connected computers.
The image is dim.
- Set any connected computers' resolution and refresh rate to values that the display supports.
See Setting a connected computer's resolution and refresh rate on page 43.
- Replace the video cables that connect any computers to the display to determine if the issue is with the cables.
There are bright spots on the screen
Tap the Home button — below the screen or press the Home button 📂 on the remote control to open the Home screen. If it appears correctly, the issue is with the video input.
Colors don't appear correctly.
- Take a photograph of the screen and send it to SMART support. If SMART support determines that the issue is with the screen and the display is under warranty, you be eligible for a replacement.
- Be aware that if two or more displays are mounted side-by-side, there could be minor differences in colors across the displays. This issue is not unique to SMART products.
- If the screen is completely lacking one color on the screen or the color problems occur on the Home screen, see Contacting your reseller for additional support on page 53.
- If you're using a VGA video input, use a different cable or connect a different source to see if the issue is with the cable or input source.
The image is cut off or shifted left or right.
to Adjust any connected computers' video settings, particularly zoom, crop, and underscan.
See the computer's operating system documentation.
- If any connected computers' desktops are entirely black, change them to dark gray or a different color.
- If any connected computers' desktops are extended across multiple screens, duplicate the desktops across the screens or set the display as the only screen.
Symptom Troubleshooting steps
The image doesn't fill the entire screen.
- Adjust any connected computers' video settings, particularly overscan. See the computer's operating system documentation.
- Make sure the connected computer's video connector is configured to output a supported video signal. See No video display output from a laptop.
A persistent image appears on the display.
See Image persistence or burn in on LCD displays.
There's no sound or there's a problem with the
Symptom Troubleshooting steps
There's no sound.
OR
There is sound, but the volume is OR
The sound is distorted or muffled.
- If you're using an external audio system, make sure it is turned on.
- Make sure the cables connecting the display to the computer are securely fastened.
NOTES
The display's stereo 3.5 mm in connector works with the VGA input only.
- Connecting an audio cable to the display's stereo 3.5 mm out connector disables the internal speakers.
If you're using the display's S/PDIF out connector to connect a sound bar or receiver for external speakers, see the SMART Board 6000S series interactive displays installation and maintenance guide (smarttech.com/kb/171414).
- If you're using the display's stereo 3.5 mm out connector, adjust the volume on the display and the connected computer and make sure neither are muted.
- If you're using the display's S/PDIF out connector, adjust the volume on the external audio system and make sure the audio system isn't muted.
- Adjust the display's audio settings.
- If you're using the integrated speakers, set the volume for the computer and any running applications to 80% , and then adjust the display's volume.
OR
If you're using an external audio system, set the volume for the computer, any running applications and the display to 80% , and then adjust the external audio system's volume.
There is a whine or buzzing sound Be aware that these sounds are normal. All displays emit some electrical noise. Such coming from the back of the displaysounds may be more noticeable with some displays than with others. However, if you hear noise from the front of the display, further investigation is required.
- Connect all devices to the same power outlet or power bar.
Touch isn't working as expected
Symptom Troubleshooting steps
The display doesn't respond to touch.
- Make sure SMART Product Drivers 12.14 or later are installed and running on any connected computers.
- Make sure the USB cable between the display and the computer doesn't exceed the supported maximum cable length. See Using recommended cables on page 43.
- Make sure any connected computers have detected the display's USB connection and SMART Product Drivers 12.14 or later is installed.
- On Windows computers, open Device Manager and make sure there is no red X or yellow explanation mark (!) over the display's icon.
- On Mac computers, open System Information and make sure there are no error messages in the display's row.
- For Mac computers with macOS Mojave, see How to resolve issues with installing and using SMART Learning Suite software on macOS Mojave.
The display responds to touch intermittently.
OR
- Restart the display.
- Make sure SMART Product Drivers and SMART Ink are installed and running on any connected computers.
When you touch the screen, the Confirm with the installers that the computer is connected to the display with only a pointer doesn't appear in the correct single cable.
place.
- Remove infrared sources, such as incandescent or arc lights, desk lamps, and infrared audio devices, or move the display to another location in the room.
- Remove any USB extenders to help isolate the USB cable.
- Update the firmware.
The pens and erasers aren't working as expected
Symptom Troubleshooting steps
The display doesn't respond to touch. Make sure any connected computers have detected the display's USB connection and or writing with a pen. SMART Product Drivers 12.14 or later is installed.
- On Windows computers, open Device Manager and make sure there is no red X or yellow explanation mark (!) over the display's icon.
- On Mac computers, open System Information and make sure there are no error messages in the display's row.
- Reinstall or update SMART Product Drivers and SMART Ink on any connected computers.
• Make sure SMART Product Drivers is version 12.14 or later.
The display responds to touch but • reinstall or update SMART Product Drivers and SMART Ink on any connected to writing with a pen. computers.
Symptom Troubleshooting steps
When you write on the screen, the Restart the display.
appears in the wrong place. OR
Writing is intermittent. OR
Ink disappears as you write. OR
Ink colors change unexpectedly.
- Confirm with the installers that the computer is connected to the display with only a single cable.
- Make sure SMART Product Drivers and SMART Ink are installed and running on any connected computers.
- Use a known working pen from another display to check if the issue is being cause the pen.
- Remove infrared sources, such as incandescent or arc lights, desk lamps, and infrared audio devices, or move the display to another location in the room.
- Update the firmware.
You change the width or color of. Be aware that a pen's color and thickness revert to the pen's default values when y pen's digital ink, but the width and place the pen back in its holder.
color revert to the pen's defaults when you can change the pen's default color and thickness through SMART Product Drivers you next pick up the pen from its (see Changing pen, eraser, and button settings).
holder on the display.
You can't write or draw in MicrosoftMake sure Microsoft Office 2013 or later is installed.
Office.
• Reinstall or update SMART Product Drivers and SMART Ink.
iQ apps aren't working as expected
Symptom Troubleshooting steps
iQ apps aren't working as expected.
See Troubleshooting the IQ experience.
SMART software on connected computers isn't working as expected
Symptom Troubleshooting steps
SMART Notebooksoftware isn't working as expected.
See Troubleshooting SMART Notebook.
SMART Learning Suite Online isn't working as expected.
See Troubleshooting common issues in SMART Learning Suite Online.
SMART TeamWorks software isn't working as expected.
See Troubleshooting SMART TeamWorks.
SMART Meeting Pro software isn't working as expected.
See Basic troubleshooting for SMART Meeting Pro.
SMART Ink isn't working as expected.
See Troubleshooting SMART Ink.
SMART Product Drivers isn't working as expected.
See Troubleshooting SMART Product Drivers.
The SMART OPS PC module isn't working as expected
Symptom Troubleshooting steps
The on-screen keyboard isn't visible.
- Enable the on-screen keyboard:
a. Select Start > Settings.
The Settings window appears.
b. Tap Ease of Access, and then tap Keyboard.
c. Enable Use the On-Screen Keyboard.
For more information, see Use the On-Screen Keyboard (OSK) to type.
- Enable tablet mode:
Tap the notification icon in the bottom-right corner of the screen and then select Tablet mode.
For more information, see Turn tablet mode on or off.
Windows 10 or the OPSPC module unresponsive.
Restart the OPS PC module:
a. Press and hold the power button on the OPS PC module.
b. Wait two minutes.
c. Press the power button to turn on the OPSPC module.
- If restarting the OPS PC module doesn't resolve the issue, contact SMART support.
There is an issue with Bluetooth.
See Fix Bluetooth problems in Windows 10: FAQ.
There is an issue with the network See Fix network connection issues in Windows. connection.
Contacting your reseller for additional support
If an issue you're experiencing with the display persists or isn't covered in this chapter or the knowledge base, contact your authorized SMART reseller (smarttech.com/where) for support.
Your reseller might ask you for the serial number for the display. The serial number is on a label located on the left side of the display (pictured).

TIPS
- Scan the QR code on the label to view the SMART Board 6000S or 6000S Pro series interactive display support pages on the SMART website.
- You can also find the serial number in the iQ settings. Refer to the SMART Board 6000S and 6000S Pro series interactive displays installation and maintenance guide (smarttech.com/kb/171414) for more information.
SMART TECHNOLOGIES
smarttech.com/support
smarttech.com/contactsupport
smarttech.com/kb/171415


- SMART Board®
- 6000S and 6000S Pro series
- interactive displays
- USER GUIDE
- Learn more
- Licenses
- Trademark notice
- Copyright notice
- Important information
- NOTE
- WARNING
- ENERGY STAR®
- Damage Federal Communication Commission damage interference statement
- FCC
- Radiation exposure statement
- CAUTION
- Restriction
- Innovation, Science and Economic Development Canada statement
- EU Declaration of Conformity
- Microsoft® statement regarding Windows® 10 operating system
- Contents
- Important information...3
- Chapter 1: Welcome...8
- Chapter 2: Using basic features...18
- Chapter 3: Using the iQ...apps
- Chapter 4: Connecting computers and other devices.
- Chapter 5: Troubleshooting...47.
- Chapter 1
- About this guide
- About the display
- Touch
- Writing, drawing and erasing
- Support for additional pens and tools
- iQ experience
- Display
- Models Size (diagonal)
- Audio
- Network connectivity
- Welcome
- Room computers and guest laptops
- Accessory slot
- Convenience panel
- Proximity sensor
- Ambient light sensor
- Remote control and IR sensor
- Temperature and humidity sensors
- Mounting hardware
- Accessory mounting points
- Identifying your specific model
- Accessories
- Pen accessory kit
- Tool Explorer-enabled objects and manipulatives
- SMART OPS PC module
- SBA-100 projection audio system
- Stands
- USB extenders
- Extender Specifications
- More information
- Chapter 2
- Waking up the display and putting it back to sleep
- Using the Home button
- To show the Home screen or the Input screen
- Using the convenience panel
- Power button Display status
- Using the remote control
- IMPORTANT
- Using touch
- Using the pens and erasers
- Writing and drawing in digital ink
- To write or draw in digital ink
- TIP
- Using the SMART Ink dynamic (floating) toolbar
- Changing a pen's default color, thickness, and other properties
- Erasing digital ink
- Adjusting the volume
- NOTES
- Freezing or hiding the screen
- Freezing the screen
- Showing and hiding the screen shade
- Using additional tools and manipulatives
- For education
- Using the magic pen
- To use the magic pen to write or draw ink that fades
- To use the magic pen to spotlight or magnify screen content
- Using the highlighter pen
- To use the highlighter pen
- Using Tool Explorer cubes
- To insert an object using a Tool Explore cube
- To move, resize, and rotate an object
- To delete an object
- Using Tool Explorer stamps
- To insert an object using a Tool Explorer stamp
- To move, resize, rotate, or delete an object
- Chapter 3
- Using the Apps Library
- To open the Apps Library
- Using the SMART Sensors app
- Using the Files Library
- Using kapp Whiteboard
- Using SMART Notebook Player
- Using Browser
- Using Screen Share
- Screen Share supports:
- Using Input
- Using screenshots
- Installing third-party apps
- Cleaning up the display
- devices
- Installing and using SMART software
- Downloading and installing SMART software
- Using SMART software
- Connecting room computers and guest laptops
- Viewing a connected computer's input
- To view a connected computer's input
- Setting a connected computer's resolution and refresh rate
- Using recommended cables
- Connecting a SMART OPS PC module
- Viewing the OPS PC module input
- To view the OPS PC module input
- Connecting external displays
- Connecting USB drives, peripherals, and other devices
- Chapter 5
- The display isn't turning on
- Symptom Troubleshooting steps
- The display is turning on when it shouldn't
- The screen is blank or there's a problem with t image on the screen
- There's no sound or there's a problem with the
- Touch isn't working as expected
- The pens and erasers aren't working as expected
- iQ apps aren't working as expected
- SMART software on connected computers isn't working as expected
- The SMART OPS PC module isn't working as expected
- Contacting your reseller for additional support
- TIPS
- SMART TECHNOLOGIES
Brand : SMART Technologies
Model : SBID-6265S-PW
Category : Interactive whiteboard