
ZDAPGM1 - Électronique automobile PHOENIX GOLD - Free user manual and instructions
Find the device manual for free ZDAPGM1 PHOENIX GOLD in PDF.


| Product Type | Car Audio Amplifier |
| Brand | Phoenix Gold |
| Model | ZDAPGM1 |
| Dimensions (Approximate) | 11.5 x 7.5 x 2.2 inches |
| Weight (Approximate) | 4.5 lbs |
| Power Supply | 12V DC (Vehicle Battery) |
| Number of Channels | 1 (Mono) or 2 (Stereo) - typical |
| RMS Power Output (Estimated) | 300W x 1 @ 4 ohms |
| Frequency Response | 20Hz - 20kHz |
| Total Harmonic Distortion (THD) | < 0.1% |
| Signal-to-Noise Ratio | > 95 dB |
| Input Sensitivity | 0.2V - 6V |
| Low Pass Filter | Yes (50Hz - 250Hz adjustable) |
| Subsonic Filter | Yes (15Hz - 40Hz adjustable) |
| Bass Boost | 0 - 18 dB |
| Protection Features | Overheating, overcurrent, short circuit |
| Heat Sink | Aluminum extruded heat sink |
| Maintenance | Clean exterior with dry cloth; ensure ventilation |
| Installation | Professional installation recommended |
| Warranty | 1 year limited (typical) |
| Replacement Parts | Contact Phoenix Gold or authorized dealer |
Frequently Asked Questions - ZDAPGM1 PHOENIX GOLD
User questions about ZDAPGM1 PHOENIX GOLD
0 question about this device. Answer the ones you know or ask your own.
Ask a new question about this device
Download the instructions for your Électronique automobile in PDF format for free! Find your manual ZDAPGM1 - PHOENIX GOLD and take your electronic device back in hand. On this page are published all the documents necessary for the use of your device. ZDAPGM1 by PHOENIX GOLD.
USER MANUAL ZDAPGM1 PHOENIX GOLD
ZDAPGM1
ZDA4.6

natural_image
Electrical wiring and electronic components connected in a row (no visible text or symbols)
natural_image
Black Phoenix Gold GPU device with visible branding and ports (no readable text beyond logo)ZDAISOT2SOT Cab
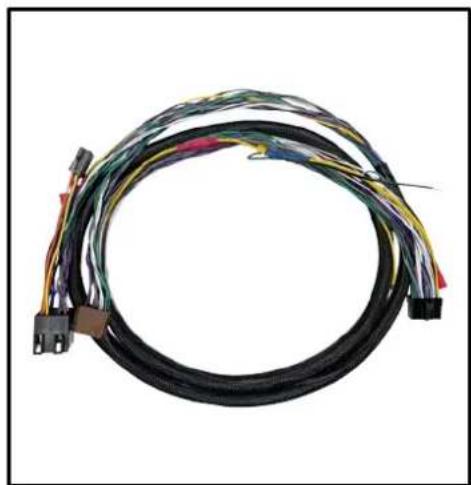
natural_image
Coiled black electrical connector with multiple colored wires (no text or symbols visible)Installation Tools Required
Vehicle used for installation:\*
Opel Astra J 03/2015
Basic Sound System
*Some differences may occur between different car and year models.
PZ2 Screwdriver

natural_image
Simple line drawing of a screwdriver with a cross mark on the bottle (no text or symbols)7mm Wrench

natural_image
Simple line drawing of a wrench (no text or symbols)Plastic Pry Tool

natural_image
Abstract geometric shape with a black vertical line and gray curved bands (no text or symbols)ZDAPGM1 Installation 1
Tools required:

1x Plastic Pry Tool
1. Stereo removal
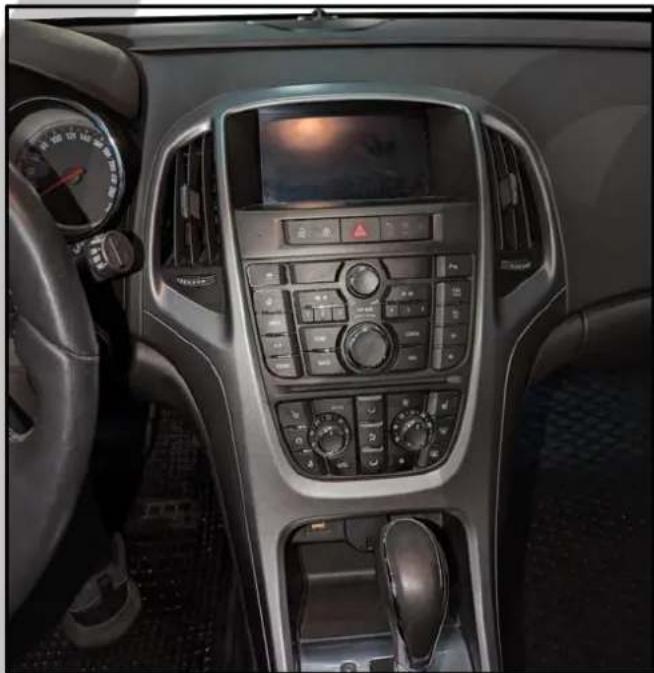
natural_image
Interior view of a car dashboard with digital display and control panel (no visible text or symbols)3. Pull up and put away the panel

natural_image
Close-up of a car gear shift lever with red arrows indicating direction (no text or symbols visible)2. Pull up the gear lever panel

natural_image
Interior view of a car gear shift lever showing meshing and keyway (no text or symbols visible)4. Remove the top of the tray

natural_image
Interior view of a car gear shift lever showing the internal circuit board and mode dial (no text or symbols visible)ZDAPGM1 Installation 2
Tools required:
1x PZ2 Screwdriver

1x Plastic Pry Tool
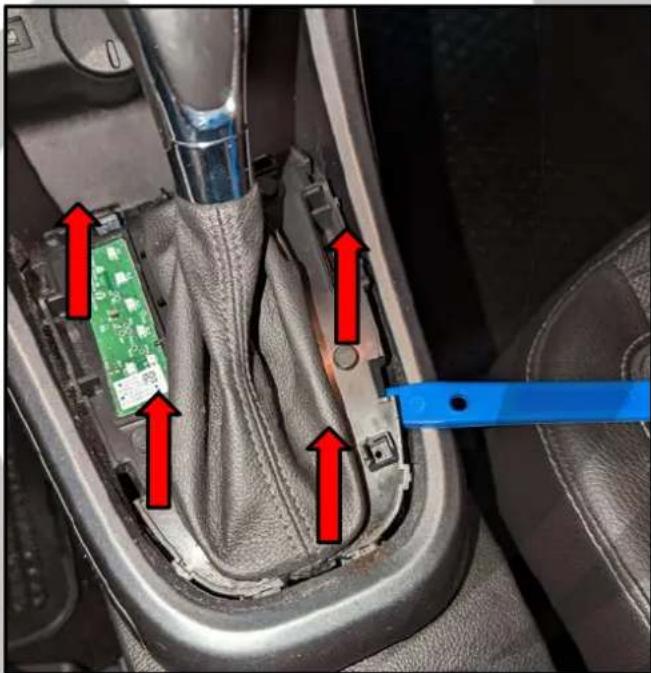
5. Pull up the plastic tray

natural_image
Close-up of a car interior showing a green circuit board and blue plastic clip, with red arrows pointing to the component (no text or symbols visible)7. Unscrew the two screws
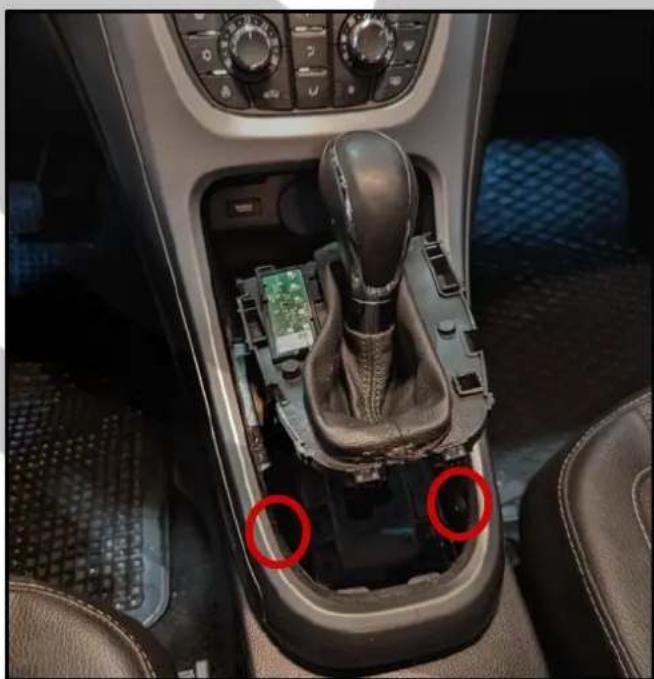
natural_image
Interior view of a car gear shift lever showing the shaft, gear, and internal components (no text or symbols visible)6. Pull up the gear lever panel
8. Unscrew the first screw

natural_image
Close-up of a car's internal mechanical component with a red circle highlighting a specific part (no visible text or symbols)ZDAPGM1 Installation 3
Tools required:
1x PZ2 Screwdriver

1x Plastic Pry Tool
9. Unscrew the other screw

natural_image
Close-up of a car gear shift lever mechanism with a red circle highlighting the component (no text or symbols visible)11. Pull off the top part

natural_image
Interior view of a car dashboard with air vent and control buttons (no visible text or symbols)10. Pull off the bottom part
natural_image
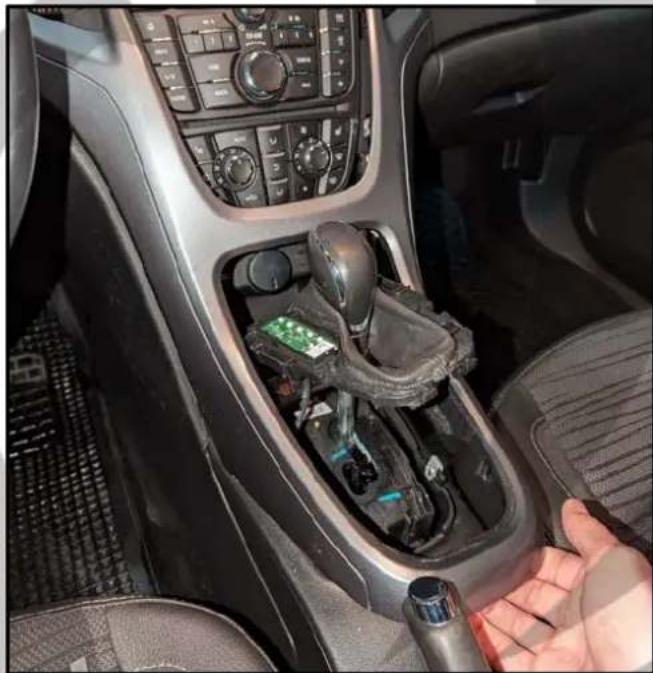
Interior view of a car gear shift lever with a hand adjusting the component (no visible text or symbols)12. Pull the entire stereo panel off
natural_image
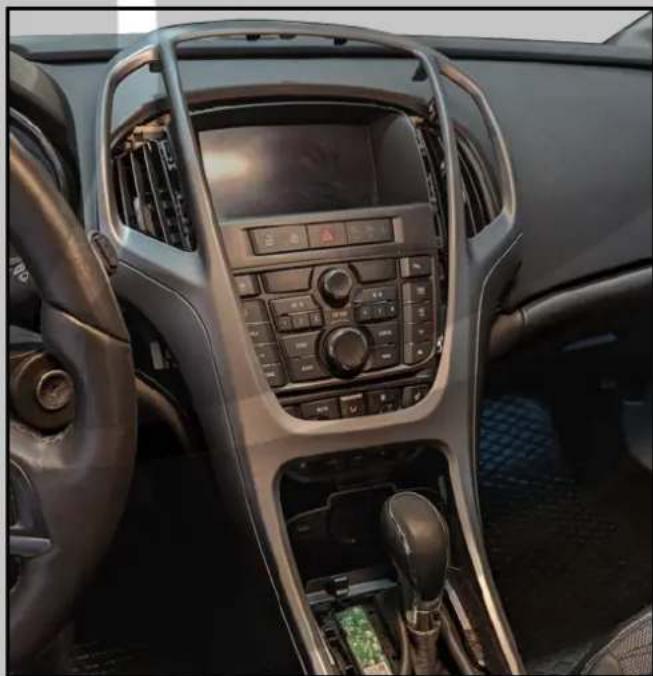
Interior view of a car dashboard with digital display and air intake (no visible text or symbols)ZDAPGM1 Installation 4
Tools required:

1x Plastic Pry Tool

1x 7mm Wrench
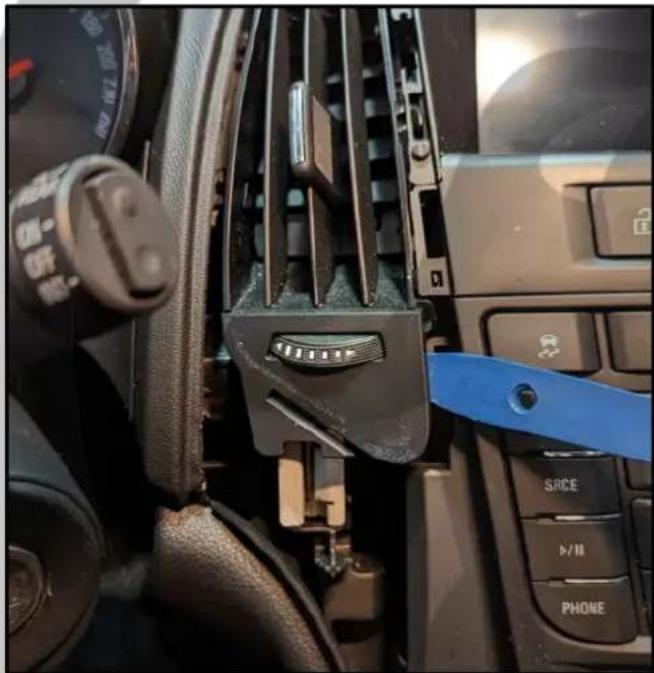
13. Loosen the left fan wheel panel
natural_image
Interior view of a car dashboard with steering wheel, keyboard, and blue tool (no visible text or symbols)15. Unscrew the four bolt

natural_image
Interior view of a car dashboard with digital display and control panels, no visible text or symbols14. Loosen the right fan wheel panel

natural_image
Close-up of a car interior showing the steering wheel and keyway, with a blue tool inserted (no visible text or symbols)16. Pull out the panel

natural_image
Interior view of a car cockpit with analog dashboard and control panels (no readable text or symbols)ZDAPGM1 Installation 5
Tools required:
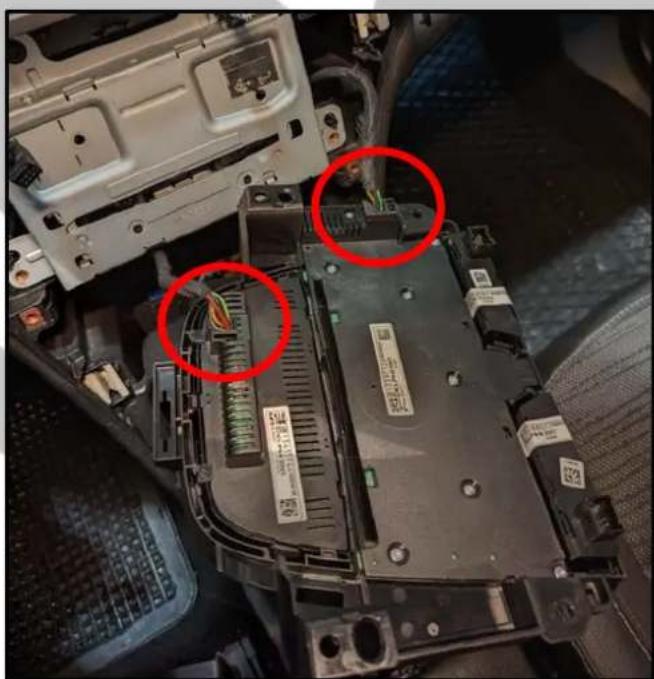
- Remove the black connector

natural_image
Close-up of a car engine component with a red circular annotation highlighting a specific part (no readable text or symbols)- Remove the other two connectors
natural_image
Interior view of a car electronic device showing internal components and wiring, with two red-circled annotations highlighting specific parts (no readable text or symbols)- Remove the grey connector
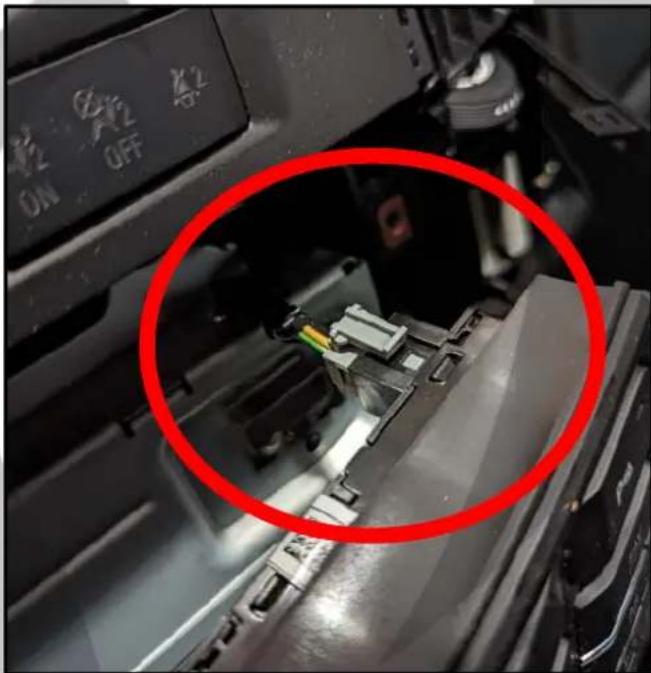
- Remove the first connector

natural_image
Close-up of a mechanical device with a red circle highlighting a green cable connector (no visible text or symbols)ZDAPGM1 Installation 6
Tools required:

1x 7mm Wrench
21. Remove the other connector

natural_image
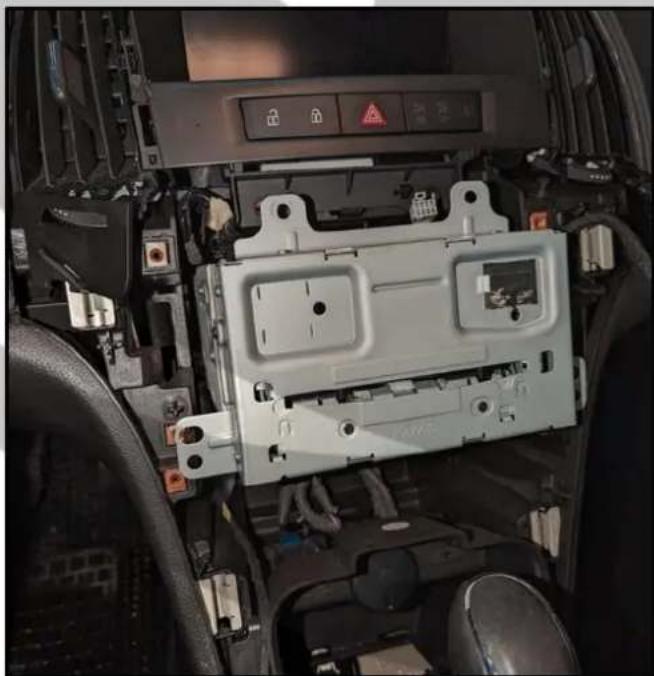
Close-up of a mechanical component with visible wiring and a red circle highlighting a section (no text or symbols)23. Pull out the stereo
natural_image
Interior view of an automotive electronic vehicle showing the driver compartment with control buttons and a warning sign (no readable text or symbols)22. Unscrew the two bolts

natural_image
Interior view of a vehicle's rear camera showing the back panel with two red-circled buttons and a small electronic device (no visible text or symbols)24. Remove the quadlock connector

ZDAPGM1 Installation 7
Tools required:

1x ZDAISOT

natural_image
Electrical connector assembly with multiple black modules and colored wires (no visible text or symbols)1x SOT Cable
25. Quadlock connector removed

natural_image
Interior view of a vehicle showing a white electronic device with multiple ports and cables, no visible text or symbols.27. Connect ZDAISOT

natural_image
Interior view of a car showing wiring harnesses and electronic components (no visible text or symbols)26. Connect the SOT cable

natural_image
Interior view of an automotive electrical connector with multicolored wires and red clamps (no visible text or symbols)28. Remove the passenger side panel

natural_image
Interior view of a car showing the floor and seat area with a red arrow pointing to a specific area (no text or symbols visible)ZDAPGM1 Installation 8
Tools required:
- Pull the panel towards you

natural_image
Close-up of a car's side panel with visible wiring and a red arrow pointing to a component (no text or symbols)- Route ZDAISOT behind the stereo

natural_image
Close-up of automotive electrical connectors with multicolored wires and connectors (no visible text or symbols)- Put the panel aside

natural_image
Close-up of a car's lower backrest and dashboard showing internal components (no visible text or symbols)- Route ZDAISOT to the floor

natural_image
Close-up of a car's lower body and suspension system with visible wiring and components (no text or symbols)ZDAPGM1 Installation 9
Tools required:

1x ZDA4.6
33. Connect SOT cable to stereo

natural_image
Interior view of a car showing wiring and a computer monitor with a warning icon, no readable text or symbols present.35. Install and screw ZDA4.6 in place

natural_image
Black electronic device labeled '20A4.4' with multiple ports and cables on a textured floor (no readable text beyond label)34. Route ZDAISOT under the carpet
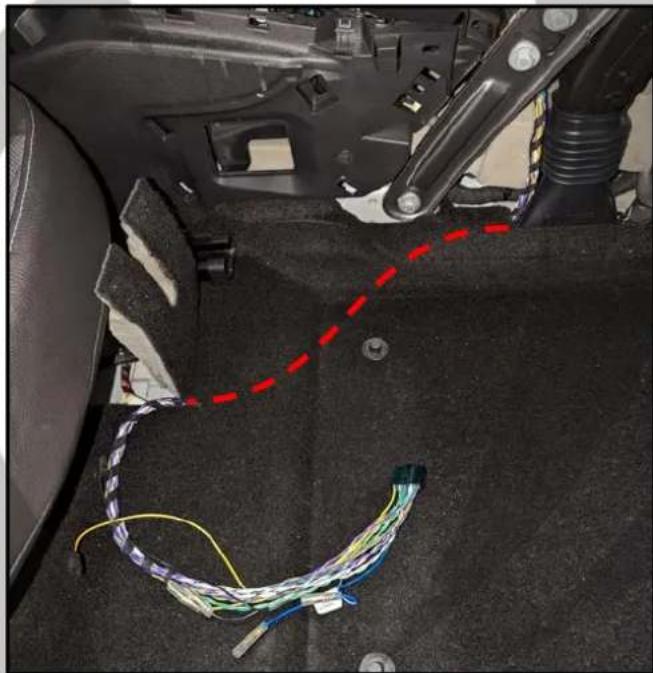
natural_image
Interior view of a car's seat and dashboard with colored wires and wiring (no visible text or symbols)36. Screw back stereo

natural_image
Interior view of a vehicle's internal battery pack with warning labels and control buttons (no readable text or symbols)ZDAPGM1 Installation 10
- Reassemble stereo in reverse

natural_image
Interior view of a car dashboard with digital display and air conditioners (no visible text or symbols)- Physical install is now complete

natural_image
Stylized orange phoenix logo with curved wings and a bird silhouette (no text or symbols)- Go to phoenixgold-eu.com/downloads/ and download the ZDA4.6 software and your Phoenix Gold sound curve
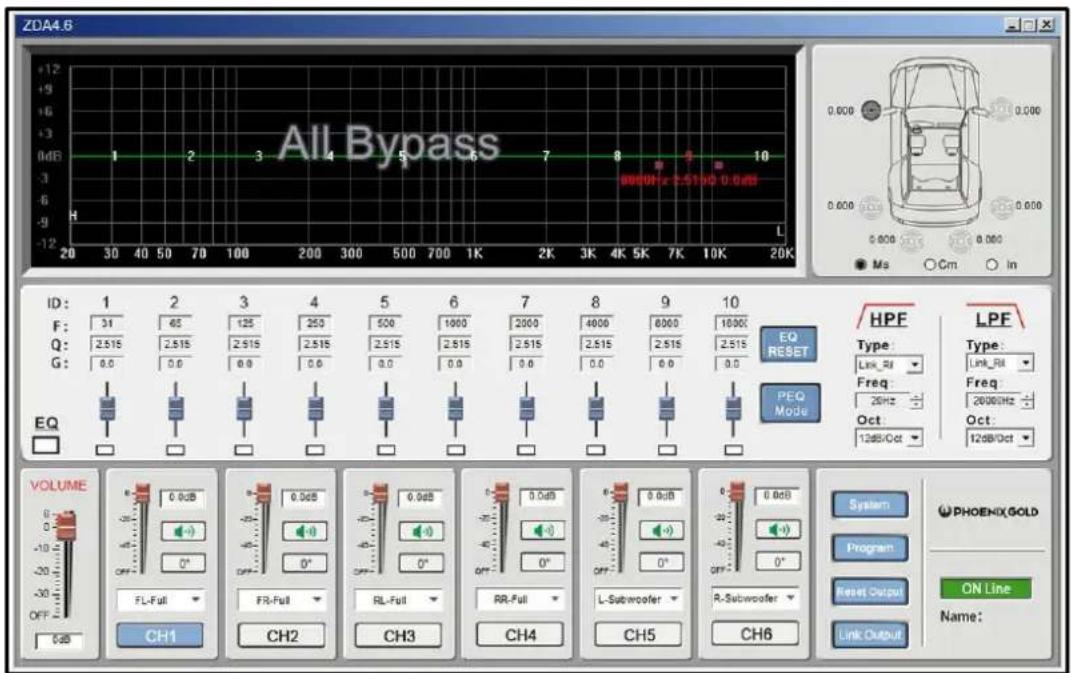
Software Installation 1
Tools required:

1x Computer
- Press "Program" 41. Press "Load PC Presets File"


- Go to your saved location and choose your Phoenix Gold sound curve, then click "Open"
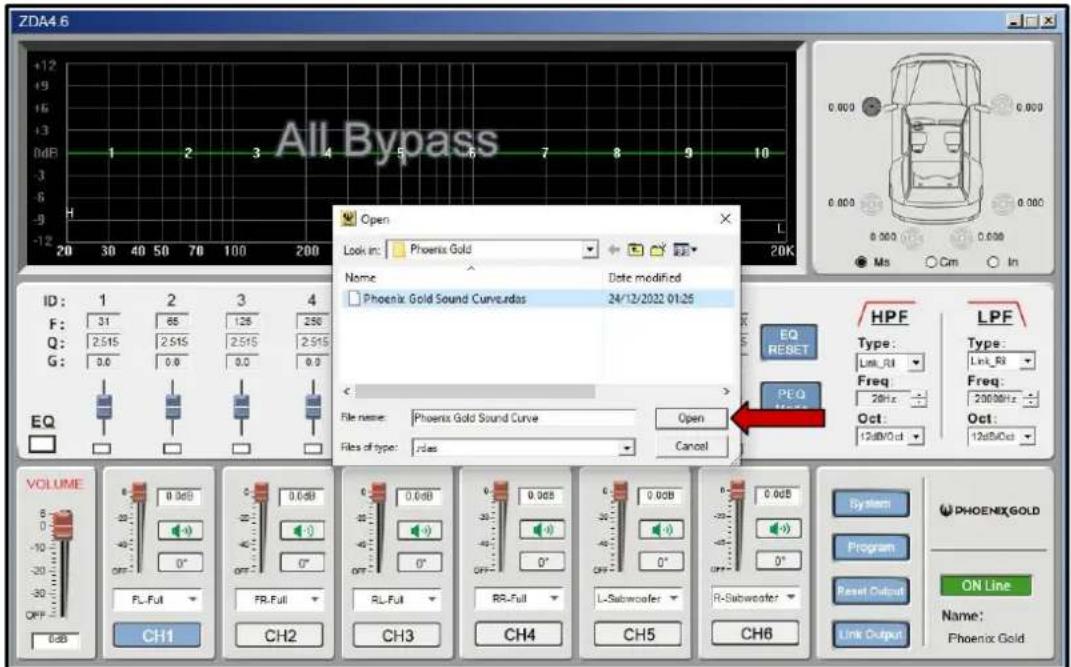
Software Installation 2
Tools required:

1x Computer
- Press "Program" 44. Press "Save As Machine Preset"

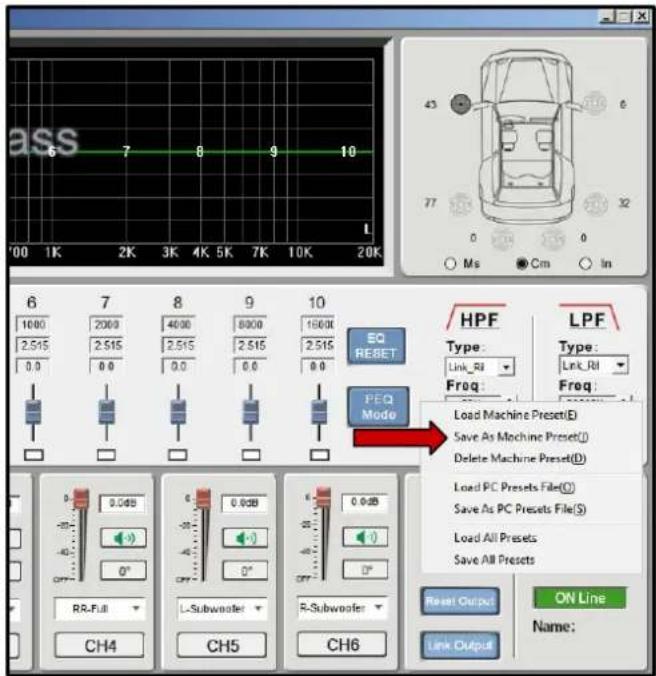
- Press "Save"

Software Installation 3
Tools required:

1x Computer
- Press "OK". The sound curve is now installed and saved to the ZDA4.6.

On Behalf of the Phoenix Gold team, Thank you for choosing us!
Your installation is complete and we hope that your new upgraded system will bring you joy and happiness for many years to come when listening to your favorite music. As always, our goal is bringing you The Gold Standard in Sound.

- ZDAPGM1
- Installation Tools Required
- Vehicle used for installation:\*
- ZDAPGM1 Installation 1
- Tools required:
- Stereo removal
- Pull up and put away the panel
- Pull up the gear lever panel
- Remove the top of the tray
- ZDAPGM1 Installation 2
- Pull up the plastic tray
- Unscrew the two screws
- Pull up the gear lever panel
- Unscrew the first screw
- ZDAPGM1 Installation 3
- Unscrew the other screw
- Pull off the top part
- Pull off the bottom part
- Pull the entire stereo panel off
- ZDAPGM1 Installation 4
- Loosen the left fan wheel panel
- Unscrew the four bolt
- Loosen the right fan wheel panel
- Pull out the panel
- ZDAPGM1 Installation 5
- ZDAPGM1 Installation 6
- Remove the other connector
- Pull out the stereo
- Unscrew the two bolts
- Remove the quadlock connector
- ZDAPGM1 Installation 7
- Quadlock connector removed
- Connect ZDAISOT
- Connect the SOT cable
- Remove the passenger side panel
- ZDAPGM1 Installation 8
- ZDAPGM1 Installation 9
- Connect SOT cable to stereo
- Install and screw ZDA4.6 in place
- Route ZDAISOT under the carpet
- Screw back stereo
- ZDAPGM1 Installation 10
- Software Installation 1
- Software Installation 2
- Software Installation 3
- On Behalf of the Phoenix Gold team, Thank you for choosing us!
Brand : PHOENIX GOLD
Model : ZDAPGM1
Category : Électronique automobile