
USA-49WG - Power Strips Tripp Lite - Free user manual and instructions
Find the device manual for free USA-49WG Tripp Lite in PDF.


| Product Type | Power Strip |
| Brand | Tripp Lite |
| Model | USA-49WG |
| Number of Outlets | 6 |
| AC Input Voltage | 120V (60Hz) |
| Maximum Current | 15A |
| Maximum Power | 1875W |
| Cord Length | 6 ft (1.83 m) |
| Surge Protection Rating | 1000 Joules |
| Clamping Voltage | 330V |
| Response Time | <1 ns |
| On/Off Switch | Yes, with built-in circuit breaker |
| Mounting | Keyhole slots for wall mounting |
| Housing Material | ABS Plastic |
| Dimensions (H x W x D) | 1.5 x 12.0 x 2.0 in (3.8 x 30.5 x 5.1 cm) |
| Weight | 1.2 lbs (0.54 kg) |
| Certifications | UL, cUL |
| Color | White |
| Cleaning | Wipe with dry cloth; unplug before cleaning |
| Safety Warnings | Do not overload; use only indoors; keep away from water |
| Spare Parts / Repairability | No user-serviceable parts; replace unit if damaged |
Frequently Asked Questions - USA-49WG Tripp Lite
User questions about USA-49WG Tripp Lite
0 question about this device. Answer the ones you know or ask your own.
Ask a new question about this device
Download the instructions for your Power Strips in PDF format for free! Find your manual USA-49WG - Tripp Lite and take your electronic device back in hand. On this page are published all the documents necessary for the use of your device. USA-49WG by Tripp Lite.
USER MANUAL USA-49WG Tripp Lite
Keyspan 4-Port RS232 Serial to USB Adapter Hub
Model: USA-49WG v2
PROTECT YOUR INVESTMENT!
Register your product for quicker service and ultimate peace of mind.
You could also win an ISOBAR6ULTRA surge protector—a \$50 value!
www.tripplite.com/warranty

KEYSPAN

Manufacturing
Excellence.
1111 W. 35th Street, Chicago, IL 60609 USA • www.tripplite.com/support
Copyright © 2014 Tripp Lite. All rights reserved. All trademarks and registered trademarks are the sole property of their respective owners.
Package Contents
- USA-49WG v2
- USB A/B Device Cable – 6 ft.
- Driver CD
- Owner's Manual
Optional Accessories
• U022-Series USB 2.0 A/B Device Cables
• UR022-Series Reversible USB 2.0 A/B Device Cables
- P520-006 RS232 Serial Straight-through Extension Cable – 6 ft.
System Requirements
- An available USB port
- A PC running Windows® XP or later
- A Mac computer running OS X® 10.6.8 or later
Features
- Add up to four RS232 serial ports via a single USB port on your computer
• Supports data transfer rates up to 460Kbps
• LEDs show adapter status and data activity - RS232 serial ports appear as standard COM ports; COM port numbers are assigned based on what is available (e.g. If COM ports 1 and 2 are occupied on your computer, the first COM port to be assigned will be 3).
- Bus Powered: No external power adapter required
• Analytic Tools: Includes Windows line monitor and data trace software - Easy Expansion: Supports use of multiple adapters on one PC
Installation
- Prior to connecting the USA-49WG to your computer's USB port, insert the driver CD that came with the product into your computer's CD drive.
- Open the CD and select the driver that is appropriate for your computer.
- After opening the driver installation file, follow the prompts that appear to install the driver on your computer.
- When complete, shutdown your computer, and then connect the USA-49WG to an available USB port using the included USB cable.
- Power on the computer to complete the installation. COM port numbers are assigned based on what is available (e.g. If COM ports 1 and 2 are occupied on your computer, the first COM port to be assigned will be 3). It is possible to have an adapter with COM3, COM8, COM9, and COM10 ports.
Configuring Your Serial Device
The following instructions provide a basic overview of how to configure your software to use your Keyspan serial port. For specific instructions on how to operate your serial device, refer to that device's user manual.
- To configure your serial device for use with the USA-49WG, you must connect it to an available DB9 port on the unit via a serial cable appropriate for your device.
- Prior to using your serial device with a Keyspan serial port, you must first tell your serial device's software which Keyspan serial port your device is connected to. Most serial devices have software that allows you to select or configure which port the device is connected to. Please refer to your serial device's documentation on how to set the serial port settings.
Configuring Your Serial Device
-
After you have determined where to select or configure your serial device's serial port settings, navigate to that screen. Here you will either have to select your device from a list of connected devices, enter in the port number your device is connected to, or some combination of both. The port number for your device can be found using the Keyspan Serial Assistant. Locate and open the Keyspan Serial Assistant via the Start > Programs section in Windows, or the Applications section in Mac. In Windows, locate the USA-49WG port that your device is connected to, and use the COM port that has been assigned to it. For Mac, locate the USA-49WG port that your device is connected to. The port number will be the last number in the port name (See page 6 in Keyspan Serial Assistant section for details).
-
Once you've set your serial device's software to use the Keyspan serial port, you are ready to start using your device.
Keyspan Serial Assistant
Besides the required drivers, the Keyspan USB Serial Adapter software installs an application called Keyspan Serial Assistant. This application is used to:
• Show the names of the installed serial ports
- Determine the status of the adapter software and hardware
- Assist in problem solving
Launching the Keyspan Serial Assistant
To launch the Keyspan Serial Assistant, locate and open Keyspan Serial Assistant via the Start > Programs menu in Windows or the Applications folder in Mac. Upon opening, the Keyspan Serial Assistant screen will appear. The name of the Keyspan serial adapter will appear as USA-49WG-1. The -1 at the end of the model name is to signify that this is the latest hardware version of the USA-49WG adapter. Towards the left of the USA-49WG-1 will be a +/- icon in the Windows assistant, and an arrow icon in the Mac assistant. Click on this icon to expand or collapse the list of serial ports.
Keyspan Serial Assistant

flowchart
graph TD
    A["USA49WG1-1"] --> B["COM3: Idle"]
    A --> C["COM4: Idle"]
    A --> D["COM5: Idle"]
    A --> E["COM6: Idle"]
Windows Keyspan Serial Assistant
![Keyspan Serial Assistant Serial Ports 1 [USA49WG1] [KeySerial1] [USA49WG141P1.1] [USA49WG141P2.2] [USA49WG141P3.3] [USA49WG141P4.4]](/content/2026/05/1086477/images/6ba96c3e9281f15b72a8469539d8e3c1229098e435b83d6f7955313664b6490d.jpg)
Mac Keyspan Serial Assistant
Keyspan Serial Assistant
Windows Keyspan Serial Assistant
The following is a description of all the relevant text boxes and menus found in the Keyspan Serial Assistant. You can also obtain this information by turning on the Enable Tool Tips check box in the Help tab in the Assistant window.
Adapter Status Tab
The Adapter Status tab, shown in the previous section of this manual, displays the status of your Keyspan adapter. Specifically, it shows the COM port number (COM1, COM2, etc.) and the COM port status (IDLE or BUSY). If you have several Keyspan adapters of the same type, they will all show up in this tab. It's also the first place to check to see if your Keyspan adapter is working properly.
Properties Tab
![Keyspan USA49WG-1 Serial Adapter Assistant Adapter Status Properties Port Mapping Diagnostics Help Adapter Serial Configuration Adapter USA49WG1-1 COM3 COM4 COM5 COM6. Test All Serial Ports on this Adapter Serial Port Options Port 1 COM3 IDLE Test This Serial Port Receive FIFO Buffer Size 16 [Default] Serial Test Options Test Mode TX Only Ext. LoopBack Test Type Quick Continuous Test Speed 230400 Bead Update Configuration Serial Test Status READY TO TEST](/content/2026/05/1086477/images/c68c369cb8e231cf4b3643e6abb7b20734d42f7fb4a91de99cf3ad2352d2822f.jpg)
Keyspan Serial Assistant
The Properties tab allows you to test your Keyspan adapter and make changes to its behavior. The following section explains the items in this tab.

If you have multiple adapters connected to your computer, use the Adapter pull down menu to select which USA-49WG you would like to configure. If you only have one Keyspan USB 4-Port Serial Adapter, you will not need to change the selection.

If you have more than one serial port on your Keyspan adapter, the Port pull down menu allows you to select which serial port you want to modify or test. You can also see the serial port's COM port number and its COM port status next to the Port pull down menu.

The Test This Serial Port button tests the selected COM port in the Port pull down menu. The test performed is the one selected in the Serial Test Options box. The Test All Serial Ports on this Adapter button tests all of the COM ports on the selected adapter in the Adapter pull down menu.

The Test Mode box allows you to specify the type of test that will be performed when you press the Test This Serial Port button.
Keyspan Serial Assistant
There are 2 types of tests:
- TX Only: Use this test to test only the transmit (Tx) signals of the Keyspan adapter.
- Ext. LoopBack: Use this test for sending and receiving data. This test sends data out the selected serial port and waits to receive it via a special Loopback connector. You can find more information about this special Loopback connector in the Serial Ports Pinout section in this manual.
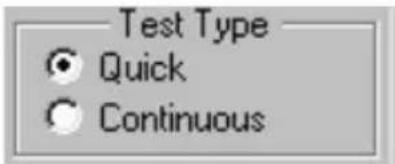
The Test Type box allows you to specify how many times the selected test will be repeated when you press the test button. Use the Quick option to perform the test once. To perform a subsequent test, press the Test This Serial Port button. Use the Continuous option to repeat the test continuously. To stop the test, press the Stop Test button (the Test This Serial Port button becomes the Stop Test button during a test).

The Test Speed pull down menu allows you to specify the speed (baud rate) at which the port will be tested when you press the Test This Serial Port button.
The Test Status box reports the test status or results of the selected COM port.
Keyspan Serial Assistant

The Receive FIFO Buffer Size pull down menu allows you to configure the number of characters that are stored in the card's "First In First Out" input buffer ("FIFO") before they are made available to the computer. The default value of this parameter is "16". The Receive FIFO Buffer Size improves the reliability of data transfer at high speeds. You can turn this option OFF for performance reasons. This is not necessary in most cases.
Update Configuration
The Update Configuration button updates the Keyspan adapter with the changes you have made in the Properties tab. Please note that these changes will take effect when you click the Update Configuration button.
Keyspan Serial Assistant
Port Mapping Tab
![Keyspan USA49WG-1 Serial Adapter Assistant Adapter Status | Properties | Port Mapping | Diagnostics | Help | COM1 Communications Port [COM1] COM2 Communications Port [COM2] COM3 Idle Keyspan USA49WG-1 Serial Adapter Port [COM3] COM4 Idle Keyspan USA49WG-1 Serial Adapter Port [COM4] COM5 Idle Keyspan USA49WG-1 Serial Adapter Port [COM5] COM6 Idle Keyspan USA49WG-1 Serial Adapter Port [COM6] Show All COM Assignments This COM port is mapped to a known device; connection state unknown. COM port mapping for selected adapter port: COM1 (in use) Delete All Keyspan USA49WG-1 Serial Adapter COM Port Mappings](/content/2026/05/1086477/images/a2456748a8203fd9e78037953fd787491323a1c64a16dbe087d0c0aa4b17db35.jpg)
The Port Mapping tab in the Keyspan Serial Assistant allows you to change how COM port numbers are assigned to your Keyspan adapter. The following section explains the items in this tab.

Important!!! Please make sure you read this entire section. Changing COM port assignments may render other hardware unusable.
Keyspan Serial Assistant
| COM3 | Idle | Keyspan USB 4-Port Serial Adapter Port (COM3) |
| COM4 | Idle | Keyspan USB 4-Port Serial Adapter Port (COM5) |
| COM5 | Idle | Keyspan USB 4-Port Serial Adapter Port (COM6) |
| COM6 | Idle | Keyspan USB 4-Port Serial Adapter Port (COM7) |
The COM Port List box shows any connected Keyspan USB 4-Port Serial Adapter, its COM port numbers and COM port statuses. You can also see any other COM ports that have been assigned or reserved on your computer if you enable or check the Show All COM Assignments check box.
Show All COM Assignments
Enable or check the Show All COM Assignments check box to display ALL of the COM port name and numbers that have been registered on your computer. This includes COM ports for other devices.
Note: You may have COM ports assigned or 'set aside' for hardware that may not be installed on your computer, depending on how your computer was setup by its manufacturer.
COM port mapping for selected adapter port: COM3 (in use)
The COM port mapping pull down menu allows you to reassign the selected Keyspan COM port in the COM port list window. This window also reports whether a COM port is ‘in use’. In this menu, ‘In use’ means that the selected COM port has been assigned or reserved. It is highly recommended that you only change the COM port mapping to COM ports that are not ‘in use’.
Note: The Com port mapping pull down menu allows you to change the COM port mapping to any COM port, including those that have already been assigned ('in use'). Changing the COM port mapping to a COM port that is in use may render any hardware and/or software using that port inoperable.
Keyspan Serial Assistant
Delete All Keyspan USB 4-Port Serial Adapter Port Mappings
The Delete All Keyspan USB 4-Port Serial Adapter Port Mappings button clears the Windows registry of all Keyspan USB 4-Port Serial Adapter COM port numbers and Keyspan USB information. This allows Windows to create new COM port assignments.
Note: This option is for advanced users only.
Diagnostics Tab
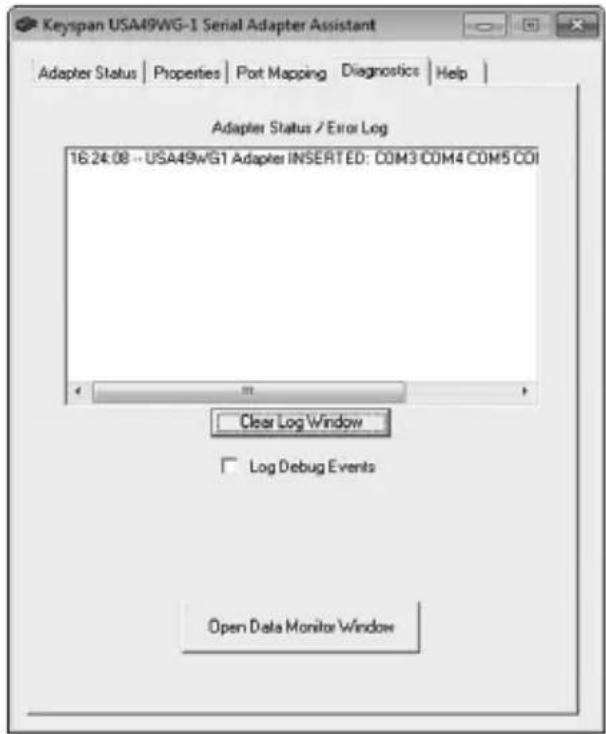
The Diagnostics tab in the Keyspan Serial Assistant reports diagnostic information about your Keyspan adapter's software and hardware. This information is useful if you are trying to solve problems with Tripp Lite's technical support staff. The following section explains the items in this tab.
Keyspan Serial Assistant
Adapter Status / Error Log
12:18:05 -- USA49W Adapter REMOVED: COM4 COM5 COM6 CO ▲ 12:18:06 -- USA49W Adapter INSERTED: COM3 COM5 COM6 CO
The Adapter Status/Error Log box displays the status of your Keyspan adapter hardware and software. It detects if the Keyspan driver is installed and whether or not a Keyspan adapter is connected.
Clear Log Window
The Clear Log Window button clears the Adapter Status/Error Log box.

Log Debug Events
Enable or check the Log Debug Events check box to display all of the Keyspan adapter's debug events as well as the driver events. This option can be turned on and off.
Open Data Monitor Window
The Open Data Monitor Window button opens the Keyspan adapter's Line Monitor (Data Monitor) window. The Line Monitor displays all data and all modem control state changes sent to and from the USB 4-Port Serial Adapter.
Keyspan Serial Assistant
Help Tab

The Help tab in the Keyspan Serial Assistant displays the version numbers of the different components in your Keyspan USB Serial Adapter installation. You can also enable Tool Tips (on screen help).
Keyspan Serial Assistant
Mac Keyspan Serial Assistant
The Keyspan Serial Assistant's Settings menu is located in the Menu bar and provides access to the following command(s).

- The Un-install USB Serial Extension command un-installs the Keyspan USB Serial extension. To un-install the USA-49WG, select this command from the menu, delete the Keyspan Serial Assistant application, and restart your computer.
Troubleshooting
If you are having problems with your Keyspan Serial to USB Adapter Hub, please read the following instructions to assist you in troubleshooting.
- Launch the Keyspan Serial Assistant to confirm that your USA-49WG is in the list of available adapters.
- Make certain that your serial device is powered on and connected to a port on the USA-49WG.
- Check your serial device's software configuration, confirming that it is configured to use the serial adapter port, and that the correct COM port is being referenced. Please refer to your serial device's documentation for instructions on how to select/switch/configure a serial port in that software.
Serial Ports Pinout
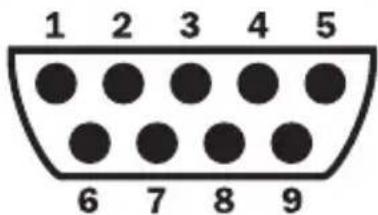
| Pin Name | Signal Designation | |
| 1 DCD | Data Carrier Detect | (Input) |
| 2 RX | Received Data (Input) | |
| 3 TX | Transmitted Data (Output) | |
| 4 DTR | Data Terminal Ready (Output) | |
| 5 GND | Ground | |
| 6 DSR | Data Set Ready (Input) | |
| 7 RTS | Request To Send (Output) | |
| 8 CTS | Clear To Send (Input) | |
| 9 | RI | Ring Indicator (Input) |
In order to ensure compliance with emission specifications, cables should be shielded using braided shields and metal hoods with complete 100% contact between the shields and hoods.
External Loopback Connector Information
The Keyspan Serial Assistant allows you to perform two types of loopback tests – internal and external. The external test requires the use of a special loopback connector. This connector requires a “DB9 Female Loopback plug” with the following wiring:
| Pin(s) | Wired To | Pin(s) |
| 1 | <-> | 4, 8 |
| 2 | <-> | 3 |
| 6 | <-> | 7,9 |
LED Behavior
The USA-49WG comes equipped with LEDs that report the status of the Keyspan adapter USB hardware and serial port.

| Color State Status | ||
| Red Off | The Keyspan adapter | is not connected or not receiving power from your computer. |
| Red On | The Keyspan adapter | is connected and is receiving power from your computer. |
| Green Off(and Red light On) | The Keyspan adapter software and hardware are working properly. The Keyspan serial port is available for use. | |
| Green On(Steady light) | The Keyspan serial port is in use by an application on your computer and is ready to send and receive data to and from your serial device. | |
| Green On(Blinking rapidly) | The Keyspan serial port is sending and/or receiving data. | |
Warranty and Product Registration
2- YEAR LIMITED WARRANTY
Seller warrants this product, if used in accordance with all applicable instructions, to be free from original defects in material and workmanship for a period of 2 years from the date of initial purchase. If the product should prove defective in material or workmanship within that period, Seller will repair or replace the product, in its sole discretion. Service under this Warranty can only be obtained by your delivering or shipping the product (with all shipping or delivery charges prepaid) to: Tripp Lite, 1111 W. 35th Street, Chicago, IL 60609 USA. Seller will pay return shipping charges. Visit www.triplite.com/support before sending any equipment back for repair.
THIS WARRANTY DOES NOT APPLY TO NORMAL WEAR OR TO DAMAGE RESULTING FROM ACCIDENT, MISUSE, ABUSE OR NEGLECT. SELLER MAKES NO EXPRESS WARRANTIES OTHER THAN THE WARRANTY EXPRESSLY SET FORTH HEREIN. EXCEPT TO THE EXTENT PROHIBITED BY APPLICABLE LAW, ALL IMPLIED WARRANTIES, INCLUDING ALL WARRANTIES OF MERCHANTABILITY OR FITNESS, ARE LIMITED IN DURATION TO THE WARRANTY PERIOD SET FORTH ABOVE; AND THIS WARRANTY EXPRESSLY EXCLUDES ALL INCIDENTAL AND CONSEQUENTIAL DAMAGES. (Some states do not allow limitations on how long an implied warranty lasts, and some states do not allow the exclusion or limitation of incidental or consequential damages, so the above limitations or exclusions may not apply to you. This Warranty gives you specific legal rights, and you may have other rights which vary from jurisdiction to jurisdiction).
WARNING: The individual user should take care to determine prior to use whether this device is suitable, adequate or safe for the use intended. Since individual applications are subject to great variation, the manufacturer makes no representation or warranty as to the suitability or fitness of these devices for any specific application.
PRODUCT REGISTRATION
Visit www.triplite.com/warranty today to register your new Tripp Lite product. You'll be automatically entered into a drawing for a chance to win a FREE Tripp Lite product!*
* No purchase necessary. Void where prohibited. Some restrictions apply. See website for details.
FCC Notice, Class B
This device complies with part 15 of the FCC Rules. Operation is subject to the following two conditions: (1) This device may not cause harmful interference, and (2) this device must accept any interference received, including interference that may cause undesired operation.
Note: This equipment has been tested and found to comply with the limits for a Class B digital device, pursuant to part 15 of the FCC Rules. These limits are designed to provide reasonable protection against harmful interference in a residential installation. This equipment generates, uses and can radiate radio frequency energy and, if not installed and used in accordance with the instructions, may cause harmful interference to radio communications. However, there is no guarantee that interference will not occur in a particular installation.
Warranty and Product Registration
If this equipment does cause harmful interference to radio or television reception, which can be determined by turning the equipment off and on, the user is encouraged to try to correct the interference by one or more of the following measures:
- Reorient or relocate the receiving antenna.
- Increase the separation between the equipment and receiver.
- Connect the equipment into an outlet on a circuit different from that to which the receiver is connected.
- Consult the dealer or an experienced radio/TV technician for help.
Any changes or modifications to this equipment not expressly approved by Tripp Lite could void the user's authority to operate this equipment.
WEEE Compliance Information for Tripp Lite Customers and Recyclers (European Union)

Under the Waste Electrical and Electronic Equipment (WEEE) Directive and implementing regulations, when customers buy new electrical and electronic equipment from Tripp Lite they are entitled to:
- Send old equipment for recycling on a one-for-one, like-for-like basis (this varies depending on the country)
- Send the new equipment back for recycling when this ultimately becomes waste
Use of this equipment in life support applications where failure of this equipment can reasonably be expected to cause the failure of the life support equipment or to significantly affect its safety or effectiveness is not recommended. Do not use this equipment in the presence of a flammable anesthetic mixture with air, oxygen or nitrous oxide.
Tripp Lite follows a policy of continuous improvement. Product specifications are subject to change without notice.

KEYSPAN

Manufacturing Excellence.
1111 W. 35th Street, Chicago, IL 60609 USA • www.tripplite.com/support
14-07-250 • 93-339A_revA
- Keyspan 4-Port RS232 Serial to USB Adapter Hub
- PROTECT YOUR INVESTMENT!
- Package Contents
- Optional Accessories
- System Requirements
- Features
- Installation
- Configuring Your Serial Device
- Keyspan Serial Assistant
- Launching the Keyspan Serial Assistant
- Windows Keyspan Serial Assistant
- Adapter Status Tab
- Properties Tab
- Port Mapping Tab
- Show All COM Assignments
- COM port mapping for selected adapter port: COM3 (in use)
- Diagnostics Tab
- Help Tab
- Mac Keyspan Serial Assistant
- Troubleshooting
- Serial Ports Pinout
- External Loopback Connector Information
- LED Behavior
- Warranty and Product Registration
- 2- YEAR LIMITED WARRANTY
- PRODUCT REGISTRATION
- FCC Notice, Class B
- WEEE Compliance Information for Tripp Lite Customers and Recyclers (European Union)
Brand : Tripp Lite
Model : USA-49WG
Category : Power Strips