
KPF849 - Fan Kambrook - Free user manual and instructions
Find the device manual for free KPF849 Kambrook in PDF.


| Product Type | Pedestal Fan |
| Brand | Kambrook |
| Model | KPF849 |
| Motor Type | DC Motor |
| Number of Speed Levels | 26 |
| Cooling Modes | Normal, Nature, Sleep, Comfort, Silent |
| Oscillation | Yes (left to right) |
| Timer | Up to 12 hours (preset on/off) |
| Remote Control | Yes (includes CR2032 battery) |
| LED Display | Yes |
| Height Adjustment | Yes (knob on pedestal) |
| Tilt Head Adjustment | Yes (manual) |
| Power Supply | 220-240V AC |
| Blade Count | 4 |
| Auto Shut-Off | After 12 hours of inactivity |
| Memory Function | Returns to last mode and speed |
| Cleaning Instructions | Wipe with soft damp cloth; do not use abrasive cleaners |
| Storage | Cool, clean, dry location |
Frequently Asked Questions - KPF849 Kambrook
User questions about KPF849 Kambrook
0 question about this device. Answer the ones you know or ask your own.
Ask a new question about this device
Download the instructions for your Fan in PDF format for free! Find your manual KPF849 - Kambrook and take your electronic device back in hand. On this page are published all the documents necessary for the use of your device. KPF849 by Kambrook.
USER MANUAL KPF849 Kambrook
natural_image
Circular fan with four blades and radial blades, labeled 'KAMBROOK' at center (no other text or symbols)
natural_image
White handheld electric water heater with digital display and control buttons (no visible text or symbols)Suits all KPF849 modelsINSTRI
Contents
Kambrook Recommends Safety First p4
Your Kambrook Smarter Cooling pó DC Motor Pedestal Fan
Using Your Kambrook Pedestal Fan p8 Care, Cleaning and Storage p17
Important
Please retain your instruction book for future use.
In the event that you need some assistance with your Kambrook appliance, please contact our Customer Service Department on 1300 139 798 (Australia) or 0800 273 845 (New Zealand). Alternatively, visit us on our website at www.kambrook.com.au or www.kambrook.co.nz
Kambrook Recommends Safety First
IMPORTANT: Please retain your instruction book for future use.
At Kambrook, we believe that safe performance is the first priority in any consumer product, so that you, our valued customer can confidently use and trust our products. We ask that any electrical appliance that you use be operated in a sensible fashion with due care and attention placed on the following important operating instructions.
Important Safeguards For Kambrook Smarter Cooling DC Motor Pedestal Fan
- Carefully read all instructions before operating the fan for the first time and save for future reference.
- Remove and safely discard any packaging material and promotional labels before using the fan for the first time.
- To eliminate a choking hazard for young children, remove and safely discard the protective cover fitted to the power plug of this fan.
- When unpacking the fan, check to see you have received all the items listed in the parts list, before discarding the packaging.
- Do not place the fan near the edge of a bench or table during operation. Ensure that the surface is level, stable, clean and free of water and other substances.
• Always ensure the fan is properly assembled before use. Follow the instructions provided in this book. - This fan is intended for household use only and not for commercial or industrial use.
- Disconnect the power plug before dismantling, assembling or before cleaning and when the fan is not in use.
- Avoid touching moving parts of the fan.
- Never Insert fingers, pencils or any other objects through the grille guards whenever the power plug is connected, in particular while the fan is switched on.
-
The fan must not be used if the grille guards are not fastened correctly, according to instructions provided in this book.
-
Ensure the fan blade engages fully onto the shaft. Please note this may require some force to ensure it is fully engaged.
- The fan must not be used if the base is not fastened correctly, according to the instructions provided in this book.
- Do not operate in the presence of explosives and/or flammable fumes or liquids.
- Never leave the fan unattended when in use.
- Do not unplug the fan by pulling on the cord.
- Never carry the fan by the cord or yank to disconnect from an outlet; instead, grasp the cord and pull to disconnect. Do not pull the cord around sharp edges or corners.
- Allow the fan blade to stop completely, always switch off at the power outlet, and then unplug the fan from the outlet:
- Before leaving it unattended
- Before attempting to move the appliance
- Before cleaning and maintenance unless otherwise specified in this booklet
- Immediately after use.
• To prevent damage to the fan, do not use alkaline cleaning agents when cleaning, uses a soft cloth and mild detergent. - Do not place anything on top of the fan when assembled, when in use and when stored.
- Store the unit out of reach of children.
- Keep the fan clean. Follow the cleaning Instructions provided in this book.
Important safeguards for all electrical appliances
- Fully unwind the power cord before use.
- Connect only to a 220V or 240V power outlet.
- Do not let the power cord hang over the edge of a bench or table, touch hot surfaces or become knotted.
• To protect against electric shock, do not immerse the power cord, power plug or appliance in water or any other liquid or allow moisture to come in contact with the part, unless it is recommended in the cleaning instructions.
- The appliance is not intended for use by persons (including children) with reduced physical, sensory or mental capabilities, or lack of experience and knowledge, unless they have been given supervision or instruction concerning use of the appliance by a person responsible for their safety.
• Children should be supervised to ensure that they do not play with the appliance.
- It is recommended to regularly inspect the appliance. To avoid a hazard, do not use the appliance if power cord, power plug or appliance becomes damaged in any way. Return the entire appliance to the nearest authorized Kambrook service centre for examination and / or repair.
- Any maintenance other than cleaning should be performed at an authorised Kambrook Service Centre.
- This appliance is for household use only. Do not use this appliance for anything other than its intended use. Do not use in moving vehicles or boats. Do not use outdoors. Misuse may cause injury.
- The installation of a residual current device (safety switch) is recommended to provide additional safety protection when using electrical appliances. It is advisable that a safety switch with a rated residual operating current not exceeding 30mA be installed in the electrical circuit supplying the appliance. See your electrician for professional advice.
• Always turn the appliance to the OFF position, switch off at the power outlet and unplug at the power outlet when the appliance is not in use.
- Before cleaning, always turn the appliance to the OFF position, switch off at the power outlet, unplug at the power outlet and remove the power cord. If detachable, from the appliance and allow all parts to cool.
- Do not place this appliance on or near a heat source, such as hot plate, oven or heaters.
- Position the appliance at a minimum distance of 20cm away from walls, curtains and other heat or steam sensitive materials and provide adequate space above and on all sides for air circulation.
Your Kambrook Smarter Cooling DC Motor Pedestal Fan
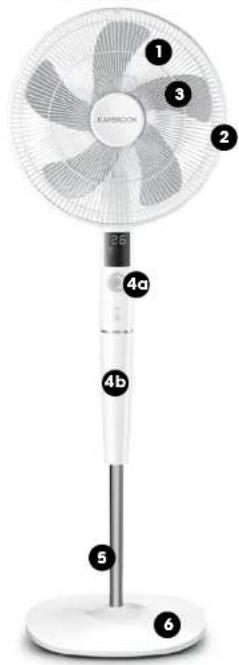
Main Image
- Front grille
2 Guard ring - Fan blade
4a. Pedestal Stand Top
4b. Pedestal Stand Bottom - Extension tube
- Anti-topple base
Individual Images
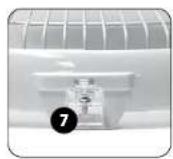
- Clear plastic clasp
- Rear grille
- Carry handle
- Motor
- Extension tube height adjustment knob
- Blade cap
- Rear grille lock nut
- Motor shaft
- Motor shaft pin
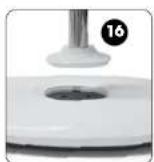
16 Extension tube flange


natural_image
Close-up of a white mechanical device with numbered parts (8, 9, 10) and no visible text or symbols.
natural_image
Close-up of a textured circular object with numbered annotations (12 and 13), no readable text or symbols present.- Fastening screw to secure the pedestal stand top and bottom together.
- Small screw fits to clear plastic clasp for grille and guard ring assembly.
- Lock nut screw to secure the anti-topple base onto the extension tube.
Main Image



Control Panel and LED Display
- LED display
- Control Panel featuring:
a) POWER On/Off button
b) Drive plate to adjust speed and timer (Includes 26 speed settings)
c) MODE & TIMER button Includes 5 cooling modes:
- Normal
• Nature - Sleep
- Comfort
- Silent mode
d) OSCILLATION (OSC) button
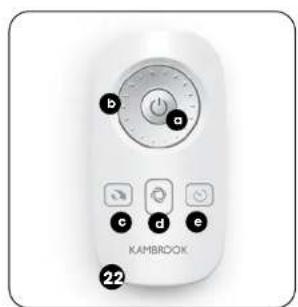
Remote Control
- Remote Control featuring:
a) POWER On/Off button
b) Drive plate
c) Oscillation
d) Mode
e) Timer

Using Your Kambrook Pedestal Fan
Before First Use
Remove any promotional material from fan.
NOTE: Assembly of the fan requires a Phillips head screwdriver (not supplied).

WARNING: When unpacking the fan, check to see you have received all parts before discarding the packaging.
Assembling Your Kambrook Pedestal Fan
Base and Pedestal Stand assembly
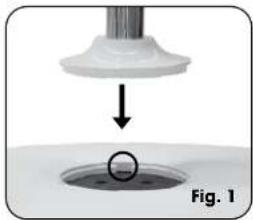
- To connect the extension tube to the anti-topple base, insert the flange located on the end of the extension tube into the ridge on the top of the base, ensuring that the tab on the flange aligns with the tab slot located on the anti-topple base (See Fig 1).
natural_image
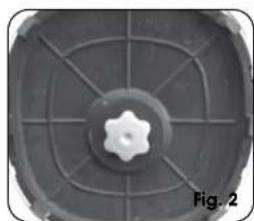
Diagram showing a mechanical component being lowered into a liquid, labeled as Fig. 1 (no text or symbols on the diagram itself)- Insert the lock nut screw into the hole at the bottom of the anti-topple base and securely tighten (See Fig 2). Turn the unit back to its upright position.
natural_image
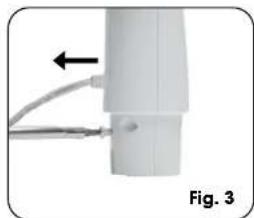
Top-down view of a mechanical component with a central star-like feature and concentric rings (no text or symbols)- Unscrew the fastening screw located on the back of the pedestal stand bottom using a screwdriver (See Fig 3).
natural_image
Close-up of a white electronic device with a black arrow pointing to a component, labeled 'Fig. 3' (no text or symbols on the device itself)Using Your Kambrook Pedestal Fan Continued...
-
To connect the pedestal stand top and bottom together, align the tab located on the upper end of bottom pedestal stand and the groove located on the lower end of top pedestal stand and press down (See Fig 4a). Twist the top pedestal stand in an anti-clockwise direction to lock together, exposing the screw hole at the back (See Fig 4b).
-
Insert the fastening screw into the exposed screw hole and, using a screwdriver, tighten securely into place (See Fig 5).

natural_image
Close-up of a mechanical component with a circular hole and an arrow indicating direction (no text or symbols)
natural_image
Close-up of a person holding a white cylindrical object with a metallic bar, labeled Fig. 5 (no text or symbols on the object itself)
natural_image
Close-up of a mechanical joint with a circular motion arrow and a labeled point (no text or symbols beyond label)Using Your Kambrook Pedestal Fan Continued...
Fan Head assembly
- Remove the blade cap from the motor shaft by turning it clockwise and then remove the rear grille locking nut by turning it counter-clockwise.
NOTE: You may have to hold the shaft in place with one hand to unscrew the blade cap with the other hand (See Fig 6).

natural_image
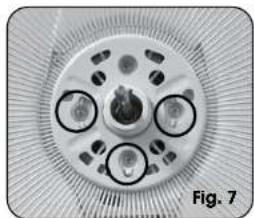
Close-up of hands holding a white fan-shaped device with a handle, labeled 'Fig. 6' (no text on device or background)- Place the rear grille centre hole on the front of the motor housing, lining up with the locating pins and ensuring that the tear drop shaped lug is pointing towards the ground (See Fig 7).
natural_image
Close-up of a circular mechanical component with radial grooves and central hub, labeled Fig. 7 (no text or symbols on the object itself)- Refit the rear grille locking nut and turn in a clockwise direction to fix the rear grille into place. Make sure that the rear grille has not slipped off the locating pins before tightening. This should be done by hand. Do not force (See Fig 8).

natural_image
Close-up of a hand holding a small mechanical component, with no visible text or symbols on the device itself.- Insert the notches on the back part of the fan blade onto the motor shaft pins (See Fig 9a and b).

natural_image
Close-up of a mechanical component with a circular head and radial blades, labeled 'Correct' and 'Fig. 9a' (no other text or symbols)
natural_image
Close-up of a hand holding a circular mechanical component, labeled 'Incorrect' and 'Fig. 9b' (no other text or symbols visible)Using Your Kambrook Pedestal Fan Continued...
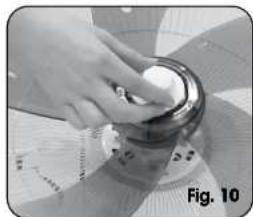
- Refit the blade cap onto the motor shaft and tighten in a counter-clockwise direction to fix the blade in place. This should be done by hand. Do not force (See Fig 10).
natural_image
Hand holding a white object over a metallic cylindrical object, labeled 'Fig. 10' (no readable text or symbols on the object itself)- Remove the small screw from the clear plastic clasp located at the bottom part of the front grille and set safely aside (See Fig 11).

natural_image
Close-up of a hand holding a small object, possibly a device or tool, with no visible text or symbols.- Place the front grille over the rear grille so that the tabs at the top of the front grille fit over the rear grille rim (See Fig 12).

natural_image
Diagram of a three-blade fan with labeled components, shown in two circular insets (no text or symbols on the fan itself)Using Your Kambrook Pedestal Fan Continued...
- Align and press together the front and rear grille, ensuring that the clear plastic clasp is in line with the LED screen. Securely snap shut the front and rear grilles by pressing together at 6 points around the edges of the grilles (See Fig 13a and b).


natural_image
Close-up of a four-blade desktop fan with blades and a central hub, labeled Fig. 13b (no text on fan or background)NOTE: Once the front and rear grilles have come together correctly, the Kambrook logo should be straight.
- Close and lock the clear plastic clasp at the bottom of the front grille over the rear grille rim. Refit the small screw previously removed through the screw hole located at the bottom of the clear plastic clasp and tighten securely (See Fig 14).

natural_image
Close-up of a white electric fan or air conditioner unit with cooling fins and a small connector, labeled Fig. 14 (no visible text or symbols on the device itself)Adjustments
Tilting Head Adjustment
Ensure the fan is turned off when making any adjustments.
To adjust the vertical angle of the fan, manually tilt the head of the fan to the desired position.
NOTE: the head will click as it is being adjusted.
Height Adjustment
To adjust the height of the fan, loosen the height adjustment knob at the rear of the pedestal stand bottom.
I manually adjust to the required height.
Re-tighten the knob when the desired height has been reached.
The fan is now ready to use.
Using Your Kambrook Pedestal Fan Continued...
To Operate the Kambrook Pedestal Fan
To operate the fan, plug the power cord into a 230V or 240V electrical outlet and switch the outlet on. Be sure the plug fits tightly as a loose fit will cause overheating and damage the plug.
Once the power outlet is switched on, the fan will beep to indicate the fan is in 'Standby'.
NOTE: The pedestal fan is fitted with a power saving feature. When any of the 5 mode types are selected or the timer function is set, the LED display panel will automatically switch off after 30 seconds. To redisplay the current setting, press the OSC button once. The fan will also automatically switch itself off after 12 hours if no action takes place.

CAUTION: Never Insert fingers, pencils or any other objects through the grille guards whenever the power plug is connected, In particular while the fan is switched on.
NOTE: To avoid infrared interference that may trigger the operation of the cooling fan, ensure the fan is positioned away from other infrared remote controlled appliances.
Control Panel
The main control panel is located on the fan body, with the LED display just above it.
The functions available on the control panel are also available when using the remote control.
a) Power button ON/OFF button
Press the 'POWER' button once to turn the fan ON.
To turn the fan OFF, press the 'POWER' button again, turn off at the power outlet and remove the plug from the power outlet.
NOTE: The fan has a memory function and will always return to the same mode and speed it was set at when it was switched off.
b) Mode button
There are five wind modes for the fan. The LED screen will indicate which mode the fan has been set at.
Choose your preferred mode by pressing the mode key.
Normal Mode
The fan speed stays at the constant rate it is set at. Increasing the speed will increase the air flow, whilst reducing the speed will decrease air flow.
This is the only mode that allows you to adjust the wind speed. Refer to part (c) of this section.
Natural Mode
The fan speed will fluctuate between various wind speeds to give a more natural feel to the air flow. The wind speed self regulates in accordance to a pre-set program.
Using Your Kambrook Pedestal Fan Continued...
Sleep Mode

The fan speed self regulates within the low wind speed range in accordance to how it has been programmed, dropping various wind speed levels every half an hour until the fan reaches the lowest wind speed range. The fan will then continue to run constantly at this lower wind speed until it is manually switched off or has reached the end of the preset time.
NOTE: The fan will automatically switch off after 12 hours if no action takes place.
Comfort Mode
The fan will automatically regulate its wind speed by Increasing or decreasing within the medium wind speed range depending on the ambient temperature of the room. If the fan is on, and the ambient temperature surrounding the fan cools down below 18°Celsius, the fan will temporarily go into standby mode. When the ambient temperature surrounding the fan increases above 18°Celsius, the fan will automatically switch back on.
Silent Mode
The fan will run at the lowest speed, generating a light air flow without making much sound, circulating the air but keeping the fan noise and vibration to a minimum level.
c) Speed control in normal mode This fan has 26 speed levels (wind speeds) which can be adjusted when using Normal mode only. Rotate the drive plate clockwise to increase the speed and counter-clockwise to decrease the speed (See Fig 15). The speed is displayed on the digital display.
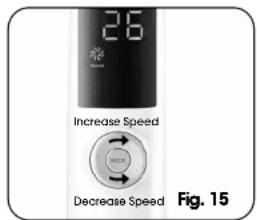
NOTE: You can only set your preferred speed when in Normal Mode.
d) OSC button (Oscillation)
The oscillation works in all modes. Press the oscillation button once, and the fan will begin to oscillate from left to right. Press again and the oscillation will stop.
Setting the timer
You can use either the control panel or the remote control to set the timer. The timer is used to turn the fan on or off after a predetermined length of time.
Using Your Kambrook Pedestal Fan Continued...
Timer Icons Guide

Pre-set the timer to turn the fan on via Remote Control or via Control Panel
Press and hold the mode button of the control panel or press the timer button once on the remote control until the pre-set icon and 0.0H is displayed on the screen.
Immediately rotate the drive plate clockwise to increase the pre-set time by 0.5 hours, up to a maximum time of 12 hours.
Once your preferred pre-set time is chosen, do not press any buttons or rotate the drive plate.
After 30 seconds only the pre-set icon will continue to illuminate on the screen. This indicates that the timer has successfully been set.
When the pre-set time is reached, the fan will switch ON automatically.
NOTE: To check the pre-set time left on the LED screen press the OSC button once on the control panel or on the remote control.
To cancel the pre-set on time and turn on the fan, press the power button once. The pre-set icon will no longer be displayed on the LED display.
Pre-set the timer to turn the fan off via Remote Control or via Control Panel
To pre-set the timer to turn the fan off, ensure the fan is switched on and the display is illuminated. Press and hold the mode button of the control panel or press the timer button once on the remote control until the timer icon and 0.0m is displayed on the screen. Immediately rotate the drive plate clockwise to increase the set time by 0.5 hours, up to a maximum set time of 12 hours.
Once your preferred time is chosen, do not press any buttons or rotate the drive plate. The timer display will flash and the unit will beep once to indicate you have successfully set the timer. The illuminated timer icon will be added to the chosen mode display.
When this set time is reached, the fan will switch OFF automatically.
NOTE: To check the pre-set time left on the LED screen press the OSC button once then press and hold the mode button on the control panel or press the timer button twice on the remote control
To cancel the pre-set off time simply switch off the fan by pressing the power button.
NOTE: The timer display will continuously flash on the screen until a preset time is selected.
Using Your Kambrook Pedestal Fan Continued...
Using the Remote Control
Before using the remote control, install the 1 x CR2032 3V Lithium battery that is provided with the remote.
To do this, open up the battery compartment at the back of the remote by forming a good grip of the remote, pushing the small arched groove to the right and simultaneously pushing out the battery compartment cover by pushing the rectangular groove outwards (See Fig 16a).
Insert the battery paying attention to the polarity (+ and -). Reinsert the battery compartment into the remote control ensuring that the + symbol is facing upwards when inserted (See Fig 16b). Make sure the battery compartment is correctly secured.


natural_image
Close-up of hands holding a small electronic device with a coin inserted (no visible text or symbols)NOTE: To use the remote control, it must be pointed at the LED display and must be used within five metres from the LED display.
WARNING - KEEP BATTERIES OUT OF REACH OF CHILDREN Swallowing may lead to serious injury in as little as 2 hours or death, due to chemical burns and potential perforation of the oesophagus.
If you suspect your child has swallowed or inserted a button battery immediately call the 24-hour Poisons Information Centre on 13 11 26 for fast, expert advice.
Examine devices and make sure the battery compartment is correctly secured, e.g. that the screw or other mechanical fastener is tightened. Do not use if compartment is not secure.
Dispose of used button batteries immediately and safely. Flat batteries can still be dangerous.
Tell others about the risk associated with button batteries and how to keep their children safe.
Always switch the Kambrook Pedestal Fan off and unplug from the power outlet prior to cleaning the housing.
Care, Cleaning and Storage
base, grilles and blades.
To clean the outside of the fan, wipe the exterior with a soft, damp cloth. Never use an abrasive cleaner.
When not in use, store the fan in a cool, clean and dry location.
Troubleshooting
If your fan displays E1 or E2 on the LED screen this indicates that there is a problem with the fan and you need to have your fan serviced.
To arrange for service, contact Customer Care.
Notes Notes
Kambrook - Australia
Ground Floor, Suite 2, 170-180 Bourke Rd
Alexandria NSW 2015, Australia
Locked Bag 2000
Botany NSW 1455
Customer Service Line 1300 139 798
Customer Service Fax 1800 621 337
www.kambrook.com.au
Kambrook - New Zealand
Private Bag 94411
Botany, Manukau
Auckland 2163
New Zealand
Customer Service Line/
Spare Parts 0800 273 845
Customer Service Fax 0800 288 513
www.kambrook.co.nz

- Contents
- Important
- Kambrook Recommends Safety First
- IMPORTANT: Please retain your instruction book for future use.
- Important Safeguards For Kambrook Smarter Cooling DC Motor Pedestal Fan
- Important safeguards for all electrical appliances
- Your Kambrook Smarter Cooling DC Motor Pedestal Fan
- Main Image
- Individual Images
- Control Panel and LED Display
- Remote Control
- Using Your Kambrook Pedestal Fan
- Before First Use
- Assembling Your Kambrook Pedestal Fan
- Using Your Kambrook Pedestal Fan Continued...
- Fan Head assembly
- Adjustments
- Tilting Head Adjustment
- Height Adjustment
- To Operate the Kambrook Pedestal Fan
- Control Panel
- a) Power button ON/OFF button
- b) Mode button
- Normal Mode
- Natural Mode
- Sleep Mode
- Comfort Mode
- Silent Mode
- d) OSC button (Oscillation)
- Setting the timer
- Pre-set the timer to turn the fan on via Remote Control or via Control Panel
- Pre-set the timer to turn the fan off via Remote Control or via Control Panel
- Using the Remote Control
- WARNING - KEEP BATTERIES OUT OF REACH OF CHILDREN Swallowing may lead to serious injury in as little as 2 hours or death, due to chemical burns and potential perforation of the oesophagus.
- Care, Cleaning and Storage
- Troubleshooting
- Notes Notes
Brand : Kambrook
Model : KPF849
Category : Fan