MPK8955UK - Mp3 player CURTIS - Free user manual and instructions
Find the device manual for free MPK8955UK CURTIS in PDF.


| Product Type | MP3 Player with Touchscreen |
| Brand/Model | Curtis MPK8955UK |
| Storage Capacity | 8 GB (internal) |
| Display | 2.8-inch TFT Touchscreen |
| Dimensions | 94 x 56 x 16.5 mm |
| Weight | 70 g |
| Battery Type | Li-Polymer Rechargeable (3.7V, 700mAh) |
| Max Playback Time | Up to 5 hours |
| Supported Audio Formats | MP1, MP2, MP3, WMA, WAV, ACT |
| Supported Video Format | AVI (via conversion tool) |
| Supported Image Formats | JPG, BMP, GIF |
| Supported E-book Format | TXT |
| Recording | Built-in microphone, ACT/WAV formats |
| Connectivity | USB 2.0 High Speed, Mini SD card slot |
| Operating System Compatibility | Windows 2000/XP/Vista |
| Additional Features | Camera, video camcorder, calculator, voice recorder, firmware upgradeable |
| Maintenance | Clean with soft dry cloth; avoid moisture |
| Safety | Keep away from water and extreme temperatures; use only specified charger (400-500mA) |
| Spare Parts / Repairability | Not specified; contact Curtis support for repairs |
Frequently Asked Questions - MPK8955UK CURTIS
User questions about MPK8955UK CURTIS
0 question about this device. Answer the ones you know or ask your own.
Ask a new question about this device
Download the instructions for your Mp3 player in PDF format for free! Find your manual MPK8955UK - CURTIS and take your electronic device back in hand. On this page are published all the documents necessary for the use of your device. MPK8955UK by CURTIS.
USER MANUAL MPK8955UK CURTIS
Table of contents....1
Basic Features....3
Accessories....3
Basic Operation....4
Power On 4
Power Off 4
Lock/ Unlock....4
Reset....4
Volume Control....4
How to insert and pull out Mini SD Card....4
Connection to PC and Data Exchange....5
Charging....5
Low Power....5
Calibrate....6
File Storage....6
General Button/ Icon Description....7
Main Menu Interface....8
Music Mode....9
Music Interface Description....9
Music Setting Interface....10
Lyrics Display....11
Video Mode....12
Photo Mode....14
Camera Mode....16
Ebook Mode....18
Application....21
Recorder....22
Explorer....23
Caculator....23
System Setting....24
Player Information....24
Set Time....24
Language....25
Display....25
Calibrate....25
Power Off Setting....26
Default Settings....26
Upgrade....26
Video Conversation Tool....27
Operating Platform....27
What format can files be converted into....27
Software Installation....27
Automatic Installation....27
Manual Installation....27
Video File Conversion....28
Firmware Upgrade....31
Technical Specification....33
Trouble Shooting 34
Basic Features
- Brand new touch screen OS for direct and convenient operation
● Build in Camera/ Camcorder
● Music player: compatible with MP3, WMA, WAV and ACT formats - Recorder: MIC recording and compatible with ACT and WAV formats
● Picture browser: for JPG, BMP and GIF formats
● Video player: for playing video of AVI format - EBook browser
- Compatible with Mini SD Card
● Settings: for setting and activating various features - USB2.0 high speed transmission
Accessories
- User manual
- USB Cable
- Earphone and Adaptor
- CD Driver
Basic Operation
Power On
Slide the Power button to ON/OFF position and hold for 3 second to turn on the player. It will prompt "Welcome" and then enter the main interface.
Power Off
When the player is on, slide the power button to ON/OFF position and hold for 3 seconds to turn off the player.
Lock / Unlock
Lock: Slide the Power button to the HOLD position to lock the player so as to avoid careless button operation.
Unlock: Slide back the Power button to Original position then touch operation will be enabled again.
Reset
If the player encounters dead halt during use, press RESET button to restart the player.
Volume Control
In the states of music and video, etc, you can perform volume control using + or - button at the lower part of the screen. + button is for increased volume and - button is for reduced volume. Hold Button + or Button - to continuously increase or reduce volume.
How to insert and pull out Mini SD card
How to insert: with the front (the side with characters) of the Mini SD card up (towards the screen of the player), slightly push to insert into the card holder of the player to connect. After the card is inserted, the player can play the files in the Mini
SD card.
How to pull out: slightly push the Mini SD card and the Mini SD card will partly come out, and then pull the card out.
Note: please insert or pull out the card when the player is off, or the internal files of the player will be lost or damaged.
Connection to PC and Data Exchange
Connect the player to PC with the USB cable, and the player will enter “U disk” mode. Press MENU button or safely remove U disk, and the player will be under USB charging mode. In USB charging mode, touch the screen or press MENU to enter the main applications interface.


Charging
This player has high capacity lithium battery. For charging, connect the player to the USB port of the PC or to a charger. When the charger is used for charging, its indicator light is in red color; when the indicator light turns into green color, it indicates that the charging finishes.
Low Power
When battery power is low, the player will prompt and power off and enter Standby mode automatically. Do not power on and charge the player instead.
Charger current specification recommended: 400-500mA.
Calibrate
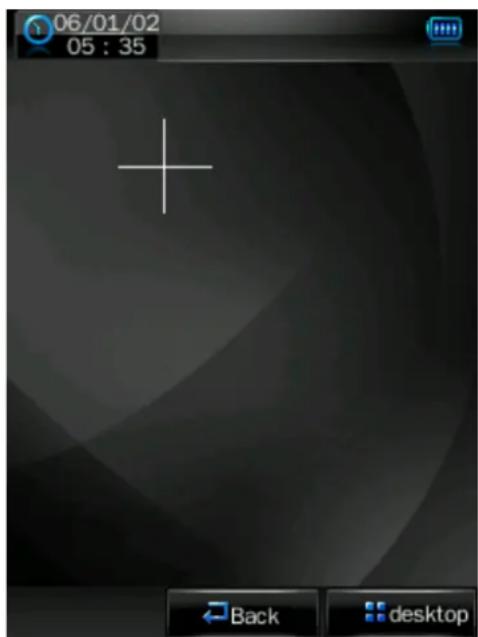
Before using this product, initial touch screen adjustment is required. Enter the Calibrate mode in system setting to calibrate the touch screen position with centering of calibrate sign +.
File Storage
Files of different types should be stored under different directories. For example, music file should be stored under MUSIC dir. Record file stored under RECORD dir. Picture files under PICTURE dir. Video files VIDEO dir. Text files TXT dir. the corresponding application unable to find the file If it is not saved in this way,
General Button /Icon Description

| Button /Icon | Description |
 | Return to upper directory |
 | Return to main menu |
 | Delete file or file folder |
 | Return to previous operation interface |
Main Menu Interface
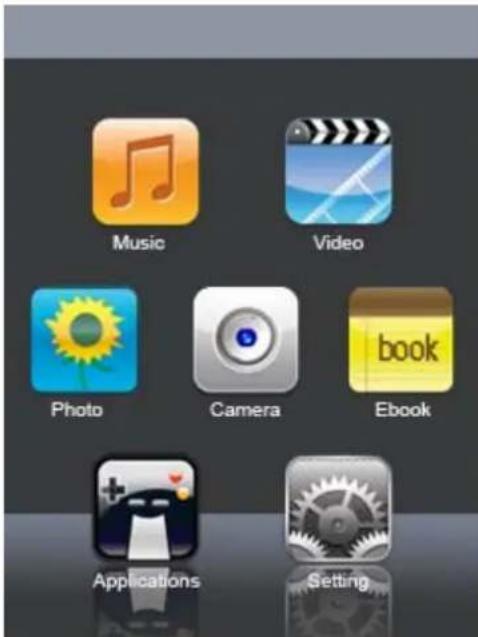
This player provides a touch screen OS for direct operation. The main menu interface is shown in the picture below:
-
The system date and time is shown on the upper left corner of the main menu interface. The battery is shown on the upper right corner of the main menu interface.
-
Under the main menu interface, touch an icon on the screen, and the player will enter the selected mode.
-
After the player enters a mode, touch the 📄Desktop icon on the bottom right corner or press and hold the MENU button to return to the main menu interface.
Music Mode
In the main interface, touch the "Music" icon to enter music mode.
Music Interface Description

| Button /icon Description | ||
 | Number of the song being played / Total songs. | |
 | Playing mode | |
 | Playing sequence | |
 | Playing style | |
 | Song playing progress bar. Drag the bar to adjust playing progress. | |
 | Volume bar. Drag the bar to adjust volume. | |
 | Touch it to switch to previous song, long press for fast rewind. | |
 | Play / pause the current song. Click the play button, and the button will be change to pause button. | |
 | Touch it to switch to the next song, press and long press for fast forward. | |
Music Setting Interface
Click one of the 4 buttons at the bottom of the interface to enable an appropriate function.
| Icon Description | |
| Click Browser to enter different song lists - main directory, card directory, all songs, ID3 list, play list, and tag list. | |
Click Settings to chooseSRS setting: WOW, WOWHD, USERClick USER to enter user setting interface. Drag the bar or chick the options to set the functions. Click OK to confirm the settings. EQ setting: click to enter User EQ setting interface, move up or down the bar to select sound effect, and click OK to confirm.06/01/05
04:14
USER EQ
+6
dB
dB
dB
50HZ 200HZ 1KHZ 3KHZ 14KHZ
OK
Back desktop
Add list
Add tag
Click
Back return to play screen. EQ setting: click to enter User EQ setting interface, move up or down the bar to select sound effect, and click OK to confirm.06/01/05
04:14
USER EQ
+6
dB
dB
dB
50HZ 200HZ 1KHZ 3KHZ 14KHZ
OK
Back desktop
Add list
Add tag
Click
Back return to play screen. | |
| Song information display. | |
Lyrics Display
The player is compatible with lyrics files of “*.LRC” format and enables playing song with synchronous lyrics. The name of the lyrics file should be the same as that of the song file. When there are the lyrics file with the same name of the song being played under the play list directory, the lyrics of the song will be displayed on the playing interface.
Video Mode
In main interface, click the "video" icon to enter Video mode.
Directly click the video file on the screen to start playing the selected video.
When play a video file, the up/down buttons and the progress bar will appear automatically by touching the screen.

natural_image
Video player in dynamic combat scene with armored warrior holding shield, surrounded by masked warriors (no visible text or symbols)| Button | Description |
 | Browse: local directory, card directory, tag list |
  | Tag: directly click the icon and a box pops out and prompts “tag saved”. Play: click and it will change to pause button, and click again to continue playing. Play: click and it will change to pause button, and click again to continue playing. |
 | Touch it and the Volume bar will pop out at the bottom. Drag the bar to adjust volume. |
 | Return to main menu |
 | Fast rewind: long press for fast rewind. Short press for the previous video file. |
 | Fast forward: long press for fast forward. Short press for the next video file. |
Photo mode
- In main interface, click the "Photo" icon to enter Photo mode.
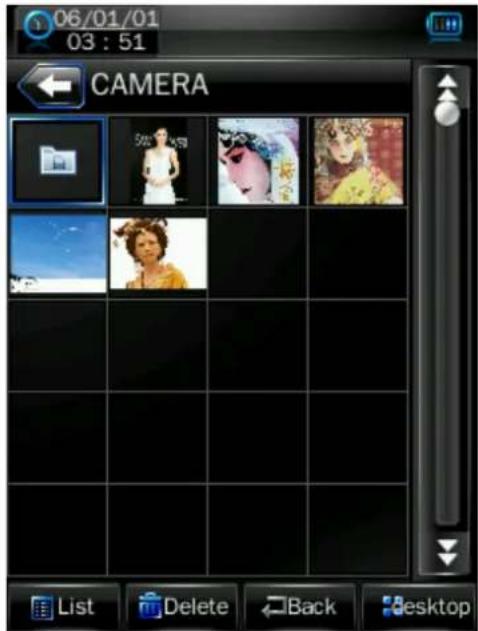
Click to change to the List mode.
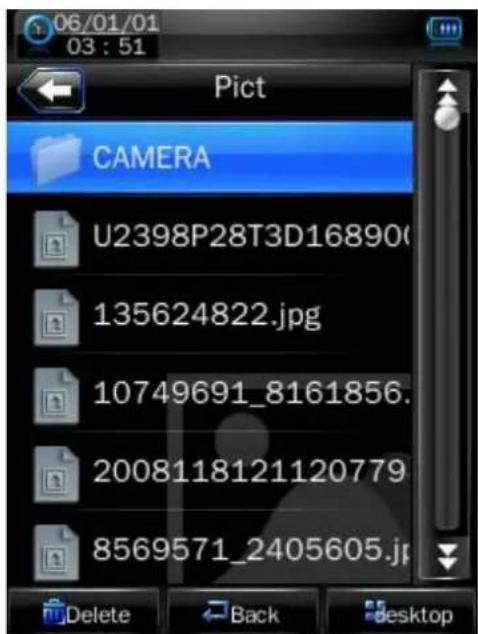
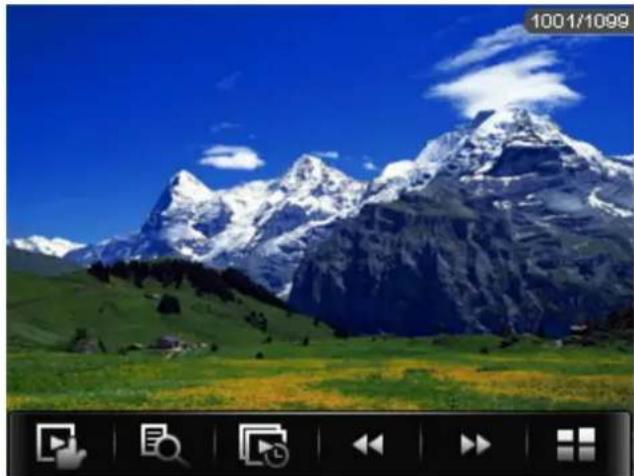
- Directly click the thumbnail to browse pictures. Click the picture, and the buttons will appear automatically at the bottom of the screen.
natural_image
Scenic mountain landscape with snow-capped peaks under a clear blue sky, no visible text or symbols| Button | Description |
 | Manual play: click the button, and the button will change to , and click again to enter auto play mode. |
 | Main dir and card dir. return to upper directory to browse picture list. |
 | Slide interval: 1 -5 seconds. |
 | Previous picture |
 | Next picture |
 | Return to the main menu |
Camera Mode
In the main interface, click the “Camera” icon to enter Camera Mode.
- Capture Mode
| Button /Icon | Description |
 | Change to video mode |
 | Memory indicator to check how many pictures left. |
 | Photo timer: 5, 15, 20 seconds and off mode. |
 | Return to main menu |
 | Browse : local directory, card directory. Click picture, and it will appear automatically at the bottom of the screen. |
 | Select camera setting in different mode: Special Effect, save path, Sutter Sound and Date Stamp |
 | Photo resolution |
 | Photo capture button |
- Record Mode
| Button /Icon | Description |
 | Change to camera mode |
 | Light balance setting: automatic light/ indoor light / out door |
 | Filter effect |
 | Return to main manu |
 | Browse : local directory, card directory. Click video, and it will appear automatically at the bottom of the screen. |
 | Select camera setting in different mode: Brightness/ Save Path |
 | Video resolution |
 | Video capture button |
3. PC Camera Mode
Connect to PC camera on computer.
Ebook Mode
- In the main interface, click the Ebook icon to enter the mode.

- Select a TXT file to enter Ebook browser interface.

| Button /Icon | Description |
 | Manual browse: click it and it will change to  enter auto browser mode. enter auto browser mode. |
 | Auto browser time setting: 10 seconds, 15 seconds, 20 seconds, 25 seconds, 30 seconds. |
 | Save and pick tag, click to show the tag list, and then click to save or select tag. Click the part outside Save tag box to exit from the tag setting box. |
 | Skip to: click to show “Skip to” dialogue box, and click  to select the skip percentage. Click outside part of the “Skip to” box to exit. to select the skip percentage. Click outside part of the “Skip to” box to exit. |
 | |
 | TXT file browser: local directory, card directory. |
 | Previous page |
 | Next page |
Application
In the main interface, click the "Application" to enter the mode.
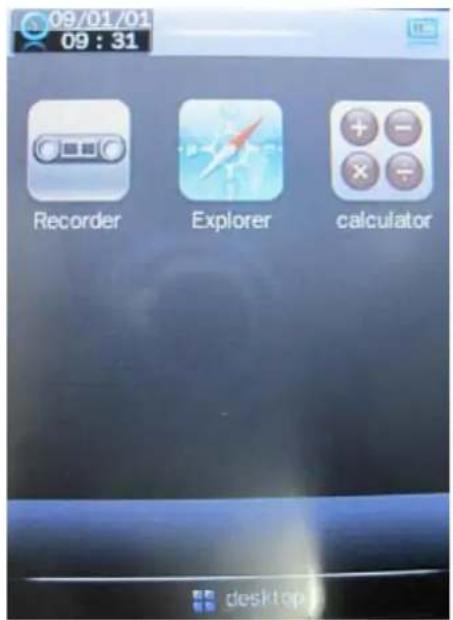
Recorder
Explorer
Calculator
Recorder
Click Recorder to enter internal MIC recorder interface.
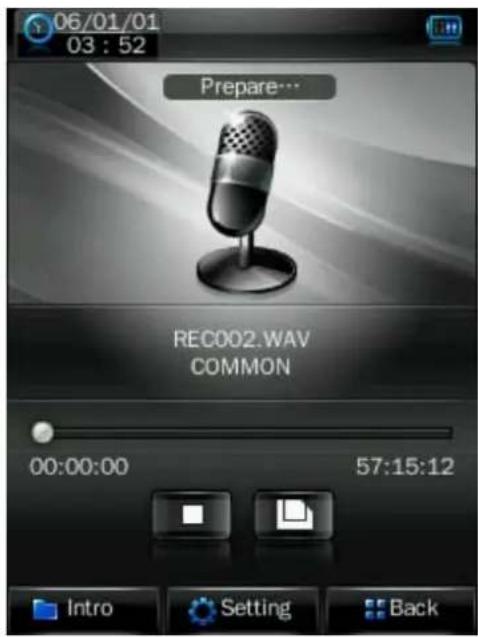
| Button /Icon | Description |
 | Stop, click it and it will change to play icon ▶ to enter recording mode |
 | Save the recorded file. |
 | View recorded file. |
 | Record settings1. Recording format: WAV &MP3 formats.2. Quality: high, medium, low.3. Recoding gain volume: level 1, 2, 3. |
Explorer
In the main interface, click the “Explorer” icon to enter the mode: Flash Memory and Card Memory (not displayed if no card inserted). All files and file folders in the player can be listed, and the user may play the compatible music, video, e-book and picture files under this interface; or, the user may directly delete the selected files.

Calculator
Simply press the corresponding button.

System Setting
In the main interface, click the "system settings" icon to enter the mode.

Player Information
Relevant read-only product information
Set Time
-
Time format: on or off.
-
Time and date: click ▲ and ▼ to set.
Language
Eleven languages available for selection: English, Simplified Chinese, Traditional Chinese, Japanese, Korean, French, German, Spanish, Portuguese, Dutch and Italian.
Display
- Backlight time
Click

to

There are 9 options: 0 second, 5 seconds, 10 seconds, 15 seconds, 30 seconds, 1 minute, 5 minutes, 15 minutes and 30 minutes.
- Brightness adjustment
There are 5 options: 1, 2, 3, 4, 5. The higher the level is, the brighter the LCD is.
Click the corresponding


to set.
Calibrate
When the touch screen position is not accurate, recalibrate with this function.
After the player enters this mode, touch the center of calibration sign + to calibrate.
Power Off Setting
Sleep time: click and to set.
There are 6 options: off, 10 minutes, 15 minutes, 30 minutes, 60 minutes and 120 minutes. The setting will change to the default value "Off" if re-start the player.
Default Settings
After the player enters this mode, the player will prompt an auto warning about whether to restore system default setting or not.
Click "Yes" to restore factory default settings. Click "No" to abandon this restoration.
Upgrade
After clicking this icon, the player will enter “hardware upgrading” warning interface. At this point, connect the player to the USB port of a PC to update the firmware of the player. Touch “cancel” on the screen to abort this upgrading.
Video Conversion Tool
Video conversion tool is used to convert AV files into advanced AVI video file format to make them viewable on this player.
Operating Platform
For Windows 98, Windows 2000, Windows XP, Vista should be used.
What format can files be converted into
This tool can converted the video files of the following formats:
1).AVI format files;
2).ASF format files;
3).MPG format files;
4).RMVB format files;
5).MOV format files;
6).VOB format files;
7). DAT format files;
8).WMV format files
Software Installation
Automatic Installation
Start PC, enter Windows system, place the tool installation CD into the CD-Rom, and the installation will be automatically run. Please follow instructions to click “next step” button, and click “off” button when installation is completed successfully.
Manual Installation
If automatic run is not set up in the PC, then the installation needs to be started manually:
First, double click the Setup.exe file under the root directory of the CD to start the installation guide; follow instructions to click “next step” button, and click “off” button when installation is completed successfully.
Video File Conversion
1. Running this tool.
Click 【start】button - 【program】menu, select “MP3player management tool” - “video converting tool” to enter the main interface.
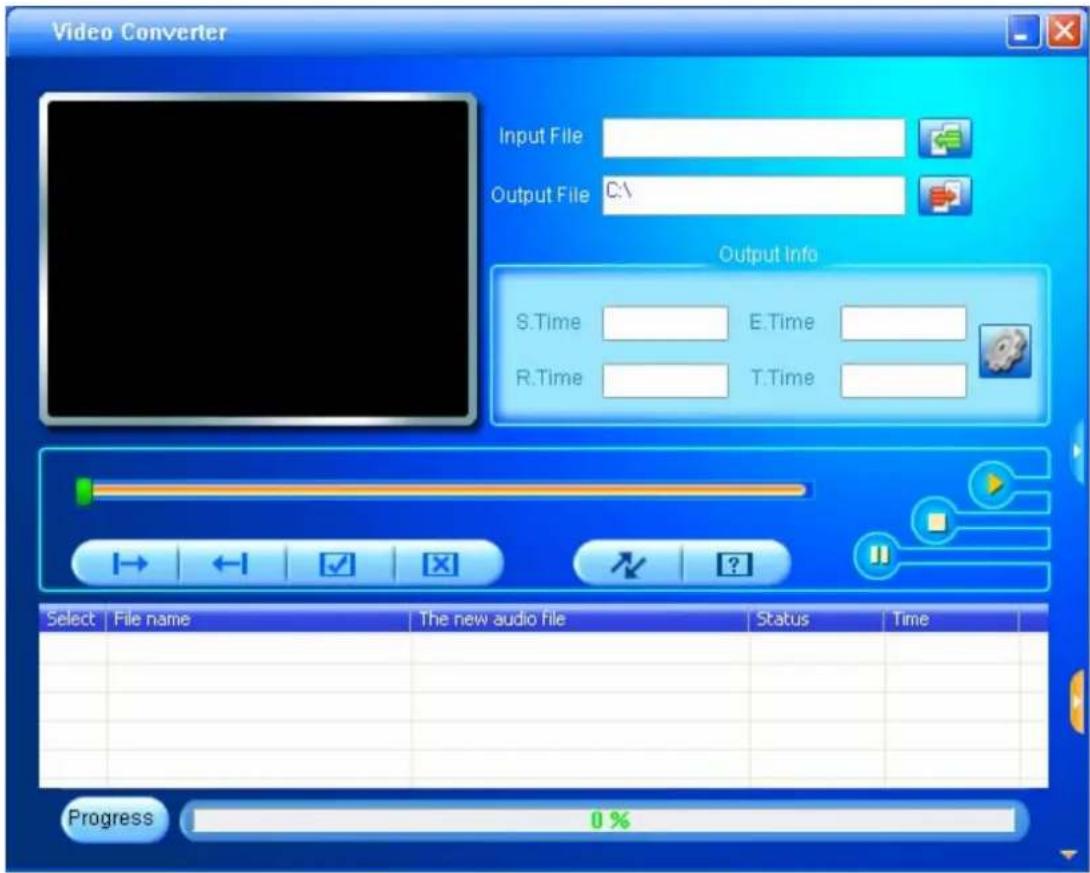
2. Adding AV files
Run software, click the “add file” button on the right side of the “input file” column to add AV files to be converted, and a dialogue box will automatically pop out for adding one or more AV files.
After the file is added, the path of the AV file will be displayed in the “input file” field as shown below; and, relevant information of the added file, such as the check box, file name and path, status and file length, will be displayed in the status column.
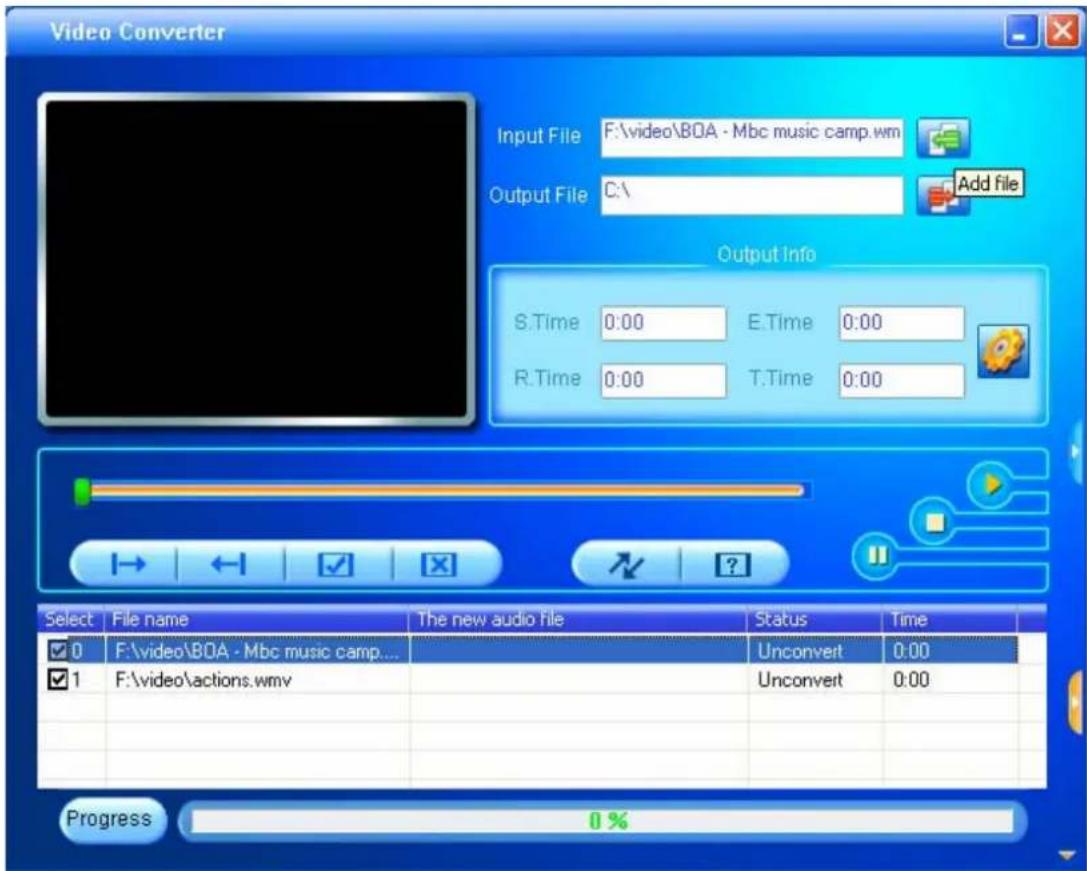
3. File conversion
1) Select the file to be converted
In status column, on the left side of each AV file name, there is a check box and a sequence number. The check box is used to choose a plurality of AV files to be converted, and the newly added AV files are checked as default setting. If a file is not checked, it indicates that this AV file will not be converted. In addition to directly tick the check box, the AV file may also be selected or removed by right clicking the mouse over the file and choosing “select” or “remove” in the pop-out window. To remove any AV file from the adding list, simply right click the mouse over one or more AV files, select “remove”, and the files will be removed from the list.
2) Select the storage path of the video files
This conversion tool uses C:\ as the default path for storage of video files. Before file
conversion, click the video storage path button 📋 on the right side of the “output file” column to specify the location for saving the video file. When the “browse file folder” dialogue box pops out, select the specified storage path, and then click “confirm” button.

Afterwards, the path in which the video files are stored will be displayed in the "output file" column of the conversion tool interface.
3) Properties setting
Before converting AV files, some important parameters of the video files need to be set, such as the type (AVI or WMV), the intercepted part and the length of the video file, image exchange, image quality. There are two methods to enter the properties setting interface:
A. After selecting one or more AV files, click the settings button in the “output information” column to enter;
B. After selecting one or more AV files, right click the mouse and select "settings" to enter;
“Select” here does not mean checking the AV file in the check box, but using the mouse to click file name to make the file background color blue.
4) Start converting file
Confirm that the check box of the AV file to be converted is checked. Press the
conversion button in the tool interface to start, the tool begins to convert
all selected AV files of which the check box has been checked, and the file status will be changed from “not processed” into “being converted”, and the conversion progress bar will be displayed in the conversion progress column at the same time.
In addition to the above file conversion methods, the AV files stored in the hard disk may also be selected and converted by right clicking the mouse and selecting the "start video conversion" in the pop-out menu, and the tool will automatically run and directly start file conversion.
Firmware Upgrade
This player provides with firmware upgrading tool to upgrade or repair the firmware in the player.
- Down load the latest firmware.
- Connect the player to PC's USB port correctly; make sure no other movable disks are connected to the PC at the same time.
- Run this tool.
If the firmware in the player is in good condition, the tool will shift to firmware upgrading mode; it displays the information of the player's firmware such as version etc in the box on the upper left corner of the tool interface. Click button "Select new version firmware file" to select the firmware file to be upgraded. After the firmware file detected to be correct by the tool, it displays the information of the selected firmware such as version etc in the box on the upper right corner of the tool interface. Now click button "Start upgrading" to upgrade the firmware. If the internal firmware of the player has been damaged, the tool will change to firmware restoration mode. The version information of the player's internal firmware now will not be displayed in the box on the upper left corner of the software interface. It requires the user to select a correct firmware file to repair the damaged one. At the same time, the information such version etc of the firmware file to be repaired is displayed in the box on the upper right corner of the interface; click button "Start upgrading" to upgrade the firmware.

- Do not disconnect the player from the PC during firmware upgrading or repairing. After the upgrading is completed, a prompt “firmware upgrading succeeded, the program will exit automatically!” pops out. Now confirm, the tool will shut down and reset the player, the whole upgrading is completed.
Technical Specification
| Capacity 8GB | |
| Display 2.8" TFT | |
| Interface USB 2.0 High Speed | |
| Max Playtime Up to 5 hrs | |
| Battery Type & Capacity | Li-Polymer Rechargeable (3.7V)700mAh |
| File Type MP1, | MP2, MP3, WMA |
| S/N Ratio 80~90Db | |
| Power Output (L) | 5mW + (R) 5mW(32ohm) |
| Operating System | Compatible with Windows 2000/XP |
| Dimensions 94 x | 56 x 16.5 |
| Weight | 70g |
Trouble Shooting
What should I do if there's no sound when playing?
You should check the volume first. If the volume has been turned up, maybe the memory format of the device is incorrect..

Specifications are subject to change without notice.
No part of this document may be reproduced or transmitted
in any form or by any mean, electronics or mechanical
including photocopying and recording
or translated to another language for any purpose
- Basic Features
- Accessories
- Basic Operation
- Power On
- Power Off
- Lock / Unlock
- Reset
- Volume Control
- How to insert and pull out Mini SD card
- Connection to PC and Data Exchange
- Charging
- Low Power
- Calibrate
- File Storage
- General Button /Icon Description
- Main Menu Interface
- Music Mode
- Music Interface Description
- Music Setting Interface
- Lyrics Display
- Video Mode
- Photo mode
- Camera Mode
- PC Camera Mode
- Ebook Mode
- Application
- Recorder
- Explorer
- Calculator
- System Setting
- Player Information
- Set Time
- Language
- Display
- Power Off Setting
- Default Settings
- Upgrade
- Video Conversion Tool
- Operating Platform
- What format can files be converted into
- Software Installation
- Automatic Installation
- Manual Installation
- Video File Conversion
- Running this tool.
- Adding AV files
- File conversion
- 1) Select the file to be converted
- 2) Select the storage path of the video files
- 3) Properties setting
- 4) Start converting file
- Firmware Upgrade
- Trouble Shooting
Brand : CURTIS
Model : MPK8955UK
Category : Mp3 player