
V325i - Smartphone MOTOROLA - Free user manual and instructions
Find the device manual for free V325i MOTOROLA in PDF.


| Product Type | Mobile Phone |
| Brand | Motorola |
| Model | V325i |
| Network Technology | CDMA |
| Dimensions (approx) | 3.5 x 1.9 x 0.9 in (89 x 48 x 23 mm) |
| Weight (approx) | 3.5 oz (100 g) |
| Battery Type | Lithium Ion (removable) |
| Battery Capacity | 920 mAh |
| Standby Time (approx) | Up to 10 days |
| Talk Time (approx) | Up to 3 hours |
| Internal Display Size | 1.8 in (estimated) |
| External Display | Yes, monochrome |
| Camera Resolution | VGA (640 x 480 pixels) |
| Messaging | SMS, MMS |
| Speakerphone | Yes (handsfree) |
| TTY Support | Yes (3 modes) |
| AGPS | Yes (assisted GPS) |
| Voice Dial | Yes (Name Dial, Digit Dial) |
| Ring Lights | Customizable |
| Keypad Lock | Yes (press CLR) |
| Phone Lock | Yes (manual or automatic) |
| Care Instructions | Keep away from liquids, dust, extreme temperatures; clean with dry cloth. |
| Warranty | 1 year limited (US/Canada) |
Frequently Asked Questions - V325i MOTOROLA
User questions about V325i MOTOROLA
0 question about this device. Answer the ones you know or ask your own.
Ask a new question about this device
Download the instructions for your Smartphone in PDF format for free! Find your manual V325i - MOTOROLA and take your electronic device back in hand. On this page are published all the documents necessary for the use of your device. V325i by MOTOROLA.
USER MANUAL V325i MOTOROLA
We are pleased that you have chosen the Motorola V325 wireless phone.

Check It Out!
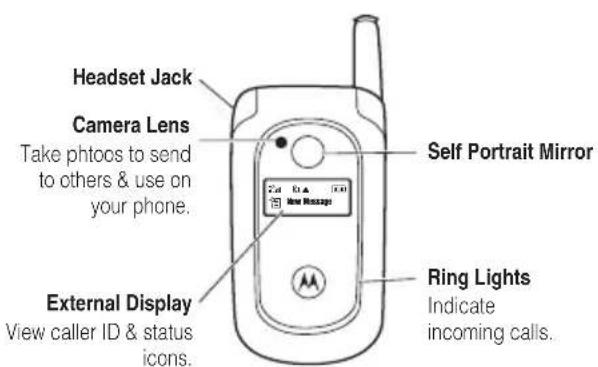
| Features |
| Take PhotoOpen the phone, press the camera key to activate the camera, point lens at subject, pressTake(OK)to take a photo. |
Send Photo  After you pressTake(OK)to take a photo:PressSend(OK)to save the photo in the Galleryand go to theCREATE PIX MESSAGE screen. After you pressTake(OK)to take a photo:PressSend(OK)to save the photo in the Galleryand go to theCREATE PIX MESSAGE screen. |
Send Picture Message  Send a message with pictures, animations, or sounds:MENU(OK) ▶ ⏻M ESSAGING ▼ New Pix Msg Send a message with pictures, animations, or sounds:MENU(OK) ▶ ⏻M ESSAGING ▼ New Pix Msg |
Send Text Message  Send a text message:MENU (OK) ▶ ⚙M ESSAGING ▼ New Txt Msg Send a text message:MENU (OK) ▶ ⚙M ESSAGING ▼ New Txt Msg |
Read Message  Read a new message that you have received:MENU (OK) ▶ ⚙M ESSAGING ▼ Inbox▼ message Open (OK) Read a new message that you have received:MENU (OK) ▶ ⚙M ESSAGING ▼ Inbox▼ message Open (OK) |
Ring Lights  Select light displays for incoming calls:MENU (OK) ▶ ⚙SETTINGS & TOOLS▼ Sounds Setting ▼ Ring Lights Select light displays for incoming calls:MENU (OK) ▶ ⚙SETTINGS & TOOLS▼ Sounds Setting ▼ Ring Lights |
Motorola, Inc.
Consumer Advocacy Office
1307 East Algonquin Road
Schaumburg, IL 60196
1-800-331-6456 (United States)
1-888-390-6456 (TTY/TDD United States for hearing impaired)
1-800-461-4575 (Canada)
www.hellomoto.com
Certain mobile phone features are dependent on the capabilities and settings of your service provider's network. Additionally, certain features may not be activated by your service provider, and/or the provider's network settings may limit the feature's functionality. Always contact your service provider about feature availability and functionality. All features, functionality, and other product specifications, as well as the information contained in this user's guide are based upon the latest available information and are believed to be accurate at the time of printing. Motorola reserves the right to change or modify any information or specifications without notice or obligation.
MOTOROLA and the Stylized M Logo are registered in the US Patent & Trademark Office. All other product or service names are the property of their respective owners.
© Motorola, Inc. 2005
Certain mobile phone features are dependent on the capabilities and settings of your service provider's network. Additionally, certain features may not be activated by your service provider, and/or the provider's network settings may limit the feature's functionality. Always contact your service provider about feature availability and functionality. All features, functionality, and other product specifications, as well as the information contained in this user's guide are based upon the latest available information and are believed to be accurate at the time of printing. Motorola reserves the right to change or modify any information or specifications without notice or obligation.
Manual number: 6809494A09-A
Contents
Use and Care .... 7
Getting Started ..... 8
About This Guide ..... 8
Installing the Battery ... 9
Removing the
Battery 9
Battery tips..... 10
Charging the Battery .. 11
Turning On
Your Phone ..... 12
Adjusting Volume .... 12
Making a Call ..... 12
Answering a Call..... 13
Changing the
Call Alert..... 13
Viewing Your
Phone Number ..... 14
Highlight Features .... 15
Taking and Sending
a Photo 15
Sending a Picture
Message..... 17
Receiving a Picture
Message..... 18
TTY Operation ..... 19
Learning to Use Your
Phone....21
Using the Display ..... 21
Using the 5-Way
Navigation Key ..... 24
Using Menus ..... 24
Entering Text ..... 27
Using the
Handsfree Speaker... 32
Using the External
Display 33
Changing a Code
or Password ..... 33
Locking and Unlocking
Your Keypad 33
Locking and Unlocking
Your Phone 34
If You Forget a Code,
PIN, or Password .... 34
Setting Up Your
Phone 35
Setting Call Sounds
and Alert Styles ..... 35
Setting Ring Lights . . . 36
Setting Answer
Options.... 36
Contents
Setting a Wallpaper
Image 37
Setting a Screen
Saver Image 37
Adjusting Brightness. . . 37
Adjusting the
Backlight 37
Hiding or Showing
Location Information... 38
AGPS Limitations
and Tips. 38
Calling Features.....40
Changing the
Active Line. . . . . . . . 40
Redialing a Number...40
Using Automatic
Redial. 40
Turning Off a
Call Alert ..... 41
Calling an Emergency
Number 41
Using AGPS During
an Emergency Call.... 42
Viewing Recent
Calls....43
Returning an
Unanswered Call ..... 44
Attaching a Number... 44
Calling with
Speed Dial 44
Calling with
1-Touch Dial ..... 45
Using Voicemail ..... 45
Phone Features.....46
Main Menu ..... 46
Settings & Tools
Menu. 47
Calling Features ..... 48
Messages ..... 48
Contacts 50
Personalizing
Features.....54
Menu Features ..... 57
Dialing Features ..... 58
Call Monitoring ..... 58
Data and Fax Calls .... 60
Network Features .... 60
Personal Organizer
Features. 61
Security 62
News and
Entertainment ..... 63
Service & Repairs .... 64
Specific Absorption
Rate Data 65
Index 67
Use and Care
To care for your Motorola phone, please keep it away from:

liquids of any kind dust and dirt
Don't expose your phone to water, rain, extreme humidity, sweat, or other moisture.

Don't expose your phone to dust, dirt, sand, food, or other inappropriate materials.

extreme heat or cold cleaning solutions
Avoid temperatures below -10°C/14°F or above 45°C/113°F.

To clean your phone, use only a dry soft cloth. Don't use alcohol or other cleaning solutions.

microwaves the ground
Don't try to dry your phone in a microwave oven.

Don't drop your phone.
Getting Started
CAUTION: Before using the phone for the first time, read the Important Safety and Legal Information included in the gray-edged pages at the back of this guide.
About This Guide
This guide shows how to locate a menu feature as follows:
Find it: Press MENU (OK) ▶ “”RECENT CALLS ▼ Dialed
This example shows that from the home screen, you must press MENU (OK), scroll across to RECENT CALLS on the main menu, then scroll down to and select Dialed. Press 🧑 to
scroll across and down, and the center key Ⓞ to select a menu option.
symbols

This means a feature is network/subscription dependent and may not be available in all areas. Contact your service provider for more information.

This means a feature requires an optional accessory.
Installing the Battery
You must install and charge the battery to use your phone.

TM
Your phone is designed to use only Motorola Original batteries and accessories.
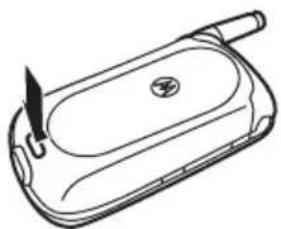
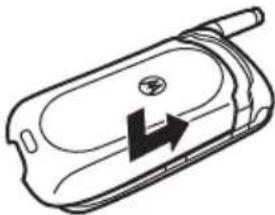
1 Using both thumbs, firmly press the release button on the battery cover.
2 Slide the cover back, then lift it away from the phone.
natural_image
Line drawing of a mobile phone with a stylus and handle (no text or symbols)
natural_image
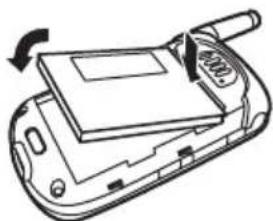
Line drawing of a mobile phone casing with an arrow indicating the direction (no text or symbols)3 Insert the battery with the tabs toward the front and facing down.
4 Lower the battery cover onto the phone, then slide it forward until it clicks into place.
natural_image
Line drawing of a foldable electronic device with a scroll wheel and screen, showing no text or symbols
natural_image
Line drawing of a mobile phone casing with an arrow indicating left side (no text or symbols)Removing the Battery
1 Press the release button on the battery cover.

natural_image
Line drawing of a mobile phone casing with a handle and keypad (no text or symbols)2 Slide the cover back, then lift it away from the phone.

natural_image
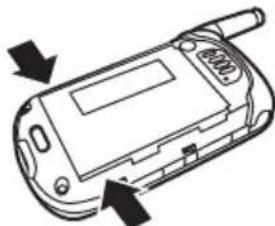
Line drawing of a mobile phone casing with an arrow indicating upward motion (no text or symbols)3 Using your fingernails, grasp the sides of the battery where shown, and pull upward.
natural_image
Line drawing of a mobile phone casing with buttons and display (no text or symbols)4 Lower the battery cover onto the phone, then slide it forward until it clicks into place.
natural_image
Line drawing of a mobile phone casing with an arrow indicating left side (no text or symbols)Battery tips
Battery life depends on the network, signal strength, temperature, features, and accessories you use.
- Always use Motorola Original batteries and chargers. The warranty does not cover damage caused by non-Motorola batteries and/or chargers.

- New batteries or batteries stored for a long time may take more time to charge.
- When charging your battery, keep it near room temperature.
- When storing your battery, keep it uncharged in a cool, dark, dry place.
- Never expose batteries to temperatures below -10°C (14°F) or above 45°C (113°F). Always take your phone with you when you leave your vehicle.
- It is normal for batteries to gradually wear down and require longer charging
times. If you notice a change in your battery life, it is probably time to purchase a new battery.

Contact your local recycling center for proper battery disposal.
Warning: Never dispose of batteries in a fire because they may explode.
Before using your phone, read the battery safety information in the "Safety and General Information" section included in the gray-edged pages at the back of this guide.
Charging the Battery
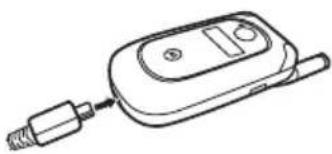
New batteries are shipped partially charged. Before you can use your phone, you need to install and charge the battery as described below. Some batteries perform best after several full charge/discharge cycles.
natural_image
Line drawing of a mobile device with a probe inserted (no text or symbols)1 Plug the charger into your phone, with the wider end at the bott
2 Plug the other end of the charger into the appropriate electrical outlet.
3 When your phone indicates Charge Complete, remove the charger.
Note: When you charge the phone with the flip open, the phone's screen may be dark. Briefly press the 🔒 key to turn the main display back on.
Tip: You can safely leave the charger connected to the phone after charging is complete. This will not damage the battery.
Note: When you charge the battery, the battery level indicator in the upper right corner of the display shows how much of the charging process is complete. At least
Getting Started
1 segment of the battery level indicator must be visible to ensure full phone functionality while charging.
Turning On Your Phone
1 Open your phone.
2 Press and hold the power key for 3 seconds.
The phone may require several seconds to power on.

3 If necessary, enter your 4-digit unlock code (the last 4 digits of your phone number) and press OK (☐) to unlock the phone.
Adjusting Volume

Press the up or down volume keys to:
- increase or decrease earpiece volume during a call
- increase or decrease the ringer volume setting when the home screen is visible (flip must be open—see "Adjusting Volume" on page 12)
• turn off an incoming call alert
Making a Call
1 Dial the number.
Tip: If you make a mistake, press the clear key ☑ to delete the last digit. Press and hold ☑ to clear all digits.
2 Press ☐ to make the call.
3 Press 📋 to end the call.

Tip: You can also close the flip to end the call.
Note: You must dial the phone number from the home screen. See page 21.
Answering a Call
When you receive a call, your phone rings and/or vibrates and displays an incoming call message.
1 Press to answer.
2 Press 📋 to end the call.
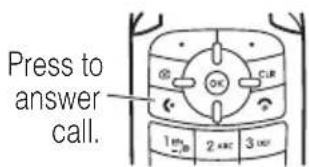
Tip: You can set the phone to answer calls when you open the flip. (To activate,
press MENU (OK) ▶ SETTINGS & TOOLS ▼ Call Settings ▼ In-Call Setup ▼ Answer Options ▼ Open To Answer.)
Note: If the phone is locked, you must unlock it to answer the call.
Changing the Call Alert
Phone Flip Open
In the home screen, press the down

volume key to switch to lower call alert volumes, then vibrate, then alarm, and, finally, all off. Press the up volume key to cycle back from all off to alarm, then vibrate, and then to the lowest alert volume setting.
Phone Flip Closed
Press the up or down volume key, then press

the speakerphone key to scroll through the alert styles: Master Volume, Alarm Only Vibrate Only, and All Off. The alert styles are shown on the external display.
After scrolling to the desired alert style, press the up or down volume key to save the setting and return to the home screen.
Viewing Your Phone Number
To view your phone number from the home screen:
- Press CLR, then #-
or
- Press MENU (OK) ▶ SETTINGS & TOOLS
▼ System ▼ Device Info ▼ My Tel. Number
While you are on a call, press Options (☐)
▼ My Tel. Number.
Highlight Features
You can do much more with your phone than make and receive calls! This section describes some of your phone's highlights.
Taking and Sending a Photo
To activate your phone's camera:
1 From the home screen, press the camera key to activate your phone's camera. The active viewfinder image appears on your phone's display.
Press ⚙ left and right to zoom in and out.
Note: The viewfinder becomes a full screen after a few seconds if no keys are pressed.

2 Point the camera lens at the photo subject, then press Take (OK) to take a photo.
3 Press Save (●) to save the photo in the Gallery.
or
Highlight Features
Press Send (OK) to send the photo in a message.
or
Press Reject (☐) to delete the photo and return to the active viewfinder.
Pictures Menu Options
When the camera is active, press
Options (☐) to open the Options menu, which can include the following options:
| Option |
| ResolutionSet resolution to High (480x640),Medium (240x320), or Low (120x160). |
| Self TimerSet a timer for the camera to take a photo. |
| BrightnessAdjust image brightness. |
| Option |
| White BalanceAdjust for different lighting. |
| File QualitySelect High, Normal, or Economy. |
| Shutter SoundActivate a tone that plays when you take a photo. |
| Color EffectsSelect Normal, Sepia, Black & White, or Negative. |
| ModeGo to Fun Frames to select an amusing frame for your photo. |
Sending a Picture Message

A picture message contains embedded media objects (possibly including photos, pictures, animations, sounds, voice records). You can send a picture message to other Verizon Wireless picture messaging-capable phones and to other email addresses.
Find it: Press MENU (OK) ▶ MESSAGING ▼ New Pix Msg
Note: You can send the message after entering a recipient phone number and the message text. You do not need to complete other fields.
1 Press keypad keys, then OK (OK), to enter a phone number.
or
Press Add (●) ▼ Contacts, then OK (OK) and Done (●), to add 1 or more entries from Contacts.
or
Press Add (●) ▼ Recent Calls, then OK (○) and Done (●), to add 1 or more entries from recent calls lists.
2 Scroll to Text.
3 Press keypad keys to enter message text.
4 Scroll to Pix and press Gallery (☐).
5 Scroll to and highlight a picture to insert, and press OK (OK).
6 Scroll to Sound and press Sounds (☐).
7 Scroll to highlight a sound to insert, and press OK (OK).
8 Scroll to Subject.
9 Press keypad keys to enter the message subject.
or
Press Options (☐), then scroll to Add Quick Text and press OK (OK), to select a Quick Text item as the message subject.
10 Press SEND (ok) to send the message.
or
Press Options (OK) to send the message later, save the message in the drafts folder, set priority, or specify how long the message is valid for delivery.
Receiving a Picture Message

When you receive a picture message, your phone displays the ☑ (message waiting)
indicator and a New Message notification, and sounds an alert.
Find it: Press MENU (OK) ▶ MESSAGING
▼ Inbox
1 Scroll to the desired message.
2 Press OPEN (OK) to open the message. Your phone displays the picture, then the message.
Picture messages that you receive can contain different media objects:
- Photos, pictures, and animations are displayed as you read the message.
- A sound file begins playing when its slide is displayed. Use the volume keys to adjust the volume as the sound file plays.
- Attached files are appended to the message. To open the attachment, highlight the file indicator/filename and
press VIEW (☐) (image file type), PLAY (☐) (sound file), or OPEN (☐) (vObject such as a Contacts or datebook entry, or unknown file type).
TTY Operation
You can use an optional TTY device with your phone to send and receive calls. You must plug the TTY device into the phone's headset jack and set the phone to operate in 1 of 3 TTY modes.
Note: Use a TSB-121 compliant cable (provided by the TTY manufacturer) to connect the TTY device to your phone.
Note: Set the phone to level 4 (middle setting) for proper operation. If you experience a high number of incorrect characters, adjust the volume as needed to minimize the error rate.
Note: For optimal performance, your phone should be at least 12 inches (30 centimeters) from the TTY device. Placing the phone too close to the TTY device may cause high error rates.
Setting TTY Mode
When you set your phone to a TTY mode, it operates in that mode whenever the TTY device is connected.
Find it: Press MENU (OK) ▶ ⚙ SETTINGS & TOOLS ▼ Initial Setup ▼ TTY Setup
TTY Mode can include the following options:
| Option |
| VoiceReturn to normal voice mode. |
| TTYTransmit and receive TTY characters. |
| VCOReceive TTY characters but transmit by speaking into microphone. |
| HCOTransmit TTY characters but receive by listening to earpiece. |
When your phone is in a TTY mode, the international TTY mode, the international TTY symbol, and the mode setting display during an active TTY call.
Returning to Voice Mode
To return to normal voice mode, selectVoice from the TTY Setup menu.
Learning to Use Your Phone
See page 1 for a basic phone diagram.
Using the Display
The home screen is displayed when you are not on a call or using the menu. You must be in the home screen to dial a phone number.
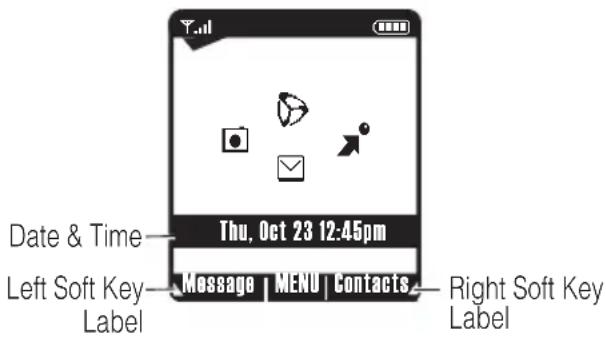
Note: Your home screen may look different than the display shown above.
The MENU label in the bottom center of the display shows that you can press the Ⓞ key to enter the main menu.
Labels at the bottom corners of the display show the current soft key functions. Press the left soft key (☐) or right soft key (☐) to perform the function indicated by the left or right soft key label.
Your phone displays indicators in 2 areas:

Learning to Use Your Phone
Indicators are described below.
System Status Indicators
| Alert/Indicator |
| Y..il Signal Strength IndicatorVertical bars show the strength of network connection. |
| ▲ Roaming IndicatorIndicates phone is in digital coverage area. |
| ☐ Digital Indicator |
| ☐ Analog IndicatorIndicates phone is in analog coverage area. |
| 1X 1X IndicatorIndicates phone is in a 1x-RTT coverage area. |
| S SSL IndicatorIndicates application verification is via SSL during a download session. |
| Alert/Indicator |
| P Voice Privacy IndicatorIndicates Voice Privacy is set to On and is enabled during active call. |
| → Data Call, Tethered, or Embedded WAP/BREW Application IndicatorShows during data call, tethered mode, or WAP/BREW application. |
| → DormantIndicates phone is dormant and PPP session is active. |
| → No Service IndicatorPhone is in area with no service. |
| → TTY IndicatorPhone is in TTY mode. |
| → Voice Call IndicatorShows during an active voice call. E911 IndicatorIndicates E911 is set to On. |
| Location On IndicatorIndicates Location is set to On. |
| Keypad Lock IndicatorIndicates keypad lock is set to On. |
| Battery Level IndicatorShows battery charge level. The more bars, the greater the charge. |
System Alerts and Settings Indicators
| Alert/Indicator |
| All Sounds OffIndicates Master Volume is set to Off. |
| Alert/Indicator |
| Alarm OnlyIndicates Master Volume is set to Alarm Only. |
| Sound On, Vibrate OnIndicates Master Volume is set to Sound On and Vibrate On. |
| SpeakerphoneIndicates speakerphone is on. |
| Missed CallsShows number of missed calls. |
| Message IndicatorDisplays when you receive a new message. |
| Calendar AppointmentShows number of calendar appointments. |
| ■" VoicemailShows number of voicemail messages received. |
| Alarm OnShows when an alarm has been set. |
Using the 5-Way Navigation Key
Use the 5-way navigation key (☐) to scroll up, down, left, or right through the menu system. Press the center key Ⓞ to select a highlighted menu item.
Using Menus

From the home screen, press MENU (OK) to enter the main menu.
Press 🔒 to scroll down to a menu feature icon in the main menu. The following icons represent features that may appear in the main menu, depending on your service provider and service subscription options.
| Menu Features |
* Optional network/subscription dependent feature
Menu Shortcuts
Your phone displays 4 menu icons in the middle of the home screen.

Press ⚙ left, right, up, or down to open the menu represented by the icon you select. You can change the menu icons that appear in the home screen, or set your phone not to display icons in the home screen (see "Show or Hide Menu Icons" on page 57).
Tip: From the main menu, you can quickly select a menu feature by pressing the number key associated with that feature. For example,
from the SETTINGS & TOOLS menu, press 4 to select Display.
Selecting a Feature Option
When you select certain features, your phone displays a list of items or options that you can select. For example, when you view the dialed calls list, you can select an entry and perform additional tasks on that entry:

- Press ⚙ to scroll up or down to highlight the option you want.
- In a numbered list, press a number key to highlight the option.
- In an alphabetized list, press a key repeatedly to cycle through the letters on the key and highlight the closest matching list option
- When an option has a list of possible values, press ⚙ left or right to scroll through and select a value.
- When an option has a list of possible numeric values, press a number key to set the value.
Entering Text
Some features require you to enter information. The following is a sample of a screen for Contacts entry information.

The message center is another screen that requires text or numeric entries. It lets you compose and send text messages.

Choosing a Text Entry Mode
Multiple text entry modes make it easy for you to enter names, numbers, and messages. The mode you select remains active until you select another mode.
From the CREATE TXT MESSAGE screen press Options (●), then select Entry Mode to select an
Learning to Use Your Phone
entry mode. From the EDIT CONTACT screen, press Abc (☐) to select an entry mode.
You can select 1 of the following entry modes:
iTAP Let the phone predict each word
English (in English) as you press keys.
iTAP Let the phone predict each word
Spanish (in Spanish) as you press keys.
Abc Enter letters and numbers by pressing a key 1 or more times, 1st character in uppercase.
ABC Enter letters and numbers by pressing a key 1 or more times, all characters in uppercase.
123 Enter numbers only.
Symbols Enter symbols.
Capitalization and Numbers
Press 📄 in any text entry screen to cycle through entry methods:
abc = n o capital 123 = all numbers letters
ABC = all capital letters Abc = capitalize next letter only
iTAP= predictive text entry
Using Tap Mode
This is the standard mode for entering text on your phone. Specify Tap mode by selecting Abc or ABC as your text entry mode.
Regular Tap mode cycles through the letters and numbers of the key you press, as shown in the "Character Chart" on page 29.
1 Press a keypad key 1 or more times to select a letter, number, or symbol.
2 Enter the remaining characters.
Tip: Press ☐ right to accept a word completion, or ☐ to insert a space.
3 Press OK (☐) to store the text.
When you enter text with Tap mode, the soft key functions change.

When you enter 3 or more characters in a row, your phone may guess the rest of the word. For example, if you enter prog, you might see:

If you want a different word (such as progress), continue pressing keypad keys to enter the remaining characters.
Character Chart
Use this chart as a guide for entering characters with Tap mode.
| Keys/Characters | |
| 16.29 | 20.45 |
| .@?!-, &:_/; 13w | a b c 2dow |
| def3 | ghi4 |
| 5w | 6w |
| jkl5 | mno6 |
| 7w | 8w |
| pqrs7 | tuv8 |
| 9w | 0+ |
| wxyz9 | change text case, for capital letters |
| * | # |
| change text entry method (hold for default) | enter space |
Note: This chart shows lowercase letters, which are produced in Abc mode. Select ABC mode to produce the capitalized versions of the letters shown.
Note: This chart may not reflect the exact character set available on your phone. In a URL editor, first shows common characters for that editor.
Tap Mode Text Entry Rules
- Press a keypad key repeatedly to cycle through its characters.
- Press ✿ left or right to move the flashing cursor to the left or right in a text message.
- The first character of every sentence is capitalized. If necessary, press down to force the character to lowercase before the cursor moves to the next position.
- If you enter or edit information and do not want to save the changes, press 📋 to exit without saving.
Using iTAP™ Mode
iTAP software provides a predictive text entry method that lets you enter a word using 1 key press per letter. This can be faster than Tap mode, because your phone combines the key presses into common words.
For example, if you press 7mm 7mm 6mpc 4mm, you see the letters Program. If you want a different word (such as Progress), continue pressing keypad keys to enter the remaining characters.
Entering Words
1 Press keypad keys (1 press per letter) to show possible letter combinations at the bottom of the display.
2 Scroll left or right to highlight the combination you want.
3 Press SELECT (☐) to lock a highlighted combination. You can press keypad keys
to add more letters to the end of the combination.
or
Press ✿️ up to enter the highlighted combination when it spells a word. A space is automatically inserted after the word.
If you enter a word your phone does not recognize, the phone stores it to use as 1 of your word options. When you fill memory space for unrecognized words, your phone deletes the oldest words to add new words.
Using Numeric Mode
Press keypad keys to enter the numbers you want. When you finish entering numbers, press ☐ to switch to another entry method.
Using Symbol Mode
Scroll to the desired symbol on the SYMBOLS screen, then press OK (OK) to select it.
Press Next (☐) on the SYMBOLS screen to page down to the next set of symbols, and pressPrev (☐) to page up to the previous set.
Deleting Letters and Words
Place the cursor to the right of the text you want to delete, and then:
- Press CLR to delete 1 letter at a time.
- Hold 📄 to delete the entire message.
Using the Handsfree Speaker
Note: You must open your phone's flip to activate the speakerphone.
Press and hold the smart/speakerphone key to turn the handsfree
speaker on or off. A soft audio alert confirms activation/deactivation.
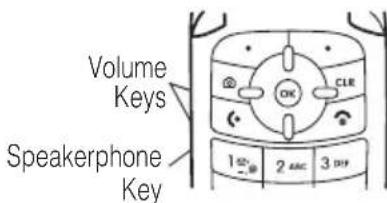
When you activate your phone's integrated handsfree speaker, you can talk to the other party without holding the phone to your ear.
When you turn on the handsfree speaker, your phone displays Spkrphone On and shows the speakerphone indicator 📋 in the service alerts and settings area. The handsfree speaker remains on until you press the smart/speakerphone key again or turn the phone off.
Note: The handsfree speaker is disabled when you connect your phone to a handsfree car kit or headset accessory.
Using the External Display
When the flip is closed, you can use the external display for the following:
- View time, date, and phone status information.
• View message notifications.
Changing a Code or Password
Your phone's 4-digit unlock code is originally set to the last 4 digits of your phone number, and the 6-digit security code is originally set to 000000. Your service provider may reset these codes before you receive your phone.
If your service provider has not reset these codes, we recommend that you change them to prevent others from accessing your personal information. The unlock code must contain 4 digits, and the security code must contain 6 digits.
To change a code or password:
Find it: Press MENU (OK) ▶ SETTINGS & TOOLS ▼ System ▼ Security ▼ New Passwords
Select the type of code you wish to change, enter the old code when prompted, then enter the new code.
Locking and Unlocking Your Keypad
You can lock your phone's keypad to prevent accidental key presses.
Press CLR to lock/unlock the keypad.
Locking and Unlocking Your Phone
You can lock your phone manually or set the phone to lock automatically whenever you turn it off.
To use a locked phone, you must enter the unlock code. A locked phone still rings or vibrates for incoming calls or messages, but you must unlock it to answer.
You can make emergency calls on your phone even when it is locked (see page 41).
Locking Your Phone
Find it: Press MENU (OK) ▶ SETTINGS & TOOLS ▼ System ▼ Security ▼ Phone Lock ▼ Lock Now or Automatic Lock
Both Phone Lock options require you to enter the unlock code before completing your selection.
Unlocking Your Phone
At the Enter Unlock Code prompt, enter your unlock code and press OK (OK) to unlock your phone.
If You Forget a Code, PIN, or Password
Note: Your phone's 4-digit unlock code is originally set to the last 4 digits of your phone number, and the 6-digit security code is originally set to 000000.
If you forget your unlock code, try entering the last 4 digits of your phone number. If that does not work, contact your service provider.
Setting Up Your Phone
Setting Call Sounds and Alert Styles
Your phone rings and/or vibrates to notify you of an incoming call or to signal certain other events.
Setting Call Sounds
Find it: Press MENU (OK) ▶ ⚪ SETTINGS & TOOLS ▼ Sounds Setting
1 If necessary, set Style: to Master Volume:
Scroll to Style: and press Change (☐), then scroll to Master Volume and press Select (☐).
2 Scroll to Master Volume Detail and press Change (☐).
3 Scroll to Calls and press Change (☐) to select it.
4 Scroll to the desired detail setting and press Select (☐).
Note: Your phone plays a sample of each highlighted setting as you scroll through the settings.
If you set Call Vibrate to On, the phone vibrates to indicate an incoming call. (If you also set Calls to a sound, the phone vibrates and rings to indicate an incoming call.)
Setting Alerts
Your phone includes alerts for Calls, Inbox, Voicemail, Alarms, Data Calls, Fax Calls, and Reminders.
Setting Up Your Phone
You can specify a detailed setting for each type of alert:
Find it: Press MENU (OK) ▶ ⚙️ SETTINGS & TOOLS ▼ Sounds Setting
1 If necessary, set Style: to Master Volume:
Scroll to Style: and press Change (☐), then scroll to Master Volume and press Select (☐).
2 Scroll to Master Volume Detail and press Change ( ).
3 Scroll to the desired alert type and press Change (☐).
4 Scroll to the desired detail setting and press Select ( ).
Note: Your phone plays a sample of each highlighted setting as you scroll through the settings.
Setting Ring Lights
Select light displays for incoming calls:
Find it: Press MENU (OK) ▶ SETTINGS & TOOLS ▼ Sounds Setting ▼ Ring Lights
Setting Answer Options
You can use these alternative methods to answer an incoming call.
Multi-key answer by pressing any key Open To answer by opening the flip Answer
To activate or deactivate an answer option:
Find it: Press MENU (OK) ▶ SETTINGS & TOOLS ▼ Call Settings ▼ In-Call Setup ▼ Answer Options
Setting a Wallpaper Image
Set a photo, picture, or animation as a wallpaper (background) image in your phone's home screen.
Find it: Press MENU (OK) ▶ SETTINGS & TOOLS
▼ Display ▼ Wallpaper
Setting a Screen Saver Image
Set a photo, picture, or animation as a screen saver image.
The screen saver image displays when the flip is open and no activity is detected for a specified time period. The image shrinks to fill the display, if necessary. An animation repeats for 1 minute, then the first frame of the animation displays.
Tip: Turn off the screen saver to extend battery life.
Find it: Press MENU (OK) ▶ SETTINGS & TOOLS
▼ Display ▼ Screen Saver
Adjusting Brightness
Find it: Press MENU (OK) ▶ SETTINGS & TOOLS
▼ Initial Setup ▼ Brightness
Adjusting the Backlight
Set the amount of time that the display and keypad backlights remain on, or turn off backlights to extend battery life.
Find it: Press MENU (OK) ▶ SETTINGS & TOOLS
▼ Initial Setup ▼ Backlight
Hiding or Showing Location Information

Your phone can use the automatic location information (ALI) feature to tell the network where you are physically located.
When ALI is set to Location On, your phone displays the Ⓧ (ALI on) indicator. Services may use your known location to provide useful information (for example, driving directions, or the location of the nearest bank). Your phone prompts you when the network or a service asks for your location. You can refuse at this point.
When ALI is set to 911 Only, your phone displays the ⊕ (ALI off) indicator, and the phone does not send location information unless you call the emergency phone number (such as 911).
Find it: Press MENU (OK) ▶ SETTINGS & TOOLS ▼ System ▼ Location
1 When prompted, enter the location code. The default location code is 0000.
2 Scroll to Location On or E911 Only.
3 Press Select (☐) to select the setting.
AGPS Limitations and Tips
Your phone uses assisted-Global Positioning System (AGPS) satellite signals to estimate your location. If your phone cannot find strong satellite signals, your AGPS might be slower, less accurate, or it might not work at all. AGPS provides only an approximate location, often within 150 feet (45 meters) but sometimes much farther from your actual location.
To improve AGPS accuracy:
- Go outside and away from underground locations, covered vehicles, structures with metal or concrete roofs, tall buildings, and foliage. Indoor performance might improve if you move closer to windows, but some window sun shielding films can block satellite signals.
- Move away from radios, entertainment equipment, and other electronic devices that might interfere with or block AGPS satellite signals.
- Extend your phone antenna.
- Hold your phone away from your body, and point the phone antenna toward the sky. Do not cover the antenna area with your fingers.
AGPS uses satellites controlled by the U.S. government and subject to changes implemented in accordance with the Department of Defense AGPS user policy and the Federal Radio Navigation Plan. These changes might affect AGPS performance.
Calling Features
For basic instructions on how to make and answer calls, see page 12.
Changing the Active Line

Change the active phone line to make and receive calls from your other phone number.
Find it: Press MENU (OK) ▶ SETTINGS & TOOLS ▼ System ▼ Device Info ▼ Active Line
Redialing a Number
1 Press ☐ to view the dialed calls list.
2 Scroll to the entry you want to call.
3 Press ☐ to redial the number.
Using Automatic Redial

When you receive a busy signal, your phone displays Call Failed, Number Busy.
With automatic redial, your phone automatically redials the number for 4 minutes. When the call goes through, your phone rings or vibrates 1 time, displays Redial Successful, and then connects the call.
You must turn on automatic redial to use the feature. To turn automatic redial on or off:
Find it: Press MENU (OK) ▶ ⚪ SETTINGS & TOOLS ▼ Initial Setup ▼ Auto Redial
When automatic redial is turned off, you can manually activate the feature to redial a phone
number. When you hear a fast busy signal and see Call Failed, press IGNORE to cancel the incoming call.
Press 📄 or RETRY to activate automatic redial.
Depending on your phone settings and/or service subscription, the call may be forwarded to another number, or the caller may hear a busy signal.

Turning Off a Call Alert
You can turn off your phone's incoming call alert before answering the call.
Press the volume key up or down to turn off the alert.
Calling an Emergency Number
Your service provider programs 1 or more emergency phone numbers, such as 911, that you can call under any circumstances, even when your phone is locked.
Note: Emergency numbers vary by country. Your phone's preprogrammed emergency number(s) may not work in all locations, and sometimes an emergency call cannot be placed due to network, environmental, or interference issues.
1 Enter the emergency number.
2 Press ☐ to call the emergency number.
Using AGPS During an Emergency Call
When you make an emergency call, your phone can use assisted-Global Positioning System (AGPS) satellite signals to tell the emergency response center your approximate location.
The AGPS feature has limitations, so always tell the emergency response center your best knowledge of your location. Remain on the phone for as long as the emergency response center instructs you.
AGPS might not work for emergency calls:
- Your phone's AGPS feature must be turned on (see page 38).
- Your local emergency response center might not process AGPS location information. For details, contact your local authorities.
For best results:
- Go outside and away from underground locations, covered vehicles, structures with metal or concrete roofs, tall buildings, and foliage. Indoor performance might improve if you move closer to windows, but some window sun shielding films can block satellite signals.
- Move away from radios, entertainment equipment, and other electronic devices that might interfere with or block AGPS satellite signals.
If your phone cannot find strong AGPS satellite signals, the location of the nearest cell tower in contact with your phone is automatically provided to the emergency response center.
Viewing Recent Calls
Your phone keeps lists of the calls you recently received and dialed, even if the calls did not connect. The lists are sorted from newest to oldest entries. The oldest entries are deleted as new entries are added.
Shortcut: Press ☐ from the home screen to view the All Calls list.
Find it: Press MENU (OK) ▶ “”RECENT CALLS
1 Scroll to Missed, Received Dialed, or All.
2 Press OK (OK) to select the list.
3 Scroll to an entry.
4 Press ☐ to call the entry's number.
or
Press Message (☐) to send a message to the entry's number.
or
Press OPEN (OK) to view entry details.
or
Press Options (☐) to open the Options menu to perform various operations on the entry.
The Options menu can include the following options:
| Option |
| SaveCreate a Contacts entry with the number in the No. field. |
| DetailsView details for the selected entry. |
| EraseDelete the selected entry. |
| Erase AllDelete all entries. |
Option
View Timers
Go to the View Timers screen.
Returning an Unanswered Call
Your phone keeps a record of your unanswered calls, and displays:
- the ↩ (missed call) indicator
- X Missed Calls, where X is the number of missed calls
1 Press VIEW (☐) to see the received calls list.
2 Scroll to the call you want to return.
3 Press ☐ to make the call.
Attaching a Number
While dialing (with digits visible in the display), press Options (OK), then scroll to and select Attach Number, attach a number from Contacts or the recent calls list.
Calling with Speed Dial
Each entry you store in Contacts is assigned a unique speed dial number.
Tip: To see an entry's speed dial number, press MENU (OK) ▶ CONTACTS ▼ Contact List, scroll to the entry, and press View (OK).
To speed dial a Contacts entry:
1 Enter the speed dial number for the entry you want to call.
2 Press ☐ to submit the number.
3 Press ☐ to call the entry.
Calling with 1-Touch Dial
To call Contacts entries 1 through 9, press and hold the single-digit speed dial number for 1 second.
Using Voicemail

Voicemail messages that you receive are stored on the network. To listen to your messages, you must call your voicemail phone number.
Note: Your service provider may include additional information about using this feature.
Listening to Voicemail Messages
Find it: Press MENU (OK) ▶ MESSAGING ▼ VoiceMail
Press 📄 (send key) to call your voicemail phone number.
If no voicemail number is stored, your phone prompts you to store a number.
Phone Features
This section helps you locate features on your phone that were not described earlier in this guide.
Main Menu
This is the standard main menu layout. Menu organization and feature names may vary on your phone. Not all features may be available on your phone.

GET IT NOW\*
- Get Tunes & Tones
- Get Pix
- Get Fun & Games
- Get News & Info
- Get Going

CONTACTS
- New Contact
- Contact List
- Groups
- Speed Dials

MESSAGING
- New Text Msg
- New Pix Msg
- Inbox
- Sent
- Drafts
• Voicemail

RECENT CALLS
- Missed
- Received
- Dialed
• All
• View Timers

SETTINGS & TOOLS
(see next page)
Settings & Tools Menu
Tools
- Calendar
- Alarm Clock
- World Clock
- Notepad
- Calculator
System
- System Select
- Next Call
- Device Info
- Location
- Security
Sounds Setting
- Style
- Master Detail
- Ring Lights
Call Settings
- In-Call Setup
- Car Settings
- Headset
Display
- Wallpaper
- Screen Saver
- Display Themes
- Greeting
- Home Screen
- Voice Dial Setup
Initial Setup
- SpeakerPhone
- Auto Redial
- Display Timeout
- Backlight
- TTY Setup
- Sc r o l l
- Language
- Brightness
• D T M F
- Hyphenation
- Master Reset
- Master Clear
Phone Features
Calling Features
Features
Voice Dial
Press and release the voice key, then (within 2 seconds) say:
- "Digit dial." When prompted, say the digits of the number you want to call.
or
- "Name dial." When prompted, say the name of a Contacts entry exactly as it is listed.
Features
For example, to call the mobile number for an entry named Bill Smith, you would say "Name dial Bill Smith mobile." (If the entry included only one number for Bill Smith, you would say only "Name dial Bill Smith.")
Note: You can also use Digit Dial for numbers of Contacts entries.
Messages
Features
Send Text Message
Send a text message:

MENU (OK) ▶ MESSAGING ▼ New Txt Msg
Press Options (●) to perform various operations on the message.
Features
Send Multimedia Message
MENU (OK) ▶ MESSAGING
▼ New Pix Msg

Enter the message address and press Ⓞ, then:
To insert a picture, scroll to Pix and press Gallery ( ).
To insert a sound, scroll to Sound and press Sounds ( ).
Store Message Objects
Go to a picture message slide, then:
Options (☐) ▼ Save Picture or Save Sound

Features
View Sent Messages
View sent messages:

MENU (OK) ▶ MESSAGING ▼ Sent
▼ sent message, then press Open (OK)
Press Options (☐) to perform various operations on the message.
Read Received Messages
Read received messages:

MENU (OK) ▶ MESSAGING ▼ Inbox
▼ received message, then press Open(OK)
Press Options (☐) to perform various operations on the message.
| Features |
| DraftsView messages saved in drafts folder:MENU (OK) ▶ ⓍM ESSAGING ▼ Drafts▼ draft messageTo edit the message, press EDIT (OK).To delete the message, press Erase (●).Press Options (●) to perform various operations on the message. |
| Erase MessagesDelete all messages or only messages from the Outbox or drafts folder:MENU (OK) ▶ ⓍM ESSAGING , then press Options (●), scroll to Erase Inbox, Erase Drafts Erase Sent, or Erase All, and press OK (OK) |
Contacts
| Features |
| Create EntryCreate a new Contacts entry:MENU (OK) ▶ CONTACTS ▼ New Contact |
| View ContactMENU (OK) ▶ CONTACTS ▼ Contact List ▼ entryPress View (OK). |
Features
Add Entries to Group
Tip: You can add a Contacts entry to a group while editing that entry by scrolling to Group and pressing Set (☐).
MENU (OK) ▶ CONTACTS ▼ Groups
Scroll to the desired group_name and press Options (☐), then scroll to Add and press OK (OK). On the ADD CONTACTS screen, scroll to each contact you want to add and press OK (OK).
When you are finished adding contacts to a group, press Done (☐).
When you send a message to a group list, the message goes to all Contacts entries in that group.
Features
Add Group
Add a new group as an entry on the GROUPS screen:
MENU (OK) ▶ CONTACTS ▼ Groups ▼ New
You can add entries to or delete entries from a group list. Use a preset group name or create your own name.
When you send a message to a group list, the message goes to all Contacts entries in that group.
| Features |
| Dial NumberCall a number stored in Contacts:MENU (OK) ▶ CONTACTS ▼ Contact List ▼ entryorMENU (OK) ▶ CONTACTS ▼ Groups▼ group_namePress [icon] to call. |
| Edit EntryEdit a Contacts entry:MENU (OK) ▶ CONTACTS ▼ Contact List ▼ entryPress Edit ([icon]) |
| Features |
| Set Speed Dial NumberAssign a speed dial number to a Contacts entry:MENU (OK) ▶ CONTACTS ▼ Contact List ▼ entryPress Edit (●) and scroll to the number to be assigned a speed dial number. Press Options (●), then scroll to Set Speed Dial and press OK (OK). |
| Set Default Number for EntrySet the default number for a Contacts entry with multiple numbers:MENU (OK) ▶ CONTACTS ▼ Contact List ▼ entryPress Edit (●) and scroll to the number to be set as the default number. Press Options (●), then scroll to Set As Default and press OK (OK). |
Features
Assign Ringtone to Entry
Assign a distinctive ringtone to a Contacts entry:
MENU (OK) ▶ CONTACTS ▼ Contact List ▼ entry
Press Edit (☐), then scroll to Ringtone. Press Set (☐) to go to the TUNES & TONES menu.
Scroll to the desired ringtone and press OK (OK).
Features
Create New Ringtone
Create a recording that you can assign as a ringtone for an entry:
MENU (OK) ▶ CONTACTS ▼ Contact List ▼ entry
Press Edit (☐), then scroll to Ringtone and press Set (☐) to go to the TUNES & TONES menu.
Scroll to Record New and press OK (OK), then follow the prompts to create a recording that is stored with your other ringtones.
Download Ringtone
MENU (OK) ▶ CONTACTS ▼ Contact List ▼ entry
Press Edit (☐), then scroll to Ringtone and press Set (☐) to go to the TUNES & TONES menu.
Scroll to Get New and press OK (OK), then proceed to download and save a ringtone.
Features
Erase Entry
Erase a Contacts entry:
MENU (OK) ▶ CONTACTS ▼ Contact List ▼ entry
Press Options (☐), then scroll to Erase and press OK (OK).
Personalizing Features
Using Voice Commands
You can place calls and access some menu options by speaking commands to your phone:
1 Press and release the voice button on the right side of the phone.
Note: If Speakerphone is not already turned on and you want to activate it, press the smart/speakerphone key on the left side of your phone. You can then speak the
commands aloud, and hear phone prompts played out loud.
Your phone plays "Say a command" and displays Say a command followed by a list of valid commands.
2 Say 1 of the following commands:
Name Dial, Digit Dial, Voicemail, Redial, Received
Your phone opens the corresponding menu or performs the corresponding action. (See page 48 for instructions on voice dialing using Name Dial and Digit Dial.)
Tip: When saying a number, speak at a normal speed and volume, pronouncing each digit distinctly. Avoid pausing between digits.
Voice Service Setup
For most people, voice dialing (Name Dial or Digit Dial) works well without any initial setup.
However, if the phone is frequently unable to recognize numbers correctly when you use
voice dialing, you may be able to improve your results by adapting it to your voice.
Note: If the phone is used by several people, reset voice dialing to the original setting before proceeding by pressing MENU (OK)
▶ SETTINGS & TOOLS ▼ Display ▶ Voice Dial Setup
- Reset Digits. This ensures that you are not saving your settings over someone else's.
To adapt voice dialing to your voice
Find it: Press MENU (OK) ▶ SETTINGS & TOOLS
▼ Display ▶ Voice Dial Setup
1 Scroll to Adapt Digits and press Select ( ).
2 Press Start ( ).
3 After you hear your phone prompt you to say the 1st digit sequence, wait for the beep, then repeat the digits in a normal tone of voice.
Tip: Speak numbers at a normal speed and volume, pronouncing each digit distinctly. Avoid pausing between digits.
4 If the recording sounds acceptable (no mistakes or background noises), say "Yes" or press Yes (☐).
or
If the recording is not acceptable, say "No" or press No (☐). When prompted to say the digits again, wait for the beep and say the digits again. The phone will prompt you to repeat this process with up to 12 additional sets of digits.
5 If the phone prompts, "More Adaptation?", pressYes (☐) to continue or No (☐) to end the process.
When the adaptation process is complete, the phone will say "Adaptation Complete.")
More Personalizing Features
| Features |
| Call & Key VolumesMENU (OK) ▶ ⚪ SETTINGS & TOOLS▼ Sounds SettingTip: If necessary, set Style: to Master Volume: Scroll to Style: and press Change (●), then scroll to Master Volume and press Select (●).With Style: set to Master Volume, scroll to Master Volume Detail and press Change (●), then scroll to Ring Volume or Key Volume and press Change (●). |
| Message AlertsSet whether or not you are alerted to messages received during a call:MENU (OK) ▶ ⚪ SETTINGS & TOOLS▼ Call Settings ▼ In-Call Setup ▼ MSG Alert |
| Features |
| GreetingChange the greeting that appears when you turn on your phone:MENU (OK) ▶ ⚙️ SETTINGS & TOOLS ▼ Display ▼ Greeting |
| Clock ViewDisplay an analog clock or digital time readout in the home screen:MENU (OK) ▶ ⚙️ SETTINGS & TOOLS ▼ Display ▼ Home Screen ▼ Clock |
| Display ThemesSet the colors and styles of screens that your phone displays:MENU (OK) ▶ ⚙️ SETTINGS & TOOLS ▼ Display ▼ Display Themes |
Menu Features
Features
Menu Language
MENU (OK) ▶ SETTINGS & TOOLS ▼ Initial Setup ▼ Language
Show or Hide Menu Icons
Show or hide menu feature icons in the home screen:
MENU (OK) ▶ SETTINGS & TOOLS ▼ Display ▼ Home Screen ▼ Home Keys ▼ Icons
Change Menu
Change the menu feature icons in the home screen:
MENU (OK) ▶ SETTINGS & TOOLS ▼ Display ▼ Home Screen ▼ Home Keys
Features
Create Banner
Create a heading to display on your phone's home screen:
MENU (OK) ▶ SETTINGS & TOOLS ▼ Display ▼ Home Screen ▼ Banner
Master Reset
Reset all options except unlock code, security code, and lifetime timer:
MENU (OK) ▶ SETTINGS & TOOLS ▼ Initial Setup ▼ Master Reset
To reset all options, you need to enter the Security Code (000000).
Features
Master Clear
Reset all options except unlock code, security code, and lifetime timer, and clear all user settings and entries:
Warning: This option erases all user-entered information stored in your phone memory, including phonebook entries and downloaded files. Once you erase the information, it cannot be recovered. It resets all options to their factory settings except for the unlock code, security code, and lifetime timer.
MENU (OK) ▶ SETTINGS & TOOLS ▼ Initial Setup ▼ Master Clear
To reset all options, you need to enter the Security Code (000000).
Dialing Features
Features
Activate DTMF Tones
MENU (OK) ▶ SETTINGS & TOOLS ▼ Initial Setup ▼ DTMF
Scroll to Short, Long, or Off, and press Select (☐).
Send DTMF Tones
Send DTMF tones during a call:
Press number keys.
Call Monitoring
Network connection time is the elapsed time from the moment you connect to your service provider's network to the moment you end the call by pressing 📄. This time includes busy signals and ringing.
The amount of network connection time you track on your resettable timer may not equal the amount of time for which you are billed by your service provider. For billing information, please contact your service provider directly.
Features
View Call Times

MENU (OK) ▶ “■” RECENT CALLS
▼ View Timers
Scroll to Last Call, All Calls, Received Calls, Dialed Calls, or Lifetime Calls, and press OK (OK).
View Roaming Times

MENU (OK) ▶ “”RECENT CALLS
▼ View Timers ▼ Roaming
Set In-Call Timer

MENU (OK) ▶ SETTINGS & TOOLS
▼ Call Settings ▼ In-Call Setup ▼ In-Call Timer
Features
View Data Volumes

MENU (OK) ▶ “”RECENT CALLS
▼ View Timers
Scroll to Transmit Kilobytes, Received Kilobytes, Total Kilobytes, or Lifetime Data Counter, and press OK (OK).
Reset Timer

MENU (OK) ▶ “”RECENT CALLS
▼ View Timers
Scroll to the desired timer and press Reset ( ).
View Last Reset

MENU (OK) ▶ “”RECENT CALLS
▼ View Timers ▼ Last Reset
Data and Fax Calls Network Features
| Features |
| Data SettingsSpecify call type for next call:MENU (OK) ▶ ⚪ SETTINGS & TOOLS ▼ Incoming CallScroll to Next Call and press Change ( ).Then scroll to Normal, Data In Only, or Fax In Onlyand press Select ( ). |
Send Data or Fax Connect your phone to the device,then place the call through the deviceapplication. Connect your phone to the device,then place the call through the deviceapplication. |
Receive Data or Fax Connect your phone to the device,then answer the call through the deviceapplication. Connect your phone to the device,then answer the call through the deviceapplication. |
| Features |
Network Settings View network information and adjustnetwork settings:MENU (OK) ▶ ⚫ SETTINGS & TOOLS ▼ System▼ System SelectScroll to Current Network and press View (○),or scroll to Analog Only or Set Mode and pressChange (○). View network information and adjustnetwork settings:MENU (OK) ▶ ⚫ SETTINGS & TOOLS ▼ System▼ System SelectScroll to Current Network and press View (○),or scroll to Analog Only or Set Mode and pressChange (○). |
Set Service Tones Set phone to beep each time thenetwork registration status changes:MENU (OK) ▶ ⚫ SETTINGS & TOOLS ▼ System▼ System SelectScroll to Service Tone and press Change (○). Set phone to beep each time thenetwork registration status changes:MENU (OK) ▶ ⚫ SETTINGS & TOOLS ▼ System▼ System SelectScroll to Service Tone and press Change (○). |
Features
Set Call Drop Alerts

Set phone to emit an alert tone
whenever the network drops a call.
(Because digital networks are so quiet, the call drop alert may be your only indication that a call has been dropped.)
MENU (OK)

SETTINGS & TOOLS
▼ System
▼ System Select
Scroll to Call DropTone and press Change

Personal Organizer Features
Features
Add Calendar Appointment
Add an event to the calendar:
MENU (OK)

SETTINGS & TOOLS ▼ Tools
▼ Calendar
Scroll to the desired date and press
Add ( )
, then enter new event on.
View Calendar Appointment
MENU (OK)

SETTINGS & TOOLS ▼ Tools
▼ Calendar
Scroll to the date of the scheduled appointment, press VIEW (OK), then press
VIEW (OK) again to view appointment details.
| Features |
| Set AlarmSet an alarm:MENU (OK) □ ⚪ SETTINGS & TOOLS □ Tools□ Alarm Clock |
| Turn Off AlarmTurn off alarm:Press Off (●) or 📄. |
| View World ClockView current time in cities around the world:MENU (OK) □ ⚪ SETTINGS & TOOLS □ Tools□ World Clock |
| CalculatorCalculate numbers:MENU (OK) □ ⚪ SETTINGS & TOOLS □ Tools□ Calculator |
Security
| Features |
| Control Access to Location FunctionSet up a location lock code to control access toLocationfunction (see “Hiding or Showing Location Information” on page 38):MENU(OK) □ ⚪ SETTINGS & TOOLS □ System□ Security □ New PasswordsScroll toLocation Codeand pressChange(●).If prompted to enter the old location code, enter the code and pressOk(●). |
| Change Unlock & Security CodesMENU(OK) □ ⚪ SETTINGS & TOOLS □ System□ Security □ New PasswordsScroll toUnlock CodeorSecurity Codeand press Change(●). If prompted, enter the old code and pressOk(●). |
News and Entertainment
| Features |
Launch Game or Application  Launch a Get It Now game orapplication:MENU (OK) ▶ ➕°GETITNOW application Launch a Get It Now game orapplication:MENU (OK) ▶ ➕°GETITNOW application |
Download Game or Application  Download a Get It Now game orapplication:MENU (OK) ▶ ➕°GETITNOWSelect category, select application, selectpricing option. Normal airtime and/or carrierusage charges apply. Download a Get It Now game orapplication:MENU (OK) ▶ ➕°GETITNOWSelect category, select application, selectpricing option. Normal airtime and/or carrierusage charges apply. |
Manage Pictures  From the idle display, press ⚙ left toselect GET PIX From the idle display, press ⚙ left toselect GET PIX |
Features
Web Sessions
Select or create a Web session:
From the idle display, press ✅ up to select OPENWAVE.

Service & Repairs
If you have questions or need assistance, we're here to help. Go to www.motorola.com/consumer/support, where you can select from a number of customer care options. You can also contact the Motorola Customer Support Center at 1-866-395-3710 (United States), 1-888-390-6456 (TTY/TDD United States for hearing impaired), or 1-800-461-4575 (Canada).
Specific Absorption Rate Data
The model wireless phone meets the government's requirements for exposure to radio waves.
Your wireless phone is a radio transmitter and receiver. It is designed and manufactured not to exceed limits for exposure to radio frequency (RF) energy set by the Federal Communications Commission (FCC) of the U.S. Government and by the Canadian regulatory authorities. These limits are part of comprehensive guidelines and establish permitted levels of RF energy for the general population. The guidelines are based on standards that were developed by independent scientific organizations through periodic and thorough evaluation of scientific studies. The standards include a substantial safety margin designed to assure the safety of all persons, regardless of age or health.
The exposure standard for wireless mobile phones employs a unit of measurement known as the
Specific Absorption Rate, or SAR. The SAR limit set by the FCC and by the Canadian regulatory authorities is 1.6 W/kg. ^1 Tests for SAR are conducted using standard operating positions accepted by the FCC and by Industry Canada with the phone transmitting at its highest certified power level in all tested frequency bands. Although the SAR is determined at the highest certified power level, the actual SAR level of the phone while operating can be well below the maximum value. This is because the phone is designed to operate at multiple power levels so as to use only the power required to reach the network. In general, the closer you are to a wireless base station, the lower the power output.
Before a phone model is available for sale to the public in the U.S. and Canada, it must be tested and certified to the FCC and Industry Canada that it does not exceed the limit established by each government for safe exposure. The tests are performed in
SAR Data
positions and locations (e.g., at the ear and worn on the body) reported to the FCC and available for review by Industry Canada. The highest SAR value for this model phone when tested for use at the ear is 1.55 W/kg, and when worn on the body, as described in this user guide, is 1.57 W/kg. (Body-worn measurements differ among phone models, depending upon available accessories and regulatory requirements). ^2
While there may be differences between the SAR levels of various phones and at various positions, they all meet the governmental requirements for safe exposure. Please note that improvements to this product model could cause differences in the SAR value for later products; in all cases, products are designed to be within the guidelines.
Additional information on Specific Absorption Rates (SAR) can be found on the Cellular Telecommunications & Internet Association (CTIA) Web site:
http://www.phonefacts.net
or the Canadian Wireless Telecommunications Association (CWTA) Web site:
http://www.cwta.ca
-
In the United States and Canada, the SAR limit for mobile phones used by the public is 1.6 watts/kg (W/kg) averaged over one gram of tissue. The standard incorporates a substantial margin of safety to give additional protection for the public and to account for any variations in measurements.
-
The SAR information includes the Motorola testing protocol, assessment procedure, and measurement uncertainty range for this product.
Index
1-touch dial
using 45
1X indicator 22
A
accessories 8
alarm clock 62
alarm on indicator 24
alarm only indicator 23
alert
downloading 49
setting 35
turning off 12, 13, 41
ALI indicators 38
all sound off indicator 23
analog indicator 22
animation
downloading 49
screen saver 37
viewing 63
wallpaper 37
answering a call 13, 36
automatic location
information
sending 38
automatic redial 40
B
battery
charging 11
extending battery life 10, 37
installing 9
battery level indicator 23
C
calculator 62
calendar 61
view appointment 61
calendar appointment
indicator 23
call
alert, setting 35
alert, turning off 12, 13, 41
answer options 36
answering 13
deleting 43
dialed calls list 43
dialing 13
emergency number 41
ending 13
handsfree speaker 32
Index
call (continued)
making 13
received calls list 43
receiving 13
recent calls 43
storing 43
unanswered call 44
Call Failed, Number Busy message 40
camera
taking a photo 2, 15
character chart 29
codes
changing 33
default 12, 33, 34
forgetting 34
Contacts
1-touch dial 45
attaching 2 numbers 44
dialing a number 52
editing an entry 52
ringtone 53
speed dial number 44
storing an entry 50
D
data call 60
volume meters 59
data call/tethered/embedded WAP/BREW indicator 22
deleting a call 43
dialed calls list 43
dialing a number 13
digital indicator 22
display
greeting 56
dormant indicator 22
drafts folder 50
DTMF tones
activating 58
sending 58
E
E911 indicator 23
earpiece volume 12
emergency number 41
end key 13
ending a call 13
Enter Unlock Code message 34
external display 33
F
fax call 60
5-way navigation key 24
flip
external display 33
open to answer 13
G
greeting 56
H
handsfree speaker 32
home screen 21
|
indicators
1X 22
alarm on 24
alarm only 23
ALI 38
all sounds off 23
analog 22
battery level 23
calendar appointment 23
data call/tethered/
embedded
WAP/BREW 22
digital 22
dormant 22
E911 23
keypad lock 23
location on 23
message 23
message waiting 18
missed call 44
missed calls 23
no service 22
roaming 22
signal strength 22
sound on & vibrate on 23
speakerphone 23
SSL 22
TTY 22
voice call 22
voice privacy 22
voicemail 24
K
key
end 13
5-way navigation 24
left soft key 21
menu 8
power 12
right soft key 21
send 13,43
volume control 12
keypad lock indicator 23
L
left soft key
functions 21
location on indicator 23
location, sending to network 38
lock
phone 34
M
making a call 13
menu
entering text 27
lists 26
navigating 24
using features 26
menu key 8
message
drafts 50
erase 50
outbox 49
reading 49
receiving 3
status 49
text 3,48
message indicator 23
message waiting indicator 18
missed call indicator 44
missed calls indicator 23
Missed Calls message 44
my telephone number 14
N
network settings 60
no service indicator 22
number
viewing your number 14
0
optional accessory 8
optional feature 8
outbox 49
P
passwords. See codes phone
alert, setting 35
alert, turning off 12, 13, 41
answer options 36
automatic location information 38
codes 33
flip 13
location 38
phone (continued)
locking 34
network settings 60
security code 33
unlock code 33
unlocking 12, 34
phone number
attaching 2 numbers 44
redialing 40
storing in Contacts 50
viewing your number 14
photo
downloading 49
sending 2, 15
taking 2, 15
picture
downloading 49
screen saver 37
viewing 63
wallpaper 37
picture message
receiving 18
sending 17
power key 12
R
received calls list 43
recent calls 43
redial
automatic redial 40
busy number 40
right soft key
functions 21
ring alert
setting 13, 35
turning off 12, 13, 41
ringer volume, setting 12
ringtone
downloading 49
roaming indicator 22
s
screen saver 37
security code
changing 33
default 33
send key 13, 43
signal strength indicator 22
silent alert, setting 35
silent ring alert, setting 13
soft keys
functions 21
sound
downloading 49
sound on & vibrate on
indicator 23
Speaker On message 32
speakerphone indicator 23
speed dial 44
SSL indicator 22
standby time, increasing 37
storing a call 43
T
telephone number
viewing your number 14
text
character chart 29
entering 27
entry mode, selecting 27
text entry mode
selecting 27
travel charger 11
TTY indicator 22
U
unlock
phone 34
unlock code
bypassing 34
changing 33
default 12, 33, 34
entering 12
forgetting 34
V
vibrate alert
setting 35
turning off 12, 13, 41
vObject, defined 18
voice call indicator 22
voice privacy indicator 22
voicemail 45
voicemail indicator 24
volume
earpiece 12
ringer 12
volume keys 12
W
wallpaper 37
U.S. patent
Re. 34,976

natural_image
Abstract black and white geometric logo resembling a stylized letter 'M' (no text or symbols)MOTOROLA
IMPORTANT SAFETY AND LEGAL INFORMATION >
Software Copyright Notice
The Motorola products described in this manual may include copyrighted Motorola and third-party software stored in semiconductor memories or other media. Laws in the United States and other countries preserve for Motorola and third-party software providers certain exclusive rights for copyrighted software, such as the exclusive rights to distribute or reproduce the copyrighted software. Accordingly, any copyrighted software contained in the Motorola products may not be modified, reverse-engineered, distributed, or reproduced in any manner to the extent allowed by law. Furthermore, the purchase of the Motorola products shall not be deemed to grant either directly or by implication, estoppel, or otherwise, any license under the copyrights, patents, or patent applications of Motorola or any third-party software provider, except for the normal, non-exclusive, royalty-free license to use that arises by operation of law in the sale of a product.
Manual Number: 6809497A59-0
A-2
Contents
Safety Information 4
Exposure To Radio Frequency (RF) Energy ..... 4
Operational Precautions 4
RF Energy Interference/Compatibility ..... 5
Driving Precautions....7
Operational Warnings 7
Choking Hazards....8
Glass Parts 9
Seizures/Blackouts....9
Repetitive Motion....9
Warranty 10
What Does this Warranty Cover?.....10
Who Is Covered?......13
What Will Motorola Do? 13
How to Obtain Warranty
Service or Other Information 13
What Other Limitations Are There? ..... 14
Hearing Aid Compatibility .... 16
WHO Information 18
Product Registration 18
Export Law Assurances 19
Wireless: The New Recyclable ..... 19
Smart Practices While Driving ..... 20
Contents
Safety and General Information
This section contains important information on the safe and efficient operation of your mobile device. Read this information before using your mobile device.*
Exposure To Radio Frequency (RF) Energy
Your mobile device contains a transmitter and receiver. When it is ON, it receives and transmits RF energy. When you communicate with your mobile device, the system handling your call controls the power level at which your mobile device transmits.
Your Motorola mobile device is designed to comply with local regulatory requirements in your country concerning exposure of human beings to RF energy.
Operational Precautions
For optimal mobile device performance and to be sure that human exposure to RF energy does not exceed the guidelines set forth in the relevant standards, always follow these instructions and precautions.
External Antenna Care
If your mobile device has an external antenna, use only a Motorola-supplied or approved replacement antenna. Use of unauthorized antennas, modifications, or attachments could damage the mobile device and/or may result in your device not
A-4 Safety Information
complying with local regulatory requirements in your country.
DO NOT hold the external antenna when the mobile device is IN USE. Holding the external antenna affects call quality and may cause the mobile device to operate at a higher power level than needed.
Product Operation
When placing or receiving a phone call, hold your mobile device just like you would a landline phone.
If you wear the mobile device on your body, always place the mobile device in a Motorola-supplied or approved clip, holder, holster, case, or body harness. If you do not use a body-worn accessory supplied or approved by Motorola, keep the mobile device and its antenna at least 2.5 centimeters (1 inch) from your body when transmitting.
When using any data feature of the mobile device, with or without an accessory cable, position the mobile device and its antenna at least 2.5 centimeters (1 inch) from your body.
Using accessories not supplied or approved by Motorola may cause your mobile device to exceed RF energy exposure guidelines. For a list of Motorola-supplied or approved accessories, visit our website at www.motorola.com.
RF Energy Interference/Compatibility
Nearly every electronic device is subject to RF energy interference from external sources if inadequately shielded, designed, or otherwise configured for RF energy compatibility. In some circumstances your mobile device may cause interference with other devices.
This device complies with Part 15 of the FCC Rules. Operation is subject to the following two conditions: (1) this device may not cause harmful interference, and (2) this device must accept any interference received, including interference that may cause undesired operation.
Safety Information
Follow Instructions to Avoid Interference Problems
Turn off your mobile device in any location where posted notices instruct you to do so. These locations include hospitals or health care facilities that may be using equipment that is sensitive to external RF energy.
In an aircraft, turn off your mobile device whenever instructed to do so by airline staff. If your mobile device offers an airplane mode or similar feature, consult airline staff about using it in flight.
Pacemakers
If you have a pacemaker, consult your physician before using this device.
Persons with pacemakers should observe the following precautions:
- ALWAYS keep the mobile device more than 20 centimeters (8 inches) from your pacemaker when the mobile device is turned ON.
A-6 Safety Information
- DO NOT carry the mobile device in the breast pocket.
- Use the ear opposite the pacemaker to minimize the potential for interference.
- Turn OFF the mobile device immediately if you have any reason to suspect that interference is taking place.
Hearing Aids
Some digital mobile devices may interfere with some hearing aids. In the event of such interference, you may want to consult your hearing aid manufacturer or physician to discuss alternatives.
Other Medical Devices
If you use any other personal medical device, consult your physician or the manufacturer of your device to determine if it is adequately shielded from RF energy.
Driving Precautions
Check the laws and regulations on the use of mobile devices in the area where you drive. Always obey them.
When using your mobile device while driving, please:
- Give full attention to driving and to the road. Using a mobile device may be distracting.
Discontinue a call if you can't concentrate on driving. - Use handsfree operation, if available.
- Pull off the road and park before making or answering a call if driving conditions so require.
Responsible driving practices can be found in the "Smart Practices While Driving" section at the end of this guide and/or at the Motorola website:
www.motorola.com/callsmart.
Operational Warnings
Obey all posted signs when using mobile devices in public areas, such as health care facilities or blasting areas.
Automobile Air Bags
Do not place a mobile device in the air bag deployment area.
Potentially Explosive Atmospheres
Areas with potentially explosive atmospheres are often but not always posted, and can include fueling areas such as below decks on boats, fuel or chemical transfer or storage facilities, or areas where the air contains chemicals or particles, such as grain, dust, or metal powders.
When you are in such an area, turn off your mobile device, and do not remove, install, or charge batteries. In such areas, sparks can occur and cause an explosion or fire.
Damaged Products
If your mobile device or battery has been submerged in water, punctured, or subjected to a severe fall, do not use it until you take it to a Motorola Authorized Service Center. Do not attempt to dry it with an external heat source, such as a microwave oven.
Batteries and Chargers
If jewelry, keys, beaded chains, or other conductive materials touch exposed battery terminals, this could complete an electrical circuit (short circuit), become very hot, and could cause damage or injury. Be careful when handling a charged battery, particularly when placing it inside a pocket, purse, or other container with metal objects. Use only Motorola Original™ batteries and chargers.
Caution: To avoid risk of personal injury, do not dispose of your battery in a fire.
Your battery, charger, or mobile device may contain symbols, defined as follows:
| Symbol Definition | |
 | Important safety information follows. |
 | Do not dispose of your battery or mobile device in a fire. |
 | Your battery or mobile device may require recycling in accordance with local laws. Contact your local regulatory authorities for more information. |
 | Do not throw your battery or mobile device in the trash. |
 | Your mobile device contains an internal lithium ion battery. |
Choking Hazards
Your mobile device or its accessories may include detachable parts, which may present a choking hazard to small children. Keep your mobile device and its accessories away from small children.
A-8 Safety Information
Glass Parts
Some parts of your mobile device may be made of glass. This glass could break if the product is dropped on a hard surface or receives a substantial impact. If glass breaks, do not touch or attempt to remove. Stop using your mobile device until the glass is replaced by a qualified service center.
Seizures/Blackouts
Some people may be susceptible to epileptic seizures or blackouts when exposed to flashing lights, such as when playing video games. These may occur even if a person has never had a previous seizure or blackout.
If you have experienced seizures or blackouts, or if you have a family history of such occurrences, please consult with your physician before playing video games or enabling a flashing-lights feature (if available) on your mobile device.
Discontinue use and consult a physician if any of the following symptoms occur: convulsion, eye or muscle twitching, loss of awareness, involuntary movements, or disorientation. It is always a good idea to hold the screen away from your eyes, leave the lights on in the room, take a 15-minute break every hour, and stop use if you are very tired.
Repetitive Motion
When you repetitively perform actions such as pressing keys or entering finger-written characters, you may experience occasional discomfort in your hands, arms, shoulders, neck, or other parts of your body. If you continue to have discomfort during or after such use, stop use and see a physician.
Motorola Limited Warranty for the United States and Canada
What Does this Warranty Cover?
Subject to the exclusions contained below, Motorola, Inc. warrants its telephones, pagers, messaging devices, and consumer and professional two-way radios (excluding commercial, government or industrial radios) that operate via Family Radio Service or General Mobile Radio Service, Motorola-branded or certified accessories sold for use with these Products ("Accessories") and Motorola software contained on CD-ROMs or other tangible media and sold for use with these Products ("Software") to be free from defects in materials and workmanship under normal consumer usage for the period(s) outlined below. This limited warranty is a
consumer's exclusive remedy, and applies as follows to new Motorola Products, Accessories and Software purchased by consumers in the United States or Canada, which are accompanied by this written warranty:
Products and Accessories
| Products Covered | Length of Coverage |
| Products and Accessories as defined above, unless otherwise provided for below. | One (1) year from the date of purchase by the first consumer purchaser of the product unless otherwise provided for below. |
| Decorative Accessories and Cases. Decorative covers, bezels, PhoneWrap^TM covers and cases. | Limited lifetime warranty for the lifetime of ownership by the first consumer purchaser of the product. |
| Monaural Headsets. Ear buds and boom headsets that transmit mono sound through a wired connection. | Limited lifetime warranty for the lifetime of ownership by the first consumer purchaser of the product. |
| Consumer and Professional Two-Way Radio Accessories. | Ninety (90) days from the date of purchase by the first consumer purchaser of the product. |
| Products Covered | Length of Coverage |
| Products and Accessories that are Repaired or Replaced. | The balance of the original warranty or for ninety (90) days from the date returned to the consumer, whichever is longer. |
Exclusions
Normal Wear and Tear. Periodic maintenance, repair and replacement of parts due to normal wear and tear are excluded from coverage.
Batteries. Only batteries whose fully charged capacity falls below 80% of their rated capacity and batteries that leak are covered by this limited warranty.
Abuse & Misuse. Defects or damage that result from: (a) improper operation, storage, misuse or abuse, accident or neglect, such as physical damage (cracks, scratches, etc.) to the surface of the product
resulting from misuse; (b) contact with liquid, water, rain, extreme humidity or heavy perspiration, sand, dirt or the like, extreme heat, or food; (c) use of the Products or Accessories for commercial purposes or subjecting the Product or Accessory to abnormal usage or conditions; or (d) other acts which are not the fault of Motorola, are excluded from coverage.
Use of Non-Motorola Products and
Accessories. Defects or damage that result from the use of Non-Motorola branded or certified Products, Accessories, Software or other peripheral equipment are excluded from coverage.
Unauthorized Service or Modification. Defects or damages resulting from service, testing, adjustment, installation, maintenance, alteration, or modification in any way by someone other than Motorola, or its authorized service centers, are excluded from coverage.
Altered Products. Products or Accessories with (a) serial numbers or date tags that have been removed, altered or obliterated; (b) broken seals or that show evidence of tampering; (c) mismatched
A-12
Warranty
board serial numbers; or (d) nonconforming or non-Motorola housings, or parts, are excluded from coverage.
Communication Services. Defects, damages, or the failure of Products, Accessories or Software due to any communication service or signal you may subscribe to or use with the Products Accessories or Software is excluded from coverage.
Software
| Products Covered Length of Coverage | |
| Software. Applies only to physical defects in the media that embodies the copy of the software (e.g. CD-ROM, or floppy disk). | Ninety (90) days from the date of purchase. |
Exclusions
Software Embodied in Physical Media. No warranty is made that the software will meet your requirements or will work in combination with any
hardware or software applications provided by third parties, that the operation of the software products will be uninterrupted or error free, or that all defects in the software products will be corrected.
Software NOT Embodied in Physical Media.
Software that is not embodied in physical media (e.g. software that is downloaded from the internet), is provided "as is" and without warranty.
Who Is Covered?
This warranty extends only to the first consumer purchaser, and is not transferable.
What Will Motorola Do?
Motorola, at its option, will at no charge repair, replace or refund the purchase price of any Products, Accessories or Software that does not conform to this warranty. We may use functionally equivalent reconditioned/refurbished/pre-owned or new Products, Accessories or parts. No data, software or applications added to your Product, Accessory or
Software, including but not limited to personal contacts, games and ringer tones, will be reinstalled. To avoid losing such data, software and applications please create a back up prior to requesting service.
How to Obtain Warranty Service or Other Information
| USA Phones | |
| 1-800-331-6456Pagers1-800-548-9954Two-Way Radios and Messaging Devices1-800-353-2729 | |
| Canada All Products | |
| 1-800-461-4575 | |
| TTY | 1-888-390-6456 |
Warranty
For Accessories and Software, please call the telephone number designated above for the product with which they are used.
You will receive instructions on how to ship the Products, Accessories or Software, at your expense, to a Motorola Authorized Repair Center. To obtain service, you must include: (a) a copy of your receipt, bill of sale or other comparable proof of purchase; (b) a written description of the problem; (c) the name of your service provider, if applicable; (d) the name and location of the installation facility (if applicable) and, most importantly; (e) your address and telephone number.
What Other Limitations Are There?
ANY IMPLIED WARRANTIES, INCLUDING WITHOUT LIMITATION THE IMPLIED WARRANTIES OF MERCHANTABILITY AND FITNESS FOR A PARTICULAR PURPOSE, SHALL BE LIMITED TO THE
A-14
Warranty
DURATION OF THIS LIMITED WARRANTY, OTHERWISE THE REPAIR, REPLACEMENT, OR REFUND AS PROVIDED UNDER THIS EXPRESS LIMITED WARRANTY IS THE EXCLUSIVE REMEDY OF THE CONSUMER, AND IS PROVIDED IN LIEU OF ALL OTHER WARRANTIES, EXPRESS OR IMPLIED. IN NO EVENT SHALL MOTOROLA BE LIABLE, WHETHER IN CONTRACT OR TORT (INCLUDING NEGLIGENCE) FOR DAMAGES IN EXCESS OF THE PURCHASE PRICE OF THE PRODUCT, ACCESSORY OR SOFTWARE, OR FOR ANY INDIRECT, INCIDENTAL, SPECIAL OR CONSEQUENTIAL DAMAGES OF ANY KIND, OR LOSS OF REVENUE OR PROFITS, LOSS OF BUSINESS, LOSS OF INFORMATION OR DATA, SOFTWARE OR APPLICATIONS OR OTHER FINANCIAL LOSS ARISING OUT OF OR IN CONNECTION WITH THE ABILITY OR INABILITY TO USE THE PRODUCTS, ACCESSORIES OR SOFTWARE TO THE FULL EXTENT THESE DAMAGES MAY BE DISCLAIMED BY LAW.
Some states and jurisdictions do not allow the limitation or exclusion of incidental or consequential damages, or limitation on the length of an implied warranty, so the above
limitations or exclusions may not apply to you. This warranty gives you specific legal rights, and you may also have other rights that vary from state to state or from one jurisdiction to another.
Laws in the United States and other countries preserve for Motorola certain exclusive rights for copyrighted Motorola software such as the exclusive rights to reproduce and distribute copies of the Motorola software. Motorola software may only be copied into, used in, and redistributed with, the Products associated with such Motorola software. No other use, including without limitation disassembly of such Motorola software or exercise of the exclusive rights reserved for Motorola, is permitted.
Warranty
Hearing Aid Compatibility with Mobile Phones
Some Motorola phones are measured for compatibility with hearing aids. If the box for your particular model has "Rated for Hearing Aids" printed on it, the following explanation applies.
When some mobile phones are used near some hearing devices (hearing aids and cochlear implants), users may detect a buzzing, humming, or whining noise. Some hearing devices are more immune than others to this interference noise, and phones also vary in the amount of interference they generate.
The wireless telephone industry has developed ratings for some of their mobile phones, to assist hearing device users in finding phones that may be compatible with their hearing devices. Not all phones have been rated. Phones that are rated have the rating on their box or a label on the box.
The ratings are not guarantees. Results will vary depending on the user's hearing device and hearing loss. If your hearing device happens to be vulnerable to interference, you may not be able to use a rated phone successfully. Trying out the phone with your hearing device is the best way to evaluate it for your personal needs.
M-Ratings: Phones rated M3 or M4 meet FCC requirements and are likely to generate less interference to hearing devices than phones that are not labeled. M4 is the better/higher of the two ratings.
T-Ratings: Phones rated T3 or T4 meet FCC requirements and are likely to be more usable with a hearing device's telecoil ("T Switch" or "Telephone Switch") than unrated phones. T4 is the better/higher of the two ratings. (Note that not all hearing devices have telecoils in them.)
Hearing devices may also be measured for immunity to this type of interference. Your hearing device
manufacturer or hearing health professional may help you find results for your hearing device. The more immune your hearing aid is, the less likely you are to experience interference noise from mobile phones.
Hearing Aid Compatibility
Information from the World Health Organization
Present scientific information does not indicate the need for any special precautions for the use of mobile phones. If you are concerned, you may want to limit your own or your children's RF exposure by limiting the length of calls or by using handsfree
devices to keep mobile phones away from your head and body.
Source: WHO Fact Sheet 193
Further information:
http://www.who.int./peh-emf
Product Registration
Online Product Registration:
http://www.motorola.com/warranty
Product registration is an important step toward enjoying your new Motorola product. Registering helps us facilitate warranty service, and permits us to contact you should your product require an update or other service. Registration is for U.S. residents only and is not required for warranty coverage.
Please retain your original dated sales receipt for your records. For warranty service of your Motorola Personal Communications Product you will need to provide a copy of your dated sales receipt to confirm warranty status.
Thank you for choosing a Motorola product.
A-18
WHO Information
Export Law Assurances
This product is controlled under the export regulations of the United States of America and Canada. The Governments of the United States of America and Canada may restrict the exportation or re-exportation of this product to certain destinations. For further information contact the U.S. Department of Commerce or the Canadian Department of Foreign Affairs and International Trade.
Wireless: The New Recyclable
Your wireless phone can be recycled. Recycling your wireless phone reduces the amount of waste disposed in landfills and allows recycled materials to be incorporated into new products.
The Cellular Telecommunications Industry Association (CTIA) and its members encourage consumers to recycle their phones and have taken steps to promote the collection and environmentally sound recycling of end-of-life wireless devices.
As a wireless phone user, you have an important role in ensuring that this phone is recycled properly. When it comes time to give this phone up or trade it in for a new one, please remember that the phone, the charger, and many of its accessories can be recycled. It's easy. To learn more about CTIA's Recycling Program for Used Wireless Devices, please visit us at http://promo.motorola.com/recycle/phones/whyrecycle.html
Export Law Assurances
Smart Practices While Driving
Drive Safe, Call Smart SM Check the laws and regulations on the use of mobile devices and their accessories in the areas where you drive. Always obey them. The use of these devices may be prohibited or restricted in certain areas. Contact www.motorola.com/callsmart for more information.
Your mobile device lets you communicate by voice and data—almost anywhere, anytime, wherever wireless service is available and safe conditions allow. When driving a car, driving is your first responsibility. If you choose to use your mobile device while driving, remember the following tips:
- Get to know your Motorola mobile device and its features such as speed dial and redial. If available, these features
help you to place your call without taking your attention off the road.
- When available, use a handsfree device. If possible, add an additional layer of convenience to your mobile device with one of the many Motorola Original™ handsfree accessories available today.
- Position your mobile device within easy reach. Be able to access your mobile device without removing your eyes from the road. If you receive an incoming call at an inconvenient time, if possible, let your voice mail answer it for you.
- Let the person you are speaking with know you are driving; if necessary, suspend the call in heavy traffic or hazardous weather conditions. Rain,
sleet, snow, ice, and even heavy traffic can be hazardous.
- Do not take notes or look up phone numbers while driving. Jotting down a “to do” list or going through your address book takes attention away from your primary responsibility—driving safely.
- Dial sensibly and assess the traffic; if possible, place calls when your car is not moving or before pulling into traffic.
If you must make a call while moving, dial only a few numbers, check the road and your mirrors, then continue. - Do not engage in stressful or emotional conversations that may be distracting.
Make people you are talking with aware you are driving and suspend conversations that can divert your attention away from the road. - Use your mobile device to call for help.
Dial 911 or other local emergency number in
the case of fire, traffic accident, or medical emergencies.*
- Use your mobile device to help others in emergencies. If you see an auto accident, crime in progress, or other serious emergency where lives are in danger, call 911 or other local emergency number, as you would want others to do for you.*
- Call roadside assistance or a special non-emergency wireless assistance number when necessary. If you see a broken-down vehicle posing no serious hazard, a broken traffic signal, a minor traffic accident where no one appears injured, or a vehicle you know to be stolen, call roadside assistance or other special non-emergency wireless number.*

MOTOMANUAL
V325
CDMA
Español
motorola.com
Bienvenido
Consumer Advocacy Office
1307 East Algonquin Road
Schaumburg, IL 60196
© Motorola, Inc. 2005
natural_image
Line drawing of a mobile phone with a stylus and handle (no text or symbols)natural_image
Line drawing of a mobile phone casing with an arrow indicating left side (no text or symbols)
natural_image
Line drawing of a foldable electronic device with an open lid and scroll, showing mechanical components (no text or symbols)
natural_image
Line drawing of a mobile phone casing with an arrow indicating left side (no text or symbols)natural_image
Line drawing of a mobile phone casing with a handle and keypad (no text or symbols)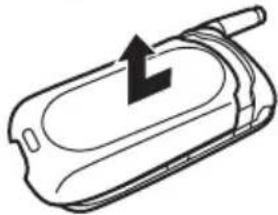
natural_image
Line drawing of a mobile phone casing with an arrow indicating the direction (no text or symbols)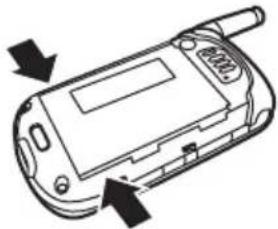
natural_image
Line drawing of a mobile phone with buttons and a screen (no text or symbols)natural_image
Line drawing of a mobile phone casing with an arrow indicating left side (no text or symbols)natural_image
Abstract black and white geometric logo resembling a stylized letter 'M' (no text or symbols)MOTOROLA
Your mobile device contains a transmitter and receiver. When it is ON, it receives and transmits RF energy. When you communicate with your mobile device, the system handling your call controls the power level at which your mobile device transmits.
- Check It Out!
- Contents
- Use and Care .... 7
- Getting Started ..... 8
- Highlight Features .... 15
- Learning to Use Your
- Phone....21
- Setting Up Your
- Phone 35
- Use and Care
- liquids of any kind dust and dirt
- extreme heat or cold cleaning solutions
- microwaves the ground
- Getting Started
- About This Guide
- symbols
- Installing the Battery
- Removing the Battery
- Battery tips
- Charging the Battery
- Turning On Your Phone
- Adjusting Volume
- Making a Call
- Answering a Call
- Changing the Call Alert
- Phone Flip Open
- Phone Flip Closed
- Viewing Your Phone Number
- Highlight Features
- Taking and Sending a Photo
- or
- Pictures Menu Options
- Sending a Picture Message
- Receiving a Picture Message
- Find it: Press MENU (OK) ▶ MESSAGING
- ▼ Inbox
- TTY Operation
- Setting TTY Mode
- Returning to Voice Mode
- Learning to Use Your Phone
- Using the Display
- Using the 5-Way Navigation Key
- Menu Shortcuts
- Selecting a Feature Option
- Entering Text
- Choosing a Text Entry Mode
- Capitalization and Numbers
- Using Tap Mode
- Character Chart
- Tap Mode Text Entry Rules
- Using iTAP™ Mode
- Entering Words
- Using Numeric Mode
- Using Symbol Mode
- Deleting Letters and Words
- Using the Handsfree Speaker
- Using the External Display
- Changing a Code or Password
- Locking and Unlocking Your Keypad
- Locking and Unlocking Your Phone
- Locking Your Phone
- Unlocking Your Phone
- If You Forget a Code, PIN, or Password
- Setting Up Your Phone
- Setting Call Sounds and Alert Styles
- Setting Call Sounds
- Setting Alerts
- Setting Ring Lights
- Setting Answer Options
- Setting a Wallpaper Image
- Setting a Screen Saver Image
- Adjusting Brightness
- Adjusting the Backlight
- Hiding or Showing Location Information
- AGPS Limitations and Tips
- Calling Features
- Changing the Active Line
- Redialing a Number
- Using Automatic Redial
- Turning Off a Call Alert
- Calling an Emergency Number
- Using AGPS During an Emergency Call
- Viewing Recent Calls
- Option
- Returning an Unanswered Call
- Attaching a Number
- Calling with Speed Dial
- Calling with 1-Touch Dial
- Using Voicemail
- Listening to Voicemail Messages
- Phone Features
- Main Menu
- GET IT NOW\*
- CONTACTS
- MESSAGING
- RECENT CALLS
- SETTINGS & TOOLS
- Settings & Tools Menu
- Tools
- System
- Sounds Setting
- Call Settings
- Display
- Initial Setup
- Features
- Voice Dial
- Messages
- Send Text Message
- Send Multimedia Message
- Store Message Objects
- View Sent Messages
- Read Received Messages
- Add Entries to Group
- Add Group
- Assign Ringtone to Entry
- Create New Ringtone
- Download Ringtone
- Erase Entry
- Personalizing Features
- Using Voice Commands
- Voice Service Setup
- More Personalizing Features
- Menu Features
- Menu Language
- Show or Hide Menu Icons
- Change Menu
- Create Banner
- Master Reset
- Master Clear
- Dialing Features
- Activate DTMF Tones
- Send DTMF Tones
- Call Monitoring
- View Call Times
- View Roaming Times
- Set In-Call Timer
- View Data Volumes
- Reset Timer
- View Last Reset
- Data and Fax Calls Network Features
- Set Call Drop Alerts
- Personal Organizer Features
- Add Calendar Appointment
- View Calendar Appointment
- News and Entertainment
- Web Sessions
- Service & Repairs
- Specific Absorption Rate Data
- The model wireless phone meets the government's requirements for exposure to radio waves.
- Index
- A
- B
- C
- D
- E
- F
- L
- M
- N
- 0
- P
- R
- s
- T
- U
- V
- W
- MOTOROLA
- Software Copyright Notice
- Safety Information 4
- Warranty 10
- Hearing Aid Compatibility .... 16
- WHO Information 18
- Product Registration 18
- Export Law Assurances 19
- Wireless: The New Recyclable ..... 19
- Smart Practices While Driving ..... 20
- Safety and General Information
- Exposure To Radio Frequency (RF) Energy
- Operational Precautions
- External Antenna Care
- A-4 Safety Information
- Product Operation
- RF Energy Interference/Compatibility
- Follow Instructions to Avoid Interference Problems
- Pacemakers
- A-6 Safety Information
- Hearing Aids
- Other Medical Devices
- Driving Precautions
- Operational Warnings
- Automobile Air Bags
- Potentially Explosive Atmospheres
- Damaged Products
- Batteries and Chargers
- Choking Hazards
- A-8 Safety Information
- Glass Parts
- Seizures/Blackouts
- Repetitive Motion
- Motorola Limited Warranty for the United States and Canada
- What Does this Warranty Cover?
- Exclusions
- Use of Non-Motorola Products and
- Software NOT Embodied in Physical Media.
- Who Is Covered?
- What Will Motorola Do?
- How to Obtain Warranty Service or Other Information
- What Other Limitations Are There?
- Hearing Aid Compatibility with Mobile Phones
- Information from the World Health Organization
- Product Registration
- Export Law Assurances
- Wireless: The New Recyclable
- Smart Practices While Driving
- MOTOMANUAL
- Bienvenido
Brand : MOTOROLA
Model : V325i
Category : Smartphone