
IDOC-PAD-LCA-DSWC-B-S - Docking Station Crestron - Free user manual and instructions
Find the device manual for free IDOC-PAD-LCA-DSWC-B-S Crestron in PDF.


| Product Type | Wall Dock for iPad Air (1st gen and iPad Air 2) |
| Model | IDOC-PAD-LCA-DSWC-B-S |
| Color | Black |
| Cutout Dimensions | 2-3/8" H x 3-3/8" W (60 mm x 86 mm) |
| Protrusion Depth | 1" (26 mm) from mounting surface |
| Weight (approx.) | 0.5 lb (0.23 kg) |
| Power Supply | 24 Vdc or PoE (IEEE 802.3af) |
| Compatible Devices | iPad Air (1st gen) and iPad Air 2 |
| Mounting Options | Standard 2-gang U.S., U.K., or European electrical box; or directly on drywall |
| Installation Tools | #2 Philips screwdriver, Torx bit (included) and driver |
| Anti-Theft Lock | Optional, included with dock |
| Grounding | Requires earth ground connection via chassis ground terminal |
| Communication | Via dock connector; compatible with Crestron control systems |
| Included Components | Mounting plate, front cover, screws, Torx bit, anti-theft lock (for -B-S models) |
| Maintenance | Clean with a soft, dry cloth. Do not use liquid cleaners. |
| Safety Certifications | FCC Part 15 Class B, Industry Canada ICES-003 |
| Spare Parts Availability | Parts available from Crestron (screws, covers, etc.) |
| Warranty | Not specified; contact Crestron for details. |
Frequently Asked Questions - IDOC-PAD-LCA-DSWC-B-S Crestron
User questions about IDOC-PAD-LCA-DSWC-B-S Crestron
0 question about this device. Answer the ones you know or ask your own.
Ask a new question about this device
Download the instructions for your Docking Station in PDF format for free! Find your manual IDOC-PAD-LCA-DSWC-B-S - Crestron and take your electronic device back in hand. On this page are published all the documents necessary for the use of your device. IDOC-PAD-LCA-DSWC-B-S by Crestron.
USER MANUAL IDOC-PAD-LCA-DSWC-B-S Crestron
iPanel® Wall Dock for iPad Air® Devices
DO Install the Device
The Crestron 1 IDOC-PAD-LCA-DSWC and IDOC-PAD-LCA2-DSWC (Panel Wall Docks feature similar operation. For simplicity within this guide, the term "iPanel" is used except where noted. Similarly, the word "iPad" is used to donate iPad Air and iPad Air. 2. The iPad 9 is sold separately.
For the iPad Air, use the IDOG-PAD-LGA-DSWG. For the iPad Air 2, use the IDOG-PAD-LGA2-DSWG.
The Crestron Panel installs into a standard 2-gang U.S., U.K., or European electrical box. It can also be attached directly to drywall and other surfaces over the front of a 2-3/8" H x 3-3/8" W (60 mm H x 86 mm W) cutout. When installed, it protrudes just 1" (26 mm) from the mounting surface and secures to its included mounting plate with included screws.
Choose a Location
To allow installation and removal of the iPad, the iPad requires a minimum amount of clearance on both sides. When choosing an installation location, make sure the center of the mounting location has a minimum of 7-7/16" (189 mm) clearance on the closed side of the iPad and 15-1/2" (394 mm) clearance on the open side of the iPad, as shown below.

NOTE: Although the iPanel can be mounted with the opening oriented to the right, note that the iPad Air volume buttons face downward in this configuration. This may not be optimal for the one user.
Required Tools
The following are required to install the iPanel.
• #2 Philips screwdriver
- Torx bit (included) and driver (not includes)
Install the Device into an Electrical Box
NOTE: A 24 Vdc or PoE cable should already be in the electrical box. The iPanel can use only one source for power.
-
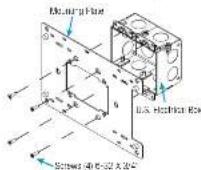
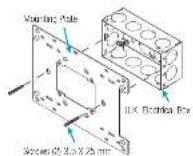
Use the included screws to attach the mounting plate to the electrical box.
-
For U.S. style installations, use the included 05-32 x 3/1" screws
- For U.K.-style installations, use the included 3.5 x 25 mm screws
- For European-style installations, use the included 3 x 16 mm screws.


DO Check the Box
| QUANTITY | PRODUCT | COLOR | PART NUMBER |
| 1 Bit, Torx, T8 2026915 | |||
| 4 Screw, 6-32 x 3/4", Undercut Head, Phillips 2033247 | |||
| 4 Screw, M3 x 16 mm, Flat Head, Phillips 2013788 | |||
| 4 Screw, 4-40 x 3/4", Pan Head, Phillips 2027184 | |||
| 2 Screw, M3.5 x 25 mm, Flat Head, Phillips 2023753 | |||
| Items for IDOC-PAD-LCA-DSWC-B-S and IDOC-PAD-LCA2-DSWC-B-S | |||
| 1 Cover, Front Block 4519612 | |||
| 1 Plate, Mounting Black 2040499 | |||
| 2 Screw, 2-58 x 5/16", Pan Head, Torx Block 2040283 | |||
| 4 | Screw, 8-32 x 1/4", Pan Head, Phillips | Block | 2007215 |
| Items for IDOC-PAD-LCA-DSWC-W-S and IDOC-PAD-LCA2-DSWC-W-S | |||
| 1 | Cover, Front | White | 4519811 |
| 1 | Plate, Mounting | White | 2035781 |
| 2 Screw, 2-58 x 5/16", Pan Head, Torx | 2040284 | ||
| 4 Screw, 6-32 x 1/4", Pan Head, Phillips | 2007213 | ||
- Connect the 24 Vdc or PoE line and earth ground to the rear of the iPanel.
NOTE: Ensure the unit is properly grounded by connecting the chassis ground terminal to an earth ground (building steel). If PoE is used, an earth ground connection must still be made to the terminal block connector.
NOTE: The iPanel can be connected to 24 Vdc and and PoE simultaneously.

- Lift and remove the plastic cover from the iPanel.

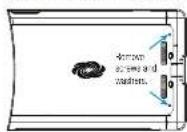
- Use the Phillips screwdriver to remove the screws and washers that hold the metal plate in place, and remove the metal plate.
NOTE: It necessary, remove the cable holder.
- Using the included 1/4 screws, attach the iPanel to the mounting plate.

- Replace the metal plate and secure it to the iPanel using the screws and washers removed in step 4.
NOTE: When replacing the metal plate, slide the metal plate between the cable holder's top prong and the bottom prongs, as shown in the following diagram.

-
Snap the plastic cover that was removed in step 3 into place.
-
(Optional) install the antithelt lock.
a. Place the iPod in the iPanel as described in "Insert the iPad" below.
b. Side the antiheft lock over the end of the iPad, and secure it to the Panel using the included Torx screws and bit, as shown in the following diagram. Do not overtighten the Torx screws.

DO Use the Device
Insert the iPad
- Hold the iPad horizontally (with the iPad dock connector facing into the deck), and position it so that it rests behind the iPanel's top and bottom retaining lips.
- Slide the iPad into the iPanel until the cable holder pops out, as shown in the following diagram.

- Hold the iPad in place and press the cable holder so that it is flush with the iPad. The iPad is now connected to the iPad.
Remove the iPad
To remove the iPad, hold the left side of the iPad and slide it out of the iPad.
DO Learn More
Visit the website for additional information and the latest firmware updates. To learn more about this product, use a QR reader application on your mobile device to scan the QR images.
Crestron Electronics
15 Volvo Drive, Rockleigh, NJ 07647 888.CRESTRON | www.crestron.com
IDO: PAI 1 [4] [5]

DOI: 241-042-1896

CE As of the share of manufacturing, the product has been leased and issued to comply with specified prior to LCL meeting.
Federal Communications Commission (FCC) Compliance Statement
This device complies with part 15 of the FCC Rules. Occasion is subject to the following conditions.
(1) This device may not cause that the interference is due, this device must also specify interference received. No using interference that may cause or defined a sensation
Caution: Charges or modifications not expressly approved by the manufacturer responsible for compliance could void the user's authority to operate the equipment.
Note: This may present have been heard and found to comply with the limits for a Class II digital device, pursuant to part 13 of the ICG Index. These limits are designed to provide reasonable protection against the natural interference in a reasonable installation. The equipment permits, uses and corrects noise frequency and gas, if not satisfied and used in accordance with the requirements, may cause harmful interference to reduce communication. However, there is no guaranteed that interference will not be due in particular installation.
If this equipment does cause harmful interference due to radio or television resolution, which can be determined by turning the equipment off and on. The user is encouraged to try to correct the interference by one or more of the following measures:
- Amount or revenue the more living environment.
- Increase the separation between the equipment and receiver.
- Connect the equipment into an outlet on a circuit different from that to which the receiver is connected.
- Connect the dealer or an experienced radio TV machine for help.
Industry Canada (IC) Compliance Statement
CAN IDE 3(BYMM 218)
The following table is provided in the image.
The text is provided in the image.
2013年8月2日,公司以自有资金进行现金管理,使用期限为三年。
The following results are given by the research committee on the 2013-2014 and 2015-2016 academic journals. The authors' opinions expressed in this report were also given by the National University of Technology, Inc. and the University of Science and Technology, Inc. in the first year ended March 2014. The authors' opinions presented in this report were also given by the National University of Science and Technology, Inc. in the second year ended March 2014.
This is not a number of the Technical Publications department or Director. 112615 Corporation Electronics, Inc.
Brand : Crestron
Model : IDOC-PAD-LCA-DSWC-B-S
Category : Docking Station